Sony NEX-C3 – страница 8
Инструкция к Цифровому Фотоаппарату Sony NEX-C3
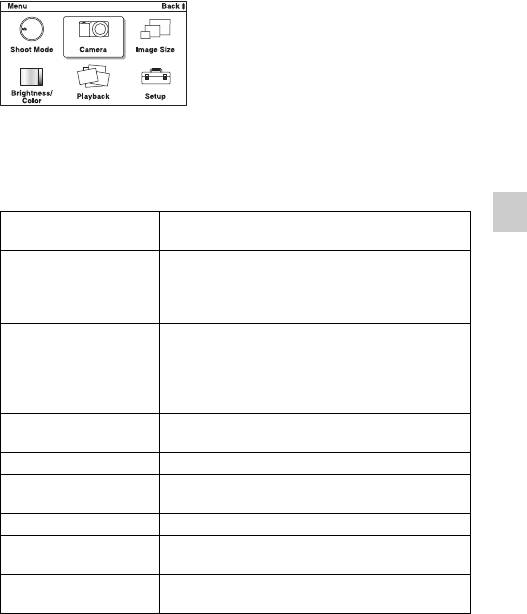
Checking the functions available
Menu list
When you press [Menu], six menu items; [Shoot Mode], [Camera], [Image
Size], [Brightness/Color], [Playback], and [Setup], appear on the screen.
You can set various functions in each item. Items that cannot be set in the
context are displayed in gray.
x
Shoot Mode
Allows you to select a shooting mode, such as exposure mode, panoramic,
Scene Selection.
Intelligent Auto The camera evaluates the subject and makes the
proper settings.
Checking the functions available
Scene Selection Shoots with preset settings according to the subject or
condition.
(Portrait/Landscape/Macro/Sports Action/Sunset/
Night Portrait/Night View/Hand-held Twilight)
Picture Effect Shoots with the desired effects to express a unique
atmosphere.
(Posterization (Color)/Posterization (B/W)/Pop Color/
Retro Photo/Partial Color/High-key/High Contrast
Monochrome/Toy Camera)
Anti Motion Blur Reduces the camera shake when shooting a slightly
dark indoor scene or a telephoto.
Sweep Panorama Shoots with panoramic size.
3D Sweep Panorama Shoots 3D panoramic images used for playback on a
3D compatible TV.
Manual Exposure Adjusts the aperture and shutter speed.
Shutter Priority Adjusts the shutter speed to express the movement of
the subject.
Aperture Priority Adjusts the range in focus, or defocuses the
GB
background.
49

Program Auto Automatic shooting that allows you to customize
settings, except for the exposure (shutter speed and
aperture).
x
Camera
Allows you to set shooting functions, such as continuous shooting, self-timer,
and flash.
Drive Mode Selects the drive mode, such as continuous shooting,
self-timer, or bracket shooting.
(Single-shot Adv./Continuous Adv./Speed Priority
Cont./Self-timer/Self-timer(Cont.)/ Bracket: Cont.)
Flash Mode Selects the method used to fire the flash.
(Flash Off/Autoflash/Fill-flash/Slow Sync./Rear
Sync.)
AF/MF Select Selects auto focusing or manual focusing.
(Autofocus/DMF/Manualfocus)
Autofocus Area Selects the area to be focused on.
(Multi/Center/Flexible Spot)
Autofocus Mode Selects the autofocus method.
(Single-shot AF/Continuous AF)
Precision Dig. Zoom Sets the digital zoom.
Face Detection Detects people’s faces automatically, and adjusts
focus and exposure to suit the faces.
(Off/Auto/Child Priority/Adult Priority)
Smile Shutter Each time the camera detects a smile, the camera
releases the shutter automatically.
(On/Off)
Smile Detection Sets the sensitivity of the Smile Shutter function for
detecting smiles.
(Big Smile/Normal Smile/Slight Smile)
Soft Skin Effect Sets the level of the Soft Skin Effect.
(High/Mid/Low/Off)
Shooting Tip List Allows you to access all shooting tips.
Display Contents Switches the information to be displayed on the
shooting screen.
(Disp. Basic Info/Display Info./No Disp. Info.)
GB
50

x
Image Size
Allows you to set the image size and aspect ratio, etc.
Still
Image Size Selects the image size.
(3:2: L: 16M/ M: 8.4M/ S: 4.0M
16:9: L: 14M/ M: 7.1M/ S: 3.4M)
Aspect Ratio Selects the aspect ratio.
(3:2/16:9)
Quality Selects the compression format.
(RAW/RAW & JPEG/Fine/Standard)
3D Panorama
Image Size Selects the image size of 3D panoramic images.
(16:9/Standard/Wide)
Panorama Direction Selects the direction to pan the camera when shooting
3D panoramic images.
(Right/Left)
Panorama
Image Size Selects the image size.
(Standard/Wide)
Checking the functions available
Panorama Direction Selects the direction to pan the camera when shooting
panoramic images.
(Right/Left/Up/Down)
Movie
Image Size Selects the image size.
(1280 × 720 (Fine)/1280 × 720 (Std)/VGA)
x
Brightness/Color
Allows you to make brightness settings such as metering mode, and color
settings such as white balance.
Exposure Comp. Compensates for the brightness of the entire image.
(–2.0EV to +2.0EV)
ISO Sets the ISO sensitivity.
(ISO AUTO/200 - 12800)
White Balance Adjusts the color tones according to the ambient light
conditions.
(Auto WB/Daylight/Shade/Cloudy/Incandescent/
Fluorescent/Flash/C.Temp./Filter/Custom/Custom
GB
Setup)
51

Metering Mode Selects the method used for measuring the brightness.
(Multi/Center/Spot)
Flash Compensation Adjusts the amount of flash light.
(–2.0EV to +2.0EV)
DRO/Auto HDR Corrects the brightness or contrast automatically.
(Off/D-Range Opt./Auto HDR)
Creative Style Selects the image processing method.
(Standard/Vivid/Portrait/Landscape/Sunset/Black &
White)
x
Playback
Allows you to set playback functions.
Delete Deletes images.
(Multiple Img./All in Folder/All in Date Rng.)
Slide Show Plays back images automatically.
(Still image mode: Repeat/Interval/Image Type)
(Movie mode: Repeat)
Still/Movie Select Selects a still image or movie to play back.
(Still/Movie)
Image Index Selects the number of images to be displayed on the
index screen.
(6 Images/12 Images)
Select Folder Selects the folder of still images to play back.
Select Date Selects the date of movies to play back.
Rotate Rotates images.
Protect Protects images, or cancels the protection.
(Multiple Img./Cancel All Images/Cancel All Movies)
3D Viewing Connects to a 3D compatible TV and allows you to
view 3D images.
Enlarge Image Enlarges the image.
Volume Settings Sets the sound volume of movies.
Specify Printing Selects the images to print, or makes printing settings.
(DPOF Setup/Date Imprint)
Display Contents Switches the information to be displayed on the
playback screen.
(Display Info./Histogram/No Disp. Info.)
GB
52

x
Setup
Allows you to make more detailed shooting settings, or change the camera
settings.
Shooting Settings
AF Illuminator Sets the AF illuminator to assist auto-focusing in dim
places.
(Auto/Off)
Red Eye Reduction Provides pre-flash before shooting when using the
flash, to prevent eyes from being shot in red.
(On/Off)
Auto Review Sets the display time of the image right after shooting.
(10 Sec/5 Sec/2 Sec/Off)
Grid Line Turns on the grid line that helps you to adjust the
composition of images.
(On/Off)
Peaking Level Enhances the outline of in-focus ranges with a specific
color.
(High/Mid/Low/Off)
Peaking Color Sets the color used for the peaking function.
(White/Red/Yellow)
Checking the functions available
Histogram Displays the histogram of the luminance distribution.
(On/Off)
MF Assist Displays an enlarged image when focusing manually.
(No Limit/5 Sec/2 Sec/Off)
Color Space Changes the range of color reproduction.
(sRGB/AdobeRGB)
SteadyShot Sets camera shake compensation.
(On/Off)
Release w/oLens Sets whether or not to release the shutter when there is
no lens.
(Enable/Disable)
Long Exposure NR Sets the noise reduction processing for long exposure
shootings.
(On/Off)
High ISO NR Sets the noise reduction processing for high ISO
sensitivity shootings.
(Auto/Weak)
Movie Audio Rec Sets the sound for movie recording.
GB
(On/Off)
53

Custom Key Settings
Left Key Setting Assigns a function to the left key on the control wheel.
(Shoot Mode/Shoot. Tips/Drive Mode/AF/MF Select/
Autofocus Mode/Autofocus Area/Precision Dig.
Zoom/ISO/White Balance/Metering Mode/DRO/Auto
HDR/Creative Style/Flash Mode/Flash
Compensation/MF Assist/Not set)
Right Key Setting Assigns a function to the right key on the control
wheel.
(Shoot Mode/Shoot. Tips/Drive Mode/AF/MF Select/
Autofocus Mode/Autofocus Area/Precision Dig.
Zoom/ISO/White Balance/Metering Mode/DRO/Auto
HDR/Creative Style/Flash Mode/Flash
Compensation/MF Assist/Not set)
Soft key B Setting Assigns a function to the soft key B.
(Shoot Mode/Shoot. Tips/Drive Mode/AF/MF Select/
Autofocus Mode/Precision Dig. Zoom/ISO/White
Balance/Metering Mode/DRO/Auto HDR/Creative
Style/Flash Mode/Flash Compensation/MF Assist)
Soft key C Setting Assigns a function to the soft key C.
(Shoot Mode/Custom)
Custom Sets the custom functions of the soft key C.
(Drive Mode/AF/MF Select/Autofocus Mode/
Autofocus Area/ISO/White Balance/Metering Mode/
DRO/Auto HDR/Creative Style/Flash Mode/Not set)
Main Settings
Menu start Selects a first-displayed menu from the top menu or
the last menu screen.
(Top/Previous)
Beep Selects the sound produced when you operate the
camera.
(AF Sound/High/Low/Off)
Language Selects the language used on the screen.
Date/Time Setup Sets the date and time.
Area Setting Selects the area where you are using the camera.
Help Guide Display Turns the Help Guide on or off.
(On/Off)
Power Save Sets the time to turn the camera to the power save
mode.
GB
(30 Min/10 Min/5 Min/1 Min)
54

LCD Brightness Sets the brightness of the LCD monitor.
(Auto/Manual/Sunny Weather)
Display Color Selects the color of the LCD monitor.
(Black/White/Blue/Pink)
Wide Image Selects a method to display wide images.
(Full Screen/Normal)
Playback Display Selects the method used to play back portrait images.
(Auto Rotate/Manual Rotate)
CTRL FOR HDMI Sets whether or not to operate the camera with an
HDMI-compliant TV’s Remote Control.
(On/Off)
USB Connection Selects the method used for a USB connection.
(Mass Storage/PTP)
Cleaning Mode Allows you to clean the image sensor.
Version Displays the version of the camera and the lens.
Demo Mode Sets whether or not to display the demonstration with
movies.
(On/Off)
Reset Default Resets the camera to the factory-settings.
Checking the functions available
Memory Card Tool
Format Formats the memory card.
File Number Selects the method used for assigning file numbers to
images.
(Series/Reset)
Folder Name Selects the folder name format.
(Standard Form/Date Form)
Select Shoot. Folder Selects the recording folder.
New Folder Creates a new folder.
Recover Image DB Repairs the image database file of movies when
inconsistencies are found.
Display Card Space Displays the remaining recording time of movies and
the recordable number of still images on the memory
card.
GB
55

Eye-Fi Setup*
Upload Settings Sets the upload function of the camera when an
Eye-Fi card is used.
(On/Off)
* Appears when an Eye-Fi card (sold separately) is inserted in the camera. Do not
use an Eye-Fi card inserted in the camera on an airplane. If there is an Eye-Fi
card inserted in the camera, set [Upload Settings] to [Off].
Eye-Fi cards can be used only in the countries/regions where they were
purchased. Use Eye-Fi cards in accordance with the law of the countries/regions
where you purchased the card.
GB
56
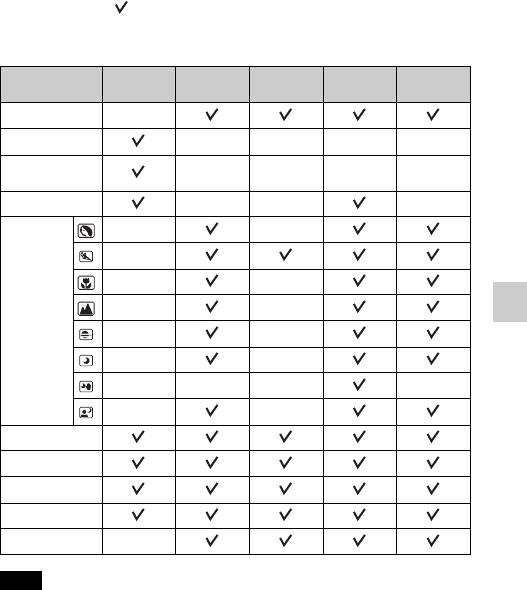
Functions available for each shooting mode
The functions you can use depend on the selected shooting mode.
In the table below, indicates the function available. – indicates the function
not available.
The functions you cannot use are displayed in gray on the screen.
Shoot Mode Exposure
Self-timer Continuous
Face
Smile Shutter
Comp.
Adv.
Detection
Intelligent Auto
–
Sweep Panorama
––––
3D Sweep
––––
Panorama
Anti Motion Blur
–– –
Scene
––
Selection
–
––
––
Checking the functions available
––
––
––– –
––
Picture Effect
Program Auto
Aperture Priority
Shutter Priority
Manual Exposure
–
Note
• The functions available may be limited also by conditions other than the shooting
mode.
GB
57
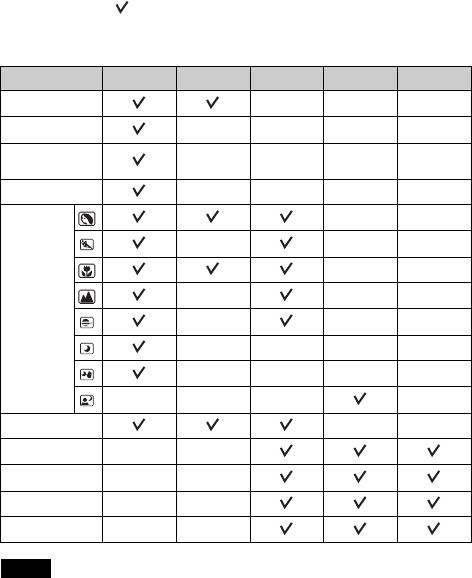
Flash modes available
The flash modes you can select depend on the shooting mode and functions
selected.
In the table below, indicates the function available. – indicates the function
not available.
The flash modes you cannot select are displayed in gray on the screen.
Shoot Mode Off Autoflash Fill-flash Slow Sync. Rear Sync.
Intelligent Auto
–––
Sweep Panorama
––––
3D Sweep
––––
Panorama
Anti Motion Blur
––––
Scene
––
Selection
–––
––
–––
–––
––––
––––
––– –
Picture Effect
––
Program Auto
––
Aperture Priority
––
Shutter Priority
––
Manual Exposure
––
Notes
• The flash modes may be limited also by conditions other than the shooting mode.
• Even if you select a workable flash mode, the flash does not fire unless it is raised.
• [Autoflash] can be selected when [Shoot Mode] is set to [Intelligent Auto],
[Picture Effect], or certain [Scene Selection] modes only.
GB
58

Importing images to the computer
Installing the software
To utilize images recorded with the camera, the following software is
provided:
• Sony Image Data Suite
“Image Data Converter SR”
“Image Data Lightbox SR”
• “PMB” (Picture Motion Browser) (Windows only)
Notes
• Log on as Administrator.
• If “PMB” has already been installed on the computer, and the version number of
the previously installed “PMB” is lower than that of the “PMB” on the CD-ROM
(supplied), install “PMB” also from the CD-ROM (supplied).
x
Windows
The following computer environment is recommended when using the
supplied software and importing images via a USB connection.
1
2
OS (pre-installed) Microsoft Windows XP*
SP3/Windows Vista*
SP2/
Windows 7
“PMB” CPU: Intel Pentium III 800 MHz or faster
(For playing/editing the movies: Intel Core Duo 1.66 GHz
Importing images to the computer
or faster /Intel Core 2 Duo 1.20 GHz or faster)
Memory: 512 MB or more (For playing/editing the High
Definition movies: 1 GB or more)
Hard Disk: Disk space required for installation—
approximately 500 MB
Display: Screen resolution—1024 × 768 dots or more
“Image Data
CPU/Memory: Pentium 4 or faster/1 GB or more
Converter SR
Display: 1024 × 768 dots or more
Ver.3”/“Image Data
Lightbox SR”
1
*
64-bit editions and Starter (Edition) are not supported.
2
*
Starter (Edition) is not supported.
GB
59

Turn on your computer, and
1
insert the CD-ROM (supplied)
into the CD-ROM drive.
The installation menu screen appears.
Click [Install].
2
• Make sure that both “Sony Image Data Suite” and “PMB” are checked
and follow the instructions on the screen.
• Connect the camera to the computer during the procedure following the
instructions on the screen.
• When the restarting confirmation message appears, restart the computer
following the instructions on the screen.
• DirectX may be installed depending on the system environment of your
computer.
Remove the CD-ROM after the installation is complete.
3
The software is installed and shortcut icons appear on the desktop.
x
Macintosh
The following computer environment is recommended when using the
supplied software and importing images via a USB connection.
OS (pre-installed) USB Connection: Mac OS X (v10.3 to v10.6)
“Image Data Converter SR Ver.3”/“Image Data
Lightbox SR”: Mac OS X v10.4/Mac OS X v10.5/
Mac OS X v10.6 (Snow Leopard)
“Image Data
CPU: Power PC G4/G5 series (1.0 GHz or faster is
Converter SR
recommended)/Intel Core Solo/Core Duo/Core 2 Duo or
Ver.3”/“Image Data
faster
Lightbox SR”
Memory: 1 GB or more is recommended.
Display: 1024 × 768 dots or more
Turn on your Macintosh computer, and insert the CD-ROM
1
(supplied) into the CD-ROM drive.
GB
60
Double-click the CD-ROM icon.
2
Copy the [IDS_INST.pkg] file in the [MAC] folder to the
3
hard disk icon.
Double-click the [IDS_INST.pkg] file in the copy-to folder.
4
• Follow the instructions on the screen to complete the installation.
What you can do with the supplied software
x
“PMB”
With “PMB” you can do the following, etc.:
• Import images shot with the camera and display them on the computer.
• Organize images on the computer on a calendar by shooting date to view
them.
• Print or save still images with the date.
For details on “PMB,” refer to “PMB Help”.
To start Help, click (PMB Help) displayed on the desktop after
installation. Or, from the start menu, click [Start] t [All Programs] t
[PMB] t [PMB Help].
Importing images to the computer
The support information for the “PMB” (English only):
http://www.sony.co.jp/pmb-se/
Note
• “PMB” is not compatible with Macintosh computers.
x
“Image Data Converter SR”/“Image Data Lightbox
SR”
With “Image Data Converter SR,” you can edit images recorded in RAW
format with various corrections, such as tone curve, and sharpness.
With “Image Data Lightbox SR,” you can display and compare RAW/JPEG
images recorded with this camera.
For details on “Image Data Converter SR” and “Image Data Lightbox SR,”
refer to Help.
To start Help, click [Start] t [All Programs] t [Sony Image Data Suite] t
[Help] t [Image Data Converter SR Ver.3] or [Image Data Lightbox SR].
GB
61
The support information for the “Sony Image Data Suite” (English only):
http://www.sony.co.jp/ids-se/
GB
62
Others
Checking the number of recordable images
Once you insert a memory card into the
camera and set the power switch to ON,
the number of images that can be
recorded (should you continue to shoot
using the current settings) is displayed
on the LCD monitor.
Notes
• When “0” (the number of recordable images) flashes in yellow, the memory card
is full. Replace the memory card with another one, or delete images in the current
memory card (page 27).
• When “NO CARD” (the number of recordable images) flashes in yellow, it means
no memory card has been inserted. Insert a memory card.
x
Number of still images and time of movies that can be
recorded on a memory card
Still images
The table shows the approximate number of still images that can be recorded
on a memory card formatted with this camera. The values are defined using
Sony standard memory cards for testing. The values may vary depending on
the shooting conditions.
Others
Image size: L 16M
Aspect ratio: 3:2*
(Units: images)
Capacity
2GB 4GB 8GB 16GB 32GB
Quality
Standard 386 781 1587 3239 6406
Fine 270 548 1116 2279 4510
RAW & JPEG 74 154 319 657 1304
RAW 106 220 452 928 1840
* When [Aspect Ratio] is set to [16:9], you can record more images than the
numbers shown in the table above (except for [RAW]).
GB
63

Movies
The table below shows the approximate recording times available. These are
the total times for all movie files. Continuous recording is possible for
approximately 29 minutes per recording. The maximum size of a movie file is
about 2 GB.
(h (hour), m (minute), s (second))
Capacity
2GB 4GB 8GB 16GB 32GB
Image size
1280×720 (Fine) 26 m
53 m
1 h 48 m
3 h 37 m
7 h 16 m
(20 m)
(41 m)
(1 h 23 m)
(2 h 46 m)
(5 h 34 m)
1280×720
40 m
1 h 20 m
2 h 42 m
5 h 26 m
10 h 54 m
(Standard)
(26 m)
(53 m)
(1 h 48 m)
(3 h 37 m)
(7 h 16 m)
The number in ( ) is the minimum recording time.
Note
• The recording time of movies varies because the camera is equipped with VBR
(Variable Bit Rate) which automatically adjusts image quality depending on
shooting scene.
When you record a fast-moving subject, the image is clearer but the recording time
is shorter because a lot of memory needed to record.
The recording time also vary depending on the shooting condition or your subject
or the setting of image quality/size.
x
Number of still images that can be recorded using a
battery pack
The approximate number of images that can be recorded is 400 images when
you use the camera with the battery pack (supplied) at full capacity.
Note that the actual numbers may be less depending on the conditions of use.
• The number is calculated with a battery pack at full capacity and in the following
situation:
– At an ambient temperature of 25°C (77°F).
– [Quality] is set to [Fine].
– [Autofocus Mode] is set to [Single-shot AF].
– Shooting once every 30 seconds.
– The flash (HVL-F7S) strobes once every two times.
– The power turns on and off once every ten times.
– Using the battery pack that is charged for an hour after the CHARGE lamp goes
out.
– Using Sony “Memory Stick PRO Duo” media (sold separately).
GB
64

• The measurement method is based on the CIPA standard.
(CIPA: Camera & Imaging Products Association)
Others
GB
65
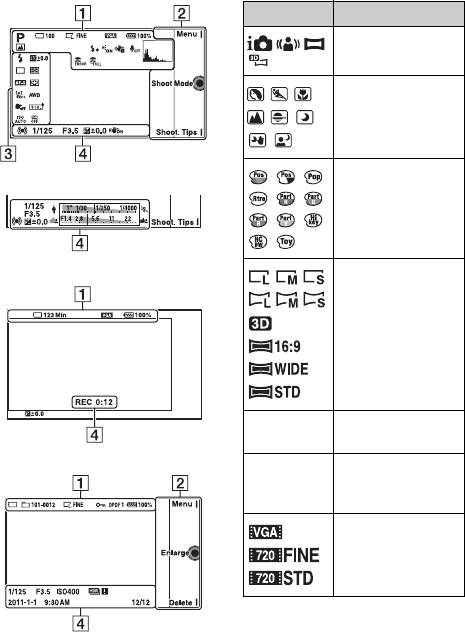
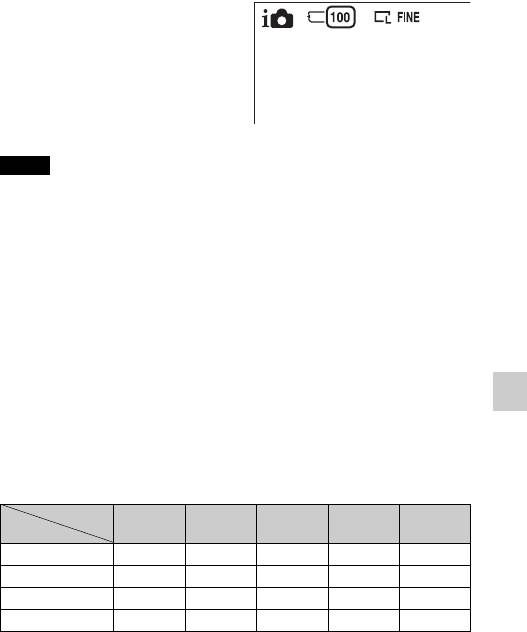
List of icons on the LCD monitor
Icons are displayed on the screen to indicate the camera status.
You can change the screen display using DISP (Display Contents) on the
control wheel.
Shooting standby
A
Display Indication
Shooting mode
P A S M
Scene Selection
Picture Effect
Graphic display
Movie recording
Image size/Aspect
ratio of still images
RAW RAW+J
Image quality of still
FINE STD
images
Playback
100 Number of
recordable still
images
Image size of movies
GB
66

B
Display Indication
Memory card/Upload
Display Indication
Soft keys
Menu
Shoot Mode
Shoot. Tips
123 Min Recordable time of
C
movies
Display Indication
100%
Remaining battery
Flash Mode/Red Eye
Scene Recognition
Reduction
icons
Drive Mode
Flash charge in
progress
AF illuminator
Does not record
Focus mode
sound during movie
recording
Camera shake
±0.0
Flash compensation
warning
Metering Mode
Others
Overheating warning
Focus area mode
Database file full/
Database file error
Face Detection
Histogram
Soft Skin Effect
101-0012 Playback folder –
File number
ISO
Protect
White Balance
1
Print order and
AWB
number of copies
7500K G9
GB
67
Display Indication
Display Indication
Creative Style
12/12 Image number/
Number of images
recorded in the date
or selected folder
SteadyShot
Appears when HDR
did not work on the
DRO/Auto HDR
image.
Smile detection
sensitivity indicator
D
Display Indication
Focus status
z
1/125 Shutter speed
F3.5 Aperture value
Metered manual
±0.0
±0.0
Exposure
compensation
Shutter speed
indicator
Aperture indicator
REC 0:12 Recording time of the
movie (m:s)
2011-1-1
Recorded date/time
9:30AM
of the image
GB
68

