Sony NEX-C3 – страница 6
Инструкция к Цифровому Фотоаппарату Sony NEX-C3

Preparing the camera
Checking the accessories supplied
First check the model name of your camera (page 8). The accessories supplied
differ depending on the model.
The number in parentheses indicates the number of pieces.
x
Common accessories
•CD-ROM (1)
– Application Software for
• Battery charger BC-VW1 (1)
α camera
– α Handbook
Preparing the camera
• Instruction Manual (This manual)
(1)
• Power cord (mains lead) (1) (not
x
NEX-C3A
supplied in the U.S.A. and Canada)
• E16 mm single focus lens/Front
lens cap (1) (attached to the
camera)
x
NEX-C3D
• Rechargeable battery pack
• E16 mm single focus lens/Front
NP-FW50 (1)
lens cap/Rear lens cap (1)
• E18 – 55 mm zoom lens/Front lens
cap (1) (attached to the camera)/
Lens hood (1)
• USB cable (1)
x
NEX-C3K
• E18 – 55 mm zoom lens/Front lens
cap (1) (attached to the camera)/
Lens hood (1)
• Shoulder strap (1)
• Flash HVL-F7S (1)/Flash case (1)
GB
9
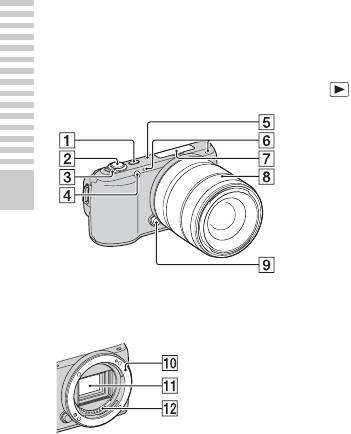
Identifying parts
See the pages in parentheses for details of operation.
A (Playback) button (26)
B Shutter button (25)
C ON/OFF (Power) switch (22)
D AF illuminator/Self-timer lamp/
Smile Shutter lamp
E Speaker
F Microphone*
Preparing the camera
G Smart Accessory Terminal (20)
H Lens (17)
I Lens release button (18)
J Mount
When the lens is removed
K Image sensor**
L Lens contact**
* Do not cover this part during movie
recording.
** Do not touch this part directly.
GB
10
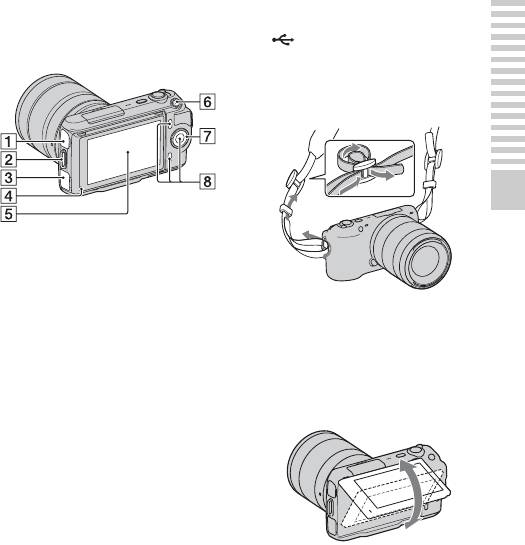
A (USB) terminal
B Hook for shoulder strap
Attaching the shoulder strap is
recommended not to drop the
camera.
Preparing the camera
C HDMI terminal (48)
D Light sensor
E LCD monitor
The tilting LCD monitor of the
camera allows flexible shooting
positions.
F MOVIE button (25)
G Control wheel (29)
H Soft keys (30)
GB
11

x
Flash
Preparing the camera
A Image sensor position mark
A Screw
B Battery cover (15)
B Flash*
C Memory card cover (19)
C Connector*
D Tripod receptacle
• Use a tripod with a screw length
* Do not touch this part directly.
of less than 5.5 mm (7/32 inch).
If it is dirty, wipe it off with a soft
You will be unable to firmly
clean cloth.
secure the camera to tripods
having screws longer than 5.5
mm (7/32 inch), and may damage
the camera.
E Battery compartment (15)
F Connection plate cover
For using the AC-PW20 AC
Adaptor (sold separately)
G Access lamp (20)
H Memory card insertion slot (19)
GB
12
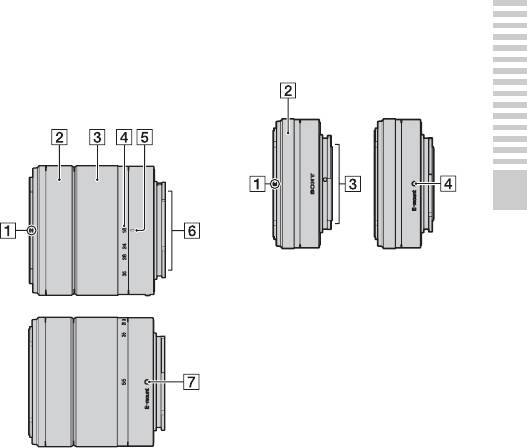
x
Lens
E16 mm F2.8 (supplied with
NEX-C3A/C3D)
E18 – 55 mm F3.5-5.6 OSS
(supplied with NEX-C3D/
C3K)
Preparing the camera
A Converter index*
B Focusing ring
C Lens contacts**
D Mounting index
* A converter is sold separately.
** Do not touch this part directly.
A Hood index
B Focusing ring
C Zooming ring
D Focal-length scale
E Focal-length index
F Lens contacts*
G Mounting index
* Do not touch this part directly.
GB
13
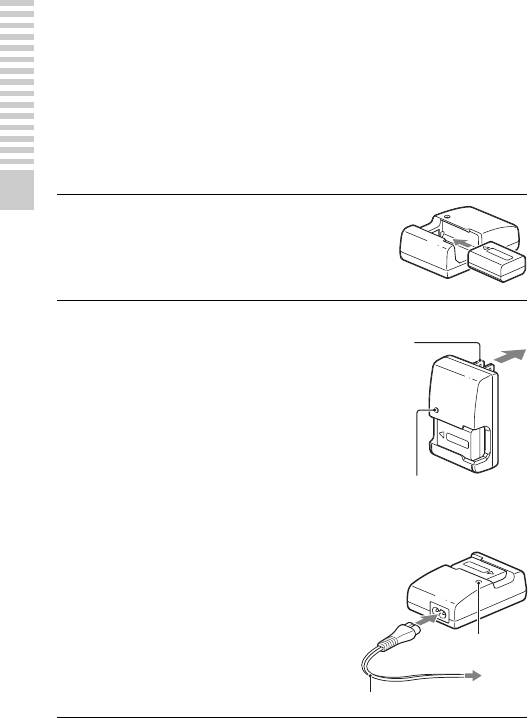
Preparing the battery pack
When using the camera for the first time, be sure to charge the NP-FW50
“InfoLITHIUM” battery pack (supplied).
x
Charging the battery pack
The “InfoLITHIUM” battery pack can be charged even when it has not been
fully depleted. It can also be used when it has not been fully charged.
Preparing the camera
Insert the battery pack onto the
1
battery charger.
• Push the battery pack until it clicks.
Connect the battery charger to
For the U.S.A and Canada
2
the wall outlet (wall socket).
Plug
• The CHARGE lamp turns off when
charging is finished.
• Time required to charge a fully depleted
battery pack at a temperature of 25 °C
(77 °F) is about 250 minutes.
CHARGE lamp
For countries/regions other
than the U.S.A. and Canada
CHARGE lamp
Power cord (mains lead)
GB
14
Notes
• The charging time differs depending on the remaining capacity of the battery pack
or charging conditions.
• We recommend charging the battery pack in an ambient temperature of between
10 °C to 30 °C (50 °F to 86 °F). You may not be able to efficiently charge the
battery pack outside of this temperature range.
• Connect the battery charger to the nearest wall outlet (wall socket).
• The CHARGE lamp may flash quickly when the battery pack is used for the first
time, or the battery pack has not been used for a long time. In such cases, remove
the battery pack from the charger and re-attach it, then charge the battery pack.
Preparing the camera
• Do not try to charge the battery pack again right after it has been charged, or when
it has not been used after being charged. Doing so will affect the performance of
the battery pack.
z Using your camera abroad — Power source
You can use your camera and battery charger, and the AC-PW20 AC Adaptor
(sold separately) in any countries/regions where the power supply is within
100 V to 240 V AC, 50 Hz/60 Hz.
An electronic voltage transformer is unnecessary and its use may cause a
malfunction.
x
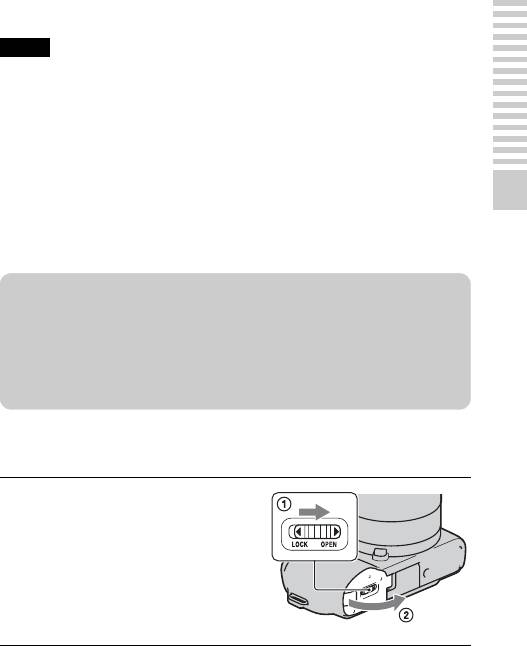
Inserting the charged battery pack
While sliding the cover open
1
lever, open the cover.
GB
15
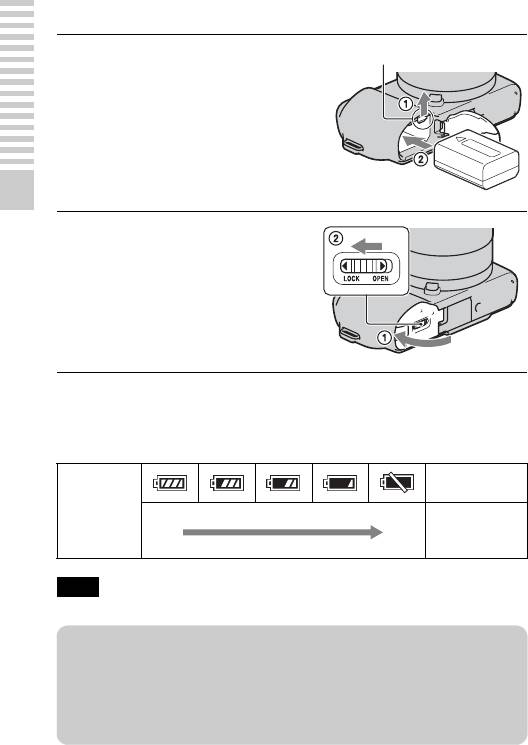
Firmly insert the battery pack
2
Lock lever
all the way while pressing the
lock lever with the tip of the
battery.
Preparing the camera
Close the cover.
3
x
Checking the remaining battery level
Check the level with the following indicators and percent figures displayed on
the LCD monitor.
“Battery
exhausted.”
Battery level
You cannot
High Low
shoot any more
image.
Note
• The displayed level may not be correct under certain circumstances.
z What is an “InfoLITHIUM” battery pack?
An “InfoLITHIUM” battery pack is a lithium-ion battery pack that has functions
for exchanging information related to operating conditions with your camera.
Using the “InfoLITHIUM” battery pack, the remaining battery time in percent
figures is displayed according to the operating conditions of your camera.
GB
16

x
Removing the battery pack
Turn off the camera and slide the lock
Lock lever
lever in the direction of the arrow after
you confirm that the access lamp is not lit.
Be careful not to drop the battery pack.
Preparing the camera
Attaching/removing the lens
The camera will come with the lens attached.
Refer to the steps below when attaching other lenses.
Set the power switch of the camera to OFF before you attach or remove the
lens.
If the cap or the packaging lid
1
is attached, remove it from the
camera or the lens.
• Quickly change the lens somewhere
away from dusty locations so as to
keep dust or debris from getting
inside the camera.
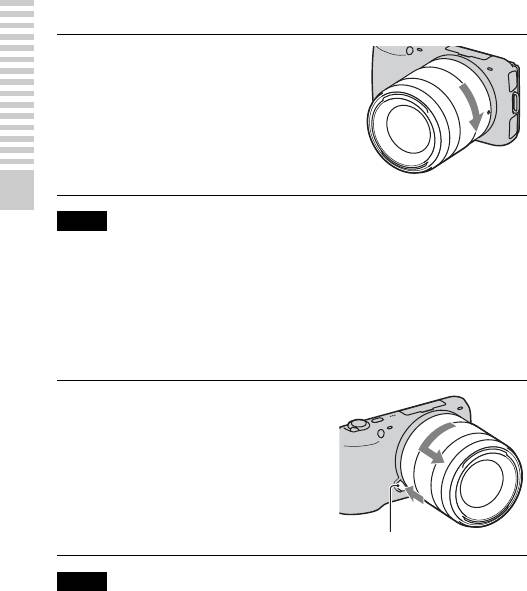
Mount the lens by aligning the
2
white index marks on the lens
and the camera.
• Hold the camera’s face downward
to prevent the dust from entering
into the camera.
White index marks
GB
17
While pushing the lens lightly
3
toward the camera, turn the
lens clockwise until it clicks
into the locked position.
• Be sure to put the lens on straight.
Preparing the camera
Notes
• When attaching a lens, do not press the lens release button.
• Do not use force when attaching a lens.
• The Mount Adaptor (sold separately) is required to use an A-mount lens (sold
separately). For details, refer to the operating manual supplied with the Mount
Adaptor.
x
Removing the lens
Press the lens release button
1
all the way in and turn the lens
counterclockwise until it
stops.
Lens release button
Notes
• When changing the lens, if dust or debris gets inside the camera and adheres to the
surface of the image sensor (the part that acts as the film), it may appear on the
image, depending on the shooting environment. The camera vibrates slightly when
it is turned off, due to the anti-dust function, to prevent dust from adhering to the
image sensor. However, attach or remove the lens quickly somewhere away from
dusty locations.
• Do not leave the camera with the lens removed.
• When you want to use body caps or rear lens caps, please purchase ALC-B1EM
(body cap) or ALC-R1EM (rear lens cap) (sold separately).
GB
18

Inserting a memory card (sold separately)
Open the cover.
1
Preparing the camera
Insert a memory card.
2
• Insert the memory card until it
clicks as illustrated.
Check on the direction of the
notched corner.
Close the cover.
3
x
Memory cards that you can use
You can use following memory cards with this camera: “Memory Stick PRO
Duo” media, “Memory Stick PRO-HG Duo” media, SD memory card, SDHC
memory card, and SDXC memory card. You cannot use MultiMediaCard.
For recording movies, it is recommended that you use following memory
cards. “Memory Stick PRO Duo” media and “Memory Stick PRO-HG Duo”
media are both called as “Memory Stick PRO Duo” media, and SD memory
card, SDHC memory card and SDXC memory card are all called as “SD card”
in this manual.
• (Mark2) (“Memory Stick PRO Duo” media
(Mark2))
• (“Memory Stick PRO-HG Duo” media)
• SD memory card, SDHC memory card, SDXC memory card (Class 4 or
more)
GB
19

Note
• Images recorded on an SDXC memory card cannot be imported to or played on
computers or AV devices that are not compatible with exFAT. Make sure that the
device is compatible with exFAT before connecting it to the camera. If you
connect your camera to an incompatible device, you may be prompted to format
the card. Never format the card in response to this prompt, as doing so will erase
all data on the card. (exFAT is the file system used on SDXC memory cards.)
x
Removing the memory card
Preparing the camera
Open the cover, make sure that the access
lamp is not lit, and push the memory card
once.
Access lamp
Notes
• When the access lamp is lit, do not remove the memory card or the battery pack, or
turn off the power. The data may be corrupted.
• Set the power switch of the camera to OFF before you attach or remove the flash.
Attaching the flash
When you want to use a flash during shooting, attach the flash device
(supplied).
The flash is enabled when it is raised, and disabled when lowered.
Set the power switch of the camera to OFF before you attach or remove the
flash.
GB
20
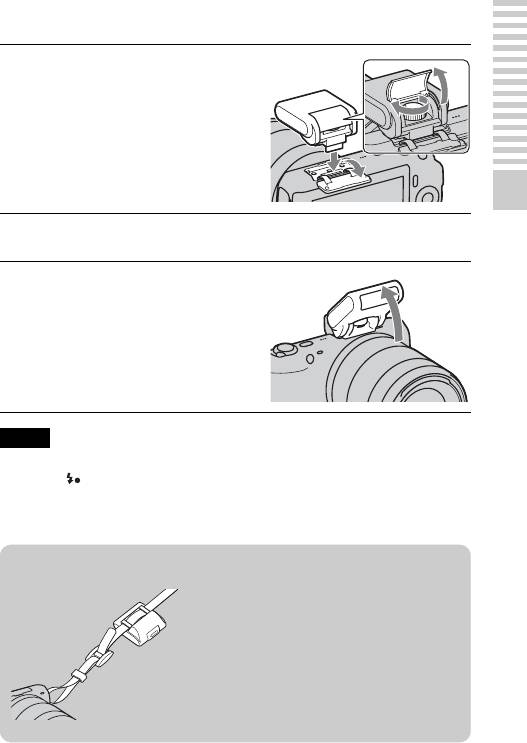
Attach the flash to the Smart
1
Accessory Terminal of the
camera.
Preparing the camera
Fasten the screw to secure the flash.
2
To fire the flash, raise the
3
flash first.
• The default setting is [Autoflash].
To change the setting, see page 41.
• Lower the flash when you do not
intend to use it.
Notes
• The power for the flash is provided from the camera. When the camera is charging
the flash, blinks on the LCD monitor. You cannot press the shutter button
when this icon is blinking.
• Plug the flash fully into the accessory terminal of the camera, and fasten the screw
securely. Make sure that the flash is attached to the camera securely.
z Carrying the flash
The flash case can be conveniently attached to
the shoulder strap.
Put the flash in the case when you are not using
it to protect it from harm.
GB
21
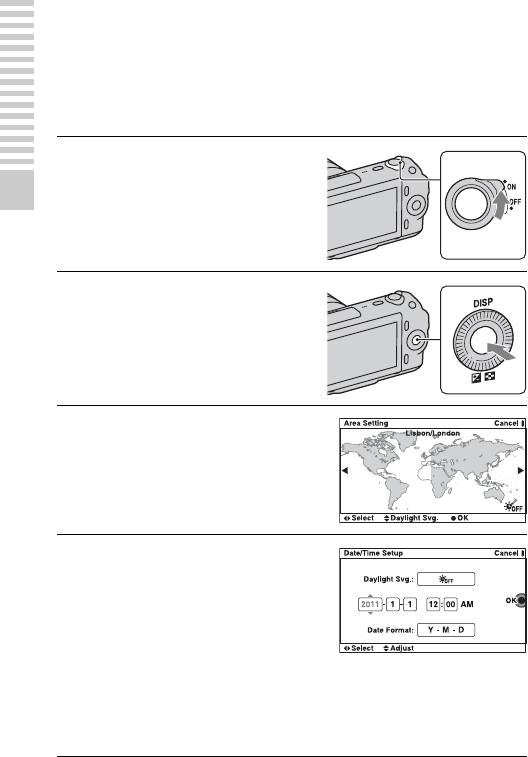
Turning on the camera and setting up the
date
When you turn on the camera for the first time, the screen to set date and time
appears.
Set the power switch to ON to
1
turn on the camera.
The screen to set date and time
Preparing the camera
appears.
• To turn off the camera, set the
power switch to OFF.
Press the center of the control
2
wheel to confirm [OK].
Select your area by pressing
3
the right or left of the control
wheel and press the center.
Press the left or right of the
4
control wheel to select each
item, and press the top or
bottom, or turn it to select the
numeric value.
Daylight Svg.: Turns on or off the
daytime saving time setting.
Date Format: Selects the format to
display date.
• Midnight is indicated as 12:00 AM,
and noon as 12:00 PM.
GB
22

Repeat step 4 to set other items, then press the center of
5
the control wheel.
Note
• You cannot superimpose the date on images on this camera. Using “PMB” stored
on the
CD-ROM (supplied), you can save or print images with date. Refer to
“PMB Help” for more details (page 61).
x
Resetting the date and time/Checking the current
Preparing the camera
clock setting
Press [Menu], then select [Setup] t [Date/Time Setup] (page 29, 54).
x
Maintaining the date and time setting
This camera has an internal rechargeable battery for maintaining the date and
time and other settings regardless of whether the power is on or off, or the
battery is installed or not. For details, see page 76.
GB
23
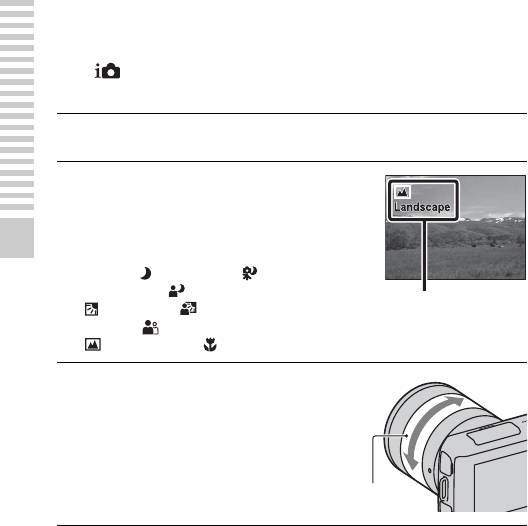
Mastering the basic operation
Shooting still images
In the (Intelligent Auto) mode, the camera analyzes the subject, and
allows you to shoot with appropriate settings.
Set the power switch to ON to turn on the camera.
1
Point the camera to the
2
subject.
When the camera recognizes the
scene, the Scene Recognition icon
and guide appear on the LCD
Mastering the basic operation
monitor: (Night View), (Tripod
Night View), (Night Portrait),
Scene Recognition icon and guide
(Backlight), (Backlight
Portrait), (Portrait),
(Landscape), or (Macro).
When using a zoom lens, turn
3
the zoom ring, then decide on
your shot.
Zoom ring
GB
24
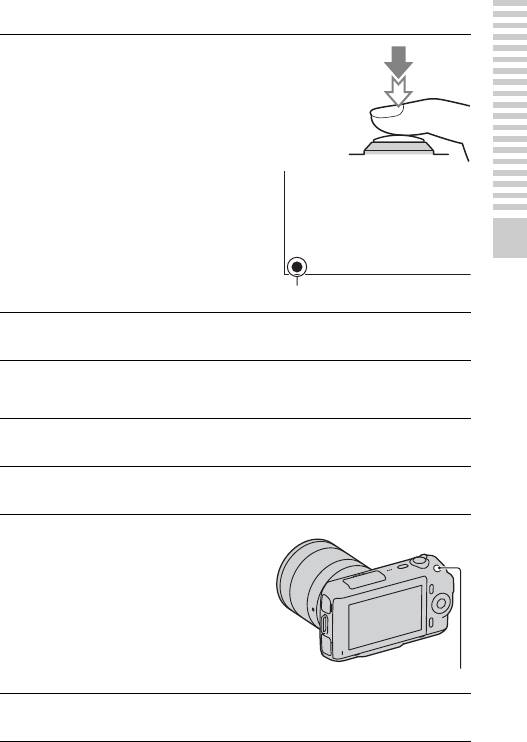
Press the shutter button
4
halfway down to focus.
When the focus is confirmed, beeps
sound and z lights up.
Mastering the basic operation
Focus indicator
Press the shutter button fully down to shoot.
5
Recording movies
Set the power switch to ON to turn on the camera.
1
Point the camera to the subject.
2
Press the MOVIE button to
3
start recording.
Focus and brightness are adjusted
automatically.
If you press the shutter button
halfway down during recording, you
will be able to focus more quickly.
MOVIE button
Press the MOVIE button again to stop recording.
4
GB
25
Notes
• The sound of the camera and the lens in operation might be recorded while
recording a movie. You can disable the sound recording by selecting [Menu] t
[Setup] t [Movie Audio Rec] t [Off] (page 29,
53).
• The continuous recording time of a movie depends on the ambient temperature or
the condition of the camera.
• The following message, “Camera overheating. Allow it to cool.” may be indicated
when the camera temperature has risen, such as when the continuous shooting
mode is used. In such cases, turn the camera off and wait until the camera is ready
to shoot again.
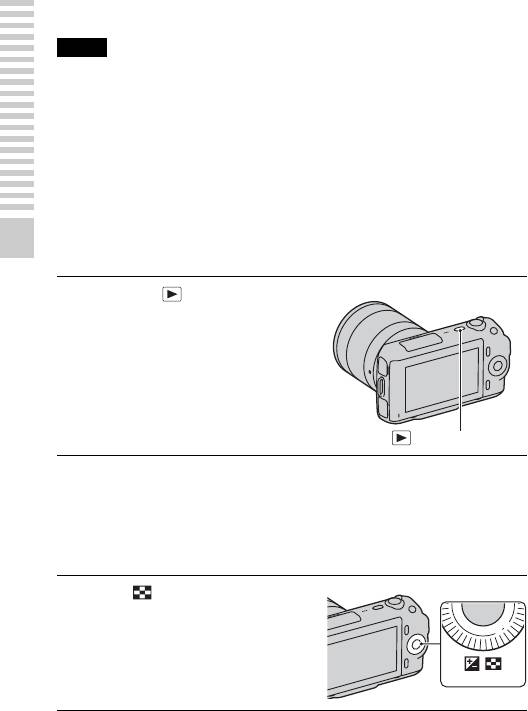
Playing back images
Mastering the basic operation
Press the (playback)
1
button.
The last recorded image is displayed
on the LCD monitor.
(playback) button
x
Selecting the image
Turn the control wheel.
x
Playing back movies
Press (Image Index) on
1
the control wheel in playback
mode.
Six images are displayed.
GB
26
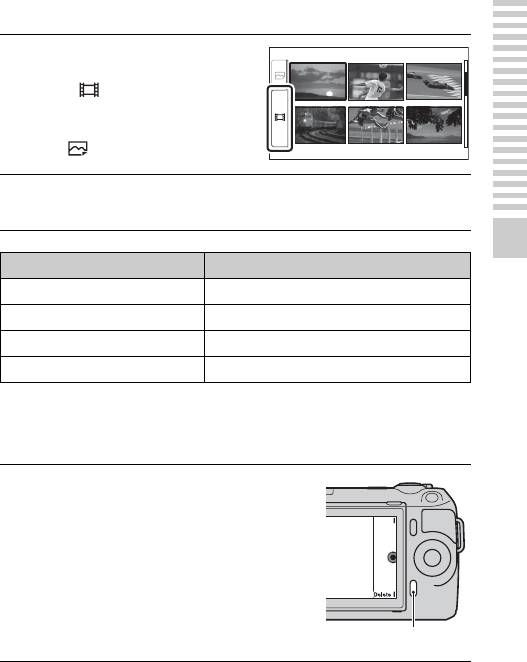
Press the left side of the
2
control wheel repeatedly to
select (movie), and press
the center.
To return to still image playback,
select (still image) (page 47).
Turn the control wheel to select the desired movie, and
3
press the center.
During movie playback Control wheel operation
Mastering the basic operation
To pause/resume Press the center.
To fast-forward Press the right, or turn it clockwise.
To fast-rewind Press the left, or turn it counterclockwise.
To adjust sound volume Press the bottom t top/bottom.
Deleting images
You can delete the image that is currently displayed.
Display the desired image,
1
and press [Delete].
[Delete]
GB
27

Press the center of the control
2
wheel to confirm [OK].
Press [Cancel] to quit the operation.
[Cancel]
[OK]
Mastering the basic operation
z To delete several images
Select [Menu] t [Playback] t [Delete] to select and delete specific images at
the same time.
GB
28

