Sony CMD-Z5: Getting Started
Getting Started: Sony CMD-Z5
Getting Started
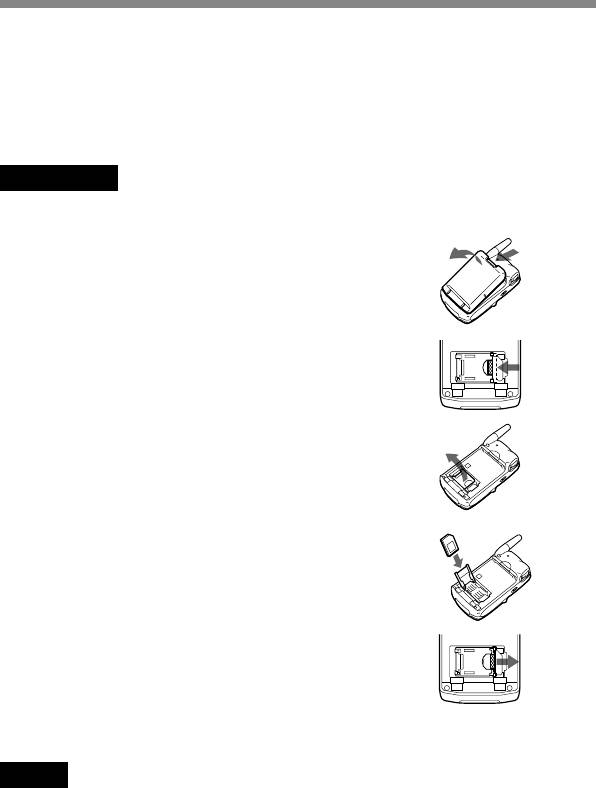
Inserting the SIM Card
Your SIM card contains a computer chip with your service details and
phone number. The SIM card should be kept secure in the same way as a
credit card. Also, do not bend, scratch or expose it to moisture, and protect
it from contact with static electricity.
Important
To avoid corrupting the memory of the SIM card, always switch off your phone
before removing or inserting your SIM card.
1 Remove the battery pack.
2 Slide the tab in the direction of the arrow
to unlock the tray.
3 Lift up the tray and slide the SIM card into
the tray.
(You can also find a brief explanation on
the SIM card holder.)
4 Close the tray with the SIM card inserted.
5 Slide the tab in the direction of the arrow
to lock the tray.
6 Replace the battery pack.
Note
Position the SIM card with the gold contacts facing up and the angled corner to the
upper left as you insert it into the SIM card holder.
To remove the SIM card
Follow steps 1 to 6 above, removing the SIM card from the tray in step 3.
GB
14

Inserting the Battery Pack
1 Unwrap the battery pack.
2 Press the battery pack firmly into place
and check that it snaps closed.
To remove the battery pack
First turn the power off and wait until the display goes blank. Press the
Getting
Started
battery release hook down and remove the battery.
Warning
• If the battery is removed from the phone (at constant temperature) for approx. 3
days, the clock will be reset.
• Do not remove the battery pack from the phone when the power is on. Doing so
may cause settings or data to be deleted or changed.
Charging the Battery Pack
As supplied, your battery pack will not be fully charged.
You can select one of the following three ways to charge the battery pack:
1 Directly connect the phone to the AC
adaptor. Be sure to position the plug
with the SONY logo side facing up
To mains
when connecting.
2 Use the desktop holder to charge the
battery pack. Be sure to position the plug
with the SONY logo side facing up when
connecting.
To mains
GB
15
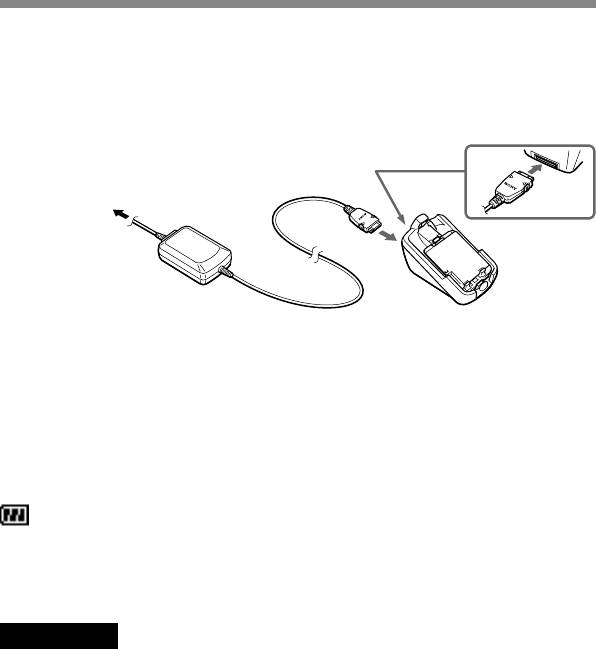
3 Charge the battery pack independently.
Make sure that the back of the battery pack (the side with the
label) is facing towards you. Align the battery with the desktop
holder and insert the battery pack all the way to the end until it
is locked. Be sure to position the plug with the SONY logo side
facing up when connecting.
To mains
Charging indicator on the battery pack
A red light comes on when charging starts. The light turns green,
after about 3 hours, when charging is complete. But, it may vary
depending on certain conditions e.g. If your phone is switched on or
temperature is beyond operational range. As an energy saving
measure, disconnect the AC adaptor from the mains socket and from
the phone after charging.
The battery icon on the display indicates charging status. When the
battery is almost completely charged, the battery icon shows all bars.
However, this display shows an approximate indication only, check the
indicator on the battery pack (refer to the above) to confirm whether or not
the battery pack is fully charged.
Important
• If the red light on the battery pack blinks, reconnect the AC adaptor and reinsert
the phone (or the battery pack). If you repeat this process several times and the
indicator continues blinking, the battery pack might be defective. Stop charging
the battery pack immediately and replace it.
• Use only the Sony-specified CMD-MZ5 battery pack and charger. Your battery is
equipped with short circuit protection. If you short your battery accidentally,
charge the battery immediately to unlock the short circuit protection.
Usage time
When your battery pack is nearly discharged the battery icon on the
display blinks and the phone beeps to inform you that only a short
amount of calling time remains.
GB
16
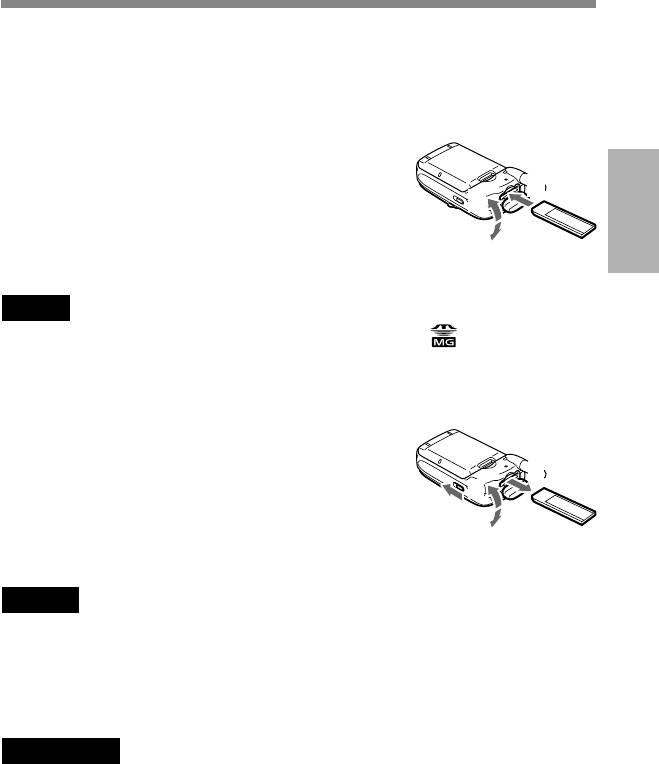
Inserting the “MagicGate Memory Stick”
To use the Music features, insert the “MagicGate Memory Stick” into your
phone beforehand.
1 Open the cover of the Memory Stick slot.
2
2 Insert the “MagicGate Memory Stick”
3
into the Memory Stick slot until it clicks.
Getting
Started
1
3 Close the cover of the Memory Stick slot.
Note
Be sure to position the “MagicGate Memory Stick” with the logo side facing up
when inserting.
To remove the “MagicGate Memory Stick”
1 Open the cover of the Memory Stick slot.
2 Slide the EJECT lever in the direction of
3
the arrow. The “MagicGate Memory
4
Stick” ejects.
2
3 Take out the “MagicGate Memory Stick”.
1
4 Close the cover of the Memory Stick slot.
Notes
• Do not remove the “MagicGate Memory Stick” when the Music menu is in use. If
the “MagicGate Memory Stick” is removed while recording, playing or
formatting, data on the “MagicGate Memory Stick” may be damaged.
• When transporting the “MagicGate Memory Stick,” place it in the supplied
storage case.
Important
If you have inserted the “MagicGate Memory Stick” upside down mistakenly,
remove it manually and then slide the EJECT lever.
GB
17
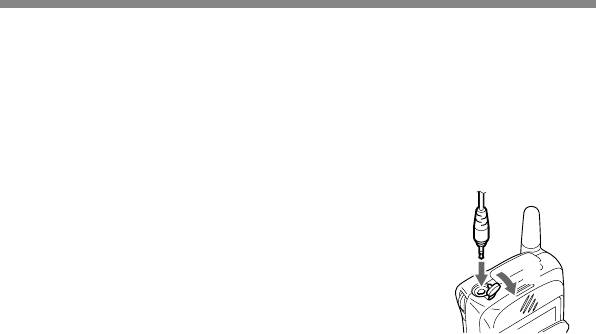
Connecting the Remote and the Headphones
To enjoy music using the Music menu, connect the headphones to the
remote and then connect the remote to your phone. You can only listen to
music through the headphones.
To connect the remote to the phone
1 Open the cover of the remote/headphone
jack.
2
2 Connect the remote plug to the remote/
1
headphone jack firmly.
To remove the remote
Disconnect the remote plug and close the cover of the remote/headphone
jack.
GB
18
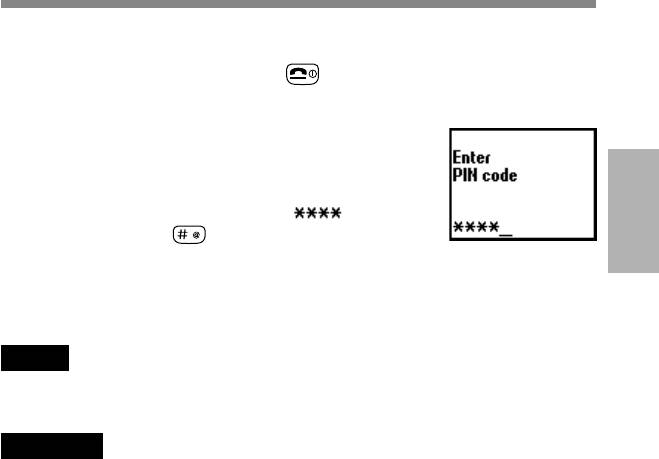
Switching on Your Phone
To switch your phone on/off, keep pressed.
Entering PIN
For security reasons, your SIM card is protected with
a Personal Identification Number (PIN), which is
supplied with your SIM card. Enter your PIN with
the keys (the PIN appears in code as ) and
press the Jog Dial (or
) to confirm your entry.
Getting
Started
If you do not enter a PIN code, your phone will automatically switch off
after approximately 2 minutes. It is possible but not recommended to
disable the PIN code prompt (see “Main Menu Operations-Settings-
Security” page 66).
Note
If the Personal lock has been set, there are some cases that you need to additionally
input the security code.
Warning
You only have 3 attempts to enter the correct PIN. After the third attempt, your SIM
is blocked and you must enter your PUK code (Personal Unblocking Key). (see also
“Troubleshooting” page 103).
If necessary, you can obtain your PUK code from your Network Operator/Service
Provider.
Emergency calls
Emergency calls (112, 999, etc.) are possible when you have network
coverage even if there is no SIM card in the phone (even if the keys are
locked). The support of this feature depends on the Network Operator.
GB
19
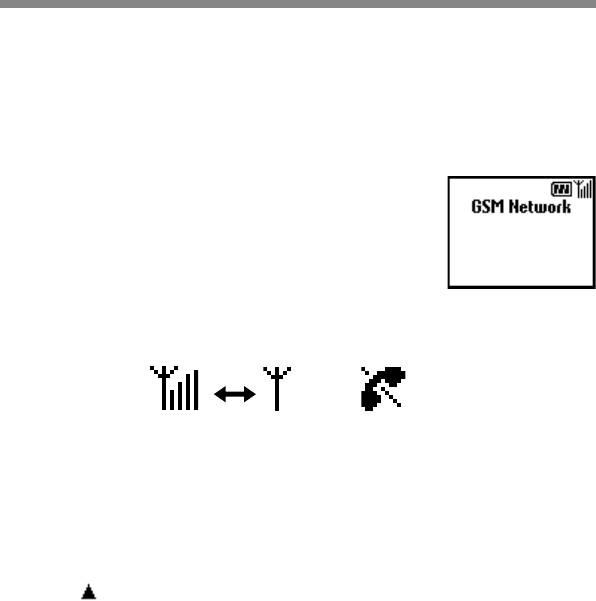
Connecting to the Network
After successfully entering your PIN code, your phone searches for an
available GSM network. The network search is automatic, but may take a
few seconds (see also “Main Menu Operations-Settings-Preferences” page
64).
You are ready to make and receive calls when the
Network Operator's name appears on the display.
The following indicates the strength of the received network signal. If the
signal is very weak, there is a risk of losing service.
Strong signal Weak signal No service
If you cannot obtain service
One reason for failure to obtain network service is that the reception
strength may be too weak. Try moving to a higher elevation, to a window
or open space. Make sure that there is nothing obstructing the antenna.
Roaming
If you are out of range of your “Home” Network Operator, especially
when you are abroad, another Network Operator may be selected
automatically, subject to signal strength and roaming agreements between
Network Operators. Contact your Network Operator/Service Provider for
details.
GB
20


