Sony GDM-F520: Setup
Setup: Sony GDM-F520
â
•Trinitron
is a registered trademark of Sony Corporation.
Table of Contents
• Macintosh is a trademark licensed to Apple Computer, Inc., registered in
Setup . . . . . . . . . . . . . . . . . . . . . . . . . . . . . . . . . . . 3
the U.S.A. and other countries.
â
• Windows
and MS-DOS are registered trademarks of Microsoft
Adjustments . . . . . . . . . . . . . . . . . . . . . . . . . . . . . 4
Corporation in the United States and other countries.
Troubleshooting . . . . . . . . . . . . . . . . . . . . . . . . . . 6
• IBM PC/AT and VGA are registered trademarks of IBM Corporation of
the U.S.A.
Specifications . . . . . . . . . . . . . . . . . . . . . . . . . . . . 7
ä
• VESA and DDC
are trademarks of the Video Electronics Standard
Precautions . . . . . . . . . . . . . . . . . . . . . . . . . . . . . . 8
Association.
•
ENERGY STAR is a U.S. registered mark.
Appendix . . . . . . . . . . . . . . . . . . . . . . . . . . . . . . . . . i
• All other product names mentioned herein may be the trademarks or
Preset mode timing table . . . . . . . . . . . . . . . . . . . . . i
registered trademarks of their respective companies.
• Furthermore, “
ä” and “â” are not mentioned in each case in this manual.
TCO’99 Eco-document . . . . . . . . . . . . . Back Cover
Setup
To select the input signal
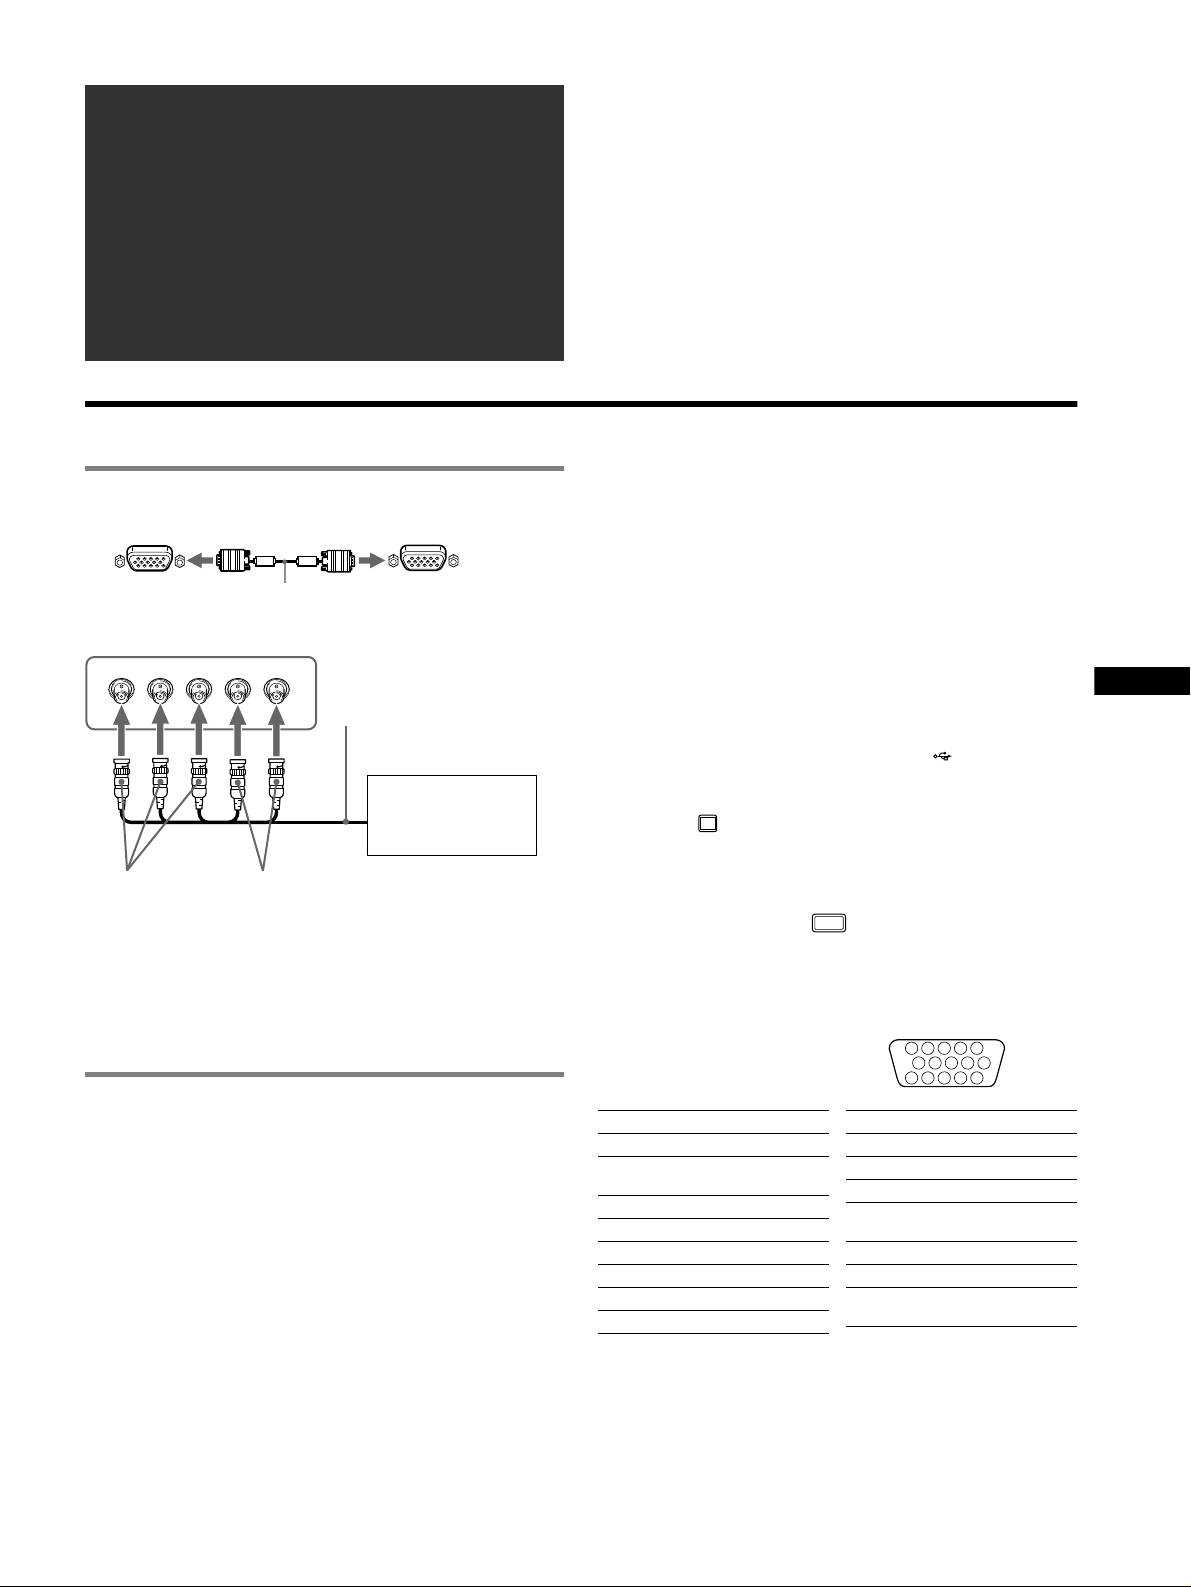
1 Connecting your monitor to your computer
You can connect two computers to this monitor using the HD15 and
BNC connectors. To select one of the two computers, use the
x To connect to the HD15 input connector
INPUT switch. The selected connector appears on the screen for 3
seconds.
Note
to HD15
video signal cable
to HD15 of the
(supplied)
connecting computer
If no signal is input to the selected connector, NO SIGNAL appears on the
screen. After a few seconds, the monitor enters the power saving mode. If
x To connect to the 5 BNC connectors
this happens, switch to the other connector.
RGBHDVD
GB
video signal cable
To connect Universal Serial Bus (USB) compliant
(not supplied)
peripherals
Confirm that the monitor and computer are turned on, then
connect your computer to the USB connectors ( ) on the right side
of the monitor.
Refer to the preceding
Connect your computer to the square upstream
examples to connect to
connector
() using the supplied USB cable.
your computer.
If a Windows message appears, follow the on-screen instructions
and select “Generic USB Hub”.
to VIDEO IN R/G/B
to SYNC IN HD/VD
When connecting your USB compliant peripheral devices (e.g.,
printer, keyboard, mouse, scanner, etc.) connect the rectangular
Connecting to a Macintosh or compatible
downstream USB connector
().
computer
Note
When connecting this monitor to a Power Mac G3/G4 computer,
The monitor functions as a USB hub as long as the monitor is either “on” or
use the supplied adapter if necessary. Connect the supplied adapter
in power saving mode.
to the computer before connecting the cable. If you connect to
another version of Macintosh series computer, having 2 rows of
HD15 input connectors
pins, you will need a different adapter (not supplied).
5 4 3 2
1
678910
1112131415
2 Turning on the monitor and computer
Pin No. Signal
Pin No. Signal
1 Connect the power cord to the monitor and press the
1Red
9 DDC + 5V*
! (power) switch to turn on the monitor.
2 Green (Sync on
10 Ground
2 Turn on the computer.
Green)
11 ID (Ground)
No need for specific drivers
3Blue
12 Bi-Directional
This monitor complies with the “DDC” Plug & Play standard and
4 ID (Ground)
Data (SDA)*
automatically detects all the monitor’s information. No specific driver
5 DDC Ground*
13 H. Sync
needs to be installed to the computer.
6 Red Ground
14 V. Sync
The first time you turn on your PC after connecting the monitor, the setup
Wizard may appear on the screen. In this case, follow the on-screen
7 Green Ground
15 Data Clock
instructions. The Plug & Play monitor is automatically selected so that you
(SCL)*
8 Blue Ground
can use this monitor.
* DDC (Display Data Channel) is a standard of VESA.
Notes
• Plug and Play is compatible with the HD15 connector only, and not
compatible with the 5 BNC connectors.
• Do not touch the pins of the video signal cable connector.
• Check the alignment of the HD15 connector to prevent bending the pins
of the video signal cable connector.
3
Оглавление
- GDM-F520 GDM-F420
- Setup
- Adjustments
- Troubleshooting
- Specifications
- Precautions
- Configuration
- Réglages
- Dépannage
- Spécifications
- Précautions
- Anschließen des Monitors
- Einstellen des Monitors
- Störungsbehebung
- Technische Daten
- Sicherheitsmaßnahmen
- Configuración
- Ajustes
- Solución de problemas
- Especificaciones
- Precauciones
- Installazione
- Regolazioni
- Guida alla soluzione dei
- Caratteristiche tecniche
- Precauzioni
- Подготовка к работе
- Регулировка
- Устранение неисправностей
- Технические
- Меры предосторожности
- Installation
- Inställningar
- Felsökning
- Specifikationer
- Försiktighetsåtgärder
- Opstelling
- Regelingen
- Verhelpen van storingen
- Technische gegevens
- Voorzorgsmaatregelen
- Appendix
