Sony DCR-TRV16E – страница 12
Инструкция к Видеокамере Sony DCR-TRV16E

Viewing images recorded on a
Просмотр изображений, записанных
tape with your computer
на ленту, на Вашем компьютере
– For Windows users
– Для пользователей Windows
If image data cannot be transferred by the
Если данные изображения не могут быть
USB connection
переданы через соединение USB
Драйвер USB зарегистрирован неправильно,
The USB driver has been registered incorrectly as
поскольку Ваш персональный компьютер был
your computer was connected to your camcorder
подсоединен к Вашей видеокамере до
before installation of the USB driver was
завершения установки драйвера USB.
completed. Reinstall the USB driver following the
Переустановите драйвер USB согласно
procedure on page 214.
процедуре, описанной на стр. 214.
Если возникает какая-либо неисправность
If any trouble occurs
Закройте все работающие приложения, а
Close all running applications, then restart your
затем перезагрузите Ваш компьютер.
computer.
Выполните следующие действия после
завершения работы приложения:
Carry out the following operations after
– Отсоедините кабель USB.
quitting the application:
– Установите переключатель POWER в
–Disconnect the USB cable.
другое положение или положение OFF
–Set the POWER switch to the other position or
(CHG) на Вашей видеокамере.
OFF (CHG) on your camcorder.
Просмотр системы встроенной
Seeing the on-line help (operating
помощи (инструкции по эксплуатации)
Viewing images using your computer Просмотр изображений с помощью Вашего компьютера
instructions) of “PIXELA
программного обеспечения “PIXELA
ImageMixer Ver.1.0 for Sony”
ImageMixer Ver.1.0 for Sony”
A “PIXELA ImageMixer Ver.1.0 for Sony” on-line
Программное обеспечение “PIXELA
ImageMixer Ver.1.0 for Sony” снабжено
help site is available where you can find the
системой встроенной помощи, в которой Вы
detailed operating method of “PIXELA
можете найти детальную информацию по
ImageMixer Ver.1.0 for Sony”.
эксплуатации программного обеспечения
“PIXELA ImageMixer Ver.1.0 for Sony”.
(1)Click button located in the upper-right
(1)Щелкните на кнопке , расположенной в
corner of the screen.
правом верхнем углу экрана.
The ImageMixer’s Manual screen appears.
Появится экран руководства по программе
(2)You can find the information you need from
ImageMixer.
the list of contents.
(2)Вы можете найти информацию, которая
Вам нужна, в перечне содержания.
To close on-line help
Для закрытия системы встроенной помощи
Click the button at the top right of the screen.
Щелкните на кнопке в правом верхнем
углу экрана.
If you have any questions about “PIXELA
Если у Вас имеются вопросы по
ImageMixer Ver.1.0 for Sony”
программному обеспечению “PIXELA
“ImageMixer Ver.1.0 for Sony” is a trademark of
ImageMixer Ver.1.0 for Sony”
PIXELA corporation. For more information, refer
“ImageMixer Ver.1.0 for Sony” является
to the instruction manual of the CD-ROM
торговой маркой корпорации PIXELA. Что
supplied with your camcorder.
касается более детальной информации,
обращайтесь к руководству по эксплуатации
CD-ROM, прилагаемого к Вашей
Notes on using your computer
видеокамере.
Communications with your computer
Примечания об использовании
Communications between your camcorder and
Вашего персонального компьютера
your computer may not recover after recovering
from Suspend, Resume, or Sleep.
Связь с Вашим персональным
компьютером
Связь между Вашей видеокамерой и Вашим
персональным компьютером может не
восстановиться после выхода компьютера из
режимов Паузы, Возобновления или Спящего
режима.
221
Viewing images recorded on a
Просмотр изображений, записанных на
“Memory Stick” with your
“Memory Stick”, с помощью Вашего
computer – For Windows users
компьютера – Для пользователей Windows
– Except DCR-TRV16E/TRV116E
– Корме моделей DCR-TRV16E/
TRV116E
Viewing images
Просмотр изображений
Before operation
Перед началом операции
•You need to install the USB driver to view
• Чтобы просматривать изображения
“Memory Stick” images with your computer
“Memory Stick” с помощью Вашего
компьютера, Вам нужно установить драйвер
(p. 210).
USB (стр. 210).
An application such as Windows Media Player
Для воспроизведения движущихся
must be installed to play back moving pictures
изображений в среде Windows должно быть
in Windows environment.
установлено приложение, такое, как,
•Set USBCONNECT in to NORMAL in the
например, Windows Media Player.
menu settings. (The default setting is
• Установите опцию USBCONNECT в в
NORMAL.)
положение NORMAL в установках меню.
(Установке по умолчанию соответствует
NORMAL).
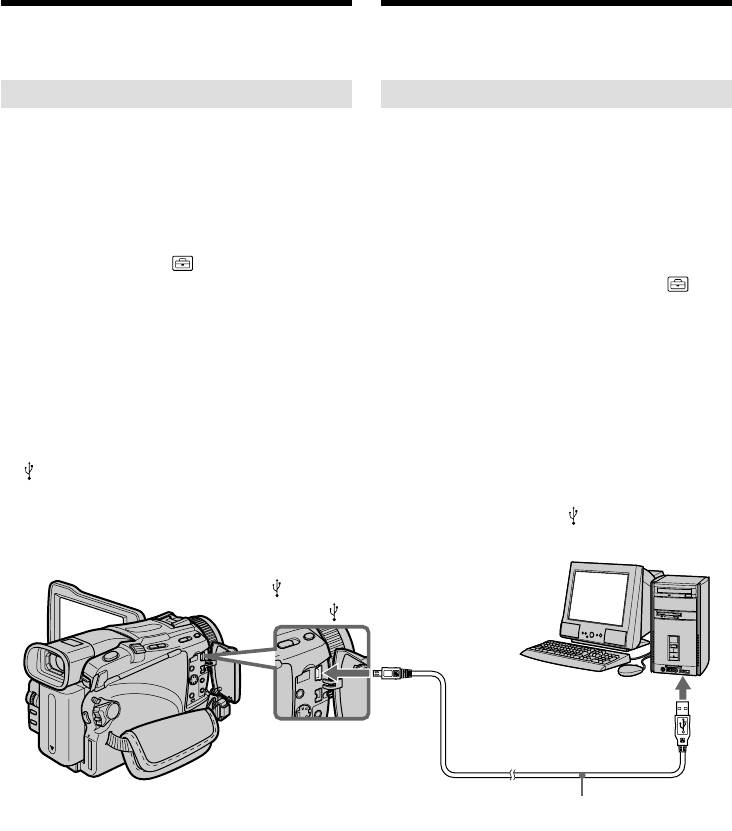
(1)Turn on your computer and allow Windows
to load.
(1)Включите Ваш персональный компьютер и
(2)Insert a “Memory Stick” into your camcorder,
дождитесь загрузки Windows.
and connect the AC power adaptor to your
(2)Установите “Memory Stick” в Вашу
camcorder.
видеокамеру, и подсоедините сетевой
(3)Set the POWER switch to MEMORY.
адаптер переменного тока к Вашей
видеокамере, а затем к сетевой розетке.
(4)Connect the USB jack on your computer to the
(3)Установите переключатель POWER в
(USB) jack on your camcorder using the
положение MEMORY.
supplied USB cable.
(4)Подсоедините гнездо USB на Вашем
компьютере к гнезду (USB) на Вашей
видеокамере с помощью прилагаемого
кабеля USB.
(USB) jack/
Гнездо (USB)
USB jack/
Гнездо USB
Push into the end/
Вставьте до упора
USB cable (supplied)/
Кабель USB (прилагается)
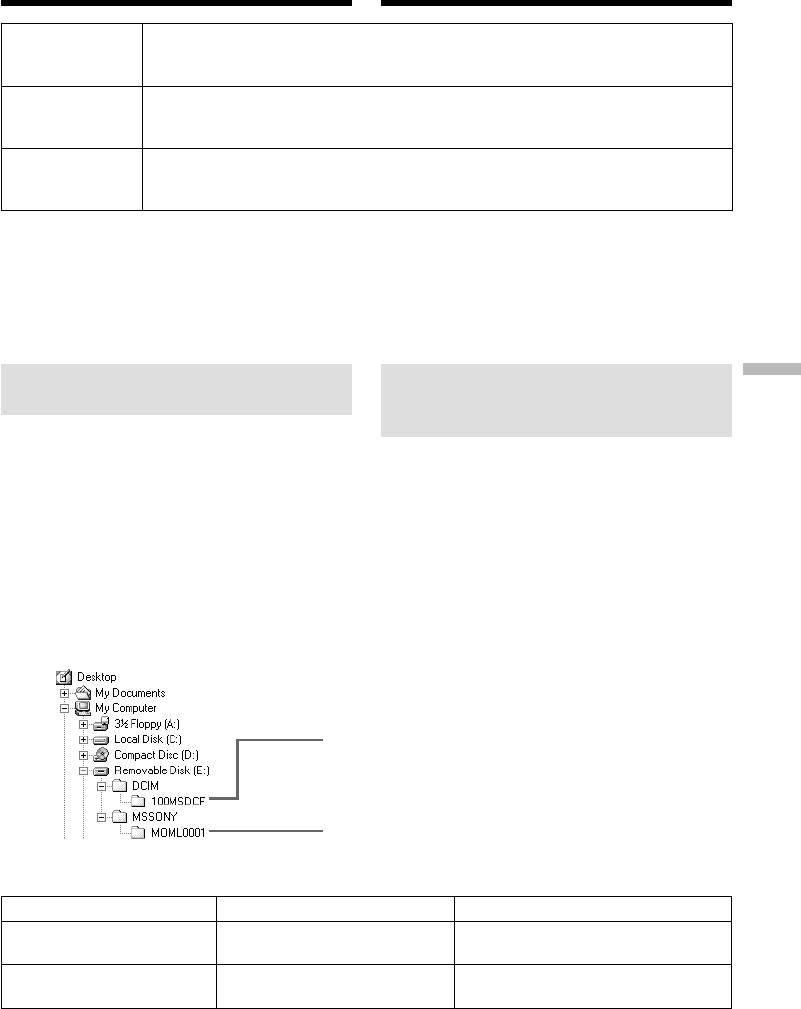
(5)Open “My Computer” on Windows and
(5)Откройте в среде Windows папку “Мой
double-click the newly recognised drive
компьютер” и дважды щелкните по вновь
(Example: “Removable Disk (E:)”).
распознанному накопителю (Пример:
The folders inside the “Memory Stick” are
“Съемный диск (Е:)”).
displayed.
Отобразятся папки, содержащиеся на
“Memory Stick”.
(6)Select and double-click the desired image file
(6)Выберите и дважды щелкните по файлу
from the folder.
нужного изображения из папки.
For the detailed folder and file name, see
Для подробного описания названий папок
“Image file storage destinations and image
и файлов обращайтесь к разделу “Места
files” (p. 223).
хранения файлов изображений и файлы
222
изображений” (стр. 223).
Viewing images recorded on a
Просмотр изображений, записанных на
“Memory Stick” with your
“Memory Stick”, с помощью Вашего
computer – For Windows users
компьютера – Для пользователей Windows
Desired file type/
Double-click in this order/
Нужный тип
Двойной щелчок в таком порядке
файла
Still image/
“Dcim” folder/
“100msdcf” folder/
Image file/
Неподвижное
t
t
Папка “Dcim” Папка “100msdcf” Файл изображения
изображение
Moving picture*/
“Mssony” folder/
“Moml0001” folder/
Image file*/
Движущееся
t
t
Папка “Mssony” Папка “Moml0001” Файл изображения*
изображение*
* Copying a file to the hard disk of your
* Рекомендуется перед просмотром
computer before viewing it is recommended. If
скопировать файл на жесткий диск Вашего
you play back the file directly from the
персонального компьютера. Если Вы будете
“Memory Stick,” the image and sound may
воспроизводить файл прямо с “Memory
break off.
Stick”, изображение и звук могут внезапно
обрываться.
Image file storage destinations
Места хранения файлов
Viewing images using your computer Просмотр изображений с помощью Вашего компьютера
and image files
изображений и файлы
изображений
Image files recorded with your camcorder are
grouped in folders by recording mode.
Файлы изображений, записанные с помощью
The meanings of the file names are as follows.
Вашей видеокамеры, сгруппированы в папки
ssss stands for any number within the range
по режиму записи.
from 0001 to 9999.
Значения имен файлов таковы.
ssss обозначает любое число в диапазоне
от 0001 до 9999.
For Windows Me users
Для пользователей Windows Me
(The drive recognising your
(Устройство, представляющее
camcorder is [E:].)
видеокамеру – [E:].)
Folder containing still image data/
Папка, содержащая данные неподвижных
изображений
Folder containing moving picture data/
Папка, содержащая данные движущихся
изображений
Folder/Папка File/Файл Meaning/Значение
Still image file/
100MSDCF DSC0ssss.JPG
Файл неподвижного изображения
Moving picture file/
MOML0001 MOV0ssss.MPG
Файл движущегося изображения
223

Viewing images recorded on a
Просмотр изображений, записанных на
“Memory Stick” with your
“Memory Stick”, с помощью Вашего
computer – For Windows users
компьютера – Для пользователей Windows
Disconnect the USB cable and
Отсоедините кабель USB и
remove the “Memory Stick” or set
извлеките “Memory Stick”, или
the POWER switch to OFF(CHG)
установите переключатель
POWER в положение OFF(CHG)
For Windows 2000 Professional/Me, Windows
XP Home Edition/Professional users
Для пользователей Windows 2000
To unplug the USB cable, eject the “Memory
Professional/Me, Windows XP Home Edition/
Stick” or set the POWER switch to OFF (CHG)
Professional
follow the procedure below.
Для отсоединения кабеля USB, извлеките
“Memory Stick” или установите
(1)Move the cursor to the “Unplug or Eject
переключатель POWER в положение OFF
Hardware” icon on the Task Tray and click to
(CHG), следуюя приведенной ниже
cancel the applicable drive.
процедуре.
(2)After the “Safe to remove” message appears,
disconnect the USB cable and eject the
(1)Переместите курсор на пиктограмму
“Memory Stick” or set the POWER switch to
“Отключить или извлечь оборудование” в
OFF(CHG).
панели задач, и щелкните для отмены
соответствующего устройства.
(2)После появления сообщения “Теперь Вы
можете удалить устройство” отсоедините
кабель USB и извлеките “Memory Stick”,
или установите переключатель POWER в
положение OFF (CHG).
224

Connecting your camcorder to
Подсоединение Вашей видеокамеры к
your computer using the USB
Вашему компьютеру с помощью кабеля
cable – For Macintosh users
USB – Для пользователей Macintosh
– Except DCR-TRV16E/TRV116E
–
Кроме моделей DCR-TRV16E/TRV116E
When connecting to a computer
При подсоединении к компьютеру с
using the USB cable
помощью кабеля USB
You must install a USB driver onto your
Чтобы подсоединить видеокамеру к гнезду
computer in order to connect the camcorder to
USB компьютера, Вы должны установить на
the computer’s USB jack. The USB driver can be
Ваш компьютер драйвер USB. Драйвер USB
вместе с программным обеспечением,
found on the CD-ROM supplied, along with the
требуемым для просмотра изображений,
application software required for viewing
содержится на прилагаемом CD-ROM.
images.
Recommended Macintosh
Рекомендованная операционная
environment
среда Macintosh
OS:
ОС:
Mac OS 8.5.1/8.6/9.0/9.1/9.2 or Mac OS X
Требуется Mac OS 8.5.1/8.6/9.0/9.1/9.2 или
(v10.0/v10.1)
Mac OS X (v10.0/v10.1)
Standard installation is required.
Требуется стандартная инсталляция.
Viewing images using your computer Просмотр изображений с помощью Вашего компьютера
Однако, обратите внимание на то, что
However, note that the upgrade to Mac OS 9.0/
следует использовать обновление до Mac OS
9.1 should be used for the following models:
9.0/9.1 для следующих моделей:
–iMac with the Mac OS 8.6 standard installation
– iMac со стандартно установленной Mac OS
and a slot loading type CD-ROM drive
8.6 и накопителем CD-ROM c щелевой
–iBook or Power Mac G4 with the Mac OS 8.6
загрузкой
standard installation
– iBook или Power Mac G4 со стандартно
установленной Mac OS 8.6
The USB jack must be provided as standard.
Гнездо USB должно входить в стандартную
QuickTime 3.0 or newer must be installed to play
комплектацию.
back moving pictures.
Должен быть установлен QuickTime 3.0 или
новее (для воспроизведения движущихся
Notes
изображений).
•Operations are not guaranteed for the
Macintosh environment if you connect two or
Примечания
more USB equipment to a single computer at
• Выполнение операций для операционной
the same time, or when using a hub.
среды Macintosh не гарантируется, если Вы
•Some equipment may not operate depending
подсоедините двое или более устройств
USB одновременно к одному персональному
on the type of USB equipment that is used
компьютеру, или при использовании
simultaneously.
концентратора.
•Operations are not guaranteed for all the
• В зависимости от типа оборудования USB,
recommended computer environments
используемого одновременно, некоторые из
mentioned above.
устройств могут не работать.
•Macintosh and Mac OS, QuickTime are
• Выполнение операций не гарантируется для
trademarks of Apple Computer Inc.
всех рекомендованных компьютерных сред,
•All other product names mentioned herein may
упомянутых выше.
be the trademarks or registered trademarks of
• Macintosh и Mac OS, QuickTime являются
their respective companies. Furthermore, “TM”
торговыми марками корпорации Apple
and “®” are not mentioned in each case in this
Computer Inc.
manual.
• Все другие названия изделий, упоминаемые
здесь, могут являться торговыми марками
или зарегистрированными торговыми
марками их соответствующих компаний. В
дальнейшем, знаки “TM” и “” не
упоминаются в каждом случае в данном
руководстве.
225
Connecting your camcorder to
Подсоединение Вашей видеокамеры к
your computer using the USB
Вашему компьютеру с помощью кабеля
cable – For Macintosh users
USB – Для пользователей Macintosh
Installing the USB driver
Установка драйвера USB
Do not connect the USB cable to your
Не подсоединяйте кабель USB к
computer before installation of the USB
Вашему компьютеру до завершения
driver is completed.
установки драйвера USB.
For Mac OS 9.1/9.2/Mac OS X (v10.0/v10.1)
Для Mac OS 9.1/9.2/Mac OS X (v10.0/v10.1)
The USB driver does not have to be installed.
Драйвер USB не следует инсталлировать.
Your camcorder is automatically recognised as a
Ваш компьютер Мас автоматически
drive just by connecting it to your Mac using the
распознается как драйвер непосредственно
USB cable.
при подсоединении Вашего компьютера Мас
с помощью кабеля USB.
For Mac OS 8.5.1/8.6/9.0 users
(1)Turn on your computer and allow the Mac OS
Для пользователей Mac OS 8.5.1/8.6/9.0
to load.
(1)Включите Ваш персональный компьютер и
(2)Insert the supplied CD-ROM in the CD-ROM
дождитесь загрузки Mac OS.
drive of your computer.
(2)Установите прилагаемый CD-ROM в
The application software screen appears.
накопитель CD-ROM Вашего компьютера.
Появится экран прикладного
программного обеспечения.
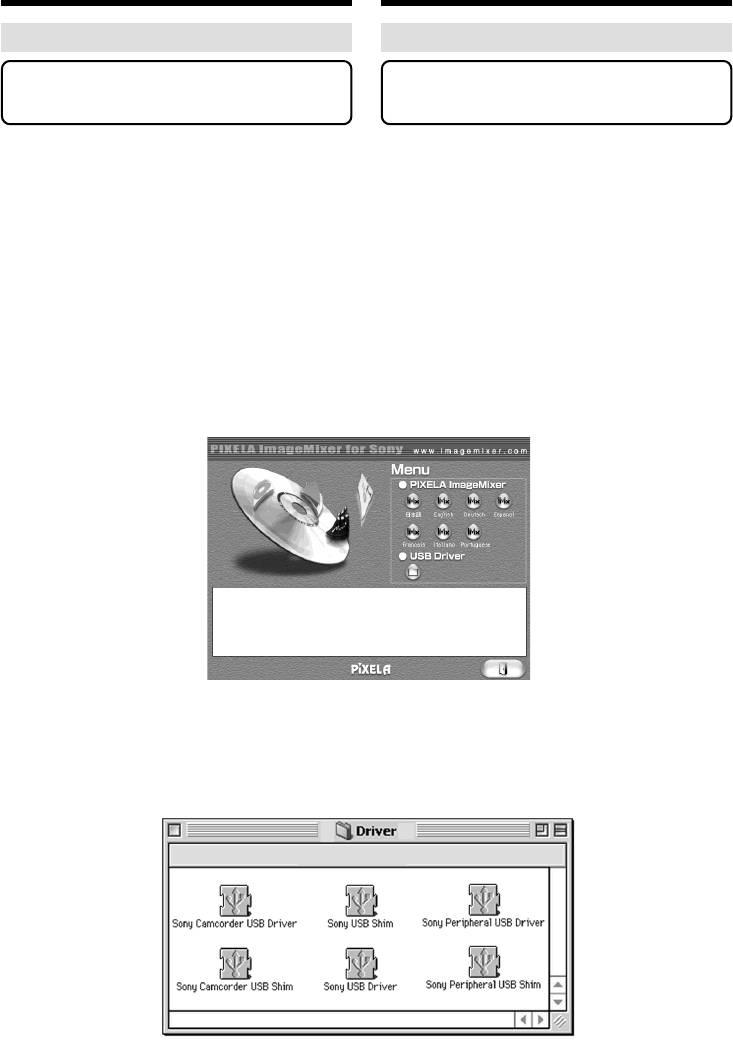
(3)Click the “USB Driver” to open the folder
(3)Щелкните по кнопке “USB Driver” для того,
containing the six files related to “Driver.”
чтобы открыть папку, содержащую шесть
файлов, относящихся к программе
“Driver”.
226

Connecting your camcorder to
Подсоединение Вашей видеокамеры к
your computer using the USB
Вашему компьютеру с помощью кабеля
cable – For Macintosh users
USB – Для пользователей Macintosh
(4)Select the following two files, and drag and
(4)Выберите следчющие два файла и
drop them into the System Folder.
перетащите и опустите их в системную
•Sony Camcorder USB Driver
папку.
•Sony Camcorder USB Shim
• Sony Camcorder USB Driver
(5)When the message appears, click “OK.”
• Sony Camcorder USB Shim
The USB driver is installed on your computer.
(5)Когда появится сообщение, щелкните по
(6)Remove the CD-ROM from the computer.
кнопке “OK”.
(7)Restart your computer.
Драйвер USB будет установлен на Ваш
компьютер.
(6)Удалите с компьютера CD-ROM.
(7)Перезапустите Ваш персональный
компьютер.
Viewing images using your computer Просмотр изображений с помощью Вашего компьютера
227

Viewing images recorded on a
Просмотр изображений, записанных
“Memory Stick” on your
на “Memory Stick”, на Вашем компью-
computer – For Macintosh users
тере – Для пользователей Macintosh
– Except DCR-TRV16E/TRV116E
– Кроме моделей DCR-TRV16E/
TRV116E
Viewing images
Просмотр изображений
Before operation
Перед выполнением операции
You need to install the USB driver to view a
Чтобы просматривать изображения “Memory
“Memory Stick” images on your computer.
Stick” на экране Вашего компьютера, Вам
(p. 226)
нужно установить драйвер USB (стр. 226).
QuickTime 3.0 or newer must be installed to play
Для воспроизведения движущихся
back moving pictures.
изображений должна быть установлена
программа QuickTime 3.0 или ее более новая
(1)Turn on your computer and allow Mac OS to
версия.
load.
(2)Insert a “Memory Stick” into your camcorder,
(1)Включите Ваш персональный компьютер и
and connect the AC power adaptor to your
дождитесь загрузки Mac OS.
camcorder.
(2)Установите “Memory Stick” в Вашу
(3)Set the POWER switch to MEMORY.
видеокамеру, и подсоедините сетевой
(4)Connect the (USB) jack on your camcorder
адаптер переменного тока к Вашей
with the USB jack on your computer using the
видеокамере.
supplied USB cable.
(3)Установите переключатель POWER в
“USB MODE” appears on the screen of your
положение MEMORY.
camcorder.
(4)Подсоедините гнездо (USB) на Вашей
(5)Double-click the “Memory Stick” icon on the
видеокамере к гнезду USB на Вашем
desktop.
компьютере, используя прилагаемый
The folders inside the “Memory Stick” are
кабель USB. На экране Вашей
displayed.
видеокамеры появится индикация “USB
(6)Select and double-click the desired image file
MODE”.
from the folder.
(5)Дважды щелкните по пиктограмме
“Memory Stick” на рабочем столе.
Отобразятся папки внутри “Memory Stick”.
(6)Выберите и дважды щелкните по файлу
нужного изображения из папки.
Desired file type/
Double-click in this order/
Нужный тип
Двойной щелчок в таком порядке
файла
Still image/
“Dcim” folder/
“100msdcf” folder/
Image file/
Неподвижное
t
t
Папка “Dcim” Папка “100msdcf” Файл изображения
изображение
Moving picture*/
“Mssony” folder/
“Moml0001” folder/
Image file*/
Движущееся
t
t
Папка “Mssony” Папка “Moml0001” Файл изображения*
изображение*
* Copying a file to the hard disk of your
* Рекомендуется перед просмотром
computer before viewing it is recommended. If
скопировать файл на жесткий диск Вашего
you play back the file directly from the
персонального компьютера. Если Вы будете
“Memory Stick,” the image and sound may
воспроизводить файл прямо с “Memory
break off.
Stick”, изображение и звук могут внезапно
обрываться.
228

Viewing images recorded on a
Просмотр изображений, записанных на
“Memory Stick” on your
“Memory Stick”, на Вашем компьютере
computer – For Macintosh users
– Для пользователей Macintosh
Disconnect the USB cable and
Отсоедините кабель USB и
remove the “Memory Stick” or set
извлеките “Memory Stick”, или
the POWER switch to OFF(CHG)
установите переключатель
POWER в положение OFF (CHG)
Follow the procedure below.
Следуйте описанной ниже процедуре.
(1)Close all running applications.
Make sure that the access lamp of your
(1)Закройте все открытые приложения.
camcorder is not lit.
Убедитесь, что лампочка доступа Вашей
(2)Drag the “Memory Stick” icon into the
видеокамеры не высвечивается.
“Trash”. Alternatively, select the “Memory
(2)Перетащите пиктограмму “Memory Stick” и
Stick” icon by clicking on it, and then select
отпустите ее над “Корзиной”. Или
“Eject disk” from the “Special” menu at the
выделите пиктограмму “Memory Stick”
top left of the screen.
одинарным щелчком по ней, а затем
(3)Unplug the USB cable or eject the “Memory
выберите команду “Извлечь Диск” в меню
Stick.” Set the POWER switch of your
“Специальное” в левом верхнем углу
camcorder to OFF (CHG).
экрана.
(3)Отсоедините кабель USB или извлеките
Viewing images using your computer Просмотр изображений с помощью Вашего компьютера
For Mac OS X (v10.0) users
“Memory Stick”. Установите
Shut down your computer, then unplug the USB
переключатель POWER Вашей
cable, eject the “Memory Stick” or set the
видеокамеры в положение OFF (CHG).
POWER switch to OFF (CHG).
Для пользователей Mac OS X (v10.0)
Отключите Ваш компьютер, а затем
отсоедините кабель USB, извлеките “Memory
Stick” или установите переключатель POWER
в положение OFF (CHG).
229
Capturing images from an analog
Ввод изображений с аналогового видео-
video unit on your computer
аппарата в Ваш персональный компьютер
– Signal convert function
– Функция преобразования сигнала
– DCR-TRV25E/TRV27E/TRV116E/
– Только модели DCR-TRV25E/
TRV118E only
TRV27E/TRV116E/TRV118E
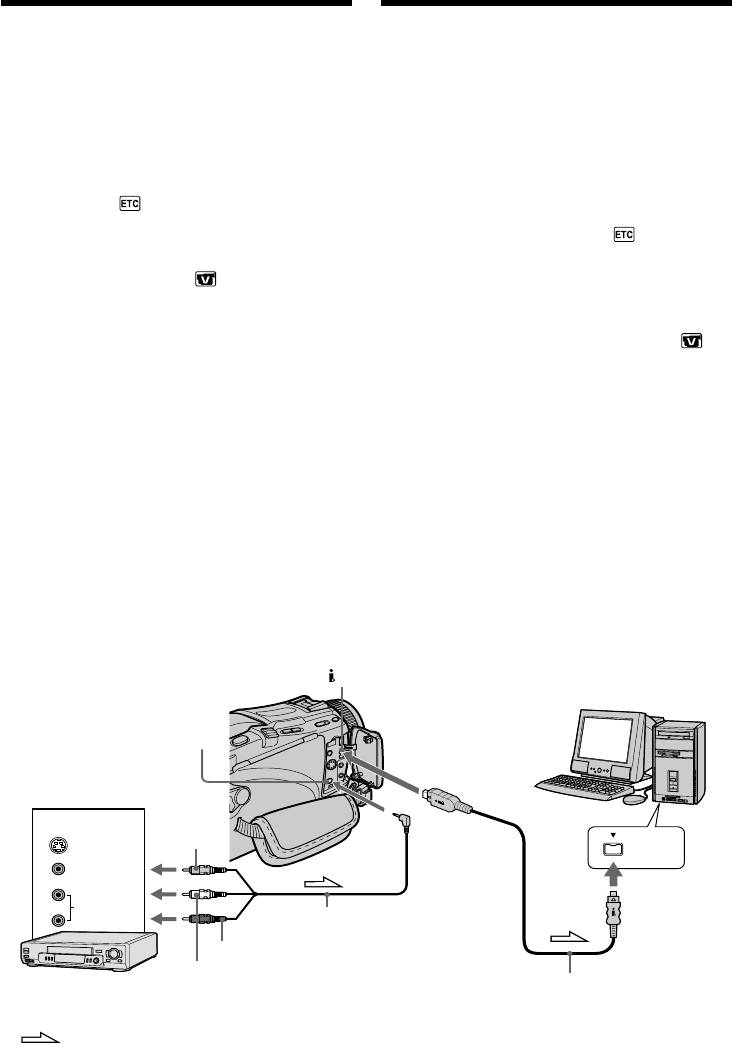
You can capture images and sound from an
Вы можете вводить изображения и звук с
analog video unit connected to your computer
аналогового видеоаппарата,
which has the i.LINK (DV) jack connected to
подсоединенного через Вашу видеокамеру в
your camcorder.
Ваш персональный компьютер с гнездом
i.LINK (цифрового видеосигнала DV),
Before operation
подсоединенный к Вашей видеокамере.
Set DISPLAY in to LCD in the menu settings.
Перед выполнением операции
(The default setting is LCD.)
Установите опцию DISPLAY в в
установках меню в положение LCD. (По
(1)Set the POWER switch to VCR.
умолчанию выбрано положение LCD.)
(2)Set A/V t DV OUT in to ON in the
menu settings (p. 236).
(1)Установите переключатель POWER в
(3)Start playback on the analog video unit.
положение VCR.
(4)Start procedures for capturing images and
(2)Установите опцию A/V t DV OUT в в
sound on your computer. The operation
установках меню в положение ON
procedures depend on your computer and the
(стр. 245).
software you are using.
(3)Начните воспроизведение на аналоговом
For details on how to capture images, refer to
видеоаппарате.
the instruction manuals of your computer and
(4)Начните процедуры ввода изображений и
software you are using.
звука в Ваш персональный компьютер.
Процедуры ввода зависят от Вашего
персонального компьютера и
используемого Вами программного
обеспечения.
Для получения более подробных сведений
о записи изображений обращайтесь к
руководствам по эксплуатации Вашего
персонального компьютера и
используемого Вами программного
обеспечения.
DV IN/OUT
AUDIO/VIDEO
OUT
Yellow/
Желтый
S VIDEO
i.LINK
VIDEO
AUDIO
A/V connecting cable (supplied)/
Соединительный кабель аудио/
Red/
видео (прилагается)
White/
Красный
i.LINK cable (DV connecting cable) (optional)/
VCR/
Белый
Кабель i.LINK (соединительный кабель
КВМ
цифрового видеосигнала DV) (приобретается
230
отдельно): Signal flow/Передача сигнала

Capturing images from an analog
Ввод изображений с аналогового видео-
video unit on your computer
аппарата в Ваш персональный компьютер
– Signal convert function
– Функция преобразования сигнала
After capturing images and sound
После ввода изображений и звука
Stop capturing procedures on your computer,
Остановите процедуры ввода на Вашем
and stop the playback on the analog video unit.
персональном компьютере, и остановите
воспроизведение на аналоговом
видеоаппарате.
Notes
•You need to install software that supports the
exchange video signals.
Примечания
•Depending on the state of the analog video
• Вам необходимо установить программное
signals, the computer may not be able to output
обеспечение, которое может обмениваться
the images correctly when you convert analog
видеосигналами.
video signals into digital video signals via your
• В зависимости от состояния аналоговых
camcorder. Depending on the analog video
видеосигналов, персональный компьютер
unit, the image may contain noise or incorrect
может быть не в состоянии воспроизводить
colours.
правильно изображения на выходе, когда
•You can capture images and sound with an S
Вы преобразовываете аналоговые
video cable (optional) instead of the
видеосигналы в цифровые видеосигналы с
A/V connecting cable (supplied).
помощью Вашей видеокамеры. В
зависимости от аналогового видеоаппарата,
If your computer has a USB jack
изображение может быть зашумленным или
Viewing images using your computer Просмотр изображений с помощью Вашего компьютера
You can connect using a USB cable, but images
с неправильными цветами.
may not be transferred smoothly.
• Вы можете вводить изображения и звук с
помощью кабеля S видео (приобретается
отдельно) вместо соединительного кабеля
аудио/видео (прилагается).
Если в Вашем компьютере имеется гнездо
USB
Вы можете выполнить подсоединение,
используя кабель USB, однако изображения
могут передаваться с помехами.
231

— Customising Your Camcorder —
— Выполнение индивидуальных
установок на Вашей видеокамере —
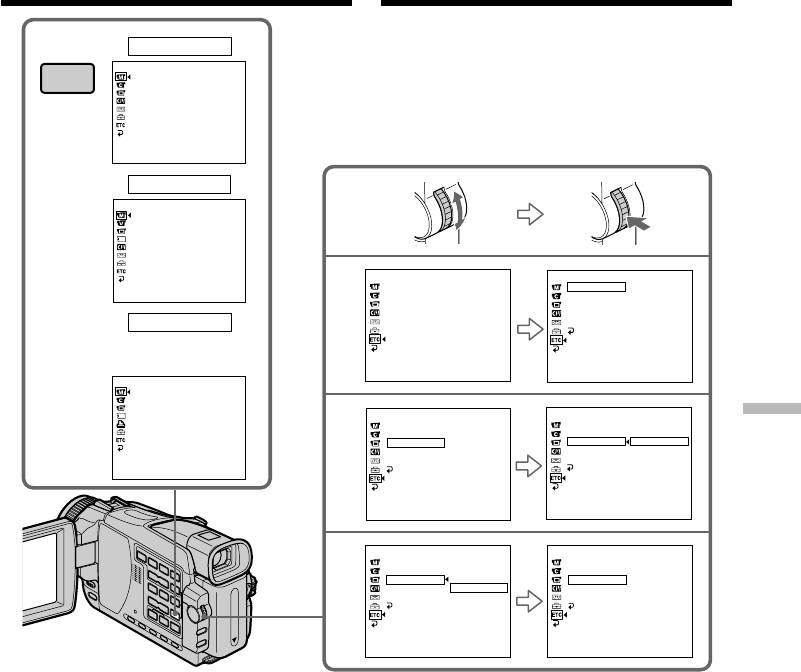
Changing the menu
settings
Изменение установок меню
To change the mode settings in the menu
Для изменения установок режима в
settings, select the menu items with the SEL/
установках меню выберите опции меню с
PUSH EXEC dial. The default settings can
помощью диска SEL/PUSH EXEC. Установки
partially be changed. First, select the icon, then
по умолчанию могут быть частично изменены.
the menu item and then the mode.
Сначала выберите пиктограмму, затем опцию
меню, а затем режим.
(1)Set the POWER switch to CAMERA,
1)
2)
PLAYER*
/VCR*
or MEMORY (except
(1)Установите переключатель POWER в
1)
2)
DCR-TRV16E/TRV116E) press MENU.
положение CAMERA, PLAYER*
/VCR*
или
(2)Turn the SEL/PUSH EXEC dial to select the
MEMORY (кроме моделей DCR-TRV16E/
desired icon, then press the dial to set.
TRV116E), и нажмите кнопку MENU.
(3)Turn the SEL/PUSH EXEC dial to select the
(2)Поверните диск SEL/PUSH EXEC для
desired item, then press the dial to set.
выбора нужной пиктограммы, а затем
(4)Turn the SEL/PUSH EXEC dial to select the
нажмите диск для выполнения установки.
desired mode, then press the dial to set.
(3)Поверните диск SEL/PUSH EXEC для
(5)If you want to change other items, select
выбора нужной опции, а затем нажмите
RETURN and press the dial, then repeat
диск для выполнения установки.
steps 2 to 4.
(4)Поверните диск SEL/PUSH EXEC для
выбора нужного режима, а затем нажмите
1)
*
DCR-TRV16E/TRV18E/TRV24E only
диск для выполнения установки.
2)
*
DCR-TRV25E/TRV27E/TRV116E/TRV118E
(5)Если Вы хотите изменить другие опции,
only
выберите команду RETURN и нажмите
диск, а затем повторите действия пунктов
For details, see “Selecting the mode setting of
с 2 по 4.
each item” (p. 234).
1)
*
Только модели DCR-TRV16E/TRV18E/
TRV24E
2)
*
Только модели DCR-TRV25E/TRV27E/
TRV116E/TRV118E
Подробные сведения приведены в разделе
“Выбор установки режима по каждой опции”
(стр. 243).
232
Changing the menu settings Изменение установок меню
1
CAMERA
MANUAL SET
MENU
PROGRAM AE
P EFFECT
D EFFECT
FLASH MODE
FLASH LVL
WHT BAL
N. S. LIGHT
AUTO SHTR
[
MENU
]
:
END
PLAYER/VCR
MANUAL SET
P EFFECT
D EFFECT
OTHERS
OTHERS
[
MENU
]
:
END
2
WORLD TIME
WORLD TIME
0 HR
BEEP
BEEP
COMMANDER
COMMANDER
DISPLAY
DISPLAY
MEMORY
REC LAMP
REC LAMP
RETURN
(Except DCR-TRV16E/TRV116E/
Кроме моделей DCR-TRV16E/
TRV116E)
MANUAL SET
PROGRAM AE
FLASH MODE
FLASH LVL
WHT BAL
OTHERS
OTHERS
N. S. LIGHT
3
WORLD TIME
WORLD TIME
Customising Your Camcorder Выполнение индивидуальных установок на Вашей видеокамере
BEEP
BEEP
COMMANDER
ON
COMMANDER
ON
DISPLAY
DISPLAY
OFF
REC LAMP
[
MENU
]
:
END
REC LAMP
RETURN
RETURN
[MENU] : END
OTHERS
OTHERS
4
WORLD TIME
WORLD TIME
BEEP
BEEP
COMMANDER
ON
COMMANDER
OFF
DISPLAY
OFF
DISPLAY
REC LAMP
REC LAMP
RETURN
RETURN
To make the menu display disappear
Для того, чтобы исчезла индикация
Press MENU.
меню
Нажмите кнопку MENU.
233
Changing the menu settings Изменение установок меню
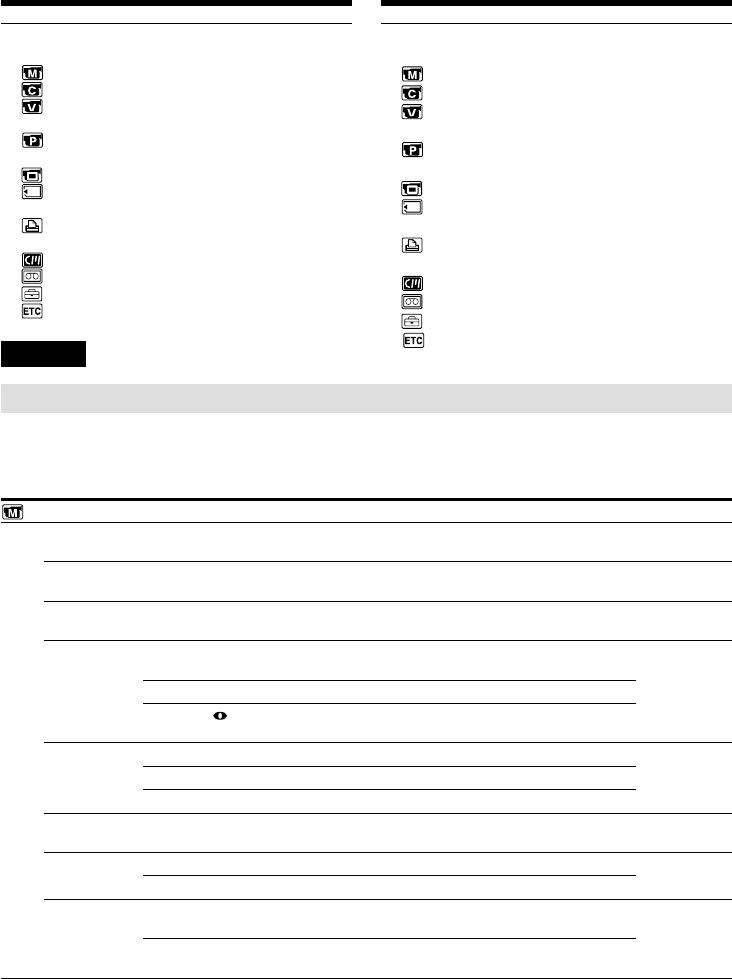
Menu items are displayed as the following
Опции меню отображаются в виде
icons:
приведенных ниже пиктограмм:
MANUAL SET
MANUAL SET
CAMERA SET
CAMERA SET
VCR SET (DCR-TRV25E/TRV27E/
VCR SET (только модели DCR-TRV25E/
TRV116E/TRV118E only)
TRV27E/TRV116E/TRV118E)
PLAYER SET (DCR-TRV16E/TRV18E/
PLAYER SET (только модели DCR-
TRV24E only)
TRV16E/TRV18E/TRV24E)
LCD/VF SET
MEMORY SET
LCD/VF SET
(except DCR-TRV16E/TRV116E)
MEMORY SET (кроме моделей DCR-
PRINT SET
TRV16E/TRV116E)
(except DCR-TRV16E/TRV116E)
PRINT SET (кроме моделей DCR-
CM SET
TRV16E/TRV116E)
TAPE SET
CM SET
SETUP MENU
TAPE SET
OTHERS
SETUP MENU
OTHERS
English
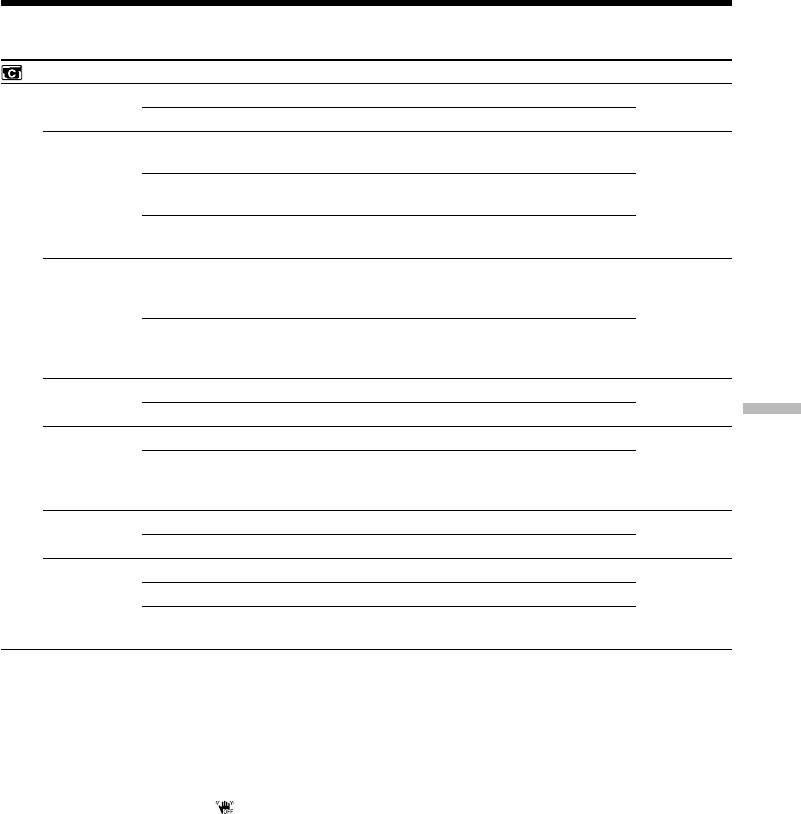
Selecting the mode setting of each item z is the default setting.
Menu items differ depending on the position of the POWER switch. The screen shows only the items
you can operate at the moment.
POWER
Icon/item
Mode
Meaning
switch
MANUAL SET
PROGRAM AE
—
To suit your specific shooting requirement
CAMERA
(p. 75)
MEMORY
P EFFECT
—
To add special effects like those in films or on the TV
PLAYER/VCR
to images (p. 70, 86)
CAMERA
D EFFECT
—
To add special effects using the various digital
PLAYER/VCR
functions (p. 72, 87)
CAMERA
FLASH MODE
z ON
To fire the flash (optional) regardless of the
CAMERA
brightness of the surrondings
MEMORY
AUTO
To fire the flash automatically
AUTO
To fire the flash before recording to reduce the red-
eye phenomenon
FLASH LVL
HIGH
To make the flash level higher than normal
CAMERA
MEMORY
z NORMAL
Normal setting
LOW
To make the flash level lower than normal
WHT BAL
—
To adjust the white balance (p. 64)
CAMERA
MEMORY
N.S.LIGHT
z ON
To use the NightShot Light function (p. 45)
CAMERA
MEMORY
OFF
To cancel the NightShot Light function
AUTO SHTR
z ON
To automatically activate the electronic shutter when
CAMERA
shooting in bright conditions
OFF
To not automatically activate the electronic shutter
even when shooting in bright conditions
Note on FLASH MODE and FLASH LVL
You cannot adjust FLASH MODE and FLASH LVL if the external flash (optional) is not set.
Note on FLASH LVL
234
You cannot adjust FLASH LVL if the external flash (optional) is not compatible with the flash level.
Changing the menu settings
POWER
Icon/item
Mode
Meaning
switch
CAMERA SET
SELFTIMER*
z OFF
To not use the self-timer function
CAMERA
MEMORY
ON
To use the self-timer function (p. 46, 60, 154, 169)
D ZOOM
z OFF
To deactivate the digital zoom. Up to 10× zoom is
CAMERA
performed.
20×
To activate the digital zoom. More than 10× to 20×
zoom is performed digitally. (p. 40)
120×
To activate the digital zoom. More than 10× to 120×
zoom is performed digitally.
PHOTO REC*
z MEMORY
To record still images on a “Memory Stick” when you
CAMERA
press PHOTO during recording of moving pictures
on a tape or the standby mode (p. 58)
TAPE
To record still images on a tape when you press
PHOTO during recording of moving pictures on a
tape or the standby mode (p. 62)
16:9WIDE
z OFF
—
CAMERA
ON
To record a 16:9 wide picture (p. 66)
Customising Your Camcorder Выполнение индивидуальных установок на Вашей видеокамере
STEADYSHOT
z ON
To compensate for camera-shake
CAMERA
OFF
To cancel the SteadyShot function. Natural pictures
are produced when shooting a stationary object with
a tripod
FRAME REC
z OFF
To deactivate frame recording
CAMERA
ON
To activate frame recording (p. 84)
INT. REC
ON
To activate interval recording (p. 81)
CAMERA
z OFF
To deactivate interval recording
SET
To set the waiting time and recording time for
interval recording
* Except DCR-TRV16E/TRV116E
Notes on the SteadyShot function
•The SteadyShot function will not correct excessive camera-shake.
•Attachment of a conversion lens (optional) may influence the SteadyShot function.
If you cancel the SteadyShot function
The SteadyShot off indicator “ ” appears. Your camcorder prevents excessive compensation for
camera-shake.
(continued on the following page)
235
Changing the menu settings
POWER
Icon/item
Mode
Meaning
switch
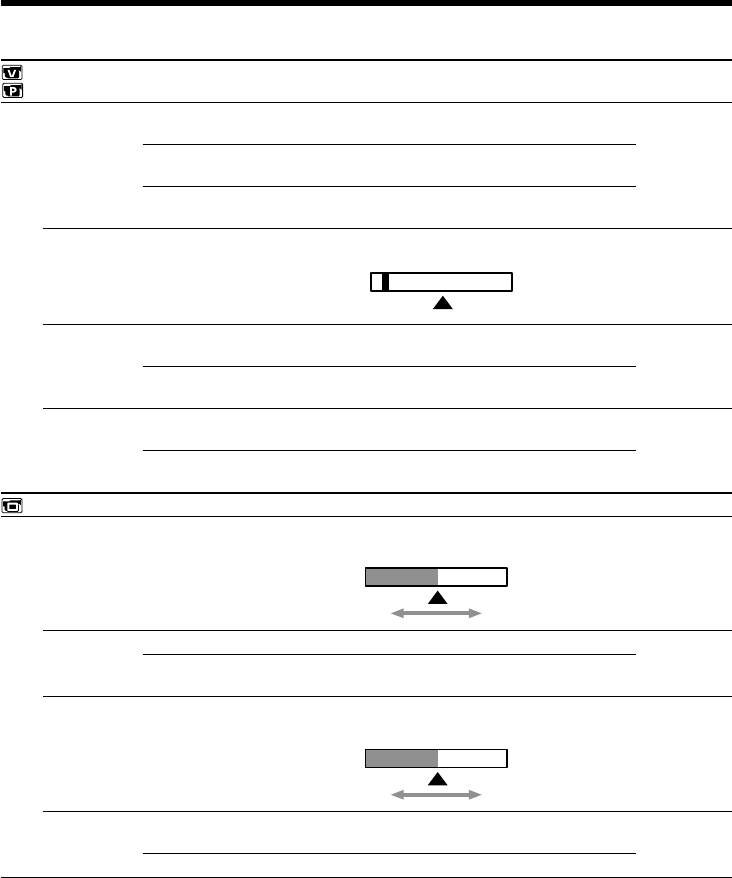
1)
VCR*
SET
2)
PLAYER*
SET
HiFi SOUND
z STEREO
To play back a stereo tape or dual sound track tape
PLAYER/VCR
with main and sub sound (p. 274)
1
To play back a stereo tape with the left sound or a
dual sound tape with main sound
2
To play back a stereo tape with the right sound or a
dual sound track tape with sub sound
AUDIO MIX
—
To adjust the balance between the stereo 1 and stereo
PLAYER/VCR
2 (p. 129)
ST 1 ST 2
A/V t
z OFF
To output digital images and sound in analog format
VCR
1)
DV OUT*
using your camcorder
ON
To output analog images and sound in digital format
using your camcorder (p. 230)
NTSC PB
z ON PAL TV
To play back a tape recorded in the NTSC colour
PLAYER/VCR
system on a PAL system TV
NTSC 4.43
To play back a tape recorded in the NTSC colour
system on a TV with the NTSC 4.43 mode
LCD/VF SET
LCD BRIGHT
—
To adjust the brightness on the LCD screen with the
PLAYER/VCR
SEL/PUSH EXEC dial
CAMERA
MEMORY
To darken To lighten
LCD B.L.
z BRT NORMAL
To set the brightness on the LCD screen to normal
PLAYER/VCR
CAMERA
BRIGHT
To brighten the LCD screen
MEMORY
LCD COLOUR
—
To adjust the colour on the LCD screen, turn and
PLAYER/VCR
press the SEL/PUSH EXEC dial
CAMERA
MEMORY
To get low-
To get high-
intensity
intensity
VF B.L.
z BRT NORMAL
To set the brightness on the viewfinder screen to
PLAYER/VCR
normal
CAMERA
MEMORY
BRIGHT
To brighten the viewfinder screen
1)
*
DCR-TRV25E/TRV27E/TRV116E/TRV118E only
2)
*
DCR-TRV16E/TRV18E/TRV24E only
Note on NTSC PB
When you play back a tape on a Multi System TV, select the best mode while viewing the picture on
the TV.
Notes on LCD B.L. and VF B.L.
•When you select BRIGHT, battery life is reduced by about 10 percent during recording.
•When you use power supplies other than the battery pack, BRIGHT is automatically selected.
Even if you adjust LCD BRIGHT, LCD B.L., LCD COLOUR, and/or VF B.L.
236
The recorded picture will not be affected.
Changing the menu settings
POWER
Icon/item
Mode
Meaning
switch
MEMORY SET (except DCR-TRV16E/TRV116E)
STILL SET
BURST
z OFF
To not record continuously
MEMORY
1)
NORMAL*
To record up to four (in 1152 × 864 size) or 13 (in 640
× 480 size) still images continuously (p. 152)
1)
EXP BRKTG*
To record three images consecutively with different
exposures
MULTI SCRN
To record nine images continuously, display the
images on a single page divided into nine boxes
1)
QUALITY
z SUPER FINE*
To record still images in the finest image quality
PLAYER/VCR
mode (p. 144)
MEMORY
2)
FINE*
To record still images in the fine image quality mode
STANDARD
To record still images in the standard image quality
mode
1)
IMAGESIZE*
z 1152 × 864
To record still images in 1152 × 864 size (p. 146)
MEMORY
640 × 480
To record still images in 640 × 480 size
Customising Your Camcorder Выполнение индивидуальных установок на Вашей видеокамере
MOVIE SET
IMAGESIZE
z 320 × 240
To record moving pictures in 320 × 240 size
PLAYER/VCR
(p. 146)
MEMORY
160 × 112
To record moving pictures in 160 × 112 size
REMAIN
z AUTO
To display the remaining capacity of the “Memory
PLAYER/VCR
Stick” in the following cases:
MEMORY
•For five seconds after setting the POWER switch to
3)
4)
PLAYER*
/VCR*
or MEMORY
•For five seconds after inserting a “Memory Stick”
3)
into your camcorder in MEMORY or PLAYER*
/
4)
VCR*
•When the capacity of the “Memory Stick” is less
than two minute in MEMORY
•For five seconds after starting a moving picture
recording
•For five seconds after completing a moving picture
recording
ON
To always display the remaining capacity of the
“Memory Stick”
1)
*
DCR-TRV24E/TRV25E/TRV27E only
2)
*
For DCR-TRV18E/TRV118E, the default setting is FINE.
3)
*
DCR-TRV16E/TRV18E/TRV24E only
4)
*
DCR-TRV25E/TRV27E/TRV116E/TRV118E only
(continued on the following page)
237
Changing the menu settings
POWER
Icon/item
Mode
Meaning
switch
MEMORY SET (except DCR-TRV16E/TRV116E)
PRINT MARK
ON
To write a print mark on recorded still images you
PLAYER/VCR
want to print out later (p. 199)
MEMORY
z OFF
To cancel print marks on still images
PROTECT
ON
To protect selected still images against accidental
PLAYER/VCR
erasure (p. 195)
MEMORY
z OFF
To not protect still images
SLIDE SHOW
—
To play back images in a continuous loop
MEMORY
(p. 193)
PHOTO SAVE
—
To copy mini DV still images on “Memory Stick”
PLAYER/VCR
(p. 179)
FILE NO.
z SERIES
To assign numbers to file in sequence even if the
PLAYER/VCR
“Memory Stick” is changed
MEMORY
RESET
To reset the file numbering each time the “Memory
Stick” is changed
DELETE ALL
—
To delete all unprotected images (p. 198)
MEMORY
FORMAT
z RETURN
To cancel formatting
MEMORY
OK
To format an inserted “Memory Stick”
Formatting erases all information on the “Memory
Stick”.
Check the contents of the “Memory Stick” before
formatting.
1. Select FORMAT with the SEL/PUSH EXEC dial,
then press the dial.
2. Turn the SEL/PUSH EXEC dial to select OK, then
press the dial.
3. After “EXECUTE” appears, press the SEL/PUSH
EXEC dial. “FORMATTING” flashes during
formatting. “COMPLETE” appears when
formatting is finished.
Notes on formatting (except DCR-TRV16E/TRV116E)
•Supplied or optional “Memory Stick”s have been formatted at factory. Formatting “Memory Stick”s
on your camcorder is not required.
•Do not do any of the following while FORMATTING is displayed:
–Switch the POWER switch
–Operate buttons
–Eject the “Memory Stick”
•You cannot format the “Memory Stick” if the write-protect tab on the “Memory Stick” is set to LOCK.
•Format again if the message “ FORMAT ERROR” appears.
•Formatting erases protected image data on the “Memory Stick.”
238

Changing the menu settings
POWER
Icon/item
Mode
Meaning
switch
PRINT SET (except DCR-TRV16E/TRV116E)
9PIC PRINT
z RETURN
To cancel prints of split screens
MEMORY
SAME
To make prints of the same split screen (p. 201)
MULTI
To make prints of different split screens
MARKED
To make prints of images with print marks in
recording order
DATE/TIME
z OFF
To make prints without the recording date and time
MEMORY
DATE
To make prints with the recording date (p. 202)
DAY&TIME
To make prints with the recording date and time
CM SET
TITLE
—
To superimpose a title or make your own title
PLAYER/VCR
(p. 130, 134)
CAMERA
TITLEERASE
—
To erase the title you have superimposed (p. 133)
PLAYER/VCR
CAMERA
TITLE DSPL
z ON
To display the title you have superimposed
PLAYER/VCR
OFF
To not display the title
Customising Your Camcorder Выполнение индивидуальных установок на Вашей видеокамере
CM SEARCH
z ON
To search using cassette memory (p. 92)
PLAYER/VCR
OFF
To search without using cassette memory
TAPE TITLE
—
To label a cassette (p. 137)
PLAYER/VCR
CAMERA
ERASE ALL
—
To erase all the data in cassette memory (p. 139)
PLAYER/VCR
CAMERA
Note on PRINT SET (except DCR-TRV16E/TRV116E)
9PIC PRINT and DATE/TIME are displayed only when an external printer (optional) is connected to
the intelligent accessory shoe.
(continued on the following page)
239

Changing the menu settings
POWER
Icon/item
Mode
Meaning
switch
TAPE SET
REC MODE
z SP
To record in the SP (Standard Play) mode
PLAYER/VCR
CAMERA
LP
To increase the recording time to 1.5 times the SP
mode
AUDIO MODE
z 12BIT
To record in the 12-bit mode (two stereo sounds)
PLAYER/VCR
CAMERA
16BIT
To record in the 16-bit mode (the one stereo sound
with high quality)
qREMAIN
z AUTO
To display the remaining tape bar:
PLAYER/VCR
•For about eight seconds after your camcorder is
CAMERA
turned on and calculates the remaining amount of
tape
•For about eight seconds after a cassette is inserted
and your camcorder calculates the remaining
amount of tape
•For about eight seconds after N is pressed in
1)
2)
PLAYER*
/VCR*
•For about eight seconds after DISPLAY is pressed
to display the screen indicators
•For the period of tape rewinding, forwarding or
1)
2)
picture search in the PLAYER*
/VCR*
ON
To always display the remaining tape indicator
1)
*
DCR-TRV16E/TRV18E/TRV24E only
2)
*
DCR-TRV25E/TRV27E/TRV116E/TRV118E only
Notes on the LP mode
•When you record a tape in the LP mode on your camcorder, we recommend playing the tape on your
camcorder. When you play back the tape on other camcorders or VCRs, noise may occur in pictures
or sound.
•When you record in the LP mode, we recommend using a Sony Excellence/Master cassette so that
you can get the most out of your camcorder.
•You cannot dub audio on a tape recorded in the LP mode. Use the SP mode for the tape to be audio
dubbed.
•When you record in the SP and LP modes on one tape or you record some scenes in the LP mode, the
playback picture may be distorted or the time code may not be written properly between scenes.
Notes on AUDIO MODE
•You cannot dub audio on a tape recorded in the 16-bit mode.
•When playing back a tape recorded in the 16-bit mode, you cannot adjust the balance in AUDIO MIX.
240


