Panasonic ES8044: инструкция
Раздел: Бытовая, кухонная техника, электроника и оборудование
Тип: Прочие персональные приборы
Инструкция к Прочим персональным приборам Panasonic ES8044
P000-005ES804443EU 05.2.21 11:15 ページ1
Wet/Dry/Rechargeable Shaver
Operating Instructions
Model No. ES8044/ES8043
Matsushita Electric Works Wanbao (Guangzhou) Ltd.
Wanbao Base, Zhong Cun Pan Yu, GuangDong 511495, China
Before operating this unit, please read these instructions completely.
No.1 EN, GR, FR, IT, NE, SP, DN, PO, NR, SW, FN, Po, Cz, Hu, Ru, Russi, TU, Uk (
欧州
)
Printed in China
32
high
mid
low
charge
status
A
B
C
N
D
O
E
F
M
G
L
H
[ES8044] [ES8043]
I
a
recharge
K
I
b
I
I
c
J
charge
status
P
R
Q
ST
1
2
3
4
5
(b)
(a)
(A) (B)
[ES8044]
(A) (B)
high
high
mid
mid
low
low
charge
charge
status
status
[ES8043]
(C) (D)
recharge
recharge
charge
charge
status
status
6
[ES8044]
[ES8043]
high
mid
recharge
low
charge
status
charge
status
P000-005ES804443EU 05.2.21 11:15 ページ2
8
7
9
Before use
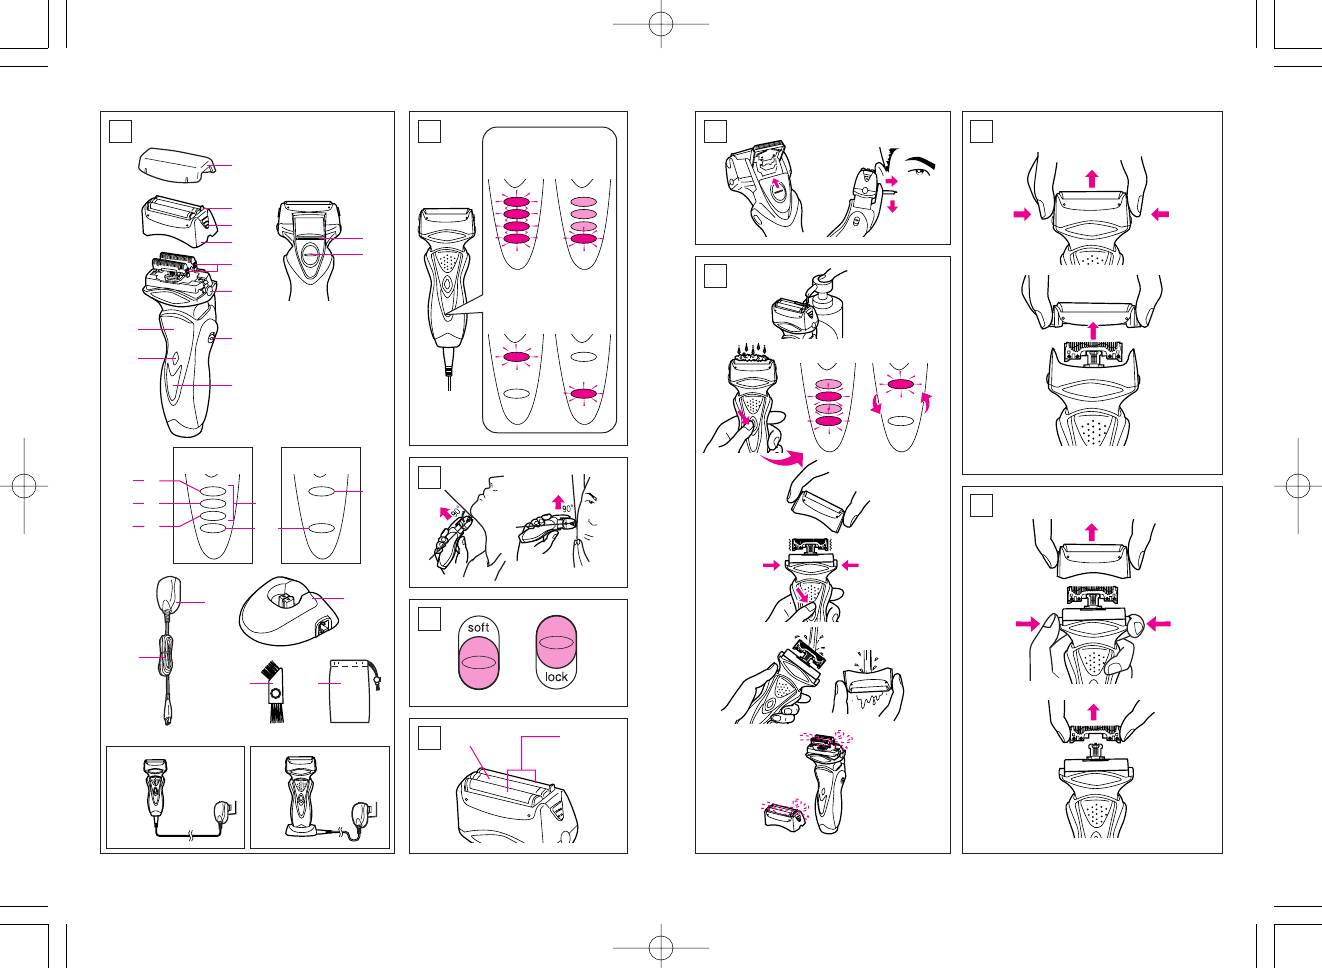
Q Power cord
This Wet/Dry shaver can be used for
R Charging stand
wet shaving with shaving lather or for
S Cleaning brush
dry shaving. You can use this water-
T Soft case
tight shaver in the shower and clean
it in water. Treat yourself to wet lather
READ ALL INSTRUCTIONS BE-
shaves for at least three weeks and
FORE USE.
notice the difference. Your Panasonic
Wet/Dry shaver requires a little time
Charging
to get used to because your skin and
Connect the power cord to the
beard need about a month to adjust
shaver, and plug the adaptor to an
to any new shaving method.
AC outlet. (see fig. 1 (A))
The shaver will be adjusted automati-
Parts identification
cally to voltages between 100-240V
(see fig. 1)
AC.
In some areas, a special plug adap-
A Protective cap
tor may be required.
B System outer foil
C System outer foil release but-
• When charging the shaver for the
tons
first time or when it has not been in
use for more than 6 months, the
D Foil frame
charge status lamp may not illumi-
E Inner blades
nate for a few minutes after opera-
F Foil frame release buttons
tion. It will eventually illuminate if
kept connected.
G Pivot action selector
H LED display
Adequate ambient temperature for
I Battery capacity monitor
charging is between 15 to 35 °C.
• If it is far below or over the appro-
I-a high
priate temperature, the charging
I-b mid
time may extend, or the adaptor
I-c low
may not function.
• In particular, low temperature may
J Charge status lamp
shorten the life span of the re-
K Low battery indicator
chargeable battery, In this case, the
L On/Off switch
charge status lamp blinks twice in
1 second.
M Finger rest
N Trimmer
[for ES8044]
O Trimmer handle
The charge status lamp will glow
when the shaver is being charged.
P Adaptor
7
10 11
12
54
d
e
f
c
b
a
g
P000-005ES804443EU 05.2.21 11:15 ページ4
(A) (B)
Index
ENGLISH Page 5
SVENSKA Sid 58
DEUTSCH Seite 11
SUOMI Sivu 63
FRANÇAIS Page 17
POLSKI Strona 68
ITALIANO Pagina 23
ČESKY Strona 75
NEDERLANDS Pagina 29
MAGYAR Oldal 81
ESPAÑOL Pagina 35
ROMANA Pagina 87
DANSK Side 41
êìëëäàâ
ëÚ‡Ìˈ‡
93
PORTUGÊS Pagina 47
TÜRKÇE Sayfa 100
NORSK Side 53
ì͇ªÌÒ¸ÍËÈ
ëÚÓ¥Ì͇
106

The battery capacity monitor will all
Charge with charging
illuminate and the charge status lamp
stand
will blink after charging is completed
(see fig. 1 (B))
(see fig. 2 (A)).
To charge with the charging stand,
10 minutes after charging is com-
connect the power cord to the charg-
pleted, the battery capacity monitor
ing stand. Place the shaver into the
will extinguish and the charge status
stand, and plug the adaptor to the
lamp will continue to blink (see fig. 2
AC outlet.
(B)).
You can always store your shaver in
You can fully charge the shaver in 1
the charging stand to maintain full
hour if the LED display shows “low”
battery capacity. This shaver cannot
(low).
be overcharged.
The battery capacity monitor indi-
cates the charge remaining in the
Using your shaver
battery in 3 levels (high/mid/low). The
unit can be used once or twice more
Caution – The system outer foil is
after the “low” (low) starts to blink.
very thin and can be damaged if
(Differs depending on the use situa-
handled improperly. Before each
tion.)
use, always check the foil for dam-
age. To avoid personal injury, do
[for ES8043]
not use if the foil or other parts of
The charge status lamp will glow
the shaving head is damaged.
when the shaver is being charged. It
will blink when the charging is com-
Disconnect the power cord from the
pleted (see fig. 2 (D)).
shaver, and push the On/Off switch
You can fully charge the shaver in 1
to turn the shaver on.
hour if the low battery indicator blinks
If you push and hold the On/Off
(see fig. 2 (C)).
switch for more than 2 seconds, it
The unit can be used once or twice
will activate the turbo mode for
more after the low battery indicator
“sonic” vibration cleaning.
starts to blink.
(see “Cleaning your shaver”)
Caution:
A full charge will supply enough
Shaving with “sonic” vibration may
power for approx. 14 shaves (3 min-
damage your skin. Please turn it
utes per shave for a normal beard).
off and on again to deactivate the
Before travelling, charge it fully for 1
turbo mode.
hour if you will not be taking the adap-
tor with you.
In case your shaver is without charge,
you may quick charge it for 1 shave
in about 5 minutes.
8
(gel, soap, cream, etc.). Do not put a
Do not place fingers on the On/Off
thick layer of shaving foam as it may
switch during use.
affect shaver’s performance. If the
This may cause the shaver to stop
shaving head is clogged with foam,
during use or change it to the
simply rinse it under running water.
“sonic” vibration cleaning mode.
Place your finger on the finger rest
Using the trimmer
during use.
(see fig. 6)
Hold the shaver at a right angle (90°)
Slide the trimmer handle up to open
to your skin (see fig. 3). Start out
the trimmer.
shaving by applying gentle pressure
Place the trimmer at a right angle to
to your face. Stretch your skin with
your skin and move it downward to
your free hand and move the shaver
trim sideburns.
back and forth in the direction of your
beard. You may gently increase the
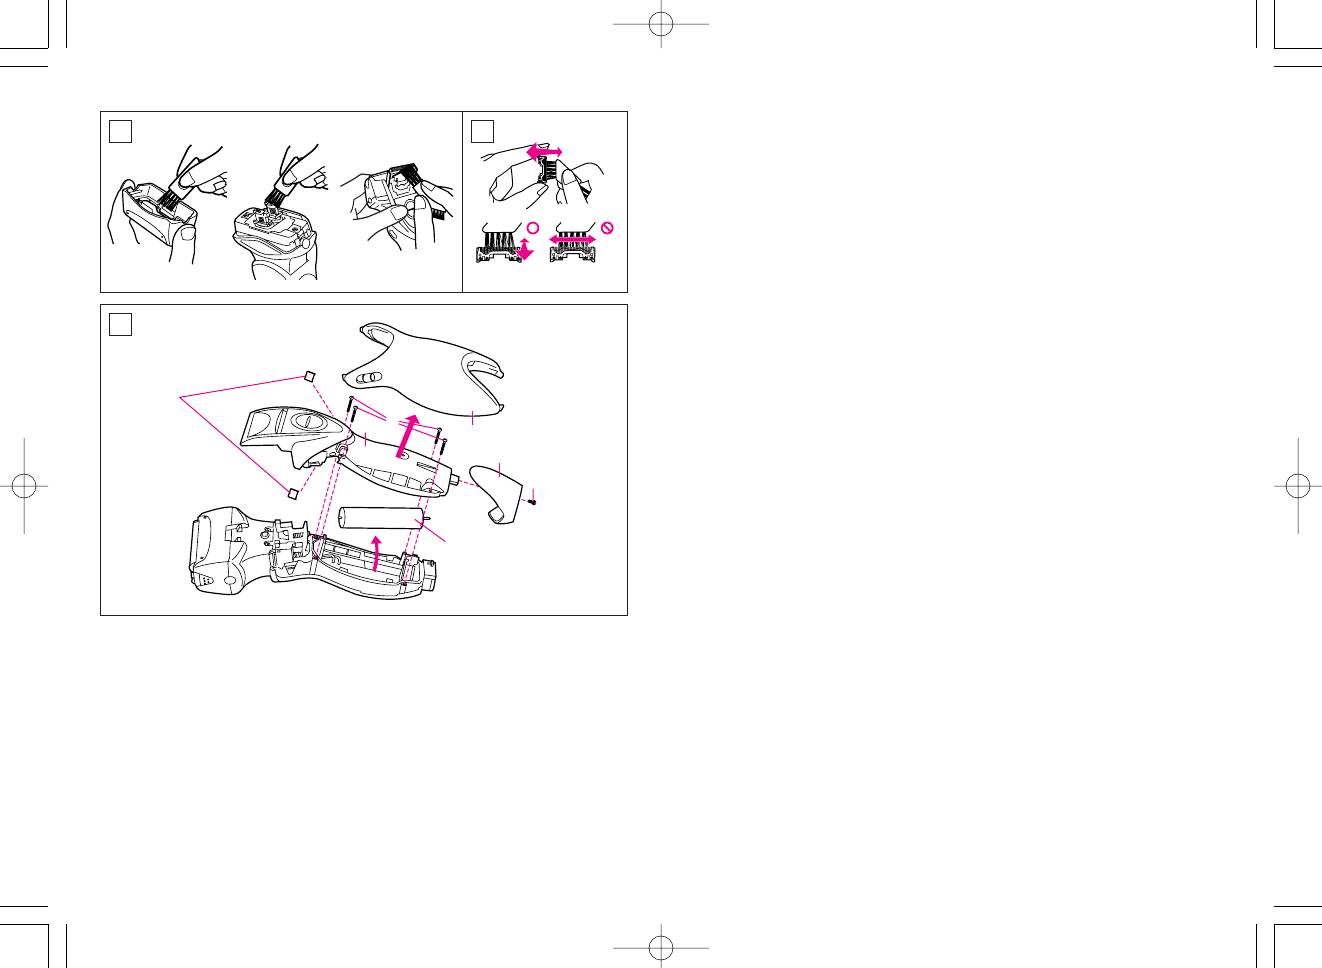
Cleaning your shaver
amount of pressure as your skin be-
(see fig. 7)
comes accustomed to this shaver.
Warning – To prevent electric
Applying excessive pressure does
shock or personal injury, discon-
not provide a closer shave.
nect the power cord from the
Pivot action selector
shaver before cleaning with water.
(see fig. 4)
Use the pivot action selector to
For cleanliness and convenience, we
choose the shaving mode, “soft”
recommend that you clean your
(soft) and “lock” (lock) based on your
shaver with water and a liquid hand
shaving preference.
soap. Regular cleaning will keep your
The pivot action can be changed
shaver in good condition while pre-
whether the switch is turned on or off.
venting odors or bacteria from devel-
oping, and maintain the cutting per-
System outer foil
formance.
(see fig. 5)
With the system outer foil in place,
System outer foil has a slit blade (a)
apply some hand soap onto the outer
between 2 foils (b). They move up
foil.
and down independently to follow the
Push and hold the On/Off switch
contours of your face.
more than 2 seconds to activate the
The slit blade catches and cuts
turbo mode for “sonic” vibration
longer and lying hairs easily.
cleaning.
For wet shaving
At the same time, the lamps of the
Battery capacity monitor (ES8044) or
Put a thin layer of shaving foam on
Low battery indicator/Charge status
your face which works as a lubrica-
lamp (ES8043) will flash around ran-
tor. Shaving foam is the most suit-
domly.
able among many other shaving aids
9
P006-039ES804443EU 05.2.21 11:15 ページ6
76
Оглавление
- Before use
- Charge with charging
- Caution
- Vor dem Gebrauch
- Für Naßrasur
- Umweltschutz und Re-
- Avant usage
- Rasage à l’eau
- Protection de l’environne-
- Prima dell’uso
- Rasatura con la schiuma da
- Protezione ambientale e Attenzione riciclaggio dei materiali
- Voor gebruik
- Voor nat scheren
- Bescherming van het mi- Let op lieu en hergebruik van
- Antes de su utilización
- Afeitado húmedo
- Protección del medio am-
- Før brug
- Brug af trimmeren
- Forsigtig
- Antes de utilizar
- Para barbear a molhado
- Cuidado
- Før bruk
- Bruk av trimmeren
- Forsiktig
- Rakapparatens använd-
- Rengöring med borste
- Ennen käyttöä
- Parranajokoneen puhdis-
- Tärkeää
- Ładowanie z zastoso-
- Golenie na mokro
- Ostrzeżenia
- Před použitím
- Holení namokro
- Upozornění
- A használat előtt
- A nedves borotválkozáshoz
- Vigyázat:
- Înainte de utilizare
- Pentru bărbierit umed
- Atenţie
- До начала эксплуатации
- Тройная бритвенная
- Замена элементов голо- Защита окружающей сре- вки бритвы ды и утилизация исполь-
- Осторожно
- fiarj standı ile flarj etme
- Trafl bafllı¤ı parçalarının
- Uyarı
- Зарядка за допомогою
- Чищення бритви
- Заходи з охорони нав-
