Panasonic TYRM50VW: инструкция
Раздел: Аудиотехника и DJ оборудование
Тип:
Инструкция к Panasonic TYRM50VW

Panasonic
Model No.
TY-RM50VW
QBarating,lnstructions
Remote Control Kit
NORMAL ID
PICTURE
CD
CD
MODE ,-INPL^-i
I I |viDEo| |
a
UDI0|
CONTRAST
BRIGHTNESS
5ECALL T—I MENU
O (5 o
E](i)C3
^
o
MUTE
VOL
o o
®
(D
CD
CD
CD
CD
CD CD CD
ID SET
ENTER
O CD CD
Panasonic
DISPLAY
English
Please read these instructions before operating your set
and retain them for future reference.

Dear Panasonic Customer
Welcome to the Panasonicfamily ofcustomers. We hope thatyou will have manyyears of enjoymentfrom
your new LCD Display.
To obtain maximum benefitfromyour set,please read these Instructions before making any adjustments,
and retain themforfuture reference.
Retainyourpurchase receipt as well, and record the model number and serial number ofyour set in the
spaceprovided on the rear cover of these instructions.
Visit our Panasonic Web Site http://panasonic.net
Table of Contents
Accessories....................................................................1
Installing Batteries......................................................... 1
Remote Control.............................................................. 2
Single Display Control.................................................... 3
Multiple Displays Control................................................3
Multiple Displays Setup..................................................4
ID Remote Control......................................................... 5
Entering OSD Menu....................................................... 5
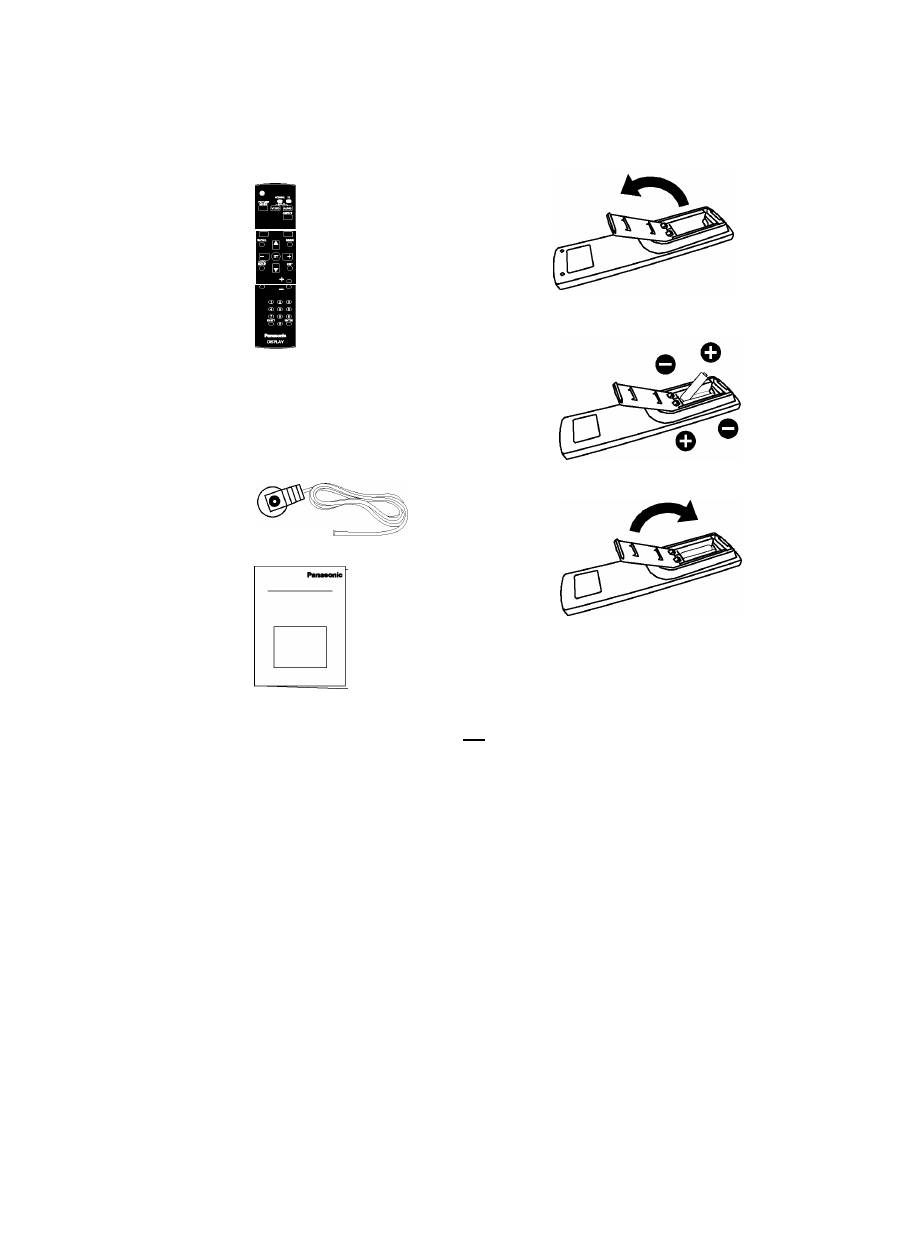
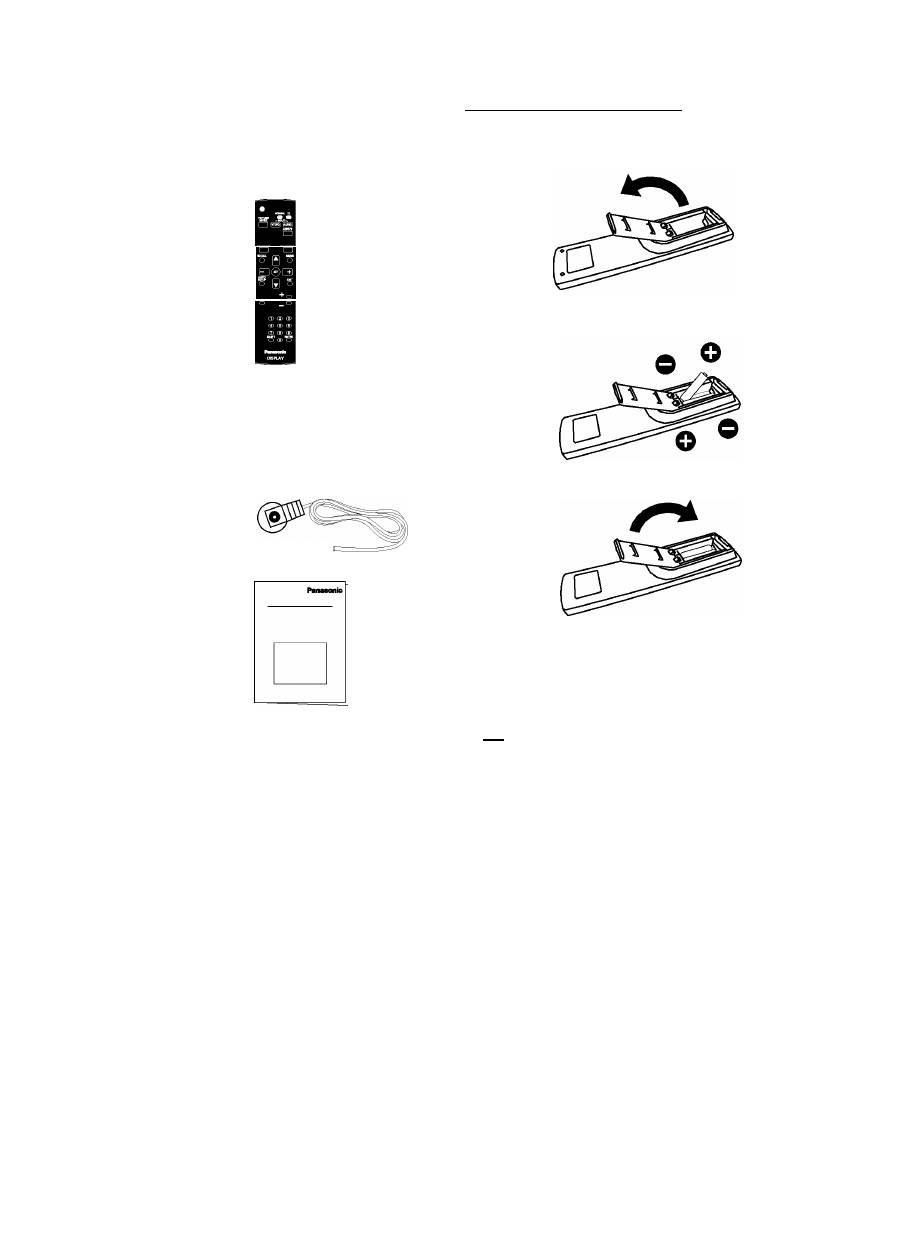
Accessories
Check ifyou have the accessories shown
Remote Control
AAA Batteries
External IR
Receiver
Operation
instruction book
Installing Batteries
Requires two AAA batteries.
1. Press and then slide the cover to open it.
2. Align the batteries according to the (+) and (-) indications
inside the battery compartment.
3. Replace the cover.
Helpful Hint: For frequent remote control users,
replace old batteries with Alkaline batteries for
longer life.
A\
Precaution on using
battery
Incorrect installation can cause battery leakage and corrosion
that will damage the remote control transmitter.
Disposal of batteries should be in an environment-friendly
manner.
Observe the following precautions:
1. Batteries should always be replaced as a pair. Always use
new batteries when replacing the old set.
2. Do not combine a used battery with a new one.
3. Do not mix battery types (example: “Zinc Carbon” with
“Alkaline”).
4. Do not attempt to charge, short-circuit, disassemble, heat
or burn used batteries.
5. Battery replacement is necessary when the remote control
acts sporadically or stops operating the Display.
6. Do not burn or breakup batteries.
7. Batteries must not be exposed to excessive heat such as
sunshine, fire or the like.

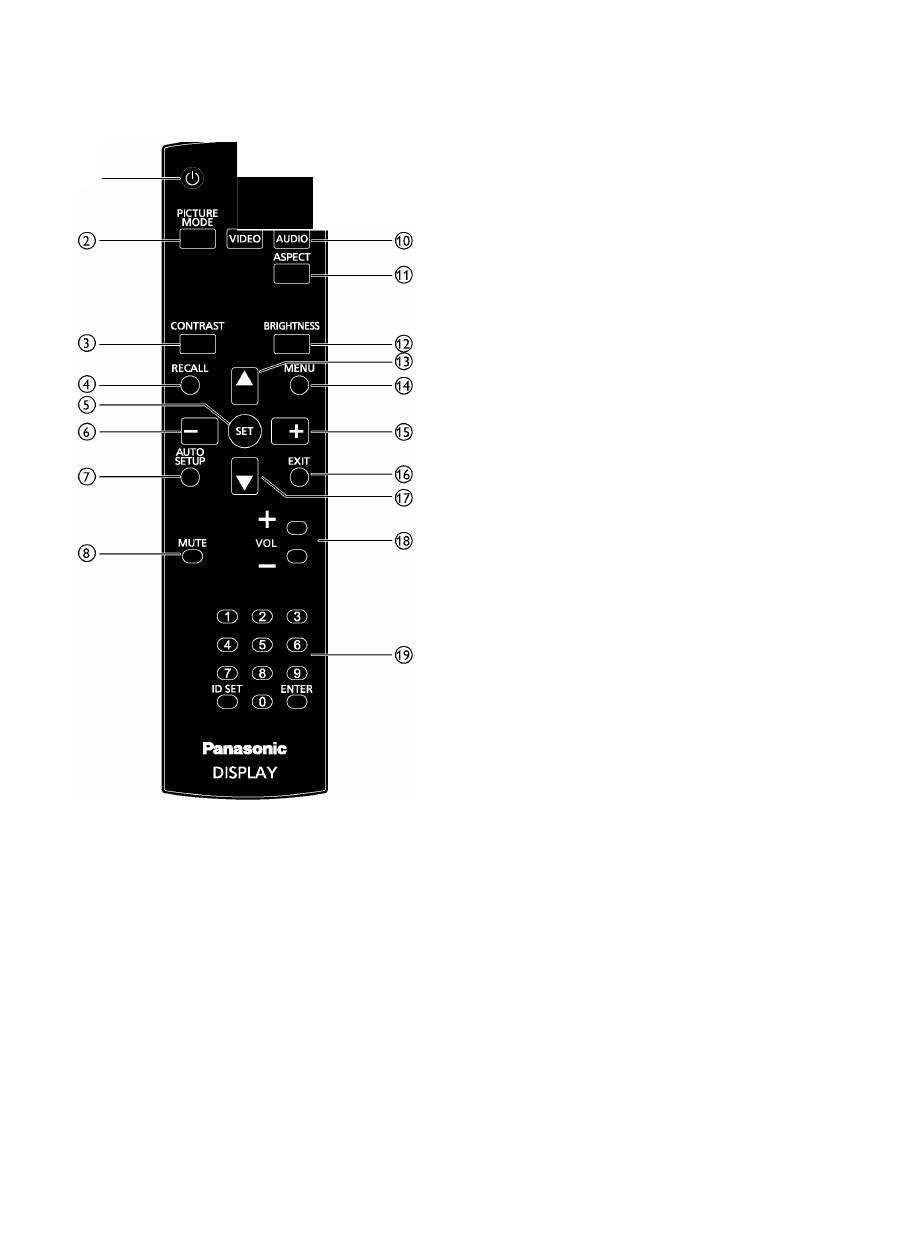
Remote Control
©■
• X
NORMAL ID
o o
,-INPUT-I
© [POWER] button
Press to switch on the display from standby mode. Press
again to turn it off and back into standby mode.
© [PICTURE MODE] button
Press to select picture mode.
•
Standard
: Used for normal images (factory setting)
•
Highbright
: Used for moving image such as Video
•
sRGB
: Used for text based images
© [CONTRAST] button
Press to activate Contrast Menu. Press H"] or [—] button
to adjust the value. Press [
MENU
] button to confirm and
exit.
© [RECALL] button
Press to turn on/off the information OSD displayed on the
upper right corner of the screen.
© [SET] button
Press to activate the setting inside the OSD menu.
© ^-] button
•
Press to move the selection left in OSD menu.
•
Press to decrease the value in OSD menu.
•
Press to move the sub-picture left in PIP mode.
© [AUTO SETUP] button
Press to run the Auto Adjust function.
NOTE: This button is functional for
VGA
input only.
© [MUTE] button
Press to turn the mute function on/off.
© [NORMAL / ID] button
Press to set the remote control ID when you want to use
this remote control on one of several different displays.
Refer to page 5 for more detail.
(1^ [INPUT] button
[VIDEO]
: Press to toggle Video Source Menu. Press ^]
or ^] button to select one of the video sources among
HDMI
,
DVI-D
,
VGA
,
DVD/HD
, or
VIDEO
. Press [
SET
]
button to confirm and exit.
[AUDIO]
: Press to toggle Audio Source Menu. Press ^]
or ^] button to select one of the audio sources among
HDMI
,
AUDIO1
, or
AUDIO2
. Press [
SET
] button to
confirm and exit.
(11)
[ASPECT] button
Press to switch screen aspect ratio.
•
For PC signal:
FULL
,
NORMAL
,
CUSTOM
and
REAL
.
•
For Video signal:
FULL
,
NORMAL
,
DYNAMIC
,
CUSTOM
and
REAL
.
(
12
) [BRIGHTNESS] button
Press to toggle Brightness Menu. Press H"] or [—] button
to adjust the value. Press [
MENU
] button to confirm and
exit.
(13)
^] button
•
Press to move the selection up in OSD menu.
•
Press to move the sub-picture up in PIP mode.
[MENU] button
Press to turn the OSD menu on/off.
(i5) H-] button
•
Press to move the selection right in OSD menu.
•
Press to increase the value in OSD menu.
•
Press to move the sub-picture right in PIP mode.
(i|) [EXIT] button
Press to turn back to the previous OSD menu.
(i^
button
•
Press to move the selection down in OSD menu.
•
Press to move the sub-picture down in PIP mode.
(1^ [VOL + /-] button
Press H"] to increase, or [—] to decrease, the audio output
level.
(iD [Number / ID SET / ENTER] button
Press to set the display ID. Refer to page 5 for more detail.
Handling the remote control
•
Do not subject to strong shock.
•
Do not allow water or other liquid to splash the remote
control. If the remote control gets wet, wipe it dry
immediately.
•
Avoid exposure to heat and steam.
•
Other than to install the batteries, do not open the remote
control.
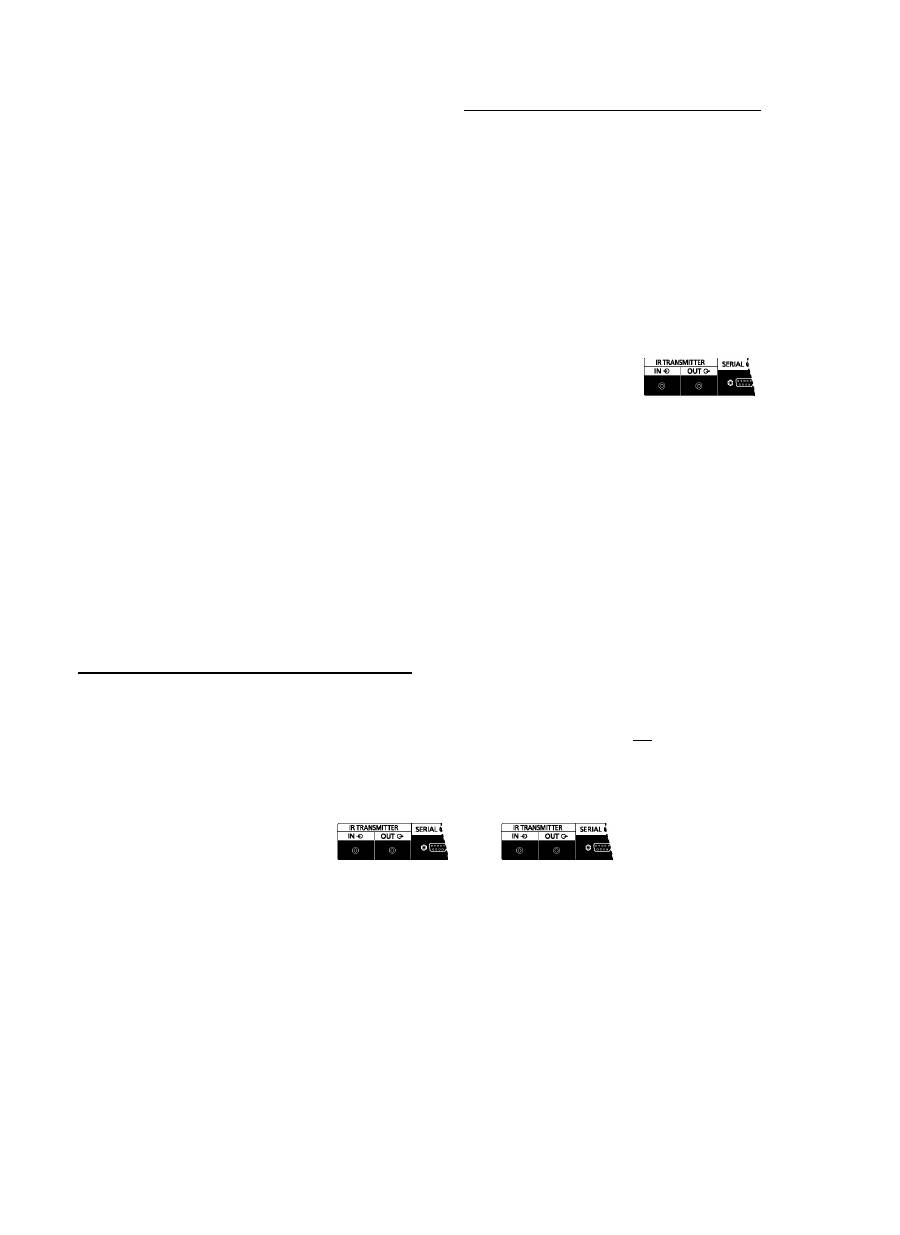
Single Display Control
To control one display, connect the “External IR Receiver^’ to
the [
IR TRANSMITTER IN
] port.
Point the top ofthe remote control toward the “External IR
Receiver” when pressing a button.
NOTE:
• The Display’s remote control sensor will stop working after
connected with the “External IR Receiver^’.
External
IR Receiver
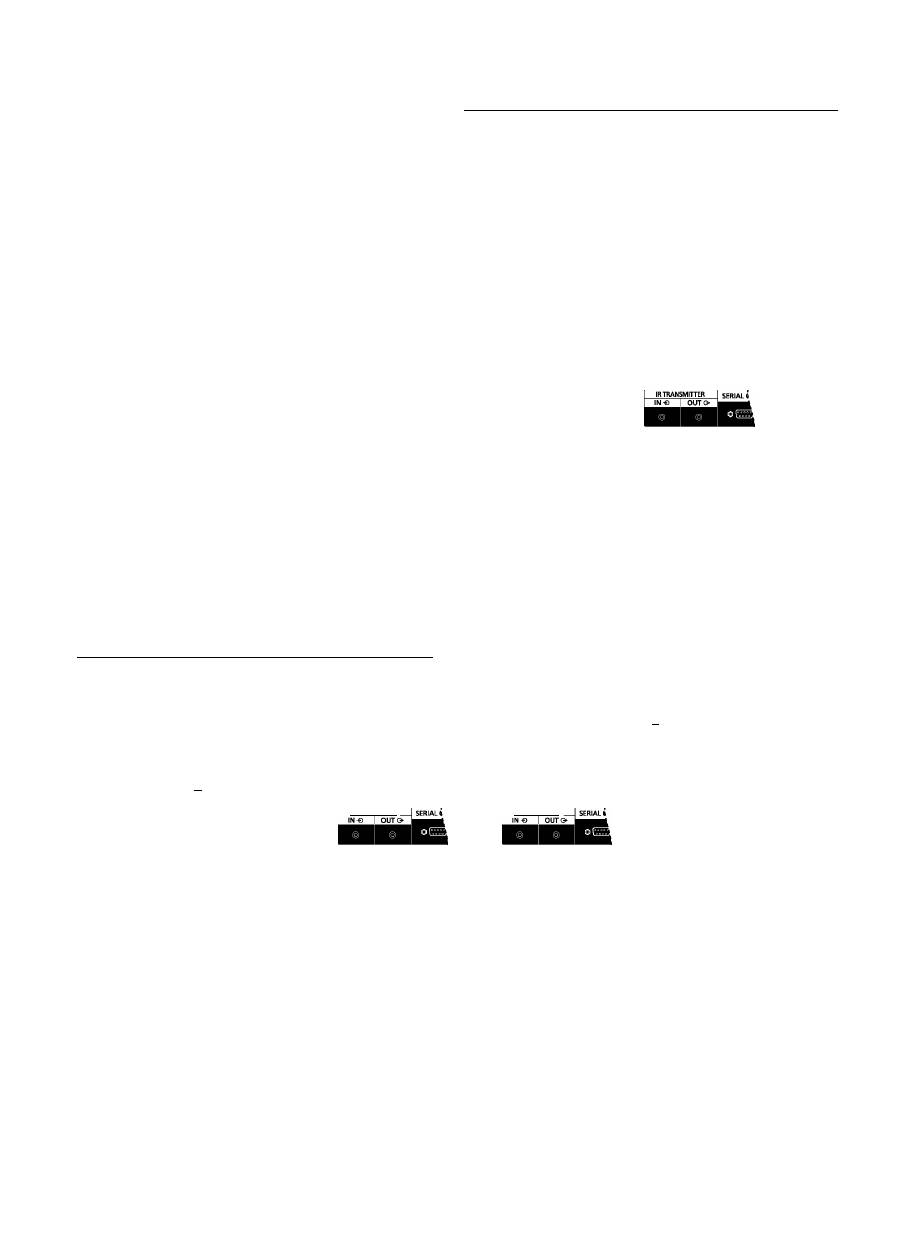
Multiple Displays Control
To control a TV-wall set up by multiple displays, use the “External IR Receiver” and the “Connector cable of remote control”
found in the PD package.
External
IR Receiver
Display No.1
Display No.2
-(M li^
1. Connect the “External IR Receiver^’ to the [
IR TRANSMITTER IN
] port of Display #1.
2. Connect with the “Connector Cable” from the [
IR TRANSMITTER OUT
] port of Display #1 to the [
IR TRANSMITTER IN
] port
of Display #2.
3. Use the “Connector cable of remote control” to connect next display.
4. Point the top of the remote control toward the “External IR Receiver” when pressing a button.
NOTE:
• The remote control may not function properly if the “External IR Receiver^’ is under direct sunlight or strong illumination, or
when there is obstacle in the path ofsignal transmission.
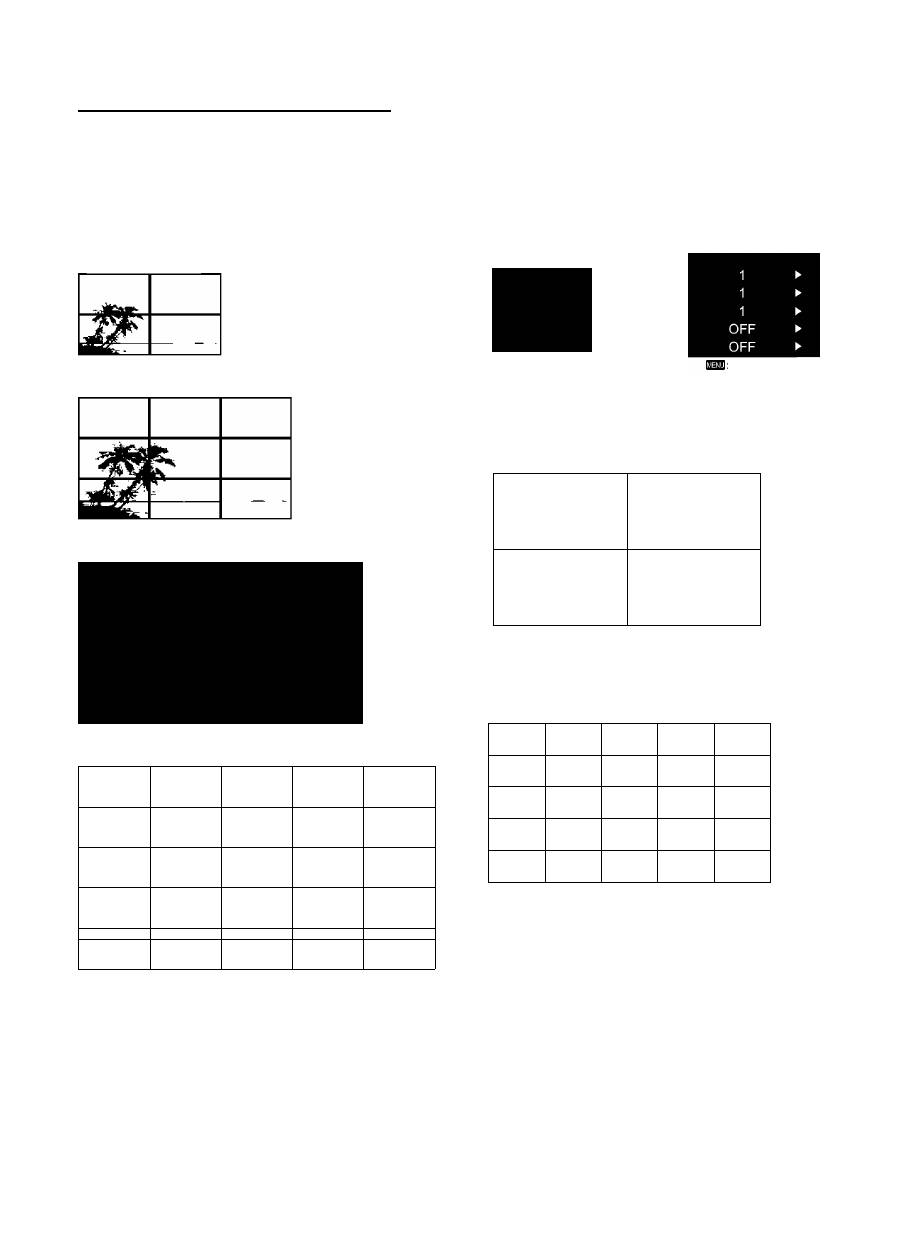
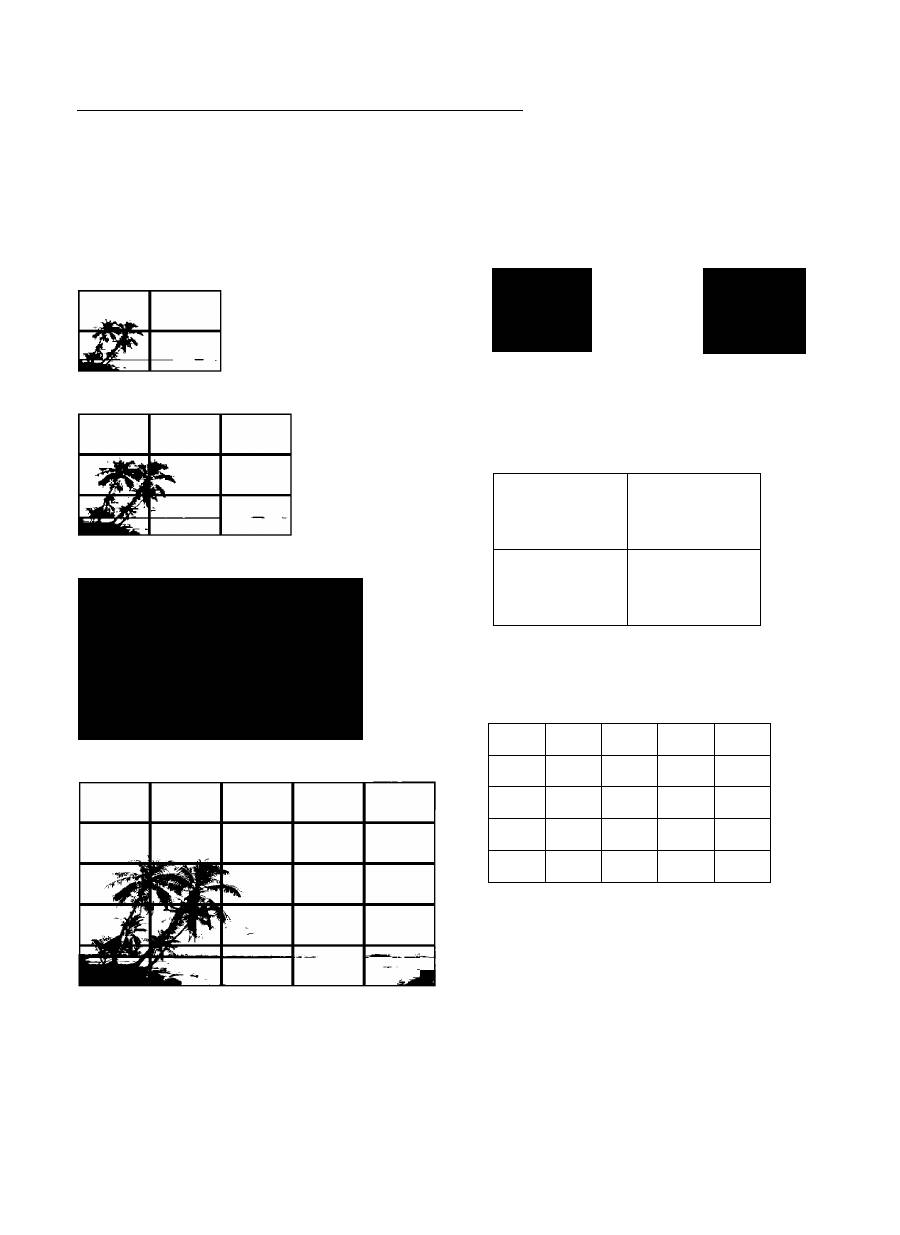
Multiple Displays Setup
By lining up the Displays in groups, for example, as illustrated
below, an enlarged picture may be displayed across all
screens.
For this mode of operation, each display has to be set up with
a Display numberto determine its location.
Example:
Group of 4 (2x2):
Group of 9 (3x3):
Group of16 (4x4):
K. L '
m
Group of 25 (5x5):
iSBiC
'
-
____
How to setup multiple displays
1. Enter the {
TILING
} setup in OSD Menu of
{
CONFIGURATION2 menu
}.
2. Select the display numbers you want to create a single
large-screen matrix (video wall).
TILING
H MONITORS
V MONITORS
POSITION
FRAME COMP.
ENABLE
AT
:SEL
+-:ADJ
:RETURN
EXIT MENU
Example: 2x2 screen matrix (4 displays)
H MONITORS = 2 displays
V MONITORS = 2 displays
H MONITORS
1 2
—
3 4
■ Position
Example: 5x5 screen matrix (25 displays)
H MONITORS = 5 displays
V MONITORS = 5 displays
H MONITORS
1
2
3
4
5
6
7
8
9
10
11
12
13
14
15
16
17
18
19
20
21
22
23
24
25
• Position
NOTE:
• Refer to the Operation Instruction Book of TH-55LFV50
for{
TILING
} setup in OSD Menu {
CONFIGURATION2
menu
}.
ID Remote Control_______
You can set the remote control ID when you want to use this
remote control on one of several different displays.
|VIDEO| |AUDIO|
ASPECT
I
CONTRAST
BRIGHTNESS
I
- SET +
o W o
+ o
MUTE
VOL
0
_ o
(D
^ (33 d) d)
1 (D d) d)
Panasonic
DISPLAY
1. Press [
ID
] button. The red LED blinks twice.
2. Press [
ID SET
] button for more than 1 second to enter the
ID Mode. The red LED lights up.
Press the [
ID SET
] button again will exit the ID Mode. The
red LED lights off.
3. Press the digit numbers [
0
] ~ [
9
] to select the display you
want to control.
For example: press [
0
] and [
1
] for display #1, press [
1
] and
[
1
]fordisplay#11.
The numbers available are from [
01
] ~ [
25
].
4. Not pressing any button within 10 seconds will exit the ID
Mode.
5. If an error pressing of buttons other than the digits
occured, wait 1 second after the red LED lights off and
then lights up again, then press the correct digits again.
6. Press [
ENTER
] button to confirm. The red LED blinks
twice and then lights off.
NOTE:
Press [
NORMAL
] button. The green LED blinks twice,
indicating the display is in normal operation.
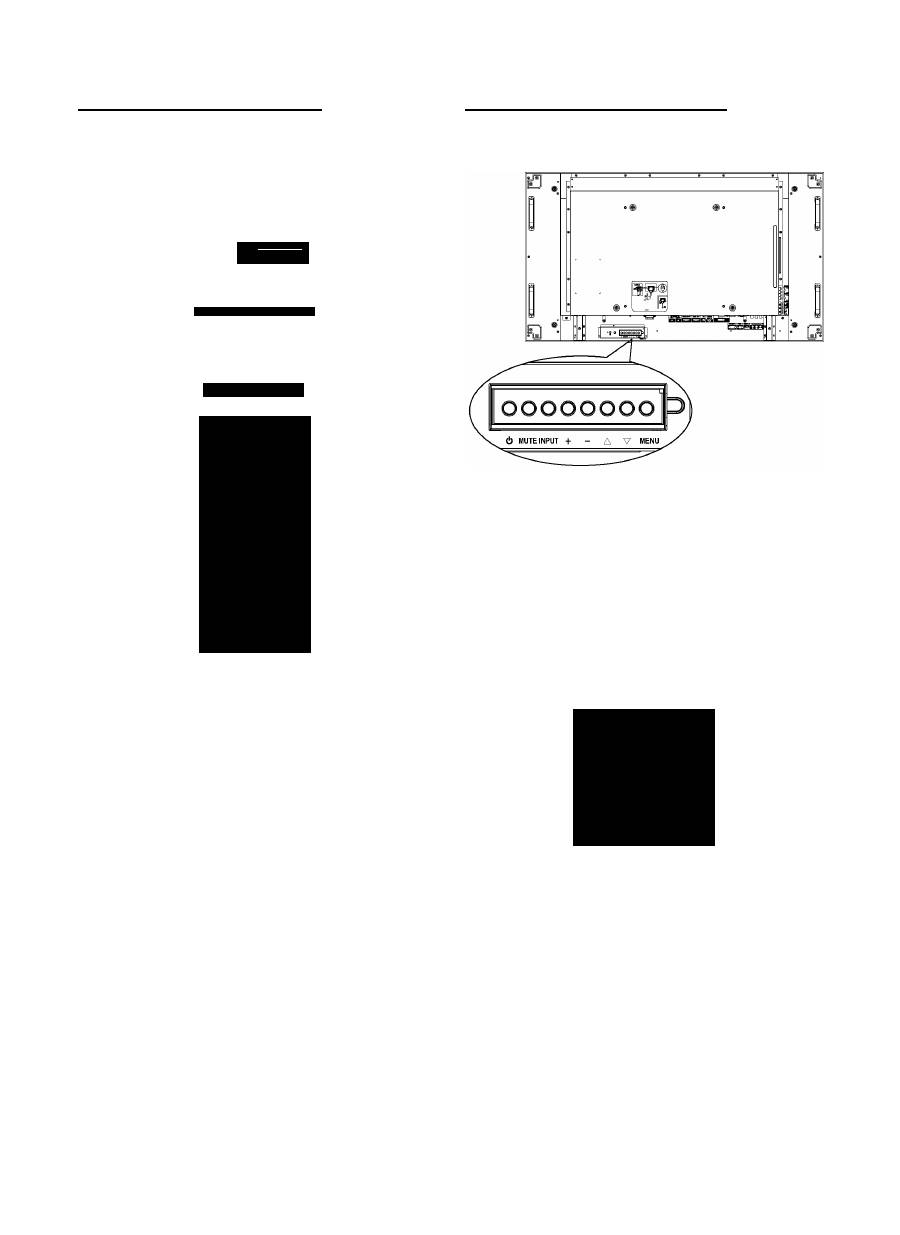
Entering OSD Menu
Using the display’s control buttons
1.
2.
3.
4.
5.
Press [
MENU
] button to display the OSD menu.
Press
or ^] button to choose the item you want to
adjust.
Press [
INPUT
] button to enter the submenu.
In the submenu, press or ^] button to toggle among
items, press H”] or [—] button to adjust settings. If there is
a submenu, press [
INPUT
] button to enterthe submenu.
Press [
MENU
] button to return to the previous menu, or
press [
MENU
] button several times to exit the OSD menu.
Using the remote control
lECALL
T—I
MENU
O
g o
E ] © S
AUTO
SETUP --------------- EXIT
o [
t
J o
1. Press [
MENU
] button on the remote control to display the
OSD menu.
2. Press ^] or ^] button to choose the item you want to
adjust.
3. Press [
SET
] button to enter the submenu.
4.
In the submenu, press ^] or ^] button to toggle among
items, press H-] or [—] button to adjust settings. If there is
a submenu, press [
SET
] button to enter the submenu.
5. Press [
EXIT
] button to return to the previous menu, or
press [
MENU
] button to exit the OSD menu.
NOTE:
• Refer to the Operation Instruction Book of TH-55LFV50 for
OSD Menu Overview.
Information for Users on Collection and Disposal of Old Equipment and used Batteries
These symbols on the products, packaging, and/or accompanying documents mean that used electrical and
electronic products and batteries should not be mixed with general household waste.
For proper treatment, recovery and recycling of old products and used batteries, please take them to applicable
collection points, in accordance with your national legislation and the Directives 2002/96/EC and 2006/66/EC.
By disposing of these products and batteries correctly, you will help to save valuable resources and prevent any
potential negative effects on human health and the environment which could otherwise arise from inappropriate
waste handling.
For more information about collection and recycling of old products and batteries, please contact your local
municipality, your waste disposal service or the point of sale where you purchased the items.
Penalties may be applicable for incorrect disposal ofthis waste, in accordance with national legislation.
For business users in the European Union
If you wish to discard electrical and electronic equipment, please contact your dealer or supplier for further
information.
[Information on Disposal in other Countries outside the European Union]
These symbols are only valid in the European Union. If you wish to discard these items, please contact your local
authorities or dealer and ask for the correct method of disposal.
Note for the battery symbol (bottom two symbol examples):
This symbol might be used in combination with a chemical symbol. In this case it complies with the requirement set
by the Directive for the chemical involved.
Customer’s Record
The model number and serial number of this product can be found on its rear panel. You should note this serial
number in the space provided below and retain this book, plus your purchase receipt, as a permanent record of
your purchase to aid in identification in the event oftheft or loss, and for Warranty Service purposes.
Model Number
Serial Number
Panasonic Corporation
Web Site: http://panasonic.net
© Panasonic Corporation 2012
Printed in China

Panasonic
Número de modelo
TY-RM50VW
Manualidgiinstrucciones
Kit de control remoto
NORMAL ID
PICTURE
O
O
MODE r-INPlTT-,
I I |viDEo| |
a
UDI0|
CONTRAST
BRIGHTNESS
5ECALL T—I MENU
O (5 o
E](i)C3
^
o
MUTE
VOL
o o
Œ)
(D
(D
® ® CD
CD ® CD
ID SET
ENTER
o ® o
Panasonic
DISPLAY
Español
Antes de utilizar este producto, lea cuidadosamente este
manual de instrucciones y consérvelo para futuras consultas.

Estimado cliente de Panasonic
Bienvenido a lafamilia de clientes de Panasonic. Esperamos quepueda disfrutar durante muchos
añoscon su nueva Pantalla LCD.
Para recibir el máximo beneficio de su aparato, lea estas instrucciones antes de hacer ajustesy guárdelas
para consultarlas en elfuturo.
Guarde también el reciboy anote el número de modeloy número de serie de su aparato en el espacio de
la cubiertaposterior de este manual.
Visite nuestro sitio Panasonic en la Web http://panasonic.net
Indice
Accesorios......................................................................1
Instalar las pilas............................................................. 1
Mando a distancia.......................................................... 2
Control de una sola pantalla.......................................... 3
Control de varias pantallas.............................................3
Configuración de varias pantallas..................................4
Mando a distancia de infrarrojos....................................5
Entrar en el menú OSD..................................................5
Accesorios
a continuación
Mando a distancia
Pilas AAA
Receptor de
infrarrojos externo
Libro de
instrucciones de
funcionamiento
Instalar las pilas
Compruebe si dispone de los accesorios que se indican
Se necesitan dos pilas de tipo AAA.
1. Presione y, a continuación, deslice la tapa para abrirla.
2. Alinee las pilas conforme a las indicaciones (+) y (-) que
se encuentran dentro del compartimento de dichas pilas.
3. Vuelva a colocar la tapa.
Sugerencia útil: Si hace mucho uso del mando a
distancia, utilice pilas alcalinas para que no tenga
que cambiarlas con mucha frecuencia.
A\
Precauciones a la hora
de utilizar las pilas
La instalación incorrecta puede provocar fugas y corrosión en
las pilas, lo que dañará el transmisor del mando a distancia.
Deshágase de las pilas de una forma que no dañe el medio
ambiente.
Tenga en cuenta las siguientes precauciones:
1. Las pilas siempre deben reemplazarse por pares. Utilice
siempre pilas nuevas cuando las reemplace.
2. No mezcle una pila usada con una nueva.
3. No combine diferentes tipos (ejemplo: de “carbono de
cinc” con “alcalinas”).
4. No cargue, cortocircuite, desmonte, caliente ni queme
pilas usadas.
5. Es necesario reemplazar las pilas cuando el mando a
distancia funciona esporádicamente o la pantalla no
obedece las órdenes del mismo.
6. No queme ni desintegre las pilas.
7. Las pilas no se deben exponer a un calor excesivo, como
por ejemplo a la luz directa del sol, al fuego, etc.
Mando a distancia
©■
• X
NORMAL ID
O o
,-INPUT-I
© Botón [POWER] (ALIMENTACIÓN)
Presione este botón para encender la pantalla desde el
modo de espera. Presiónelo de nuevo para apagarla y
volver a activar el modo de espera.
© Botón [PICTURE MODE] (MODO DE IMAGEN)
Presione este botón para seleccionar el modo de imagen.
•
Estándar
: se utiliza para imágenes normales
(configuración de fábrica).
•
Alto brillo
: se utiliza para imágenes en movimiento
como por ejemplo vídeo.
•
sRGB
: se utiliza para imágenes basadas en texto.
© Botón [CONTRAST] (CONTRASTE)
Presione este botón para activar el menú Contraste.
Presione H"] o [—] para ajustar el valor. Presione el botón
[
MENU
j(
MENÚ
) para confirmar la selección y salir.
© Botón [RECALL] (RECUPERAR)
Presione este botón para activar o desactivar el menú
OSD de información mostrado en la esquina superior
derecha de la pantalla.
© Botón [SET] (ESTABLECER)
Presione este botón para activar el valor dentro del menú
OSD.
© Botón ^-]
•
Presione este botón para mover la selección hacia la
izquierda en el menú OSD.
•
Presione este botón para disminuir el valor en el menú
OSD.
•
Presione este botón para mover la imagen secundaria
hacia la izquierda en el modo PIP.
© Botón [AUTO SETUP] (Confìguración automática)
Presione este botón para e
j
ecutar la función Auto a
j
uste.
NOTA: Este botón solamente funciona con la entrada
VGA
.
© Botón [MUTE] (SILENCIO)
Presione este botón para activar o desactivar la función
de silencio.
© Botón [NORMAL / ID] (NORMAL / IDENTIFICADOR)
Pensione este botón para establecer el identificador del
mando a distancia cuando disponga de varias pantallas y
de desee utilizar dicho mando en una de ellas. Consulte
la página 5 para obtener más detalles.
(í^ Botón [INPUT] (ENTRADA)
[VIDEO] (VÍDEO)
: Presione este botón para cambiar
al menú Fuente de vídeo. Presione el botón o
para seleccionar una de las siguientes fuentes de vídeo
disponibles:
HDMI
,
DVI-D
,
VGA
,
DVD/HD
, o
VÍDEO
.
Presione el botón [
SET
] (
ESTABLECER
) para confirmar
la selección y salir.
[AUDIO]
: Presione este botón para cambiar al menú
Fuente de audio. Presione el botón
o ^] para
seleccionar una de las siguientes fuentes de audio
disponibles:
HDMI
,
AUDIO1
o
AUDIO2
. Presione el botón
[
SET
] (
ESTABLECER
) para confirmar la selección y salir.
(íí) Botón [ASPECT] (ASPECTO)
Presione este botón para cambiar la relación de aspecto
de la pantalla.
•
Opciones disponibles para una señal de PC:
COMPLETA
,
NORMAL
,
PERSONALIZAR
y
REAL
.
•
Opciones disponibles para una señal de vídeo:
COMPLETA
,
NORMAL
,
DINÁMICA
,
PERSONALIZAR
y
REAL
.
(Í
2
) Botón [BRIGHTNESS] (BRILLO)
Presione este botón para cambiar al menú Brillo. Presione
H”] o [—] para a
j
ustar el valor. Presione el botón [
MENU
]
(
MENÚ)
para confirmar la selección y salir.
(Í3) Botón ^]
•
Presione este botón para mover la selección hacia
arriba en el menú OSD.
•
Presione este botón para mover la imagen secundaria
hacia arriba en el modo PIP.
Botón [MENU] (MENÚ)
Presione este botón para activar y desactivar el menú
OSD.
(Í5) Botón H-]
•
Presione este botón para mover la selección hacia la
derecha en el menú OSD.
•
Presione este botón para aumentar el valor en el
menú OSD.
•
Presione este botón para mover la imagen secundaria
hacia la derecha en el modo PIP.
(1^ Botón [EXIT] (SALIR)
Presione este botón para volver al menú OSD anterior.
(í^ Botón ^]
•
Presione este botón para mover la selección hacia
abajo en el menú OSD.
•
Presione este botón para mover la imagen secundaria
hacia abajo en el modo PIP.
Botón [VOL + /-]
Permite H"] para aumentar o [—] para reducir el nivel de
salida de audio.
(Í9) Botón [Number / ID SET / ENTER] (Número/
ESTABLECER IDENTIFICADOR / ENTRAR)
Presione este botón para establecer el identifìcador de la
pantalla. Consulte la página 5 para obtener más detalles.
Usar el mando a distancia
•
No lo someta a impactos fuertes.
•
No derrame agua ni ningún otro líquido sobre el mando
a distancia. Si el mando a distancia se moja, límpielo con
un paño seco inmediatamente.
•
Evite la exposición al calor y al vapor.
•
No abra el mando a distancia excepto para instalar las
pilas.
Control de una sola pantalla
Para controlar una pantalla, conecte el “Receptor de
infrarro
j
os externo” al puerto [
IR TRANSMITTER IN
]
(
ENTRADA DEL TRANSMISOR DE INFRARROJOS
).
Apunte con la parte superior del mando a distancia hacia el
“Receptor de infrarrojos externo” cuando presione un botón.
NOTA:
• El sensor del mando a distancia de la pantalla dejará de
funcionar después de conectarse con el “Receptor de
infrarrojos externo”.
Receptor de
jEEl infrarrojos externo
Control de varias pantallas
Para controlar una configuración de mural de televisores compuesta por varias pantallas, utilice el “Receptor de infrarrojos
externo” y el “Cable del conector del mando a distancia” incluidos en el paquete PD.
--------------MlUn
Receptor de
^ infrarrojos externo
Pantalla n° 1
Pantalla n° 2
IR TRANSMITTER
IRTRANSMITTER
1. Conecte el “Receptor de infrarrojos externo” al puerto [
IR TRANSMITTER IN
] (
ENTRADA DEL TRANSMISOR DE
INFRARROJOS
) de la Pantalla n°1.
2. Conecte el “Cable del conector^’ del puerto [
IR TRANSMITTER OUT
] (
SALIDA DEL TRANSMISOR DE INFRARROJOS
) de
la Pantalla n° 1 al puerto [
IR TRANSMITTER IN
] (
TRANSMISOR DE INFRARROJOS
) de la Pantalla n° 2.
3. Utilice el “Cable del conector del mando a distancia” para conectar la siguiente pantalla.
4. Apunte con la parte superior del mando a distancia hacia el “Receptor de infrarrojos externo” cuando presione un botón.
NOTA:
• El mando a distancia puede no funcionar correctamente cuando la luz directa del sol o una iluminación intensa incide sobre
el “Receptor de infrarrojos externo”, o cuando hay un obstáculo en la trayectoria de trasmisión de la señal.
Configuración de varias pantallas
Alineando las pantallas en grupos, por ejemplo, tal y como
se ilustra a continuación, se puede mostrar una imagen
ampliada por todas las pantallas.
Para este modo de funcionamiento, cada pantalla se tiene
que configurar con un número de pantalla para determinar su
ubicación.
Ejemplo:
Grupo de 4 (2x2):
Cómo configurarvarias pantallas
1.
2.
Entre en el menú OSD de configuración {
MOSAICO
} del
menú {
CONFIGURACIÓN 2
}.
Seleccione los números de pantalla que desea crear en
una sola matriz de pantalla grande (mural de vídeo).
TILING
H MONITORS
V MONITORS
POSITION
FRAME COMP.
ENABLE
AT
:SEL
+-:ADJ
Eii:RETURN
1
►
1
►
1 ►
APAGADO
►
APAGADO ►
EÜ!1:EXITMENU
Grupo de 9 (3x3):
Grupo de16 (4x4):
Grupo de 25 (5x5):
Ejemplo: matriz d e 2 x 2 pantallas (4 pantallas)
MONITORES H = 2 pantallas
MONITORES V = 2 pantallas
H MONITORS
1 2
—
3 4
■ Position
Ejemplo: matriz d e 5 x 5 pantallas (25 pantallas)
MONITORES H = 5 pantallas
MONITORES V=5 pantallas
H MONITORS
1
2
3
4
5
6
7
8
9
10
11
12
13
14
15
16
17
18
19
20
21
22
23
24
25
• Position
NOTA:
• Consulte el manual de instrucciones de funcionamiento
de TH-55LFV50 para obtener instrucciones sobre la
opción de configuración {
MOSAICO
} del menú SD
{
CONFIGURACIÓN 2
}.

Mando a distancia de
infrarrojos______________
Puede establecer el identifìcador del mando a distancia
cuando disponga de varias pantallas y de desee utilizar dicho
mando en una de ellas.
CONTRAST BRIGHTNESS
- SET +
1.
2.
3.
4.
5.
6.
O
O
+ o
MUTE
VOL
0
_ o
4*^ (2)
/ (D (D CD
1 CD CD CD
\
ID SET
ENTER
CD
Panasonic
DISPLAY
Presione el botón [ID] (IDENTIFICADOR). El LED de color
rojo parpadeará dos veces.
Presione el botón [ID SET] (ESTABLECER
IDENTIFICADOR) durante más de 1 segundo para entrar
en el modo de identiflcador. El LED de color rojo se
iluminará.
Presione de nuevo el botón [ID SET] (ESTABLECER
IDENTIFICADOR) para salir del modo de identiflcador. El
LED de color rojo se apagará.
Presione los botones de numero [0] ~ [9] para seleccionar
la pantalla que desea controlar.
Por ejemplo: presione [0] y [1] para la pantalla n° 1;
presione [1]y[1] para la pantalla n°11.
Los números disponibles son los comprendidos entre [01]
y [25].
Si no presiona ningún botón durante 10 segundos, el
modo de identiflcador se cerrará.
Si se produce un error al presionar botones diferentes
a los numéricos, espere 1 segundo a que el LED se
apague y se vuelva a iluminar y, a continuación, vuelva a
presionar los botones numéricos correctos.
Presione el botón [ENTER] (ENTRAR) para conflrmar la
selección. El LED parpadeará dos veces y, a continuación,
se apagará.
NOTA:
• Presione el botón [NORMAL]. El LED de color verde
parpadea dos veces, lo que indica que la pantalla se
encuentra en el estado de funcionamiento normal.
Entrar en el menú OSD
utilizar los botones de control de la
pantalla
1. Presione el botón [MENU] (MENÚ) para mostrar el menú
OSD.
2. Presione el botón o ^] para elegir el elemento que
desee ajustar.
3. Presione el botón [INPUT] (ENTRADA) para entrar en el
submenú.
4. En el submenú, presione el botón ^] o ^] para cambiar
de elemento y presione el botón H"] o [—] para ajustar
la confìguración. Si hay un submenú, presione el botón
[INPUT] (ENTRADA) para entrar en él.
5. Presione el botón [MENU] (MENÚ) para volver al menú
anterior; presiónelo varias veces para salir del menú OSD.
Usar el mando a distancia
1.
2.
3.
4.
5.
Presione el botón [MENU] (MENÚ) del mando a distancia
para mostrar el menú OSD.
Presione el botón ^] o ^] para elegir el elemento que
desee ajustar.
Presione el botón [SET] (ESTABLECER) para entrar en el
submenú.
En el submenú, presione el botón ^] o ^] para cambiar
de elemento y presione el botón H-] o [—] para ajustar la
confìguración. Si hay un submenú, presione el botón [SET]
(ESTABLECER) para entrar en él.
Presione el botón [EXIT] (SALIR)_para volver al menú
anterioro el botón [MENU] (MENÚ) para salirdel menú
OSD.
NOTA:
• Consulte el manual de instrucciones de funcionamiento
de TH-55LFV50 para obtener información general sobre
el menú OSD.
Información para Usuarios sobre la Recolección y Eliminación de aparatos viejos y baterías usadas
Estos símbolos en los productos, embalajes y/o documentos adjuntos, signiflcan que los aparatos eléctricos y
electrónicos y las baterías no deberían ser mezclados con los desechos domésticos.
Para el tratamiento apropiado, la recuperación y el reciclado de aparatos viejos y baterías usadas, por favor,
observe las normas de recolección aplicables, de acuerdo a su legislación nacional y a las Directivas 2002/96/CE
y 2006/66/CE.
Al desechar estos aparatos y baterías correctamente, Usted estará ayudando a preservar recursos valiosos y
a prevenir cualquier potencial efecto negativo sobre la salud de la humanidad y el medio ambiente que, de lo
contrario, podría surgir de un manejo inapropiado de los residuos.
Para mayor información sobre la recolección y el reciclado de aparatos y baterías viejos, por favor, contacte a su
comunidad local, su servicio de eliminación de residuos o al comercio donde adquirió estos aparatos.
Podrán aplicarse penas por la eliminación incorrecta de estos residuos, de acuerdo a la legislación nacional.
Para usuarios empresariales en la Unión Europea
Si usted desea descartar aparatos eléctricos y electrónicos, por favor contacte a su distribuidor o proveedor a fln
de obtener mayor información.
[Informacion sobre la Eliminación en otros Países fuera de la Unión Europea]
Estos símbolos sólo son válidos dentro de la Unión Europea. Si desea desechar estos objetos, por favor contacte
con sus autoridades locales o distribuidor y consulte por el método correcto de eliminación.
Nota sobre el símbolo de la bateria (abajo, dos ejemplos de símbolos):
Este símbolo puede ser usado en combinación con un símbolo químico. En este caso, el mismo cumple con los
requerimientos establecidos por la Directiva para los químicos involucrados.
Registro del cliente
El número de modelo y número de serle de este producto están en la cubierta trasera. Debe anotar este
número de serie en el espacio a continuación y guardar este librojunto con el recibo de compra como registro
permanente de su compra para ayudar a identificarlo en el caso de robo o pérdida y para el servicio bajo
garantía.
Número de modelo
Número de serie
Panasonic Corporation
sitio Web: http://panasonlc.net
© Panasonic Corporation 2012
Impreso en China
