Panasonic ES3042: инструкция
Раздел: Красота, здоровье, спорт. туризм, хобби
Тип: Электрическая Бритва
Инструкция к Электрической Бритве Panasonic ES3042
0•charge
Wet/Dry
R
P00-01.ES3042(欧州・東欧)05.10.1710:22ページ1
Wet /Dry Rechargeable Shaver
Operating Instructions
ES3042
Matsushita Electric Works-
Wanbao (Guangzhou)Ltd.
Before operating this unit, please read these instructions completely.
No.2 EN, GR, FR, IT, NE, SP, DN, PO, NR, SW, FN, RU, TU, PO, CZ, HU, RO (
欧州・東欧
)
Printed in China
1
3
A
(A)
B
C
D
(B)
F
G
H
E
I
4
K
L
M
J
2
2 3
90°
90°
P02-05.ES3042(欧州・東欧)05.10.1710:22ページ2
5 6
7
(A)
8
(B)
9
10
(e)
(c)
(a)
(d)
(b)
Index
ENGLISH Page 5
SVENSKA Sid 42
DEUTSCH Seite 9
SUOMI Sivu 46
FRANCAIS Page 14
PìCCKNÑ CrpaHàya 50
ITALIANO Pagina 18
TÜRKÇE Sayfa 55
NEDERLANDS Pagina 22
POLSKI Strona 59
ESPAÑOL Pagina 26
CESKY Strana 64
DANSK Side 30
MAGYAR Oldal 68
PORTUGÊS Pagina 34
ROMANA Pagina 72
NORSK Side 38
4
Before use
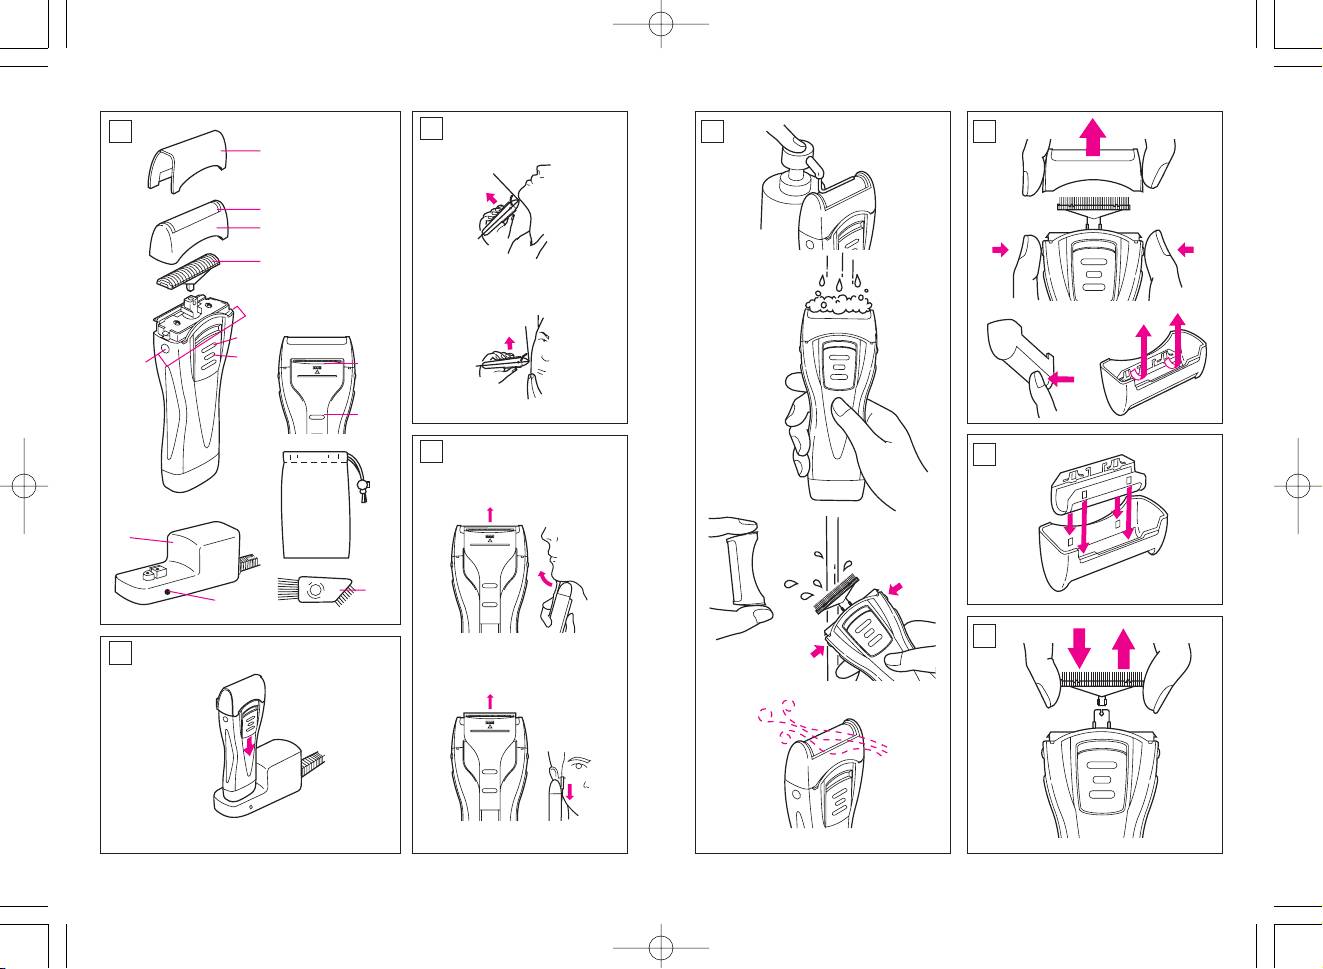
L Travel pouch
This Wet/Dry shaver can be used for
M Cleaning brush
wet shaving with shaving lather or for
dry shaving. You can use this water-
Charging
tight shaver in the shower and clean
(see fig. 2)
it in water. The following is the sym-
Place the charging adaptor upright
bol of Wet shaver. The symbol means
on a flat surface. Plug the adaptor into
that hand-held part may be used in
an AC outlet.
a bath or shower.
Switch the shaver to the “0 • charge”
position and place it upright into the
charging adaptor with the switch fac-
ing toward the front.
The charge indicator lamp will glow
and it will stay on until the shaver is
Treat yourself to wet lather shaves
removed from the adaptor.
for at least three weeks and notice
You can fully charge the shaver in 8
the difference. Your Panasonic Wet/
hours if it seems to be losing speed.
Dry shaver requires a little time to get
A full charge will supply enough
used to because your skin and beard
power for about 7 shaves (three min-
need about a month to adjust to any
utes per shave for a normal beard).
new shaving method.
Before traveling, charge it fully for 8
Charge the shaver for at least 8 hours
hours if you will not be taking the
before using it for the first time or
charging adaptor with you.
when it has not been in use for more
than six months.
For a better shave
Parts identification
Put a thin layer of shaving foam on
your face which works as a lubrica-
(see fig. 1)
tor.
A Protective cap
Shaving foam is the most suitable
B Outer foil
among many other shaving aids (gel,
C Foil frame
soap, cream, etc). Do not put a thick
D Inner blade
layer of shaving foam as it may af-
fect shaver's performance. If the
E Foil frame release buttons
shaving head is clogged with foam,
F On/Off switch
simply rinse it under running water.
G Switch lock button
Depress the switch lock button and
H Trimmer
slide the On/Off switch upward to turn
I Trimmer handle
the shaver on. Hold the shaver at a
right angle (90°) to your skin (see fig.
J Charge indicator lamp
3). Start out shaving by applying gen-
K Charging adaptor
5
P02-05.ES3042(欧州・東欧)05.10.1710:22ページ4

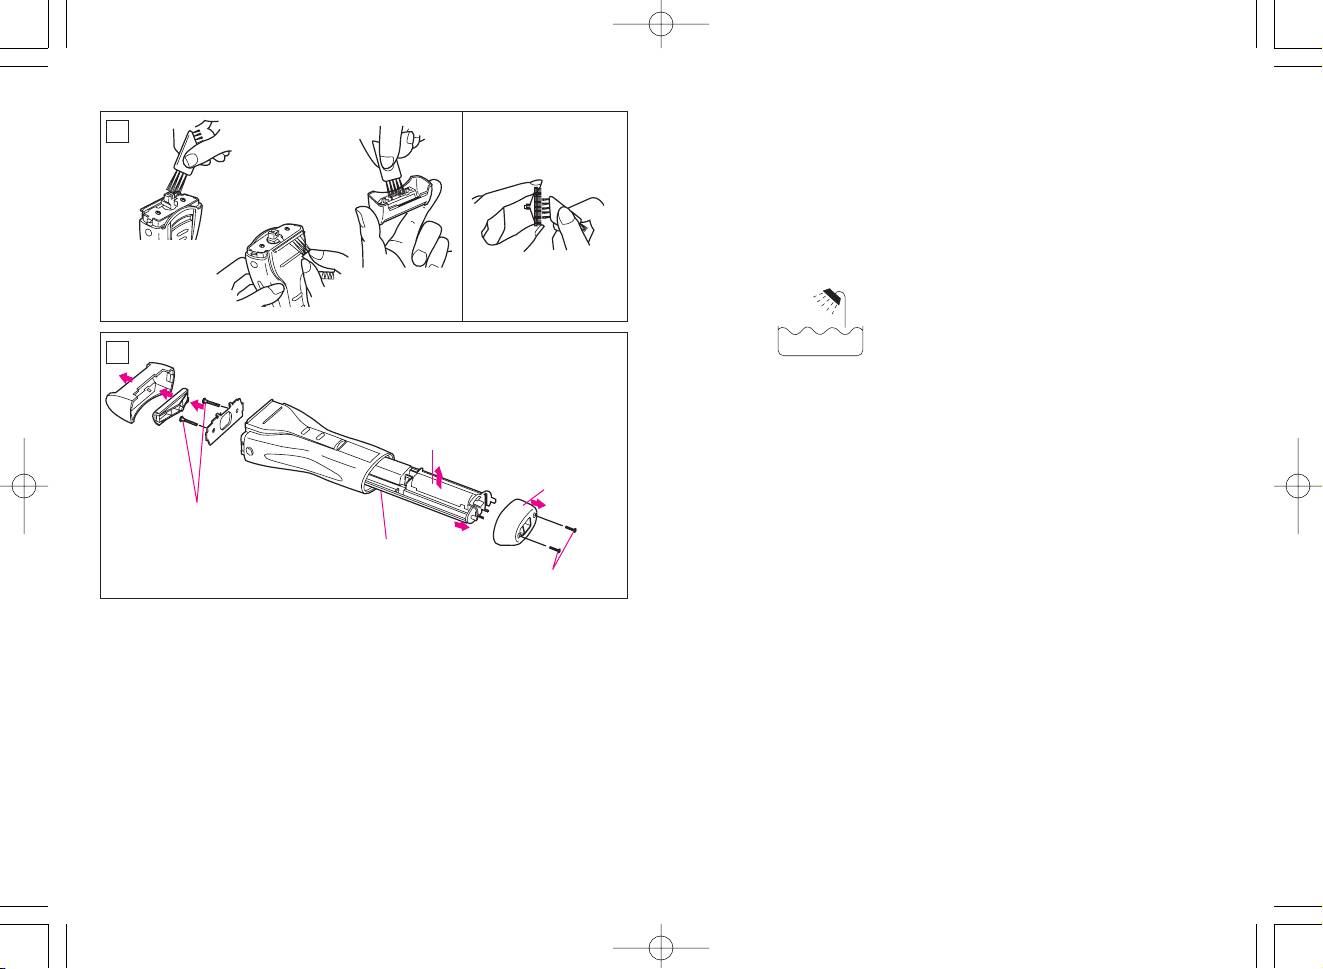
Insert the new outer foil
after the battery has been removed.
WES9941Y
1. Remove the protective cap, foil
Slip the foil into the frame with the
frame and inner blade.
plastic edges facing inward. Guide
2. Remove the two screws (a) on the
the plastic edges onto the hooks in
top.
the frame (see fig. 7).
3. Remove the two screws (b) and
remove the bottom cover (c).
Replacing the inner blades
4. Push the chassis (d) out of the
WES9942Y
housing.
(see fig. 8)
5. Remove the battery (e) from the
Squeeze the foil frame release but-
chassis.
tons and lift the foil frame upward to
remove it. Remove the inner blade
Caution
by grasping it firmly at both ends and
• Do not charge the shaver where the
pulling straight away from the shaver.
temperature is below 0°C (32°F) or
To insert the new inner blade, hold
above 40°C (104°F), where it will
the blade at both ends and press
be exposed to direct sunlight or a
downward until it snaps into the
heat source, or where there is a lot
shaver.
of moisture.
• Use only the included shaver
For environmental protec-
charging adaptor RE3-68 to charge
tion and recycling of
the ES3042, ES3041 shaver.
• The supply cord of the charging
materials
adaptor cannot be replaced; if the
This shaver contains Nickel-Cad-
cord is damaged, the entire charger
mium battery.
should be discarded.
When you are no longer able to use
• Dry the shaver completely before
your shaver after consulting dealers
setting it in the charging adaptor.
and decide to discard it, the battery
• Keep the charging adaptor away
must be recycled or disposed of
from water and handle it only with
properly.
dry hands. Do not use an extension
How to remove the built-in re-
cord to connect the charging adap-
chargeable battery before dis-
tor to an outlet.
posal of the shaver (see fig. 10)
• Grip the plug when disconnecting
the charging adaptor from a recep-
The battery in this shaver is not in-
tacle; tugging on the cord may dam-
tended to be replaced by consum-
age it.
ers. However, the battery may be re-
• Store the charging adaptor and its
placed at an authorized service cen-
cord set in a dry area where it will
tre. The procedure described in fig.
be protected from damage.
10 is intended only for removal for
proper disposal. Discard shaver only
7
tle pressure to your face. Stretch your
water over the outer foil.
skin with your free hand and move
After about 10-20 seconds, turn the
the shaver back and forth in the di-
shaver off.
rection of your beard. You may gen-
Remove the foil frame and clean it
tly increase the amount of pressure
with running water.
as your skin becomes accustomed
Wipe off any moisture from the
to this shaver. Applying excessive
shaver with a dry cloth and remove
pressure does not provide a closer
the protective cap to allow the outer
shave.
foil to dry completely.
Using the trimmer
Brush cleaning
(see fig. 4)
Squeeze the foil frame release but-
tons and lift the foil frame upward to
Shaving longer, curly hairs under
remove it (see fig. 6).
the chin (see fig. 4A)
Remove the inner blade by grasping
Slide the trimmer handle up to the
it firmly at both ends and pulling it
1st position. This position makes the
straight away from the shaver (see
trimmer an intercept cutter, cutting
fig. 8). Clean the outer foil, the shaver
long hairs while the outer foil shaves
body and the trimmer with the long
shorter hairs. Make sure that the trim-
side of the brush (see fig. 9). Clean
mer is facing outward away from the
the inner blade with the short side of
neck.
the brush (see fig. 9). Do not use the
Trimming sideburns (see fig. 4B)
short brush to clean the outer foil.
Slide the trimmer handle up to the 2
position.
Replacing shaving head
Place the trimmer at a right angle to
components
your skin and move it downward to
It is recommended that you replace
trim sideburns.
the outer foil at least every year and
Cleaning your shaver
the inner blade at least every two
years to maintain your shaver’s cut-
(see fig. 5)
ting performance.
For cleanliness and convenience, we
recommend that you clean your
Remove the outer foil
shaver with water and a liquid hand
Squeeze the foil frame release but-
soap. Regular cleaning will keep your
tons and lift the foil frame upward to
shaver in good condition while pre-
remove it. Remove the outer foil from
venting odors or bacteria from devel-
the frame by slipping it off the hooks.
oping, and maintain the cutting per-
(Caution: The foil may spring out
formance.
when released from the hooks.) (see
With the outer foil in place, apply
fig. 6)
some hand soap onto the outer foil.
Turn the shaver on and pour some
6
P06-37.ES3042(欧州・東欧)05.10.1710:22ページ6
6 7
- 1
- 2
