Panasonic EY4640: инструкция
Раздел: Инструмент, электроинструмент, силовая техника
Тип:
Инструкция к Panasonic EY4640
Operating Instructions
Bedienungsanleitung
Instructions d’utilisation
Istruzioni per l’uso
Gebruiksaanwijzing
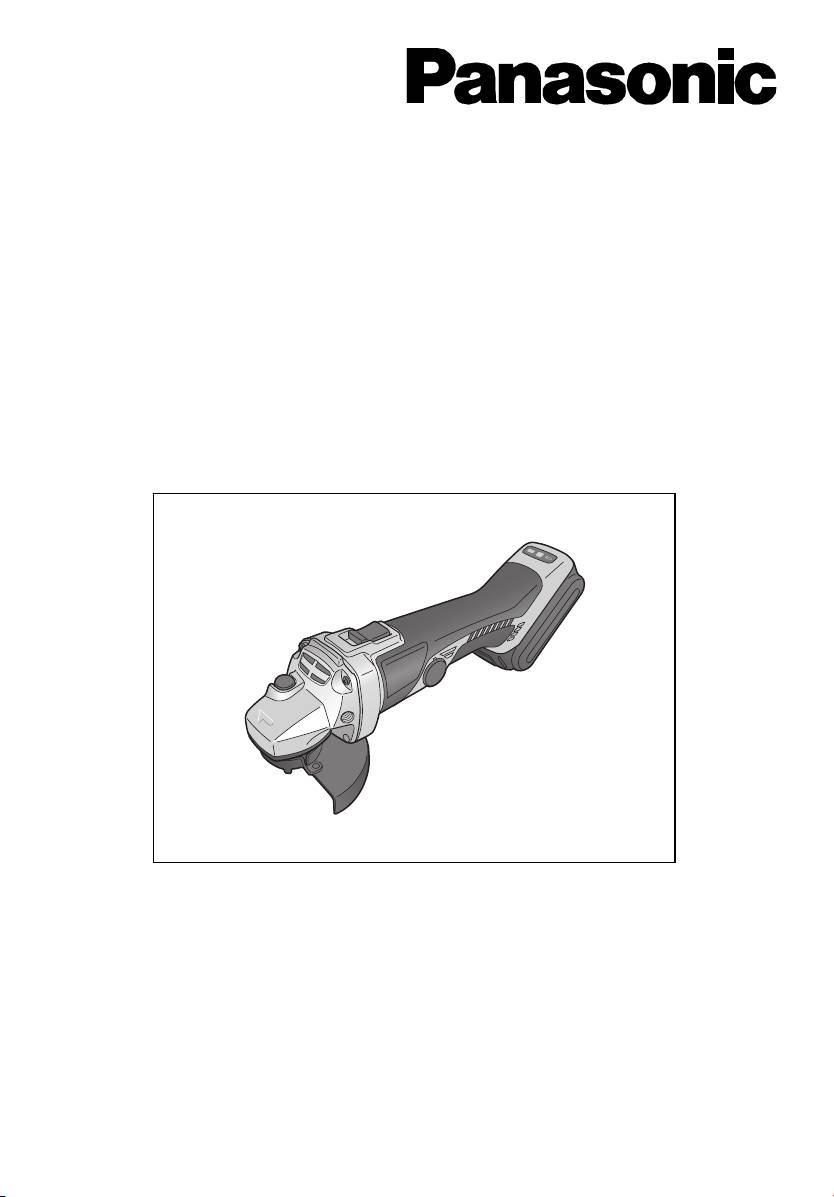
Cordless Angle Grinder
Manual de instrucciones
Kabelloser Winkelschleifer
Brugsvejledning
Meule d'angle sans fil
Driftsföreskrifter
Smerigliatrice angolare senza fili
Snoerloze haakse slijper
Bruksanvisning
Amoladora angular inalámbrica
Käyttöohjeet
Akku-vinkelslibemaskine
Инструкция по эксплуатации
Sladdlös vinkelslipmaskin
Batteridrevet vinkelsliper
Iнструкцiя з експлуатації
Ladattava kulmahiomakone
Угловая шлифовальная машина с аккумуляторным питанием
Кутова шліфувальна машина з батарейним блоком
Model No: EY4640
Before operating this unit, please read these instructions completely and save this manual for future use.
Vor Inbetriebnahme des Gerätes die Betriebsanleitung bitte gründlich durchlesen und diese Broschüre zum späteren Nachschlagen
sorgfältig aufbewahren.
Lire entièrement les instructions suivantes avant de faire fonctionner l’appareil et conserver ce mode d’emploi à des fins de consultation
ultérieure.
Prima di usare questa unità, leggere completamente queste istruzioni e conservare il manuale per usi futuri.
Lees deze gebruiksaanwijzing aandachtig door voor u het apparaat in gebruik neemt en bewaar de gebruiksaanwijzing voor eventuele
naslag.
Antes de usar este aparato por primera vez, lea todas las instrucciones de este manual y guarde el manual para poderlo consultar en el
futuro.
Gennemlæs denne betjeningsvejledning før brugen og gem den til fremtidig brug.
Läs igenom hela bruksanvisningen innan verktyget tas i bruk. Spara bruksanvisningen för senare användning.
Før enheten tas i bruk, vennligst les disse alle anvisningene og oppbevar deretter bruksanvisningen for senere bruk.
Lue ohjeet huolella ennen laitteen käyttöönottoa ja säilytä tämä käyttöohje tallessa tulevaa tarvetta varten.
Перед эксплуатацией данного устройства, пожалуйста, полностью прочтите данную инструкцию и сохраните данное руководство
для использования в будущем..
Перед екплуатацiєю даного пристрою, будь ласка, повнiстю прочитайте дану iнструкцiю i збережiть даний посiбник для
використання у майбутньому.
Index/Index/Index/Indice/Index/Indice/Indeks/Index/Indeks/Hakemisto/
Индекс/Індекс
English: Page 6
Dansk: Side 103
Deutsch: Seite 23
Svenska: Sid 118
Français: Page 39
Norsk: Side 133
Italiano: Pagina 55
Suomi: Sivu 148
Nederlands: Bladzijde 71
Русский: Страница 163
Español: Página 87
Українська: Сторiнка 179
FUNCTIONAL DESCRIPTION
FUNKTIONSBESCHREIBUNG
DESCRIPTION DES FONCTIONS
DESCRIZIONE DELLE FUNZIONI
FUNCTIEBESCHRIJVING
DESCRIPCIÓN FUNCIONAL
FUNKTIONSBESKRIVELSE
FUNKTIONSBESKRIVNING
FUNKSJONSBESKRIVELSE
TOIMINTOKUVAUS
ФУНКЦИОНАЛЬНОЕ ОПИСАНИЕ
ФУНКЦIОНАЛЬНИЙ ОПИС
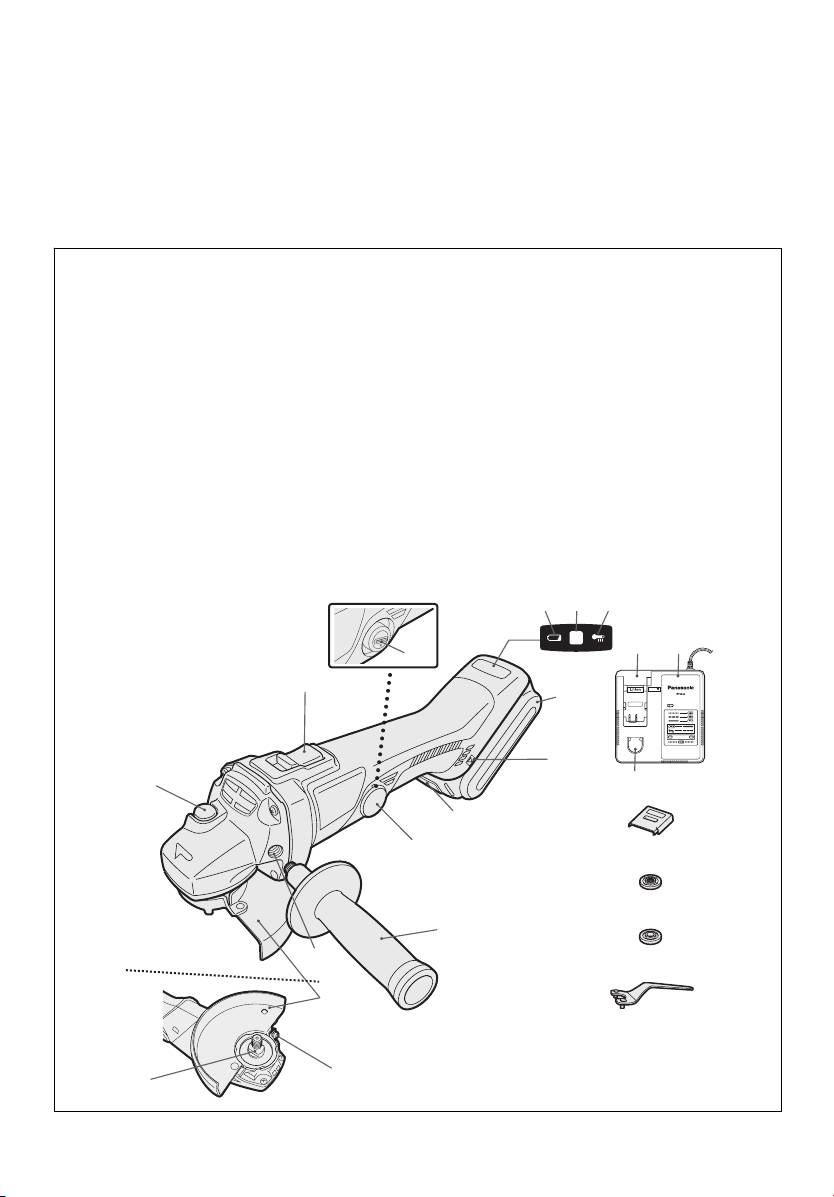
(D) (E) (F)
(C)
(Q)
(R)
(B)
(A)
(G)
Ni-MH
Ni-Cd
(H)
(P)
(S)
(I)
(J)
(T)
(U)
(K)
(V)
(L)
(M)
(W)
(N)
(O)
- 2 -

Power switch
Brush cap
Netzschalter
Bürstenkappe
Interrupteur d’alimentation
Capuchon des charbons
Interruttore di accensione
Capsula spazzole
Hoofdschakelaar
Borstelkap
Interruptor de alimentación
Tapa de cepillo
(A)
(B)
Afbryder
Børstehætte
Strömbrytare
Borstlock
Strømbryter
Børstehette
Käyttökytkin
Harjan suojus
Переключатель питания
Колпачок щетки
Перемикач живлення
Ковпачок щітки
Display panel
Battery low warning lamp
Anzeigefeld
Akkuladungs-Warnlampe
Ecran d'affichage
Témoin d’avertissement de batterie basse
Display
Spia avvertenza batteria scarica
Displaypaneel
Waarschuwingslampje voor lage accuspanning
Panel de exhibición
Luz de aviso de baja carga de batería
(C)
(D)
Displaypanel
Advarselslampes batterieffekt lav
Display
Varningslampa för svagt batteri
Displaypanel
Varsellampe for at batteriet er for lavt
Näyttöpaneeli
Alhaisen akkujännitteen varoituslamppu
Индикаторная панель
Предупреждающая лампочка низкого заряда батареи
Індикаторна панель
Попереджувальна лампочка низького заряду батареї
On lock warning lamp
Overheat warning lamp (battery)
Einschaltsicherungsleuchte
Überhitzungs-Warnlampe (Akku)
Témoin d'avertissement à verrou activé
Témoin d’avertissement de surchauffe (batterie)
Spia avvertenza blocco utensile
Spia avvertenza surriscaldamento (batteria)
Waarschuwingslampje inschakelvergrendeling
Oververhitting-waarschuwingslampje (accu)
Luz de advertencia de bloqueo
Luz de advertencia de sobrecalentamiento (batería)
(E)
(F)
Låseadvarselslampe
Advarselslamp til overophedning (batteri)
Varningslampa för påslagningssäkring
Varningslampa för överhettning (batteri)
Varsellampe for innkoblingssikring
Varsellampe for overoppheting (batteri)
Turvalukituksen merkkivalo
Ylikuumenemisen varoituslamppu (akku)
Предупреждающая лампа блокировки
Предупреждающая лампочка перегрева (батареи)
Попереджувальна лампочка блокіровки
Попереджувальна лампочка перегріву (батареї)
Battery pack (EY9L40/EY9L41)
Alignment mark
Akku (EY9L40/EY9L41)
Ausrichtmarkierung
Batterie autonome (EY9L40/EY9L41)
Marque d'alignement
Pacco batteria (EY9L40/EY9L41)
Marcatura di allineamento
Accu (EY9L40/EY9L41)
Uitlijntekens
Batería (EY9L40/EY9L41)
Marca de alineación
(G)
(H)
Batteripakning (EY9L40/EY9L41)
Flugtemærke
Batteri (EY9L40/EY9L41)
Anpassningsmärken
Batteripakke (EY9L40/EY9L41)
Innrettingsmerke
Akku (EY9L40/EY9L41)
Sovitusmerkki
Батарейный блок (EY9L40/EY9L41)
Метка совмещения
Батарейний блок (EY9L40/EY9L41)
Мітка вирівнювання
Battery pack release button
Brush cap cover
Akku-Entriegelungsknopf
Bürstenkappenabdeckung
Bouton de libération de batterie autonome
Couvercle de capuchon des charbons
Tasto di rilascio pacco batteria
Copertura capsula spazzole
Accu-ontgrendeltoets
Borstelkapafdekking
Botón de liberación de batería
Cubierta de tapa de cepillo
(I)
(J)
Udløserknap til batteripakning
Børstehætteafdækning
Frigöringsknapp för batteri
Borstlockskydd
Utløserknapp for batteripakke
Børstehettedeksel
Akkupaketin irrotuspainike
Hiiliharjan suojakansi
Кнопка освобождения батарейного блока
Заглушка колпачка щетки
Кнопка вивільнення батарейного блоку
Заглушка ковпачка щітки
- 3 -

Support handle
Support handle mounting hole
Zusatzgriff
Montageloch für Stützgriff
Manche de support
Orifice de montage du manche de support
Maniglia di sostegno
Foro montaggio maniglia di sostegno
Handgreep
Montage-opening van handgreep
Mango de soporte
Orificio de montaje de mango de soporte
(K)
(L)
Hjælpehåndtag
Monteringshul til hjælpehåndtag
Stödhandtag
Monteringshål för stödhandtag
Støttehåndtak
Monteringshull for støttehåndtak
Tukikahva
Tukikahvan asennusaukko
Поддерживающая рукоятка
Отверстие для крепления дополнительной рукоятки
Підтримуюча рукоятка
Отвір для кріплення додаткової рукоятки
Grinding disc guard
Grinding disc guard fixing screw
Schleifscheibenschutz
Schleifscheibenschutzschraube
Carter de disque abrasif
Vis de fixation du carter de disque abrasif
Carter disco mola
Vite di fissaggio carter disco mola
Afbraamschijfbeschermkap
Bevestigingsschroef van afbraamschijfbeschermkap
Protección de disco de desbastado
Tornillo de fijación de protector de disco de amoladora
(M)
(N)
Slibeskivebeskytter
Slibeskivebeskytter skrue
Slipskivans skydd
Låsskruv för slipskivans skydd
Slipeskiveskjerm
Festeskrue for slipeskiveskjerm
Hiomalaikan suojus
Hiontalaikan suojuksen kiinnitysruuvi
Защитный кожух шлифовального круга
Скрепляющий винт кожуха шлифовального круга
Захисний кожух шліфувального круга
Скріпляючий гвинт кожуха шліфувального круга
Spindle
Spindle lock button
Spindel
Spindelverriegelungstaste
Axe
Bouton de blocage de l'axe
Asse
Pulsante di blocco asse
As
Afbraamschijf
Eje
Botón de bloqueo de eje
(O)
(P)
Spindel
Spindellåseknap
Spindel
Spindelns låsknapp
Spindel
Spindellåseknapp
Kara
Karan lukituspainike
Шпиндель
Стопорная кнопка шпинделя
Шпиндель
Стопорна кнопка шпінделя
Li-ion battery pack dock
Battery charger (EY0L80)
Li-Ion-Akkuladeschacht
Ladegerät (EY0L80)
Poste d’accueil de la batterie autonome Li-ion
Chargeur de batterie (EY0L80)
Spazio raccordo pacco batteria Li-ion
Caricabatterie (EY0L80)
Li-ion accuhouder
Acculader (EY0L80)
Enchufe de carga de batería Li-ión
Cargador de batería (EY0L80)
(Q)
(R)
Li-ion batteripakningsdok
Batterioplader (EY0L80)
Docka för litiumjonbatteri
Batteriladdare (EY0L80)
Dokk for Li-ion-batteripakke
Batterilader (EY0L80)
Li-ioniakun liitin
Akkulaturi (EY0L80)
Углубление для установки литий-ионного батарейного блока
Зарядное устройство (EY0L80)
Заглиблення для встановлення літій-іонного батарейного блоку
Зарядний пристрій (EY0L80)
- 4 -

Ni-MH/Ni-Cd battery pack dock
Battery pack cover
Ni-MH/Ni-Cd-Akkuladeschacht
Akkuabdeckung
Poste d’accueil de la batterie autonome Ni-MH/Ni-Cd
Couvercle de la batterie autonome
Spazio raccordo pacco batteria Ni-MH/Ni-Cd
Coperchio batterie
Ni-MH/Ni-Cd accuhouder
Accudeksel
Enchufe de carga de batería Ni-MH/Ni-Cd
Cubierta de la batería
Ni-MH/Ni-Cd batteripakningsdok
Akkuafdækning
(S)
(T)
Docka för NiMH/NiCd-batteri
Batterilock
Dokk for Ni-MH/Ni-Cd-batteripakke
Batteripakkedeksel
Ni-MH/Ni-Cd akun latauspesä
Akun liitinsuoja
Углубление для установки никель-металлогидридного
Крышка аккумуляторного блока
батарейного блока/никель-кадмиевого батарейного блока
Кришка батарейного блоку
Заглиблення для встановлення нікель-метал-гідридного
батарейного блоку/нікель-кадмієвого батарейного блоку
Clamp nut
Disc flange
Mutter
Scheibenflansch
Écrou de serrage de collier
Flasque du disque
Dado di fissaggio
Flangia disco
Klemmoer
Schijfflens
Tuerca de abrazadera
Brida de disco
(U)
(V)
Møtrik
Skiveflange
Mutter
Skivfläns
Klemmutter
Skiveflens
Aluslevy
Laikan lukituslaippa
Фланцевая гайка
Дисковый фланец
Фланцева гайка
Дисковий фланець
Disc wrench
Scheibenschlüssel
Clé de disque
Chiave per il disco
Schijfsleutel
Llave de disco
(W)
Skivenøgle
Skivnyckel
Skivenøkkel
Lukituslaipan avain
Дисковый ключ
Дисковий ключ
- 5 -
WARNING:
I. INTENDED USE
Warning indicates a potentially haz-
Thank you for purchasing the Panasonic
ardous situation, which could result in
Angle Grinder. The powerful grinding
serious injury or death if not avoided.
action of this tool, combined with the
convenience of its rechargeable battery
DANGER:
pack, provides you with great grinding
Danger indicates an imminent hazard
performance.
which will result in serious injury or
death if not avoided.
This Angle Grinder is only to be used for
grinding and cutting-off.
Read the “Safety Instructions” booklet
and the following before using.
DANGER:
This product is a grinding tool, designed
to grind. It has a rotating disc which is
II. ADDITIONAL
capable of cutting you deeply, causing
serious injury or death. As a result,
please read this manual and the cau-
SAFETY RULES
tionary markings on the tool carefully,
Safety instructions for all op-
and obey all of the Safety Instructions to
avoid such injury.
erations
Safety warning common for Grinding
or Abrasive Cutting-off operations:
WARNING:
1)
This power tool is intended to
To reduce the risk of injury, always
use proper guards when grinding.
function as a grinder, or cut-off
tool. Read all safety warnings,
instructions, illustrations and
How to Use This Manual
specifications provided with this
• Please read this manual completely
power tool.
Failure to follow all in-
before starting to use your grinder. If
structions listed below may result in
you let someone else use the grinder,
electric shock, fire and/or serious
make sure they either read this man-
injury.
ual or are fully instructed in the proper
2)
use and all safety precautions con-
Operations such as sanding,
cerning the grinder.
wire brushing, polishing are not
recommended to be performed
• Please keep this manual for future
with this power tool.
Operations
reference. It contains important safety
for which the power tool was not
information that you must follow to use
designed may create a hazard and
the grinder safely.
cause personal injury.
• This manual and product use the fol-
3)
Do not use accessories which
lowing signal words:
are not specifically designed and
NOTE:
recommended by the tool
Notes provide additional information
manufacturer.
Just because the
that you should know about the grinder.
accessory can be attached to your
power tool, it does not assure safe
CAUTION:
operation.
Caution indicates a potentially haz-
4)
The rated speed of the accessory
ardous situation, which could result in
must be at least equal to the
minor or moderate injury if not avoided.
maximum speed marked on the
Cautions also alert you to unsafe prac-
power tool.
Accessories running
tices to be avoided.
faster than their RATED SPEED
can break and fly apart.
- 6 -

5)
The outside diameter and the
9)
Keep bystanders a safe distance
thickness of your accessory must
away from work area. Anyone
be within the capacity rating of
entering the work area must wear
your power tool.
Incorrectly sized
personal protective equipment.
accessories cannot be adequately
Fragments of workpiece or of a
guarded or controlled.
broken accessory may fly away and
cause injury beyond immediate area
6)
The arbour size of wheels, flanges,
of operation.
backing pads or any other ac-
cessory must properly fit the
10)
Hold power tool by insulated grip-
spindle of the power tool.
Acces-
ping surfaces only, when perform-
sories with arbour holes that do not
ing an operation where the cutting
match the mounting hardware of
accessory may contact hidden wir-
the power tool will run out of bal-
ing or its own cord.
Cutting acces-
ance, vibrate excessively and may
sory contacting a “live” wire may
cause loss of control.
make exposed metal parts of the
power tool “live” and shock the op-
7)
Do not use a damaged accessory.
erator.
Before each use inspect the ac-
cessory such as abrasive wheels
11)
Position the cord clear of the
for chips and cracks. If power tool
spinning accessory.
If you lose
or accessory is dropped, inspect
control, the cord may be cut or
for damage or install an undam-
snagged and your hand or arm may
aged accessory. After inspecting
be pulled into the spinning acces-
and installing an accessory, po-
sory.
sition yourself and bystanders
12)
Never lay the power tool down
away from the plane of the rotat-
until the accessory has come to a
ing accessory and run the power
complete stop.
The spinning ac-
tool at maximum no-load speed
cessory may grab the surface and
for one minute.
Damaged acces-
pull the power tool out of your con-
sories will normally break apart dur-
trol.
ing this test time.
13)
Do not run the power tool while
8)
Wear personal protective
carrying it at your side.
Accidental
equipment. Depending on ap-
contact with the spinning accessory
plication, use face shield, safety
could snag your clothing, pulling the
goggles or safety glasses. As
accessory into your body.
appropriate, wear dust mask,
hearing protectors, gloves and
14)
Regularly clean the power tool’s
workshop apron capable of
air vents.
The motor’s fan will draw
stopping small abrasive or
the dust inside the housing and
workpiece fragments.
The eye
excessive accumulation of pow-
protection must be capable of
dered metal may cause electrical
stopping flying debris generated
hazards.
by various operations.
The eye
15)
Do not operate the power tool near
protection must be capable of
flammable materials.
Sparks could
stopping flying debris generated by
ignite these materials.
various operations. The dust mask
16)
Do not use accessories that re-
or respirator must be capable of fil-
quire liquid coolants.
Using water
trating particles generated by your
or other liquid coolants may result in
operation. Prolonged exposure to
electrocution or shock.
high intensity noise may cause
hearing loss.
- 7 -

Further safety instructions for
bouncing have a tendency to snag
the rotating accessory and cause
all operations
loss of control or kickback.
Kickback and Related Warnings
5)
Do not attach a saw chain wood-
Kickback is a sudden reaction to a
carving blade or toothed saw
pinched or snagged rotating wheel,
blade.
Such blades create frequent
backing pad, brush or any other acces-
kickback and loss of control.
sory. Pinching or snagging causes rapid
stalling of the rotating accessory which
in turn causes the uncontrolled power
Additional safety instructions for
tool to be forced in the direction opposite
grinding and cutting-off opera-
of the accessory’s rotation at the point of
tions
the binding.
Safety warnings specific for Grinding
For example, if an abrasive wheel is
snagged or pinched by the workpiece,
and Abrasive Cutting-off operations:
the edge of the wheel that is entering
1)
Use only wheel types that are
into the pinch point can dig into the
recommended for your power
surface of the material causing the
tool and the specific guard de-
wheel to climb out or kick out. The
signed for the selected wheel.
wheel may either jump toward or away
Wheels for which the power tool
from the operator, depending on direc-
was not designed cannot be ade-
tion of the wheel’s movement at the
quately guarded and are unsafe.
point of pinching. Abrasive wheels may
2)
The guard must be securely at-
also break under these conditions.
tached to the power tool and po-
Kickback is the result of power tool
sitioned for maximum safety, so
misuse and/or incorrect operating
the least amount of wheel is ex-
procedures or conditions and can be
posed towards the operator.
The
avoided by taking proper precautions
guard helps to protect operator
as given below.
from broken wheel fragments and
accidental contact with wheel.
1)
Maintain a firm grip on the power
tool and position your body and
3)
Wheels must be used only for rec-
arm to allow you to resist kickback
ommended applications. For exam-
forces. Always use auxiliary handle,
ple: do not grind with the side of
if provided, for maximum control
cut-off wheel.
Abrasive cut-off wheels
over kickback or torque reaction
are intended for peripheral grinding,
during start-up.
The operator can
side forces applied to these wheels
control torque reactions or kickback
may cause them to shatter.
forces, if proper precautions are
4)
Always use undamaged wheel
taken.
flanges that are of correct size and
2)
Never place your hand near the
shape for your selected wheel.
rotating accessory.
Accessory may
Proper wheel flanges support the
kickback over your hand.
wheel thus reducing the possibility of
wheel breakage. Flanges for cut-off
3)
Do not position your body in the
wheels may be different from grind-
area where power tool will move
ing wheel flanges.
if kickback occurs.
Kickback will
propel the tool in direction opposite
5)
Do not use worn down wheels
to the wheel’s movement at the
from larger power tools.
Wheel
point of snagging.
intended for larger power tool is not
suitable for the higher speed of a
4)
Use special care when working
smaller tool and may burst.
corners, sharp edges etc. Avoid
bouncing and snagging the ac-
cessory.
Corners, sharp edges or
- 8 -
Additional Safety Warnings Spe-
6)
Use extra caution when making a
“pocket cut” into existing walls or
cific for Abrasive Cutting-Off Op-
other blind areas.
The protruding
erations:
wheel may cut gas or water pipes,
1)
Do not “jam” the cut-off wheel or
electrical wiring or objects that can
apply excessive pressure. Do
cause kickback.
not attempt to make an exces-
sive depth of cut.
Overstressing
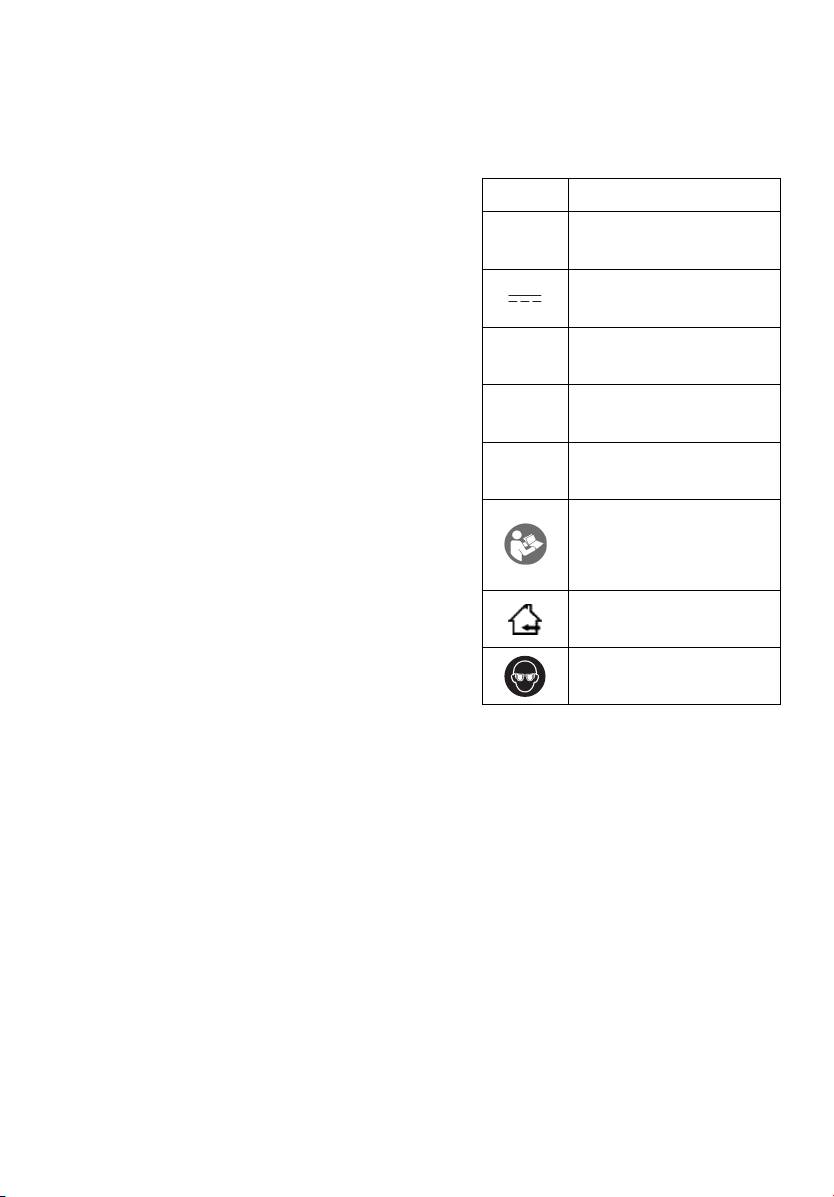
Symbol Meaning
the wheel increases the loading
and susceptibility to twisting or
V Volts
binding of the wheel in the cut and
the possibility of kickback or wheel
breakage.
Direct current
2)
Do not position your body in line
with and behind the rotating
n
Rated speed
wheel.
When the wheel, at the point
of operation, is moving away from
-1
Revolutions or reciproca-
your body, the possible kickback
…min
tions per minutes
may propel the spinning wheel and
the power tool directly at you.
Electrical capacity of
Ah
3)
battery pack
When wheel is binding or when
interrupting a cut for any reason,
To reduce the risk of
switch off the power tool and
injury, user must read
hold the power tool motionless
and understand instruc-
until the wheel comes to a com-
tion manual.
plete stop. Never attempt to re-
move the cut-off wheel from the
For indoor use only.
cut while the wheel is in motion
otherwise kickback may occur.
Always wear eye protec-
Investigate and take corrective ac-
tion
tion to eliminate the cause of wheel
binding.
4)
Do not restart the cutting opera-
tion in the workpiece. Let the
wheel reach full speed and care-
fully reenter the cut.
The wheel
may bind, walk up or kickback if the
power tool is restarted in the work-
piece.
5)
Support panels or any oversized
workpiece to minimize the risk of
wheel pinching and kickback.
Large workpieces tend to sag under
their own weight. Supports must be
placed under the workpiece near the
line of cut and near the edge of the
workpiece on both sides of the
wheel.
- 9 -
