Panasonic EY3544: инструкция
Раздел: Инструмент, электроинструмент, силовая техника
Тип:
Инструкция к Panasonic EY3544
Operating Instructions
Bedienungsanleitung
Instructions d'utilisation
Cordless Reciprocating Saw
Istruzioni per l’uso
Akku-Reciprosäge
Gebruiksaanwijzing
Scie alternative sur batterie
Manual de instrucciones
Sega alternativa a batteria
Brugsvejledning
Snoerloze reciprozaag
Sierra alternativa inalámbrica
Driftsföreskrifter
Akku-reciproksav
Bruksanvisning
Trådlös växelverkande såg
Käyttöohjeet
Oppladbar stempelsag
Инструкция по эксплуатации
Akkukäyttöinen pistosaha
Iнструкцiя з експлуатації
Аккумуляторная механическая пила
Акумуляторна механічна пила
Model No: EY3544
Before operating this unit, please read these instructions completely and save this manual for future use.
Vor Inbetriebnahme des Gerätes, die Betriebsanleitung bitte grüdlich durchlesen und diese Broschüre zum späteren Nachschlagen sorgfältig aufbewahren.
Lire entièrement les instructions suivantes avant de faire fonctionner l’appareil et conserver ce mode d’emploi à des fins de consultation ultérieure.
Prima di usare questa unità, leggere completamente queste istruzioni e conservare il manuale per usi futuri.
Lees deze gebruiksaanwijzing aandachtig door voor u het apparaat in gebruik neemt en bewaar de gebruiksaanwijzing voor eventuele naslag.
Antes de usar este aparato por primera vez, lea todas las instrucciones de este manual y guarde el manual para poderlo consultar en el futuro.
Gennemlæs denne betjeningsvejledning før brugen og gem den til fremtidig brug.
Läs igenom hela bruksanvisningen innan strålkastaren tas i bruk. Spara bruksanvisningen för senere användning.
Før enheten tas i bruk, vennligst les disse alle anvisningene og oppbevar deretter bruksanvisningen for senere bruk.
Lue ohjeet huolella ennen laitteen käyttöönottoa ja säilytä tämä käyttöohje tallessa tulevaa tarvetta varten.
Перед эксплуатацией данного устройства, пожалуйста, полностью прочтите данную инструкцию и сохраните данное руководство для использования в будущем.
Перед екплуатацiєю даного пристрою, будь ласка, повнiстю прочитайте дану iнструкцiю i збережiть даний посiбник для використання у майбутньому.
-
2
-
Index/Hinweise
/Index
/Indice
/Index
/Indice
/Indeks
/Index
/Indeks
/Hakemisto
/Индекс/Індекс
English:
Page
4
Dansk:
Side
42
Deutsch:
Seite
12
Svenska:
Sid
48
Français:
Page
18
Norsk:
Side
54
Italiano:
Pagina
24
Suomi:
Sivu
60
Nederlands:
Badzijde
30
Русский:
Страница
66
Español:
Página
36
Українська:
Сторiнка
73
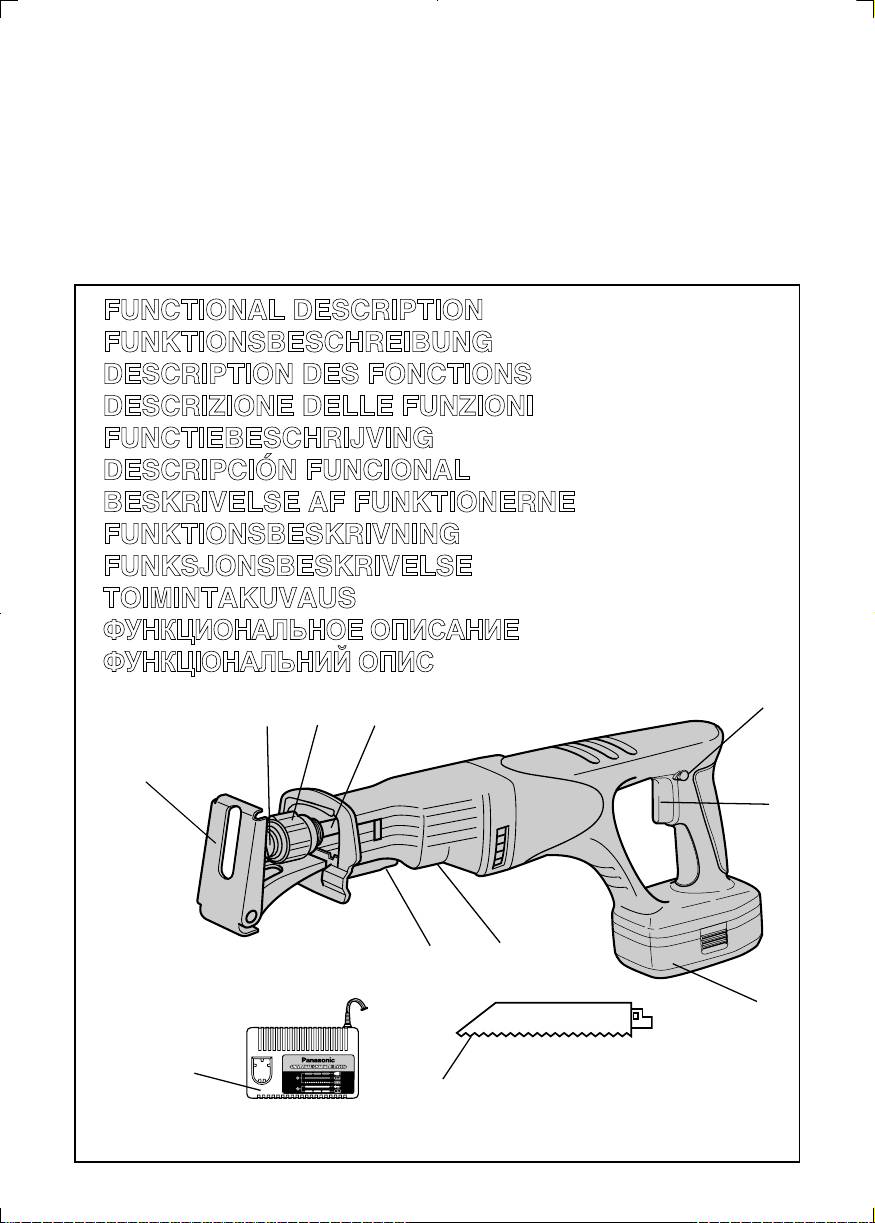
FUNCTIONAL DESCRIPTION
FUNKTIONSBESCHREIBUNG
DESCRIPTION DES FONCTIONS
DESCRIZIONE DELLE FUNZIONI
FUNCTIEBESCHRIJVING
DESCRIPCIÓN FUNCIONAL
BESKRIVELSE AF FUNKTIONERNE
FUNKTIONSBESKRIVNING
FUNKSJONSBESKRIVELSE
TOIMINTAKUVAUS
ФУНКЦИОНАЛЬНОЕ ОПИСАНИЕ
ФУНКЦIОНАЛЬНИЙ ОПИС
(E)
(B)
(C)
(D)
(A)
(F)
(I)
(H)
(G)
(K)
(J)

-
3
-
Shoe
Blade clamp
Blade clamp sleeve
Führungsschuh
Sägeblattklemme
Sägeblatt-Klemmring
Sabot
Serre-lame
Manchon de serre-lame
Pattino
Morsetto della lama
Manicotto del morsetto della lama
Schoen
Zaagbladklem
Zaagbladklemmof
Zapata
Abrazadera de cuchilla
Manguito de abrazadera de cuchilla
(
A
)
(
B
)
(
C
)
Sko
Savbladsklemme
Savblad-klemring
Sko
Bladklämma
Bladklämmhylsa
Sko
Bladklamp
Bladklamphylse
Kenkä
Terän kiinnitin
Terän kiinnittimen holkki
Основание
Фиксатор полотна
Фиксирующая соединительная муфта
Основа
Фіксатор полотна
Фіксуюча з’єднувальна муфта
Slider
Switch lock lever
Trigger switch
Schieber
Einschaltsperren marche avant
Elektronikschalter
Glissière
Levier de verrouillage de Commutateur
Commutateur à gâchette
Piano inclinato
Leva di bloccaggio dell’interruttore
Grilletto interruttore
Schuifstuk
Schakelaarblokkeerhendel
Trekschakelaar
Deslizador
Palanca de bloqueo del interruptor
Interruptor de activación
(
D
)
(
E
)
(
F
)
Skyder
Omskifterlåsearmen
Trykker
Löparet
Omkopplarlåsspak
Vippströmställare
Sleid
Bryterlås
Utløserbryter
Liu’utin
Kytkimen lukkovipu
Laukaisinkytkin
Ползун
Рычаг блокировки переключателя
Пусковой переключатель
Повзун
Важіль блокування перемикача
Пусковий перемикач
Battery pack (EY9251)
Insulated rubber boot
Shoe lock lever
Akkupack (EY9251)
Gummi-Isolierung
Führungsschuh-Arretierhebel
Batterie (EY9251)
Soufet en caoutchouc isolé
Levier de verrouillage de sabot
Pacco batteria (EY9251)
Cappuccio di gomma isolante
Leva di bloccaggio del pattino
Accu (EY9251)
Geïsoleerde rubberhoes
Schoenblokkeerhendel
Bloque de pilas (EY9251)
Funda de caucho aislada
Palanca del seguro de zapata
(
G
)
(
H
)
(
I
)
Batteri (EY9251)
Gummi-isolering
Skolåsearm
Batteri (EY9251)
Isolerad gummikänga
Skolåsspak
Batteri-pakke (EY9251)
Isolert gummistøvel
Skolås
Akku (EY9251)
Kumieriste
Kengän lukkovipu
Батарейный блок (EY9251)
Изолирующий резиновый кожух
Рычаг блокировки основания
Батарейний блок (EY9251)
Ізолюючий резиновий кожух
Важіль блокування основи
Saw blade
Battery charger (EY0110)
Sägeblatt
Ladegerät (EY0110)
Lame de scie
Chargeur de batterie (EY0110)
Lama della sega
Carica-batterie (EY0110)
Zaagblad
Batterijlader (EY0110)
Cuchilla de sierra
Cargador de la batería (EY0110)
(
J
)
(
K
)
Savblad
Batterioplader (EY0110)
Sågblad
Batteriladdare (EY0110)
Sagblad
Batterilader (EY0110)
Sahanterä
Akkulaturi (EY0110)
Полотно пилы
Зарядное устройство (EY0110)
Полотно пили
Зарядний пристрій (EY0110)
-
4
-
Read “the Safety Instructions” booklet
tion; they may be extremely hot
and the following before using.
and could burn your skin.
14) Never swing Reciprocating Saw.
. ADDITIONAL
15) Do not use blades which are
deformed or cracked.
SAFETY RULES
16) Do not use blades which do not
1) Keep hands away from cutting
comply with the characteristics
area and blade. Keep your insu-
specified in these instructions.
lated gripping surfaces.
17) Remove the battery pack from
If both hands are holding the
the tool body before replacement
saw,they cannot be cut by the
of the blade, making adjustments,
blade.
or other maintenance work.
2) Never hold piece being cut in
18) Wear ear protectors when using
your hands or across your leg.
the tool for extended periods.
It is important to support the work
properly to minimize body exposure
or loss of control.
. ASSEMBLY
3) Hold tool by insulated gripping
surfaces when performing an
WARNING:
operation where the cutting tool
may contact hidden wiring.
To reduce the risk of injury, always
Contact with a "live" wire will also
remove battery pack before chang-
make exposed metal parts of the
ing the blade.
tool “live” and shock the operator.
Selecting a blade
4) Be aware that this tool is always
in an operating condition, since it
The blade clamp sleeve can be used
does not have to be plugged into
with all 1/2" shank universal reciprocat-
an electrical outlet.
ing saw blade. When selecting a blade,
choose the right type and length.
5) Always use safety goggles or
glasses with side shields.
Choose a length long enough to
Ordinary eye or sun glasses are
extend beyond the shoe and your
NOT safety glasses.
work throughout the stroke. Do not use
6) When this tool is used for wood-
blades less than 3-9/16" (90 mm) long
working in confined areas (e.g.
since they will not extend beyond the
indoors), wear dust mask.
shoe throughout the stroke.
7) Avoid cutting nails. Inspect work-
Installing or removing the
piece for any nails and remove
them before operation.
saw blade
8) Do not cut oversized workpiece.
CAUTION:
Always clean out all chips or foreign
9) Check for the proper clearance
material adhering to the blade, blade
beyond the workpiece before
clamp and/or slider before use.
cutting so that the blade will not
Failure to do so may cause insuf-
strike the floor, workbench, etc.
ficient tightening of the blade, result-
10) Hold the tool firmly.
ing in a serious injury.
11) Make sure the blade is not con-
Depending on the job, the blade may
tacting the workpiece before the
be inserted with the teeth facing up or
switch is turned on.
down. To install the saw blade, always
12) Keep hands away from moving
make sure that the blade clamp sleeve
parts.
is in open position before inserting the
saw blade. If the blade clamp sleeve is
13) Do not touch the blade or work-
in the close position, rotate the sleeve
piece immediately after opera-
-
5
-
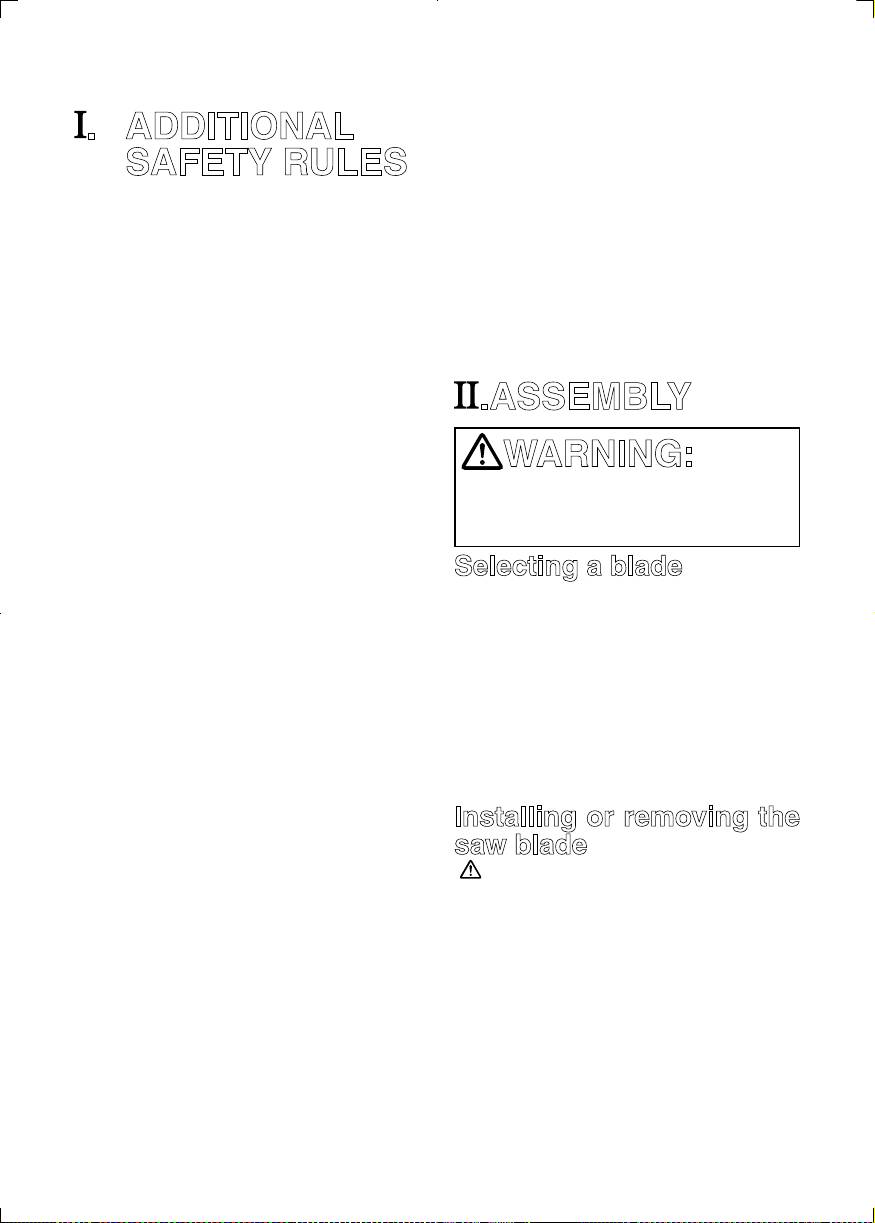
to the open position until it clicks.
Blade Clamp Maintenance
Blade clamp sleeve
Always keep blade clamp sleeve clean
and dry after use.
Periodically lubricate blade clamp sleeve
with a dry lubricant. Using wet lubricant
may keep the dust and debris, and
causes malfunction of the blade clamp.
. OPERATION
Open position Close position
Hold tool by the insulated grip-
Insert the saw blade into the blade clamp
ping surfaces when performing an
until the saw blade snaps in place and
operation where the cutting tool
clamp sleeve rotates. When the blade
may contact hidden wiring.
clamp sleeve rotates, the saw blade is
Always wear safety goggles or
fixed. Make sure that the saw blade is
glasses with side shields.
firmly fixed and locked. If the blade clamp
does not lock properly, have the tool
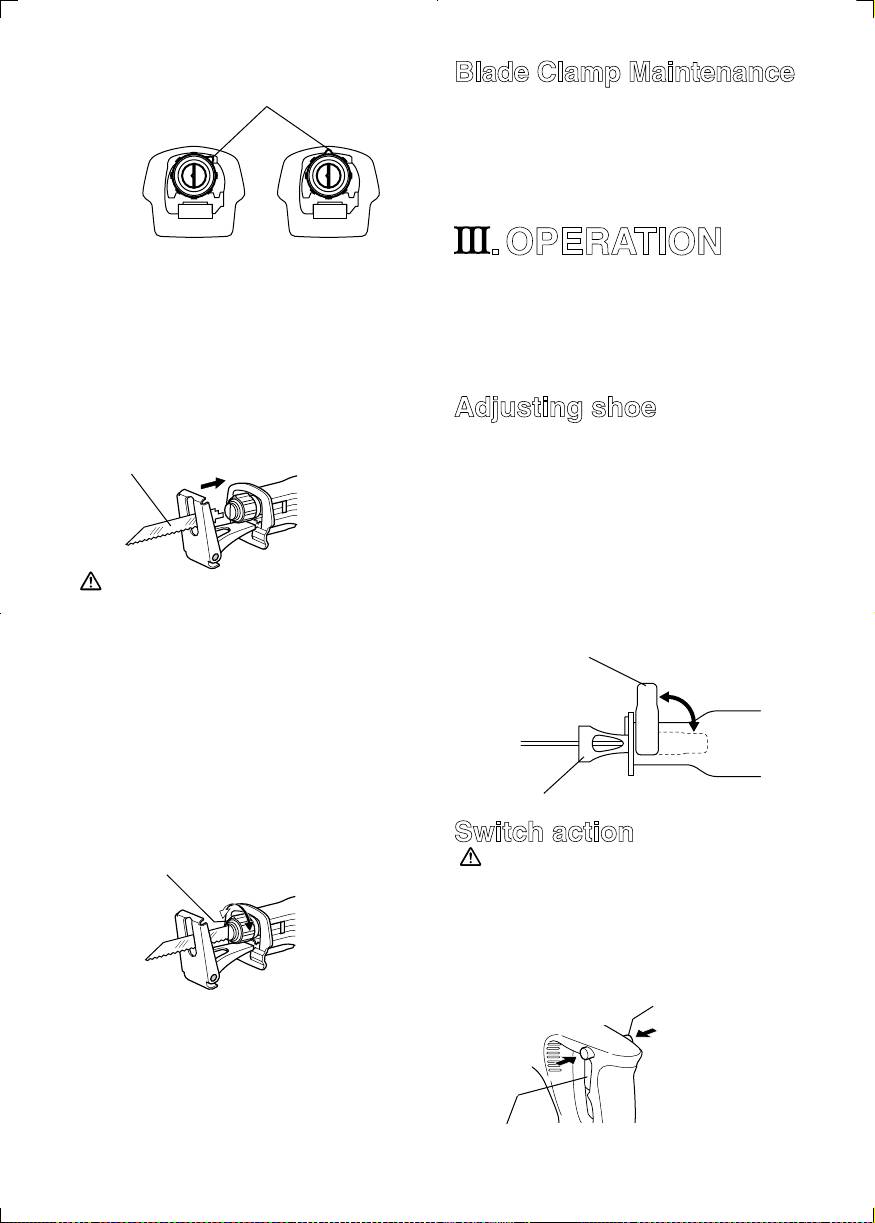
Adjusting shoe
serviced by a qualified repair personnel.
When the blade loses its cutting efficien-
cy in one place along its cutting edge,
Blade
reposition the shoe to utilize a sharp,
unused portion of its cutting edge. This
will help to lengthen the life of the blade.
To reposition the shoe, loosen the shoe
lock lever counter-clockwise and slide
the shoe forward or back to the desired
WARNING:
position. Then tighten the lever clock-
If you do not insert the saw blade
wise to firmly secure the shoe.
deep enough, the saw blade may
be ejected unexpectedly during
Shoe lock lever
operation. This can be extremely
dangerous.
To remove the saw blade, rotate the
blade clamp sleeve in the direction
of the arrow (clockwise from the front
view) fully. The saw blade is removed
and the blade clamp sleeve is fixed at
Shoe
the open position. Be careful when han-
dling hot blades after use.
Switch action
Blade clamp sleeve
CAUTION:
Before inserting the battery pack
into the tool, always check to see
that the trigger switch actuates
properly and returns to the “OFF”
position when released.
Switch lock lever
NOTE
:
If you remove the saw blade without
rotating the blade clamp sleeve fully,
the sleeve may not be fixed. In this
case, rotate the blade clamp sleeve
fully, then make the sleeve fixed at
the open position.
Trigger switch
-
6
-
To prevent the trigger switch from
strong vibration and/or twisting will
being accidentally pulled, a lock-off
be produced, causing the blade to
button switch lock lever is provided.
snap dangerously.
Always make sure the switch is locked
• Always wear gloves to protect your
when carrying or storing the tool to
hands from flying hot chips when
eliminate unintentional starting.
cutting metal.
To start the motor, press the switch
• Always use a suitable coolant (cut-
lock lever, then squeeze the trigger
ting oil) when cutting metal. Failure
switch.
to do so will cause premature
blade wear.
WARNING:
• If the tool is operated continuously
until the battery pack has dis-
To reduce the risk of injury, keep
charged, allow the tool to rest for
hands away from the blade and
15 minutes before proceeding with
other moving parts.
a fresh battery pack.
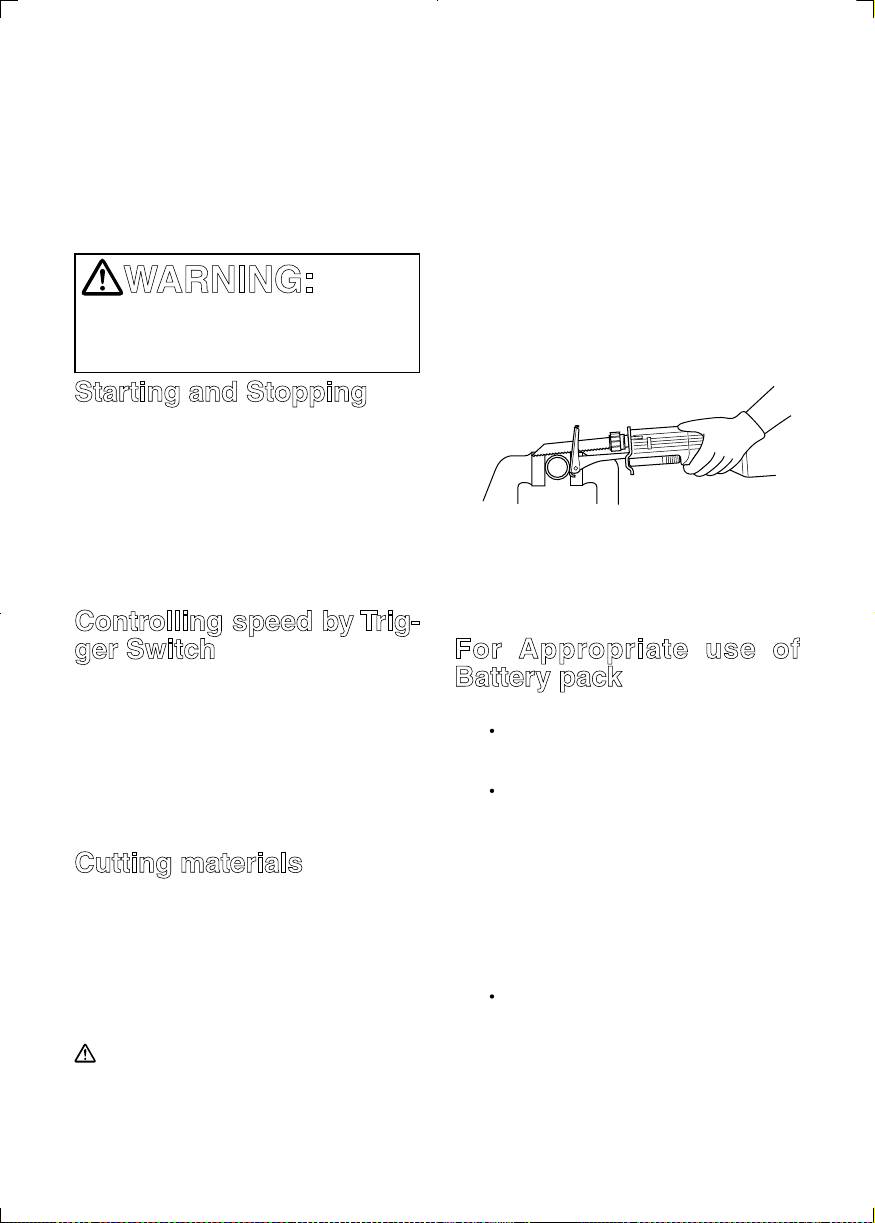
Starting and Stopping
To start the tool, grasp the handle
firmly. Press the switch lock lever,
which can be pressed in from either
left or right side of the tool.
Then pull the trigger switch.
Press the shoe firmly against the work-
To stop the tool, release the trigger.
piece. Do not allow the tool to bounce.
Allow the tool to come to a complete
Bring the blade into light contact with
stop before removing the blade from a
the workpiece. First, make a pilot
partial cut or before laying the tool down.
groove, using a slower speed. Then
use a faster speed to continue cutting.
Controlling speed by Trig-
ger Switch
For Appropriate use of
The reciprocating saw is equipped with
Battery pack
a trigger speed control switch. It may
be operated at any speed from zero
Ni-MH Battery pack (EY9251)
stroke per minute to full speed. Always
Charge the Ni-MH battery fully be-
start tool before blade contacts the
fore storage in order to ensure a
workpiece. To vary the speed, simply
longer service life.
increase or decrease the pressure on
The ambient temperature range
the trigger. The further the trigger is
is between 0°C (32°F) and 40°C
pulled, the greater the speed.
(104°F).
If the battery pack is used when the
Cutting materials
battery temperature is below 0°C
Before the blade contacts the work-
(32°F), the tool may fail to function
piece, grasp the handle firmly and
properly. In that case, charge the
pull the trigger. Begin cutting at slow
battery until charging is completed
speed, gradually increasing speed as
for appropriate functioning of the bat-
you cut. When cutting into materials or
tery.
hard materials that can not be cut from
When battery pack is not in use, keep
an edge, drill a starting hole larger
it away from other metal objects like:
than the widest part of the blade.
paper clips, coins, keys, nails, screws,
CAUTION:
or other small metal objects that can
• Always press the shoe firmly
make a connection from one terminal
against the workpiece during oper-
to another.
ation. If the shoe is held away from
Shorting the battery terminals togeth-
the workpiece during operation,
er may cause sparks, burns or a fire.
-
7
-
When operating with a Ni-MH bat-
internal electronic switch will au-
tery pack, make sure the place is
tomatically be triggered to prevent
well-ventilated.
overcharging.
Charging will not start if the battery
Battery Pack Life
pack is warm (for example, immedi-
The rechargeable batteries have a
ately after heavy-duty operation).
limited life. If operation time becomes
The orange standby lamp will be lit
extremely short after recharging, replace
until the battery cools down. Charging
the battery pack with a new one.
will then begin automatically.
NOTE:
4.
When charging is completed, the
Use under extremely hot or cold
charging lamp will start flashing quickly
conditions will reduce operating
in green color.
capacity per charge.
5. When in any of the conditions that
battery pack is too cool, or the bat-
Battery Recycling
tery pack has not been used for a
ATTENTION:
long time, the charging lamp is lit. In
For environmental protection and
this case charging takes longer to
recycling of materials, be sure
fully charge the battery pack, than
that it is disposed of at an officially
the standard charging time.
assigned location, if there is one in
If a fully charged battery pack is
your country.
inserted into the charger again, the
charging lamp light up. After several
Charging
minutes, the charging lamp may
NOTE:
flash quickly to indicate the charging
When you charge the battery pack
is completed.
for the first time, or after prolonged
6. If the charging lamp does not light
storage, charge it for about 24
immediately after the charger is
hours to bring the batteries up to
plugged in, or if after the standard
full capacity.
charging time the lamp does not go
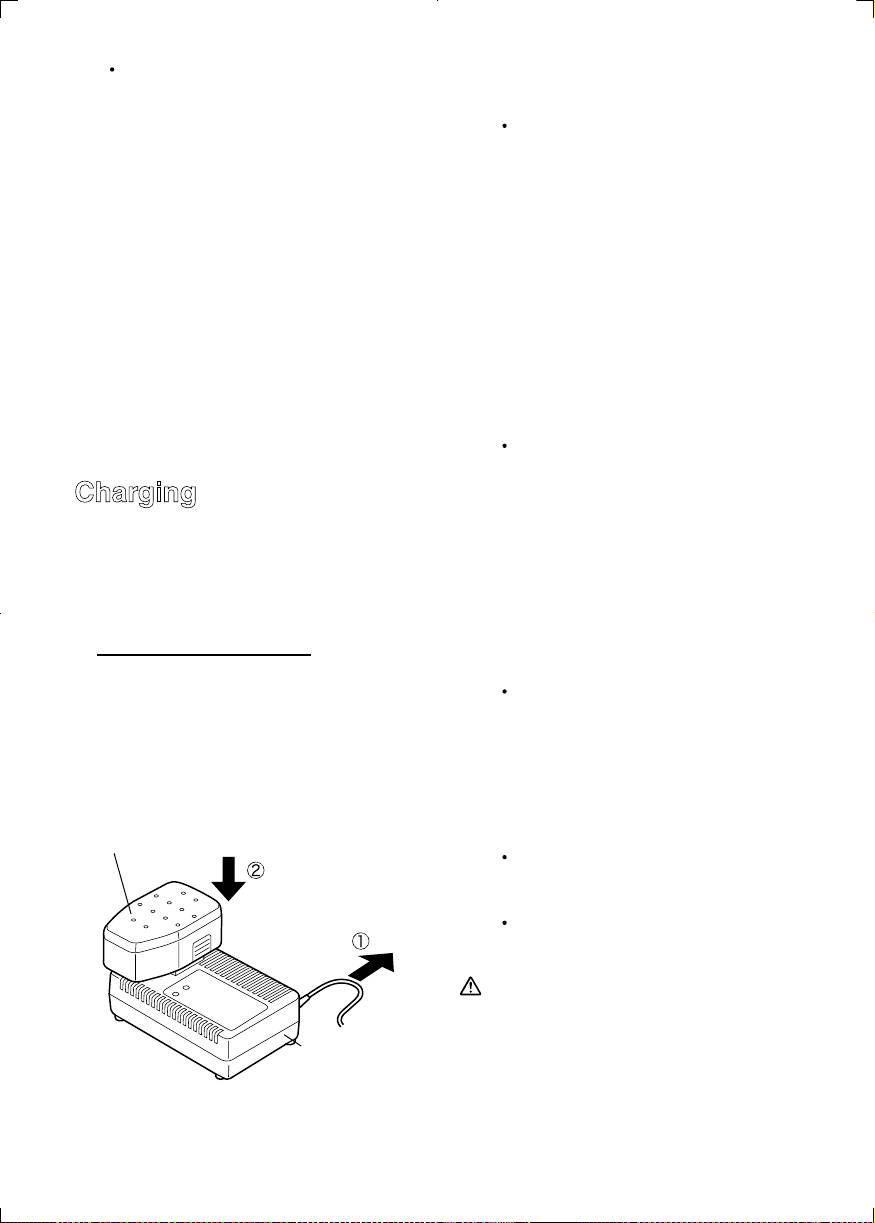
Battery charger (EY0110)
off, consult an authorized dealer.
1. Plug the charger into the AC outlet.
NOTE:
NOTE:
When charging a cool battery pack
Sparks may be produced when the
(below 5°C (41°F)) in a warm place,
plug is inserted into the AC power
leave the battery pack at the place
supply, but this is not a problem in
and wait for more than one hour to
terms of safety.
warm up the battery to the level of
the ambient temperature.Otherwise
2. Insert the battery pack firmly into
battery pack may not be fully
the charger.
charged.
Battry pack
Cool down the charger when charg-
ing more than two battery packs
To AC
consecutively.
outlet
Do not insert your fingers into con-
tact hole, when holding charger or
any other occasions.
CAUTION:
• Do not use power source from an
engine generator.
Battery
This can damage the charger and
charger
present the risk of fire or personal
3. During charging, the charging lamp
injury.
will be lit.
• Do not cover vent holes on the
When charging is completed, an
charger and the battery pack.
