Panasonic SCPM500EP: инструкция
Раздел: Авто, мото оборудование и транспорт
Тип: Автоакустика
Инструкция к Автоакустику Panasonic SCPM500EP
Operating Instructions
Instrukcja obsługi
Návod k obsluze
Dear Customer
Уважаемый Покупатель
Thank you for purchasing this system.
Благодарим Вас за покупку данной системы.
Инструкция по эксплуатации
For optimum performance and safety, read these instructions fully
Для обеспечения оптимальных
before you connect, operate or adjust this system.
характеристик и безопасности внимательно
Інструкція з експлуатації
Keep this manual for future reference.
прочтите эти инструкции перед
Your system and the illustrations can look differently.
подключением, работой или настройкой
данной системы.
Drogi Kliencie
Сохраните инструкцию для дальнейших
CD Stereo System
справок.
Dziękujemy za zakupienie tego zestawu.
Ваша система может отличаться от
W celu zapewnienia optymalnej jakości odbioru i bezpieczeństwa,
представленных иллюстраций.
Zestaw stereo z CD
przed podłączeniem, uruchomieniem lub zmianą ustawień
urządzenia należy dokładnie zapoznać się z niniejszą instrukcją
obsługi.
Шановний Покупцю
Stereosystém s CD
Prosimy o zachowanie niniejszej instrukcji obsługi.
Дякуємо за придбання цієї системи.
Zakupione urządzenie może różnić się od przedstawionego na
Для отримання оптимальних характеристик
ilustracjach.
роботи пристрою та гарантування безпеки
CD-cтереосистема
Niniejsza instrukcja została opracowana na podstawie oryginalnej
роботи повністю прочитайте ці інструкції до
publikacji firmy Panasonic Corporation.
того, як ви під’єднаєте, почнете експлуатацію
або налаштування цієї системи.
CD-стереосистема
Збережіть даний посібник для майбутнього
Vážený Zákazníku
використання.
Děkujeme za zakoupení tohoto systému.
Фактичний вигляд вашої системи й ілюстрації
Pro optimální využití a bezpečnost si před připojováním, používáním
системи в цій інструкції можуть відрізнятися.
Model No.
SC-PM500
nebo nastavováním tohoto systému tento návod pečlivě přečtěte.
Uschovejte si prosím tento návod k obsluze.
Váš systém a obrázky se mohou lišit.
Panasonic Corporation
EP
UrRuPoEn ArCz
Web Site: http://panasonic.net
EU
EU
Pursuant to at the directive 2004/108/EC, article 9(2)
Panasonic Testing Centre
Panasonic Marketing Europe GmbH
RQT9537-1R
Winsbergring 15, 22525 Hamburg, Germany
L0511LL1061
PM500_EP1_1gb.indd 1PM500_EP1_1gb.indd 1 6/20/2011 6:30:13 PM6/20/2011 6:30:13 PM

Do the procedures with the remote control. You can
Information for Users on Collection and Disposal of
also use the buttons on the main unit if they are the
Old Equipment and used Batteries
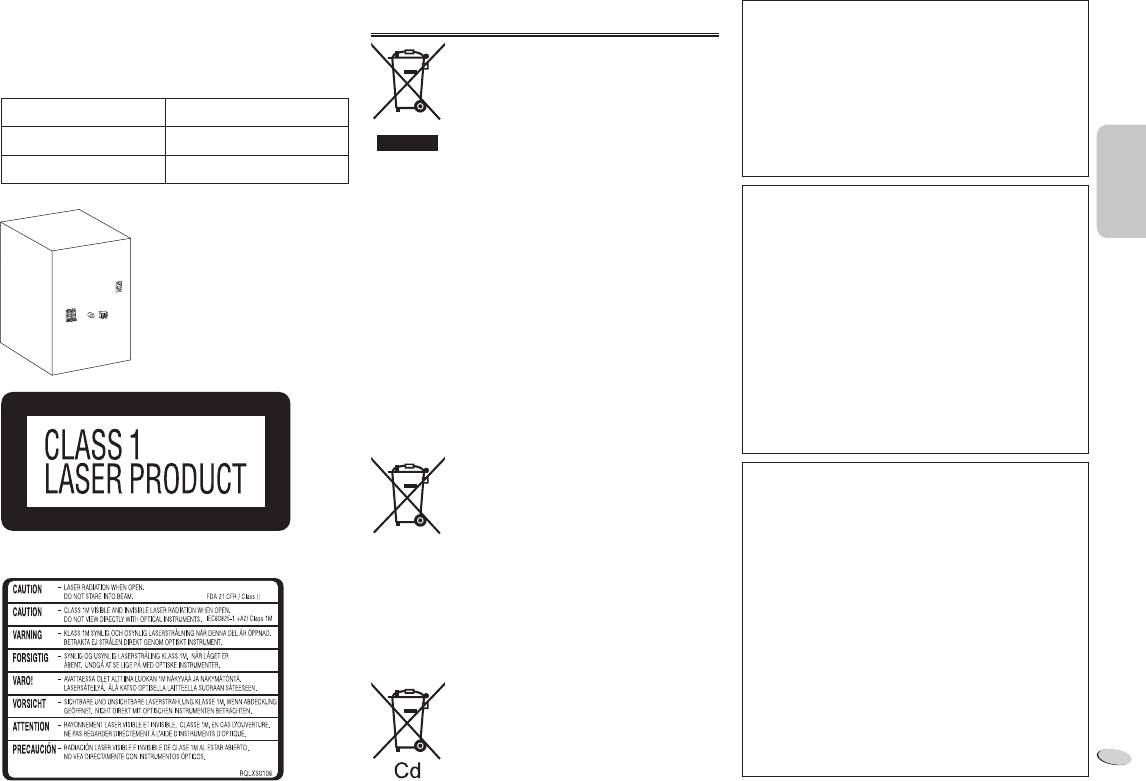
CAUTION!
same.
THIS PRODUCT UTILIZES A LASER.
These symbols on the products, packaging,
USE OF CONTROLS OR ADJUSTMENTS OR
These operating instructions are applicable to the following
and/or accompanying documents mean that
PERFORMANCE OF PROCEDURES OTHER THAN
system.
used electrical and electronic products and
THOSE SPECIFIED HEREIN MAY RESULT IN
ENGLISHENGLISH
batteries should not be mixed with general
HAZARDOUS RADIATION EXPOSURE.
System SC-PM500
household waste.
DO NOT OPEN COVERS AND DO NOT REPAIR
For proper treatment, recovery and
YOURSELF. REFER SERVICING TO QUALIFIED
Main unit SA-PM500
recycling of old products and used batteries,
PERSONNEL.
please take them to applicable collection
Speakers SB-PM500
points, in accordance with your national
legislation and the Directives 2002/96/EC
and 2006/66/EC.
WARNING:
By disposing of these products and
TO REDUCE THE RISK OF FIRE, ELECTRIC SHOCK
batteries correctly, you will help to save
OR PRODUCT DAMAGE,
valuable resources and prevent any
• DO NOT EXPOSE THIS APPARATUS TO RAIN,
potential negative effects on human health
MOISTURE, DRIPPING OR SPLASHING AND THAT
and the environment which could otherwise
NO OBJECTS FILLED WITH LIQUIDS, SUCH AS
arise from inappropriate waste handling.
VASES, SHALL BE PLACED ON THE APPARATUS.
For more information about collection and
• USE ONLY THE RECOMMENDED ACCESSORIES.
recycling of old products and batteries,
• DO NOT REMOVE THE COVER (OR BACK);
Back of product
please contact your local municipality, your
THERE ARE NO USER SERVICEABLE PARTS
waste disposal service or the point of sale
INSIDE. REFER SERVICING TO QUALIFIED
where you purchased the items.
SERVICE PERSONNEL.
Penalties may be applicable for incorrect
disposal of this waste, in accordance with
national legislation.
For business users in the European
CAUTION!
Union
• DO NOT INSTALL OR PLACE THIS UNIT IN A
If you wish to discard electrical and
BOOKCASE, BUILT-IN CABINET OR IN ANOTHER
electronic equipment, please contact your
CONFINED SPACE. ENSURE THE UNIT IS
dealer or supplier for further information.
WELL VENTILATED. TO PREVENT RISK OF
ELECTRIC SHOCK OR FIRE HAZARD DUE TO
[Information on Disposal in other
OVERHEATING, ENSURE THAT CURTAINS AND
Inside of product
Countries outside the European Union]
ANY OTHER MATERIALS DO NOT OBSTRUCT
These symbols are only valid in the
THE VENTILATION VENTS.
European Union. If you wish to discard
• DO NOT OBSTRUCT THE UNIT’S VENTILATION
these items, please contact your local
OPENINGS WITH NEWSPAPERS, TABLECLOTHS,
authorities or dealer and ask for the correct
CURTAINS, AND SIMILAR ITEMS.
method of disposal.
• DO NOT PLACE SOURCES OF NAKED FLAMES,
SUCH AS LIGHTED CANDLES, ON THE UNIT.
Note for the battery symbol (bottom two
• DISPOSE OF BATTERIES IN AN
symbol examples):
ENVIRONMENTALLY FRIENDLY MANNER.
This symbol might be used in combination
RQT9537
with a chemical symbol. In this case it
complies with the requirement set by the
2
Directive for the chemical involved.
2
PM500_EP1_1gb.indd 2PM500_EP1_1gb.indd 2 6/20/2011 6:30:15 PM6/20/2011 6:30:15 PM

The socket outlet shall be installed near the equipment
Safety precautions
Foreign matter
and easily accessible.
The mains plug of the power supply cord shall remain
Do not let metal objects fall inside the system. This can
Placement
readily operable.
cause electric shock or malfunction.
To completely disconnect this apparatus from the AC
Set the system up on an even surface away from direct
Mains, disconnect the power supply cord plug from AC
sunlight, high temperatures, high humidity, and excessive
Do not let liquids get into the system. This can cause
ENGLISHENGLISH
receptacle.
vibration. These conditions can damage the cabinet and
electric shock or malfunction. If this occurs, immediately
other components, thereby shortening the service life of
disconnect the system from the power supply and contact
This product may receive radio interference caused
the system.
your dealer.
by mobile telephones during use. If such interference
Do not spray insecticides onto or into the system. They
is apparent, please increase separation between the
Place it at least 15 cm away from wall surfaces to avoid
product and the mobile telephone.
distortion and unwanted acoustical effects.
contain flammable gases which can ignite if sprayed into
the system.
Do not place heavy items on the system.
THIS UNIT IS INTENDED FOR USE IN MODERATE
CLIMATES.
Service
Voltage
Do not attempt to repair this system by yourself. If sound
Do not use high voltage power sources. This can overload
is interrupted, indicators fail to light, smoke appears, or
the system and cause a fire.
any other problem that is not covered in these instructions
Table of contents
occurs, disconnect the AC mains lead and contact your
Do not use a DC power source. Check the source carefully
dealer or an authorised service centre. Electric shock or
Safety precautions .....................................3
when setting the system up on a ship or other place where
damage to the system can occur if the system is repaired,
DC is used.
disassembled or reconstructed by unqualified persons.
Supplied accessories .................................3
Preparing the remote control ....................4
Extend operating life by disconnecting the system from the
Placement of speakers...............................4
AC mains lead protection
power source if it is not to be used for a long time.
Making the connections .............................4
Ensure the AC mains lead is connected correctly and not
Overview of controls ..................................5
damaged. Poor connection and lead damage can cause
fire or electric shock. Do not pull, bend, or place heavy
Discs ............................................................ 6
Supplied accessories
items on the lead.
Using an iPod or iPhone ............................7
Please check and identify the supplied accessories.
Radio ............................................................8
Grasp the plug firmly when unplugging the lead. Pulling the
AC mains lead can cause electric shock.
1 x AC mains lead
1 x Remote control battery
Clock and timers.........................................9
1 x AM loop antenna
1 x Remote control
Sound effects ............................................10
Do not handle the plug with wet hands. This can cause
(N2QAYB000640)
External equipment ..................................10
electric shock.
1 x FM indoor antenna
Remote control code ................................10
Troubleshooting guide ............................. 11
Maintenance ..............................................12
Specifications ...........................................12
RQT9537
3
3
PM500_EP1_1gb.indd 3PM500_EP1_1gb.indd 3 6/20/2011 6:30:15 PM6/20/2011 6:30:15 PM

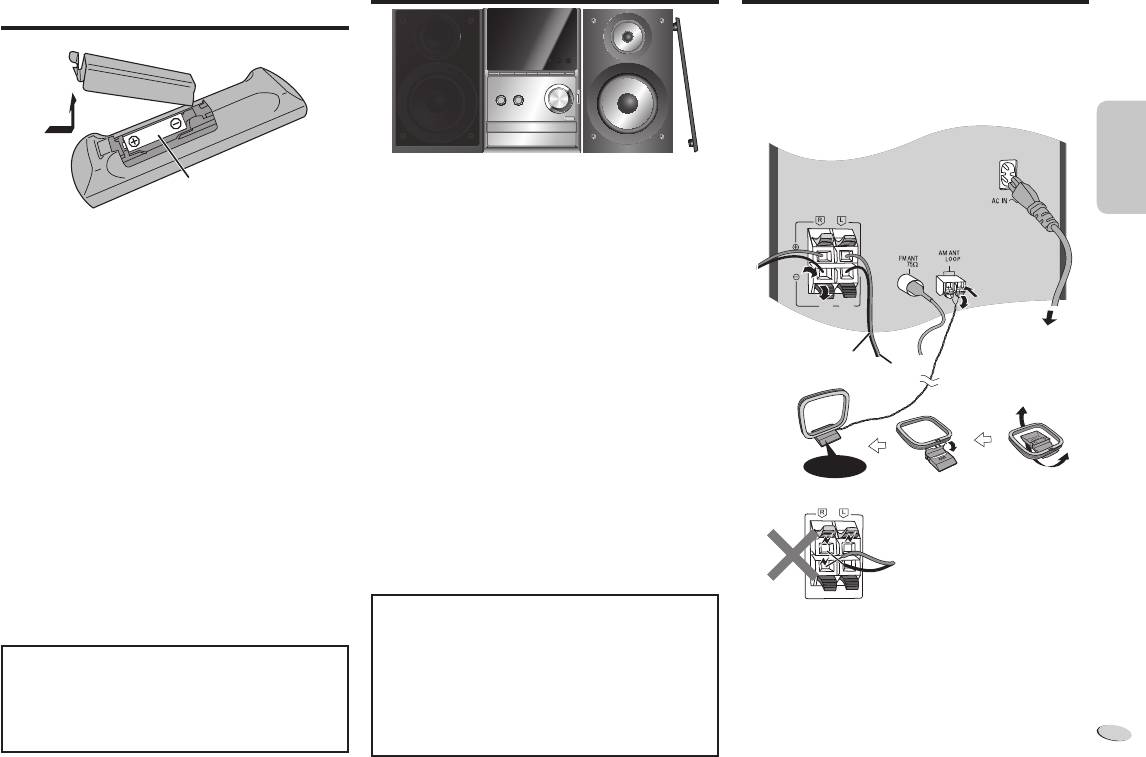
Preparing the remote control
Placement of speakers
Making the connections
Conserving power
The system consumes approximately 0.2 W when it is in
standby mode. Disconnect the power supply if you do not
ENGLISHENGLISH
use the system.
Some settings will be lost after you disconnect the system.
You have to set them again.
R6/LR6, AA
The right and left speakers are the same.
1
Use alkaline or manganese battery.
4
Use only the supplied speakers.
Install the battery so that the poles (+ and –) align with
The combination of the main unit and speakers give the
those in the remote control.
B
2
3
best sound.
B
You can cause damage to the system and decrease the
Point the remote control at the remote control sensor
A
(6:)
(6:)
sound quality if you use other speakers.
(Z 5), away from obstacles, at a maximum range of 7 m
A
directly in front of the main unit.
Note:
To household
• Keep your speakers more than 10 mm from the main unit
mains socket
CAUTION!
Black
for ventilation.
Red
• Do not break open or short-circuit the battery.
• Put the speakers on a flat safe surface.
• Do not charge the alkaline or manganese battery.
• These speakers do not have magnetic shielding. Do
• Do not use the battery if the cover has peeled off.
not put them near TVs, PCs or other equipment easily
• Do not heat or expose to flame.
influenced by magnetism.
• Do not leave the battery(ies) in an automobile exposed
• When you play at high levels for a long period, it can
to direct sunlight for a long period of time with doors and
cause damage to the system and decrease the life of
Click!
windows closed.
the system.
• Mishandling of battery can cause electrolyte leakage,
• Decrease the volume in these conditions to prevent
which can cause a fire.
1 Connect the speakers.
damage:
• Remove the battery if you do not use the remote control
– When you play distorted sound.
Be careful not to cross
for a long period of time. Keep in a cool, dark area.
– When you adjust the sound quality.
(short-circuit) or reverse the
• To prevent damage to the speakers, do not touch the
polarity of the speaker wires
CAUTION!
speaker cones if you remove the nets.
as doing so may damage the
Danger of explosion if battery is incorrectly replaced.
speakers.
Replace only with the same or equivalent type
CAUTION!
recommended by the manufacturer. Dispose of used
• Use the speakers only with the recommended
2 Connect the FM indoor antenna.
batteries according to the manufacturer’s instructions.
system. If not, you can cause damage to the
Place the antenna where reception is best.
amplifier and speakers and can cause a fire.
3 Connect the AM loop antenna.
Consult an approved service personnel if damage
occurs or if there is a sudden apparent change in
4 Connect the AC mains lead.
RQT9537
performance.
Use the included AC mains lead with this system only.
• Do the procedures included in these instructions
Do not use an AC mains lead from other equipment.
4
when you attach the speakers.
4
PM500_EP1_1gb.indd 4PM500_EP1_1gb.indd 4 6/20/2011 6:30:16 PM6/20/2011 6:30:16 PM
ENGLISHENGLISH
RQT9537
5
5
SLEEP
PLAY
EXT-IN
RADIO
D.BASS
SOUND
PRESET EQ
DISPLAY
DIMMER
AUTO OFF
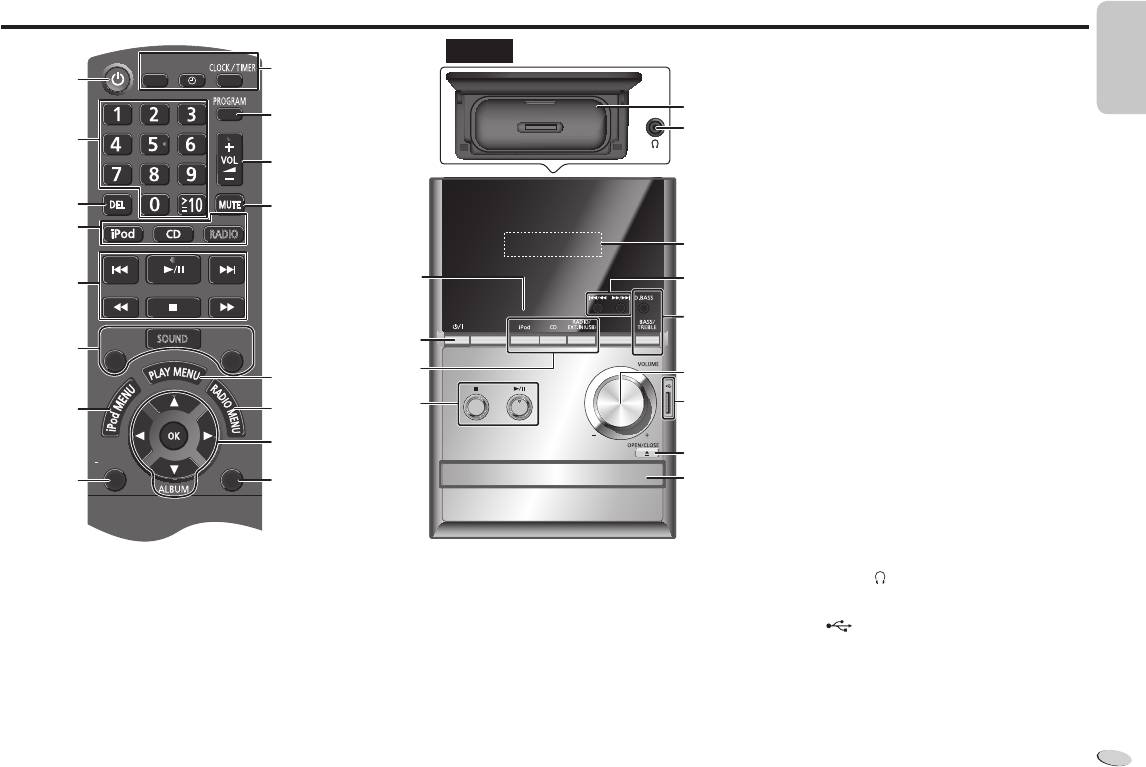
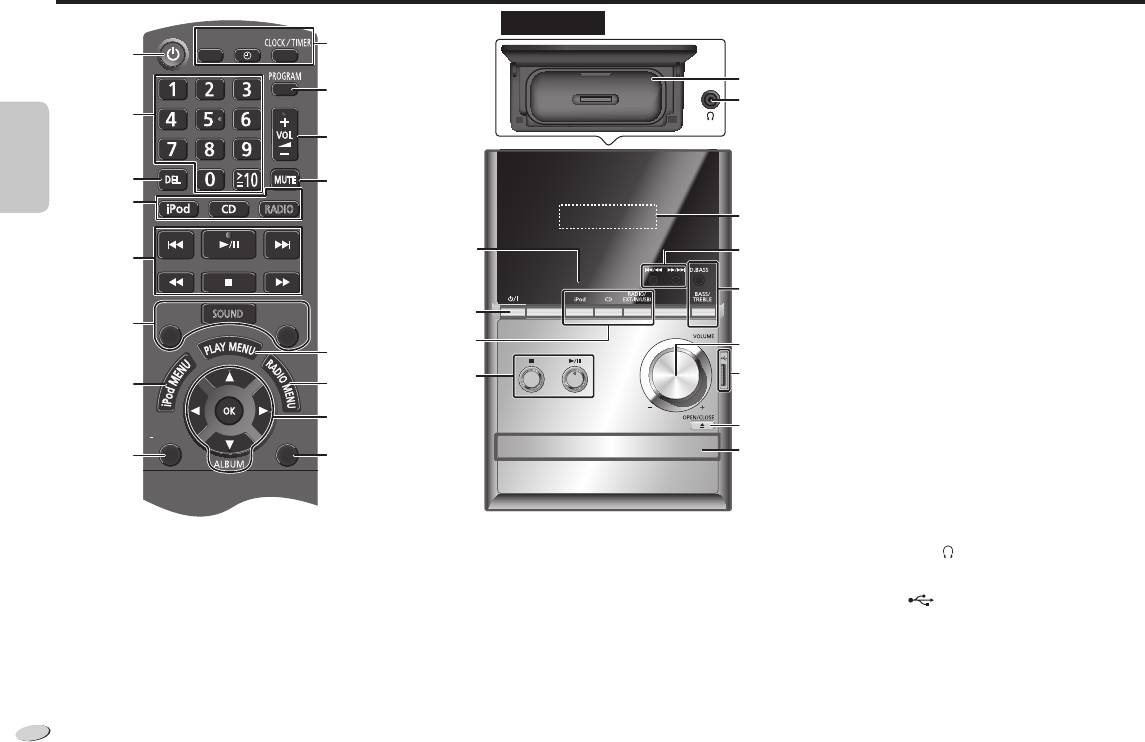
Overview of controls
Top view
F Select the sound effects (Z 10)
I
A
G Select the iPod menu item (Z 7)
Q
H View the information shown on the display panel
J
R
Decrease the brightness of the display panel
B
Press and hold the button to use this function.
To cancel, press and hold the button again.
K
I Set the sleep timer (Z 9)
Set the clock and timer (Z 9)
C
L
J Set the program function (Z 6, 8)
D
S
K Adjust the volume of the system
L Mute the sound of the system
W
E
E
Press the button again to cancel.
“MUTE” is also cancelled when you adjust the volume
F
or when you switch off the system.
A
M Set the play menu item (Z 6)
F
D
K
N Set the radio menu item (Z 8)
M
O [R, T]: Skip album
E
T
G
N
Adjust clock setting
[Y, U]: Select the item in the menu
O
[OK]: Confirm the setting
U
P Automatically switch off the system
H
P
V
This function switches off the system (except in radio
source) if you do not use the system for approximately
30 minutes.
To cancel, press the button again.
D Select source
Q iPod or iPhone dock (Z 7)
A Standby/on switch [`], [1] (Z 9, 12)
[iPod]: Select iPod (Z 7)
R Headphones jack ( ) (Z 10)
Press to switch the unit from on to standby mode or
[CD]: Select disc (Z 6)
vice versa. In standby mode, the unit is still consuming
[RADIO, EXT-IN] / [RADIO/EXT-IN(USB)]:
S Display panel
a small amount of power.
Select radio or USB (Z 8, 10)
T USB port ( ) (Z 10)
B Numeric buttons [1 to 9, 0, ≧10]
E Basic operation
U Open or close the disc tray
To select a 2-digit number
[4/9]: Playback or pause operation
Example: 16: [≧10] → [1] → [6]
[8]: Stop playback
V Disc tray
C Delete a programmed track (Z 6)
[2], [6]: Skip track
W Remote control sensor
Select preset radio station
[3], [5]: Search track
Tune in to the radio station
[2/3], [5/6]: Skip and search track
Select preset radio station
PM500_EP1_1gb.indd 5PM500_EP1_1gb.indd 5 6/20/2011 6:30:17 PM6/20/2011 6:30:17 PM
Discs
Playmode function
Program playback
This function allows you to program up to 24 tracks.
Playing discs
1 Press [PLAY MENU] to select “PLAYMODE”.
2 Press [Y, U] and then press [OK] to select the
1 Press [x, OPEN/CLOSE] on the main unit to open
1 Press [PROGRAM] in the stop mode.
ENGLISHENGLISH
desired mode.
the disc tray.
“PGM” is shown.
Put in a disc with the label facing up.
OFF
Play all tracks.
Press [x, OPEN/CLOSE] again to close the disc tray.
PLAYMODE
2 Press the numeric buttons to select the desired
track.
1-TRACK
Play one selected track on the disc.
2 Press [CD] and then press [4/9] to start playback.
1TR
Do this step again to program other tracks.
Press the numeric buttons to select the
Stop playback
Press [8] during playback.
track.
3 Press [4/9] to start playback.
Pause playback
Press [4/9] during playback.
1-ALBUM
Play one selected album on the disc.
Press again to continue playback.
1ALBUM
Press [R, T] to select the album.
1 Press [PROGRAM] in the stop mode.
Skip album
Press [R, T].
RANDOM
Play a disc randomly.
2 Press [R, T] to select the desired album.
RND
Skip track
Press [2] or [6] (main unit:
1- ALBUM
Play all tracks in one selected album
3 Press [6] and then press the numeric buttons to
[2/3] or [5/6]).
RANDOM
randomly.
select the desired track.
Search through
Press and hold [3] or [5]
1ALBUM RND
Press [R, T] to select the album.
4 Press [OK].
track
(main unit: [2/3] or [5/6]).
Do steps 2 through 4 again to program other tracks.
Note:
• During random playback, you cannot skip to tracks which
5 Press [4/9] to start playback.
have been played or press the numeric buttons.
Cancel
Press [PROGRAM] in the stop mode.
• This function does not work with “Program playback”.
program mode
Repeat playback
• The setting returns to the default “OFF PLAYMODE”
when you open the disc tray.
Replay the
Press [PROGRAM] and then press
You can repeat “Program playback” or other selected
program
[4/9].
“Playmode function”.
Check program
Press [2] or [6] when “PGM” is
1 Press [PLAY MENU] to select “REPEAT”.
Viewing available information
contents
shown in the stop mode.
To check while programming, press
2 Press [Y, U] to select “ON REPEAT” and then
You can view the available information on the display panel.
[PROGRAM] two times after “PGM” is
press [OK].
Press [DISPLAY].
shown, then press [2] or [6].
“
” is shown.
To cancel, select “OFF REPEAT”.
Note:
Clear the last
Press [DEL] in the stop mode.
• Maximum characters that can be shown:
track
approximately 16
Clear all
Press [8] in the stop mode. “CLR ALL”
• This system supports ver. 1.0, 1.1 and 2.3 ID3 tags.
programmed
is shown. Within 5 seconds, press [8]
• Text data that the system does not support can show
tracks
again.
differently.
Note:
The program memory is cleared when you open the disc
tray.
RQT9537
6
6
PM500_EP1_1gb.indd 6PM500_EP1_1gb.indd 6 6/20/2011 6:30:17 PM6/20/2011 6:30:17 PM
Note on CDs
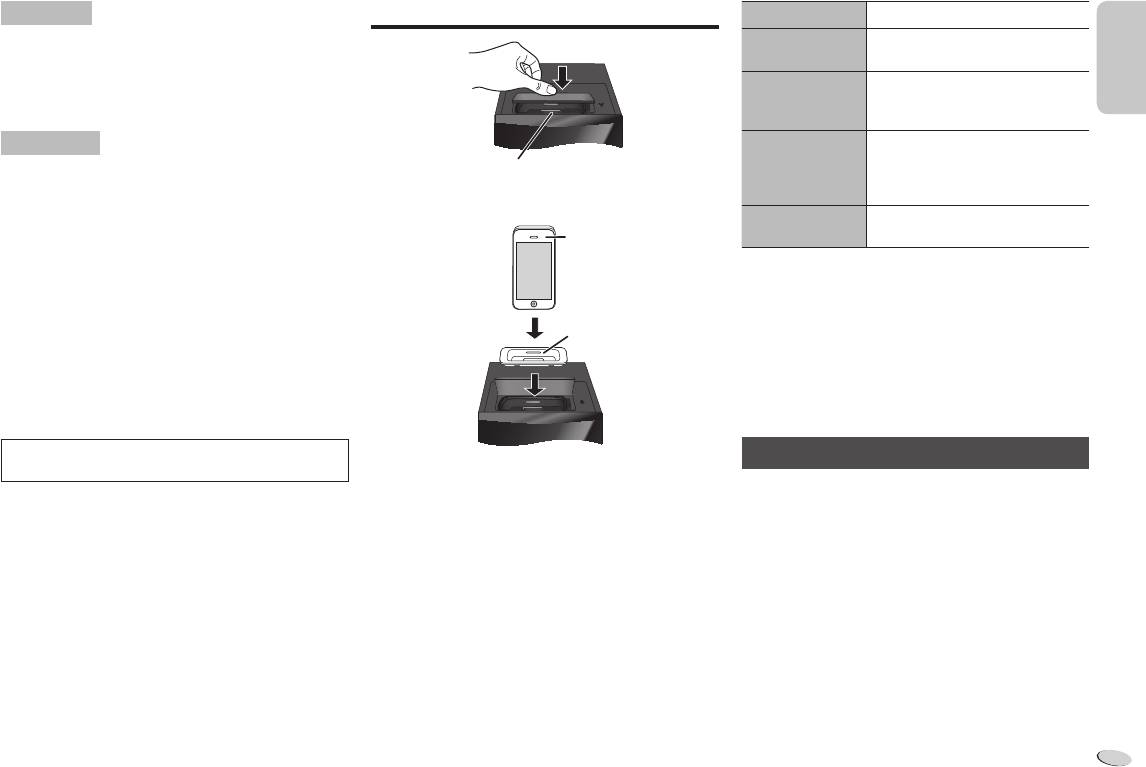
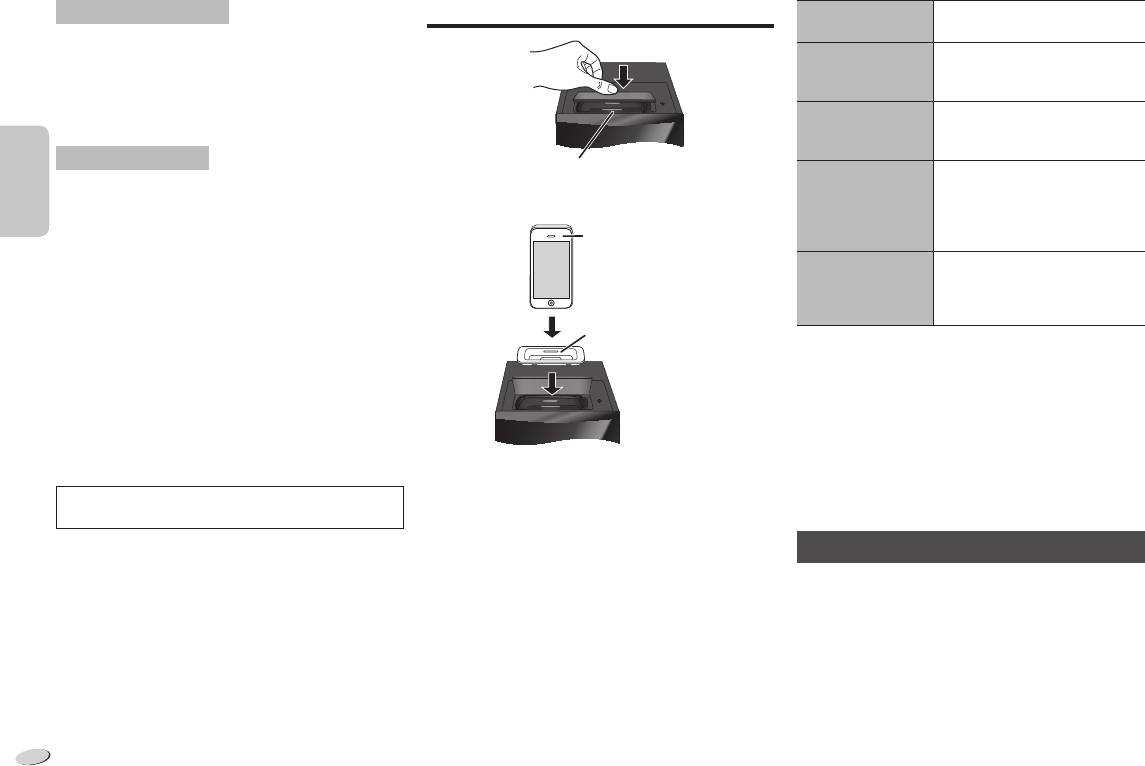
Using an iPod or iPhone
Pause playback
Press [4/9] or [8].
• This system can access up to 99 tracks.
Skip track
Press [2] or [6] (main unit:
• This system can play MP3 files and CD-DA format audio
[2/3] or [5/6]).
CD-R/RW that have been finalised.
• This system can fail to play some CD-R/RW because of
Search the
Press and hold [3] or [5]
current track
(main unit: [2/3] or
ENGLISHENGLISH
the condition of the recording.
[5/6]).
Note on MP3s
View iPod or
Press [iPod MENU] in the play
iPhone menu,
mode.
• Files are treated as tracks and folders are treated as
Connector
Return to previous
albums.
1 Press to open the cover and insert a compatible
menu
• This system can access up to 999 tracks, 255 albums
dock adapter.
(including root folder) and 20 sessions.
Select an iPod or
Press [R, T] and then press [OK].
• Disc must conform to ISO9660 level 1 or 2 (except for
iPhone
iPhone menu item
extended formats).
(not included)
• To play in a certain order, prefix the folder and file names
Note:
with 3-digit numbers in the order you want them to play.
• Make sure to align your iPod or iPhone with the
connector when inserting the iPod or iPhone.
Limitations on MP3 playback
• The operations may vary or not work depending on the
• If you have recorded MP3s on the same disc as
Dock adapter
iPod or iPhone models.
CD-DA, only the format recorded in the first session can
(not included)
• Depending on the model, it may be necessary to remove
be played.
the iPod or iPhone and select the album, artist, etc. on
• Some MP3s cannot be played because of the condition
the iPod or iPhone.
of the disc or recording.
• Read the User Guide of the iPod or iPhone for the
• Recordings will not necessarily be played in the order
operating instructions.
you recorded them.
MPEG Layer-3 audio coding technology licensed from
Charging an iPod or iPhone
Fraunhofer IIS and Thomson.
2 Connect the iPod or iPhone firmly.
Make sure to remove the iPod or iPhone from its case.
An iPod or iPhone is charged automatically when
connected to the system (even when the system is in
3 Press [iPod] and then press [4/9] to start
standby mode).
playback.
• See the iPod or iPhone display for its battery charging
status.
• Disconnect the iPod or iPhone if it is not used for an
extended period of time after charging is complete.
• Charging stops when the battery is fully charged. The
battery will deplete naturally.
RQT9537
7
7
PM500_EP1_1gb.indd 7PM500_EP1_1gb.indd 7 6/20/2011 6:30:17 PM6/20/2011 6:30:17 PM
Compatible iPod and iPhone
To improve the sound quality
Update your iPod or iPhone with the latest software before
When “FM” is selected
using this system.
1 Press [RADIO MENU] to select “FM MODE”.
Compatibility depends on the software version of your iPod
ENGLISHENGLISH
or iPhone.
2 Press [Y, U] to select “MONO” and then press
• iPod touch 4th generation (8GB, 32GB, 64GB)
[OK].
• iPod nano 6th generation (8GB, 16GB)
“Made for iPod” and “Made for iPhone” mean that an
To cancel, select “STEREO”.
• iPod touch 3rd generation (32GB, 64GB)
electronic accessory has been designed to connect
• “MONO” is also cancelled when you change the
• iPod nano 5th generation (video camera) (8GB, 16GB)
specifically to iPod, or iPhone, respectively, and
frequency.
• iPod touch 2nd generation (8GB, 16GB, 32GB)
has been certified by the developer to meet Apple
• Switch off “MONO” for normal listening.
• iPod classic [120GB, 160GB (2009)]
performance standards.
• iPod nano 4th generation (video) (8GB, 16GB)
When “AM” is selected
• iPod classic (160GB) (2007)
Apple is not responsible for the operation of this device
1 Press [RADIO MENU] to select “B.PROOF”.
• iPod touch 1st generation (8GB, 16GB, 32GB)
or its compliance with safety and regulatory standards.
• iPod nano 3rd generation (video) (4GB, 8GB)
2 Press [Y, U] to select “BP 1” or “BP 2” and then
• iPod classic (80GB)
Please note that the use of this accessory with iPod, or
press [OK].
• iPod nano 2nd generation (aluminum) (2GB, 4GB, 8GB)
iPhone may affect wireless performance.
• iPod 5th generation (video) (60GB, 80GB)
• iPod 5th generation (video) (30GB)
iPhone, iPod, iPod classic, iPod nano, and iPod touch
Memory presetting
• iPod nano 1st generation (1GB, 2GB, 4GB)
are trademarks of Apple Inc., registered in the U.S. and
• iPhone 4 (16GB, 32GB)
30 FM and 15 AM stations can be preset.
other countries.
• iPhone 3GS (8GB, 16GB, 32GB)
Preparation
• iPhone 3G (8GB, 16GB)
Press [RADIO, EXT-IN] (main unit: [RADIO/EXT-IN(USB)])
• iPhone (4GB, 8GB, 16GB)
to select “FM” or “AM”.
Note on iPhone
Radio
Automatic presetting
• All phone features can only be controlled by the touch
screen of the iPhone.
Manual tuning
1 Press [OK] to select “LOWEST” or “CURRENT”
• The system does not show incoming calls or the phone
frequency.
status.
1 Press [RADIO, EXT-IN] (main unit:
2 Press [RADIO MENU] to select “A.PRESET” and
• Playback will stop when there is an incoming call.
[RADIO/EXT-IN(USB)]) to select “FM” or “AM”.
then press [OK].
• A call is not cancelled when you connect or disconnect
the iPhone from the system.
2 Press [3] or [5] to select the frequency of the
“START?” is shown.
• There is no Apple Inc. specification that will guarantee
required station.
3 Press [OK] to start presetting.
the above iPhone response. iPhone responses can be
To tune automatically, press and hold the button until
different on newer models or with new software.
the frequency starts changing quickly.
Manual presetting
1 Press [3] or [5] to tune in to the station.
2 Press [PROGRAM].
3 Press the numeric buttons to select a preset
RQT9537
number.
Do steps 1 through 3 again to preset more stations.
8
The new station replaces any station that occupies the
8
same preset number.
PM500_EP1_1gb.indd 8PM500_EP1_1gb.indd 8 6/20/2011 6:30:17 PM6/20/2011 6:30:17 PM

Selecting a preset station
Clock and timers
1 Press [CLOCK/TIMER] to select “#PLAY 1”,
“#PLAY 2” or “#PLAY 3”.
Press the numeric buttons, [2] or [6] (main unit:
Setting the clock
2 Within 10 seconds, press [R, T] to set the start
[2/3] or [5/6]) to select the preset station.
time.
This is a 24-hour clock.
3 Press [OK].
ENGLISHENGLISH
1 Press [CLOCK/TIMER] to select “CLOCK”.
AM allocation setting (by main unit only)
4 Do steps 2 and 3 again to set the end time.
2 Within 10 seconds, press [R, T] to set the time.
This system can also receive AM broadcasts allocated in
10 kHz steps.
To start the timer
3 Press [OK].
1 Press [RADIO/EXT-IN(USB)] to select “FM” or
5 Press [#, PLAY] to start “#PLAY 1”, “#PLAY 2” or
“AM”.
Press [CLOCK/TIMER] to show the clock for a few
“#PLAY 3”.
seconds.
2 Press and hold [RADIO/EXT-IN(USB)].
6 Press [`] to switch off the system.
Note:
After a few seconds, the display panel shows the current
The system must be switched off for the timer to
Reset the clock regularly to maintain accuracy.
minimum radio frequency. Release the button when the
operate.
minimum frequency changes.
• To go back to the initial setting, do the above steps
Change the
Do steps 1 through 4 and 6 again
Sleep timer
again.
settings
(Z above).
• After you change the setting, preset frequencies are
The sleep timer switches off the system after the set time.
Change the
1) Press [#, PLAY] two times to remove
erased.
source or
the timer indicator on the display
Press [SLEEP] to select the setting (in minutes).
volume
panel.
To cancel, select “OFF”.
2) Change the source or volume.
RDS broadcasting
3) Do steps 5 and 6 (Z above).
30 MIN → 60 MIN → 90 MIN → 120 MIN → OFF
This system can show the text data transmitted by the
Check the
Press [CLOCK/TIMER] to select
radio data system (RDS) available in some areas.
settings
“#PLAY 1”, “#PLAY 2” or “#PLAY 3”.
To show the remaining time
Press [SLEEP].
Cancel
Press [#, PLAY] two times to remove the
Press [DISPLAY].
timer indicator on the display panel.
Note:
PS
PTY
FREQ
→
→
• The sleep timer can be used together with the play timer.
(Station name)
(Program type)
(Frequency)
Note:
• The sleep timer always comes first. Be sure not to set an
• The timer starts at a low volume and increases gradually
overlap of timers.
Note:
to the preset level.
RDS may not be available if reception is poor.
• The timer comes on at the set time every day if the timer
is on.
Play timer
• If you switch off the system and switch on again while
You can set the timer to come on at a certain time to wake
a timer is in operation, the timer will not stop at the end
you up.
time.
Switch on the system and set the clock.
Prepare the music source you want to listen to (disc, radio,
USB, iPod or iPhone) and set the volume.
RQT9537
9
9
PM500_EP1_1gb.indd 9PM500_EP1_1gb.indd 9 6/20/2011 6:30:18 PM6/20/2011 6:30:18 PM
Sound effects
External equipment
Connecting to headphones
Connect the headphones to the headphones jack.
Changing the sound quality
USB
Plug type: Ø 3.5 mm stereo (not included)
• Avoid listening for prolonged periods of time to prevent
1 Press [SOUND] to select a sound effect.
ENGLISHENGLISH
hearing damage.
You can connect and play MP3 tracks from your USB
2 Within 3 seconds, press [Y, U] to select the desired
• Excessive sound pressure from earphones and
mass storage device.
setting.
headphones can cause hearing loss.
Do not use a USB extension cable. The system cannot
• Listening at full volume for long periods may damage
recognise USB mass storage device connected through
the user’s ears. Be sure to use the supplied or
BASS
a cable.
-4 to +4
recommended headphones or earphones.
TREBLE
1 Decrease the volume and connect the USB mass
storage device to the USB port.
SURROUND
“ON SURROUND” or
“OFF SURROUND”
2 Press [RADIO, EXT-IN] (main unit:
[RADIO/EXT-IN(USB)]) to select “USB” and then
By main unit only
press [4/9] to start playback.
1 Press [BASS/TREBLE] to select “BASS” or
Stop
Press [8] during playback.
“TREBLE”.
Remote control code
playback
“RESUME” is shown.
Press [4/9] to continue playback from the
2 Press [2/3] or [5/6] to adjust the level.
When other Panasonic equipment responds to the remote
start of the track.
control of this system, change the remote control code for
OR
this system.
Press [8] two times to stop the playback
Preset EQ
fully.
To set the code to “REMOTE 2”
Press [PRESET EQ] to select a setting.
For other operations, refer to “Discs” (Z 6).
1 Press and hold [CD] on the main unit and [2] on
the remote control until “REMOTE 2” is shown.
HEAVY Adds punch to rock
Compatible devices
• USB mass storage devices that support bulk-only
2 Press and hold [OK] and [2] for a minimum of
SOFT For background music
transfer.
4 seconds.
CLEAR Clarifies higher frequencies
• USB mass storage devices that support USB 2.0 full
To set the code to “REMOTE 1”
speed.
VOCAL Adds gloss to vocal
1 Press and hold [CD] on the main unit and [1] on
Supported format
the remote control until “REMOTE 1” is shown.
FLAT Cancels the sound effect
• Folders are defined as album.
2 Press and hold [OK] and [1] for a minimum of
• Files are defined as track.
4 seconds.
• Track must have the extension “.mp3” or “.MP3”.
D.BASS
• CBI (Control/Bulk/Interrupt) is not supported.
• NTFS file system is not supported (only FAT 12/16/32 file
This function lets you enjoy a powerful bass effect.
system is supported).
Press [D.BASS] to select “ON D.BASS” or
• Some files can fail to work because of the sector size.
“OFF D.BASS”.
Note:
• Maximum album: 255 albums (including root folder)
• Maximum track: 2500 tracks
RQT9537
• Maximum track in one album: 999 tracks
10
10
PM500_EP1_1gb.indd 10PM500_EP1_1gb.indd 10 6/20/2011 6:30:18 PM6/20/2011 6:30:18 PM

“F61” or “F76”
Troubleshooting guide
iPod or iPhone
• There is a power supply problem.
Before requesting service, make the following checks. If
You cannot switch on the iPod or iPhone.
“ERROR”
you are in doubt about some of the check points, or if the
• Examine that the battery of the iPod or iPhone is not
• An incorrect operation was done. Read the instructions
solutions indicated do not solve the problem, consult your
depleted.
and try again.
dealer for instructions.
• Switch off the iPod or iPhone and the system before you
ENGLISHENGLISH
connect the iPod or iPhone. Connect the iPod or iPhone
“NOT MP3/ERROR”
and try again.
Common problems
• An unsupported MP3 format. The system will skip that
track and play the next one.
No sound.
No operations can be done with the remote control.
• Switch off the iPod or iPhone and remove from the
• Examine that the battery is installed correctly.
“VBR–”
system. Connect the iPod or iPhone to the system and
• The system cannot show the remaining play time for
switch it on and play it again.
Sound is distorted or no sound.
variable bit rate (VBR) tracks.
• Increase the volume.
• Switch off the system, determine and correct the cause,
USB
“NODEVICE”
then switch the system on again. It can be caused by
• The USB mass storage device, iPod or iPhone is not
straining of the speakers through excessive volume or
The USB mass storage device or the contents in it
connected. Examine the connection.
power, and when using the system in a hot environment.
cannot be read.
• The format of the USB mass storage device or the
“NO DISC”
A “humming” sound can be heard during playback.
contents in it is/are not compatible with the system.
• You have not put in a disc or put in a disc that the system
• An AC mains lead or fluorescent light is near the cables.
• USB mass storage devices with storage capacity of more
cannot play (Z 6).
Keep other appliances and cords away from the cables
than 32 GB cannot work in some conditions.
of this system.
“NOT SUPPORT”
Slow operation of the USB mass storage device.
• You have inserted an iPod or iPhone that cannot be
• Large content size or large memory USB mass storage
played.
Discs
device takes longer time to read.
“--:--”
Display not shown correctly.
The elapsed time shown is different from the actual
• You connected the AC mains lead for the first time or
Playback does not start.
play time.
there was a power failure recently. Set the clock.
• You have not put in the disc correctly. Put it in correctly.
• Transfer the data to another USB mass storage device
• Disc is dirty. Clean the disc.
or backup the data and reformat the USB mass storage
“ADJUST CLOCK”
• Replace the disc if it is scratched, warped, or
device.
• Clock is not set. Adjust the clock accordingly.
non-standard.
• There is condensation. Let the system dry for 1 to 2
“ADJUST TIMER”
Main unit displays
hours.
• Play timer is not set. Adjust the play timer accordingly.
“NO PLAY”
Radio
• Examine the content. You can only play supported
“PGM FULL”
format.
• The number of programmed tracks is more than 24.
A beat sound is heard.
• If there are more than 255 albums or folders (audio
• Switch off the TV or move it away from the system.
and non-audio), some of the MP3 files in these albums
• Set to “BP 1” or “BP 2” when in AM tuner mode.
cannot be read and played. Transfer these music albums
to another USB mass storage device. Alternatively,
A low hum is heard during AM broadcasts.
reformat the USB mass storage device and save these
• Move the antenna away from other cables and cords.
music albums prior to saving the other non-audio folders.
RQT9537
11
11
PM500_EP1_1gb.indd 11PM500_EP1_1gb.indd 11 6/20/2011 6:30:18 PM6/20/2011 6:30:18 PM
Specifications
Memory reset (Initialisation)
USB section
When the following situations occur, refer to the
USB port
Amplifier section
instructions below to reset the memory:
USB standard USB 2.0 full speed
• There is no response when buttons are pressed.
RMS output power stereo mode
Media file format support MP3 (
.mp3)
ENGLISHENGLISH
• You want to clear and reset the memory contents.
Front Ch (both ch driven)
USB device file system FAT 12, FAT 16, FAT 32
20 W per channel (6
), 1 kHz, 10% THD
USB port power 500 mA (max)
To reset the memory
Total RMS stereo mode power 40 W
1 Disconnect the AC mains lead.
Speaker section
(Wait 3 minutes before you continue with step 2.)
FM/AM tuner, terminals section
Type 2 way, 2 speaker system (bass reflex)
2 While you press and hold [1] on the main unit,
Preset station FM 30 stations
Speaker unit(s)
connect the AC mains lead again.
Woofer 10 cm cone type
“– – – – – – – –” shows on the display panel.
AM 15 stations
Frequency modulation (FM)
Tweeter 6 cm cone type
3 Release [1].
Frequency range
Impedance 6
All the settings are set back to the factory preset.
87.50 MHz to 108.00 MHz (50 kHz step)
Output sound pressure 80.5 dB/W (1 m)
It is necessary to set the memory items again.
Antenna terminals 75
(unbalanced)
Frequency range 52 Hz to 31 kHz (–16 dB)
Amplitude modulation (AM)
74 Hz to 27 kHz (–10 dB)
Frequency range
Dimensions (W x H x D) 145 mm x 224 mm x 197 mm
522 kHz to 1629 kHz (9 kHz step)
Mass 1.9 kg
520 kHz to 1630 kHz (10 kHz step)
Headphones jack
General
Maintenance
Terminal Stereo, 3.5 mm jack
Power supply AC 220 to 240 V, 50 Hz
To clean this system, wipe with a soft, dry cloth.
• Never use alcohol, paint thinner or benzine to clean this
Power consumption 19 W
Disc section
system.
Dimensions (W x H x D) 153 mm x 224 mm x 232 mm
• Before using chemically treated cloth, read the
Disc played (8 cm or 12 cm)
Mass 1.7 kg
instructions that came with the cloth carefully.
CD, CD-R/RW (CD-DA, MP3
formatted disc)
Operating temperature range 0°C to +40°C
MPEG-1 Layer 3, MPEG-2 Layer 3
Operating humidity range
Pick up
35% to 80% RH (no condensation)
Wavelength 790 nm (CD)
Power consumption in standby mode
Laser power CLASS 1 (CD)
0.2 W (approximate)
Audio output (Disc)
Number of channels 2 ch (FL, FR)
Note:
FL = Front left channel
1) Specifications are subject to change without notice.
Mass and dimensions are approximate.
FR = Front right channel
2) Total harmonic distortion is measured by the digital
spectrum analyzer.
RQT9537
12
12
PM500_EP1_1gb.indd 12PM500_EP1_1gb.indd 12 6/20/2011 6:30:18 PM6/20/2011 6:30:18 PM
Opisane procedury należy wykonać za pomocą pilota
Informacja dla użytkowników o gromadzeniu i
zdalnego sterowania. Można również użyć przycisków
pozbywaniu się zużytych urządzeń i baterii
UWAGA!
na panelu przednim urządzenia, jeśli są identyczne.
PRODUKT WYKORZYSTUJE PROMIEŃ LASERA.
Niniejsze symbole umieszczane na produktach,
STEROWANIE, REGULACJE LUB POSTĘPOWANIE
opakowaniach i/lub w dokumentacji
Niniejsza instrukcja obsługi ma zastosowanie do
W SPOSÓB TUTAJ NIE OKREŚLONY GROZI
towarzyszącej oznaczają, że nie wolno
następującego zestawu.
NIEBEZPIECZNYM NAŚWIETLENIEM PROMIENIAMI
mieszać zużytych urządzeń elektrycznych i
LASERA.
elektronicznych oraz baterii z innymi odpadami
Zestaw SC-PM500
PROSIMY NIE OTWIERAĆ OBUDOWY I NIE
domowymi.
DOKONYWAĆ NAPRAW SAMODZIELNIE. PROSIMY
Urządzenie główne SA-PM500
W celu zapewnienia właściwego przetwarzania,
utylizacji oraz recyklingu zużytych produktów
POWIERZYĆ NAPRAWY WYKWALIFIKOWANEMU
Głośniki SB-PM500
i baterii, należy oddawać je do wyznaczonych
PERSONELOWI.
punktów gromadzenia odpadów zgodnie
z przepisami prawa krajowego oraz
OSTRZEŻENIE:
postanowieniami Dyrektyw 2002/96/WE i
POLSKIPOLSKI
ABY OGRANICZYĆ NIEBEZPIECZEŃSTWO
2006/66/WE.
POŻARU, PORAŻENIA PRĄDEM LUB
Prawidłowe pozbywanie się w/w produktów
i baterii pomaga oszczędzać cenne zasoby
USZKODZENIA URZĄDZENIA,
naturalne i zapobiegać potencjalnemu
• NIE NALEŻY WYSTAWIAĆ URZĄDZENIA NA
negatywnemu wpływowi na zdrowie człowieka
DZIAŁANIE DESZCZU, WILGOCI, KAPANIE LUB
oraz stan środowiska naturalnego, który
ZACHLAPANIE; PONADTO NA URZĄDZENIU
towarzyszy niewłaściwej gospodarce odpadami.
NIE NALEŻY USTAWIAĆ ŻADNYCH NACZYŃ
Więcej informacji o zbiórce oraz recyklingu
ZAWIERAJĄCYCH PŁYNY, TAKICH JAK WAZONY.
zużytych produktów i baterii można otrzymać od
• NALEŻY STOSOWAĆ TYLKO ZALECANE
Ściana tylna urządzenia
władz lokalnych, miejscowego przedsiębiorstwa
AKCESORIA.
oczyszczania lub w punkcie sprzedaży, w
• NIE ZDEJMOWAĆ POKRYWY (LUB PANELU
którym użytkownik nabył przedmiotowe towary.
TYLNEGO); WEWNĄTRZ URZĄDZENIA NIE MA
Za niewłaściwe pozbywanie się powyższych
CZĘŚCI PRZEZNACZONYCH DO WYMIANY PRZEZ
odpadów mogą grozić kary przewidziane
UŻYTKOWNIKA. SERWIS NALEŻY ZLECIĆ W
przepisami prawa krajowego.
AUTORYZOWANYM PUNKCIE SERWISOWYM.
Dotyczy użytkowników firmowych
działających na terenie Unii Europejskiej
UWAGA!
Chcąc w odpowiedni sposób pozbyć się
• NINIEJSZEGO URZĄDZENIA NIE NALEŻY
urządzeń elektrycznych lub elektronicznych,
INSTALOWAĆ LUB UMIESZCZAĆ W
należy skontaktować się ze sprzedawcą lub
BIBLIOTECZCE, WBUDOWANEJ SZAFCE LUB
dostawcą, który udzieli dalszych informacji.
INNEJ OGRANICZONEJ PRZESTRZENI. ABY
[Informacje o pozbywaniu się w/w urządzeń
Wewnątrz urządzenia
ZAPEWNIĆ PRAWIDŁOWĄ WENTYLACJĘ
w państwach trzecich]
NALEŻY UPEWNIĆ SIĘ, ŻE ZASŁONY I INNE
Niniejsze symbole obowiązują wyłącznie na
MATERIAŁY NIE ZASŁANIAJĄ OTWORÓW
terenie Unii Europejskiej. Chcąc pozbyć się w/w
WENTYLACYJNYCH TAK, ABY ZAPOBIEC
urządzeń elektrycznych lub elektronicznych,
RYZYKU PORAŻENIA PRĄDEM LUB POŻARU W
należy skontaktować się z władzami lokalnymi
WYNIKU PRZEGRZANIA.
lub sprzedawcą w sprawie właściwego sposobu
• NIE ZASŁANIAJ OTWORÓW WENTYLACYJNYCH
wyrzucania tego rodzaju przedmiotów.
URZĄDZENIA GAZETAMI, OBRUSAMI,
Dotyczy symbolu baterii (symbole
ZASŁONAMI I PODOBNYMI PRZEDMIOTAMI.
przykładowe):
• NIE UMIESZCZAĆ NA URZĄDZENIU ŹRÓDEŁ
Ten symbol może występować wraz z
OTWARTEGO OGNIA, JAK NP. ZAPALONE
RQT9537
symbolem pierwiastka chemicznego. W takim
ŚWIECE.
przypadku spełnia on wymagania Dyrektywy w
• ZUŻYTE BATERIE UTYLIZOWAĆ W SPOSÓB NIE
2
sprawie określonego środka chemicznego.
ZAGRAŻAJĄCY ŚRODOWISKU NATURALNEMU.
13
PM500_EP1_2pl.indd 2PM500_EP1_2pl.indd 2 6/20/2011 6:31:51 PM6/20/2011 6:31:51 PM

Gniazdo zasilania powinno znajdować się blisko
Środki ostrożności
Obce przedmioty i substancje
urządzenia i być łatwo dostępne.
Wtyczka przewodu zasilania podłączona do gniazdka
Należy uważać, aby do wnętrza urządzenia nie dostały się
Ustawienie urządzenia
powinna być łatwo dostępna.
metalowe przedmioty. Mogą one być przyczyną porażenia
Aby całkowicie odłączyć urządzenie od źródła zasilania,
Urządzenie należy ustawić na równej powierzchni,
prądem elektrycznym lub nieprawidłowej pracy urządzenia.
należy wyjąć wtyczkę przewodu zasilania z gniazdka.
z dala od miejsc bezpośrednio nasłonecznionych, w
których panuje wysoka temperatura, duża wilgotność
Należy uważać, aby do wnętrza urządzenia nie dostały się
lub występują nadmierne drgania. Takie warunki mogą
substancje płynne. Mogą one być przyczyną porażenia
To urządzenie może odbierać zakłócenia wywołane
doprowadzić do uszkodzenia obudowy i innych części i
prądem elektrycznym lub nieprawidłowej pracy urządzenia.
użyciem telefonu komórkowego. Jeżeli takie zakłócenia
przez to skrócić czas prawidłowego działania urządzenia.
Jeśli do tego dojdzie, należy natychmiast odłączyć
wystąpią, wskazane jest zwiększenie odległości
urządzenie od źródła zasilania i skontaktować się ze
pomiędzy urządzeniem a telefonem komórkowym.
Aby uniknąć zniekształcenia i innych niekorzystnych
sprzedawcą.
POLSKIPOLSKI
efektów akustycznych, ustawiać urządzenie w odległości
przynajmniej 15 cm od ścian.
Nie wolno rozpylać na powierzchnię urządzenia lub do
jego wnętrza środków owadobójczych. Zawierają one
URZĄDZENIE JEST PRZEZNACZONE DO UŻYWANIA
Na urządzeniu nie wolno umieszczać żadnych ciężkich
łatwopalne gazy
, które mogą zapalić się, jeżeli środek
W KLIMACIE UMIARKOWANYM.
przedmiotów.
dostanie się do wnętrza urządzenia.
Spis treści
Napięcie
Naprawa
Nie wolno stosować źródeł zasilania o wysokim napięciu.
Użytkownik nie powinien podejmować się naprawy
Środki ostrożności .....................................3
Można w ten sposób doprowadzić do przeciążenia
urządzenia na własną rękę. Jeśli dźwięk jest przerywany,
Dostarczone wyposażenie .........................3
urządzenia i spowodować pożar.
wskaźniki nie świecą, pojawia się dym lub wystąpi
Przygotowanie pilota zdalnego
problem, który nie został omówiony w niniejszej instrukcji,
Nie wolno stosować zasilania prądem stałym. Przed
należy odłączyć przewód zasilania i skontaktować się ze
sterowania .............................................. 4
podłączeniem urządzenia do zasilania na statku lub w
sprzedawcą lub autoryzowanym punktem serwisowym.
Rozmieszczenie głośników .......................4
innym miejscu, gdzie stosowane jest zasilanie prądem
W przypadku napraw, demontażu lub przeróbek
wykonywanych przez osoby niewykwalifikowane może
Podłączenie .................................................4
stałym, należy sprawdzić dokładnie parametry źródła
zasilania.
dojść do porażenia prądem elektrycznym lub uszkodzenia
Opis elementów sterowania ......................5
urządzenia.
Płyty kompaktowe ......................................6
Czas eksploatacji urządzenia można wydłużyć odłączając
Korzystanie z iPod'a lub iPhone'a ............7
Ochrona przewodu zasilania
je od źródła zasilania, kiedy nie jest ono używane przez
Radio ............................................................8
dłuższy okres.
Należy sprawdzić, czy przewód zasilania jest dobrze
Zegar i timer ................................................9
podłączony i czy nie jest uszkodzony. Złe podłączenie lub
Efekty dźwiękowe ..................................... 10
uszkodzenie przewodu może być przyczyną pożaru lub
Urządzenia zewnętrzne ............................10
porażenia prądem. Nie wolno ciągnąć za przewód, zginać
Dostarczone wyposażenie
go ani kłaść na nim ciężkich przedmiotów.
Kod zdalnego sterowania ........................10
Sprawdzić i znaleźć poszczególne elementy
Rozwiązywanie problemów ..................... 11
Przy odłączaniu przewodu należy chwycić mocno za
dostarczonego wyposażenia.
wtyczkę. Ciągnięcie za przewód zasilania grozi
Konserwacja .............................................12
porażeniem prądem elektrycznym.
1 x Przewód zasilania
1 x Bateria do pilota
Dane techniczne .......................................12
zdalnego sterowania
RQT9537
1 x Antena pętlowa AM
Nie wolno dotykać wtyczki mokrymi rękoma. Grozi to
1 x Pilot zdalnego
3
1 x Antena zewnętrzna FM
porażeniem prądem elektrycznym.
sterowania
14
(N2QAYB000640)
PM500_EP1_2pl.indd 3PM500_EP1_2pl.indd 3 6/20/2011 6:31:52 PM6/20/2011 6:31:52 PM
Przygotowanie pilota zdalnego
Rozmieszczenie głośników
Podłączenie
sterowania
Oszczędzanie energii
System zużywa około 0,2 W energii w trybie spoczynku.
Gdy system nie jest używany, należy go odłączać od
zasilania.
Po odłączeniu systemu od zasilania niektóre ustawienia
zostaną utracone. Konieczne będzie ich ponowne
ustawienie.
Zestawy głośnikowe prawy i lewy są identyczne.
Prosimy używać tylko zestawów głośnikowych
R6/LR6, AA
znajdujących się w wyposażeniu.
POLSKIPOLSKI
Najlepszą jakość dźwięku pozwoli uzyskać stosowanie
1
zestawów głośnikowych z urządzeniem, do którego są
4
Należy stosować baterie alkaliczne lub manganowe.
przeznaczone.
Użycie innych zestawów głośnikowych grozi uszkodzeniem
B
Załóż baterię tak, aby jej bieguny (+ i –) były zgodne
urządzenia i pogorszeniem jakości dźwięku.
2
3
Uwaga:
z oznaczeniami wewnątrz obudowy pilota zdalnego
B
• Aby zapewnić odpowiednią wentylację, należy zachować
A
sterowania.
(6:)
(6:)
przynajmniej 10 mm odstępu między zestawami
A
głośnikowymi a urządzeniem głównym.
Skieruj pilota w stronę czujnika (Z 5). Maksymalny
Do domowego
• Zestawy głośnikowe należy ustawić na płaskim,
zasięg, z przodu urządzenia, wynosi 7 m, gdy na drodze
gniazdka
stabilnym podłożu.
Czarny
sygnału nie ma żadnych przeszkód.
• Niniejsze zestawy głośnikowe nie mają ekranu
Czerwony
zasilającego
magnetycznego. Nie należy ich umieszczać w
UWAGA!
pobliżu odbiorników telewizyjnych, komputerów ani
• Nie wolno zwierać biegunów baterii ani jej rozbierać.
innych urządzeń wrażliwych na oddziaływanie pola
• Nie ładować baterii alkalicznych ani manganowych.
magnetycznego.
• Nie wolno używać baterii, z których została zdjęta
• Długotrwałe odtwarzanie przy dużym poziomie głośności
warstwa ochronna.
może spowodować uszkodzenie urządzenia i skrócić
Kliknięcie!
• Nie zbliżać baterii do źródeł ciepła lub ognia.
jego żywotność.
• Baterii nie należy pozostawiać przez dłuższy czas, w
• Aby
uniknąć uszkodzenia urządzenia, w następujących
1 Podłącz głośniki.
pojeździe z zamkniętymi drzwiami i oknami, narażonym
przypadkach należy zmniejszyć głośność:
Uważaj, aby nie krzyżować
na bezpośrednie promieniowanie słoneczne.
– Podczas odtwarzania zniekształconych dźwięków.
(zwierać) lub odwracać
• Niewłaściwe obchodzenie się z bateriami, może
– Podczas regulacji brzmienia dźwięku.
polaryzacji przewodów
spowodować wyciek elektrolitu, co może by
ć przyczyną
• Aby zapobiec uszkodzeniu zestawów głośnikowych,
głośnikowych, gdyż można
pożaru.
proszę nie dotykać stożków głośnikowych, jeśli siatki
w ten sposób uszkodzić
• Jeśli pilot ma nie być używany przez dłuższy czas,
zostały ściągnięte.
głośniki.
należy wyjąć z niego baterię. Przechowywać w
UWAGA!
2 Podłącz antenę zewnętrzna FM.
chłodnym, ciemnym miejscu.
• Zestawów głośnikowych należy używać wyłącznie
Antenę należy zainstalować w miejscu zapewniającym
z zalecanym urządzeniem. W przeciwnym wypadku
najlepszy odbiór.
może dojść do uszkodzenia wzmacniacza, zestawów
UWAGA!
głośnikowych i do pożaru. W przypadku uszkodzenia
3 Podłącz antenę pętlową AM.
Istnieje niebezpieczeństwo wybuchu w przypadku, gdy
urządzenia lub nagłej zmiany w jakości odtwarzania
baterie zostaną nieprawidłowo założone. Baterie należy
4 Podłącz przewód zasilania.
należy zwrócić się po radę do wykwalifikowanego
wymieniać na takie same lub na baterie równorzędnego
Do zasilania tego systemu należy stosować wyłącznie
RQT9537
specjalisty.
typu, zalecane przez producenta. Zużytych baterii
dołączony przewód sieciowy.
• W celu podłączenia zestawów głośnikowych należy
4
należy pozbywać się zgodnie z instrukcjami producenta.
Nie stosować przewodów zasilania, pochodzących z
zastosować procedury opisane w niniejszej instrukcji.
innych urządzeń.
15
PM500_EP1_2pl.indd 4PM500_EP1_2pl.indd 4 6/20/2011 6:31:52 PM6/20/2011 6:31:52 PM
POLSKIPOLSKI
RQT9537
5
SLEEP
PLAY
EXT-IN
RADIO
D.BASS
SOUND
PRESET EQ
DISPLAY
DIMMER
AUTO OFF
Opis elementów sterowania
Widok od góry
F Wybierz charakterystykę dźwięku (Z 10)
I
A
G Wybierz polecenie z menu urządzenia iPod (Z 7)
Q
H Wyświetlanie informacji na panelu
J
R
Zmniejszanie jasności wyświetlacza
B
Naciśnij i przytrzymaj przycisk, aby włączyć funkcję.
Ponownie naciśnij i przytrzymaj przycisk, aby anulować
K
wybór.
I Ustawianie timera wyłączającego (Z 9)
C
L
Ustawianie zegara i timera (Z 9)
D
S
J Ustawianie funkcji programu (Z 6, 8)
K Regulacja głośności systemu
W
E
E
L Wyciszanie dźwięku
Ponownie naciśnij przycisk, aby anulować wybór.
F
„MUTE” można wyłączyć również przez regulowanie
A
głośności lub wyłączając system.
F
M Ustawienia elementów menu odtwarzania (Z 6)
D
K
M
N Ustawienia elementów menu radia (Z 8)
E
T
G
N
O [R, T]: Ominięcie albumu
Regulacja ustawień zegara
O
[Y, U]: Wybór elementu menu
U
[OK]: Potwierdzenie ustawień
H
P
V
P Automatyczne wyłączanie systemu
Funkcja ta wyłącza system (z wyjątkiem radia) jeśli nie
jest on używany przez około 30 minut.
Ponownie naciśnij przycisk, aby anulować wybór.
D Wybór źródła
Q Stacja dokująca urządzenia iPod lub iPhone (Z 7)
A Przełącznik „STANDBY/ON” [`], [1] (Z 9, 12)
[iPod]: Wybór iPod (Z 7)
R Gniazdo słuchawek ( ) (Z 10)
Naciśnij ten przycisk, aby wyłączyć urządzenie
[CD]: Wybór płyty CD (Z 6)
(przełączyć je w stan gotowości) lub włączyć je z
[RADIO, EXT-IN] / [RADIO/EXT-IN(USB)]:
S Wyświetlacz
powrotem. W stanie gotowości urządzenie nadal
Wybór radia lub USB (Z 8, 10)
T Gniazdo USB ( ) (Z 10)
pobiera pewną niewielką moc.
E Podstawowe czynności obsługowe
[4/9]:
Odtwarzanie i wstrzymywanie odtwarzania (pauza)
U Otwieranie lub zamykanie kieszeni napędu płyt
B Przyciski numeryczne [1 do 9, 0, ≧10]
[8]: Zatrzymywanie odtwarzania
Aby wybrać 2-cyfrowy numer
V Kieszeń napędu płyt
[2], [6]: Pominięcie utworów
Przykład: 16: [≧10] → [1] → [6]
Wybór zaprogramowanej stacji radiowej
W Czujnik zdalnego sterowania
C Usuwanie zaprogramowanej ścieżki (Z 6)
[3], [5]: Wyszukaj ścieżkę
Dostrój odbiornik do stacji radiowej
[2/3], [5/6]: Pomiń i przeszukaj ścieżkę
Wybór zaprogramowanej stacji
16
radiowej
PM500_EP1_2pl.indd 5PM500_EP1_2pl.indd 5 6/20/2011 6:31:54 PM6/20/2011 6:31:54 PM
Płyty kompaktowe
Funkcja trybu odtwarzania
Odtwarzanie zaprogramowane
Ta funkcja pozwala zaprogramować do 24 utworów.
Odtwarzanie płyt
1 Naciśnij [PLAY MENU], aby wybrać „PLAYMODE”.
2 Naciśnij [Y, U], następnie naciśnij [OK], aby
1 Naciśnij [x, OPEN/CLOSE] na urządzeniu, aby
1 Naciśnij [PROGRAM] w trybie zatrzymanym.
wybrać żądany tryb.
otworzyć kieszeń napędu płyt.
Wyświetlony zostanie symbol „PGM”.
Włóż płytę etykietą do góry.
OFF
Odtwarzanie wszystkich utworów.
2 Za pomocą odpowiednich przycisków
Naciśnij ponownie [x, OPEN/CLOSE], aby zamknąć
PLAYMODE
numerycznych wybierz żądany utwór.
kieszeń napędu płyt.
Aby zaprogramować nowe utwory należy powtórzyć
1-TRACK
Odtwarzaj jeden wybrany utwór z płyty.
1TR
ten krok.
Naciśnij odpowiedni przycisk numeryczny,
2 Naciśnij [CD], następnie naciśnij [4/9], aby
aby wybrać utwór.
3 Naciśnij [4/9] aby rozpocząć odtwarzanie.
rozpocząć odtwarzanie.
1-ALBUM
Odtwarzaj jeden wybrany album z płyty.
POLSKIPOLSKI
Zatrzymywanie
Podczas odtwarzania naciśnij [8].
1ALBUM
Naciśnij [R, T], aby wybrać album.
1 Naciśnij [PROGRAM] w trybie zatrzymanym.
odtwarzania
2 Naciśnij [R, T], aby wybrać album.
Wstrzymywanie
Podczas odtwarzania naciśnij [4/9].
RANDOM
Odtwarzaj losowo wybraną płytę.
3 Naciśnij [6], następnie za pomocą odpowiednich
odtwarzania
Naciśnij ponownie, aby kontynuować
RND
przycisków numerycznych wybierz żądany utwór.
odtwarzanie.
1-ALBUM
Odtwarzaj losowo wszystkie utwory w
4 Naciśnij [OK].
Pominięcie
Naciśnij [R, T].
RANDOM
jednym wybranym albumie.
Aby zaprogramować nowe utwory należy powtórzyć
albumuu
1ALBUM RND
Naciśnij [R, T], aby wybrać album.
kroki od 2 do 4.
5 Naciśnij [4/9] aby rozpocząć odtwarzanie.
Pominięcie
Uwaga:
Naciśnij [2] lub [6] (urządzenie
Naciśnij [PROGRAM] w trybie
utworu
• Podczas odtwarzania w losowej kolejności nie można
Anulowanie
główne: [2/3] lub [5/6]).
odtwarzania
zatrzymanym.
przejść do utworów poprzednio odtworzonych lub
Przeszukiwanie
Naciśnij i przytrzymaj [3] lub [5]
zaprogramowanych
naciśnij przyciski numeryczne.
utworu
(urządzenie główne: [2/3] lub
utworów
• Funkcja ta nie działa z włączoną opcją „Odtwarzanie
[5/6]).
zaprogramowane”.
Powtórzyć program Naciśnij [PROGRAM], następnie
• Nastawa ta powraca do domyślnej opcji „OFF
naciśnij [4/9].
PLAYMODE” z chwilą odtwarcia kieszeń napędu płyt.
Sprawdzić
Naciśnij [2] lub [6] gdy w
zawartość
trybie zatrzymania odtwarzania
Odtwarzanie z powtórzeniem
programu
wyświetlany jest komunikat „PGM”.
Wyświetlanie dostępnych informacji
Aby sprawdzić obecny stan
Można powtarzać „Odtwarzanie zaprogramowane” lub
podczas programowania, należy
inną wybraną „Funkcja trybu odtwarzania”.
Dostępne informacje można wyświetlać na panelu
dwukrotnie nacisnąć [PROGRAM]
1 Naciśnij [PLAY MENU], aby wybrać „REPEAT”.
wyświetlacza.
po wyświetleniu komunikatu
„PGM”, następnie naciśnij [2]
Naciśnij [DISPLAY].
2 Naciśnij [Y, U], aby wybrać „ON REPEAT”
lub [6].
następnie naciśnij [OK].
Uwaga:
Usunąć ostatni
Naciśnij [DEL] w trybie
Wyświetlony zostanie symbol „
”.
• Maksymalna liczba wyświetlanych znaków: około 16
zaprogramowany
zatrzymanym.
Aby anulować, wybierz „OFF REPEAT”.
• Urządzenie obsługuje etykiety w formacie
utwór
1.0, 1.1 i 2.3 ID3.
• Dane tekstowe nieobsługiwane przez system mogą być
Usunąć wszystkie
W trybie zatrzymania naciśnij [8].
wyświetlane odmiennie.
zaprogramowane
Wyświetlony zostanie symbol
utwory
„CLR ALL”. W ciągu 5 sekund
naciśnij ponownie [8].
RQT9537
Uwaga:
6
Pamięć programu zostanie skasowana po otworzeniu
podajnika płyt.
17
PM500_EP1_2pl.indd 6PM500_EP1_2pl.indd 6 6/20/2011 6:31:54 PM6/20/2011 6:31:54 PM
Uwaga dotycząca płyt CD
Korzystanie z iPod'a lub iPhone'a
Wstrzymywanie
Naciśnij [4/9] lub [8].
odtwarzania
• Urządzenie może odtwarzać do 99 utworów.
• To urządzenie może odtwarzać pliki w formacie MP3
Pominięcie utworu
Naciśnij [2] lub [6]
oraz płyty audio CD-R/RW formatu CD-DA poddane
(urządzenie główne: [2/3]
finalizacji.
lub [5/6]).
• System ten może nie odtwarzać niektórych płyt
CD-R/RW z uwagi na jakość ich nagrania.
Przeszukiwanie
Naciśnij i przytrzymaj [3]
aktualnej ścieżki
lub [5] (urządzenie główne:
[2/3] lub [5/6]).
Uwaga dotycząca MP3
Gniazdo stacji dokującej
Przeglądanie menu
Naciśnij [iPod MENU] w trybie
• Pliki są traktowane jako utwory, a foldery jako albumy.
1 Naciśnij, aby otworzyć pokrywę i podłącz
urządzenia iPod lub
odtwarzania.
• Urządzenie może odtwarzać do 999 utworów,
kompatybilną przejściówkę stacji dokującej.
iPhone,
POLSKIPOLSKI
255 albumów (z folderem nadrzędnym włącznie) i
Powracanie do
20 sesji.
iPhone
poprzedniego menu
• Płyty muszą być zgodne ze standardem ISO9660
(nie należy do wyposażenia)
poziom 1 lub 2 (z wyjątkiem formatów rozszerzonych).
Wybieranie
Naciśnij [R, T], następnie
• Aby odtwarzać w określonej kolejności, poprzedź nazwy
elementu menu
naciśnij [OK].
folderów i plików 3-cyfrowymi numerami, zgodnymi z
urządzenia iPod lub
zamierzoną kolejnością odtwarzania.
Przejściówka stacji dokującej
iPhone
Ograniczenia dotyczące odtwarzania plików MP3
(nie należy do wyposażenia)
Uwaga:
• Jeżeli pliki w formacie MP3 zostały nagrane na tej
• Podczas podłączania należy upewnić się, ż
e iPod
samej płycie, na której nagrano dźwięk w formacie
lub iPhone jest dobrze połączony z wtyczką zanim
CD-DA, tylko format nagrany w pierwszej sesji będzie
urządzenie iPod lub iPhone zostanie włożone.
odtwarzany.
•
Operacja ta może się różnić lub nie działać w zależności
• Niektóre utwory MP3 mogą nie być
odtwarzane z uwagi
od modelu urządzenia iPod lub iPhone.
na stan płyty lub nagrania.
• W zależności od modelu, może zaistnieć potrzeba
•
Nagrania nie zawsze odtwarzane są w kolejności
odłączenia urządzenia iPod lub iPhone i wybrania
nagrywania.
2 Odpowiednio mocno podłącz urządzenie iPod lub
albumu, artysty, itp. na urządzeniu iPod lub iPhone.
iPhone.
• W celu zapoznania się z działaniem urządzenia iPod lub
Technologia kodowania dźwięku MPEG Layer-3
Upewnij się, że z urządzenia iPhone lub iPod został
iPhone należy przeczytać Podręcznik Użytkownika.
podlega licencji firmy Fraunhofer IIS i Thomson.
ściągnięty pokrowiec.
3 Naciśnij [iPod], następnie naciśnij [4/9], aby
Ładowanie iPod’a lub iPhone’a
rozpocząć odtwarzanie.
Urządzenie iPod lub iPhone ładowane jest automatycznie
po podłączeniu do systemu (nawet, jeśli system jest w
trybie gotowości).
• Spójrz na wyświetlacz iPod'a lub iPhone'a, aby
sprawdzić status naładowania jego baterii.
• Należy odłączyć urządzenie iPod lub iPhone jeśli nie jest
one używane przez dłuższy czas, a ładowanie baterii
zostało ukończone.
• Ładowanie zatrzyma się po naładowaniu baterii do
RQT9537
pełna. Poziom naładowania będzie spadał w naturalny
sposób.
7
18
PM500_EP1_2pl.indd 7PM500_EP1_2pl.indd 7 6/20/2011 6:31:55 PM6/20/2011 6:31:55 PM
Kompatybilny iPod i iPhone
W celu poprawy brzmienia dźwięku
Aktualizować iPod lub iPhone przy użyciu najnowszego
Jeśli wybrano pasmo „FM”
oprogramowania, przed rozpoczęciem korzystania z
1 Naciśnij [RADIO MENU], aby wybrać „FM MODE”.
systemu.
Kompatybilność jest uzależniona od wersji
2 Naciśnij [Y, U], aby wybrać „MONO” następnie
oprogramowania zainstalowanego na iPod’zie lub
naciśnij [OK].
iPhone’ie.
Aby anulować, wybierz „STEREO”.
„Made for iPod” i „Made for iPhone” oznaczają, że
• iPod touch 4. generacji (8GB, 32GB, 64GB)
elektroniczne wyposażenie zostało przeznaczone do
• Tryb „MONO” jest również anulowany z chwilą zmiany
• iPod nano 6. generacji (8GB, 16GB)
podłączenia do iPod’a lub iPhone’a i producent wydał
częstotliwości.
• iPod touch 3. generacji (32GB, 64GB)
oświadczenie co do jego zgodności ze standardami
• Podczas słuchania w normalnych warunkach tryb
• iPod nano 5. generacji (kamera wideo) (8GB, 16GB)
pracy firmy Apple.
„MONO” powinien być wyłączony.
• iPod touch 2. generacji (8GB, 16GB, 32GB)
Jeśli wybrano pasmo „AM”
POLSKIPOLSKI
• iPod classic [120GB, 160GB (2009)]
Firma Apple nie ponosi odpowiedzialności za działanie
• iPod nano 4. generacji (wideo) (8GB, 16GB)
1 Naciśnij [RADIO MENU], aby wybrać „B.PROOF”.
tego urządzenia oraz jego zgodność z wymogami
• iPod classic (160GB) (2007)
prawnymi oraz dotyczącymi bezpieczeństwa.
2 Naciśnij [Y, U], aby wybrać „BP 1” lub „BP 2”
• iPod touch 1. generacji (8GB, 16GB, 32GB)
następnie naciśnij [OK].
• iPod nano 3. generacji (wideo) (4GB, 8GB)
Proszę mieć na uwadze, że korzystanie z tego
• iPod classic (80GB)
akcesorium razem z urządzeniem iPod lub iPhone
• iPod nano 2. generacji (aluminiowy) (2GB, 4GB, 8GB)
Programowanie stacji
może mieć wpływ na wydajność systemów
• iPod 5. generacji (wideo) (60GB, 80GB)
bezprzewodowych.
Można zaprogramować 30 stacji FM i 15 stacji AM.
• iPod 5. generacji (wideo) (30GB)
• iPod nano 1. generacji (1GB, 2GB, 4GB)
iPhone, iPod, iPod classic, iPod nano, oraz iPod touch
Przygotowanie
• iPhone 4 (16GB, 32GB)
to znaki firmowe firmy Apple Inc., zarejestrowane w
Naciśnij [RADIO, EXT-IN] (urządzenie główne:
• iPhone 3GS (8GB, 16GB, 32GB)
Stanach Zjednoczonych i innych krajach.
[RADIO/EXT-IN(USB)]), aby wybrać pasmo „FM” lub „AM”.
• iPhone 3G (8GB, 16GB)
• iPhone (4GB, 8GB, 16GB)
Automatyczne programowanie
Uwaga dotyczące urządzenia iPhone
1 Aby wybrać „LOWEST” (najniższą) lub
Radio
„CURRENT” (aktualną) częstotliwość, naciśnij [OK].
• Wszystkie funkcje urządzenia iPhone mogą być
kontrolowane tylko za pomocą jego ekranu dotykowego.
2 Naciśnij [RADIO MENU], aby wybrać „A.PRESET”
• System nie pokazuje połączeń przychodzących oraz
Strojenie ręczne
następnie naciśnij [OK].
statusu telefonu.
Wyświetlony zostanie symbol „START?”.
• Odtwarzanie zostanie wstrzymane podczas połączenia
1 Naciśnij [RADIO, EXT-IN] (urządzenie główne:
3 Naciśnij [OK], aby rozpocząć programowanie.
przychodzącego.
[RADIO/EXT-IN(USB)]), aby wybrać pasmo „FM”
• Rozmowa nie zostanie anulowana po podłączeniu lub
lub „AM”.
Ręczne programowanie stacji
odłączeniu urządzenia iPhone od systemu.
• Nie istnieje specyfikacja firmy Apple Inc. gwarantująca
2 Naciśnij [3] lub [5], aby wybrać częstotliwość
powyższe zachowanie urządzenia iPhone. Zachowania
stacji.
1 Naciśnij [3] lub [5], aby dostroić radio do
urządzenia iPhone mogą różnić się w nowszych
Aby uruchomić automatyczne strojenie, należy
żądanej stacji.
modelach lub nowszym oprogramowaniu.
nacisnąć i przytrzymać ten przycisk, aż do momentu,
2 Naciśnij [PROGRAM].
gdy wyświetlana częstotliwość zacznie szybko się
zmieniać.
3 Wybierz żądaną zaprogramowaną stację
przyciskiem numerycznym.
Aby zaprogramować więcej stacji, wykonaj ponownie
RQT9537
koki od 1 do 3.
8
Nowa stacja zastąpi wcześniej zaprogramowaną pod
tym samym numerem.
19
PM500_EP1_2pl.indd 8PM500_EP1_2pl.indd 8 6/20/2011 6:31:55 PM6/20/2011 6:31:55 PM

Wybieranie zaprogramowanej stacji
Zegar i timer
1 Naciśnij [CLOCK/TIMER], aby wybrać „#PLAY 1”,
„#PLAY 2” lub „#PLAY 3”.
Naciśnij przyciski numeryczne, [2] lub [6]
Ustawianie zegara
2 W ciągu 10 sekund naciśnij [R, T] aby ustawić
(urządzenie główne: [2/3] lub [5/6], aby
czas rozpoczęcia.
wybrać zaprogramowaną stację.
Jest to zegar 24-godzinny.
3 Naciśnij [OK].
1 Naciśnij [CLOCK/TIMER], aby wybrać „CLOCK”.
Ustawianie stacji w paśmie AM
4 Powtórz kroki 2 i 3, aby ustawić godzinę
2 W ciągu 10 sekund naciśnij [R, T] aby ustawić
zakończenia.
(tylko poprzez urządzenie główne)
czas.
Aby uaktywnić timer
Ten system jest w stanie odbierać stacje radiowe w paśmie
3 Naciśnij [OK].
AM w krokach co 10 kHz.
5 Naciśnij [#, PLAY], aby rozpocząć „#PLAY 1”,
Aby wyświetlić zegar na kilka sekund, naciśnij
POLSKIPOLSKI
1 Naciśnij [RADIO/EXT-IN(USB)], aby wybrać
„#PLAY 2” lub „#PLAY 3”.
pasmo „FM” lub „AM”.
[CLOCK/TIMER].
6 Naciśnij [`], aby wyłączyć urządzenie.
2 Naciśnij i przytrzymaj [RADIO/EXT-IN(USB)].
Uwaga:
Aby timer działał, urządzenie musi być wyłączone.
Zegar należy regularnie nastawiać, aby zawsze była
Po kilku sekundach wyświetlona zostanie bieżąca
ustawiona dokładna godzina.
Zmiany
Powtórz kroki od 1 do 4 i 6 (Z powyżej).
minimalna częstotliwość radiowa. Zwolnij przycisk po
ustawień
zmianie minimalnego zakresu częstotliwości.
• Aby powrócić do ustawień początkowych, należy
Wybieranie
1) Naciśnij dwukrotnie [#, PLAY] tak,
Timer wyłączający
wykonać ponownie powyższe kroki.
innego źródła
aby symbol timera przestał być
• Po zmianie ustawień, zaprogramowane częstotliwości
Timer wyłącza system po upływie ustawionego czasu.
lub głośności
wyświetlany.
zostaną usunięte.
2) Wybieranie innego źródła lub
Naciśnij [SLEEP], aby wybrać żądane ustawienie
głośności.
(w minutach).
3) Wykonaj kroki 5 i 6 (Z powyżej).
Odbiór RDS
Aby anulować, wybierz „OFF”.
Sprawdzanie
Naciśnij [CLOCK/TIMER], aby wybrać
Urządzenie to może wyświetlać dane tekstowe nadawane
30 MIN → 60 MIN → 90 MIN → 120 MIN → OFF
ustawień
„#PLAY 1”, „#PLAY 2” lub „#PLAY 3”.
przez rozgłośnie radiowe (RDS) dostępny w niektórych
Anulowanie
Naciśnij dwukrotnie [#, PLAY] tak, aby
rejonach.
Aby wyświetlić pozostały czas
symbol timera przestał być wyświetlany.
Naciśnij [SLEEP].
Naciśnij [DISPLAY].
Uwaga:
Uwaga:
PS
PTY
FREQ
• Timer rozpoczyna odtwarzanie z niskim poziomem
→
→
• Timer wyłączający system może być używany łącznie z
(Nazwa stacji)
(Typ programu)
(Częstotliwość)
głośności, który stopniowo rośnie do ustawionego
timerem odtwarzania.
poziomu.
• Timer wyłączający ma zawsze priorytet. Należy
• Jeśli timer jest aktywny, zadziała codziennie o ustawionej
Uwaga:
pamiętać, aby czasy timerów się nie nakładały.
godzinie.
Informacje RDS mogą być niedostępne, jeżeli odbiór jest
• W przypadku wyłączenia systemu i włą
czenia go
słaby.
ponownie podczas pracy timera, timer nie zatrzyma się z
Timer odtwarzania
chwilą upływu ustawionego czasu.
Timer można ustawić w taki sposób, aby o określonej
godzinie urządzenie włączało się i budziło użytkownika.
Włącz urządzenie i ustaw zegar.
RQT9537
Przygotuj źródło dźwięku do odsłuchu (płyta, radio, USB,
iPod lub iPhone) i ustaw głośność.
9
20
PM500_EP1_2pl.indd 9PM500_EP1_2pl.indd 9 6/20/2011 6:31:55 PM6/20/2011 6:31:55 PM
