Panasonic EY0L80: инструкция
Раздел: Аксессуары для дома
Тип:
Инструкция к Panasonic EY0L80
Ni-MH
Ni-Cd
Operating Instructions
Bedienungsanleitung
Instructions d’utilisation
Istruzioni per l’uso
Battery charger
Gebruiksaanwijzing
Ladegerät
Manual de instrucciones
Chargeur de batterie
Brugsvejledning
Caricabatterie
Acculader
Driftsföreskrifter
Cargador de la batería
Bruksanvisning
Batterioplader
Batteriladdare
Käyttöohjeet
Batterilader
Инструкция по эксплуатации
Akkulaturi
Iнструкцiя з експлуатації
Зарядное устройство
Зарядний пристрій
Model No: EY0L80
Before operating this unit, please read these instructions completely and save this manual for future use.
Vor Inbetriebnahme des Gerätes die Betriebsanleitung bitte gründlich durchlesen und diese Broschüre zum späteren Nachschlagen sorgfältig aufbewahren.
Lire entièrement les instructions suivantes avant de faire fonctionner l’appareil et conserver ce mode d’emploi à des fins de consultation ultérieure.
Prima di usare questa unità, leggere completamente queste istruzioni e conservare il manuale per usi futuri.
Lees deze gebruiksaanwijzing aandachtig door voor u het apparaat in gebruik neemt en bewaar de gebruiksaanwijzing voor eventuele naslag.
Antes de usar este aparato por primera vez, lea todas las instrucciones de este manual y guarde el manual para poderlo consultar en el futuro.
Gennemlæs denne betjeningsvejledning før brugen og gem den til fremtidig brug.
Läs igenom hela bruksanvisningen innan batteriladdaren tas i bruk. Spara bruksanvisningen för senare användning.
Før enheten tas i bruk, vennligst les disse alle anvisningene og oppbevar deretter bruksanvisningen for senere bruk.
Lue ohjeet huolella ennen laitteen käyttöönottoa ja säilytä tämä käyttöohje tallessa tulevaa tarvetta varten.
Перед эксплуатацией данного устройства, пожалуйста, полностью прочтите данную инструкцию и сохраните данное руководство для использования в будущем.
Перед екплуатацiєю даного пристрою, будь ласка, повнiстю прочитайте дану iнструкцiю i збережiть даний посiбник для використання у майбутньому
Index/Index/Index/Indice/Index/Indice/Indeks/Index/Indeks/Hakemisto/Индекс/Індекс
English: Page 4
Dansk: Side 36
Deutsch: Seite 10
Svenska: Sid 41
Français: Page 15
Norsk: Side 46
Italiano: Pagina 21
Suomi: Sivu 51
Nederlands: Bladzijde 26
Русский:
Страница
56
Español: Página 31
Українська: Сторiнка 62
FUNCTIONAL DESCRIPTION
FUNKTIONSBESCHREIBUNG
DESCRIPTION DES FONCTIONS
DESCRIZIONE DELLE FUNZIONI
FUNCTIEBESCHRIJVING
DESCRIPCIÓN FUNCIONAL
FUNKTIONSBESKRIVELSE
FUNKTIONSBESKRIVNING
FUNKSJONSBESKRIVELSE
TOIMINTOJEN KUVAUS
ФУНКЦИОНАЛЬНОЕ ОПИСАНИЕ
ФУНКЦIОНАЛЬНИЙ ОПИС
-
2
-
Ni-MH
Ni-Cd
(A)
(C)
(B)

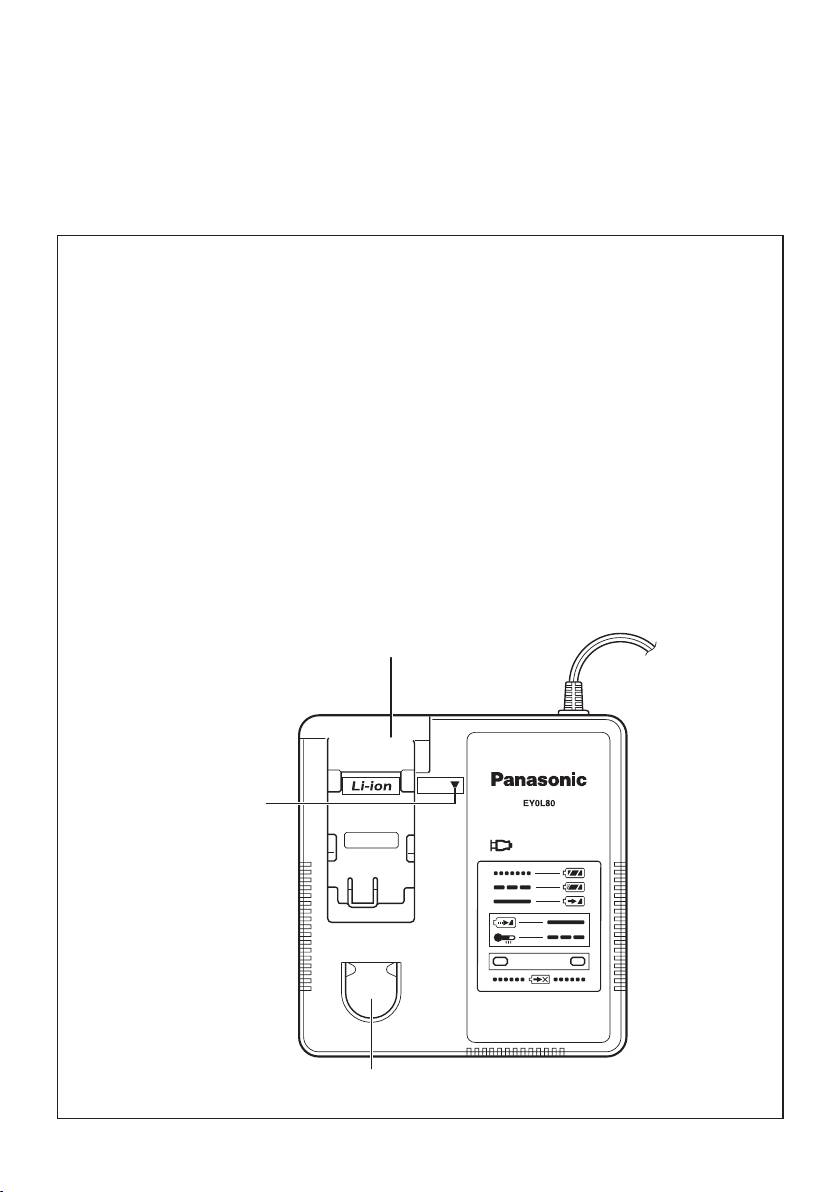
Li-ion battery pack dock
Li-Ion-Akkuladeschacht
Poste d’accueil de la batterie autonome Li-ion
Spazio raccordo pacco batteria Li-ion
Li-ion accuhouder
Enchufe de carga de batería Li-ión
(A)
Li-ion batteripakningsdok
Docka för litiumjonbatteri
Dokk for Li-ion-batteripakke
Li-ioniakun liitin
Углублениедляустановкилитий-ионногобатарейногоблока
Заглибленнядлявстановленнялітій-іонногобатарейногоблоку
Ni-MH/Ni-Cd battery pack dock
Ni-MH/Ni-Cd-Akkuladeschacht
Poste d’accueil de la batterie autonome Ni-MH/Ni-Cd
Spazio raccordo pacco batteria Ni-MH/Ni-Cd
Ni-MH/Ni-Cd accuhouder
Enchufe de carga de batería Ni-MH/Ni-Cd
Ni-MH/Ni-Cd batteripakningsdok
(B)
Docka för NiMH/NiCd-batteri
Dokk for Ni-MH/Ni-Cd-batteripakke
Ni-MH/Ni-Cd akun liitin
Углублениедляустановкиникель-металлогидридного
батарейногоблока/никель-кадмиевогобатарейногоблока
Заглибленнядлявстановленнянікель-метал-гідридного
батарейногоблоку/нікель-кадмієвогобатарейногоблоку
Alignment mark
Ausrichtmarkierungen
Marques d’alignement
Marcature allineamento
Uitlijntekens
Marcas de alineación
(C)
Flugtemærker
Anpassningsmärken
Opprettingsmerke
Sovitusmerkit
Меткисовмещения
Міткивирівнювання
-
3
-

13) The charger and battery pack are
I
.
IMPORTANT SAFE-
specifically designed to work toge-
ther. Do not attempt to charge any
TY INSTRUCTIONS
other cordless tool or battery pack
with this charger. Do not attempt
Read All Instructions
to charge the battery pack with any
1) SAVE THESE INSTRUCTIONS
other charger.
-This manual contains important
14) Do not attempt to disassemble the
safety and operating instructions
battery charger and the battery
for battery charger EY0L80.
pack housing.
2) Before using battery charger, read
15) Do not store the tool and battery
all instructions and cautionary mark-
pack in locations where the
ings on (1) battery charger, (2) bat-
temperature may reach or exceed
tery pack.
50°C (122°F) (such as a metal
3)
CAUTION -To reduce the risk
tool shed, or a car in the summer),
of injury, charge only applicable
which can lead to deterioration of
battery pack as shown in the last
the storage battery.
page. Other types of batteries may
16) Do not charge battery pack when
burst causing personal injury and
the temperature is BELOW 0°C
damage.
(32°F) or ABOVE 40°C (104°F).
4) Do not expose charger and battery
17) Do not incinerate the battery pack.
pack to rain or snow or use in damp
It can be explode in a fire.
location.
18) The charger is designed to operate
5) Use of an attachment not recom-
on standard household electrical
mended may result in a risk of fire,
power only. Charge only on the volt-
electric shock, or injury to persons.
age indicated on the nameplate.
6) To reduce risk of damaging the
Do not attempt to use it on any
electric plug and cord, pull by plug
other voltage!
rather than cord when disconnecting
19) Do not abuse cord. Never carry
charger.
charger by cord or yank it to discon-
7) An extension cord should not be
nect from outlet. Keep cord away
used.
from heat, oil and sharp edges.
8) Do not operate charger with damag-
20) Charge the battery pack in a well
ed cord or plug — replace them
ventilated place, do not cover the
immediately.
charger and battery pack with a
9) Do not operate charger if it has
cloth, etc., while charging.
received a sharp blow, been dropped,
21) Do not short the battery pack.
or otherwise damaged in any way;
A battery short can cause a large
take it to a qualified service agent.
current flow, over heating and burns.
10) Do not disassemble charger; take
22)
NOTE: If the supply cord of this
it to a qualified service agent when
appliance is damaged, it must
service or repair is required. Incor-
only be replaced by a repair shop
rect reassembly may result in a risk
appointed by the manufacturer,
of electric shock or fire.
because special purpose tools are
11) To reduce risk of electric shock,
required.
unplug charger from outlet before
23) The appliance is not intended for
attempting any maintenance or
use by young children or infirm
cleaning.
persons without supervision.
12) Make sure cord is located so that it
24) Young children should be supervis-
will not be stepped on, tripped over,
ed to ensure that they do not play
or otherwise subjected to damage
with the appliance.
or stress.
-
4
-
Symbol Meaning
and wait for more than one hour to
warm up the battery to the level of
Read the operating
the ambient temperature.
instructions before use.
•
Cool down the charger when charging
more than two battery packs consecu-
For indoor use only.
tively.
• Do not insert your fingers into con-
tact hole, when holding charger or
any other occasions.
WARNING:
CAUTION:
• Do not use other than the Panasonic
battery packs that are designed for
To prevent the risk of fire or damage
use with this rechargeable tool.
to the battery charger.
•
Do not dispose of the battery pack in
• Do not use power source from an
a fire, or expose it to excessive heat.
engine generator.
•
Do not drive the likes of nails into the
• Do not cover vent holes on the
battery pack, subject it to shocks, dis-
charger and the battery pack.
mantle it, or attempt to modify it.
• Unplug the charger when not in
• Do not allow metal objects to touch
use.
the battery pack terminals.
•
Do not carry or store the battery pack
Li-ion Battery Pack
in the same container as nails or sim-
NOTE:
ilar metal objects.
Your battery pack is not fully charg-
•
Do not charge the battery pack in a
ed at the time of purchase. Be sure
high-temperature location, such as
next to a fire or in direct sunlight.
to charge the battery before use.
Otherwise, the battery may overheat,
Battery charger (EY0L80)
catch fire, or explode.
•
Never use other than the dedicated
1. Plug the charger into the AC outlet.
charger to charge the battery pack.
NOTE:
Otherwise, the battery may leak,
Sparks may be produced when the
overheat, or explode.
plug is inserted into the AC power
•
After removing the battery pack from
supply, but this is not a problem in
the tool or the charger, always reattach
terms of safety.
the pack cover. Otherwise, the battery
contacts could be shorted, leading to a
2. Insert the battery pack firmly into the
risk of fire.
charger.
1. Line up the alignment marks and
place the battery onto the dock on
II
. CHARGING THE
the charger.
2. Slide forward in the direction of the
BATTERY
arrow.
Common Cautions for the Li-
Alignment marks
ion/Ni-MH/Ni-Cd Battery Pack
NOTE:
• If the temperature of the battery pack
falls approximately below −10°C
(14°F), charging will automatically
3. During charging, the charging lamp
stop to prevent degradation of the
will be lit.
battery.
When charging is completed, an inter-
•
Do not charge the battery pack whose
nal electronic switch will automatically
temperature is below 0°C (32°F).
be triggered to prevent overcharging.
• When charging a cool battery pack
• Charging will not start if the battery
(below 0°C (32°F)) in a warm place,
pack is warm (for example, immedi-
leave the battery pack at the place
-
5
-

ately after heavy-duty operation).
• Charging will not start if the battery
The orange standby lamp will be
pack is warm (for example, immedi-
flashing until the battery cools down.
ately after heavy-duty operation).
Charging will then begin automati
-
The orange standby lamp will be
cally.
flashing until the battery cools down.
Charging will then begin automati-
4.
The charge lamp (green) will flash
cally.
slowly once the battery is approximate-
ly 80% charged.
4.
When charging is completed, the
charging lamp will start flashing quickly
5.
When charging is completed, the
in green color.
charging lamp will start flashing quickly
in green color.
5. If the charging lamp does not light
immediately after the charger is
6. If the power lamp does not light imme
-
plugged in, or if after the standard
diately after the charger is plugged
charging time the charging lamp does
in, or if after the standard charging
not flash quickly in green, consult an
time the charging lamp does not flash
authorized dealer.
quickly in green, consult an author-
ized dealer.
6. If a fully charged battery pack is
inserted into the charger again, the
7. If a fully charged battery pack is insert-
charging lamp lights up. After sever-
ed into the charger again, the charg-
al minutes, the charging lamp may
ing lamp lights up. After several min-
flash quickly to indicate the charging
utes, the charging lamp may flash
is completed.
quickly to indicate the charging is
completed.
Ni-MH/Ni-Cd Battery Pack
NOTE:
When you charge the battery pack
for the first time, or after prolonged
storage, charge it for about 24
hours to bring the battery up to full
capacity.
Battery charger (EY0L80)
1. Plug the charger into the AC outlet.
NOTE:
Sparks may be produced when the
plug is inserted into the AC power
supply, but this is not a problem in
terms of safety.
2. Insert the battery pack firmly into the
charger.
3. During charging, the charging lamp will
be lit.
When charging is completed, an inter-
nal electronic switch will automatically
be triggered to prevent overcharging.
-
6
-
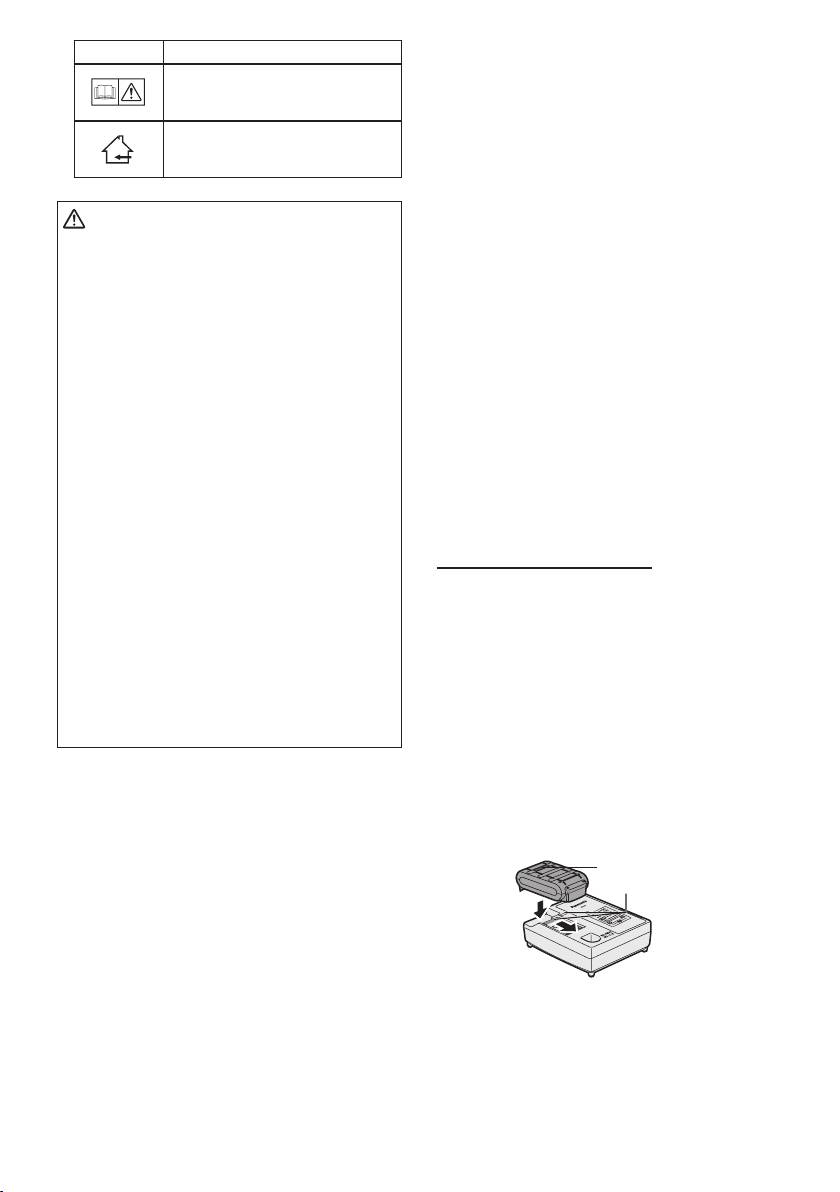
LAMP INDICATIONS
Green Lit
Charger is plugged into the AC outlet.
Ready to charge.
Green Flashing Quickly
Charging is completed. (Full charge.)
Green Flashing
Battery is approximately 80% charged. (Usable charge. Li-
ion only)
Green Lit
Now charging.
Orange Lit
Battery pack is cool.
The battery pack is being charged slowly to reduce the load
on the battery. (Li-ion only)
Orange Flashing
Battery pack is warm. Charging will begin when temperature
of battery pack drops. (Li-ion only)
If the temperature of the battery pack is –10°C or less, the
chargingstatuslamp(orange)willalsostartashing.Charg
-
ing will begin when the temperature of the battery pack goes
up. (Li-ion only)
Charging Status Lamp
Left: green Right: orange will be displayed.
Both Orange and Green Flashing Quickly
Charging is not possible. Clogged with dust or malfunction
of the battery pack.
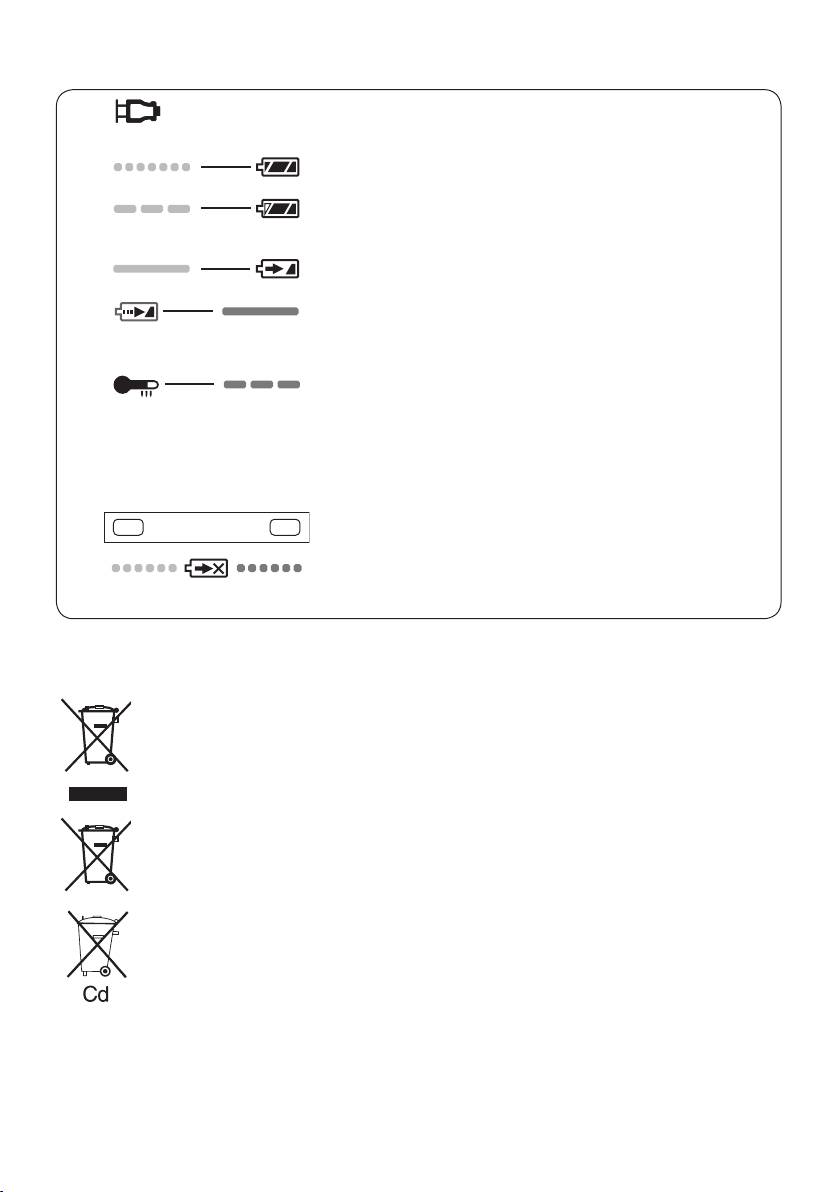
Information for Users on Collection and Disposal of Old Equip-
ment and used Batteries
These symbols on the products, packaging, and/or accompanying docu-
ments mean that used electrical and electronic products and batteries
should not be mixed with general household waste.
For proper treatment, recovery and recycling of old products and used bat-
teries, please take them to applicable collection points, in accordance with
your national legislation and the Directives 2002/96/EC and 2006/66/EC.
By disposing of these products and batteries correctly, you will help to save
valuable resources and prevent any potential negative effects on human
health and the environment which could otherwise arise from inappropriate
waste handling.
For more information about collection and recycling of old products and bat-
teries, please contact your local municipality, your waste disposal service or
the point of sale where you purchased the items.
Penalties may be applicable for incorrect disposal of this waste, in accordance
with national legislation.
For business users in the European Union
If you wish to discard electrical and electronic equipment, please contact your
dealer or supplier for further information.
-
7
-
