Panasonic NR-C703: инструкция
Раздел: Бытовая, кухонная техника, электроника и оборудование
Тип: Холодильник
Характеристики, спецификации
Инструкция к Холодильнику Panasonic NR-C703
Operating Instructions
àÌÒÚÛ͈Ëfl ÔÓ ˝ÍÒÔÎÛ‡Ú‡ˆËË
Refrigerator
ïÓÎÓ‰ËθÌËÍ
NR-C703M NR-C703MS
NR-C703R NR-C703MW
Before operating this unit, please read these instructions completely.
èÓʇÎÛÈÒÚ‡, ÔÓÎÌÓÒÚ¸˛ ËÁÛ˜ËÚ ‰‡ÌÌÛ˛ ËÌÒÚÛÍˆË˛ ‰Ó ̇˜‡Î‡ ˝ÍÒÔÎÛ‡Ú‡ˆËË ıÓÎÓ‰ËθÌË͇.
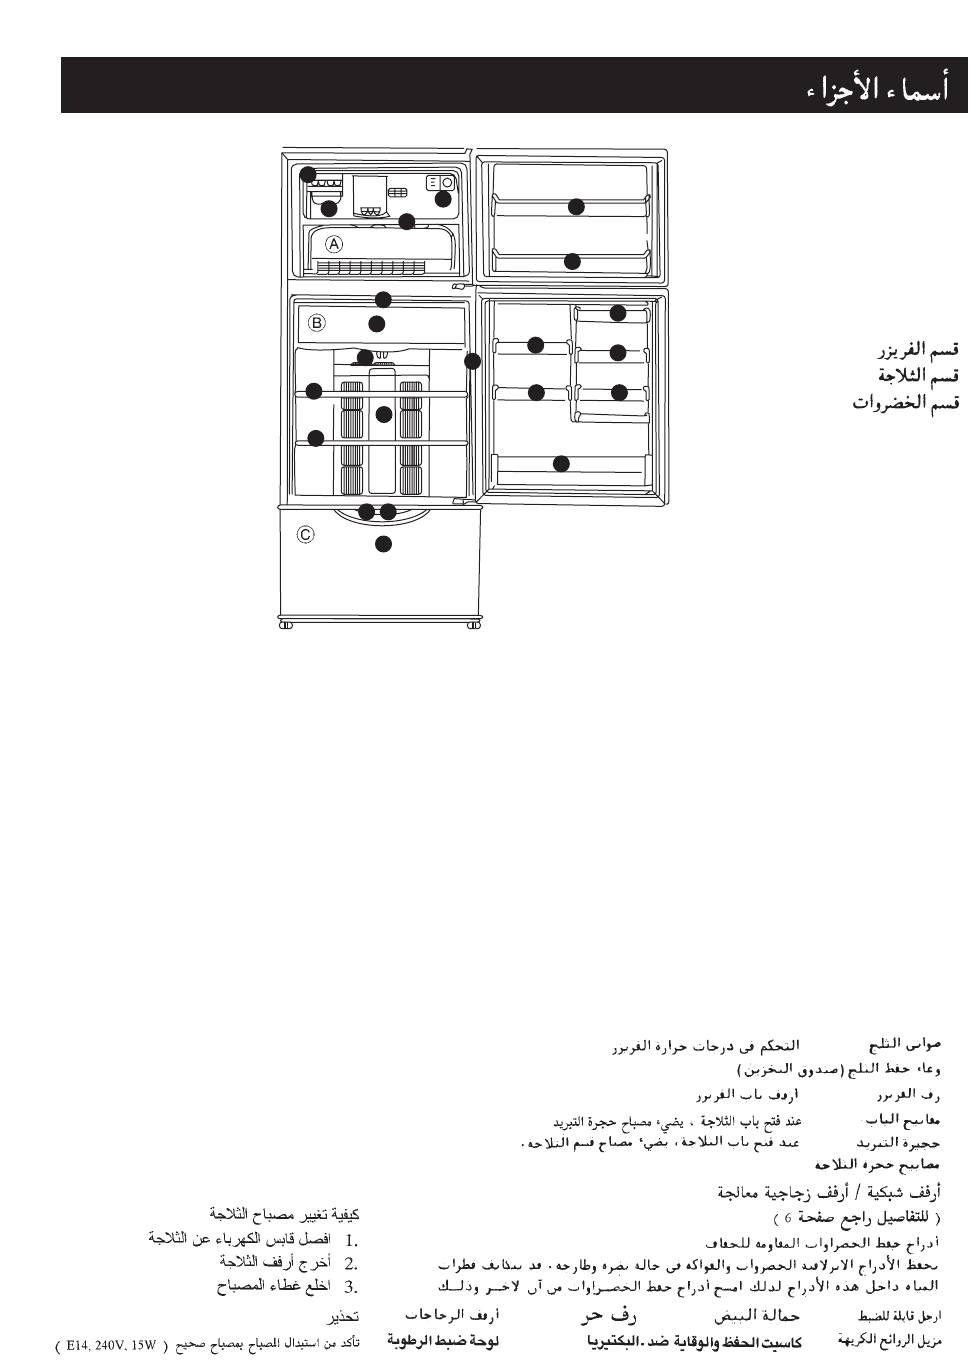
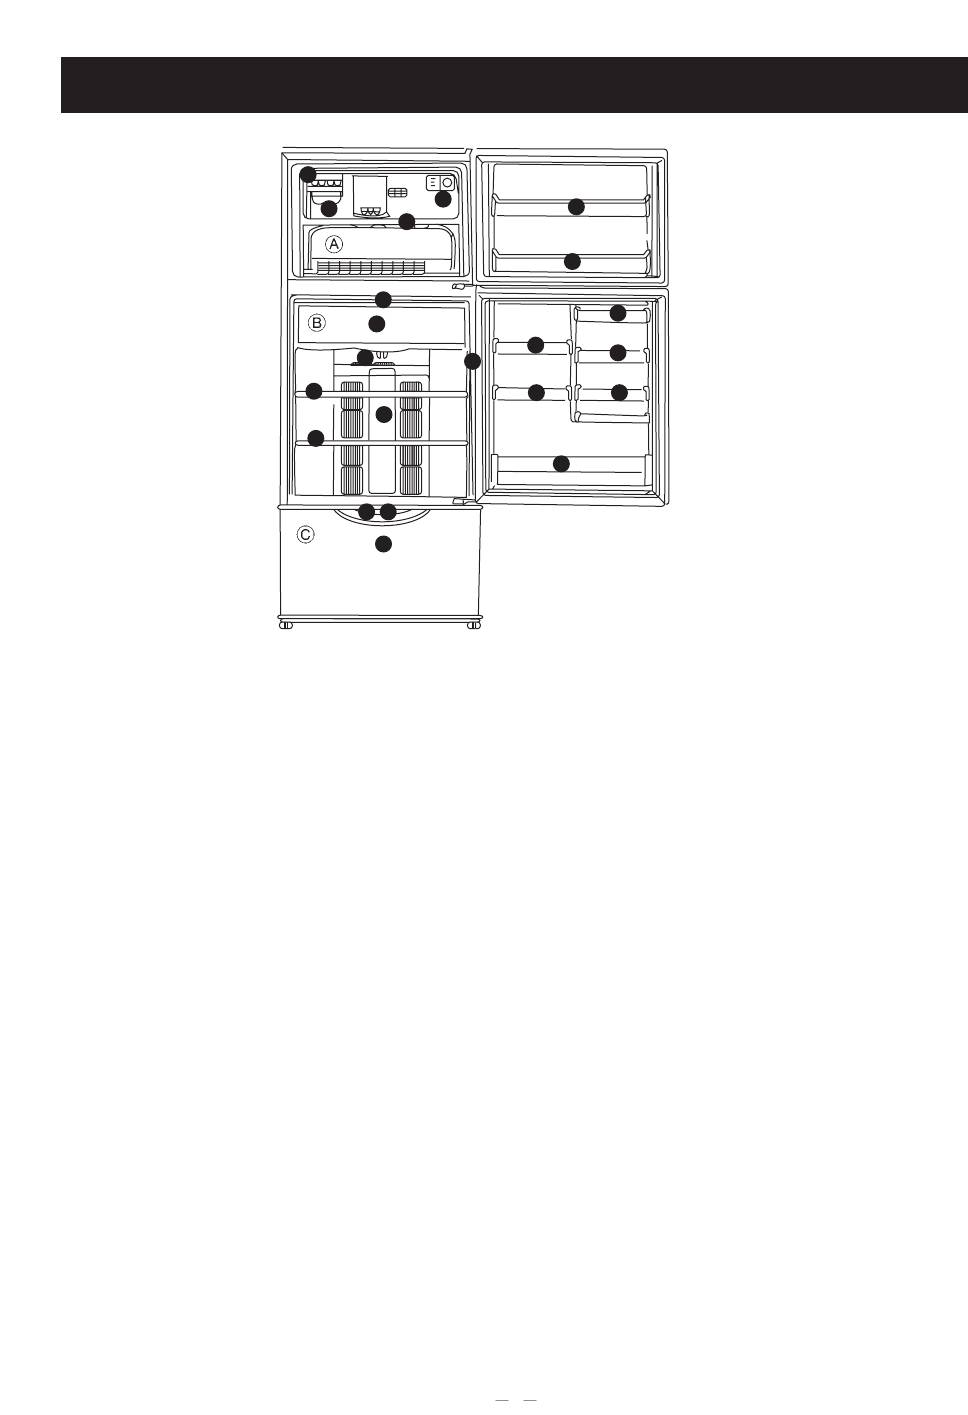
PARTS IDENTIFICATION
1
2
3
5
4
5
16
13
7
14
13
8
6
10
14
14
9
10
훽 FREEZER COMPARTMENT
15
훾 REFRIGERATOR COMPARTMENT
훿 VEGETABLE COMPARTMENT
17 18
11
Sketch: NR-C703M
Ice Trays
Freezer Temperature Control Dial
Ice Server (Storage Box)
Freezer Shelf
Freezer Door Racks
Door Switch
When the refrigerator door is opened, the room lamp comes on.
Chilled Corner
Refrigerator Temperature Control Dial
Room Lamp
쐅
Tempered Glass Shelves/Net Shelves
쐈
Vegetable Compartment
It is used to store fruits and vegetables. Because it is designed to preserve natural moisture and freshness
of them, Refer to page 10-12 for details of how to use Vegetable Compartment.
쐉
Adjustable Legs
씈
Egg Racks
씉
Free Racks
씊
Bottle Rack
씋
Deodorizer
씌
Herb Cassette
씍
Shape Memory Film
■ HOW TO REPLACE ROOM LAMP
1. Disconnect power supply cord.
2. Remove storage shelves.
3. Remove lamp cover.
Caution
Replace proper lamp (E14, 240V, 15W) surely.
쐅
■
쐈
씉 씈씊
쐉
씍
씌
씋
– 2 –
çÄáÇÄçàü éëçéÇçõï óÄëíÖâ
1
2
3
5
4
5
16
13
7
14
13
8
6
10
14
14
9
10
훽 éÚ‰ÂÎÂÌË ‰Îfl Á‡ÏÓÓÁÍË
15
훾 ïÓÎÓ‰ËθÌÓ ÓÚ‰ÂÎÂÌËÂ
훿 éÚ‰ÂÎÂÌË ‰Îfl ı‡ÌÂÌËfl Ó‚Ó˘ÂÈ
17 18
11
ëıÂχ: NR-C703M
ãÓÚÓÍ ‰Îfl 艇
„ÛÎflÚÓ ÚÂÏÔ‡ÚÛ˚ ÏÓÓÁËθÌÓÈ Í‡ÏÂ˚
èÓ‰ÌÓÒ ‰Îfl 艇 (ÍÓÌÚÂÈÌ ‰Îfl ı‡ÌÂÌËfl)
èÓÎ͇ ÏÓÓÁËθÌÓÈ Í‡ÏÂ˚
èÓÎÓ˜ÍË ‰‚ÂË ÏÓÓÁËθÌÓÈ Í‡ÏÂ˚
Ñ‚ÂÌÓÈ ‚˚Íβ˜‡ÚÂθ
(ÔË ÓÚÍ˚ÚËË ‰‚ÂË Á‡„Ó‡ÂÚÒfl Ò‚ÂÚ ‚ÌÛÚË ıÓÎÓ‰ËθÌË͇)
éÚ‰ÂÎÂÌË ‰Îfl ı‡ÌÂÌËfl Óı·ʉÂÌÌ˚ı ÔÓ‰ÛÍÚÓ‚
ê„ÛÎflÚÓ ÚÂÏÔ‡ÚÛ˚ ıÓÎÓ‰ËθÌË͇
ÇÌÛÚÂÌÌflfl ·ÏÔ‡
쐅
èÓÎÍË ËÁ Á‡Í‡ÎÂÌÌÓ„Ó ÒÚÂÍ· / èÓÎÍË ËÁ ÒÂÚÍË
쐈
éÚ‰ÂÎ ‰Îfl ı‡ÌÂÌËfl Ó‚Ó˘ÂÈ
è‰̇Á̇˜ÂÌ ‰Îfl ı‡ÌÂÌËfl ÙÛÍÚÓ‚ Ë Ó‚Ó˘ÂÈ, Ú‡Í Í‡Í ÓÌ ÔÓÁ‚ÓÎflÂÚ ÒÓı‡ÌËÚ¸ ‚·„Û Ë Ò‚ÂÊÂÒÚ¸. é ÔËÏÂÌÂÌËË Óډ· ‰Îfl
ı‡ÌÂÌËfl Ó‚Ó˘ÂÈ, ÒÏÓÚËÚ ÒÚ‡ÌËˆÛ 10-12.
쐉
ê„ÛÎËÛÂÏ˚ ÌÓÊÍË ıÓÎÓ‰ËθÌË͇
씈
ü˜ÂÈ͇ ‰Îfl flˈ
씉
ü˜ÂÈ͇ ‰Îfl ‡ÁÌ˚ı Ô‰ÏÂÚÓ‚
씊
ü˜ÂÈ͇ ‰Îfl ·ÛÚ˚ÎÓÍ
씋
ÑÂÁÓ‰Ó‡ÚÓ
씌
ä‡ÒÒÂÚ‡-ÙËÎ¸Ú Ç‡Ò‡·Ë
씍
èÓÎ͇ ÒÓ ÒÔˆˇθÌ˚Ï ÔÓÍ˚ÚËÂÏ Ì‡‰ ‚˚‰‚ËÊÌ˚Ï fl˘ËÍÓÏ
왎 ä‡Í Á‡ÏÂÌËÚ¸ ‚ÌÛÚÂÌÌ˛˛ ·ÏÔÛ
1. éÚÍβ˜ËÚ ıÓÎÓ‰ËθÌËÍ ÓÚ ËÒÚÓ˜ÌË͇ ˝ÎÂÍÚÓ˝Ì„ËË
2. Ç˚̸Ú ÔÓÎÍË
3. ì·ÂËÚ Í˚¯ÍÛ Ò Î‡ÏÔ˚
è‰ÛÔÂʉÂÌËÂ:
á‡ÏÂÌËÚ ·ÏÔÛ ÒÓÓÚ‚ÂÚÒÚ‚Û˛˘ÂÈ (E14, 240Ç, 15 LJÚÚ).
3
INSTALLATION
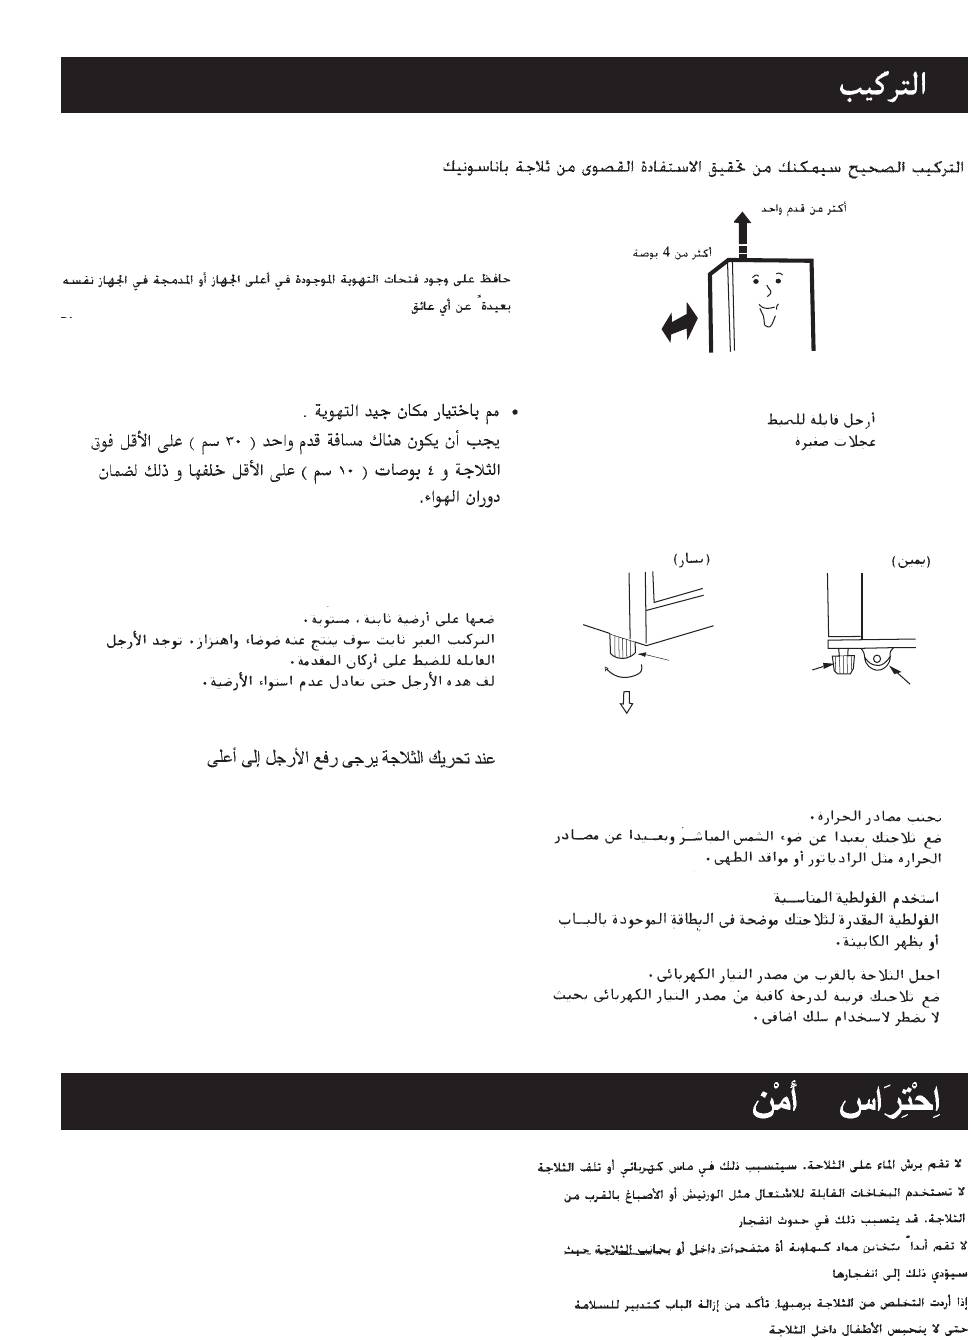
Proper installation will help you get the most use out of your Panasonic refrigerator.
WARNING
more than
Keep ventilation openings in the appliance enclosure
one foot
or in the built-in structure, clear of obstruction.
more than
4 inches
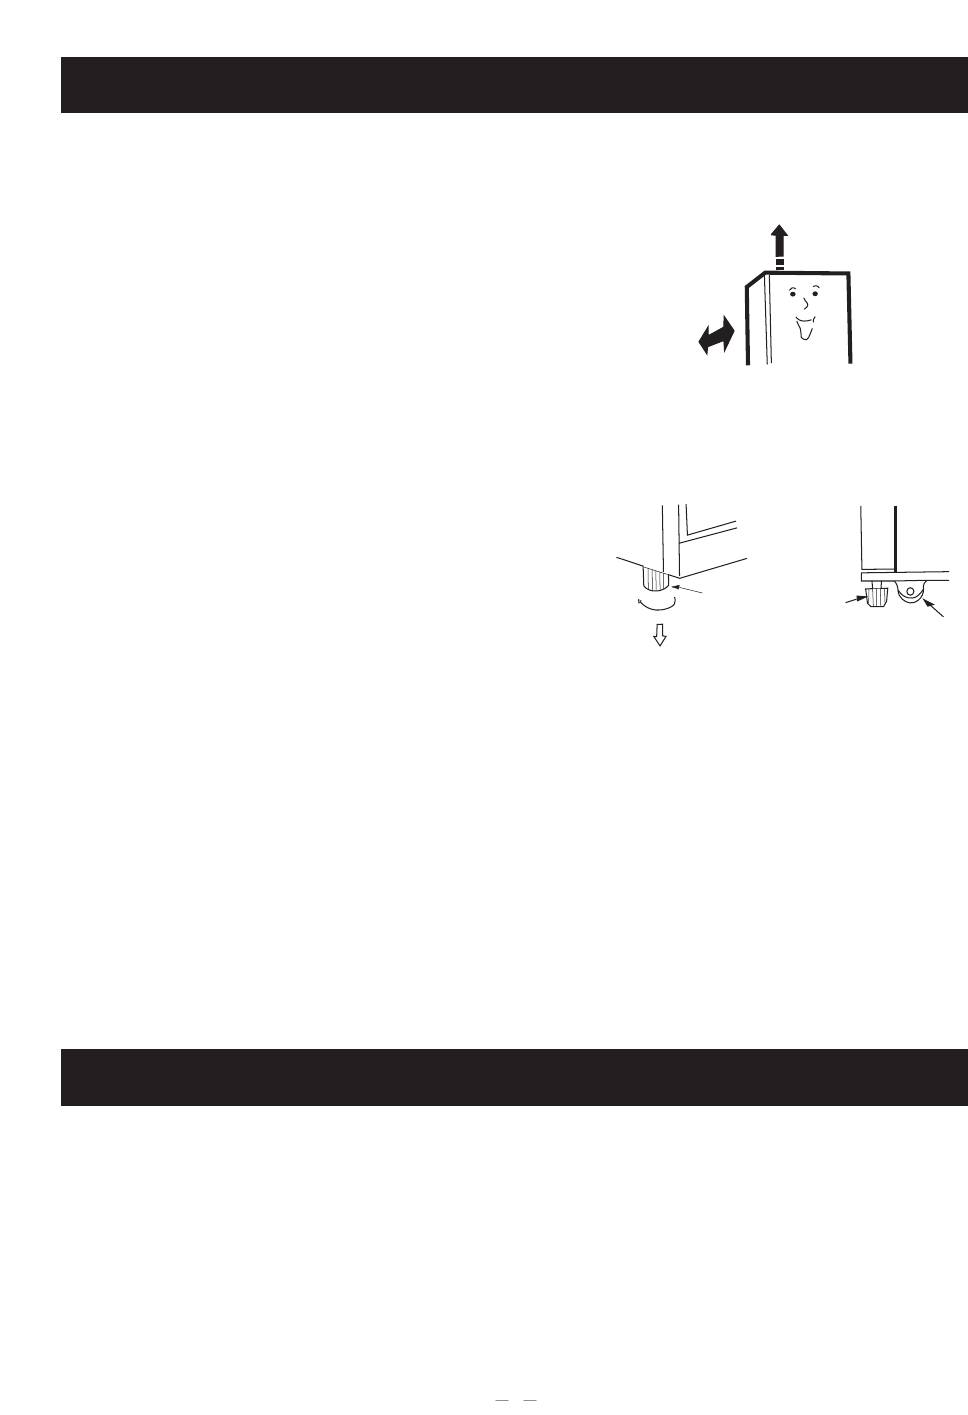
• Choose a well-ventilated place.
Provide at least one foot (30cm) above and at least 4 inches
(10cm) at the back to ensure air circulation.
Adjustable Legs
•
Caster
• Place on a firm, level floor.
Unstable installation will produce noise and vibration. Adjustable
(Left) (Right)
legs are located at front corners. Turn them to compensate for
any unevenness in the floor.
•
쐇
• Screw up the adjustable legs before moving the refrigerator.
•
• Avoid extreme heat.
쎲
Place your refrigerator the out of direct sunlight and away from
heat sources such as radiators or cooking ranges.
• Use the proper voltage.
쎲
Your refrigerator’s rated voltage is indicated on a label put at the
door or at the back of the cabinet.
• Keep it close to the outlet.
쎲
Place your refrigerator near enough the electrical outlet so that
you do not have to use an extension cord.
SAFETY PRECAUTIONS
쎱
DO NOT splash water on the refrigerator. Water
splashed would cause an electric leak or malfunction.
쎱
DO NOT use inflammable sprays such as lacquer and
paint near the refrigerator. They would cause an
explosion.
쎱
NEVER store explosives and chemicals inside or nearby
the refrigerator as they could explode.
쎱
Should you be discarding a refrigerator DO remove the
door completely as a safeguard against small children
being trapped inside.
– 4 –
ìëíÄçéÇäÄ
臂Ëθ̇fl ÛÒÚ‡Ìӂ͇ ÔÓÁ‚ÓÎËÚ Ç‡Ï Ï‡ÍÒËχθÌÓ ËÒÔÓθÁÓ‚‡Ú¸ ‚Ò ÙÛÌ͈ËË ıÓÎÓ‰ËθÌË͇ Panasonic.
è‰ÛÔÂʉÂÌËÂ
ç Á‡„Ó‡ÊË‚‡ÈÚ ‚ÂÌÚËÎflˆËÓÌÌ˚ ÔÓÒÚ‡ÌÒÚ‚‡ ‚ÓÍÛ„ ıÓÎÓ‰ËθÌË͇.
more than
• Ç˚·Ë‡ÈÚ ıÓÓ¯Ó ÔÓ‚ÂÚË‚‡ÂÏÓ ÏÂÒÚÓ ‰Îfl ÛÒÚ‡ÌÓ‚ÍË
one foot
ıÓÎÓ‰ËθÌË͇.
·Óθ¯Â 30 ÒÏ
more than
ë‚ÂıÛ ‰ÓÎÊÌÓ ·˚Ú¸ ‚ÂÌÚËÎflˆËÓÌÌÓ ÔÓÒÚ‡ÌÒÚ‚Ó ÏËÌËÏÛÏ ‚ 30 ÒÏ, Á‡
4 inches
ıÓÎÓ‰ËθÌËÍÓÏ – ÏËÌËÏÛÏ 10 ÒÏ
ÅÓθ¯Â 10 ÒÏ
• ê‡ÁÏ¢‡ÈÚ ıÓÎÓ‰ËθÌËÍ Ì‡ ÔÓ˜ÌÓÏ, Ó‚ÌÓÏ ÔÓÎÛ
ê„ÛÎËÛÂχfl ÌÓÊ͇
çÂÛÒÚÓȘ˂‡fl ÛÒÚ‡Ìӂ͇ ÔӂΘÂÚ Á‡ ÒÓ·ÓÈ ¯ÛÏ Ë ‚Ë·‡ˆË˛.
äÓÎÂÒÓ
ê„ÛÎËÛÂÏ˚ ÌÓÊÍË Ì‡ıÓ‰flÚÒfl ‚ Ô‰ÌËı ۄ·ı ıÓÎÓ‰ËθÌË͇.
éÚ„ÛÎËÛÈÚ Ëı, ˜ÚÓ·˚ ÍÓÏÔÂÌÒËÓ‚‡Ú¸ ÌÂÓ‚ÌÓÒÚ¸ ÔÓ·.
(Left) (Right)
쐇
• èË‚ËÌÚËÚ „ÛÎËÛÂÏ˚ ÌÓÊÍË Í ıÓÎÓ‰ËθÌËÍÛ, ÔÂʉ ˜ÂÏ
Ô‰‚Ë„‡Ú¸ „Ó.
• àÁ·Â„‡ÈÚ Ô„‚‡ ıÓÎÓ‰ËθÌË͇
ç ‡ÁÏ¢‡ÈÚ ıÓÎÓ‰ËθÌËÍ ‚ ÏÂÒÚ‡ı, „‰Â ̇ ÌÂ„Ó ·Û‰ÛÚ ÔÓÔ‡‰‡Ú¸
ÔflÏ˚ ÒÓÎ̘Ì˚ ÎÛ˜Ë, ‡ Ú‡ÍÊ ‚·ÎËÁË ÓÚ ËÒÚÓ˜ÌËÍÓ‚ ÚÂÔ·, Ú‡ÍËı ͇Í
‡‰Ë‡ÚÓ˚ ÓÚÓÔÎÂÌËfl Ë ÔÎËÚ˚.
•ÇÒÂÚË ‰ÓÎÊÌÓ ·˚Ú¸ ÒÓÓÚ‚ÂÚÒÚ‚Û˛˘Â ̇ÔflÊÂÌËÂ
çÓÏË̇θÌÓ ̇ÔflÊÂÌË ÒÂÚÂ‚Ó„Ó ÔËÚ‡ÌËfl ‰Îfl ‚‡¯Â„Ó ıÓÎÓ‰ËθÌË͇
Û͇Á‡ÌÓ Ì‡ ̇ÍÎÂÈÍÂ, ‡ÁÏ¢ÂÌÌÓÈ Ì‡ ‰‚ÂË ËÎË Ì‡ Á‡‰ÌÂÈ ˜‡ÒÚË
ÍÓÔÛÒ‡.
• ê‡ÁÏ¢‡ÈÚ ıÓÎÓ‰ËθÌËÍ Ì‰‡ÎÂÍÓ ÓÚ ÒÂÚ‚ÓÈ ÓÁÂÚÍË.
ê‡ÁÏ¢‡ÈÚ ıÓÎÓ‰ËθÌËÍ ‰ÓÒÚ‡ÚÓ˜ÌÓ ·ÎËÁÍÓ Í ÓÁÂÚÍÂ, ˜ÚÓ·˚ ÌÂ
ÔÓ̇‰Ó·ËÎÓÒ¸ ËÒÔÓθÁÓ‚‡Ú¸ Û‰ÎËÌËÚÂθ.
èêÄÇàãÄ ÅÖáéèÄëçéëíà
쎱
He ÔÓÎË‚‡ÈÚ ‚Ó‰Û Ì‡ ıÓÎÓ‰ËθÌËÍ, Ú‡Í Í‡Í ˝ÚÓ ÏÓÊÂÚ
ÔË‚ÂÒÚË Í Ûژ͠ÚÓ͇ ËÎË ÔÓÎÓÏÍÂ.
쎱
ç ‡ÒÔ˚ÎflÈڠ΄ÍÓ‚ÓÒÔ·ÏÂÌfl˛˘ËÂÒfl ‡˝ÓÁÓÎË, ̇ÔËÏÂ, Ò
·ÍÓÏ ËÎË Ò Í‡ÒÍÓÈ, fl‰ÓÏ Ò ıÓÎÓ‰ËθÌËÍÓÏ., Ú‡Í Í‡Í ˝ÚÓ ÏÓÊÂÚ
ÔË‚ÂÒÚË Í ‚Á˚‚Û.
쎱
çËÍÓ„‰‡ Ì ı‡ÌËÚ ‚Á˚‚ÓÓÔ‡ÒÌ˚ ‚¢ÂÒÚ‚‡ Ë ıËÏË͇ÚÓ‚
‚ÌÛÚË ıÓÎÓ‰ËθÌË͇ ËÎË fl‰ÓÏ Ò ÌËÏ, Ú‡Í Í‡Í ÓÌË ÏÓ„ÛÚ
‚ÁÓ‚‡Ú¸Òfl.
쎱
ÖÒÎË ·Û‰ÂÚ ‚˚·‡Ò˚‚‡Ú¸ ıÓÎÓ‰ËθÌËÍ, Ó·flÁ‡ÚÂθÌÓ ÒÌËÏËÚ Ò
ÌÂ„Ó ‰‚¸, ˜ÚÓ·˚ ‰ÂÚË Ì Á‡Í˚ÎËÒ¸ ‚ ÌÂÏ ‚Ó ‚ÂÏfl Ë„˚.
5
INITIAL OPERATION
çÄóÄãúçÄü ëíÄÑàü ùäëèãìÄíÄñàà
1. Clean the refrigerator and parts to remove dust from shipping
and packing.(See “CLEANING” section).
2. Plug your refrigerator into its own individual outlet, open the
door, and check the room lamp.
3. Close the door and allow your refrigerator a few hours to reach
the proper temperature.
4. Open the freezer door, listening and check the cold air flow in
the freezer compartment.
5. Store foods after the interior is cold.
1. èÓÚËÚ ıÓÎÓ‰ËθÌËÍ ÓÚ Ô˚ÎË, ÓÒÚ‡‚¯ÂÈÒfl ÓÚ
Ú‡ÌÒÔÓÚËÓ‚ÍË Ë ÛÔ‡ÍÓ‚ÍË (ÒÏ. ‡Á‰ÂÎ é˜ËÒÚ͇).
2. èÓ‰Íβ˜ËÚ ıÓÎÓ‰ËθÌËÍ Í ËÒÚÓ˜ÌËÍÛ ÔËÚ‡ÌËfl, ÓÚÍÓÈÚÂ
‰‚¸, Ë Ôӂ¸ÚÂ, „ÓËÚ ÎË ‚ÌÛÚÂÌÌflfl ·ÏÔ‡.
3. á‡ÍÓÈÚ ‰‚¸, Ë ÓÒÚ‡‚¸Ú ıÓÎÓ‰ËθÌËÍ Ì‡ ÌÂÒÍÓθÍÓ ˜‡ÒÓ‚ ,
ÔÓ͇ ÓÌ Ì ‰ÓÒÚË„ÌÂÚ ÓÔ‰ÂÎÂÌÌÓÈ ÚÂÏÔ‡ÚÛ˚.
4. éÚÍÓÈÚ ‰‚¸ ÏÓÓÁËθÌÓÈ Í‡ÏÂ˚, ÔËÒÎÛ¯‡ÈÚÂÒ¸ Ë
Ôӂ¸Ú ̇΢ˠÔÓÚÓÍÓ‚ ıÓÎÓ‰ÌÓ„Ó ‚ÓÁ‰Ûı‡ ‚ ͇ÏÂÂ.
5. èÓÎÓÊËÚ ÔÓ‰ÛÍÚ˚ ̇ ı‡ÌÂÌËÂ, ÍÓ„‰‡ ıÓÎÓ‰ËθÌËÍ
Óı·‰ËÚÒfl.
– 6 –
E
R
L
D
O
C
MED.
3
5
2
6
1
7
TEMP.CONTROL
D
E
R
O
L
C
1
MED.
3
TEMP.CONTROL
TEMPERATURE CONTROL
êÖÉìãàêéÇäÄ íÖåèÖêÄíìêõ
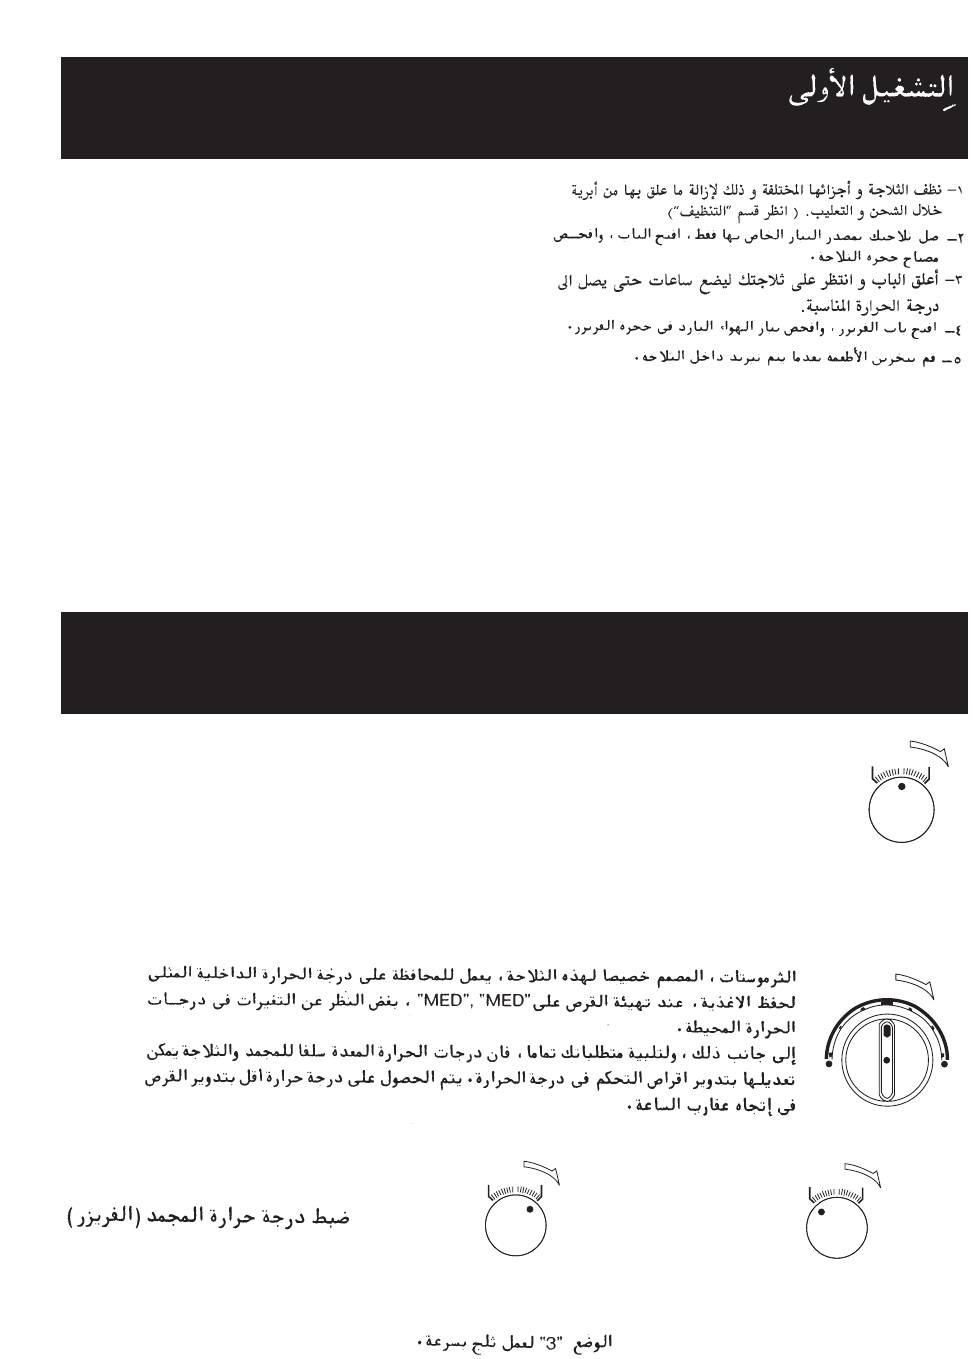
The thermostat, specially designed for this refrigerator, functions to maintain the optimum inside condition for
food storage at the “MED”, “MED” dial setting, regardless of ambient temperature variations.
Besides, in order to meet your individual requirements, the freezer and refrigerator temperature as you desire
can be obtained by adjusting the temperature control dials.
Lower temperature can be obtained by turning the dial clockwise on both controls.
íÂÏÓÒÚ‡Ú, ‡Á‡·ÓÚ‡ÌÌ˚È ÒÔˆˇθÌÓ ‰Îfl ˝ÚÓÈ ÏÓ‰ÂÎË ıÓÎÓ‰ËθÌË͇, ÒÓÁ‰‡ÂÚ ÓÔÚËχθÌ˚ ÛÒÎÓ‚Ëfl ‰Îfl
ı‡ÌÂÌËfl ÔË˘Ë Ò ÔÓ‰‰ÂʇÌËÂÏ Ò‰ÌÂÈ ÚÂÏÔ‡ÚÛ˚.
äÓÏ ÚÓ„Ó, ÚÂÏÔ‡ÚÛÛ ‚ÌÛÚË ÏÓÓÁËθÌÓÈ Ë ıÓÎÓ‰ËθÌÓÈ Í‡Ï ÏÓ„ÛÚ ·˚Ú¸ ËÁÏÂÌÂÌ˚ ‚ ÒÓÓÚ‚ÂÚÒÚ‚ËË Ò
‚‡¯ËÏË Ú·ӂ‡ÌËflÏË Ò ÔÓÏÓ˘¸˛ „ÛÎflÚÓÓ‚ ÚÂÏÔ‡ÚÛ˚.
ÑÎfl ÛÒÚ‡ÌÓ‚ÍË ·ÓΠÌËÁÍËı ÚÂÏÔ‡ÚÛ ‚‡˘‡ÈÚ „ÛÎflÚÓ ÔÓ ˜‡ÒÓ‚ÓÈ ÒÚÂÎÍÂ.
L
D
E
R
O
C
1
MED.
3
TEMP.CONTROL
Freezer Temperature Control
ê„ÛÎËӂ͇ ÚÂÏÔ‡ÚÛ˚ ÏÓÓÁËθÌÓÈ Í‡ÏÂ˚
D
E
R
O
L
C
1
MED.
3
TEMP.CONTROL
“3” For quick ice-making.
“1” When frozen foods are not stored.
“3” ‰Îfl ·˚ÒÚÓ„Ó ÔË„ÓÚÓ‚ÎÂÌËfl 艇
“1” ÂÒÎË ‚ ıÓÎÓ‰ËθÌËÍ ÌÂÚ
Á‡ÏÓÓÊÂÌÌ˚ı ÔÓ‰ÛÍÚÓ‚
ICE-MAKING /
èêàÉéíéÇãÖçàÖ ãúÑÄ
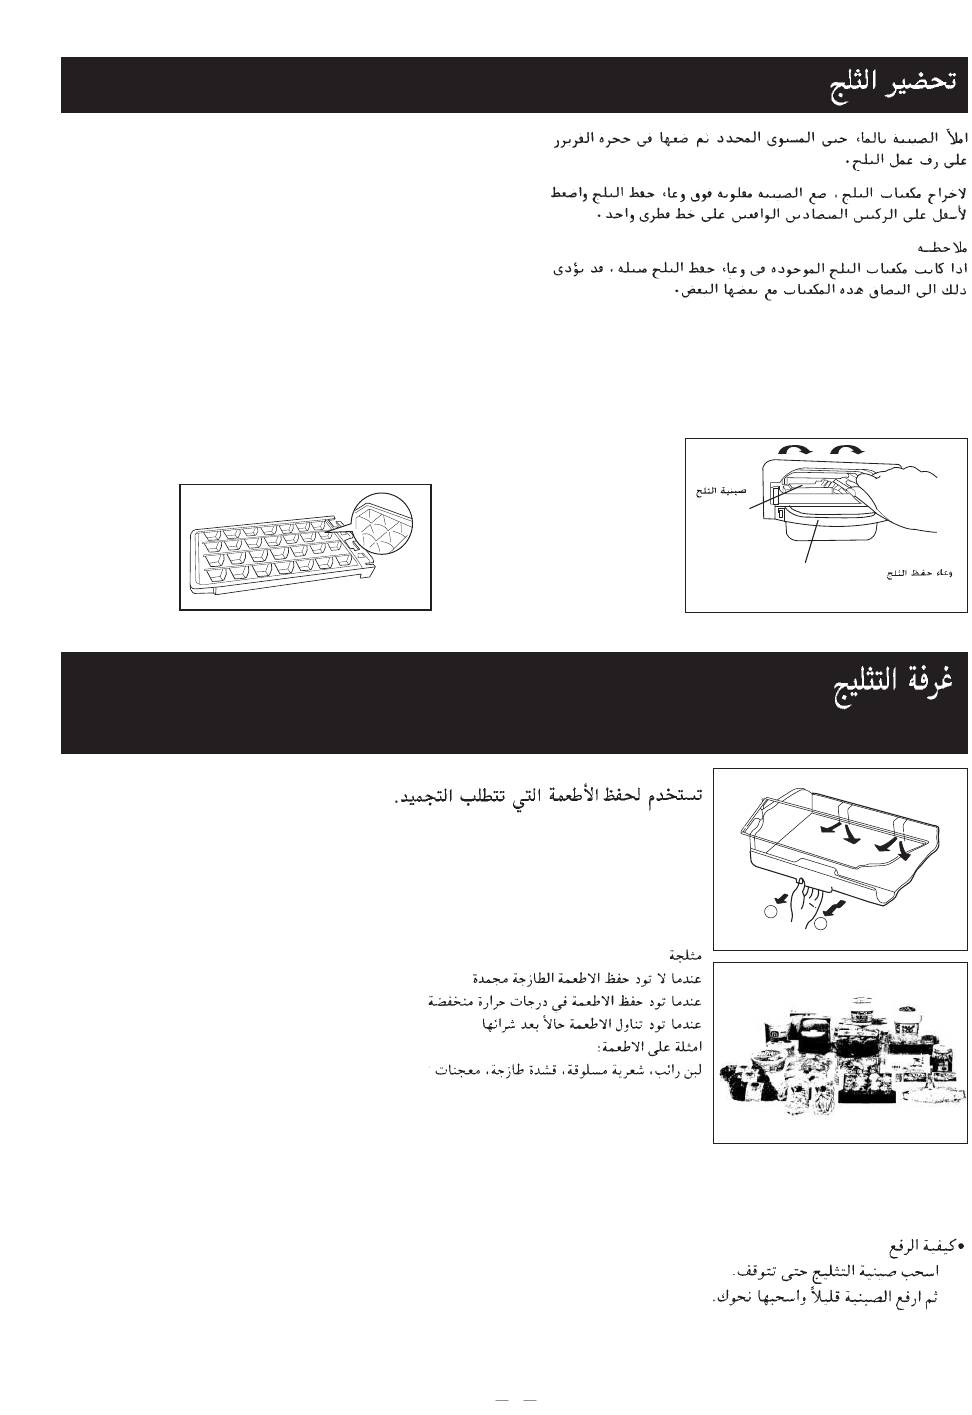
Pour water into the ice tray to the water level line and put it insert ice
tray rail.
To remove ice cubes, twist the tray over the ice server as illustrated.
Keep ice cubes in the ice server for sudden or large requirement.
NOTE
If you put wet ice cubes in the ice server, they may stick one another.
ç‡ÎÂÈÚ ‚Ó‰Û ‚ ÎÓÚÓÍ ‰Îfl 艇 ‰Ó ÎËÌËË ÛÓ‚Ìfl ‚Ó‰˚, Ë ÔÓÏÂÒÚËÚÂ
̇ ÔÓÎÍÛ ‰Îfl ÎÓÚ͇.
ÑÎfl ÚÓ„Ó, ˜ÚÓ·˚ ‚˚ÚflıÌÛÚ¸ ÍÛ·ËÍË Î¸‰‡, Ô‚ÂÌËÚ ÎÓÚÓÍ Ì‡‰
ÍÓÌÚÂÈÌÂÓÏ ‰Îfl ı‡ÌÂÌËfl 艇, Í‡Í ÔÓ͇Á‡ÌÓ Ì‡ ËÒÛÌÍÂ. ï‡ÌËÚÂ
ÍÛ·ËÍË Î¸‰‡ ‚ ÍÓÌÚÂÈÌ ‰Îfl ÒÎÛ˜‡Â‚, ÍÓ„‰‡ Ëı ÌÛÊÌÓ ÒÓ˜ÌÓ
ÔËÏÂÌËÚ¸, ËÎË ‚ ÒÎÛ˜‡Â ÌÂÓ·ıÓ‰ËÏÓÒÚË Ëı ·Óθ¯Ó„Ó ÍÓ΢ÂÒÚ‚‡.
èËϘ‡ÌËÂ
ÖÒÎË Ç˚ ÔÓÏÂÒÚËÚ ÏÓÍ˚ ÍÛ·ËÍË Î¸‰‡ ‚ ÍÓÌÚÂÈÌÂ, ÚÓ ÓÌË ÏÓ„ÛÚ
ÒÎËÔÌÛÚ¸Òfl.
Water
Level Line
ãÓÚÓÍ ‰Îfl
艇
Ice Server
äÓÌÚÂÈÌ ‰Îfl 艇
CHILLED ROOM /
éíÑÖãÖçàÖ Ñãü éïãÄÜÑÖçàü èêéÑìäíéÇ
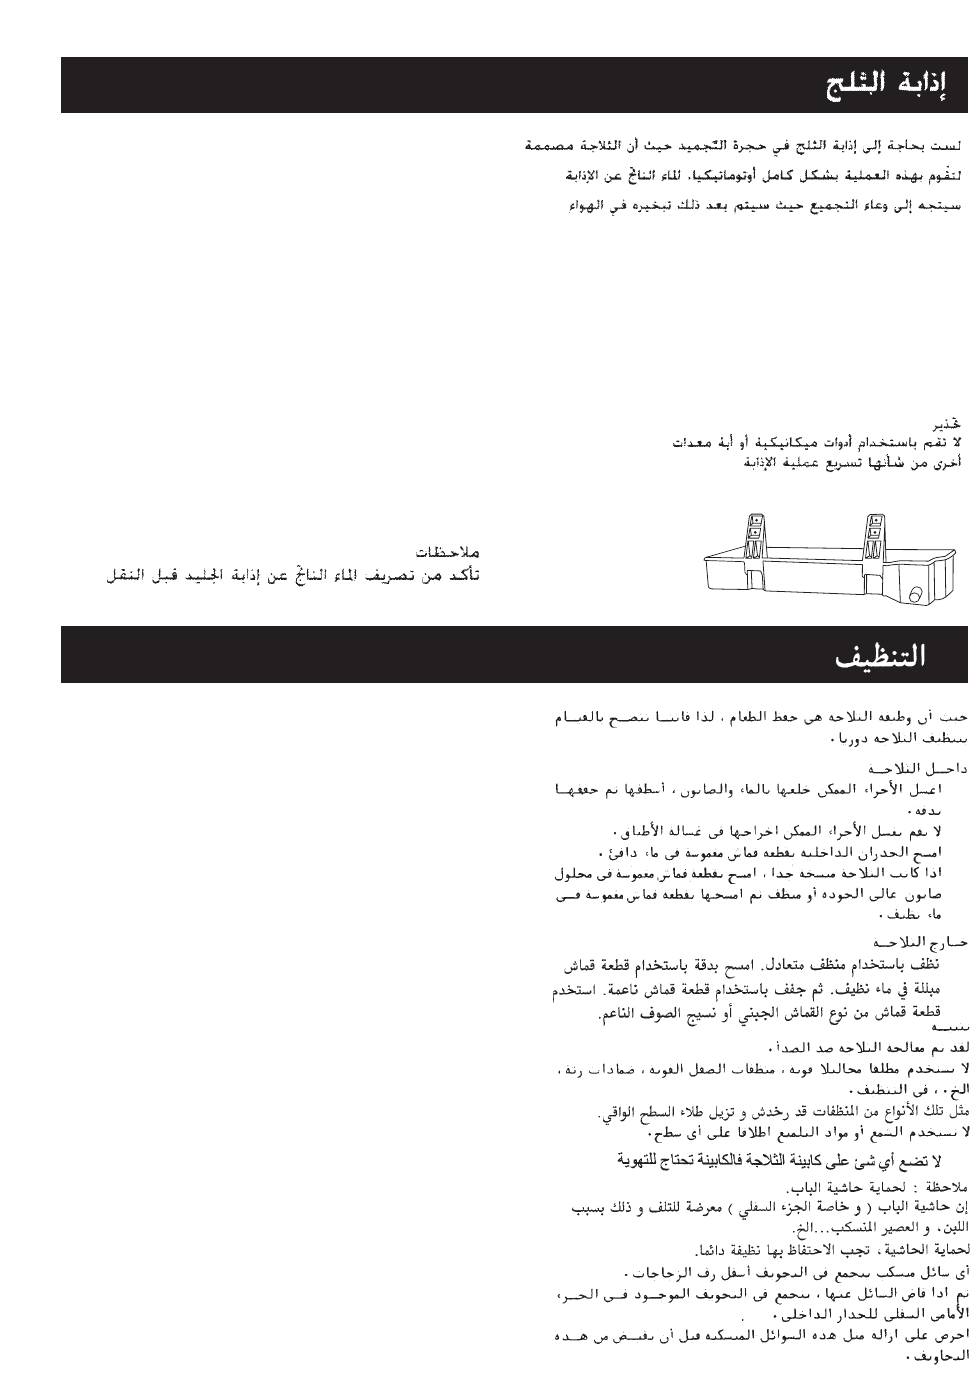
Use for storage of fresh meat, poultry or fish.
CHILLED
• When you do not want to keep fresh food freeze
• When you want to store food in lower temperature
• When you eat fresh food soon after you purchase
Example of foods:
meat, fish, yogurt, boiled, noodles, raw cream,
dumpling
ÑÎfl ı‡ÌÂÌËfl Óı·ʉÂÌÌ˚ı ÔÓ‰ÛÍÚÓ‚, ÂÒÚ¸
ÒÔˆˇθÌÓ ۉӷÌÓ ‚˚‰‚ËÊÌÓ ÓÚ‰ÂÎÂÌËÂ.
éÚ‰ÂÎÂÌË ‰Îfl Óı·ʉÂÌÌ˚ı ÔÓ‰ÛÍÚÓ‚
ÒÛ˘ÂÒÚ‚ÛÂÚ ‰Îfl ÚÓ„Ó, ÂÒÎË:
Ç˚ Ì ıÓÚËÚ Á‡ÏÓ‡ÊË‚‡Ú¸ Ò‚ÂÊË ÔÓ‰ÛÍÚ˚
Ç˚ ıÓÚËÚ ı‡ÌËÚ¸ ÔË˘Û ÔË ÌËÁÍËı ÚÂÏÔ‡ÚÛ‡ı
Ç˚ ıÓÚËÚ Ò˙ÂÒÚ¸ Ò‚ÂÊÛ˛ ÔË˘Û ÒÍÓÓ ÔÓÒΠÔÓÍÛÔÍË
èËÏÂ˚ ÔÓ‰ÛÍÚÓ‚:
åflÒÓ, ˚·‡, ÈÓ„ÛÚ, ‚‡Â̇fl Ôˢ‡, ·ԯ‡, Ò˚,
ÔÂθÏÂÌË.
• HOW TO REMOVE
Pull the chilled tray until stop.
Then lift the tray a little and pull it toward you.
• ä‡Í ËÁ‚Θ¸
Ç˚Ú‡˘ËÚ ÍÓÌÚÂÈÌ ‰Ó ÔÓÎÌÓÈ ÓÒÚ‡ÌÓ‚ÍË.
á‡ÚÂÏ, ÔËÔÓ‰ÌËÏËÚ ‚‚Âı, Ë ‚˚Ú‡˘ËÚ ÔÓÎÌÓÒÚ¸˛ ̇ Ò·fl.
7
1
2
DEFROSTING /
êÄáåéêéáäÄ
You never have to defrost the compartment since. your
refrigerator is designed to defrost itself completely and
automatically. Defrosted water flows to the collector pan where
it is forcibly evaporated into the air.
Ç‡Ï ÌËÍÓ„‰‡ Ì ÌÛÊÌÓ ·Û‰ÂÚ ‡ÁÏÓ‡ÊË‚‡Ú¸ ıÓÎÓ‰ËθÌËÍ, Ú‡Í
Í‡Í ÓÌ ÒÍÓÌÒÚÛËÓ‚‡Ì Ú‡ÍËÏ Ó·‡ÁÓÏ, ˜ÚÓ ‡ÁÏÓ‡ÊË‚‡ÂÚ Ò‡Ï
Ò·fl ÔÓÎÌÓÒÚ¸˛ ‡‚ÚÓχÚ˘ÂÒÍË. ê‡ÁÏÓÓÊÂÌ̇fl ‚Ó‰‡ ÒÚÂ͇ÂÚ
̇ ÒÔˆˇθÌ˚È Ò·ÓÌ˚È ÎÓÚÓÍ, ÓÚÍÛ‰‡ Ó̇ ÔËÌÛ‰ËÚÂθÌÓ
ËÒÔ‡flÂÚÒfl ‚ ‚ÓÁ‰Ûı.
WARNING
Do not use mechanical devices or other means to accelerate the defrosting process.
è‰ÛÔÂʉÂÌËÂ:
ç ÛÔÓÚ·ÎflÈÚ ÏÂı‡Ì˘ÂÒÍËı ÛÒÚÓÈÒÚ‚ ËÎË ‰Û„Ëı ÔËÒÔÓÒÓ·ÎÂÌËÈ ‰Îfl ÛÒÍÓÂÌËfl ‡ÁÏÓÓÁÍË.
REMARKS:
*Be sure to drain the defrost water before transportation.
èËϘ‡ÌËÂ:
쉇ÎËÚ ‚Ó‰Û ËÁ ÎÓÚ͇ Ô‰ Ú‡ÌÒÔÓÚËÓ‚ÍÓÈ.
CLEANING
Since the function of the refrigerator is to store food, regular
cleaning is advised.
Interior
• Wash removable parts with soapy water, rinse and dry thoroughly.
쎲
Do not wash removable parts in dish washer.
• Wipe interior walls with a cloth soaked in lukewarm water.
If the unit is very dirty, wipe with cloth soaked in good quality
쎲
soap solution or detergent and then with a cloth rinsed in clean
water.
Exterior
• Clean with a mild detergent, wipe thoroughly with a cloth rinsed
in clean water, and then dry with a soft cloth. Use cheese
cloth or flannel to polish.
쎲
CAUTION
The refrigerator is treated against rust.
Never use strong solutions, harsh abrasives, scouring pads,
etc., to clean.
These types of cleaners will scratch and remove the protective
surface finish.
Appliance wax or polish should never be used on any surface.
• Do not cover the refrigerator cabinet with any material,
the cabinet needs to radiate heat.
쎲
NOTE: To protect the door gasket
The door gasket (especially the bottom portion) is apt to be
damaged by spilled milk, juice, etc.
To protect the gasket, it should be kept clean at all times.
Any spilled liquid will collect in the hollow under the bottle rack.
Then, if it overflows, it will collect in the hollow located at the lower
front section of the inner wall.
Be sure to wipe off such spillage before it overflows from
these hollows.
– 8 –
óàëíäÄ
í‡Í Í‡Í Ì‡Á̇˜ÂÌËÂÏ ıÓÎÓ‰ËθÌË͇ fl‚ÎflÂÚÒfl ı‡ÌÂÌË ÔÓ‰ÛÍÚÓ‚, ÚÓ ÂÍÓÏẨÛÂÚÒfl Â„Ó Â„ÛÎfl̇fl Ó˜ËÒÚ͇.
ÇÌÛÚÂÌÌflfl Ó˜ËÒÚ͇
• Ç˚ÏÓÈÚ ‚˚‰‚ËÊÌ˚ ˜‡ÒÚË Ï˚θÌÓÈ ‚Ó‰ÓÈ, ÒÔÓÎÓÒÌËÚÂ Ë Ú˘‡ÚÂθÌÓ ÔÓÒÛ¯ËÚÂ.
ç ÏÓÈÚ ‚˚‰‚ËÊÌ˚ ˜‡ÒÚË ‚ χ¯ËÌ ‰Îfl Ï˚Ú¸fl ÔÓÒÛ‰˚.
• èÓÚËÚ ‚ÌÛÚÂÌÌË ÒÚÂÌÍË Ú̸͇˛, ÒÏÓ˜ÂÌÌÓÈ ‚ ÚÂÔÎÓÈ ‚Ó‰Â. ÖÒÎË ÓÚ‰ÂÎ Ó˜Â̸ Á‡„flÁÌÂÌÌ˚È, ÔÓÚËÚ Ú̸͇˛, ÒÏÓ˜ÂÌÌÓÈ
Ï˚θÌ˚Ï ‡ÒÚ‚ÓÓÏ, ‡ Á‡ÚÂÏ Ú̸͇˛, ÒÏÓ˜ÂÌÌÓÈ ‚ ˜ËÒÚÓÈ ‚Ó‰Â.
Ç̯Ìflfl Ó˜ËÒÚ͇
• Ç˚ÏÓÈÚ Ò··˚Ï Ï˚θÌ˚Ï ‡ÒÚ‚ÓÓÏ, Ú˘‡ÚÂθÌÓ ÔÓÚËÚ Ú̸͇˛, ÒÏÓ˜ÂÌÌÓÈ ‚ ˜ËÒÚÓÈ ‚Ó‰Â, ‡ Á‡ÚÂÏ ÔÓÒÛ¯ËÚ ÒÛıÓÈ Ú̸͇˛.
éÚÔÓÎËÛÈÚ Ïfl„ÍÓÈ ıÎÓÔ˜‡ÚÓ·ÛχÊÌÓÈ ËÎË Ù·ÌÂ΂ÓÈ Ú̸͇˛.
è‰ÛÔÂʉÂÌËÂ
ÇÌÛÚÂÌÌËÂ Ë ‚̯ÌË ˜‡ÒÚË ıÓÎÓ‰ËθÌË͇ Ó·‡·ÓÚ‡Ì˚ ÔÓÚË‚ ʇ‚˜ËÌ˚. çËÍÓ„‰‡ Ì ÛÔÓÚ·ÎflÈÚ ÒËθÌÓ‰ÂÈÒÚ‚Û˛˘Ëı
ÊˉÍÓÒÚÂÈ, ÊÂÒÚÍËı ¯ÎËÙÓ‚‡Î¸Ì˚ı Ò‰ÒÚ‚, ¯ÎËÙÓ‚‡Î¸Ì˚ı ÔӉۯ˜ÂÍ Ë Ú.‰., ‰Îfl Ó˜ËÒÚÍË.
ùÚË ‚ˉ˚ Ó˜ËÒÚËÚÂÎÂÈ ÔÓˆ‡‡Ô‡˛Ú Ë ÒÌËÏÛÚ Á‡˘ËÚÌ˚È ÔÓ‚ÂıÌÓÒÚÌ˚È ÒÎÓÈ.
çËÍÓ„‰‡ Ì ̇ÚˇÈÚ ‚ÓÒÍÓÏ Ë Ì ÔÓÎËÛÈÚ ÔÓ‚ÂıÌÓÒÚ¸ ıÓÎÓ‰ËθÌË͇.
èËϘ‡ÌËÂ: Á‡˘ËÚ‡ ‰‚ÂÌÓÈ ÔÓÍ·‰ÍË
Ñ‚Â̇fl ÔÓÍ·‰Í‡ (ÓÒÓ·ÂÌÌÓ ÌËÊÌflfl ˜‡ÒÚ¸) ΄ÍÓ ÔÓ‰‚ÂÊÂ̇ ÔӘ ÓÚ ‡ÁÎËÚÓ„Ó ÏÓÎÓ͇, ÒÓ͇ Ë Ú.‰.
ÑÎfl ÚÓ„Ó, ˜ÚÓ·˚ Á‡˘ËÚËÚ¸ ÔÓÍ·‰ÍÛ ÓÚ ÔÓ˜Ë, ‰ÂÊËڠ ‚ ÔÓÒÚÓflÌÌÓÈ ˜ËÒÚÓÚÂ.
ã˛·‡fl ‡ÁÎËÚ‡fl ÊˉÍÓÒÚ¸ ÒӷˇÂÚÒfl ‚ Û„ÎÛ·ÎÂÌËflı fl˜ÂÂÍ ‰Îfl ·ÛÚ˚ÎÓÍ. á‡ÚÂÏ, ÂÒÎË Ó̇ ÔÂÂθÂÚÒfl ˜ÂÂÁ ͇È, ÚÓ ÒӷˇÂÚÒfl ‚
Û„ÎÛ·ÎÂÌËË, ̇ıÓ‰fl˘ÂÏÒfl ‚ ÌËÊÌÂÈ Ô‰ÌÂÈ ˜‡ÒÚË ‚ÌÛÚÂÌÌÂÈ ÒÚÂÌÍË.
èÓÚˇÈÚ ڇÍË ÛÚ˜ÍË Ô‰ ÚÂÏ, Í‡Í ÓÌË ÔÂÂθ˛ÚÒfl ˜ÂÂÁ ͇fl Û„ÎÛ·ÎÂÌËÈ.
FOOD KEEPING TIPS
éÅôàÖ ëÇÖÑÖçàü é ïêÄçÖçàà èêéÑìäíéÇ
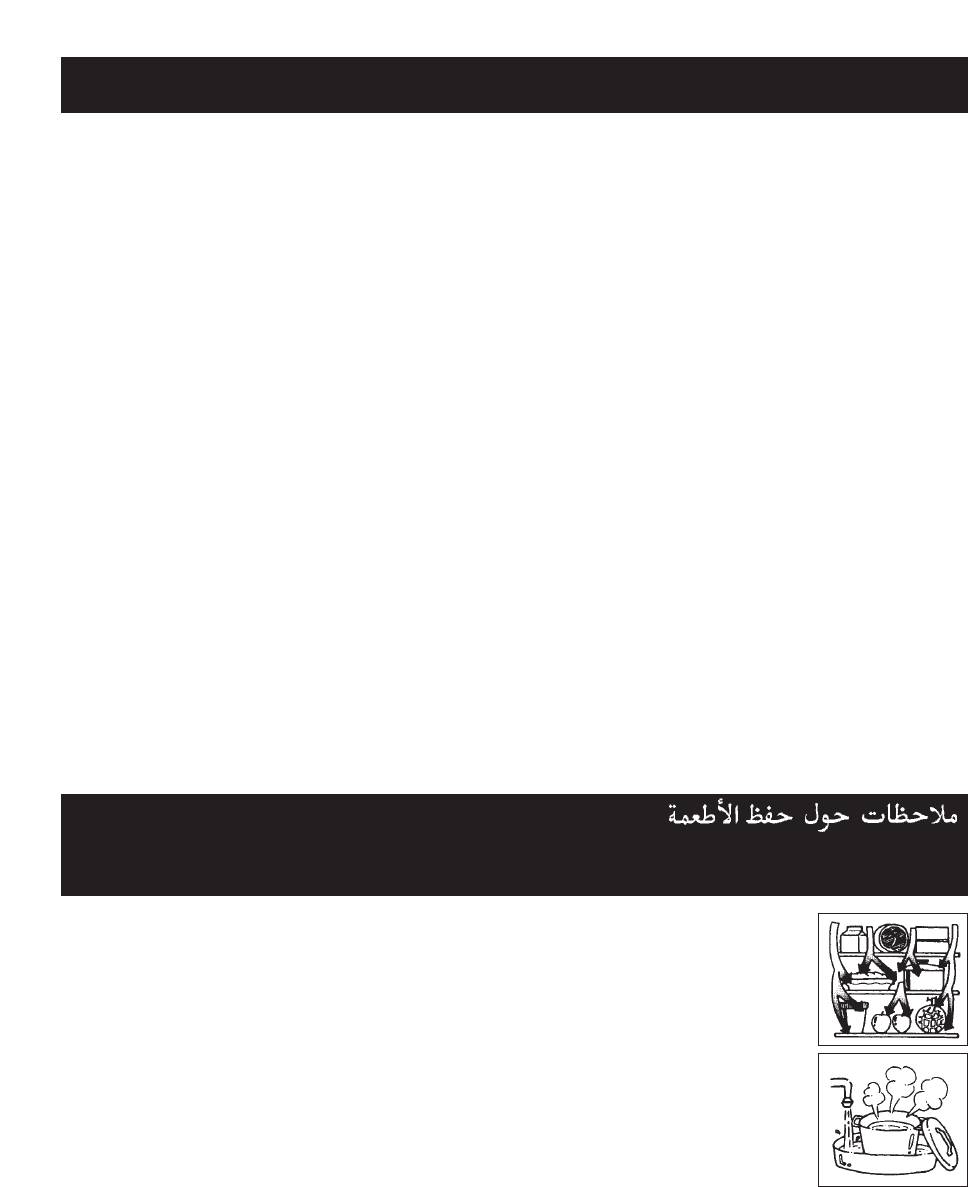
• Leave spaces among foods to help air circulation. Blocking the air flow will cause warm temperature in
the refrigerator compartment.
• Cool hot dishes to room temperature before placing them in your refrigerator.
• Cover juicy foods with tight lids, plastic film or foil.
• Do not keep the door open any longer than necessary, particularly in hot, humid weather.
• Do not put carbonated liquids (fizzy drinks, etc.) in the freezer compartment as they may burst.
• Do not give children lollipops direct from the freezer compartment.They may burn their lips by “freezzer
burn” due to low temperature.
• Leaf vegetables such as spinach, cabbage should only be stored in the vegetable drawer to prevent early
deterioration.
•
éÒÚ‡‚ÎflÈÚ ҂ӷӉÌ˚ ÔÓÒÚ‡ÌÒÚ‚‡ ÏÂÊ‰Û ÔÓ‰ÛÍÚ‡ÏË ‰Îfl Ó·ÂÒÔ˜ÂÌËfl ˆËÍÛÎflˆËË ‚ÓÁ‰Ûı‡.
èÂÂÍ˚ÚË ˆËÍÛÎflˆËË ‚ÓÁ‰Ûı‡ ÒÓÁ‰‡ÒÚ ÚÂÔÎÛ˛ ÚÂÏÔ‡ÚÛÛ ‚ ÓÚ‰ÂÎÂÌËË ıÓÎÓ‰ËθÌË͇.
• éÒÚÛʇÈÚ „Ófl˜Ë ·Î˛‰‡ ‰Ó ÍÓÏ̇ÚÌÓÈ ÚÂÏÔ‡ÚÛ˚, ÔÂʉ ˜ÂÏ ÔÓÏÂÒÚËÚ¸ Ëı ‚ ıÓÎÓ‰ËθÌËÍ.
• á‡Í˚‚‡ÈÚ ÒÓ˜Ì˚ ÔÓ‰ÛÍÚ˚ ÔÎÓÚÌ˚ÏË Í˚¯Í‡ÏË, ÔÎÂÌÍÓÈ ËÎË ÙÓθ„ÓÈ.
• ç ‰ÂÊËÚ ‰‚¸ ıÓÎÓ‰ËθÌË͇ ÓÚÍ˚ÚÓÈ ‰Óθ¯Â ÌÂÓ·ıÓ‰ËÏÓÒÚË, ÓÒÓ·ÂÌÌÓ ÔË Ê‡ÍÓÈ Ë ‚·ÊÌÓÈ
ÔÓ„Ó‰Â.
• ç ÔÓÏ¢‡ÈÚ „‡ÁËÓ‚‡ÌÌ˚ı ÊˉÍÓÒÚÂÈ („‡ÁËÓ‚‡ÌÌ˚ı ̇ÔËÚÍÓ‚ Ë Ú.‰.) ‚ ÏÓÓÁËθÌÛ˛ ͇ÏÂÛ, Ú‡Í Í‡Í
ÓÌË ÏÓ„ÛÚ ‚ÁÓ‚‡Ú¸Òfl.
• ç ‰‡‚‡ÈÚ ‰ÂÚflÏ Î‰Â̈ӂ, ÚÓθÍÓ ˜ÚÓ ‚˚ÌÛÚ˚ı ËÁ ÏÓÓÁËθÌÓÈ Í‡ÏÂ˚. éÌË ÏÓ„ÛÚ ‚˚Á‚‡Ú¸ ÏÓÓÁÌ˚È
ÓÊÓ„ ̇ „Û·‡ı ËÁ-Á‡ ÌËÁÍÓÈ ÚÂÏÔ‡ÚÛ˚.
– 9 –
쎲
쎲
쎲
쎲
쎲
쎲
쎲
VEGETABLE COMPARTMENT
éíÑÖã Ñãü ïêÄçÖçàü éÇéôÖâ
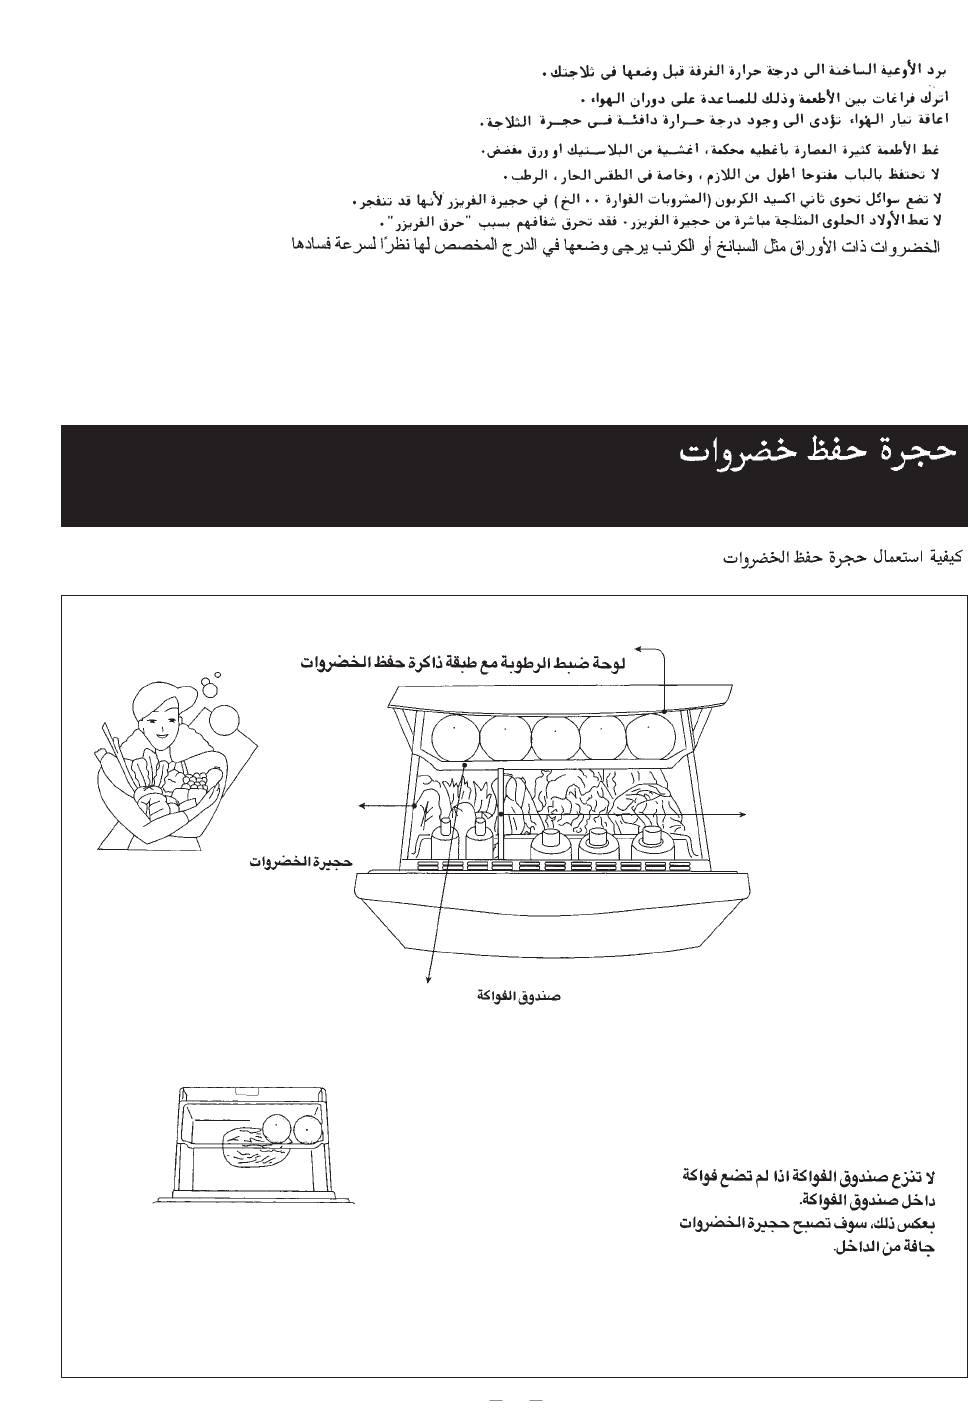
• How to use vegetable compartment
• ä‡Í ÔÓθÁÓ‚‡Ú¸Òfl ÓÚ‰ÂÎÓÏ ‰Îfl ı‡ÌÂÌËfl Ó‚Ó˘ÂÈ
Shape memory film
è‰Óı‡ÌËÚÂθ̇fl ÔÎfiÌ͇
Divider
This is a safety gizmo
Please don’t remove the
Vegetable Case
divider for chit ingress the
äÓÌÚÂÈÌ ‰Îfl
case obviate.
Ó‚Ó˘ÂÈ
è„ÓӉ͇
ùÚÓ ÛÒÚÓÈÒÚ‚Ó ·ÂÁÓÔ‡ÒÌÓÒÚË.
ç ‚˚ÌËχÈÚ Ô„ÓÓ‰ÍÛ ‚Ó
ËÁ·ÂʇÌË Á‡ÎÂÁ‡ÌËfl ‰ÂÚÂÈ ‚
fl˘ËÍ
Fruit Case
äÓÌÚÂÈÌ ‰Îfl ÙÛÍÚÓ‚
Do not remove fruit case even if no fruit put into fruit case.
Otherwise, inside vegetable compartment becomes dry.
ç ‚˚ÌËχÈÚ ÍÓÌÚÂÈÌ ‰Îfl ÙÛÍÚÓ‚, ‰‡Ê ÂÒÎË ‚ ÌÂÏ
ÌË˜Â„Ó ÌÂÚ. Ç ÔÓÚË‚ÌÓÏ ÒÎÛ˜‡Â, ÍÓÌÚÂÈÌ ‰Îfl Ó‚Ó˘ÂÈ ÒÚ‡ÌÂÚ
ÒÎ˯ÍÓÏ ÒÛıËÏ.
10
VEGETABLE COMPARTMENT
éíÑÖãÖçàÖ Ñãü ïêÄçÖçàü éÇéôÖâ
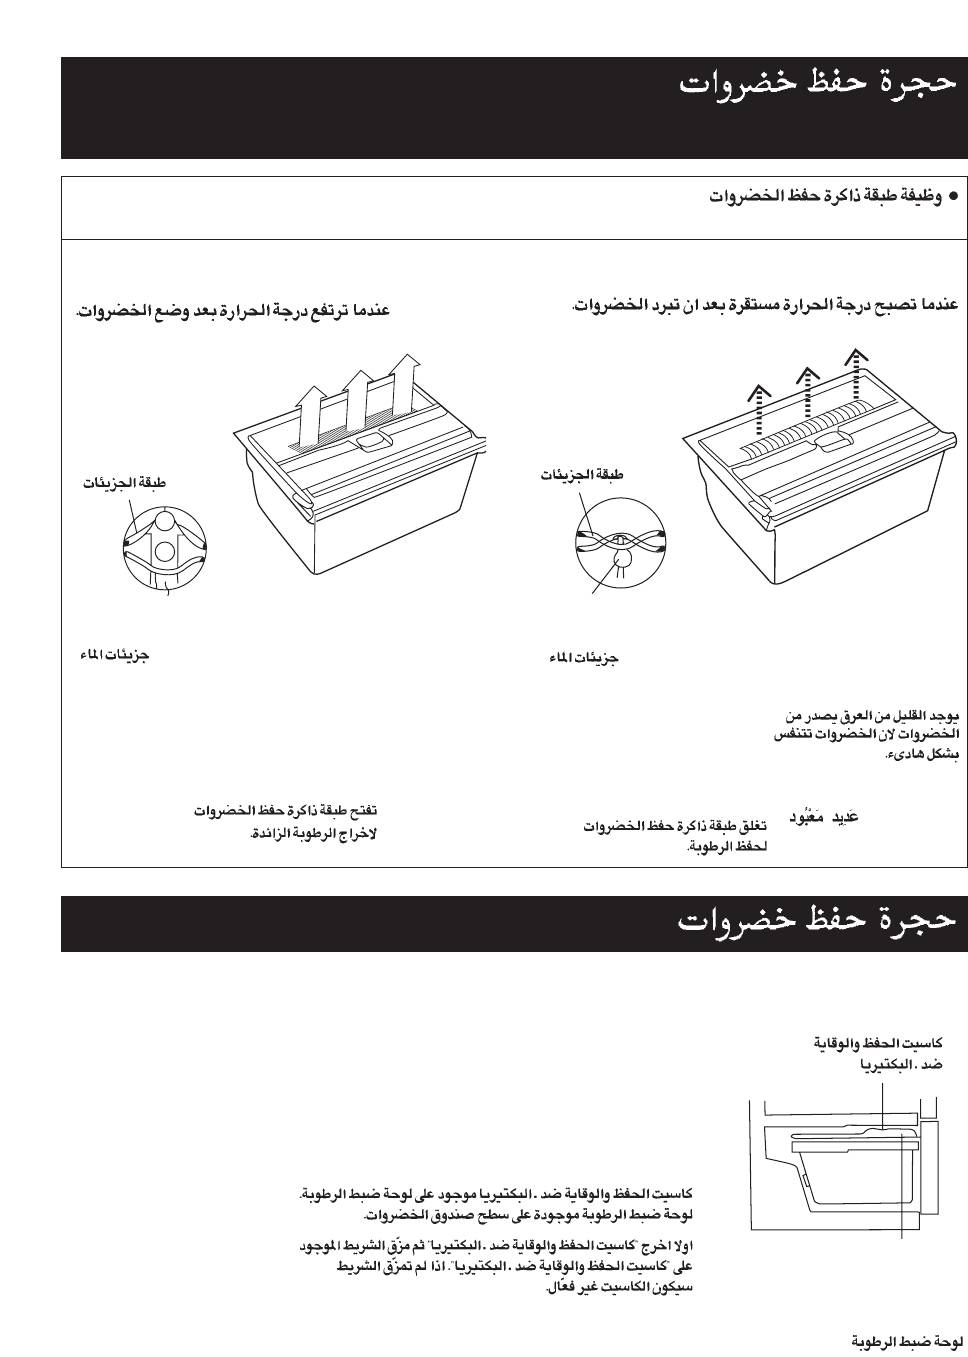
• The function of Shape Memory Film
• îÛÌ͈Ëfl Ô‰Óı‡ÌËÚÂθÌÓÈ ÔÎfiÌÍË
When temperature rises after putting vegetables.
When temperature becomes stable after vegetables is cooled.
äÓ„‰‡ ÚÂÏÔ‡ÚÛ‡ ÔÓ‚˚¯‡ÂÚÒfl ÔË ‚Í·‰˚‚‡ÌËË Ó‚Ó˘ÂÈ
äÓ„‰‡ ÚÂÏÔ‡ÚÛ‡ ÒÚ‡·ËÎËÁËÛÂÚÒfl ÔÓÒΠÓı·ʉÂÌËfl Ó‚Ó˘ÂÈ
Film molecule
Flim molecule
åÓÎÂÍÛÎ˚ ÔÎÂÌÍË
åÓÎÂÍÛÎ˚ ÔÎÂÌÍË
There are much amount of
There are little amount of
Water molecule
Water molecule
transpiration from vegetables because
transpiration from vegetables
åÓÎÂÍÛÎ˚ ÔÎÂÌÍË
åÓÎÂÍÛÎ˚ ÔÎÂÌÍË
vegetable breathe lively.
because vegetables breathe quietly.
ë ÔÓ‚ÂıÌÓÒÚË Ó‚Ó˘ÂÈ ËÒÔ‡flÂÚÒfl
ë ÔÓ‚ÂıÌÓÒÚË Ó‚Ó˘ÂÈ ËÒÔ‡flÂÚÒfl
·Óθ¯Â ÍÓ΢ÂÒÚ‚Ó ‚·„Ë
ÏÂ̸¯Â ÍÓ΢ÂÒÚ‚Ó ‚·„Ë
Shape Memory film opens to let
Shape Memory Film closes to keep
too much humid moisture go out.
moisture.
è‰Óı‡ÌËÚÂθ̇fl ÔÎfiÌ͇ ÓÚÍ˚‚‡ÂÚÒfl,
è‰Óı‡ÌËÚÂθ̇fl ÔÎfiÌ͇
˜ÚÓ·˚ ËÁÎ˯Ìflfl ‚·„‡ Ïӄ· ËÒÔ‡ËÚ¸Òfl.
IMAGED FIGURIES
Á‡Í˚‚‡ÂÚÒfl, ˜ÚÓ·˚ ÒÓı‡ÌËÚ¸ ‚·„Û.
VEGETABLE /
éÇéôà
Fresh and anti-fungus cassette is attached to he humidity control panel.
Fresh Anti-fungus Cassette
(The humidity control panel is set on the top of vegetable case.)
éÒ‚Âʇ˛˘‡fl ‡ÌÚÔÎÂÒÌ‚‡fl
͇ÒÒÂÚ‡
Firstly take out “fresh anti-fungus cassette” and tear off the tear off the tape at the back of
“fresh anti-fungus cassette”.
Dtherwise the cassette will not operate.
ä Ô‡ÌÂÎË Â„ÛÎËÓ‚ÍË ‚·ÊÌÓÒÚË ÔËÒÚ‡‚ÎÂ̇ ÓÒ‚Âʇ˛˘‡fl, ‡ÌÚË-ÔÎÂÒÌ‚‡fl ͇ÒÒÂÚ‡.
(è‡ÌÂθ „ÛÎËÓ‚ÍË ‚·ÊÌÓÒÚË ÛÒÚ‡ÌÓ‚ÎÂ̇ ̇ ‚ÂıÛ ÍÓÌÚÂÈ̇ ‰Îfl ı‡ÌÂÌËfl Ó‚Ó˘ÂÈ).
ë̇˜‡Î‡ ÌÂÓ·ıÓ‰ËÏÓ ‚˚Ú‡˘ËÚ¸ ÓÒ‚Âʇ˛˘Û˛, ‡ÌÚË-ÔÎÂÒÌÂ‚Û˛ ͇ÒÒÂÚÛ, Ë ÓÚÓ‚‡Ú¸
ÔÎÂÌÍÛ Ò Ó·‡ÚÌÓÈ ÒÚÓÓÌ˚ ͇ÒÒÂÚ˚, Ë̇˜Â ͇ÒÒÂÚ‡ Ì ·Û‰ÂÚ ‰ÂÈÒÚ‚Ó‚‡Ú¸.
Humidity
Control Panel
è‡ÌÂΠ„ÛÎËÓ‚ÍË
‚·ÊÌÓÒÚË
– 11 –
VEGETABLE /
éÇéôà
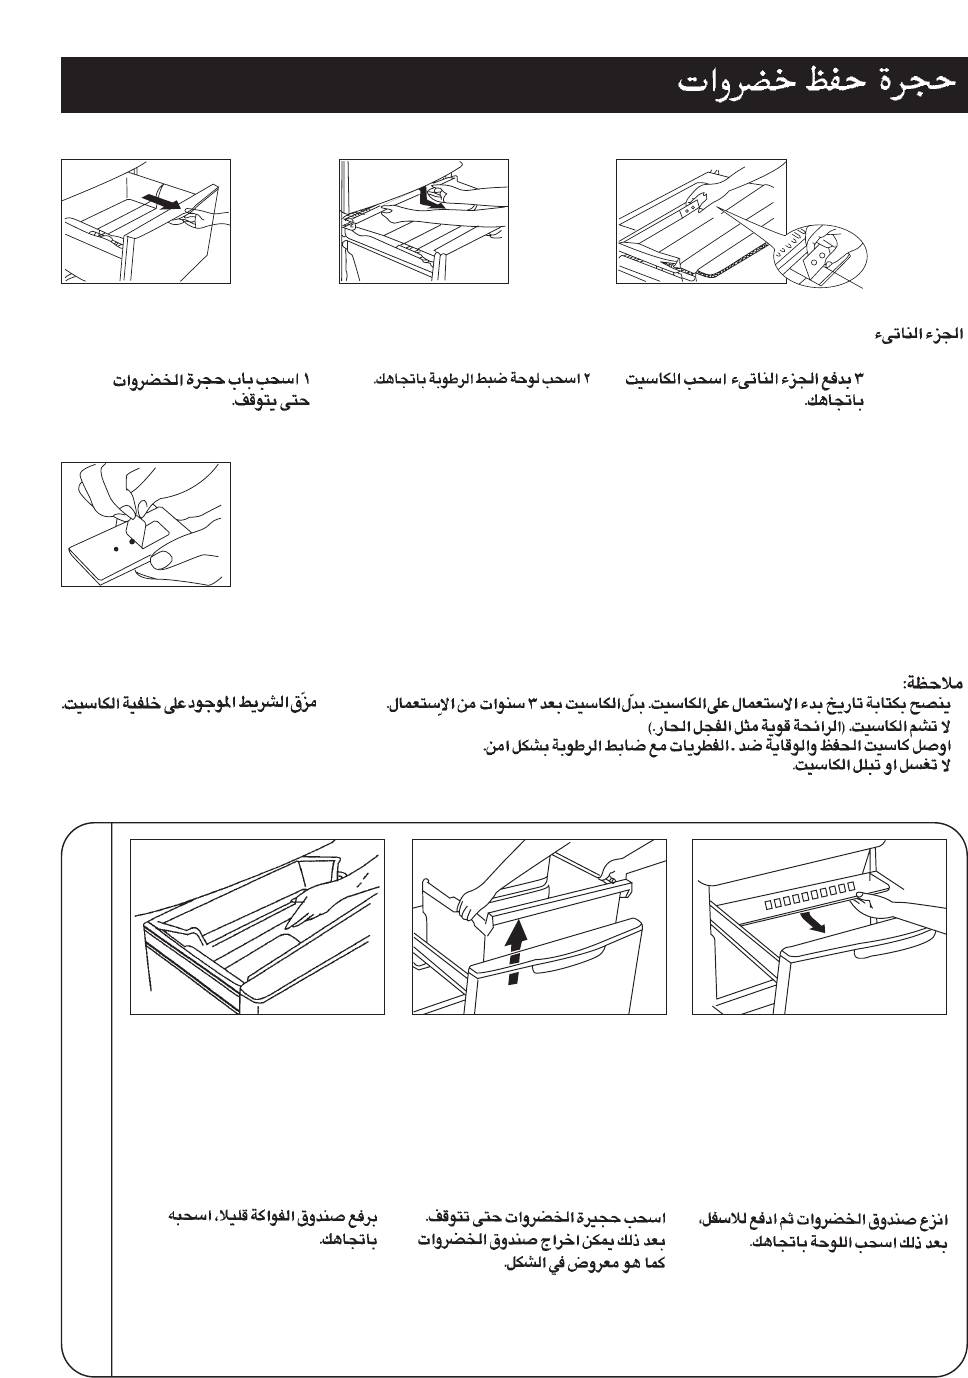
• HOW TO TEAR OFF TAPE ON CASSETTE / ä‡Í Á‡ÏÂÌËÚ¸ (ÓÚÍ˚Ú¸) ͇ÒÒÂÚÛ-ÙËÎ¸Ú Ç‡ÒÒ‡·Ë.
PROJECTION
Ç˚ÒÚÛÔ‡˛˘‡fl
Pull the vegetable door until it
Pull the humidity control panel
Pushing the projection of the
˜‡ÒÚ¸
stops.
toward you.
cassette and pull it toward you.
Ç˚‰‚Ë̸Ú ‰‚¸ Óډ·
èÓÚflÌËÚ ԇÌÂθ ÛÔ‡‚ÎÂÌËfl
ç‡ÊÏËÚ ̇ ‚˚ÒÚÛÔ‡˛˘Û˛ ˜‡ÒÚ¸
ı‡ÌÂÌËfl Ó‚Ó˘ÂÈ ‰Ó ÔÓÎÌÓÈ
‚·ÊÌÓÒÚ¸˛ ̇ Ò·fl.
͇ÒÒÂÚ˚ Ë ÔÓÚflÌËÚ Âe ̇ Ò·fl.
NOTE:
èêàåÖóÄçàÖ:
• It is advised to write the date of starting
• êÂÍÓÏẨÛÂÚÒfl ÓÚÏÂÚËÚ¸ ‰Â̸ ̇˜‡Î‡
use on the cassette.Replace this
ÔËÏÂÌÂÌËfl ͇ÒÒÂÚ˚ ̇  ÔÓ‚ÂıÌÓÒÚË.
cassette after 3 years use.
á‡ÏÂÌflÈÚ ͇ÒÒÂÚÛ Í‡Ê‰˚ 3 „Ó‰‡.
• Do not smell the cassette. (The smell is
• çÂ Ì˛ı‡ÈÚ ͇ÒÒÂÚÛ (Á‡Ô‡ı Ó˜Â̸ ÒËθÌ˚È).
strong horseradish.)
• Not attach oppend anything in the herb
• ç ‚Í·‰˚‚‡ÈÚ ÌË˜Â„Ó ‚ ͇ÒÒÂÚÛ.
Tear off the tape at the back of
(wasabi) cassette case.
the cassette.
• Do not wash and wet the cassette.
• ç ÏÓÈÚÂ Ë Ì Òχ˜Ë‚‡ÈÚ ͇ÒÒÂÚÛ.
ëÌËÏËÚ ̇ÍÎÂÈÍÛ Ò Á‡‰ÌÂÈ
ÒÚÓÓÌ˚ ͇ÒÒÂÚ˚.
쎲
쎲
쎲
쎲
How To Remove. / ä‡Í ‚˚Ú‡ÒÍË‚‡Ú¸
Lifting the fruit case slightly, put it
Pull the vegetable compartment until
Remove the vegetables case end,
toward you.
it stops.
push downward, then pull the panel
Then vegetable case can be taken
toward you.
ë΄͇ ÔËÔÓ‰ÌËÏËÚ ÍÓÌÚÂÈÌ ‰Îfl
out as in the figure.
ÙÛÍÚÓ‚, ÔÓÏÂÒÚËÚ Ô‰ ÒÓ·ÓÈ
Ç˚‰‚Ë̸Ú ÓÍÓ̘‡ÌË fl˘Ë͇ ‰Îfl
Ç˚ÚflÌËÚ fl˘ËÍ ‰Îfl Ó‚Ó˘ÂÈ ‰Ó
Ó‚Ó˘ÂÈ, ̇ÊÏËÚ ‚ÌËÁ, Á‡ÚÂÏ
ÔÓÎÌÓÈ ÓÒÚ‡ÌÓ‚ÍË. èÓÒΠ˝ÚÓ„Ó
‚˚ÚflÌËÚ ԇÌÂθ ̇ Ò·fl
fl˘ËÍ ÏÓÊÂÚ ·˚Ú¸ ‚˚Ú‡˘ÂÌ, Í‡Í Ì‡
ËÒÛÌÍÂ
– 12 –
DEODORIZER /
ÑÖáéÑéêÄíéê
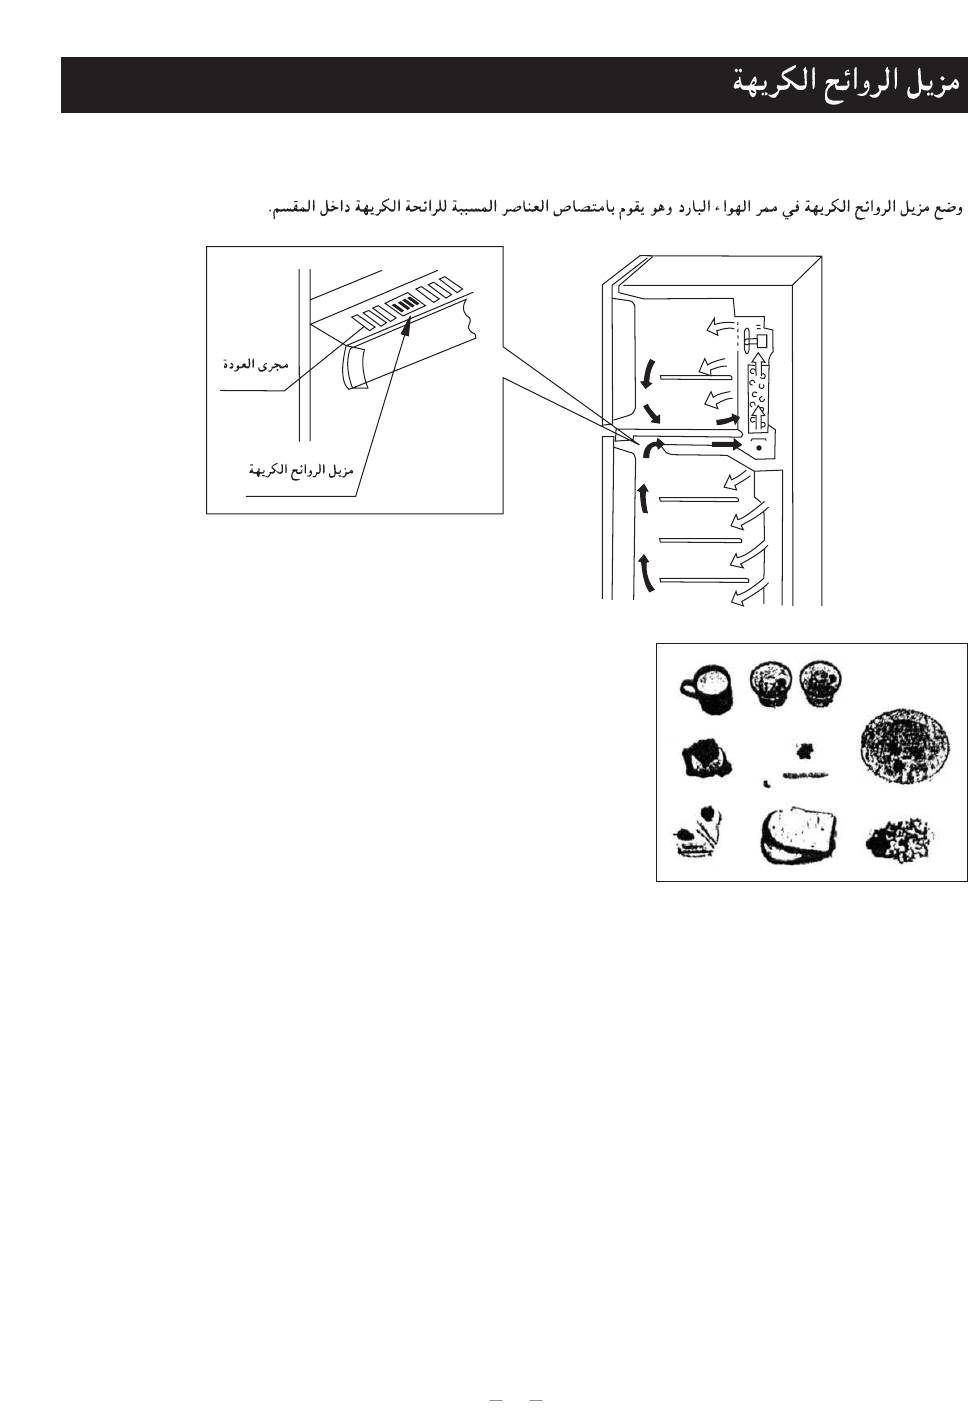
Deodorizer is placed in the passage of cold air and it absorbs the odorous elements inside the compartment.
ÑÂÁÓ‰Ó‡ÚÓ ‡ÁÏ¢ÂÌ ‚ ÏÂÒÚ ÔÓıÓʉÂÌËfl ıÓÎÓ‰ÌÓ„Ó ‚ÓÁ‰Ûı‡, Ë ‚ÔËÚ˚‚‡ÂÚ ‚ Ò·fl ‚Ò ÌÂÔËflÚÌ˚ Á‡Ô‡ıË ‚ÌÛÚË ıÓÎÓ‰ËθÌË͇.
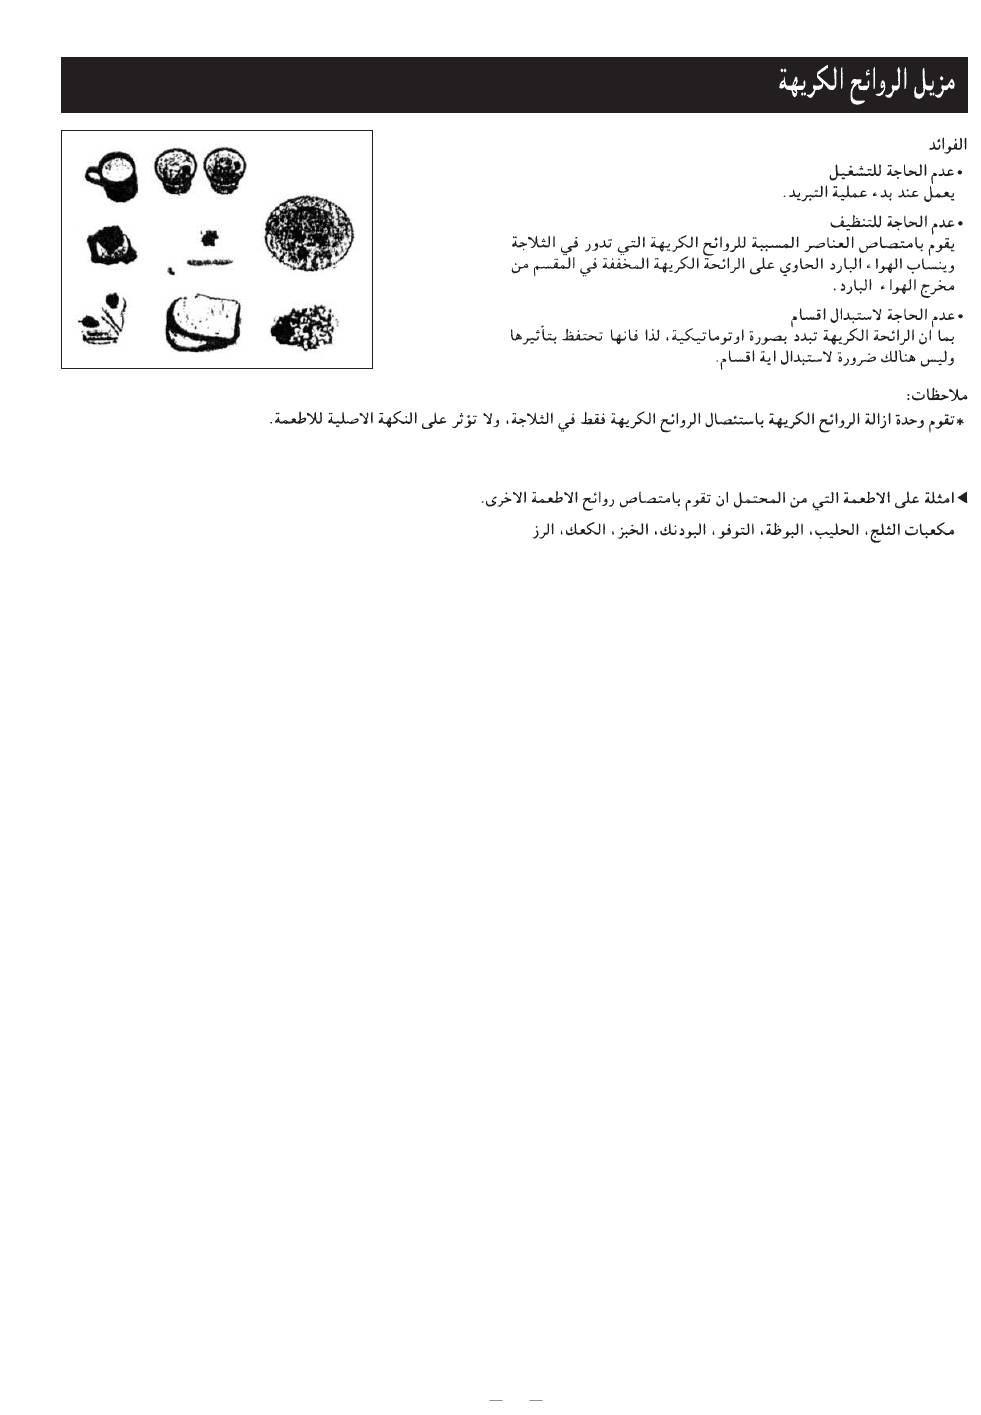
ADVANTAGES
• No need to operate
It functions when cooling operation starts.
• No need to clean
It absorbs the odorous elements which circulate in the refrigerator and the cold air
containing diminished odor is blown into the compartment from the outlet of cold air.
• No need to replace parts
Since the odor is decomposed automatically, it keeps its effect and there is no
need to replace parts.
REMARKS:
*The deodorizing unit eradicates only the odor in the refrigerator.It will not affect the
original flavor of food.
왘 Examples of foods which likely to absorb the smell of other food.
ice cube, milk, ice cream, tofu, pudding, bread, cake, rice
èêÖàåìôÖëíÇÄ
• çÂÚ ÌÂÓ·ıÓ‰ËÏÓÒÚË ÛÔ‡‚ÎflÚ¸.
ÑÂÁÓ‰Ó‡ÚÓ Ì‡˜Ë̇ÂÚ ÙÛÌ͈ËÓÌËÓ‚‡Ú¸ ÍÓ„‰‡ ̇˜Ë̇ÂÚÒfl ÔÓˆÂÒÒ Óı·ʉÂÌËfl.
•çÂÚ ÌÂÓ·ıÓ‰ËÏÓÒÚË ‚ Ó˜ËÒÚÍÂ
ÑÂÁÓ‰Ó‡ÚÓ ÒӷˇÂÚ ˝ÎÂÏÂÌÚ˚ Ò ÌÂÔËflÚÌ˚Ï Á‡Ô‡ıÓÏ, ÍÓÚÓ˚ ˆËÍÛÎËÛ˛Ú ‚ ıÓÎÓ‰ËθÌËÍÂ, Ë ıÓÎÓ‰Ì˚È ‚ÓÁ‰Ûı, ÒÓ‰Âʇ˘ËÈ
ÏÂ̸¯Â Á‡Ô‡ı‡, ‚‰Û‚‡ÂÚÒfl ‚ ıÓÎÓ‰ËθÌËÍ ËÁ ‚˚ıÓ‰‡ ıÓÎÓ‰ÌÓ„Ó ‚ÓÁ‰Ûı‡.
• çÂÚ ÌÂÓ·ıÓ‰ËÏÓÒÚË ‚ Á‡ÏÂÌ ˜‡ÒÚÂÈ
í‡Í Í‡Í ÌÂÔËflÚÌ˚È Á‡Ô‡ı ‡Á·„‡ÂÚÒfl ‡‚ÚÓχÚ˘ÂÒÍË, Ë ˝ÙÙÂÍÚ ‡ÁÎÓÊÂÌËfl ÒÓı‡ÌflÂÚÒfl, ÚÓ ÌÂÚ ÌÂÓ·ıÓ‰ËÏÓÒÚË ‚ Á‡ÏÂÌÂ
˜‡ÒÚÂÈ.
èêàåÖóÄçàü:
* ÑÂÁÓ‰Ó‡ÚÓ ÛÌ˘ÚÓʇÂÚ ÚÓθÍÓ ÌÂÔËflÚÌ˚È Á‡Ô‡ı ‚ ıÓÎÓ‰ËθÌËÍÂ, ÌÓ Ì ‚ÎËflÂÚ Ì‡ ‚ÍÛÒ ÔÓ‰ÛÍÚÓ‚.
왘èËÏÂ˚ ÔÓ‰ÛÍÚÓ‚, ‚ÔËÚ˚‚‡˛˘Ëı Á‡Ô‡ıË ‰Û„Ëı ÔÓ‰ÛÍÚÓ‚: ÍÛ·ËÍË Î¸‰‡, ÏÓÎÓÍÓ, ÏÓÓÊÂÌÓÂ, ÒÓ‚˚È Ò˚, ÔÛ‰ËÌ„, ıη,
ÔËÓÊÌ˚Â, ËÒ.
13
DEODORIZER
14
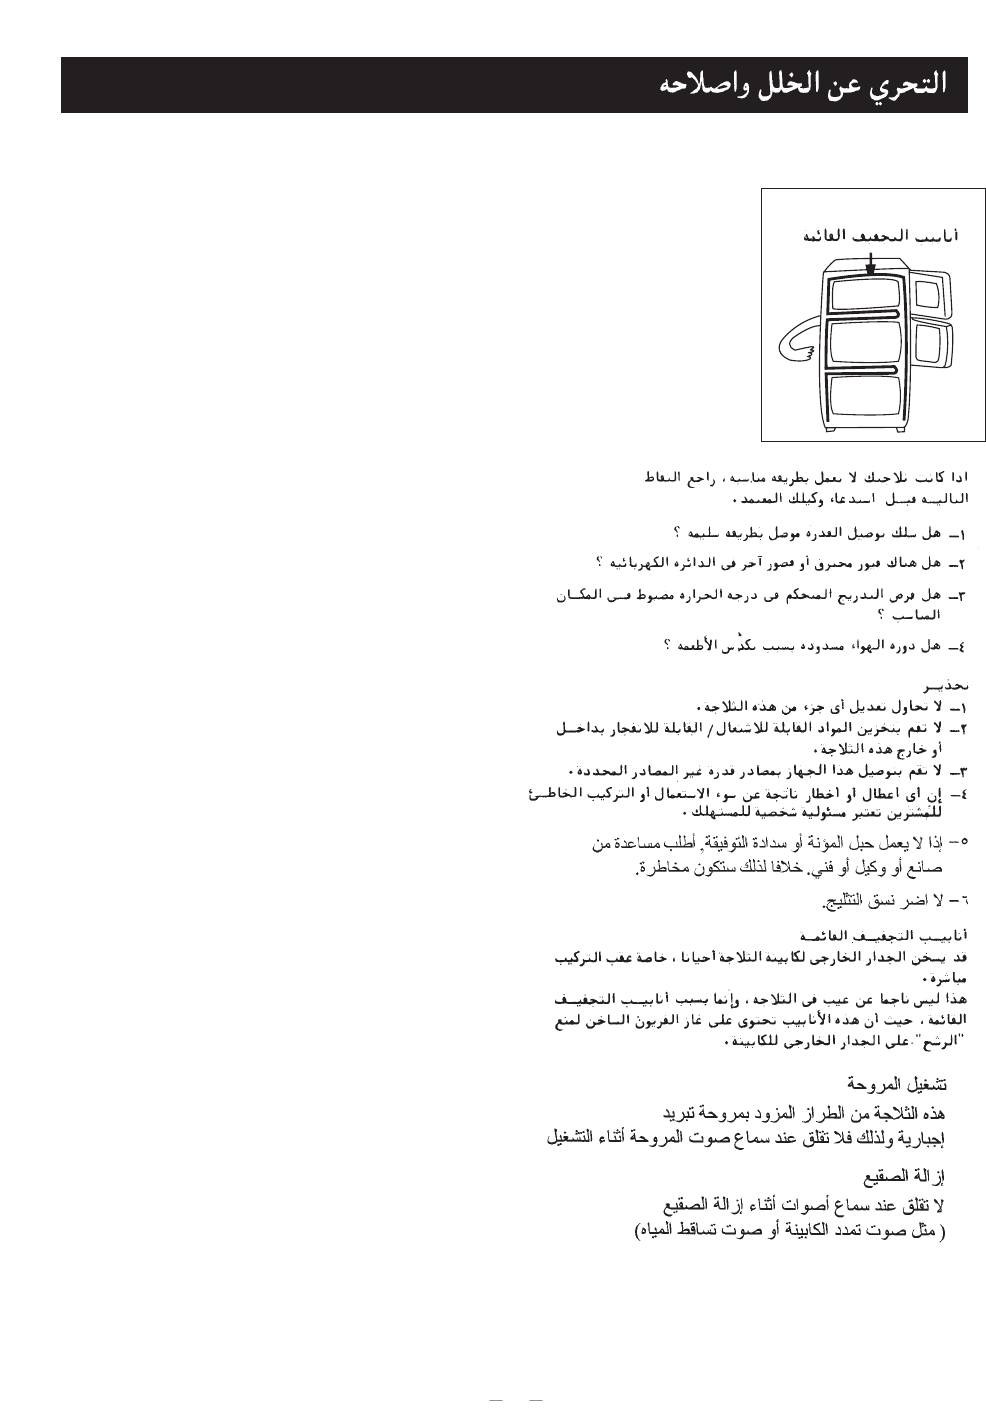
TROUBLESHOOTING
If your refrigerator is not working properly, check the following points before calling your authorized dealer.
1. Is the power plug inserted properly?
Mullion Dryer Pipe
2. Is there a blown fuse or other power failure?
3. Is the temperature control dial set to the proper position?
4. Is air circulation blocked by overcrowding of foods?
WARNING
1. Do not attempt to modify any part of this appliance.
2. Do not store flammable/explosive substances inside or outside
this appliance.
3. Do not connect this appliance to power sources other than
specified.
4. Any damages or hazards caused by misuse or faulty installation
of purchasers are the personal responsibility of the consumer.
5. If the supply cord or plug of the appliance is damaged, it must be
replaced by the manufacturer or its service agent or similarly
qualified person in order to avoid a hazard.
6. Do not mischief refrigeratory system.
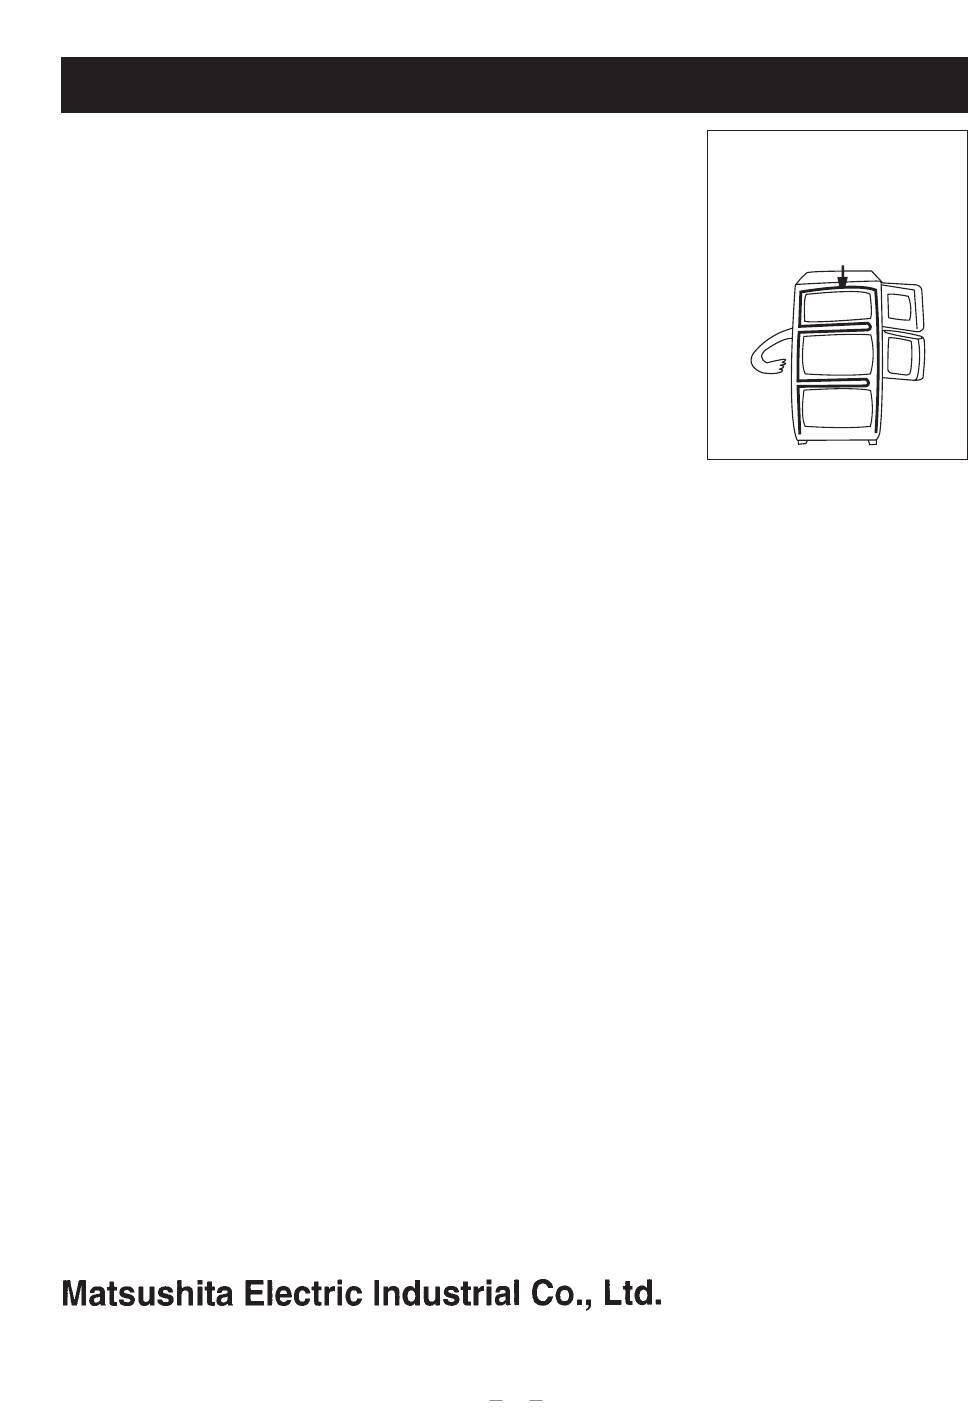
Mullion Dryer Pipe
The outside wall of refrigerator cabinet may sometimes get quite
warm, especially just after installation.
This is not a defect of refrigerator, it is due to the Mullion Dryer
Pipe, plumbing hot freon gas around the cabinet to prevent
“sweating” on the outside wall of
the cabinet.
• Fan operation
This refrigerator isb a fan forced cooling type. Some fan noise
is audible during cooling operation. This is normal.
• Defrosting
Some low volume noises (1. e: expansion & water dripping)
are audible during defrost operation. This is normal.
쎲
쎲
15
ÇõüÇãÖçàÖ çÖàëèêÄÇçéëíÖâ
ÖÒÎË Ç‡¯ ıÓÎÓ‰ËθÌËÍ Ì ‡·ÓÚ‡ÂÚ ‰ÓÎÊÌ˚Ï Ó·‡ÁÓÏ, ÔÓ˜ËÚ‡ÈÚ ÒÎÂ‰Û˛˘ËÈ
Mullion Dryer Pipe
‡Á‰ÂÎ, ÔÂʉ ˜ÂÏ Ó·‡˘‡Ú¸Òfl ‚ Ò‚ËÒÌ˚È ˆÂÌÚ Panasonic:
í۷͇ ‰Îfl ‡ÒÒÂË‚‡ÌËfl
„Ófl˜Â„Ó ‚ÓÁ‰Ûı‡
1. 臂ËθÌÓ ÎË ‚ÒÚ‡‚ÎÂÌ ¯ÚÂÔÒÂθ ‚ ÒÂÚÂ‚Û˛ ÓÁÂÚÍÛ?
2. èӂ¸ÚÂ, ÌÂÚ ÎË ÍÓÓÚÍÓ„Ó Á‡Ï˚͇ÌËfl ‚ ÒÂÚË, ËÎË ‰Û„Ëı ÔÓ·ÎÂÏ Ò ÔÓ‰‡˜ÂÈ
ÔËÚ‡ÌËfl?
3. çÄïéÑàíëü ãà êÖÉìãüíéê íÖåèÖêÄíìêõ Ç èêÄÇàãúçéâ èéáàñàà?
4. ç ÔÂÂÒڇΠÎË ˆËÍÛÎËÓ‚‡Ú¸ ‚ÓÁ‰Ûı ‚ ıÓÎÓ‰ËθÌËÍ ËÁ-Á‡ ˜ÂÁÏÂÌÓ„Ó
ÍÓ΢ÂÒÚ‚‡ ÔÓ‰ÛÍÚÓ‚?
èêÖÑìèêÖÜÑÖçàÖ
1. ç Ô˚Ú‡ÈÚÂÒ¸ ÏÓ‰ËÙˈËÓ‚‡Ú¸ β·Û˛ ËÁ ˜‡ÒÚÂÈ ‰‡ÌÌÓ„Ó ÔË·Ó‡.
2. ç ı‡ÌËڠ΄ÍÓ‚ÓÁ„Ó‡˛˘ËıÒfl Ë ‚Á˚‚ÓÓÔ‡ÒÌ˚ı ‚¢ÂÒÚ‚ ‚ ıÓÎÓ‰ËθÌËÍÂ,
ËÎË ‚·ÎËÁË ıÓÎÓ‰ËθÌË͇.
3. ç ÔÓ‰Íβ˜‡ÈÚ ‰‡ÌÌ˚È ÔË·Ó Í Ì ÒÔˆˇÎËÁËÓ‚‡ÌÌ˚Ï ËÒÚÓ˜ÌË͇Ï
ÔËÚ‡ÌËfl.
4. ᇠ‚Ò ÌÂËÒÔ‡‚ÌÓÒÚË, ‚˚Á‚‡ÌÌ˚ ÌÂÔ‡‚ËθÌ˚Ï ËÒÔÓθÁÓ‚‡ÌËÂÏ ËÎË
Ì‚ÂÌÓÈ ÛÒÚ‡ÌÓ‚ÍÓÈ, ÌÂÒÂÚ ÓÚ‚ÂÚÒÚ‚ÂÌÌÓÒÚ¸ Ò‡Ï ÔÓÍÛÔ‡ÚÂθ.
5. ÖÒÎË ¯ÌÛ ÔËÚ‡ÌËfl ˝ÎÂÍÚÓ˝Ì„ËÂÈ ÔÓ‚ÂʉÂÌ, ÚÓ ÓÌ ‰ÓÎÊÂÌ ·˚Ú¸ Á‡ÏÂÌÂÌ
ÔÓËÁ‚Ó‰ËÚÂÎÂÏ, Â„Ó Ò‚ËÒÌ˚Ï Ô‰ÒÚ‡‚ËÚÂÎÂÏ, ËÎË Í‚‡ÎËÙˈËÓ‚‡ÌÌ˚Ï
ÒÔˆˇÎËÒÚÓÏ.
6. àÁ·Â„‡ÈÚ ÔÓ‚ÂʉÂÌËfl ˝ÎÂÍÚ˘ÂÒÍÓÈ ˆÂÔË ıÓÎÓ‰ËθÌË͇.
í۷͇ ‰Îfl ‡ÒÒÂË‚‡ÌËfl „Ófl˜Â„Ó ‚ÓÁ‰Ûı‡
Ç̯ÌË ÒÚÂÌÍË ıÓÎÓ‰ËθÌË͇ ËÌÓ„‰‡ ÏÓ„ÛÚ ÒÚ‡ÌÓ‚ËÚ¸Òfl „Ófl˜ËÏË, ÓÒÓ·ÂÌÌÓ
Ò‡ÁÛ ÔÓÒΠÛÒÚ‡ÌÓ‚ÍË Ë ÔÛÒ͇ ‚ ‡·ÓÚÛ.
ùÚÓ Ì ‰ÂÙÂÍÚ ‰‡ÌÌÓ„Ó ÔË·Ó‡. í‡ÍÓ fl‚ÎÂÌË ‚˚Á‚‡ÌÓ ÚÛ·ÍÓÈ ‰Îfl
‡ÒÒÂË‚‡ÌËfl „Ófl˜Â„Ó ‚ÓÁ‰Ûı‡, ÍÓÚÓ‡fl Ô„ÓÌflÂÚ „Ófl˜ËÈ „‡Á ÙÂÓÌ ÔÓ
ıÓÎÓ‰ËθÌÓÈ Í‡ÏÂÂ, ˜ÚÓ·˚ Ô‰ÓÚ‚‡ÚËÚ¸ ÍÓ̉ÂÌÒ‡Ú Ì‡ ‚̯ÌËı ÒÚÂÌ͇ı
ıÓÎÓ‰ËθÌË͇.
• ꇷÓÚ‡ ‚ÂÌÚËÎflÚÓ‡
чÌÌ˚È ıÓÎÓ‰ËθÌËÍ ËÏÂÂÚ ‚ÂÌÚËÎflÚÓÌÛ˛ ÒËÒÚÂÏÛ Óı·ʉÂÌËfl. ÇÓ ‚ÂÏfl
ÔÓˆÂÒÒ‡ Óı·ʉÂÌËfl ÏÓÊÌÓ ÒÎ˚¯‡Ú¸ Ì·Óθ¯ÓÈ ¯ÛÏ, ˝ÚÓ ÌÓχθÌÓÂ
fl‚ÎÂÌËÂ.
• ê‡ÁÏÓÓÁ͇
ç·Óθ¯Ë ¯ÛÏ˚ ÏÓ„ÛÚ ·˚Ú¸ ÒÎ˚¯Ì˚ ÔË ‡ÁÏÓÓÁÍÂ, ˝ÚÓ ÌÓχθÌÓÂ
fl‚ÎÂÌËÂ.
http://www.panasonic.co.jp/global/
AK-115651
© 2004 Matsushita Electric (Taiwan) Co., Ltd All Right Reserved
Printed in Taiwan
16


