Sony XR-3753: Additional
Additional: Sony XR-3753

Notes on Cassettes
Additional
Cassette care
• Do not touch the tape surface of a cassette, as
Information
any dirt or dust will contaminate the heads.
• Keep cassettes away from equipment with
built-in magnets such as speakers and
amplifiers, as erasure or distortion on the
recorded tape could occur.
Precautions
• Do not expose cassettes to direct sunlight,
• If your car was parked in direct sunlight
extremely cold temperatures or moisture.
resulting in a considerable rise in
• Slack in the tape may cause the tape to be
temperature inside the car, allow the unit to
caught in the machine. Before you insert the
cool off before operating it.
tape, use a pencil or similar object to turn the
• If no power is being supplied to the unit,
reel and take up any slack.
check the connections first. If everything is in
order, check the fuse.
• If no sound comes from the speakers of a
2-speaker system, set the fader control to the
centre position.
• When the tape is played back for a long
period, the cassette may become warm
Slack
because of the built-in power amplifier.
However, this is not a sign of malfunction.
EN
If you have any questions or problems
• Distorted cassettes and loose labels can cause
concerning your unit that are not covered in
problems when inserting or ejecting tapes.
this manual, please consult your nearest Sony
Remove or replace loose labels.
dealer.
To maintain high quality sound
If you have drink holders near your audio
equipment, be careful not to splash juice or
other soft drinks onto the car audio. Sugary
residues on this unit or cassette tapes may
Cassettes longer than 90 minutes
contaminate the playback heads, reduce the
The use of cassettes longer than 90 minutes is
sound quality, or prevent sound reproduction
not recommended except for long continuous
altogether.
play. The tapes used for these cassettes are
Cassette cleaning kits cannot remove sugar
very thin and tend to be stretched easily.
from the tape heads.
Frequent playing and stopping of these tapes
may cause them to be pulled into the cassette
deck mechanism.
12
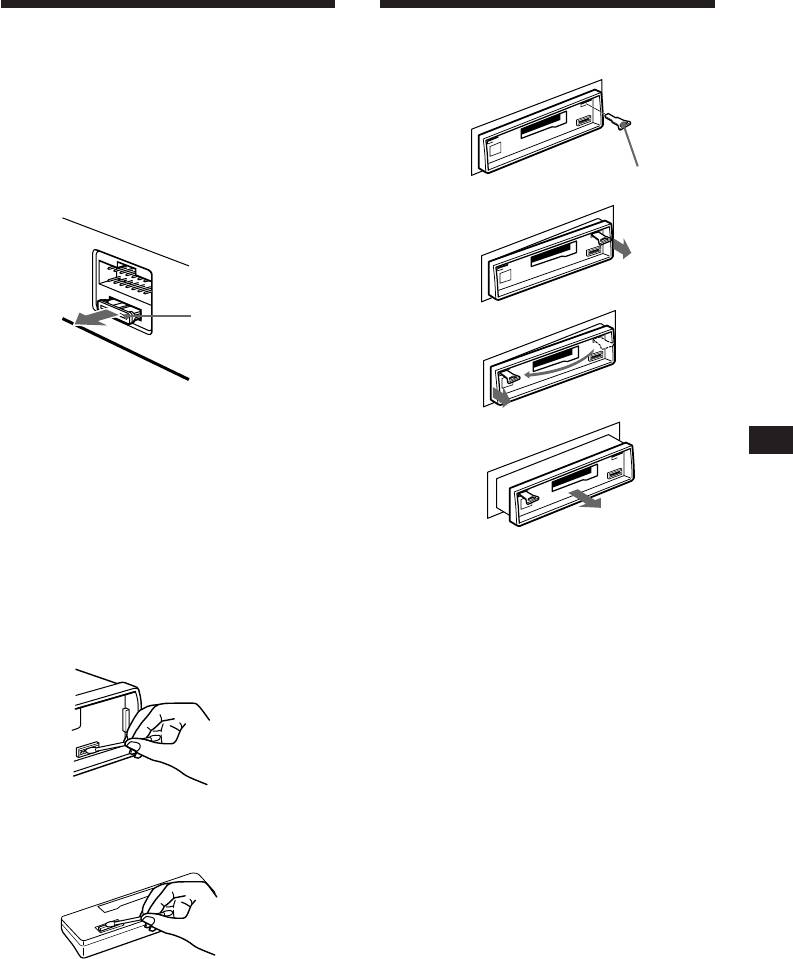
Maintenance
Dismounting the unit
Fuse Replacement
When replacing the fuse, be sure to use one
1
matching the amperage rating stated on the
fuse. If the fuse blows, check the power
connection and replace the fuse. If the fuse
blows again after replacement, there may be an
internal malfunction. In such a case, consult
Release key (supplied)
your nearest Sony dealer.
2
Fuse (10 A)
3
Warning
Never use a fuse with an amperage rating
exceeding the one supplied with the unit as
4
EN
this could damage the unit.
Additional Information
Cleaning the Connectors
The unit may not function properly if the
connectors between the unit and the front
panel are not clean. In order to prevent this,
open the front panel by pressing (RELEASE),
then detach it and clean the connectors with a
cotton swab dipped in alcohol. Do not apply
too much force. Otherwise, the connectors may
be damaged.
Main unit
Back of the front panel
13
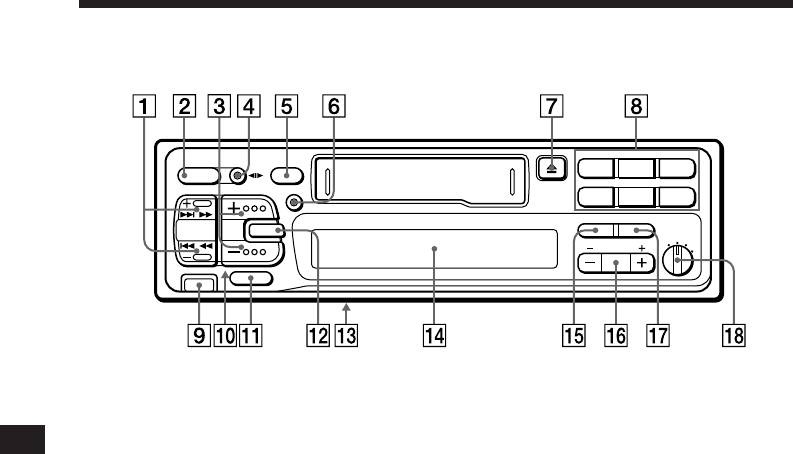
Location of controls
INTRO REPEAT SHUF
MODE
213
SOURCE
OFF
MTL
ATA BL.SKIP
DSPL
546
SEEK
D-BASS
SEL
BTM LCL
AMS
OFF
1
2
PRESET
3
DISC
RELEASE
MUTE
EN
Refer to the pages for further details.
1 SEEK/AMS button 5, 6, 7, 8, 10, 11
9 RELEASE (front panel release) button 4,
13
2 SOURCE button (TAPE/TUNER/CD*/MD*)
!º Reset button (located on the front side
5, 7, 10
of the unit hidden by the front panel)
Press this button when you use this unit
3 (+)(–) (volume/bass/treble/balance/
for the first time, when you have changed
fader control) button 5, 9
the car battery, or when the buttons of this
4 MODE (*) button
unit do not function properly.
During tuner reception:
!¡ MUTE button 9
BAND select 7
!™ SEL (control mode select) button 5, 9, 10
During tape playback:
Transport direction change 5
!£ POWER SELECT switch (located on the
bottom of the unit)
During CD*/MD* playback:
See “POWER SELECT Switch” in the
CD/MD Changer select 10
Installation/Connections manual.
5 OFF button 4, 5
!¢ Display window
6 DSPL (display mode change/time set)
!∞ BTM (Best tuning memory) button 7
button 5, 6, 8, 10
!§ PRESET/DISC button* 7, 11
7 6 (eject) button 5
During tuner reception:
8 During radio reception:
Preset station select 7
Preset number buttons 7
During CD/MD playback:
During tape/CD*/MD* playback:
Disc select 11
(1) INTRO button 6, 11
!¶ LCL button 8
(2) REPEAT button 6, 11
(3) SHUF (Shuffle) button* 11
!• D-BASS control 9
(4) MTL (Metal) button 6
* XR-C353 only
(5) ATA (Automatic Tuner
Activation) button 6
The illustration of the front panel in the manual is
(6) BL.SKIP (Blank Skip) button 6
of the XR-C353.
14

Specifications
Cassette player section
General
Tape track 4-track 2-channel stereo
Outputs Power aerial control lead
Wow and flutter 0.08 % (WRMS)
Power amplifier control
Frequency response 30 – 20,000 Hz
lead (XR-C353 only)
Signal-to-noise ratio 58 dB
Telephone mute control
lead (XR-C353 only)
Line out (XR-C353 only)
Tuner section
Tone controls Bass ±8 dB at 100 Hz
FM
Treble ±8 dB at 10 kHz
Tuning range 65.0 – 74.0 MHz
Power requirements 12 V DC car battery
(at 30 kHz step)
(negative ground)
87.5 – 108.0 MHz
Dimensions Approx. 188 × 58 × 181
(at 50 kHz step)
mm (w/h/d)
Aerial terminal External aerial connector
Mounting dimensions Approx. 182 × 53 × 164 mm
Intermediate frequency 10.7 MHz
(w/h/d)
Usable sensitivity 8 dBf
Mass Approx. 1.2 kg
Selectivity 75 dB at 400 kHz
Supplied accessories Parts for installation and
Signal-to-noise ratio 65 dB (stereo),
connections (1 set)
68 dB (mono)
Front panel case (1)
Harmonic distortion at 1 kHz
Rotary commander
0.5 % (stereo),
RM-X2S
0.3 % (mono)
Optional accessories Bus cable (supplied with
Separation 35 dB at 1 kHz
an RCA pin cord)
Frequency response 30 – 15,000 Hz
EN
RC-61 (1 m), RC-62 (2 m)
Capture ratio 2 dB
RCA pin cord
Additional Information
RC-63 (1 m), RC-64 (2 m),
MW/LW
RC-65 (5 m)
Tuning range MW: 531 – 1,602 kHz
Optional equipment CD changer
LW: 153 – 281 kHz
CDX-705 (10 discs),
Aerial terminal External aerial connector
CDX-T60 (6 discs),
Intermediate frequency 10.71 MHz/450kHz
CDX-T62 (6 discs),
Sensitivity MW: 30 µV
MD changer
LW: 50 µV
MDX-60, MDX-61
Source selector XA-C30
Power amplifier section
Outputs Speaker outputs
Design and specifications are subject to change without
(sure seal connectors)
notice.
Speaker impedance 4 – 8 ohms
Maximum power output 35 W × 4 (at 4 ohms)
15
Troubleshooting guide
The following checklist will assist in the correction of most problems you may encounter with your
unit.
Before going through the checklist below, refer to the operating procedures.
General
Problem
Cause/Solution
No sound.
• Adjust the volume with (+).
• Set the fader control to the center position for 2-speaker
systems.
Indications do not appear on
Remove the front panel and clean the connectors. See “Cleaning
the display.
the Connectors” in “Maintenance” for details.
No beep tone.
• An optional power amplifier is connected and you are not
using the built-in amplifier (XR-C353 only).
• The beep tone is muted.
Tape playback
Problem
Cause/Solution
EN
Playback sound is distorted.
Contamination of the tape head. n Clean the head.
The AMS does not operate
• There is noise in the space between tracks.
correctly.
• A blank space is too short (less than four seconds).
• + on (SEEK/AMS) is pressed immediately before the
following track.
• = on (SEEK/AMS) is pressed immediately after the track
starts.
• A long pause, or a passage of low frequencies or very low
sound level is treated as a blank space.
Radio reception
Problem
Cause/Solution
Preset tuning is not possible.
• Store the correct frequency.
• The broadcast is too weak.
Automatic tuning is not possible.
The broadcast is too weak. n Use manual tuning.
Disc play (XR-C353 only)
Problem
Cause/Solution
Playback sound skips.
A dusty or defective disc.
16

Error displays (XR-C353 only) (when the optional CD/MD changer(s) is connected)
The following indications will flash for about five seconds and an alarm sound will be heard.
Display Cause
Solution
The disc magazine is not inserted in
Insert the disc magazine with discs
E-01
the CD/MD changer.
into the CD/MD changer.
No disc is inserted in the disc
Take out the magazine and insert a
E-02
magazine.
disc.
The disc is dirty.
Clean the disc.
E-04
The disc is inserted upside down.
Insert the disc correctly.
The CD/MD changer cannot be
Press the reset button on the unit.
E-99
operated because of some problem.
The ambient temperature is more than
Wait until the temperature goes
TEMP
50° C.
below 50° C.
If the above-mentioned solutions do not help to improve the situation, consult your nearest Sony
dealer.
EN
Additional Information
17

Index
A
S
Automatic Music Sensor (AMS) 6, 10
Shuffle play 11
Automatic tuning 8
Automatic Tuner Activation (ATA) 6
T, U, V, W, X, Y, Z
B
Tape playback 5
Telephone mute 10
Balance 9
Treble 9
Bass 9
Best Tuning Memory (BTM) 7
Blank skip 6
C
Caution alarm 4
CD playback 10
Clock 5
D, E
DIGITAL D-BASS (D-Bass) 9
EN
Display 6, 10
F, G, H
Fader 9
Fast-forward 5
Front panel 4
Fuse 13
I, J, K
Intro scan 6, 11
L
Local seek mode (LCL) 8
M, N, O
Manual search 11
Manual tuning 8
MD playback 10
METAL 6
Mute 10
P, Q
Preset search 7
R
Radio 7
Repeat play 6, 11
Reset 4
Rewind 5
Rotary remote 4, 8, 9
18

EN
19

Witamy !
Dziękujemy za zakupienie Odtwarzacza Kaset
Sony. Nasz sprzęt zapewni Państwu sporo
przyjemności polegającej na wygodzie
korzystania z wielu funkcji przy pomocy pilota
zdalnego sterowania, typu obrotowego.
Zakupiony sprzęt spełnia nie tylko funkcje
odtwarzcza kaset i radioodbiornika, lecz
oferuje również możliwości poszerzenia
systemu przez podłączenie dodatkowych opcji
jak np. odtwarzacza dysków CD/MD (Tylko dla
modelu XR-C353).
PL
2

Spis treści
Informacje dotyczące wylącznie
Sprzęt opcjonalny
tego sprzętu
Odtwarzacz zmieniający dyski CD/
Przygotowania wstępne
MD (Tylko dla modelu XR-C353)
Wyzerowanie .................................................. 4
Odtwarzanie dysku CD/MD ..........................12
Zdejmowanie przedniego panela.................... 4
Szybkie przesłuchiwanie dysków
Przygotowanie obrotowego pilota zdalnego
Funkcja — Intro scan ...............................12
sterowania do użytkowania ....................... 5
Powtórne odtwarzanie nagrań
Nastawianie zegara......................................... 5
Funkcja — Repeat play ............................13
Odtwarzanie nagrań w dowolnej kolejności
— Tryb Shuffle play.................................. 13
Odtwarzacz taśm kasetowych
Słuchanie taśmy ............................................. 6
Odtwarzanie taśmy w różnych trybach .......... 6
Radio
Automatyczne kodowanie stacji nadawczych
w pamięci sprzętu
— Tryb Best Tuning memory
(BTM) (pamięć najlepszego strojenia).... 8
Kodowanie wyłącznie wybranych stacji
nadawczych ............................................... 8
PL
Odbiór zakodowanych w pamięci sprzętu
radiowych stacji nadawczych .................... 8
Informacje dodatkowe
Środki Ostrożności ....................................... 14
Pozostałe funkcje
Konserwacja .................................................15
Korzystanie z obrotowego pilota zdalnego
sterowania .................................................. 9
Demontaż sprzętu ......................................... 15
Umiejscowienie kontrolek ............................. 16
Regulacja charakterystyk dźwięku ............... 11
Wyciszanie dźwięku ......................................11
Dane Techniczne ..........................................17
Zmienianie nastawionych charakterystyk
Usuwanie usterek ......................................... 18
dźwięku i wskaźników akustycznych .......11
Indeks ...........................................................20
3
Оглавление
- Getting Started
- Cassette Player
- Radio
- Other Functions
- CD/MD Changer (XR-C353 only)
- Additional
- Przygotowania
- Odtwarzacz taśm
- Radio
- Pozostałe funkcje
- Odtwarzacz zmieniający dyski
- Informacje
- Начални действия
- Касетофон
- Радиоапарат
- Други функции
- Устройство за смяна
- Допълнителна
- Bevezetés
- Kazetta lejátszó
- Rádió
- Más funkciók
- CD/MD váltó (Csak XR-C353)
- Egyéb információ
- Перед началом
- Магнитофон
- Радиоприемник
- Прочие функции
- Многозарядный компакт/ MD-проигрыватель
- Дополнительная

