Sony DSC-WX7 White – страница 2
Инструкция к Цифровому Фотоаппарату Более 16 Мпикс Sony DSC-WX7 White

Focus Select the focus method.
Select the metering mode that sets which part of the
Metering Mode
subject to measure to determine the exposure.
Scene Recognition Set to automatically detect shooting conditions.
Soft Skin Effect Set the Soft Skin Effect and the effect level.
Set to automatically release the shutter when a smile is
Smile Shutter
detected.
GB
Smile Detection
Set the Smile Shutter function sensitivity for detecting
Sensitivity
smiles.
Select to detect faces and adjust various settings
Face Detection
automatically.
Set to automatically shoot two images and select image
Anti Blink
in which the eyes are not blinking.
Sets the strength of SteadyShot in movie mode. If you
Movie SteadyShot
change this setting, the angle of view will change.
In-Camera Guide Search the camera’s functions according to your needs.
Viewing
Easy Mode Increase the text size on the screen for ease of use.
Date Select Selects the desired image to view by date.
Calendar Selects the date to be played back on Calendar.
Image Index Displays multiple images at the same time.
Slideshow Select a method of continuous playback.
Delete Delete an image.
Send by
Transfer data by closely aligning two products equipped
TransferJet
with TransferJet.
Retouch Retouch an image using various effects.
Picture Effect Add various texture on images.
Paint Paints on a still image and saves it as a new file.
3D Viewing Set to play back images shot in 3D mode on a 3D TV.
View Mode Select the display format for images.
GB
21
Display Cont.
Select to display burst images in groups or display all
Shooting Group
images during playback.
Protect Protect the images.
Print (DPOF) Add a print order mark to a still image.
Rotate Rotate a still image to the left or right.
Volume Adjusts the volume.
Sets whether or not to display the shooting data (Exif
Exposure data
data) of the currently displayed file on the screen.
Number of images
Sets the number of images displayed in the index screen.
in index
In-Camera Guide Search the camera’s functions according to your needs.
x
Setting items
If you touch the MENU while shooting or during playback, (Settings) is
provided as a final selection. You can change the default settings on the
(Settings) screen.
Movie format/AF Illuminator/Grid Line/Clear Image
Zoom/Digital Zoom/Wind Noise Reduct./Scene Recog.
Shooting Settings
Guide/Red Eye Reduction/Blink Alert/Write Date
Beep/Histogram Setting/Panel Brightness/Language
Setting/Display color/Demo Mode/Initialize/CTRL FOR
HDMI/Eco Mode/Calibration/USB Connect Setting/
Main Settings
USB Power Supply/LUN Setting/Download Music/
Empty Music/TransferJet/Eye-Fi/Drop Sensor/Version
Format/Create REC.Folder/Change REC.Folder/Delete
Memory Card
REC.Folder/Copy/File Number
Tool
*
Area Setting/Date & Time Setting
Clock Settings
* If a memory card is not inserted, (Internal Memory Tool) will be displayed and
only [Format] can be selected.
GB
22

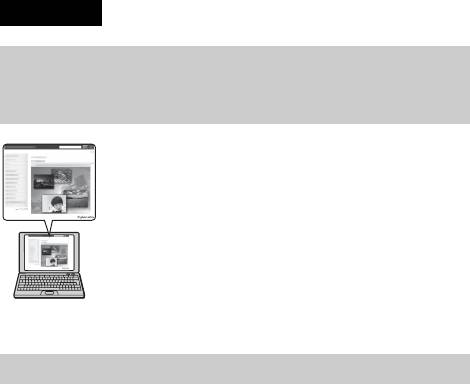
Install PC application (Windows)
The built-in software “PlayMemories Home” allows you to import still images
and movies to your computer and use them.
You can shoot or play back images on this camera even if you do not install
“PlayMemories Home”, however, “PlayMemories Home” is required to
import AVCHD movies to your computer.
GB
Connect the camera to a computer.
1
Windows 7: [Computer] t camera icon t media icon
2
t Double-click [PMHOME.EXE]
Windows XP/Vista: [Computer] (in Windows XP, [My
Computer]) t [PMHOME] t Double-click
[PMHOME.EXE]
Follow the instructions on the screen to complete the
3
installation.
Note
• “PlayMemories Home” is not compatible to Mac OS. If you play back images on a
Mac, use the applications that are installed on your Mac.
For details, see http://www.sony.co.jp/imsoft/Mac/
x
Features of “PlayMemories Home”
Below are examples of the functions available when you use “PlayMemories
Home”. To take advantage of the various “PlayMemories Home” functions,
connect to the Internet and install the “Expanded Feature”.
• You can import images shot with the camera to a computer for display.
• You can display images stored on a computer by shooting date in a calendar
display.
• You can correct (Red Eye Correction, etc.) still images, print the images,
send images by e-mail, and change the shooting date and time.
• You can save and print images with the date.
• You can create a disc from AVCHD movies imported to a computer.
(Expanded Feature)
GB
23

Number of still images and recordable time of
movies
The number of still images and recordable time may vary depending on the
shooting conditions and the memory card.
x
Still images
(Units: Images)
Capacity
Internal memory Memory card
Size
Approx. 19 MB 2 GB
16M 3 320
VGA 65 6400
16:9(12M) 3 330
x
Movies
The table below shows the approximate maximum recording times. These are
the total times for all movie files. Continuous shooting is possible for
approximately 29 minutes. The maximum size of an MP4-format movie file is
up to approximately 2 GB.
(h (hour), m (minute))
Capacity
Internal memory Memory card
Size
Approx. 19 MB 2 GB
AVC HD 24M (FX) — 10 m
(10 m)
AVC HD 9M (HQ) — 25 m
(15 m)
MP4 12M — 15 m
MP4 3M — 1 h 10 m
The number in ( ) is the minimum recordable time.
• The recordable time of movies varies because the camera is equipped with VBR
(Variable Bit Rate), which automatically adjusts image quality depending on the
shooting scene. When you record a fast-moving subject, the image is clearer but
the recordable time is shorter because more memory is required for recording.
The recordable time also varies depending on the shooting conditions, the subject
or the image quality/size settings.
GB
24

Notes on using the camera
Functions built into this camera
• This manual describes each of the functions of TransferJet compatible/
incompatible devices, 1080 60i-compatible devices and 1080 50i-compatible
devices.
To check if your camera supports the TransferJet function, and whether it is a
1080 60i-compatible device or 1080 50i-compatible device, check for the
GB
following marks on the bottom of the camera.
TransferJet-compatible device:
(TransferJet)
1080 60i-compatible device: 60i
1080 50i-compatible device: 50i
• Do not watch 3D images shot with this camera for extended periods of time on
3D-compliant monitors.
• When you view 3D images shot with this camera on a 3D-compliant monitors, you
may experience discomfort in the form of eye strain, fatigue, or nausea. To prevent
these symptoms, we recommend that you take regular breaks. However, you need
to determine for yourself the length and frequency of breaks you require, as they
vary according to the individual. If you experience any type of discomfort, stop
viewing the 3D images until you feel better, and consult a physician as necessary.
Also refer to the operating instructions supplied with the device or software you
have connected or are using with this camera. Note that a child’s eyesight is still at
the development stage (particularly children below the age of 6).
Consult a pediatrician or ophthalmologist before letting your child view 3D
images, and make sure he/she observes the above precautions when viewing such
images.
On use and care
Avoid rough handling, disassembling, modifying, physical shock, or impact such as
hammering, dropping, or stepping on the product. Be particularly careful of the lens.
Notes on recording/playback
• Before you start recording, make a trial recording to make sure that the camera is
working correctly.
• The camera is neither dust-proof, nor splash-proof, nor water-proof.
• Avoid exposing the camera to water. If water enters inside the camera, a
malfunction may occur. In some cases, the camera cannot be repaired.
• Do not aim the camera at the sun or other bright light. It may cause the
malfunction of the camera.
• If moisture condensation occurs, remove it before using the camera.
• Do not shake or strike the camera. It may cause a malfunction and you may not be
able to record images. Furthermore, the recording media may become unusable or
image data may be damaged.
GB
25
Do not use/store the camera in the following places
• In an extremely hot, cold or humid place
In places such as in a car parked in the sun, the camera body may become
deformed and this may cause a malfunction.
• Under direct sunlight or near a heater
The camera body may become discolored or deformed, and this may cause a
malfunction.
• In a location subject to rocking vibration
• Near a location that generates strong radio waves, emits radiation or is strongly
magnetic place. Otherwise, the camera may not properly record or play back
images.
• In sandy or dusty places
Be careful not to let sand or dust get into the camera. This may cause the camera to
malfunction, and in some cases this malfunction cannot be repaired.
On carrying
Do not sit down in a chair or other place with the camera in the back pocket of your
trousers or skirt, as this may cause malfunction or damage the camera.
Carl Zeiss lens
The camera is equipped with a Carl Zeiss lens which is capable of reproducing sharp
images with excellent contrast. The lens for the camera has been produced under a
quality assurance system certified by Carl Zeiss in accordance with the quality
standards of Carl Zeiss in Germany.
Note on the screen and lens
The screen is manufactured using extremely high-precision technology so over
99.99% of the pixels are operational for effective use. However, some tiny black
and/or bright dots (white, red, blue or green) may appear on the screen. These dots
are a normal result of the manufacturing process, and do not affect the recording.
On camera’s temperature
Your camera and battery may get hot due to continuous use, but it is not a
malfunction.
On the overheat protection
Depending on the camera and battery temperature, you may be unable to record
movies or the power may turn off automatically to protect the camera.
A message will be displayed on the screen before the power turns off or you can no
longer record movies. In this case, leave the power off and wait until the camera and
battery temperature goes down. If you turn on the power without letting the camera
and battery cool enough, the power may turn off again or you may be unable to
record movies.
GB
26

On charging the battery
If you charge a battery that has not been used for a long time, you may be unable to
charge it to the proper capacity.
This is due to the battery characteristics, and is not a malfunction. Charge the battery
again.
Warning on copyright
Television programs, films, videotapes, and other materials may be copyrighted.
Unauthorized recording of such materials may be contrary to the provisions of the
copyright laws.
GB
No compensation for damaged content or recording failure
Sony cannot compensate for failure to record or loss or damage of recorded content
due to a malfunction of the camera or recording media, etc.
Cleaning the camera surface
Clean the camera surface with a soft cloth slightly moistened with water, then wipe
the surface with a dry cloth. To prevent damage to the finish or casing:
– Do not expose the camera to chemical products such as thinner, benzine, alcohol,
disposable cloths, insect repellent, sunscreen or insecticide.
GB
27

Specifications
Camera
File format:
Still images: JPEG (DCF, Exif,
[System]
MPF Baseline) compliant, DPOF
compatible
Image device: 7.77 mm (1/2.3 type)
3D still images: MPO (MPF
Exmor R CMOS sensor
Extended (Disparity Image))
Total pixel number of camera:
compliant
Approx. 16.8 Megapixels
Movies (AVCHD format):
Effective pixel number of camera:
AVCHD format Ver. 2.0
Approx. 16.2 Megapixels
compatible
Lens: Carl Zeiss Vario-Tessar 5× zoom
Video: MPEG-4 AVC/H.264
lens
Audio: Dolby Digital 2ch,
f = 4.5 mm – 22.5 mm (25 mm –
equipped with Dolby Digital Stereo
125 mm (35 mm film equivalent))
Creator
F2.6 (W) – F6.3 (T)
• Manufactured under license from
While shooting movies (16:9):
Dolby Laboratories.
29 mm – 145 mm*
Movies (MP4 format):
While shooting movies (4:3):
Video: MPEG-4 AVC/H.264
35 mm – 175 mm*
Audio: MPEG-4 AAC-LC 2ch
* When [Movie SteadyShot] is set
Recording media: Internal Memory
to [Standard]
(Approx. 19 MB), “Memory Stick
SteadyShot: Optical
Duo” media, “Memory Stick
Exposure control: Automatic exposure,
Micro” media, SD cards, microSD
Scene Selection (14 modes)
memory cards
White balance: Automatic, Daylight,
Flash: Flash range (ISO sensitivity
Cloudy, Fluorescent 1/2/3,
(Recommended Exposure Index)
Incandescent, Flash, One Push
set to Auto):
Signal format:
Approx. 0.2 m to 5.3 m
For 1080 50i: PAL color, CCIR
(7 7/8 inches to 17 ft 4 3/4 inches)
standards HDTV 1080/50i
(W)
specification
Approx. 1.0 m to 2.2 m
For 1080 60i: NTSC color, EIA
(3 ft 3 3/8 inches to 7 ft
standards HDTV 1080/60i
2 5/8 inches) (T)
specification
GB
28

AC Adaptor AC-UB10/UB10B
[Input and Output connectors]
Power requirements: AC 100 V to
HDMI connector: HDMI mini jack
240 V, 50 Hz/60 Hz, 70 mA
Micro USB connector: USB
Output voltage: DC 5 V, 0.5 A
communication
Operating temperature: 0 °C to 40 °C
USB communication: Hi-Speed USB
(32°F to 104°F)
(USB 2.0)
Storage temperature: –20 °C to +60 °C
(–4 °F to +140 °F)
[Screen]
Dimensions:
GB
LCD screen:
Approx. 50 mm × 22 mm × 54 mm
Wide (16:9), 7.5 cm (3.0 type) TFT
(2 inches × 7/8 inches ×
drive
2 1/4 inches) (W/H/D)
Total number of dots:
Mass:
921 600 dots equivalent
For the USA and Canada:
Approx. 48 g (1.7 oz)
[Power, general]
For countries or regions other than
Power: Rechargeable battery pack
the USA and Canada:
NP-BN, 3.6 V
Approx. 43 g (1.5 oz)
AC Adaptor AC-UB10/UB10B,
5V
Rechargeable battery pack
Power consumption (during shooting):
NP-BN
1.0 W
Used battery: Lithium-ion battery
Operating temperature: 0 °C to 40 °C
Maximum voltage: DC 4.2 V
(32 °F to 104 °F)
Nominal voltage: DC 3.6 V
Storage temperature: –20 °C to +60 °C
Maximum charge voltage: DC 4.2 V
(–4 °F to +140 °F)
Maximum charge current: 0.9 A
Dimensions (CIPA compliant):
Capacity:
92.2 mm × 52.0 mm × 19.1 mm
typical: 2.3 Wh (630 mAh)
(3 3/4 inches × 2 1/8 inches ×
minimum: 2.2 Wh (600 mAh)
25/32 inches) (W/H/D)
Mass (CIPA compliant) (including
Design and specifications are subject to
NP-BN battery pack, “Memory
change without notice.
Stick Duo” media):
Approx. 114 g (4.0 oz)
Microphone: Stereo
Speaker: Monaural
Exif Print: Compatible
PRINT Image Matching III:
Compatible
GB
29
Trademarks
Additional information on this
• The following marks are trademarks
product and answers to frequently
of Sony Corporation.
asked questions can be found at
, “Cyber-shot,”
“Memory Stick PRO Duo,”
our Customer Support Website.
“Memory Stick PRO-HG Duo,”
“Memory Stick Duo,” “Memory
Stick Micro”
• “AVCHD” and “AVCHD” logotype
Printed on 70% or more recycled paper
are trademarks of Panasonic
using VOC (Volatile Organic
Compound)-free vegetable oil based
Corporation and Sony Corporation.
ink.
• Windows is registered trademark of
Microsoft Corporation in the United
States and/or other countries.
• Mac is registered trademark of Apple
Inc.
• SDXC logo is a trademark of SD-3C,
LLC.
• “ ” and “PlayStation” are
registered trademarks of Sony
Computer Entertainment Inc.
• In addition, system and product
names used in this manual are, in
general, trademarks or registered
trademarks of their respective
developers or manufacturers.
However, the ™ or ® marks are not
used in all cases in this manual.
• Add further enjoyment with your
PlayStation 3 by downloading the
application for PlayStation 3 from
PlayStation Store (where available.)
• The application for PlayStation 3
requires PlayStation Network
account and application download.
Accessible in areas where the
PlayStation Store is available.
GB
30

GB
GB
31
Русский
Получение дополнительных сведений о
фотоаппарате (“Руководство пользователя
Cyber-shot”)
“Руководство пользователя Cyber-shot” является
интерактивным руководством. Обращайтесь к нему
для получения подробных инструкций по многим
функциям фотоаппарата.
1 Перейдите на страницу поддержки Sony.
http://www.sony.net/SonyInfo/Support/
2 Выберите страну или регион.
3 Найдите наименование модели фотоаппарата на
странице поддержки.
• Проверьте наименование модели на нижней
стороне фотоаппарата.
Проверка прилагаемых предметов
Число в скобках указывает количество штук.
• Фотоаппарат (1)
• Перезаряжаемый батарейный блок NP-BN (1)
(Данный перезаряжаемый батарейный блок не может
использоваться с фотоаппаратами Cyber-shot, которые
поставляются с батарейным блоком NP-BN1.)
• Кабель Micro USB (1)
• Адаптер переменного тока AC-UB10/UB10B (1)
• Шнур питания (не прилагается для США и Канады) (1)
• Перо (1)
• Наручный ремешок (1)
• Инструкция по эксплуатации (данное руководство) (1)
RU
2

ПРЕДУПРЕЖДЕНИЕ
Для уменьшения опасности возгорания или поражения
электрическим током не подвергайте аппарат воздействию
дождя или влаги.
ВАЖНЫЕ ИНСТРУКЦИИ ПО ТЕХНИКЕ
БЕЗОПАСНОСТИ
-СОХРАНИТЕ ЭТИ ИНСТРУКЦИИ
RU
ОПАСНОСТЬ
ДЛЯ УМЕНЬШЕНИЯ ОПАСНОСТИ
ВОЗГОРАНИЯ ИЛИ ПОРАЖЕНИЯ
ЭЛЕКТРИЧЕСКИМ ТОКОМ СТРОГО
СОБЛЮДАЙТЕ ЭТИ ИНСТРУКЦИИ
Если форма штепсельной вилки не соответствует сетевой розетке, используйте
для сетевой розетки переходник соответствующей конфигурации.
ПРЕДУПРЕЖДЕНИЕ
[ Батарейный блок
Неправильное обращение с батарейным блоком может стать причиной его
взрыва, возгорания, а также химических ожогов. Соблюдайте следующие
меры предосторожности.
• Не разбирайте блок.
• Не подвергайте батарейный блок каким бы то ни было механическим
воздействиям: ударам, падениям или попаданиям под тяжелые предметы.
• Во избежание короткого замыкания не допускайте контакта металлических
предметов с контактами батарейного блока.
• Не допускайте нагрева батарейного блока до температуры выше 60 °C:
избегайте воздействия на него прямых солнечных лучей, а также не
оставляйте в припаркованном на солнце автомобиле.
• Запрещается сжигать блок или бросать его в огонь.
• Не следует использовать поврежденные и протекшие литий-ионные батареи.
• Для зарядки батарейного блока используйте оригинальное зарядное
устройство Sony или другое совместимое зарядное устройство.
• Храните батарейный блок в недоступном для детей месте.
• Храните батарейный блок в сухом месте.
RU
3
• Замену следует выполнять только на батарейный блок того же или
аналогичного типа, рекомендованный Sony.
• Утилизация использованных батарейных блоков должна производиться
надлежащим образом в соответствии с инструкциями.
[ Адаптер переменного тока
Подсоедините адаптер переменного тока к ближайшей сетевой розетке.
Если при использовании адаптера переменного тока возникнут какие-либо
проблемы, немедленно отключите питание, вынув штепсельную вилку из
сетевой розетки.
Сетевой шнур (провод питания), если он прилагается, предназначен
специально для использования только с данным фотоаппаратом, и не должен
использоваться с другим электрическим оборудованием.
[ Дата изготовления изделия.
Вы можете узнать дату изготовления изделия, взглянув на обозначение “P/D:”,
которое находится на этикетке со штрих кодом картонной коробки.
Знаки, указанные на этикетке со штрих кодом картонной коробки.
P/D:XX XXXX
1 2
1. Месяц изготовления
2. Год изготовления
A-0, B-1, C-2, D-3, E-4, F-5, G-6,
H-7, I-8, J-9.
Дата изготовления литий-ионного батарейного блока указаны на боковой
стороне или на поверхности с наклейкой.
RU
4

Для покупателей в Европе
[ Примечание для покупателей в странах, где действуют
директивы ЕС
Производителем данного устройства является корпорация Sony Corporation, 1-
7-1 Konan Minato-ku Tokyo, 108-0075 Japan. Уполномоченным представителем
по электромагнитной совместимости (EMC) и безопасности изделия является
компания Sony Deutschland GmbH, Hedelfinger Strasse 61, 70327 Stuttgart,
Germany. По вопросам обслуживания и гарантии обращайтесь по адресам,
указанным в соответствующих документах.
RU
Данное изделие прошло испытания и соответствует ограничениям,
установленным в Директиве EMC в отношении соединительных кабелей,
длина которых не превышает 3 метров.
[ Внимание
Электромагнитные поля определенных частот могут влиять на изображение и
звук данного аппарата.
[ Уведомление
Если статическое электричество или электромагнитныe силы приводят к сбою
в передачe данных, перезапустите приложение или отключите и снова
подключите коммуникационный кабель (USB и т.д.).
[ Утилизация отслужившего электрического и электронного
оборудования (директива применяется в странах Евросоюза
и других европейских странах, где действуют системы
раздельного сбора отходов)
Данный знак на устройстве или его упаковке обозначает, что
данное устройство нельзя утилизировать вместе с прочими
бытовыми отходами. Его следует сдать в соответствующий
приемный пункт переработки электрического и электронного
оборудования. Неправильная утилизация данного изделия
может привести к потенциально негативному влиянию на
окружающую среду и здоровье людей, поэтому для
предотвращения подобных последствий необходимо выполнять
специальные требования по утилизации этого изделия. Переработка данных
материалов поможет сохранить природные ресурсы. Для получения более
подробной информации о переработке этого изделия обратитесь в местные
органы городского управления, службу сбора бытовых отходов или в магазин,
где было приобретено изделие.
RU
5

[ Утилизация использованных элементов питания
(применяется в странах Евросоюза и других европейских
странах, где действуют системы раздельного сбора отходов)
Данный знак на элементе питания или упаковке означает, что
элемент питания, поставляемый с устройством, нельзя
утилизировать вместе с прочими бытовыми отходами.
На некоторых элементах питания данный символ может
комбинироваться с символом химического элемента. Символы
ртути (Hg) или свинца (Pb) указываются, если содержание
данных металлов более 0,0005% (для ртути) и 0,004% (для свинца)
соответственно.
Обеспечивая правильную утилизацию использованных элементов питания, вы
предотвращаете негативное влияние на окружающую среду и здоровье людей,
возникающее при неправильной утилизации. Вторичная переработка
материалов, использованных при изготовлении элементов питания,
способствует сохранению природных ресурсов.
При работе устройств, для которых в целях безопасности, выполнения каких-
либо действий или сохранения имеющихся в памяти устройств данных
необходима подача постоянного питания от встроенного элемента питания,
замену такого элемента питания следует производить только в
специализированных сервисных центрах.
Для правильной утилизации использованных элементов питания, после
истечения срока службы, сдавайте их в соответствующий пункт по сбору
электронного и электрического оборудования.
Об использовании прочих элементов питания, пожалуйста, узнайте в разделе, в
котором даны инструкции по извлечению элементов питания из устройства,
соблюдая меры безопасности. Сдавайте использованные элементы питания в
соответствующие пункты по сбору и переработке использованных элементов
питания.
Для получения более подробной информации о вторичной переработке
данного изделия или использованного элемента питания, пожалуйста,
обратитесь в местные органы городского управления, службу сбора бытовых
отходов или в магазин, где было приобретено изделие.
RU
6
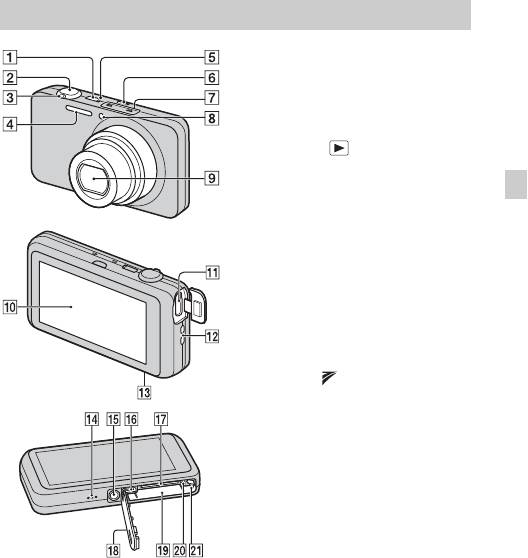
Обозначение частей
A Кнопка ON/OFF (Питание)
B Кнопка затвора
C Рычажок W/T (увеличение)
D Вспышка
E Лампочка питания/зарядки
F Кнопка
(воспроизведение)
G Микрофон
RU
H Лампочка таймера
самозапуска/Лампочка
режима Smile Shutter/
Подсветка АФ
I Объектив
J Экран/сенсорная панель
K Мини-гнездо HDMI
L Крючок для наручного
ремешка
M Метка (TransferJet™)
N Громкоговоритель
O Гнездо штатива
• Используйте штатив с
винтом длиной менее 5,5 мм.
В противном случае Вы не
сможете плотно закрепить
фотоаппарат, что может
привести к его повреждению.
P Разъем Micro USB
Q Слот карты памяти
R Крышка отсека батареи/
карты памяти
S Слот для вставления батареи
T Лампочка доступа
U Рычажок выталкивания
батареи
RU
7
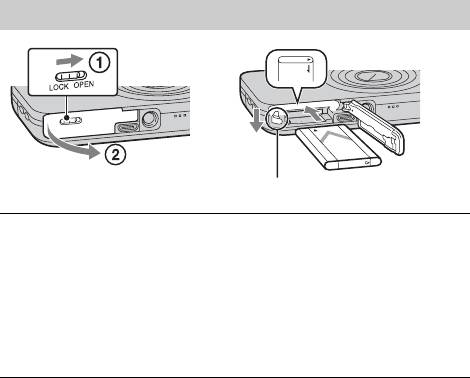
Вставка батарейного блока
Рычажок выталкивания батареи
Откройте крышку.
1
Вставьте батарейный блок.
2
• Нажав рычажок выталкивания батареи, вставьте батарейный
блок, как показано на рисунке. Убедитесь, что рычаг
выталкивания батареи защелкнулся после вставки батареи.
• В случае закрывания крышки с неправильно вставленной
батареей, фотоаппарат можно повредить.
RU
8
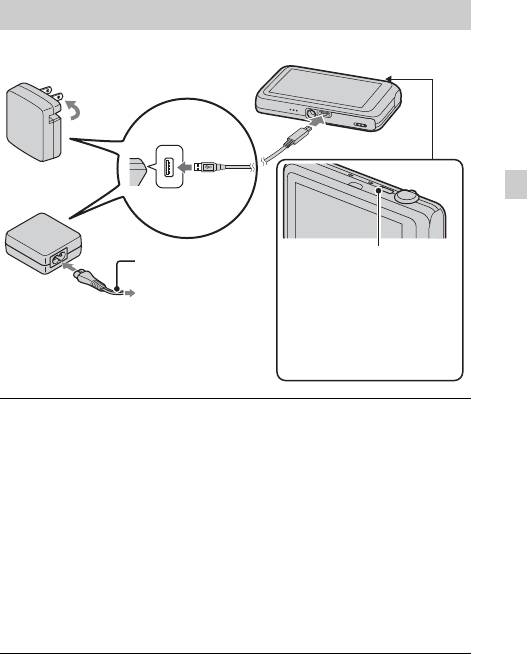
Зарядка батарейного блока
Для покупателей в США, Канаде
RU
Лампочка питания/зарядки
Шнур питания
Высвечивается: Зарядка
Не горит: Зарядка
завершена
Для покупателей в странах/регионах
Мигание:
за пределами США и Канады
Ошибка зарядки
Зарядка приостановлена
из-за перегрева
Подключите фотоаппарат к адаптеру переменного
1
тока (прилагается) с помощью кабеля micro USB
(прилагается).
Подсоедините адаптер переменного тока к сетевой
2
розетке.
Лампочка питания/зарядки высветится оранжевым цветом, и
начнется зарядка.
• Выключите фотоаппарат на время зарядки батареи.
• Батарейный блок можно заряжать, даже если он частично
заряжен.
• Если лампочка питания/зарядки мигает, и зарядка не
завершена, извлеките и снова вставьте батарейный блок.
RU
9

Примечания
• Если лампочка питания/зарядки на фотоаппарате мигает при
подключении адаптера переменного тока к сетевой розетке, это
указывает на то, что зарядка временно остановлена из-за выхода
температуры за пределы рекомендуемого диапазона. Зарядка
возобновляется, когда температура возвращается в подходящий для
зарядки диапазон. Мы рекомендуем Вам заряжать батарейный блок при
температуре окружающей среды от 10°C до 30°C.
• Если участок разъема батареи загрязнен, батарейный блок может не
заряжаться эффективно. В этом случае слегка протрите пыль мягкой
тканью или ватным тампоном, чтобы очистить участок разъема
батареи.
• Подсоедините адаптер переменного тока (прилагается) к ближайшей
сетевой розетке. При возникновении каких-либо неисправностей во
время использования адаптера переменного тока немедленно
отключите питание, отсоединив штепсельную вилку от сетевой
розетки.
• По завершении зарядки отключите адаптер переменного тока от
сетевой розетки.
• Обязательно используйте только оригинальный батарейный блок Sony,
кабель micro USB (прилагается) и адаптер переменного тока
(прилагается).
• Зарядное устройство BC-TRN2 (продается отдельно) обеспечивает
быструю зарядку перезаряжаемого батарейного блока NP-BN,
прилагаемого к данной модели. Зарядное устройство BC-TRN
(продается отдельно) не обеспечивает быструю зарядку
перезаряжаемого батарейного блока NP-BN, прилагаемого к данной
модели.
x
Время зарядки (полная зарядка)
Время зарядки с помощью адаптера переменного тока (прилагается)
составляет приблизительно 115 мин.
Примечание
• Указанное выше время зарядки относится к зарядке полностью
разряженного батарейного блока при температуре 25°C. В зависимости
от условий использования или обстоятельств зарядка может длиться
дольше.
RU
10

