Sony DSC-HX200 Black – страница 2
Инструкция к Цифровому Фотоаппарату Sony DSC-HX200 Black
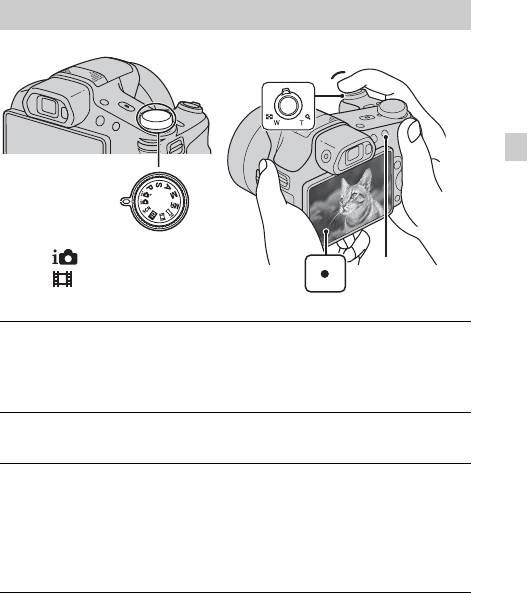
Shooting still images/movies
W: zoom out
Shutter button
T: zoom in
GB
Mode dial
: Intelligent Auto
MOVIE
: Movie Mode
Shooting still images
Press the shutter button halfway down to focus.
1
When the image is in focus, a beep sounds and the z indicator lights.
Press the shutter button fully down to shoot an image.
2
Shooting movies
Press the MOVIE (Movie) button to start recording.
1
• Use the W/T (zoom) lever to change the zoom scale.
• Press the shutter button to shoot still images while continuing to record
the movie.
Press the MOVIE button again to stop recording.
2
GB
21
Notes
• If you use the zoom function while shooting a movie, the sounds of the lens
moving and the lever, jog dial, and manual ring being operated will be recorded.
The sound of the MOVIE button operating may also be recorded when movie
recording is finished.
• Continuous shooting is possible for approximately 29 minutes at one time at the
camera’s default settings and when the temperature is approximately 25°C (77°F).
When movie recording is finished, you can restart recording by pressing the
MOVIE button again. Recording may stop to protect the camera depending on the
ambient temperature.
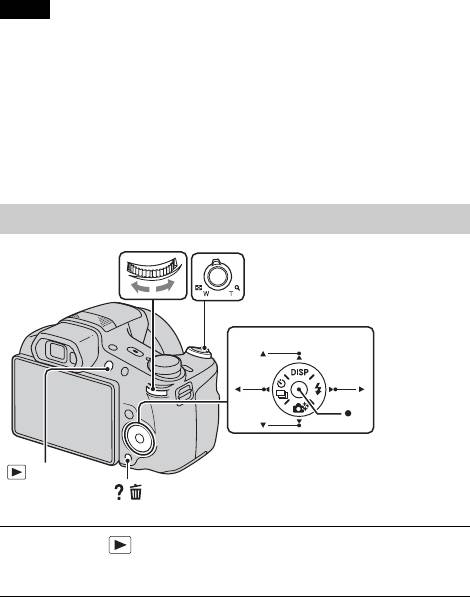
Viewing images
W: zoom out
Jog dial
T: zoom in
Control button
Select images: B (next)/b (previous) or
turn the jog dial
(Playback)
Set: z
/ (Delete)
Press the (Playback) button.
1
• When images on a memory card recorded with other cameras are played
back on this camera, the registration screen for the data file appears.
x
Selecting next/previous image
Select an image by pressing B (next)/b (previous) on the control button or by
turning the jog dial. Press z in the center of the control button to view movies.
GB
22
x
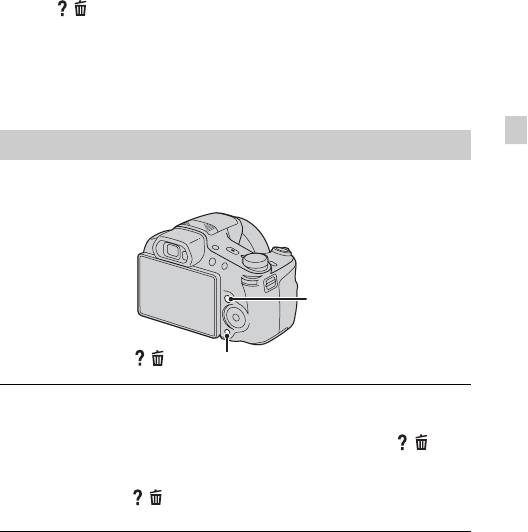
Deleting an image
1 Press / (Delete) button.
2 Select [This Image] with v on the control button, then press z.
x
Returning to shooting images
Press the shutter button halfway down.
GB
In-Camera Guide
This camera contains an internal function guide. This allows you to search the
camera’s functions according to your needs.
MENU
/ (In-Camera Guide)
Press the MENU button.
1
Select the desired MENU item, then press the / (In-
2
Camera Guide) button.
The operation guide for the selected item is displayed.
• If you press the / (In-Camera Guide) button when the MENU screen
is not displayed, you can search the guide using keywords or icons.
GB
23
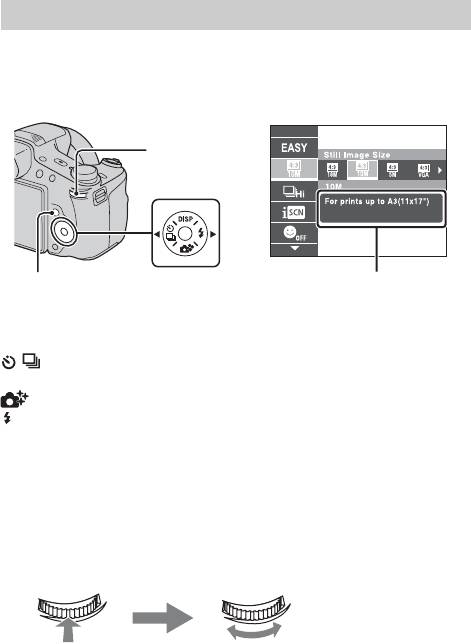
Introduction of other functions
Other functions used when shooting or playing back can be operated using the
control button, the jog dial or MENU button on the camera. This camera is
equipped with a Function Guide that allows you to easily select from the
functions. While displaying the guide, try the other functions.
Jog dial
MENU
Control button
Function Guide
x
Control button
DISP (Display Setting): Allows you to change the screen display.
/ (Cont. Shooting/Self-Timer): Allows you to use the self-timer and
burst shooting mode.
(Photo Creativity): Allows you to operate the camera intuitively.
(Flash): Allows you to select a flash mode for still images.
x
Jog dial
You can use the jog dial to change the following setting values:
–ISO speed
– Shutter speed
– Aperture value (F value)
–EV
• You may not be able to change the setting values depending on the shooting mode.
Turn the jog dial to
Press the jog dial to
change the setting
select an item.
value.
In playback mode, you can turn the jog dial to view the next or previous
GB
image.
24

x
Menu Items
Shooting
Movie shooting
Select movie recording mode.
scene
3D Shooting Select the 3D image shooting mode.
Shoot a still image with an original texture according to
Picture Effect
the desired effect.
GB
Scene Selection Select pre-set settings to match various scene conditions.
Memory recall
Select a setting you want to recall when the mode dial is
mode
set to [Memory recall mode].
Easy Mode Shoot still images using minimal functions.
Set the level of background defocus effect when
Defocus Effect
shooting in Background Defocus mode.
Still Image
Set the still image size shot while recording a movie.
Size(Dual Rec)
Still Image Size/
Select the image size and the quality for still images,
Panorama Image
panoramic images or movie files.
Size/Movie Size/
Movie Quality
HDR Painting
When [HDR Painting] is selected in Picture Effect, sets
effect
the effect level.
When [Miniature] is selected in Picture Effect, sets the
Area of emphasis
part to focus on.
When [Toy camera] is selected in Picture Effect, sets the
Color hue
color hue.
When [Partial Color] is selected in Picture Effect, selects
Extracted Color
the color to extract.
When [Watercolor] is selected in Picture Effect, sets the
Watercolor Effect
effect level.
When [Illustration] is selected in Picture Effect, sets the
Illustration Effect
effect level.
White Balance Adjust color tones of an image.
White Balance
Adjust color tones according to the adjusted value set
Shift
based on the selected White Balance tone.
GB
25

ND Filter Turn the internal ND filter on or off.
Select the metering mode that sets which part of the
Metering Mode
subject to measure to determine the exposure.
Cont. Shooting
Select the number of images taken per second for Burst
Interval
shooting.
Bracket Setting Set the type of the bracket shooting.
Scene Recognition Set to automatically detect shooting conditions.
Soft Skin Effect Set the Soft Skin Effect and the effect level.
Set to the camera automatically release the shutter when
Smile Shutter
a smile is detected.
Smile Detection
Set the Smile Shutter function sensitivity for detecting
Sensitivity
smiles.
Select to detect faces and adjust various settings
Face Detection
automatically.
Flash Level Adjust the amount of flash light.
Select the vividness of the image, accompanied by
Color Mode
effects.
Color Saturation Adjust the vividness of the image.
Contrast Adjust the contrast of the image.
Sharpness Adjust the sharpness of the image.
Noise Reduction Adjust the image resolution and the noise balance.
Set to automatically shoot two images and select image
Anti Blink
in which the eyes are not blinking.
Set the strength of SteadyShot in Movie Mode. If you
Movie SteadyShot
change the setting for [Movie SteadyShot], the angle of
view will change.
Position
Check the GPS triangulating status and update the
Information*
position information.
GPS Log REC* Record the route taken while carrying the camera.
Register the desired modes or camera settings. Set the
Register Setting
mode dial to (Memory recall mode) to retrieve the
registered settings.
GB
26

In-Camera Guide Search the camera’s functions according to your needs.
* DSC-HX200V only
Viewing
Slideshow Select a method of continuous playback.
Send by
Transfer data by closely aligning two products equipped
TransferJet
with TransferJet.
GB
Delete Delete an image.
Retouch Retouch an image using various effects.
Picture Effect Add various texture on images.
3D Viewing Set to play back images shot in 3D mode on a 3D TV.
View Mode Select the display format for images.
Display Cont.
Select to display burst images in groups or display all
Shooting Group
images during playback.
Protect Protect the images.
Print (DPOF) Add a print order mark to a still image.
Rotate Rotate a still image to the left or right.
In-Camera Guide Search the camera’s functions according to your needs.
GB
27
x
Setting items
If you press the MENU button while shooting or during playback,
(Settings) is provided as a final selection. You can change the default
settings on the (Settings) screen.
Movie format/AF Illuminator/Grid Line/Clear Image
Zoom/Digital Zoom/Wind Noise Reduct./Micref Level/
Shooting Settings
Red Eye Reduction/Blink Alert/Write Date/Custom
Button/Disp. Resolution
Beep/Panel Brightness/Language Setting/Display color/
Demo Mode/Initialize/Function Guide/HDMI
Resolution/CTRL FOR HDMI/Eco Mode/USB Connect
Main Settings
Setting/LUN Setting/Download Music/Empty Music/
*1
*1
*1
Airplane Mode
/GPS setting
/GPS assist data
/
*1
Dlt.GPS Log Data
/TransferJet/Eye-Fi/Version
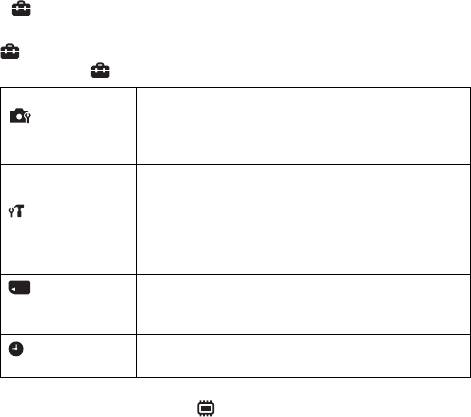
Format/Create REC.Folder/Change REC.Folder/Delete
Memory Card
REC.Folder/Copy/File Number
*2
Tool
*1
Area Setting/Date & Time Setting/Auto Clock ADJ
/
*1
Clock Settings
Auto Area ADJ
*1
DSC-HX200V only
*2
If a memory card is not inserted, (Internal Memory Tool) will be displayed
and only [Format] can be selected.
GB
28

Install PC application (Windows)
The built-in software “PlayMemories Home” allows you to import still images
and movies to your computer and use them.
You can shoot or play back images on this camera even if you do not install
“PlayMemories Home”, however, “PlayMemories Home” is required to
import AVCHD movies to your computer.
GB
Connect the camera to a computer.
1
Windows 7: [Computer] t camera icon t media icon
2
t Double-click [PMHOME.EXE]
Windows XP/Vista: [Computer] (in Windows XP, [My
Computer]) t [PMHOME] t Double-click
[PMHOME.EXE]
Follow the instructions on the screen to complete the
3
installation.
Note
• “PlayMemories Home” is not compatible to Mac OS. If you play back images on a
Mac, use the applications that are installed on your Mac.
For details, see http://www.sony.co.jp/imsoft/Mac/
x
Features of “PlayMemories Home”
Below are examples of the functions available when you use “PlayMemories
Home”. To take advantage of the various “PlayMemories Home” functions,
connect to the Internet and install the “Expanded Feature”.
• You can import images shot with the camera to a computer and display them.
• You can display images stored on a computer by shooting date in a calendar
display.
• You can correct (Red Eye Correction, etc.) still images, print the images,
send images by e-mail, and change the shooting date and time.
• You can save and print images with the date.
• You can create a disc from AVCHD movies imported to a computer.
(Expanded Feature)
GB
29
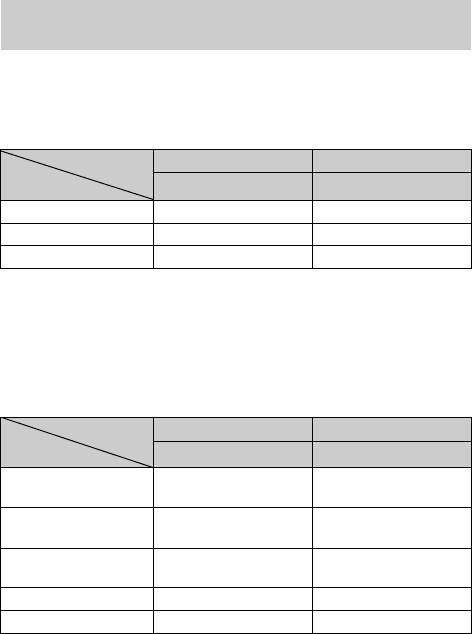
Number of still images and recordable time of
movies
The number of still images and recordable time may vary depending on the
shooting conditions and the memory card.
x
Still images
(Units: Images)
Capacity
Internal memory Memory card
Size
Approx. 105 MB 2 GB
18M 17 295
VGA 370 6400
16:9(13M) 19 330
x
Movies
The table below shows the approximate maximum recording times. These are
the total times for all movie files. Continuous shooting is possible for
approximately 29 minutes. The maximum size of an MP4-format movie file is
up to approximately 2 GB.
(h (hour), m (minute))
Capacity
Internal memory Memory card
Size
Approx. 105 MB 2 GB
AVC HD 28M (PS)
9m
—
(9 m)
AVC HD 24M (FX)
10 m
—
(10 m)
AVC HD 9M (HQ)
25 m
—
(15 m)
MP4 12M — 15 m
MP4 3M — 1 h 10 m
The number in ( ) is the minimum recordable time.
• The recordable time of movies varies because the camera is equipped with VBR
(Variable Bit Rate), which automatically adjusts image quality depending on the
shooting scene. When you record a fast-moving subject, the image is clearer but
the recordable time is shorter because more memory is required for recording.
GB
The recordable time also varies depending on the shooting conditions, the subject
30
or the image quality/size settings.

Notes on using the camera
Functions built into this camera
• This manual describes each of the functions of TransferJet compatible/
incompatible devices, 1080 60i-compatible devices and 1080 50i-compatible
devices.
– To determine whether your camera supports the GPS function, check the model
name of your camera.
GB
GPS-compatible: DSC-HX200V
GPS-incompatible: DSC-HX200
– To check if your camera supports the TransferJet function, and whether it is a
1080 60i-compatible device or 1080 50i-compatible device, check for the
following marks on the bottom of the camera.
TransferJet-compatible device:
(TransferJet)
1080 60i-compatible device: 60i
1080 50i-compatible device: 50i
• This camera is compatible with 1080 60p or 50p-format movies. Unlike standard
recording modes up to now, which record in an interlacing method, this camera
records using a progressive method. This increases the resolution, and provides a
smoother, more realistic image.
• While aboard an airplane, set [Airplane Mode] to [On] (DSC-HX200V only).
• Do not watch 3D images shot with this camera for extended periods of time on
3D-compatible monitors.
• When you view 3D images shot with this camera on a 3D-compatible monitor,
you may experience discomfort in the form of eye strain, fatigue, or nausea. To
prevent these symptoms, we recommend that you take regular breaks. However,
you need to determine for yourself the length and frequency of breaks you require,
as they vary according to the individual. If you experience any type of discomfort,
stop viewing the 3D images until you feel better, and consult a physician as
necessary. Also refer to the operating instructions supplied with the device or
software you have connected or are using with this camera. Note that a child’s
eyesight is still at the development stage (particularly children below the age of 6).
Consult a pediatrician or ophthalmologist before letting your child view 3D
images, and make sure he/she observes the above precautions when viewing such
images.
On GPS-compatible devices (DSC-HX200V only)
• Use GPS in accordance with regulations of countries and regions where you use it.
• If you do not record the direction or location information, set [GPS setting] to
[Off].
On use and care
Avoid rough handling, disassembling, modifying, physical shock, or impact such as
hammering, dropping, or stepping on the product. Be particularly careful of the lens.
GB
31
Notes on recording/playback
• Before you start recording, make a trial recording to make sure that the camera is
working correctly.
• The camera is neither dust-proof, nor splash-proof, nor water-proof.
• Avoid exposing the camera to water. If water enters inside the camera, a
malfunction may occur. In some cases, the camera cannot be repaired.
• Do not aim the camera at the sun or other bright light. It may cause the
malfunction of the camera.
• If moisture condensation occurs, remove it before using the camera.
• Do not shake or strike the camera. It may cause a malfunction and you may not be
able to record images. Furthermore, the recording media may become unusable or
image data may be damaged.
Do not use/store the camera in the following places
• In an extremely hot, cold or humid place
In places such as in a car parked in the sun, the camera body may become
deformed and this may cause a malfunction.
• Under direct sunlight or near a heater
The camera body may become discolored or deformed, and this may cause a
malfunction.
• In a location subject to rocking vibration
• Near a location that generates strong radio waves, emits radiation or is strongly
magnetic place. Otherwise, the camera may not properly record or play back
images.
• In sandy or dusty places
Be careful not to let sand or dust get into the camera. This may cause the camera to
malfunction, and in some cases this malfunction cannot be repaired.
Notes on the LCD screen and lens
The LCD screen is manufactured using extremely high-precision technology so over
99.99% of the pixels are operational for effective use. However, some tiny black
and/or bright dots (white, red, blue or green) may appear on the LCD screen. These
dots are a normal result of the manufacturing process, and do not affect the
recording.
On camera’s temperature
Your camera and battery may get hot due to continuous use, but it is not a
malfunction.
GB
32

On the overheat protection
Depending on the camera and battery temperature, you may be unable to record
movies or the power may turn off automatically to protect the camera.
A message will be displayed on the LCD screen before the power turns off or you
can no longer record movies. In this case, leave the power off and wait until the
camera and battery temperature goes down. If you turn on the power without letting
the camera and battery cool enough, the power may turn off again or you may be
unable to record movies.
On charging the battery
GB
If you charge a battery that has not been used for a long time, you may be unable to
charge it to the proper capacity.
This is due to the battery characteristics, and is not a malfunction. Charge the battery
again.
Warning on copyright
Television programs, films, videotapes, and other materials may be copyrighted.
Unauthorized recording of such materials may be contrary to the provisions of the
copyright laws.
No compensation for damaged content or recording failure
Sony cannot compensate for failure to record or loss or damage of recorded content
due to a malfunction of the camera or recording media, etc.
Cleaning the camera surface
Clean the camera surface with a soft cloth slightly moistened with water, then wipe
the surface with a dry cloth. To prevent damage to the finish or casing:
– Do not expose the camera to chemical products such as thinner, benzine, alcohol,
disposable cloths, insect repellent, sunscreen or insecticide.
GB
33

Specifications
Camera
File format:
Still images: JPEG (DCF, Exif,
[System]
MPF Baseline) compliant, DPOF
compatible
Image device: 7.76 mm (1/2.3 type)
3D still images: MPO (MPF
Exmor R CMOS sensor
Extended (Disparity Image))
Total pixel number of camera:
compliant
Approx. 18.9 Megapixels
Movies (AVCHD format):
Effective pixel number of camera:
AVCHD format Ver.2.0
Approx. 18.2 Megapixels
compatible
Lens: Carl Zeiss Vario-Sonnar T* 30×
Video: MPEG-4 AVC/H.264
zoom lens
Audio: Dolby Digital 2ch,
f = 4.8 mm – 144 mm (27 mm –
equipped with Dolby Digital Stereo
810 mm (35 mm film equivalent))
Creator
F2.8 (W) – F5.6 (T)
• Manufactured under license from
While shooting movies (16:9):
Dolby Laboratories.
29 mm – 870 mm*
Movies (MP4 format):
While shooting movies (4:3):
Video: MPEG-4 AVC/H.264
36 mm – 1080 mm*
Audio: MPEG-4 AAC-LC 2ch
* when [Movie SteadyShot] is set to
Recording media: Internal Memory
[Standard]
(Approx. 105 MB), “Memory Stick
SteadyShot: Optical
Duo” media, “Memory Stick
Exposure control: Automatic exposure,
Micro” media, SD cards, microSD
Shutter priority, Aperture priority,
memory cards
Manual exposure, Scene Selection
Flash: Flash range (ISO sensitivity
(16 modes)
(Recommended Exposure Index)
White balance: Automatic, Daylight,
set to Auto):
Cloudy, Fluorescent 1/2/3,
Approx. 0.3 m to 12.4 m
Incandescent, Flash, One Push,
(11 7/8 inches to 40 feet 8 1/4
White Balance Shift
inches) (W)/
Signal format:
Approx. 2.0 m to 5.9 m
For 1080/50i:
(6 feet 6 3/4 inches to 19 feet
PAL color, CCIR standards HDTV
4 3/8 inches) (T)
1080/50i, 1080/50p specification
For 1080/60i:
NTSC color, EIA standards HDTV
1080/60i, 1080/60p specification
GB
34

AC Adaptor AC-L200C/AC-
[Input and Output connectors]
L200D
HDMI connector: HDMI mini jack
Power requirements: AC 100 V to
DC IN connector
240 V, 50 Hz/60 Hz
Micro USB connector:
Power consumption: 18 W
USB communication
Output voltage: DC 8.4 V*
USB communication: Hi-Speed USB
Operating temperature: 0 °C to 40 °C
(USB 2.0)
(32°F to 104°F)
Storage temperature: –20 °C to +60 °C
[LCD screen]
GB
(–4 °F to +140 °F)
LCD panel: 7.5 cm (3.0 type) TFT
Dimensions:
drive
Approx. 48 mm × 29 mm × 81 mm
Total number of dots: 921 600 dots
(1 15/16 inches × 1 3/16 inches ×
3 1/4 inches) (W/H/D)
[Power, general]
Mass:
Power: Rechargeable battery pack
Approx. 150 g (5.3 oz) (excluding
NP-FH50, 6.8 V
the power cord (mains lead))
AC Adaptor AC-L200C/AC-
* See the label on the AC Adaptor for
L200D (supplied), 8.4 V
other specifications.
Power consumption:
1.3 W (during shooting with the
Rechargeable battery pack
LCD screen)
NP-FH50
1.2 W (during shooting with the
Used battery: Lithium-ion battery
viewfinder)
Maximum voltage: DC 8.4 V
Operating temperature: 0 °C to 40 °C
Nominal voltage: DC 6.8 V
(32 °F to 104 °F)
Maximum charge voltage: DC 8.4 V
Storage temperature: –20 °C to +60 °C
Maximum charge current: 1.7 A
(–4 °F to +140 °F)
Capacity:
Dimensions (CIPA compliant):
typical: 6.1 Wh (900 mAh)
121.6 mm × 86.6 mm × 93.3 mm
minimum: 5.9 Wh (870 mAh)
(4 7/8 inches × 3 1/2 inches ×
3 3/4 inches)
Design and specifications are subject to
(W/H/D)
change without notice.
Mass (CIPA compliant) (including NP-
FH50 battery pack, “Memory Stick
Duo” media):
Approx. 583 g (1 lb 4.6 oz)
Microphone: Stereo
Speaker: Monaural
Exif Print: Compatible
PRINT Image Matching III:
Compatible
GB
35

Trademarks
Additional information on this
• The following marks are trademarks
product and answers to frequently
of Sony Corporation.
asked questions can be found at
, “Cyber-shot,”
“Memory Stick PRO Duo,”
our Customer Support Website.
“Memory Stick PRO-HG Duo,”
“Memory Stick Duo”
• “AVCHD Progressive” and
“AVCHD Progressive” logotype are
Printed on 70% or more recycled paper
trademarks of Panasonic Corporation
using VOC (Volatile Organic
Compound)-free vegetable oil based
and Sony Corporation.
ink.
• Windows is registered trademark of
Microsoft Corporation in the United
States and/or other countries.
• Mac is registered trademark of Apple
Inc.
• SDXC logo is a trademark of SD-3C,
LLC.
• “ ” and “PlayStation” are
registered trademarks of Sony
Computer Entertainment Inc.
• In addition, system and product
names used in this manual are, in
general, trademarks or registered
trademarks of their respective
developers or manufacturers.
However, the ™ or ® marks are not
used in all cases in this manual.
• Add further enjoyment with your
PlayStation 3 by downloading the
application for PlayStation 3 from
PlayStation Store (where available.)
• The application for PlayStation 3
requires PlayStation Network
account and application download.
Accessible in areas where the
PlayStation Store is available.
GB
36

GB
GB
37

Русский
Получение дополнительных сведений о
фотоаппарате (“Руководство пользователя
Cyber-shot”)
“Руководство пользователя Cyber-shot” является
интерактивным руководством. Обращайтесь к нему
для получения подробных инструкций по многим
функциям фотоаппарата.
1 Перейдите на страницу поддержки Sony.
http://www.sony.net/SonyInfo/Support/
2 Выберите страну или регион.
3 Найдите наименование модели фотоаппарата на
странице поддержки.
• Проверьте наименование модели на нижней
стороне фотоаппарата.
Проверка прилагаемых предметов
Число в скобках указывает количество штук.
• Фотоаппарат (1)
• Адаптер переменного тока AC-L200C/AC-L200D (1)
• Шнур питания (1)
• Перезаряжаемый батарейный блок NP-FH50 (1)
• Кабель Micro USB (1)
• Плечевой ремень (1)
• Крышка объектива (1)/Ремень крышки объектива (1)
• Инструкция по эксплуатации (данное руководство) (1)
RU
2

ПРЕДУПРЕЖДЕНИЕ
Для уменьшения опасности возгорания или поражения
электрическим током не подвергайте аппарат воздействию
дождя или влаги.
ВАЖНЫЕ ИНСТРУКЦИИ ПО ТЕХНИКЕ
БЕЗОПАСНОСТИ
-СОХРАНИТЕ ЭТИ ИНСТРУКЦИИ
RU
ОПАСНОСТЬ
ДЛЯ УМЕНЬШЕНИЯ ОПАСНОСТИ
ВОЗГОРАНИЯ ИЛИ ПОРАЖЕНИЯ
ЭЛЕКТРИЧЕСКИМ ТОКОМ СТРОГО
СОБЛЮДАЙТЕ ЭТИ ИНСТРУКЦИИ
Если форма штепсельной вилки не соответствует сетевой розетке, используйте
для сетевой розетки переходник соответствующей конфигурации.
ПРЕДУПРЕЖДЕНИЕ
[ Батарейный блок
Неправильное обращение с батарейным блоком может стать причиной его
взрыва, возгорания, а также химических ожогов. Соблюдайте следующие
меры предосторожности.
• Не разбирайте блок.
• Не подвергайте батарейный блок каким бы то ни было механическим
воздействиям: ударам, падениям или попаданиям под тяжелые предметы.
• Во избежание короткого замыкания не допускайте контакта металлических
предметов с контактами батарейного блока.
• Не допускайте нагрева батарейного блока до температуры выше 60 °C:
избегайте воздействия на него прямых солнечных лучей, а также не
оставляйте в припаркованном на солнце автомобиле.
• Запрещается сжигать блок или бросать его в огонь.
• Не следует использовать поврежденные и протекшие литий-ионные батареи.
• Для зарядки батарейного блока используйте оригинальное зарядное
устройство Sony или другое совместимое зарядное устройство.
• Храните батарейный блок в недоступном для детей месте.
• Храните батарейный блок в сухом месте.
RU
3

• Замену следует выполнять только на батарейный блок того же или
аналогичного типа, рекомендованный Sony.
• Утилизация использованных батарейных блоков должна производиться
надлежащим образом в соответствии с инструкциями.
[ Адаптер переменного тока
Подсоедините адаптер переменного тока к ближайшей сетевой розетке.
Если при использовании адаптера переменного тока возникнут какие-либо
проблемы, немедленно отключите питание, вынув штепсельную вилку из
сетевой розетки.
Сетевой шнур (провод питания), если он прилагается, предназначен
специально для использования только с данным фотоаппаратом, и не должен
использоваться с другим электрическим оборудованием.
Только для модели DSC-HX200V
[ Дата изготовления изделия.
Вы можете узнать дату изготовления изделия, взглянув на обозначение “P/D:”,
которое находится на этикетке со штрих кодом картонной коробки.
Знаки, указанные на этикетке со штрих кодом картонной коробки.
P/D:XX XXXX
1 2
1. Месяц изготовления
2. Год изготовления
A-0, B-1, C-2, D-3, E-4, F-5, G-6,
H-7, I-8, J-9.
RU
4


