Sony DCR-TRV240E – страница 12
Инструкция к Видеокамере Sony DCR-TRV240E

Enlarging still images
Увеличение неподвижных изобра-
recorded on “Memory
жений, записанных на “Memory
Stick”s – Memory PB ZOOM
Stick” – Функция PB ZOOM памяти
–
DCR-TRV340E/TRV341E/TRV740E only
– Только модели DCR-TRV340E/
You can enlarge still images recorded on a
TRV341E/TRV740E
“Memory Stick.” You can select and view a
Вы можете увеличивать неподвижные
desired part from the enlarged still image. Also,
изображения, записанные на “Memory Stick”.
you can copy the desired part of the enlarged still
Вы может выбирать и просматривать нужную
image to tapes or “Memory Stick”s.
часть увеличенного неподвижного
изображения. Вы можете также копировать
Before operation
нужную часть увеличенного неподвижного
Insert a “Memory Stick” into your camcorder.
изображения на ленты или “Memory Stick”.
(1) Set the POWER switch to MEMORY or VCR.
Перед выполнением операции
Make sure that the LOCK switch is set to the
Установите “Memory Stick” в Вашу
left (unlock) position.
видеокамеру.
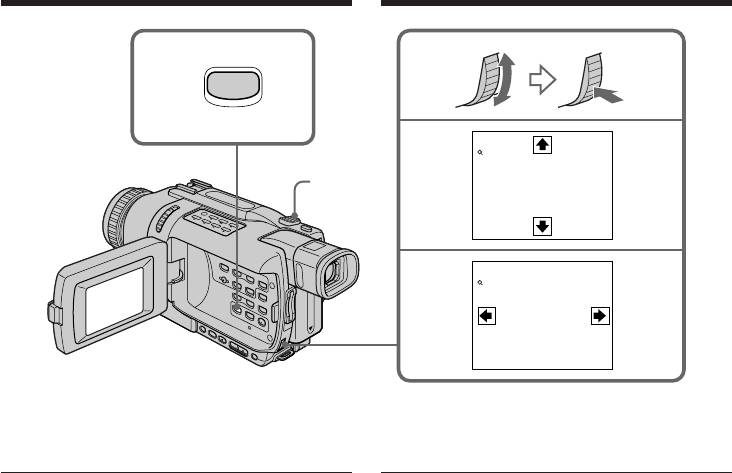
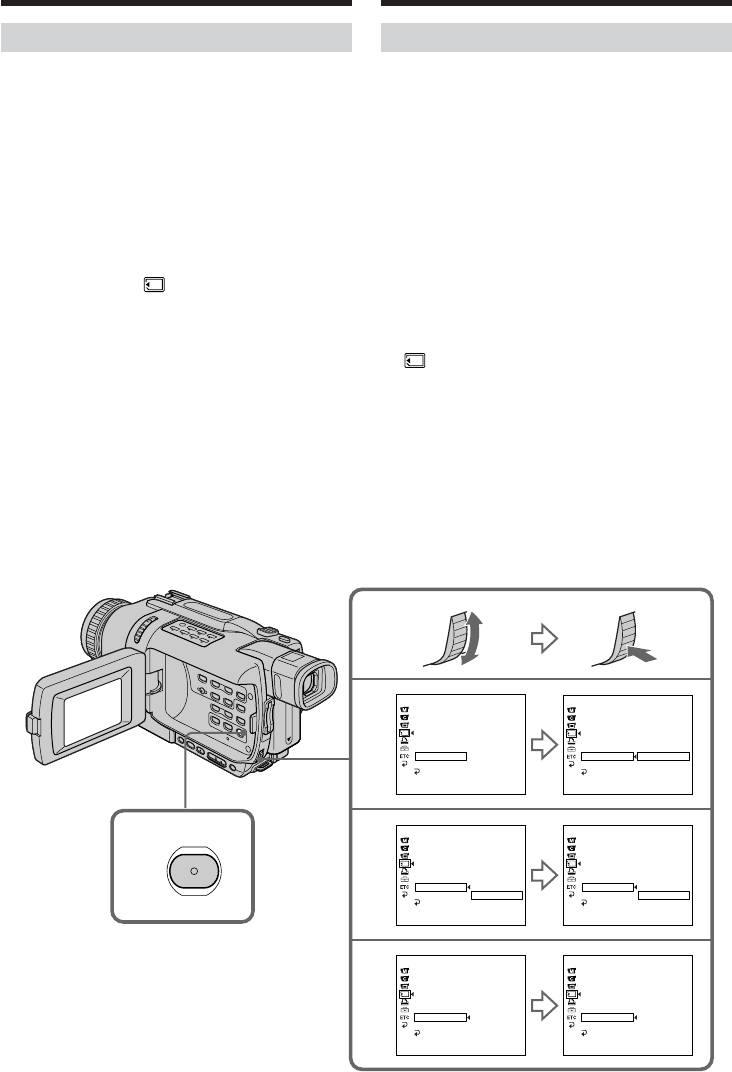
(2) Press PB ZOOM on your camcorder while
you are playing back images recorded on
(1) Установите переключатель POWER в
“Memory Stick.” The still image is enlarged,
положение MEMORY или VCR. Убедитесь,
and R r indicators showing the direction to
что фиксатор LOCK установлен в левом
move the image appear on the screen.
(незафиксированном) положении.
“Memory Stick” operations Операции с “Memory Stick”
(3) Turn SEL/PUSH EXEC dial to move the
(2) Во время воспроизведения изображений,
enlarged image, then press the dial.
записанных на “Memory Stick”, нажмите
R : The image moves downward.
кнопку PB ZOOM на Вашей видеокамере.
r : The image moves upward.
Неподвижное изображение увеличится, а
на экране появится индикация R r,
T t becomes available.
показывающая направление перемещения
(4) Turn SEL/PUSH EXEC dial to move the
изображения.
enlarged image, then press the dial.
(3) Поверните диск SEL/PUSH EXEC для
T : The image moves rightward. (Turn
перемещения увеличенного изображения,
the dial downward.)
а затем нажмите диск.
t : The image moves leftward. (Turn the
R : Изображение перемещается вниз.
dial upward.)
r : Изображение перемещается вверх.
(5) Adjust the zoom ratio by the power zoom
Опция T t становится доступной.
lever.
You can enlarge the image from 1.1 times up
(4) Поверните диск SEL/PUSH EXEC для
to five times its size.
перемещения увеличенного изображения,
W:Decreases the zoom ratio.
а затем нажмите диск.
T:Increase the zoom ratio.
T : Изображения перемещается
вправо. (Поверните диск вверх.)
t : Изображение перемещается влево.
(Поверните диск вниз.)
(5) Отрегулируйте масштаб увеличения с
помощью рычага приводного
вариообъектива.
Вы можете увеличить изображение от 1,1
раза до пятикратного его размера.
W:Уменьшает масштаб увеличения.
T:Увеличивает масштаб увеличения.
221
Enlarging still images recorded
Увеличение неподвижных
on “Memory Stick”s
изображений, записанных на “Memory
– Memory PB ZOOM
Stick” – Функция PB ZOOM памяти
2
PB ZOOM
PB ZOOM
× 5.0
3
5
[
EXEC
]
: T t
PB ZOOM
× 5.0
4
[
EXEC
]
: r R
To cancel memory PB ZOOM mode
Для отмены режима PB ZOOM памяти
Press PB ZOOM.
Нажмите кнопку PB ZOOM.
The PB ZOOM mode is cancelled when the
Режим PB ZOOM отменяется при нажатии
following buttons are pressed:
на следующие кнопки:
– MENU
– MENU
– MEMORY PLAY
– MEMORY PLAY
– MEMORY INDEX
– MEMORY INDEX
– MEMORY +/–
– MEMORY +/–
Moving pictures recorded on “Memory Stick”s
Движущиеся изображения, записанные на
The PB ZOOM mode does not work.
“Memory Stick”
Режим PB ZOOM не работает.
To record an image processed by PB ZOOM on
“Memory Stick”s
Для записи изображения, обработанного с
Press PHOTO to record the image processed by
помощью функции PB ZOOM, на “Memory
PB ZOOM.
Stick”
Нажмите кнопку PHOTO для записи
To record an image processed by PB ZOOM on
изображения, обработанного с помощью
tape
функции PB ZOOM.
Press REC to record the image processed by
Memory PB ZOOM.
Для записи изображения, обработанного с
помощью функции PB ZOOM на ленте
Нажмите кнопку REC для записи
изображения, обработанного с помощью
функции PB ZOOM памяти.
222
Playing back images
Воспроизведение изобра-
in a continuous loop
жений по замкнутому циклу
– SLIDE SHOW
– Функция SLIDE SHOW
–
DCR-TRV340E/TRV341E/TRV740E only
– Только модели DCR-TRV340E/
You can automatically play back images in
TRV341E/TRV740E
sequence. This function is useful especially when
Вы можете автоматически воспроизводить
checking recorded images or during a
изображения в последовательности. Эта
presentation.
функция является особенно полезной при
проверке записанных изображений или во
Before operation
время презентации.
Insert a “Memory Stick” into your camcorder.
Перед выполнением операции
(1) Set the POWER switch to MEMORY. Make
Установите “Memory Stick” в Вашу
sure that the LOCK switch is set to the left
видеокамеру.
(unlock) position.
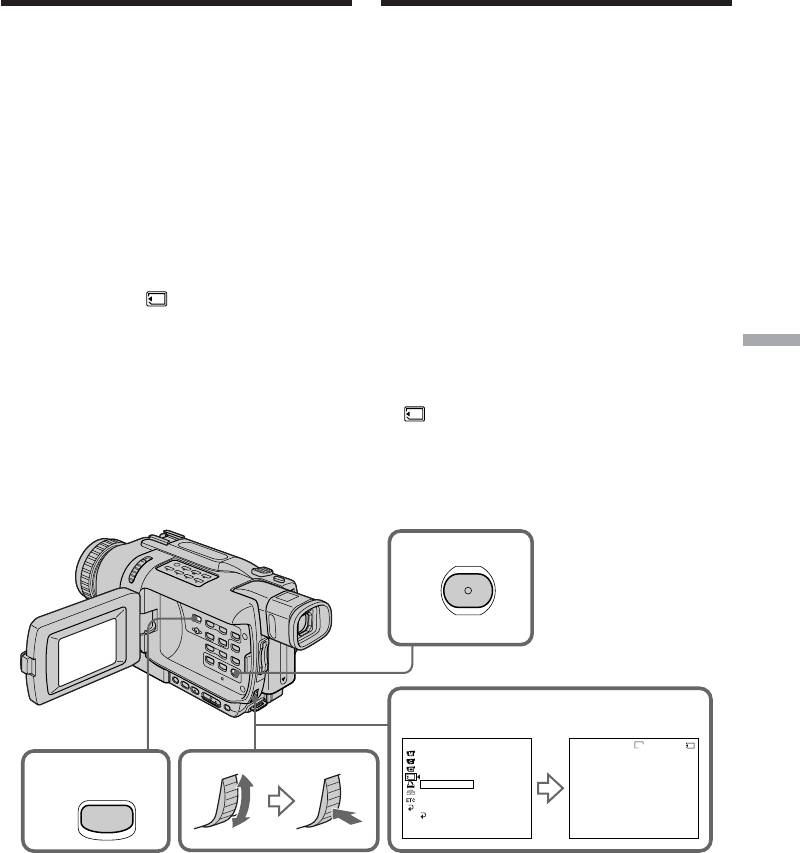
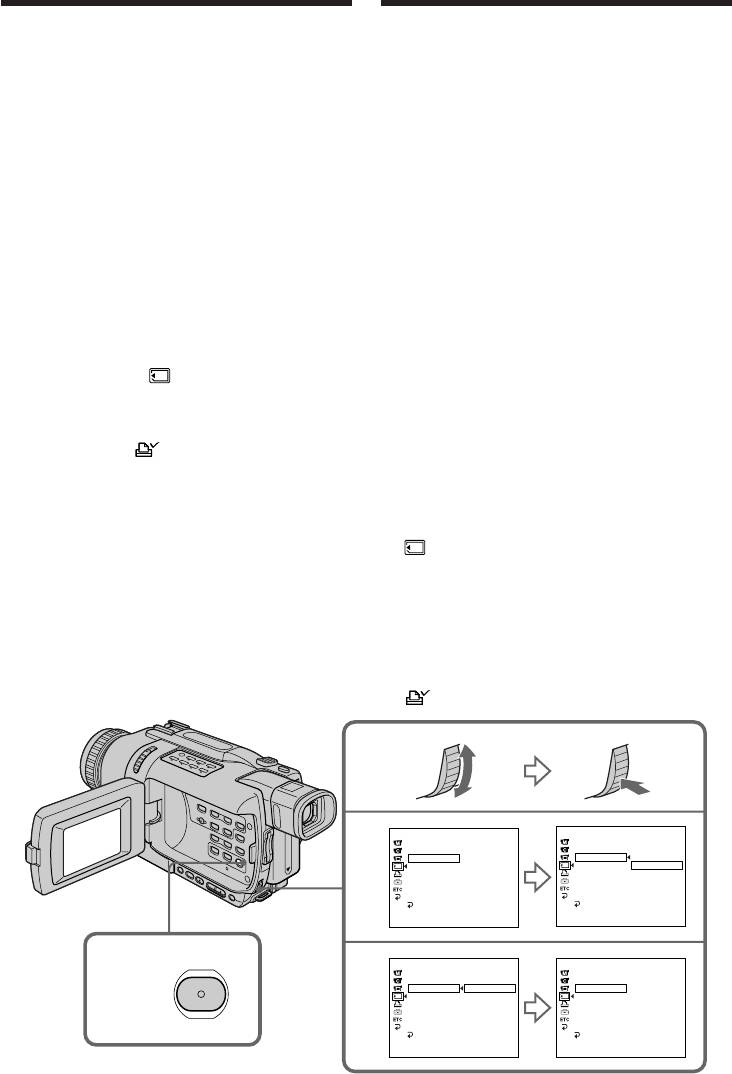
(2) Press MENU to display the menu settings.
(1) Установите переключатель POWER в
(3) Turn the SEL/PUSH EXEC dial to select
положение MEMORY. Убедитесь, что
SLIDE SHOW in
, then press the dial.
фиксатор LOCK установлен в левом
(4) Press MEMORY PLAY. Your camcorder plays
(незафиксированном) положении.
back the images recorded on the “Memory
(2) Нажмите кнопку MENU для отображения
Stick” in sequence.
установок меню.
“Memory Stick” operations Операции с “Memory Stick”
(3) Поверните диск SEL/PUSH EXEC для
выбора установки SLIDE SHOW в опции
, а затем нажмите диск.
(4) Нажмите кнопку MEMORY PLAY. Ваша
видеокамера воспроизведет изображения,
записанные на “Memory Stick”, в
последовательности.
2
MENU
3
MEMORY SET
SLIDE SHOW
640
21/40
STILL SET
100 – 0021
MOVIE SET
PRINT MARK
PROTECT
4
SLIDE SHOW
READY
PLAY
FILE NO.
DELETE ALL
FORMAT
RETURN
[
MENU
]
:
END
[
M PLAY
]
:
START
[
MENU
]
:
END
223

Воспроизведение изображений по
Playing back images in a
замкнутому циклу
continuous loop – SLIDE SHOW
– Функция SLIDE SHOW
To stop the slide show
Для остановки показа слайдов
Press MENU.
Нажмите кнопку MENU.
To pause during a slide show
Для паузы во время показа слайдов
Press MEMORY PLAY.
Нажмите кнопку MEMORY PLAY.
To start the slide show from a
Для начала показа слайдов с
particular image
определенного изображения
Select the desired image using MEMORY +/–
Выберите нужное изображение с помощью
buttons before step 2.
кнопок MEMORY +/– перед выполнением
действий пункта 2.
To view recorded images on TV
Before operation, connect your camcorder to a
Для просмотра записанных изображений
TV with the A/V connecting cable supplied with
на экране телевизора
your camcorder.
Перед началом операции подсоедините Вашу
видеокамеру к телевизору с помощью
If you change the “Memory Stick” during
соединительного кабеля аудио/видео,
operation
прилагаемого к Вашей видеокамере.
The slide show function does not operate. If you
change the “Memory Stick”, be sure to follow the
В случае замены “Memory Stick” во время
steps again from the beginning.
просмотра
Функция показа слайдов не будет работать.
В случае замены “Memory Stick” Вам следует
начать действия сначала.
224
Preventing accidental
Предотвращение
erasure
случайного стирания
– Image protection
– Защита изображения
–
DCR-TRV340E/TRV341E/TRV740E only
– Только модели DCR-TRV340E/
You can protect selected images, to prevent
TRV341E/TRV740E
accidental erasure of important images.
Для предотвращения случайного стирания
важных изображений Вы можете защитить
Before operation
выбранные изображения.
Insert a “Memory Stick” into your camcorder.
Перед выполнением операции
(1) Set the POWER switch to MEMORY or VCR.
Установите “Memory Stick” в Вашу
Make sure that the LOCK switch is set to the
видеокамеру.
left (unlock) position.
(2) Play back the image you want to protect.
(1) Установите переключатель POWER в
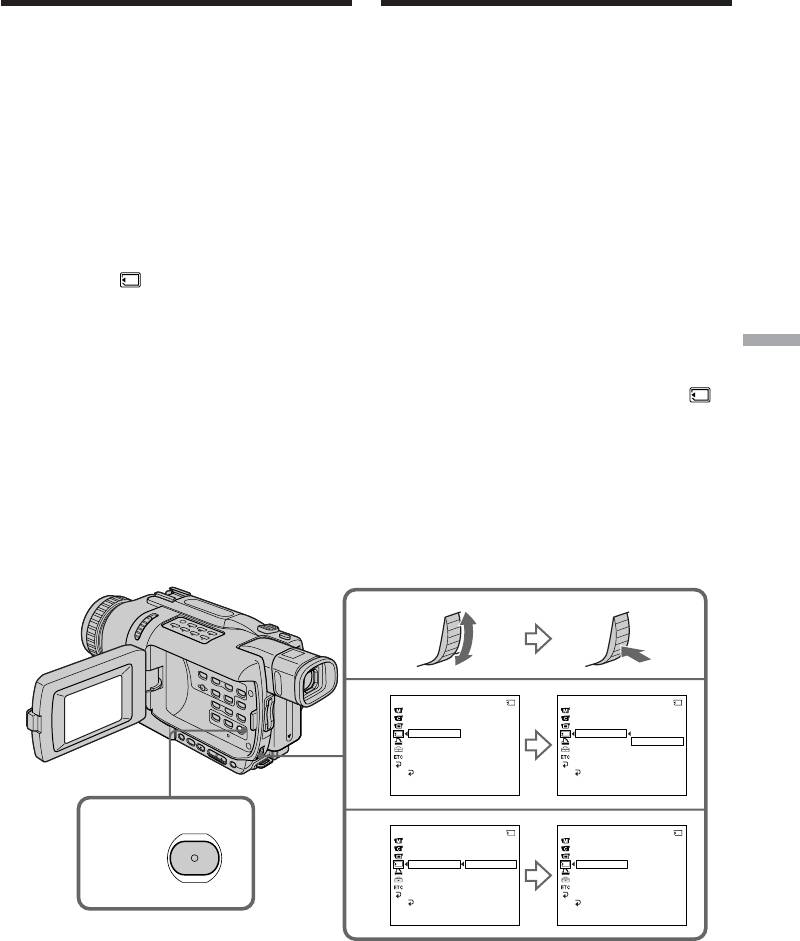
(3) Press MENU to display the menu settings.
положение MEMORY или VCR. Убедитесь,
(4) Turn the SEL/PUSH EXEC dial to select
что фиксатор LOCK установлен в левом
PROTECT in
, then press the dial.
(незафиксированном) положении.
(5) Turn the SEL/PUSH EXEC dial to select ON,
(2) Воспроизведите изображение, которое Вы
then press the dial.
хотите защитить.
(6) Press MENU to make the menu settings
(3) Нажмите кнопку MENU для отображения
disappear. The - mark is displayed beside
установок меню.
“Memory Stick” operations Операции с “Memory Stick”
the data file name of the protected image.
(4) Поверните диск SEL/PUSH EXEC для
выбора установки PROTECT в опции
, а
затем нажмите диск.
(5) Поверните диск SEL/PUSH EXEC для
выбора установки ON, а затем нажмите
диск.
(6) Нажмите кнопку MENU для того, чтобы
исчезла индикация меню. На дисплее
появится знак “-” рядом с названием
файла данных защищенного изображения.
MEMORY SET
21/40
MEMORY SET
21/40
STILL SET
STILL SET
4
MOVIE SET
MOVIE SET
PRINT MARK
PRINT MARK
PROTECT
OFF
PROTECT
ON
SLIDE SHOW
SLIDE SHOW
OFF
FILE NO.
FILE NO.
DELETE ALL
DELETE ALL
FORMAT
FORMAT
RETURN
RETURN
[
MENU
]
:
END
[
MENU
]
:
END
3,6
MEMORY SET
21/40
MEMORY SET
21/40
STILL SET
STILL SET
5
MOVIE SET
MOVIE SET
PRINT MARK
PRINT MARK
PROTECT
ON
PROTECT
ON
SLIDE SHOW
OFF
SLIDE SHOW
FILE NO.
FILE NO.
DELETE ALL
DELETE ALL
MENU
FORMAT
FORMAT
RETURN
RETURN
[
MENU
]
:
END
[
MENU
]
:
END
225

Preventing accidental erasure
Предотвращение случайного
– Image protection
стирания – Защита изображения
To cancel image protection
Для отмены защиты изображения
Select OFF in step 5, then press the SEL/PUSH
Выберите установку OFF при выполнении
EXEC dial.
действий пункта 5, а затем нажмите диск
SEL/PUSH EXEC.
Note
Formatting erases all information on the
Примечание
“Memory Stick”, including the protected image
Форматирование стирает всю информацию
data. Before formatting a “Memory Stick”, check
на “Memory Stick”, включая данные
its contents.
защищенного изображения. Проверьте
содержание “Memory Stick” перед
If the write-protect tab on the “Memory Stick”
форматированием.
is set to LOCK
You cannot protect images.
Если лепесток защиты записи на “Memory
Stick” установлен в положение LOCK
Вы не сможете выполнить защиту
изображения.
226
Deleting images
Удаление изображений
– DELETE
– Функция DELETE
–
DCR-TRV340E/TRV341E/TRV740E only
– Только модели DCR-TRV340E/
You can delete images stored in a “Memory
TRV341E/TRV740E
Stick.” You can delete all images or only selected
Вы можете удалить изображения,
images.
сохраненные на “Memory Stick”. Вы можете
удалить все изображения или только
выбранные изображения.
Deleting selected images
Удаление выбранных
изображений
Before operation
Insert a “Memory Stick” into your camcorder.
Перед выполнением операции
Установите “Memory Stick” в Вашу
(1) Set the POWER switch to MEMORY or VCR.
видеокамеру.
Make sure that the LOCK switch is set to the
left (unlock) position.
(1) Установите переключатель POWER в
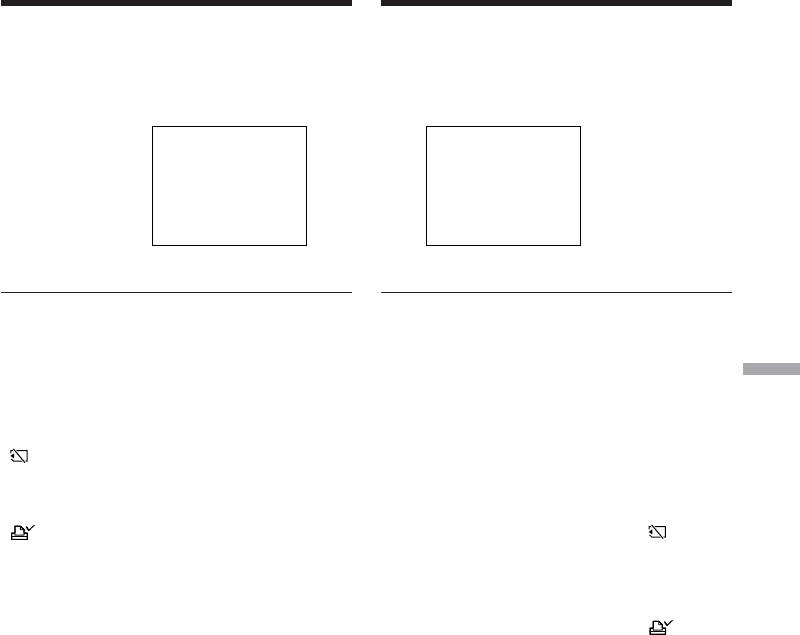
(2) Play back the image you want to delete.
положение MEMORY или VCR. Убедитесь,
(3) Press MEMORY DELETE. “DELETE?”
что фиксатор LOCK установлен в левом
appears on the screen.
(незафиксированном) положении.
(4) Press MEMORY DELETE again. The selected
(2) Воспроизведите изображение, которое Вы
“Memory Stick” operations Операции с “Memory Stick”
image is deleted.
хотите удалить.
(3) Нажмите кнопку MEMORY DELETE. На
экране появится индикация “DELETE?”
(4) Нажмите кнопку MEMORY DELETE еще
раз. Выбранное изображение будет
удалено.
DELETE
640
21/40
100–0021
3
DELETE
DELETE?
[
DELETE
]
:
DEL
[
–
]
:
CANCEL
To cancel deleting an image
Для отмены удаления изображения
Press MEMORY – in step 4.
Нажмите кнопку MEMORY – при выполнении
действий пункта 4.
To delete an image displayed on the
Для удаления изображения,
index screen
отображаемого на индексном экране
Press MEMORY +/– to move the B indicator to
Нажмите кнопку MEMORY +/– для
the image and follow steps 3 and 4.
перемещения индикатора B к изображению и
следуйте действиям пунктов 3 и 4.
Notes
•You cannot delete a protected image. To delete
Примечания
a protected image, first cancel image protection.
• Вы не сможете удалить защищенное
•Once you delete an image, you cannot restore
изображение. Для удаления защищенного
it. Before deleting an image, carefully check the
изображения, сначала отмените защиту
image.
изображения.
• После удаления изображения Вы не сможе-
If the write-protect tab on the “Memory Stick”
те восстановить его. Проверьте изображе-
is set to LOCK
ния внимательно, прежде чем удалить их.
You cannot delete images.
Если лепесток защиты записи на “Memory
Stick” установлен в положение LOCK
Вы не можете удалить изображения.
227
Удаление изображений
Deleting images – DELETE
– Функция DELETE
Deleting all images
Удаление всех изображений
You can delete all unprotected images in the
Вы можете удалить все незащищенные
“Memory Stick.”
изображения на “Memory Stick”.
Before operation
Перед выполнением операции
Insert a “Memory Stick” into your camcorder.
Установите “Memory Stick” в Вашу
видеокамеру.
(1) Set the POWER switch to MEMORY. Make
sure that the LOCK switch is set to the left
(1) Установите переключатель POWER в
(unlock) position.
положение MEMORY. Убедитесь, что
(2) Press MENU to display the menu settings.
фиксатор LOCK установлен в левом
(3) Turn the SEL/PUSH EXEC dial to select
(незафиксированном) положении.
DELETE ALL in
, then press the dial.
(2) Нажмите кнопку MENU для отображения
(4) Turn the SEL/PUSH EXEC dial to select OK,
установок меню.
then press the dial. OK changes to EXECUTE.
(3) Поверните диск SEL/PUSH EXEC для
(5) Turn the SEL/PUSH EXEC dial to select
выбора установки DELETE ALL в опции
EXECUTE, then press the dial. DELETING
, а затем нажмите диск.
appears on the screen. When all unprotected
(4) Поверните диск SEL/PUSH EXEC для
images are deleted, COMPLETE is displayed.
выбора установки OK, а затем нажмите
диск. Индикация OK изменится на
индикацию EXECUTE.
(5) Поверните диск SEL/PUSH EXEC для
выбора установки EXECUTE, а затем
нажмите диск. На экране появится
индикация DELETING. Когда все
незащищенные изображения будут
удалены, на дисплее появится индикация
COMPLETE.
MEMORY SET
MEMORY SET
STILL SET
STILL SET
3
MOVIE SET
MOVIE SET
PRINT MARK
PRINT MARK
PROTECT
PROTECT
SLIDE SHOW
SLIDE SHOW
FILE NO.
FILE NO.
DELETE ALL
READY
DELETE ALL
RETURN
FORMAT
FORMAT
OK
RETURN
RETURN
[
MENU
]
:
END
[
MENU
]
:
END
MEMORY SET
MEMORY SET
STILL SET
STILL SET
2
4
MOVIE SET
MOVIE SET
PRINT MARK
PRINT MARK
PROTECT
PROTECT
SLIDE SHOW
SLIDE SHOW
FILE NO.
FILE NO.
DELETE ALL
RETURN
DELETE ALL
RETURN
FORMAT
OK
FORMAT
EXECUTE
RETURN
RETURN
MENU
[
MENU
]
:
END
[
MENU
]
:
END
MEMORY SET
MEMORY SET
STILL SET
STILL SET
5
MOVIE SET
MOVIE SET
PRINT MARK
PRINT MARK
PROTECT
PROTECT
SLIDE SHOW
SLIDE SHOW
FILE NO.
FILE NO.
DELETE ALL
DELETING
DELETE ALL
COMPLETE
FORMAT
FORMAT
RETURN
RETURN
[
MENU
]
:
END
[
MENU
]
:
END
228

Удаление изображений
Deleting images – DELETE
– Функция DELETE
To cancel deleting all the images in
Для отмены удаления всех
the “Memory Stick”
изображений на “Memory Stick”
Select RETURN in step 4, then press the SEL/
Выберите установку RETURN при
PUSH EXEC.
выполнении действий пункта 4, а затем
нажмите диск SEL/PUSH EXEC.
While DELETING appears
Do not turn the POWER switch or press any
Во время отображения индикации
buttons.
DELETING
Не изменяйте положение переключателя
If the write-protect tab on the “Memory Stick”
POWER и не нажимайте каких-либо кнопок.
is set to LOCK
You cannot delete images.
Если лепесток защиты записи на “Memory
Stick” установлен в положение LOCK
Вы не можете удалить изображения.
“Memory Stick” operations Операции с “Memory Stick”
229
Writing a print mark
Запись знака печати
– PRINT MARK
– Функция PRINT MARK
–
DCR-TRV340E/TRV341E/TRV740E only
– Только модели DCR-TRV340E/
You can specify a recorded still image to print
TRV341E/TRV740E
out by writing a print mark. This function is
Вы можете указать записанные неподвижные
useful for printing out still images later.
изображения для распечатки, помечая их
Your camcorder conforms to the DPOF (Digital
знаками печати. Эта функция является
Print Order Format) standard for specifying still
полезной для распечатки неподвижных
images to print out.
изображений позднее.
Ваша видеокамера соответствует стандарту
Before operation
DPOF (цифровой формат порядка печати)
Insert a “Memory Stick” into your camcorder.
для указания неподвижных изображений для
распечатки.
(1) Set the POWER switch to MEMORY or VCR.
Make sure that the LOCK switch is set to the
Перед выполнением операции
left (unlock) position.
Установите “Memory Stick” в Вашу
(2) Play back the still image you want to write a
видеокамеру.
print mark on.
(3) Press MENU to display the menu settings.
(1) Установите переключатель POWER в
(4) Turn the SEL/PUSH EXEC dial to select
положение MEMORY или VCR. Убедитесь,
PRINT MARK in , then press the dial.
что фиксатор LOCK установлен в левом
(5) Turn the SEL/PUSH EXEC dial to select ON,
(незафиксированном) положении.
then press the dial.
(2) Воспроизведите неподвижное
(6) Press MENU to make the menu settings
изображение, на котором Вы хотите
disappear. The
mark is displayed beside
записать знак печати.
the data file name of the image with a print
(3) Нажмите кнопку MENU для отображения
mark.
установок меню.
(4) Поверните диск SEL/PUSH EXEC для
выбора установки PRINT MARK в опции
, а затем нажмите диск.
(5) Поверните диск SEL/PUSH EXEC для
выбора установки ON, а затем нажмите
диск.
(6) Нажмите кнопку MENU для того, чтобы
исчезла индикация меню. Рядом с
названием файла данных изображения со
знаком печати будет отображаться знак
.
MEMORY SET
MEMORY SET
STILL SET
STILL SET
4
MOVIE SET
MOVIE SET
PRINT MARK
OFF
PRINT MARK
ON
PROTECT
PROTECT
OFF
SLIDE SHOW
SLIDE SHOW
FILE NO.
FILE NO.
DELETE ALL
DELETE ALL
FORMAT
FORMAT
RETURN
RETURN
[
MENU
]
:
END
[
MENU
]
:
END
3,6
MEMORY SET
MEMORY SET
STILL SET
STILL SET
5
MOVIE SET
MOVIE SET
PRINT MARK
ON
PRINT MARK
ON
PROTECT
OFF
PROTECT
SLIDE SHOW
SLIDE SHOW
FILE NO.
FILE NO.
DELETE ALL
DELETE ALL
MENU
FORMAT
FORMAT
RETURN
RETURN
[
MENU
]
:
END
[
MENU
]
:
END
230

Writing a print mark
Запись знака печати
– PRINT MARK
– Функция PRINT MARK
To cancel writing of print marks
Для отмены записи знаков печати
Select OFF in step 5, then press the SEL/PUSH
Выберите установку OFF при выполнении
EXEC dial.
действий пункта 5, а затем нажмите диск
SEL/PUSH EXEC.
If the write-protect tab on the “Memory Stick”
is set to LOCK
Если лепесток защиты записи на “Memory
You cannot write print marks on still images.
Stick” установлен в положение LOCK
Вы не можете записать знаки печати на
Moving pictures
неподвижные изображения.
You cannot write print marks on moving
pictures.
Движущиеся изображения
Вы не можете записать знаки печати на
While the file name is flashing
движущиеся изображения.
You cannot write the print mark on the still
image.
Если имя файла мигает
Вы не можете записать знак печати на
неподвижное изображение.
“Memory Stick” operations Операции с “Memory Stick”
231

Using the optional
Использование допол-
printer
нительного принтера
–
DCR-TRV340E/TRV341E/TRV740E only
– Только модели DCR-TRV340E/
You can use the printer (optional) on your
TRV341E/TRV740E
camcorder to print images on print paper.
Вы можете использовать принтер
For details, refer to the operating instructions of
(приобретается отдельно) с Вашей
the printer.
видеокамерой для печати изображений на
There are various ways of printing still images.
бумаге для отпечатков. Более подробные
The following, however, describes how to print
сведения приведены в инструкции по
by selecting
in the menu settings on your
эксплуатации принтера.
camcorder. (p. 137)
Существуют различные способы печати
неподвижных изображений. Следующий
Before operation
способ, тем не менее, описывает, как
•Insert a recorded “Memory Stick” into your
выполнить печать путем выбора опции
из
camcorder.
установок меню Вашей видеокамеры.
•Attach the optional printer to your camcorder.
(стр. 137)
Перед выполнением операции
• Установите записанную “Memory Stick” в
Вашу видеокамеру.
• Подсоедините дополнительный принтер к
Вашей видеокамере.
Printer/
9PIC PRINT DATE/TIME
PRINT SET
PRINT SET
DATE
9PIC PRINT
RETURN
9PIC PRINT
DATE/TIME
SAME
DATE/TIME
OFF
RETURN
MULTI
RETURN
DATE
MARKED
DAY&TIME
[
MENU
]
:
END
[
MENU
]
:
END
MENU
You can print nine still images on the 9-split print
Вы можете напечатать девять неподвижных
paper. Select the desired mode in the menu
изображений на разделенном на 9 частей
settings.
листе бумаги для отпечатков. Выберите
нужный режим в установках меню.
MULTI PICS or MARKED PICS*/
SAME PICS
Режимы MULTI PICS или MARKED PICS*
* Nine still images with print marks are printed
* Девять неподвижных изображений со
together.
знаками печати печатаются вместе.
232
Использование дополнительного
Using the optional printer
принтера
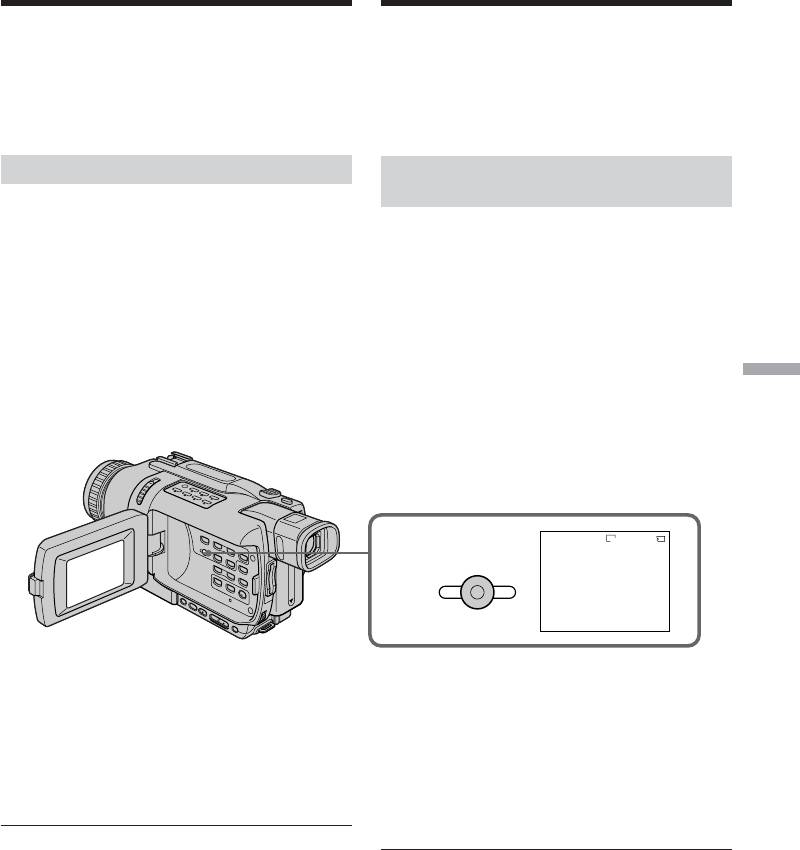
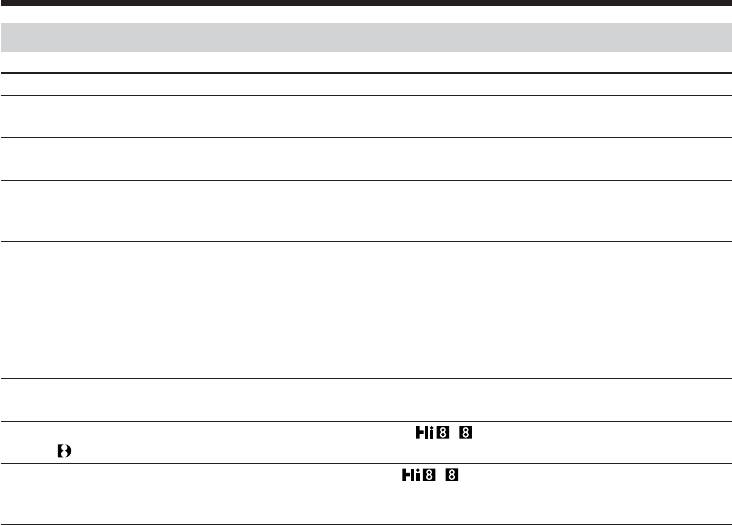
You can make prints with the recording date
Вы можете делать отпечатки с датой записи
and/or recording time. Select the desired mode
и/или временем записи. Выберите нужный
in the menu settings.
режим в установках меню.
DATE DAY & TIME
4 7 2002
Images recorded in the multi screen mode
Изображения, записанные в
You cannot print images recorded in the multi
многоэкранном режиме
screen mode on sticker type print paper.
Вы не сможете напечатать изображения,
записанные в многоэкранном режиме, на
Moving pictures recorded on “Memory Stick”
бумаге для отпечатков типа наклеек.
“Memory Stick” operations Операции с “Memory Stick”
You cannot print moving pictures.
Движущиеся изображения, записанные на
When “Memory Stick” has no files
“Memory Stick”
“
NO STILL IMAGE FILE” appears on the
Вы не сможете напечатать движущиеся
screen.
изображения.
When there are no files with a PRINT MARK
Когда “Memory Stick” не содержит файлов
“
NO PRINT MARK” appears on the screen.
На экране появляется индикация “
NO
STILL IMAGE FILE”.
Images processed by 9PIC PRINT
You cannot insert a DATE/TIME indicator.
Когда нет файлов, помеченных знаком
печати PRINT MARK
На экране появляется индикация “
NO
PRINT MARK”.
Изображения, обработанные с помощью
команды 9PIC PRINT
Вы не можете вставить индикацию DATE/
TIME.
233
4 12:00

— Troubleshooting —
English
Types of trouble and how to correct trouble
If you run into any problem using your camcorder, use the following table to troubleshoot the
problem. If the problem persists, disconnect the power source and contact your Sony dealer or local
authorized Sony service facility. If “C:ss:ss” appears on the screen or the display window, the self-
diagnosis display function has worked. See page 241.
In the recording mode
Symptom Cause and/or Corrective Actions
START/STOP does not operate.
• The POWER switch is not set to CAMERA.
c Set it to CAMERA (p. 29).
• The tape has run out.
c Rewind the cassette or insert a new one (p. 27, 44).
• The write-protect tab is set to expose the red mark.
c Use a new tape or slide the tab (p. 27, 28).
• The tape is stuck to the drum (moisture condensation).
c Remove the cassette and leave your camcorder for at least
one hour to acclimatize (p. 262).
The power goes off.
• While being operated in CAMERA mode, your camcorder has
been in the standby mode for more than three minutes.
c Set the POWER switch to OFF (CHG) and then to CAMERA
again (p. 29).
• The battery pack is dead or nearly dead.
c Install a charged battery pack (p. 18, 19).
The image on the viewfinder screen
• The viewfinder lens is not adjusted.
is not clear.
c Adjust the viewfinder lens (p. 34).
The SteadyShot function does not
• STEADYSHOT is set to OFF in the menu settings.
work.
c Set it to ON (p. 137).
The autofocusing function does not
• The setting is the manual focus mode.
work.
c Set FOCUS to the autofocus mode (p. 70).
• Shooting conditions are not suitable for autofocus.
c Adjust for manual focusing (p. 70).
The picture does not appear in the
• The LCD panel is open.
viewfinder.
c Close the LCD panel (p. 31).
A vertical band appears when you
• The contrast between the subject and background is too high.
shoot a subject such as lights or a
This is not a malfunction.
candle flame against a dark
background.
A vertical band appears when you
• This is not a malfunction.
shoot a very bright subject.
Some tiny white, red, blue or green
• Slow shutter, Super NightShot or Colour Slow Shutter mode is
spots appear on the screen.
activated. This is not a malfunction.
You cannot record still images on
• PHOTO REC is set to MEMORY in the menu settings.
tapes
c Set it to TAPE (p. 137) (DCR-TRV340E/TRV341E/TRV740E
only)
234

Types of trouble and how to correct trouble
Symptom Cause and/or Corrective Actions
An unknown picture is displayed on
• If 10 minutes elapse after you set the POWER switch to
the screen.
CAMERA or DEMO MODE is set to ON in the menu settings
without a cassette inserted, your camcorder automatically
starts the demonstration.
c Insert a cassette and the demonstration stops.
You can also cancel DEMO MODE (p. 137).
The picture is recorded in incorrect or
• NIGHTSHOT is set to ON.
unnatural colours.
c Set it to OFF (p. 38).
Picture appears too bright, and the
• NIGHTSHOT is set to ON in a bright place.
subject does not appear on the
c Set it to OFF (p. 38).
screen.
• The backlight function is active.
c Set it off (p. 37).
The shutter does not sound.
• BEEP is set to OFF in the menu settings.
c Set it to MELODY or NORMAL (p. 137).
A horizontal black band appears
• Set STEADYSHOT to OFF in the menu setting (p. 137).
when shooting a TV screen or a
computer screen.
An external flash (optional) does not
• The power of the external flash is off or the power source does
work.
not installed.
Troubleshooting Поиск и устранение неисправностей
c Turn on the external flash or install the power source.
• Two or more external flashes are attached.
c Only one external flash can be attached.
• AUTO is selected in FLASH MODE in the menu settings while
recording in a bright place.
c Set it to ON (p. 137).
(continued on the following page)
235
Types of trouble and how to correct trouble
In the playback mode
Symptom Cause and/or Corrective Actions
The tape does not move when a
• The POWER switch is not set to VCR.
video control button is pressed.
c Set it to VCR (p. 44).
The playback button does not work.
• The cassette has run out of tape.
c Rewind the tape (p. 44).
There are horizontal lines on the
• The video heads may be dirty.
picture, or the playback picture is not
c Clean the heads using the Sony V8-25CLD cleaning cassette
clear or does not appear.
(optional) (p. 263).
No sound or only a low sound is
• The stereo tape is played back with HiFi SOUND set to 2 in the
heard when playing back a tape.
menu settings.
c Set it to STEREO (p. 137).
• The volume is turned to minimum.
c Press VOLUME + (p. 44).
• AUDIO MIX is set to the ST2 side in the menu settings.
c Adjust AUDIO MIX (p. 137).
The date search does not work
• The tape has a blank portion between recorded portion
correctly.
(p. 90).
The picture which is recorded in the
• PB MODE is set to / in the menu settings.
Digital8
system is not played back.
c Set it to AUTO (p. 137).
The tape which is recorded in the Hi8
• Set PB MODE to / in the menu settings (p. 137).
/standard 8 system is not played
back correctly.
236

Types of trouble and how to correct trouble
In the recording and playback modes
Symptom Cause and/or Corrective Actions
The power does not turn on.
• The battery pack is not installed, or is dead or nearly dead.
c Install a charged battery pack (p. 18, 19).
• The AC power adaptor is not connected to a wall socket.
c Connect the AC power adaptor to a wall socket (p. 24).
The end search function does not
• The tape was ejected after recording.
work.
• You have not recorded on the new cassette yet.
The end search function does not
• The tape has a blank portion at the beginning or midway.
work correctly.
The battery pack is quickly
• The operating temperature is too low.
discharged.
• The battery pack is not charged enough.
c Charge the battery pack fully again (p. 19).
• The battery pack is completely dead, and cannot be recharged.
c Replace with a new battery pack (p. 18).
The remaining battery time indicator
• You have used the battery pack in an extremely hot or cold
does not indicate the correct time.
environment for a long time.
• The battery pack is completely dead, and cannot be recharged.
c Replace with a new battery pack (p. 18).
Troubleshooting Поиск и устранение неисправностей
• The battery is dead.
c Use a fully charged battery pack (p. 18, 19).
•A deviation has occurred in the remaining battery time.
c Charge the battery pack fully so that the remaining battery
time indicator indicates correct time (p. 19).
The power goes off although the
•A deviation has occurred in the remaining battery time.
remaining battery time indicator
c Charge the battery pack fully so that the remaining battery
indicates that the battery pack has
time indicator indicates correct time (p. 19).
enough power to operate.
The cassette cannot be removed from
• The power source is disconnected.
the holder.
c Connect it firmly (p. 18, 24).
• The battery is dead.
c Use a charged battery pack (p. 18, 19).
The % and Z indicators flash and no
• Moisture condensation has occurred.
functions except for cassette ejection
c Remove the cassette and leave your camcorder for at least
work.
one hour to acclimatize (p. 262).
(continued on the following page)
237

Types of trouble and how to correct trouble
When operating using the “Memory Stick”
– DCR-TRV340E/TRV341E/TRV740E only
Symptom Cause and/or Corrective Actions
The “Memory Stick” does not
• The POWER switch is not set to MEMORY.
function.
c Set it to MEMORY (p. 169).
• The “Memory Stick” is not inserted.
c Insert a “Memory Stick” (p. 162).
Recording does not function.
• The “Memory Stick” is full.
c Delete unnecessary images and record again (p. 227).
• The “Memory Stick” formatted incorrectly is inserted.
c Format the “Memory Stick” on your camcorder or use
another “Memory Stick” (p. 144, 162).
• The write-protect tab on the “Memory Stick” is set to LOCK.
c Release the lock (p. 159).
The image cannot be deleted.
• The image is protected.
c Cancel image protection (p. 225).
• The write-protect tab on the “Memory Stick” is set to LOCK.
c Release the lock (p. 159).
You cannot format the “Memory
• The write-protect tab on the “Memory Stick” is set to LOCK.
Stick”.
c Release the lock (p. 159).
Deleting all the images cannot be
• The write-protect tab on the “Memory Stick” is set to LOCK.
carried out.
c Release the lock (p. 159).
You cannot protect the image.
• The write-protect tab on the “Memory Stick” is set to LOCK.
c Release the lock (p. 159).
• The image to protect is not played back.
c Press MEMORY PLAY to play back the image (p. 201).
You cannot write a print mark on the
• The write-protect tab on the “Memory Stick” is set to LOCK.
still image.
c Release the lock (p. 159).
• The image to write a print mark to is not played back.
c Press MEMORY PLAY to play back the image (p. 201).
• You are trying to write a print mark on a moving picture.
c Print marks cannot be written on a moving picture.
The photo save function does not
• The write-protect tab on the “Memory Stick” is set to LOCK.
work.
c Release the lock (p. 159).
You cannot record still images on
• PHOTO REC is set to TAPE in the menu settings.
“Memory Stick”s while in the
c Set it to MEMORY (p. 137)
standby mode or while moving
pictures are being recorded to tape
238

Types of trouble and how to correct trouble
Others
Symptom Cause and/or Corrective Actions
Digital program editing to a tape
• The input selector on the VCR is not set correctly.
does not function.
c Check the connection and set the input selector on the VCR
again (p. 99)
• Your camcorder is connected to DV equipment of other than
Sony using the i.LINK cable (DV connecting cable).
c Set it to IR (p. 100).
• You have attempted to set a programme on a blank portion of
the tape.
c Set the programme again on a recorded portion (p. 110).
• Your camcorder and the VCR are not synchronized.
c Adjust the synchronization (p. 108).
• The IR SETUP code is incorrect.
c Set the correct code (p. 102).
• PB MODE is set to
/ in the menu settings.
c Set it to AUTO. (p. 137)
Digital program editing to a
• Setting programme on a blank portion of the tape is attempted.
“Memory Stick” does not function
c Set the programme again on a recorded portion (p. 196).
Troubleshooting Поиск и устранение неисправностей
(DCR-TRV340E/TRV341E/TRV740E
only).
The Remote Commander supplied
• COMMANDER is set to OFF in the menu settings.
with your camcorder does not work.
c Set it to ON (p. 137).
• Something is blocking the infrared rays.
c Remove the obstacle.
• The batteries are inserted with + and – incorrectly matching +
and – inside the battery compartment.
c Insert the batteries correctly (p. 281).
• The batteries are dead.
c Insert new ones (p. 281).
The picture from a TV or VCR does
• DISPLAY is set to V-OUT/LCD in the menu settings.
not appear on the screen even when
c Set it to LCD (p. 137).
your camcorder is connected to
outputs on the TV or VCR.
The melody or beep sounds for five
• Moisture condensation has occurred.
seconds.
c Remove the cassette and leave your camcorder for at least
one hour to acclimatize (p. 262).
• Some trouble have occurred in your camcorder.
c Remove the cassette and insert it again, then operate your
camcorder.
You cannot charge the battery pack.
• The POWER switch is not set to OFF (CHG).
c Set it to OFF (CHG).
While charging the battery pack, the
• Charging is completed.
backlight of the display window
• The AC power adaptor is disconnected.
does not light.
c Connect it firmly (p. 19).
• Something is wrong with the battery pack.
c Contact your Sony dealer or local authorized Sony service
facility.
(continued on the following page)
239

Types of trouble and how to correct trouble
Others
Symptom Cause and/or Corrective Actions
While charging the battery pack, the
• The battery pack is not properly installed.
remaining battery time indicator
c Install it properly.
flashes.
• Something is wrong with the battery pack.
c Contact your Sony dealer or local authorized Sony service
facility.
No function works though the power
• Disconnect the power cord of the AC power adaptor or remove
is on.
the battery, then reconnect it in about one minute. Turn the
power on. If the functions still do not work, open the LCD
panel and press the RESET button under TITLE button using a
sharp-pointed object (If you press the RESET button, all the
settings including the date and time return to their defaults.)
(p. 275).
Image data cannot be transferred by
• The USB cable was connected before installation of the USB
the USB connection.
driver was completed.
c Uninstall the incorrect USB driver and re-install the USB
driver (p. 128, 210).
240

