Sony DCR-TRV310E – страница 5
Инструкция к Видеокамере Sony DCR-TRV310E
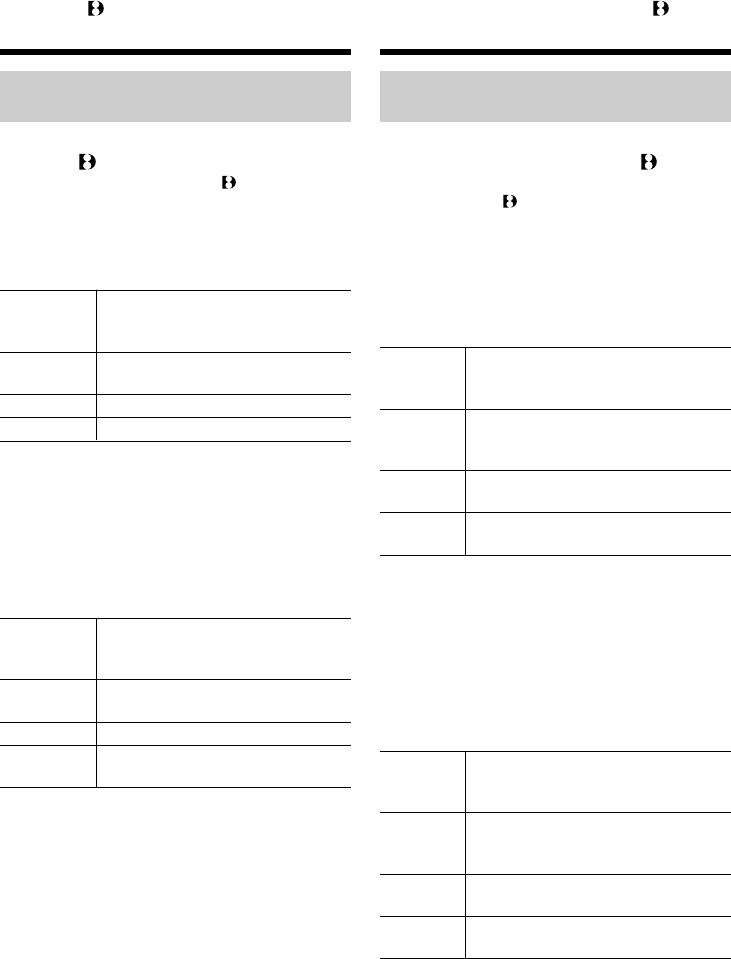
Changing the MENU settings
POWER
Icon/item
Mode
Meaning
switch
HiFi SOUND
r STEREO
To play back a stereo tape or dual sound track tape
VTR
with main and sub sound
1
To play back dual sound track tape with main
sound
2
To play back a dual sound track tape with sub
sound
AUDIO MIX
To adjust the balance between the stereo 1 and
VTR
stereo 2
ST1 ST2
NTSC PB
r ON PAL TV
To playback a tape recorded in the NTSC colour
VTR
system on a PAL system TV
NTSC 4.43
To playback a tape recorded in the NTSC colour
Customizing Your Camcorder Выполнение индивидуальных установок на видеокамере
system on a TV with the NTSC 4.43 mode
PB MODE
r AUTO
To automatically select the system (Hi8/standard 8
VTR
or Digital8) that was used to record on the tape, and
play back the tape
H/h
To play back a tape that was recorded in the Hi8/
standard 8 system when your camcorder does not
automatically distinguish the recording system
LCD B. L.
r BRT NORMAL
To set the brightness on the LCD screen normal
VTR
CAMERA
BRIGHT
To brighten the LCD screen
LCD COLOUR
To adjust the colour on the LCD screen, turn and
VTR
press the SEL/PUSH EXEC dial
CAMERA
To lighten
To darken
Notes on AUDIO MIX
•You can adjust the balance only for tapes recorded in the Digital8 system.
•When playing back a tape recorded in the 16-bit mode, you cannot adjust the balance.
Note on NTSC PB
You can play back tapes recorded in the NTSC video system, if the tape is recorded in the Digital8
system.
When you play back a tape on a Multi System TV, select the best mode while viewing the picture
on the TV.
Note on PB MODE
The mode will return to the factory setting when:
•you remove the battery pack or power source.
•you turn the POWER switch.
Notes on LCD B.L.
•When you select “BRIGHT”, battery life is reduced by about 10 percent during recording.
•When you use power sources other than the battery pack, “BRIGHT” is automatically selected.
81

Changing the MENU settings
POWER
Icon/item
Mode
Meaning
switch
AUDIO MODE
r 12BIT
To record or play back in the 12-bit mode (two
VTR*
stereo sounds)
CAMERA
16BIT
To record or play back in the 16-bit mode (the one
stereo sound with high quality)
Ò REMAIN
r AUTO
To display the remaining tape bar:
VTR
•for about 8 seconds after your camcorder is
CAMERA
turned on and calculates the remaining amount
of tape
•for about 8 seconds after a cassette is inserted and
your camcorder calculates the remaining amount
of tape
•for about 8 seconds after ( is pressed in VTR
mode
•for about 8 seconds after DISPLAY is pressed to
display the screen indicators
•for the period of tape rewinding, forwarding or
picture search in the VTR mode
ON
To always display the remaining tape indicator
DATA CODE
r DATE/CAM
To display date, time and recording data during
VTR
playback
DATE
To display date and time during playback
CLOCK SET
To reset the date or time (p. 88)
CAMERA
AUTO TV ON
r OFF
—
VTR
CAMERA
ON
To automatically turn on the Sony TV when using
the laser link function
TV INPUT
r VIDEO1
To switch the video input on a Sony TV when using
VTR
VIDEO2
the laser link function (p. 41)
CAMERA
VIDEO3
OFF
—
LTR SIZE
r NORMAL
To display selected menu items in normal size
VTR
CAMERA
2×
To display selected menu items at twice the normal
size
DEMO MODE
r ON
To make the demonstration appear
CAMERA
OFF
To cancel the demonstration mode
Note on AUDIO MODE
When playing back a tape recorded in the 16-bit mode, you cannot adjust the balance in AUDIO
MIX.
Notes on DEMO MODE
•You cannot select DEMO MODE when a cassette is inserted in your camcorder.
•DEMO MODE is set to STBY (Standby) at the factory and the demonstration starts about 10
minutes after you have set the POWER switch to CAMERA without a cassette inserted.
Note that you cannot select STBY of DEMO MODE in the MENU settings.
•When NIGHTSHOT is set to ON, the NIGHTSHOT indicator appears in the viewfinder or on the
LCD screen and you cannot select DEMO MODE in the MENU settings.
*To dub a tape to another VCR
You cannot select AUDIO MODE for tapes recorded in the Digital8 system. You, however, can
select AUDIO MODE when you dub tapes recorded in the Hi8/standard 8 system to another
82
VCR using the i.LINK cable.
Changing the MENU settings
POWER
Icon/item
Mode
Meaning
switch
WORLD TIME
To set the clock to the local time. Turn the SEL/
CAMERA
PUSH EXEC dial to set a time difference. The clock
changes by the time difference you set here. If you
set the time difference to 0, the clock returns to the
originally set time.
BEEP
r MELODY
To output the melody when you start/stop
VTR
recording or when an unusual condition occurs on
CAMERA
your camcorder
NORMAL
To output the beep instead of the melody
OFF
To cancel the melody and beep sound
COMMANDER
r ON
To activate the Remote Commander supplied with
VTR
your camcorder
CAMERA
OFF
To deactivate the Remote Commander to avoid
remote control misoperation caused by other VCR’s
Customizing Your Camcorder Выполнение индивидуальных установок на видеокамере
remote control
DISPLAY
r LCD
To show the display on the LCD screen and
VTR
viewfinder
CAMERA
V-OUT/LCD
To show the display on the TV screen, LCD screen
and viewfinder
REC LAMP
r ON
To light up the camera recording lamp at the front
CAMERA
of your camcorder
OFF
To turn the camera recording lamp off so that the
subject is not aware of the recording
INDICATOR
r BL OFF
To turn off the backlight on display window
VTR
CAMERA
BL ON
To turn on the backlight
In more than 5 minutes after removing the power source
The “COMMANDER” and “HiFi SOUND” items are returned to their factory settings.
The other menu items are held in memory even when the battery is removed, as long as the lithium
battery is installed.
Note
If you press DISPLAY with “DISPLAY” set to “V-OUT/LCD” in the MENU settings, the picture from a
TV or VCR will not appear on the LCD screen even when your camcorder is connected to outputs on
the TV or VCR.
Notes on INDICATOR
•When you select “BL ON”, battery life is reduced by about 10 percent during recording.
•When you use power sources other than the battery pack, “BL ON” is automatically selected.
83
Изменение установок MENU
Русский
Выбор установок режима по каждому пункту r заводская установка.
Пункты меню отличаются в зависимости от того, установлен переключатель POWER в
положение VTR или CAMERA.
Переключа-
Пиктограмма/пункт
Режим
Предназначение
тель POWER
D ZOOM
r ON
Для приведение в действие цифрового
CAMERA
вариообъектива. Наезд видеокамеры в
пределах от 20× до 360× выполняется
цифровым методом (стр. 25)
OFF
Для предотвращения ухудшения качества
изображения
16:9WIDE
r OFF
—
CAMERA
ON
Для записи широкоэкранного изображения 16:9
(стр. 45)
STEADYSHOT
r ON
Для компенсации подрагивания видеокамеры
CAMERA
OFF
Для отмены функции устойчивой съемки. При
съемке стационарного объекта с помощью
треноги получаются очень естественные
изображения.
N.S. LIGHT
r ON
Для использования функции подсветки для
CAMERA
ночной съемки (стр. 29)
OFF
Для отмены функции подсветки для ночной
съемки
Примечания по функции устойчивой съемки
• Функция устойчивой съемки не в состоянии компенсировть чрезмерную тряску
видеокамеры.
• Использование преобразовательного объектива (не прилагается) может повлиять на
функцию устойчивой съемки.
84
Изменение установок MENU
Переключа-
Пиктограмма/пункт
Режим
Предназначение
тель POWER
HiFi SOUND
r STEREO
Для воспроизведения стереофонической ленты
VTR
или же ленты с дорожкой двуязычного звучания
1
Для воспроизведения монофонической ленты
или же ленты с дорожкой двуязычного
звучания при воспроизведении основного звука
2
Для воспроизведения ленты с дорожкой
двуязычного звучания
AUDIO MIX
Для регулировки баланса между стереофоническим
VTR
каналом 1 и стереофоническим каналом 2
ST1 ST2
NTSC PB
r ON PAL TV
Для воспроизведения ленты, записанной в
VTR
системе цветного телевидения NTSC, на
телевизоре системы PAL
Customizing Your Camcorder Выполнение индивидуальных установок на видеокамере
NTSC 4.43
Для воспроизведения ленты, записанной в
системе цветного телевидения NTSC, на
телевизоре с системой NTSC 4.43
PB MODE
r AUTO
Для автоматического выбора системы (Hi8/
VTR
стандартной системы 8 или же системы
Digital8), которая использовалась для записи на
ленту, и для воспроизведения ленты
H/h
Для воспроизведения ленты, записанной в
системе Hi8/стандартной системе 8, если Ваша
видеокамера автоматически не распознает
систему записи
LCD B. L.
r BRT NORMAL
Для установки нормальной яркости на экране ЖКД
VTR
Для более яркого экрана ЖКД
CAMERA
BRIGHT
LCD COLOUR
Для регулировки цвета на экране ЖКД,
VTR
поверните и нажмите диск SEL/PUSH EXEC
CAMERA
Ярче
Темнее
Примечания по функции AUDIO MIX
• Вы можете регулировать баланс только для лент, записанных в цифровой системе
Digital8 .
• При воспроизведении ленты, записаннной в 16-битовом режиме, Вы не можете
регулировать баланс.
Примечание по воспроизведению NTSC PB
Вы можете воспроизводить ленты, записанные в системе NTSC, если лента записана в
цифровой системе Digital8 .
При воспроизведении ленты на мультисистемном телевизоре выберите наилучший режим
во время просмотра изображения на экране телевизора.
Примечание по режиму воспроизведения PB MODE
Режим вернется к заводской установке при:
• отсоединении батарейного блока или источника питания.
• установке переключателя POWER в выключенное положение.
Примечания по режиму LCD B.L.
• Если Вы выберите установку “BRIGHT”, срок службы батарейного блока сократится
примерно на 10 процентов при записи.
• При использовании источников питания, отличных от батарейного блока, автоматически
будет выбрана установка “BRIGHT”.
85
Изменение установок MENU
Переключа-
Пиктограмма/пункт
Режим
Предназначение
тель POWER
AUDIO MODE
r 12BIT
Для записи или воспроизведения в 12-битовом
VTR*
режиме (два стереофонических звука)
CAMERA
16BIT
Для записи или воспроизведения в 16-битовом
режиме (один стереофонический
высококачественный звук)
Ò REMAIN
r AUTO
Для отображения полосы оставшейся ленты:
VTR
• около 8 секунд после того, как видеокамера
CAMERA
включится и вычислит оставшееся
количество ленты
• около 8 секунд после того, как будет
вставлена кассета и видеокамера вычислит
оставшееся количество ленты
• около 8 секунд после нажатия кнопки ( в
режиме VTR
•
около 8 секунд после нажатия кнопки DISPLAY
для отображения экранных индикаторов
• в течение времени ускоренной перемотки
ленты назад, вперед или поиска изображения
в режиме VTR
ON
Для постоянного отображения индикатора
оставшейся ленты
DATA CODE
r DATE/CAM
Для отображения данных даты, времени и
VTR
записи во время воспроизведения
DATE
Для отображения даты и времени во время
воспроизведения
CLOCK SET
Для пepeycтaнoвки даты или времени (стр. 88)
CAMERA
AUTO TV ON
r OFF
—
VTR
CAMERA
ON
Для автоматического включения телевизора
Sony при использовании функции лазерного
канала передачи данных
TV INPUT
r VIDEO1
Для переключения видеовхода на телеуизоре
VTR
VIDEO2
Sony при использовании функции лазерного
CAMERA
VIDEO3
канала передачи данных (стр. 41)
OFF
—
LTR SIZE
r NORMAL
Для отображения выбранных пунктов меню с
VTR
обычным размером
CAMERA
2×
Для отображения пунктов выбранного меню с
размером вдвое больше обычного
DEMO MODE
r ON
Для того, чтобы появилась демонстрация
CAMERA
OFF
Для отмены режима демонстрации
Примечание по режиму AUDIO MODE
При воспроизведении ленты в 16-битовом режиме Вы не можете регулировать баланс в
установке AUDIO MIX.
Примечания по режиму DEMO MODE
• Вы не можете выбрать команду DEMO MODE, если кассета вставлена в Вашу видеокамеру.
• Команда DEMO MODE установлена в положение STBY (ожидание) на предприятии-
изготовителе, и демонстрация начнется примерно через 10 минут после того, как Вы
установите переключатель POWER в положение CAMERA без вставленной кассеты.
Имейте в виду, что Вы не можете выбрать положение STBY команды DEMO MODE в установках MENU.
• Если команда NIGHTSHOT установлена в положение ON, то в видоискателе или на экране
ЖКД появится индикация NIGHTSHOT, и Вы не сможете выбрать команду DEMO MODE в
установках MENU.
*Для перезаписи ленты на другой КВМ
Вы не можете выбрать команду AUDIO MODE для лент, записанных в цифровой системе
Digital8 . Однако Вы можете выбрать команду AUDIO MODE при перезаписи лент,
86
записанных в системе Hi8/стандартной системе 8, на другой КВМ с помощью кабеля i.LINK.
Изменение установок MENU
Переключа-
Пиктограмма/пункт
Режим
Предназначение
тель POWER
WORLD TIME
Для установки часов на местное время.
CAMERA
Поверните диск SEL/PUSH EXEC для установки
разницы во времени. Здесь устанавливаются
изменения часов на разницу во времени. Если
Вы установите разницу во времени на 0, часы
вернутся к первоначально установленному
времени.
BEEP
r MELODY
Для получения выходного мелодичного сигнала
VTR
при пуске/остановке записи или же при
CAMERA
необычных условиях функционирования Вашей
видеокамеры.
NORMAL
Для получения выходного зуммерного сигнала
вместо мелодии
OFF
Для отмены мелодии и зуммерного сигнала
Customizing Your Camcorder Выполнение индивидуальных установок на видеокамере
COMMANDER
r ON
Для приведения в действие пульта
VTR
дистанционного управления, прилагаемого к
CAMERA
Вашей видеокамере
OFF
Для выключения пульта дистанционного
управления во избежание его неправильного
срабатывания, вызванного функционированием
пульта дистанционного управления другого
КВМ
DISPLAY
r LCD
Для отображения индикации на экране ЖКД и в
VTR
видоискателе
CAMERA
V-OUT/LCD
Для отображения индикации на экране
телевизора, экране ЖКД и в видоискателе
REC LAMP
r ON
Для высвечивания лампочки записи на
CAMERA
передней панели видеокамеры
OFF
Для выключения лампочки записи, так чтобы
позирующий человек не мог распознать, что
выполняется запись
INDICATOR
r BL OFF
Для выключения задней подсветки на окошке
VTR
дисплея
CAMERA
BL ON
Для включения задней подсветки
Если после извлечения источника питания пройдет более 5 минут
Пункты “COMMANDER” и “HiFi SOUND” вернутся к заводским установкам.
Другие установки меню будут оставаться в памяти, даже если будет вынут батарейный блок,
до тех пор, пока будет установлена литиевая батарейка.
Примечание
Если Вы нажмете кнопку DISPLAY в то время, когда команда “DISPLAY” установлена в
положение “V-OUT/LCD” в установках меню, изображение от телевизора или КВМ не появится
на экране ЖКД, даже если Ваша видеокамера подсоединена к выходным гнездам на
телевизоре или КВМ.
Примечания по установке INDICATOR
• Если Вы выберите команду “BL ON”, срок службы батарейного блока будет уменьшен
примерно на 10 процентов во время записи.
• Если Вы используете источники питания, отличные от батарейного блока, то автоматически
выберется команда “BL ON”.
87
Resetting the date
Переустановка даты и
and time
времени
The clock is set at the factory to Sydney time for
Часы установлены на предприятии-
Australia and New Zealand models, to Tokyo
изготовителе на время Сиднея для моделей
Австралии и Новой Зеландии, на время Токио
time for the models sold in Japan, and to Hong
для моделей, продаваемых в Японии, и на
Kong time for other models.
время Гонконга для других моделей.
The date and time are held in memory by the
Дата и время сохраняются в памяти с помощью
lithium battery. If you replace the lithium battery
литиевой батарейки. Если Вы от литиевой
with the battery pack or other power source
батарейки переключитесь на батарейный блок
connected, you need not reset the date and time.
или другой подсоединенный источник питания,
You must reset the date and time when the
Вам нужно будет переустановить дату и время.
lithium battery becomes dead with no power
Вам нужно также переустановить дату и время,
когда литиевая батарейка разрядится и в это
source installed.
время не будет вставлен источник питания.
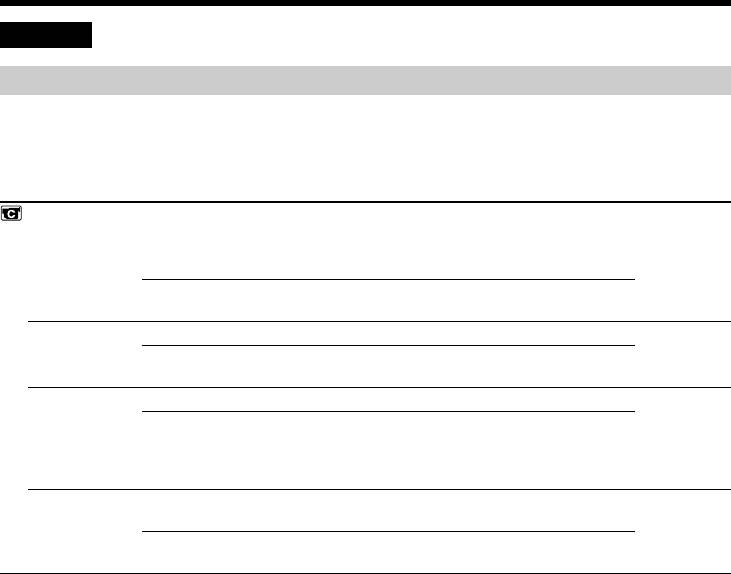
First, set the year, then the month, the day, the
Сначала установите год, затем месяц, день,
hour and then the minute.
час и минуту.
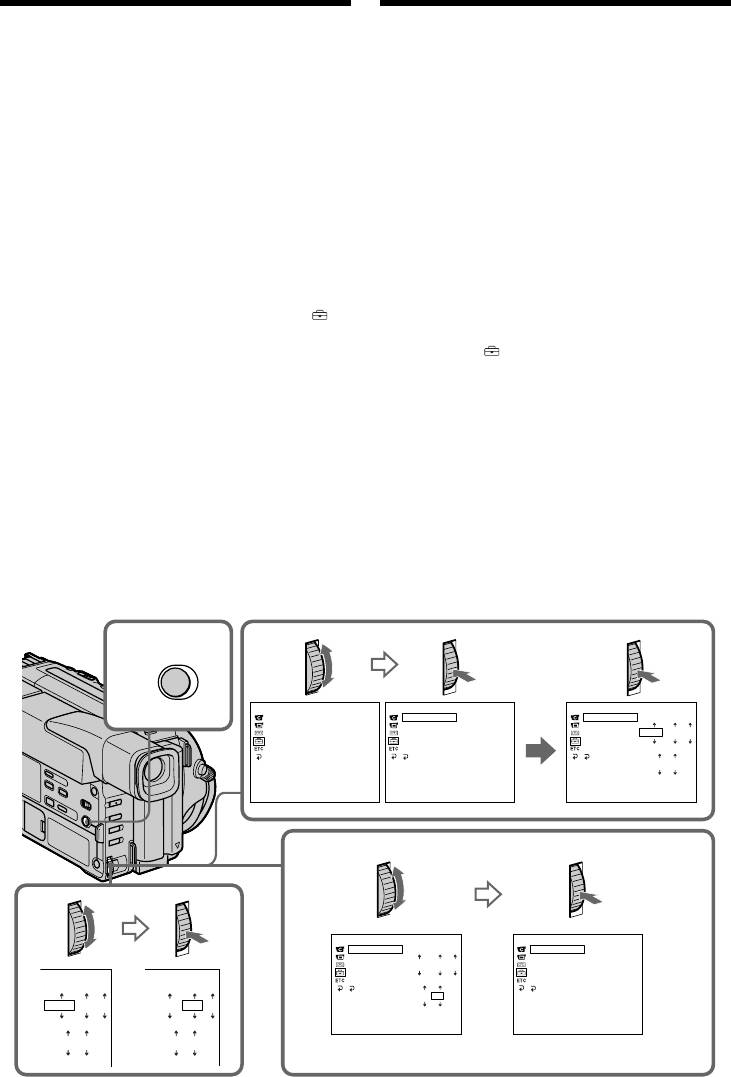
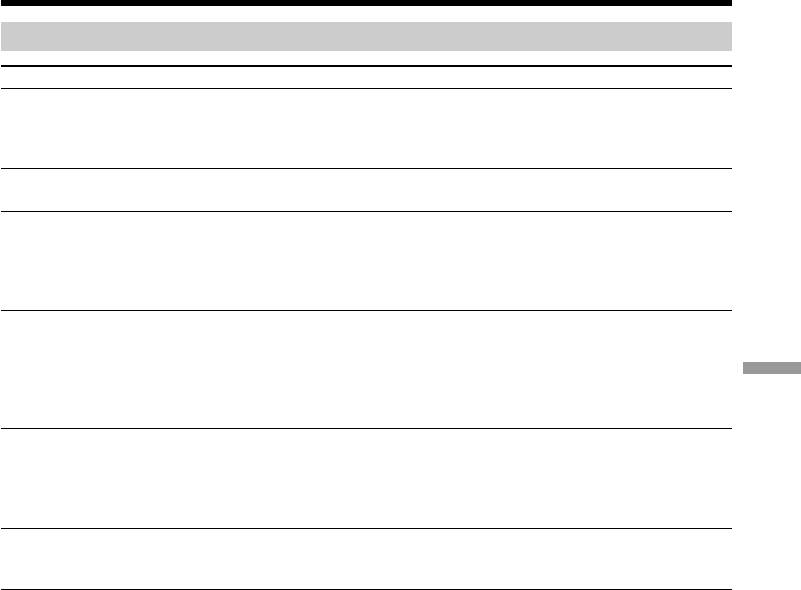
(1)While the camcorder is in the standby mode,
(1)В режиме ожидания видеокамеры
press MENU to display the MENU settings.
нажмите кнопку MENU для отображения
(2)Turn the SEL/PUSH EXEC dial to select ,
установок MENU.
then press the dial.
(2)
Поверните диск SEL/PUSH EXEC для выбора
(3)Turn the SEL/PUSH EXEC dial to select
индикации , а затем нажмите диск.
CLOCK SET, then press the dial.
(3)Поверните диск SEL/PUSH EXEC для
выбора команды CLOCK SET, а затем
(4)Turn the SEL/PUSH EXEC dial to adjust the
нажмите диск.
desired year, then press the dial.
(4)
Поверните диск SEL/PUSH EXEC для
(5)Set the month, day and hour by turning the
выбора нужного года, а затем нажмите диск.
SEL/PUSH EXEC dial and pressing the dial.
(5)Установите месяц, день и час путем
(6)Set the minute by turning the SEL/PUSH
вращения диска SEL/PUSH EXEC и
EXEC dial and pressing the dial by the time
нажимания диска.
signal. The clock starts to move.
(6)Установите минуту путем вращения диска
(7)Press MENU to make the MENU settings
SEL/PUSH EXEC и нажимания диска в
момент передачи сигнала точного
disappear.
времени. Часы начнут функционировать.
(7)Нажмите кнопку MENU для того, чтобы
исчезли установки MENU.
1,
2
3
MENU
7
SETUP MENU
SETUP MENU
SETUP MENU
CLOCK SET
CLOCK SET
1
1 1998
CLOCK SET
AUTO TV ON
AUTO TV ON
0:00:00
AUTO TV ON
TV INPUT
TV INPUT
TV INPUT
1998
1
1
LTR SIZE
LTR SIZE
LTR SIZE
DEMO MODE
DEMO MODE
DEMO MODE
RETURN
RETURN
0 00
[MENU] : END
[MENU] : END
6
4
SETUP MENU
SETUP MENU
CLOCK SET
CLOCK SET
4
7
1999
AUTO TV ON
AUTO TV ON
17:30:00
TV INPUT
1999
7
4
TV INPUT
LTR SIZE
LTR SIZE
DEMO MODE
DEMO MODE
RETURN
RETURN
17 30
1999
1
1
1999
1
1
[MENU] : END
[MENU] : END
0 00
0 00
88

Resetting the date and time
Переустановка даты и времени
The year changes as follows:
Год изменяется следующим образом:
1998 ˜ 1999 N · · · · n 2029
1998 ˜ 1999 N · · · · n 2029
Note on the time indicator
Примечание по индикатору времени
The internal clock of your camcorder operates on
Встроенные часы Вашей видеокамеры
a 24-hour cycle.
работают в 24-часовом режиме.
Customizing Your Camcorder Выполнение индивидуальных установок на видеокамере
89

— Additional Information —
— Дополнительная информация —
Digital8 system,
Цифровая система Digital8 ,
recording and playback
запись и воспроизведение
What is the “Digital8 system”?
Что такое “система Digital8 ”?
This video system has been developed to enable
Эта видеосистема была разработана для
digital recording to Hi8 video cassettes H.
обеспечения цифровой записи на
видеокассеты Hi8 H.
Usable cassette tapes
Используемые кассеты
We recommend using Hi8 video cassettes H.
Рекомендуется использовать видеокассеты
The recording time when you use your Digital8
Hi8 H. Время записи при использовании
system camcorder on Hi8 H/standard 8 h
Вашей видеокамеры системы Digital8 на
tape is 2/3 the recording time when using the
ленте Hi8 H/стандартной ленте 8 h
conventional Hi8 H/standard 8 h system
составляет 2/3 времени записи в сравнении с
camcorder. (90 minutes of recording time
обычной видеокамерой Hi8 H/
becomes 60 minutes.)
видеокамерой стандартной системы 8 h (90
If you use standard 8 h tape, be sure to play back
минут времени записи становятся равными
the tape on this camcorder. Mosaic pattern noise
60 минутам).
may appear when you play back standard 8 h
Если Вы используете стандартную ленту 8 h,
tape on other VCRs.
то ее следует воспроизводить на этой же
видеокамере. В случае воспроизведения
стандартной ленты 8 h на других КВМ могут
Note
появиться помехи мозаичного типа.
Tapes recorded in the Digital8 system cannot
be play back on Hi8 H/standard 8 h (analog)
Примечание
system machine.
Ленты, записанные в цифровой системе
Digital8 , не могут быть воспроизведены на
Playback system
аппараратуре системы Hi8 H/стандартной
системы 8 h (аналоговой).
The Digital8 system or Hi8 H/standard 8 h
system is automatically detected before the tape
Система воспроизведения
is played back.*
Система Digital8 или Hi8 H/стандартная
* During playback of tapes recorded in the Hi8
система 8 h автоматически детектируется
H/standard 8 h system, digital signals are
перед воспроизведением ленты.*
output as the image signals from the DV IN/
* Во время воспроизведения лент,
OUT jack.
записанных в системе Hi8 H/стандартной
системе 8 h, цифровые сигналы выводятся
Display during automatic detection of system
в качестве сигналов изображения через
The Digital8 system or Hi8 H/standard 8 h
гнездо DV IN/OUT.
system is automatically detected, and the
playback system is automatically switched to.
Индикация во время автоматического
During switching of systems, the screen turns
детектирования системы
blue, and the following displays appear. A
Система Digital8 или H/стандартная
hissing noise also sometimes can be heard.
система 8 h автоматически детектируется, а
система воспроизведения автоматически
n H/h: During switching from Digital8
включается. Во время выключения системы
экран становится голубым и появляются
to Hi8 H/standard 8 h
следующие индикации. Может быть также
H/h n : During switching from Hi8 H/
слышен свистящий шум.
standard 8 h to Digital8
n H/h: Во время переключения с
системы Digital8 на систему
Hi8 H/стандартную систему 8
h
H/h n : Во время переключения с
системы Hi8 H/стандартную
систему 8 h на систему Digital8
90
Digital8
system, recording and
Цифровая система Digital8 ,
playback
запись и воспроизведение
When you play back
При воспроизведении
Playing back an NTSC-recorded tape
Воспроизведение лент, записанных в
You can play back tapes recorded in the NTSC
системе NTSC
video system, if the tape is recorded in the
Вы можете воспроизводить ленты,
Digital8 system. If the tape is recorded in the
записанные в системе NTSC, если лента
AFM HiFi system, the AFM HiFi sound is
записана в цифровой системе Digital8 . Если
reproduced. However, note that the following
лента записана в системе АFM Hi-Fi, то звук
will occur during playback of an NTSC-recorded
будет воспроизводиться в системе АFM Hi-Fi.
tape.
Однако, имейте в виду, что во время
•When playing back a tape on a TV, you may
воспроизведения лент, записанных в системе
not get the original colour depending on the
NTSC, будет иметь место следующее.
TV. When you play back on a Multi System TV,
• При воспроизведении ленты на экране
set NTSC PB to the desired mode in the menu
телевизора Вы можете не получить
setting.
первоначальные цвета в зависимости от
•During playback, a black band appears on the
типа телевизора. При воспроизведении на
lower part of the viewfinder.
мультисистемном телевизоре установите
•If a tape has portions recorded in PAL and
переключатель NTSC PB на нужный режим
NTSC video systems, the tape counter reading
в установках меню.
Additional Information Дополнительная информация
is not correct. This discrepancy is due to the
• Во время воспроизведения в нижней части
difference between the counting cycle of the
видоискателя будет появляться черная
two video systems.
полоса.
•You cannot edit the NTSC-recorded tape onto
• Если на ленте имеются участки, записанные
another VCR.
в видеосистемах PAL и NTSC, то
функционирование счетчика ленты будет
неправильным. Это расхождение
Copyright signal
объясняется разницей между счетными
When you record
циклами двух видеосистем.
You cannot record software on your
• Вы не можете выполнять монтаж ленты,
camcorder that contains copyright control
записанной в системе в системе NTSC, на
signals for copyright protection of software.
другой КВМ.
“COPY INHIBIT” appears on the LCD screen, in
the viewfinder or on the TV screen if you try to
Сигнал авторского права
record such software.
Your camcorder does not record copyright
Во время записи
control signals on the tape when it records.
Вы не можете записывать программы на
Вашей видеокамере, которые содержат
сигналы авторского права,
предохраняющие защищенные программы.
На экране ЖКД, в видоискателе или на
экране телевизора появится индикация
“COPY INHIBIT”, если Вы попытаетесь
записать такую программу.
Ваша видеокамера не записывает сигналы
авторского права на ленту.
91
Digital8
system, recording and
Цифровая система Digital8 ,
playback
запись и воспроизведение
When you playback a dual
При воспроизведении ленты с
sound track tape
двойной звуковой дорожкой
When you use tapes recorded in the
При использовании лент, записанных
Digital8
system
в цифровой системе Digital8
When you play back a Digital8 system tape
При воспроизведении ленты в цифровой
which is dubbed from a dual sound track tape
системе Digital8 , на которую выполнена
recorded in the DV system, set “HiFi SOUND” to
перезапись ленты с двойной звуковой
the desired mode in the MENU settings (p. 79).
дорожкой, записанной в цифровой
видеосистеме DV, установите команду “HiFi
Sound from speaker
SOUND” в нужный режим в установках MENU
(стр. 79).
HiFi Sound Playing back Playing back
Mode a stereo tape a dual sound
Звук от динамика
track tape
Режим
Воспроизведение
Воспроизведение
STEREO Stereo Main sound and
звучания
стереофони-
ленты с двойной
sub sound
HiFi
ческой ленты
звуковой дорожкой
1 Lch Main sound
STEREO Стерео Основной звук и
2 Rch Sub sound
вспомогательный
звук
When you use tapes recorded in the
1 Левый Основной
Hi8/standard 8 system
канал звук
When you play back a dual sound track tape
2
Правый
Вспомога-
recorded in an AFM HiFi stereo system, set “HiFi
канал звук тельный звук
SOUND” to the desired mode in the MENU
settings (p. 79).
При использовании лент, записанных
Sound from speaker
в системе Hi8/стандартной системе 8
При воспроизведении ленты с двойной
HiFi Sound Playing back Playing back
звуковой дорожкой, записанной в
Mode a stereo tape a dual sound
стереофонической системе AFM HiFi,
track tape
установите команду “HiFi SOUND” в нужный
STEREO Stereo Main sound and
режим в установках MENU (стр. 79).
sub sound
1 Monaural Main sound
Звук от динамика
2 Unnatural Sub sound
Режим
Воспроизведение
Воспроизведение
Sound
звучания
стереофони-
ленты с двойной
HiFi
ческой ленты
звуковой дорожкой
You cannot record dual sound programmes on
STEREO Стерео Основной звук и
your camcorder.
вспомогательный
звук
1 Монофони- Основной
ческий звук звук
2 Необычный Вспомога-
звук тельный звук
Вы не можете записывать программы с
двойным звучанием на Вашей видеокамере.
92
Changing the lithium
Замена литиевой
battery in your
батарейки в Вашей
camcorder
видеокамере
When replacing the lithium battery, keep the
При замене литиевой батарейки батарейный
battery pack or other power source attached.
блок или другой источник питания должен
Otherwise, you will need to reset the date, time
быть прикреплен к видеокамере. В
and other items in the MENU settings hold in
противном случае Вам понадобится
memory by the lithium battery.
переустанавливать дату, время и другие
пункты в установках MENU, хранимых в
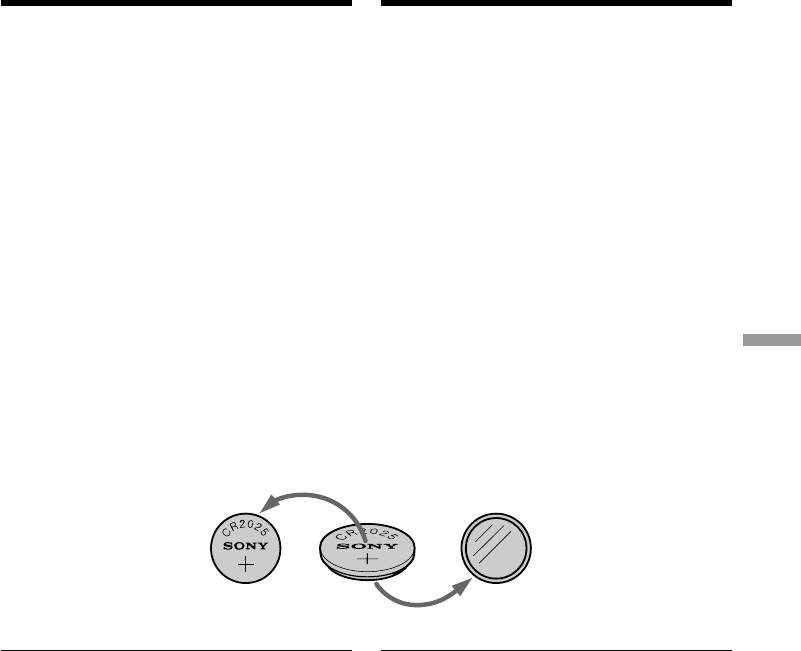
Insert the battery with the positive (+) side facing
памяти видеокамеры с помощью литиевой
out. When the battery becomes weak or dead, the
батарейки.
I indicator flashes in the viewfinder for about 5
seconds when you set the POWER switch to
Вставьте батарейку так, чтобы
CAMERA. In this case, replace the battery
положительный (+) полюс был обращен
with a Sony CR2025 or Duracell DL-2025
наружу. Если батарейка станет слабой или
lithium battery. Use of any other battery may
разрядится, индикатор I будет мигать в
present a risk of fire or explosion. Discard used
видоискателе около 5 секунд, если
batteries according to the manufacturer’s
переключатель POWER установлен в
instructions.
положение CAMERA. В этом случае,
замените батарейку на литиевую
батарейку Sony CR2025 или Duracell DL-
Additional Information Дополнительная информация
2025. Использование какой-либо другой
батарейки создает риск воспламенения
или взрыва. Ликвидируйте использованные
батарейки в соответствии с инструкциями
предприятия-изготовителя.
(+) (--)-
WARNING
ВНИMAHИЕ
The battery may explode if mistreated. Do not
Если с батарейкой неправильно обращаться,
recharge, disassemble, nor dispose of it in fire.
она может взорваться. Не перезаряжайте, не
разбирайте и не бросайте в огонь батарейку.
Lithium battery
•Keep the lithium battery out of the reach of
Литиевая батарейка
children.
• Храните литиевую батарейку в месте, не
•Should the battery be swallowed, immediately
доступном для детей.
consult a doctor.
• В случае, если кто-либо случайно проглотит
•Wipe the battery with a dry cloth to ensure
батарейку, следует немедленно обратиться
good contact.
к врачу.
• Протрите батарейку сухой тканью для
Lithium battery installed at the factory
обеспечения хорошего контакта.
This battery may not last 1 year.
Литиевая батарейка, установленная на
заводе
Этой батарейки может не хватить на 1 год.
93
Changing the lithium battery in
Замена литиевой батарейки в
your camcorder
Вашей видеокамере
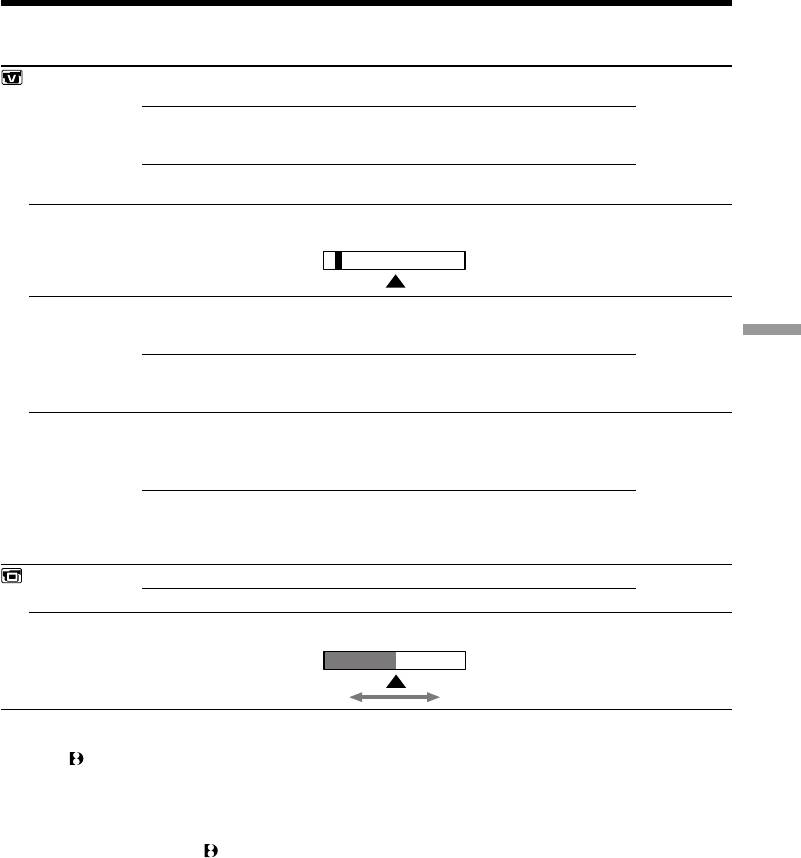
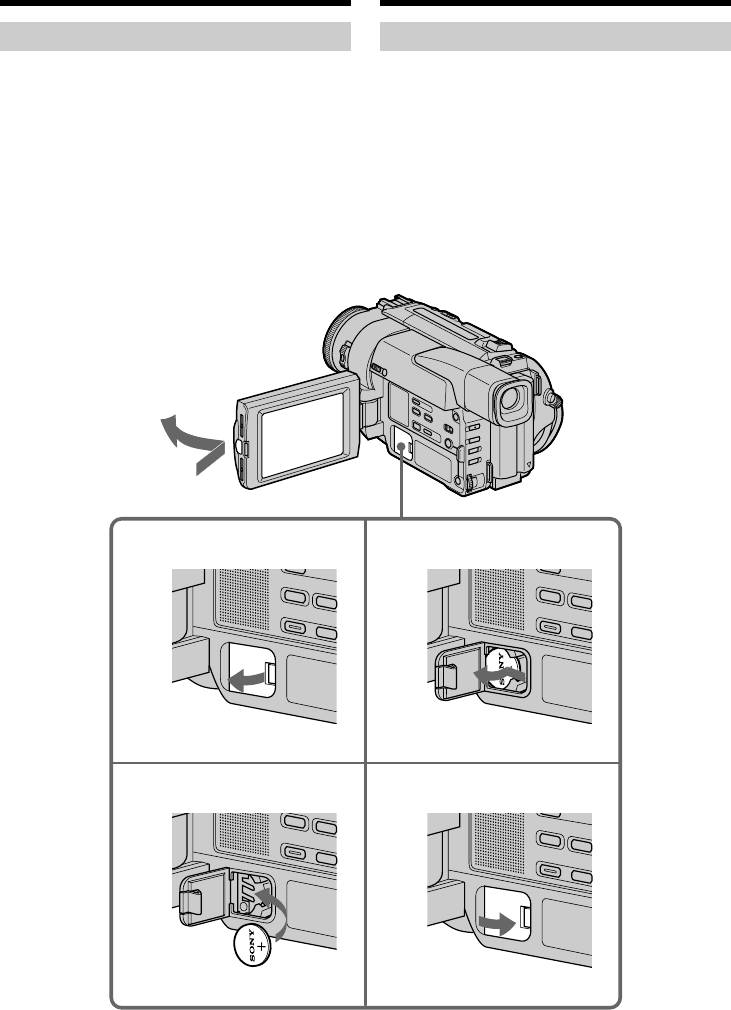
Changing the lithium battery
Замена литиевой батарейки
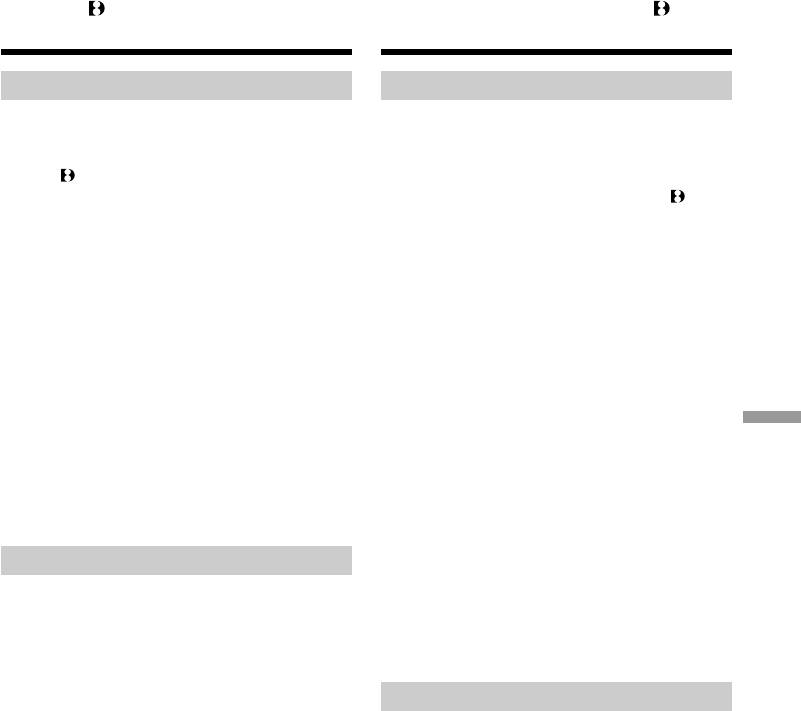
(1)Open the LCD panel and open the lid of the
(1)Откройте панель ЖКД и откройте крышку
lithium battery compartment.
отсека для литиевой батарейки.
(2)Push the lithium battery down once and pull
(2)Нажмите литиевую батарейку вниз один
it out from the holder.
раз и выньте ее из держателя.
(3)Install a Sony CR2025 or Duracell DL-2025
(3)Установите литиевую батарейку Sony
lithium battery with the positive (+) side
CR2025 или Duracell DL-2025 так, чтобы
facing out.
положительный (+) полюс был обращен
(4)Close the lid.
наружу.
(4)Закройте крышку.
1
1
2
0
2
5
2
R
C
3
4
2
5
0
2
R
C
94
English
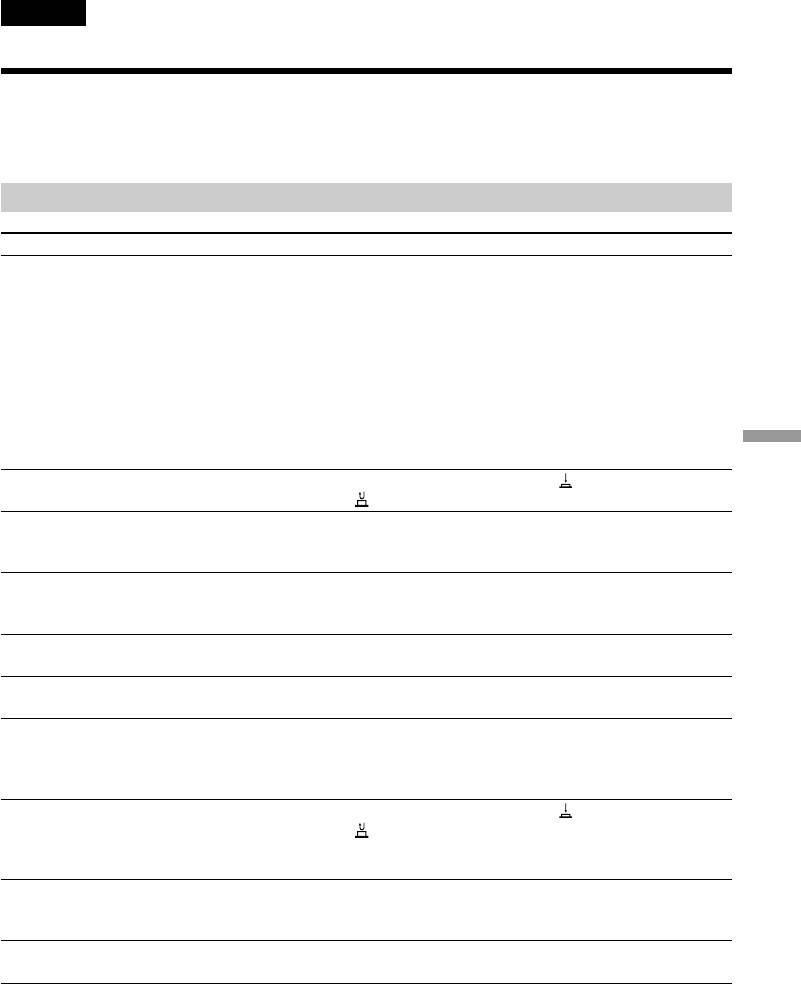
Troubleshooting
If you run into any problem using your camcorder, use the following table to troubleshoot the
problem. If the problem persists, disconnect the power source and contact your Sony dealer or local
authorized Sony service facility. If “C:ππ:ππ” appears on the LCD screen or in the viewfinder, the
self-diagnosis display function has worked. See page 99.
In the recording mode
Symptom Cause and/or Corrective Actions
START/STOP does not operate.
• The POWER switch is set to VTR.
m Set it to CAMERA. (p. 21)
• STANDBY is set to LOCK.
m Turn STANDBY to STANDBY. (p. 21)
• The tape has run out.
m Rewind the tape or insert a new one. (p. 19, 33)
• The write-protect tab is set to expose the red mark.
m Use a new tape or slide the tab. (p. 19)
• The tape is stuck to the drum (moisture condensation).
m Remove the cassette and leave your camcorder for at least 1
Additional Information Дополнительная информация
hour to acclimatize. (p. 108)
Recording stops in a few seconds.
• START/STOP MODE is set to 5SEC or .
m Set it to . (p. 26)
The power goes off.
• While being operated in the CAMERA mode, your camcorder
has been in the standby mode for more than 3 minutes.
m Turn STANDBY down once and then up again. (p. 21)
Your camcorder turns on/off when
• Your camcorder is working with the AC power adaptor.
using the accessory that is attached
m Use the battery pack.
to the intelligent accessory shoe.
The image on the viewfinder screen
• The viewfinder lens is not adjusted.
is not clear.
m Adjust the viewfinder lens. (p. 24)
The SteadyShot function does not
• STEADYSHOT is set to OFF in the MENU settings.
work.
m Set it to ON. (p. 79)
The autofocusing function does not
• FOCUS is set to MANUAL.
work.
m Set it to AUTO. (p. 59)
• Shooting conditions are not suitable for autofocus.
m Set FOCUS to MANUAL to focus manually. (p. 59)
The fader function does not work.
• START/STOP MODE is set to 5SEC or .
m Set it to . (p. 26)
• The digital effect function is working.
m Cancel it. (p. 51)
The v indicator flashes in the
• The video heads may be dirty.
viewfinder.
m Clean the heads using the Sony V8-25CLD cleaning cassette
(not supplied). (p. 109)
The picture does not appear in the
• The LCD panel is open.
viewfinder.
m Close the LCD panel. (p. 22)
(Continued on the following page)
95
Troubleshooting
Symptom Cause and/or Corrective Actions
A vertical band appears when you
• The contrast between the subject and background is too high.
shoot a subject such as lights or a
Your camcorder is not a malfunction.
candle flame against a dark
background.
A vertical band appears when you
• Your camcorder is not a malfunction.
shoot a very bright subject.
Some tiny white spots appear in the
• Slow shutter, low lux or NightShot +Slow shutter mode is
viewfinder or on the LCD screen.
activated. This is not a malfunction.
An unknown picture is displayed in
• If 10 minutes elapse after you set the POWER switch to
the viewfinder or on the LCD screen.
CAMERA or DEMO MODE is set to ON in the MENU settings
without a cassette inserted, your camcorder automatically
starts the demonstration.
m Insert a cassette and the demonstration stops.
You can also cancel DEMO MODE. (p. 82)
The picture is recorded in incorrect or
• NIGHTSHOT is set to ON.
unnatural colours.
m Set it to OFF. (p. 29)
Picture appears too bright, and the
• NIGHTSHOT is set to ON in a bright place.
subject does not appear in the
m Set it to OFF, or use the NightShot function in a dark place.
viewfinder or on the LCD screen.
(p. 29)
In the playback mode
Symptom Cause and/or Corrective Actions
The tape does not move when a
• The POWER switch is set to CAMERA or OFF.
video control button is pressed.
m Set it to VTR. (p. 33)
• The tape has run out.
m Rewind the tape. (p. 33)
The playback picture is not clear or
• The television’s video channel is not adjusted correctly.
does not appear.
m Adjust it. (p. 38)
There are four horizontal lines on
• The video head may be dirty.
the picture or the playback picture
m Clean the heads using the Sony V8-25CLD cleaning cassette
is not clear or does not appear.
(not supplied). (p. 109)
No sound or only a low sound is
• The stereo tape is played back with HiFi SOUND set to 2 in the
heard when playing back a tape.
MENU settings.
m Set it to STEREO. (p. 79)
• The volume is turned to minimum.
m Open the LCD panel and press VOLUME +. (p. 33)
• AUDIO MIX is set to ST2 side in the MENU settings.
m Adjust AUDIO MIX. (p. 79)
The date search does not work
• The tape has a blank portion in the recorded portion
correctly.
(p. 67)
The picture which is recorded in the
• PB MODE is set to H/h in the MENU settings.
Digital8
system is not played back.
m Set it to AUTO. (p. 79)
The tape which is recorded in the Hi8
• Set PB MODE to H/h in the MENU settings. (p. 79)
/standard 8 system is not played
back correctly.
96
Troubleshooting
In the recording and playback modes
Symptom Cause and/or Corrective Actions
The power does not turn on.
• The battery pack is not installed, or is dead or nearly dead.
m Install a charged battery pack. (p. 12, 13)
• The AC power adaptor is not connected to the mains.
m Connect the AC power adaptor to the mains. (p. 17)
The end search function does not
•The tape was ejected after recording.
work.
•You have not recorded on the new cassette yet.
The battery pack is quickly
• The operating temperature is too low.
discharged.
• The battery pack is not fully charged.
m Charge the battery pack again. (p. 13)
• The battery pack is completely dead, and cannot be recharged.
m Replace with a new battery pack. (p. 12)
The battery remaining indicator does
• You have used the battery pack in an extremely hot or cold
not indicate the correct time.
environment for a long time.
• The battery pack is completely dead, and cannot be recharged.
m Replace with a new battery pack. (p. 12)
Additional Information Дополнительная информация
• The battery is dead.
m Use a charged battery pack. (p. 12, 13)
The cassette cannot be removed from
• The power source is disconnected.
the holder.
m Connect it firmly. (p. 12, 17)
• The battery is dead.
m Use a charged battery pack or the AC power adaptor.
(p. 12, 13)
The { and 6 indicators flash and no
• Moisture condensation has occurred.
functions except for cassette ejection
m Remove the cassette and leave your camcorder for at least 1
work.
hour to acclimatize. (p. 108)
(Continued on the following page)
97

Troubleshooting
Others
Symptom Cause and/or Corrective Actions
The Remote Commander supplied
• COMMANDER is set to OFF in the MENU settings.
with your camcorder does not work.
m Set it to ON. (p. 79)
• Something is blocking the infrared rays.
m Remove the obstacle.
• The batteries are inserted in the battery holder with the + –
polarities incorrectly matching the + – marks.
m Insert the batteries with the correct polarity. (p. 121)
• The batteries are dead.
m Insert new ones. (p. 121)
The picture from a TV or VCR does
• DISPLAY is set to V-OUT/LCD in the MENU settings.
not appear even when your
m Set it to LCD. (p. 79)
camcorder is connected to outputs on
the TV or VCR.
The melody or beep sounds for 5
• Moisture condensation has occurred.
seconds.
m Remove the cassette and leave your camcorder for at least 1
hour to acclimatize. (p. 108)
• Some troubles has occurred in your camcorder.
m Remove the cassette and insert it again, then operate your
camcorder.
While charging the battery pack, no
• The AC power adaptor is disconnected.
indicator appears or the indicator
m Connect it firmly. (p. 17)
flashes in the display window.
• Something is wrong with the battery pack.
m Contact your Sony dealer or local authorized Sony service
facility.
98
English
Self-diagnosis display
Your camcorder has a self-diagnosis display
function.
Viewfinder (or LCD screen)
This function displays the current condition of
C:21:00
your camcorder as a 5-digit code (a combination of
a letter and figures) in the viewfinder, on the LCD
screen or in the display window. If a 5-digit code is
displayed, check the following code chart. The last
two digits (indicated by ππ) will differ depending
on the state of your camcorder.
Self-diagnosis display
•C:ππ:ππ
You can service your camcorder
yourself.
•E:ππ:ππ
Contact your Sony dealer or local
authorized Sony facility.
Additional Information Дополнительная информация
Five-digit display Cause and/or Corrective Actions
C:04:ππ
• You are using a battery pack that is not an “InfoLITHIUM”
battery pack.
m Use an “InfoLITHIUM” battery pack. (p. 17)
C:21:ππ
• Moisture condensation has occurred.
m Remove the cassette and leave your camcorder for at least 1
hour to acclimatize. (p. 108)
C:22:ππ
• The video heads are dirty.
m Clean the heads using the Sony V8-25CLD cleaning cassette
(not supplied). (p. 109)
C:31:ππ
• A malfunction other than the above that you can service has
C:32:ππ
occurred.
m Remove the cassette and insert it again, then operate your
camcorder.
m Disconnect the mains lead of the AC power adaptor or
remove the battery pack. After reconnecting the power
source, operate your camcorder.
E:61:ππ
• A malfunction that you cannot service has occurred.
m Contact your Sony dealer or local authorized Sony service
E:62:ππ
facility and inform them of the 5-digit code. (example:
E:61:10)
If you are unable to rectify the problem even if you try corrective actions a few times, contact your
Sony dealer or local authorized Sony service facility.
99
English
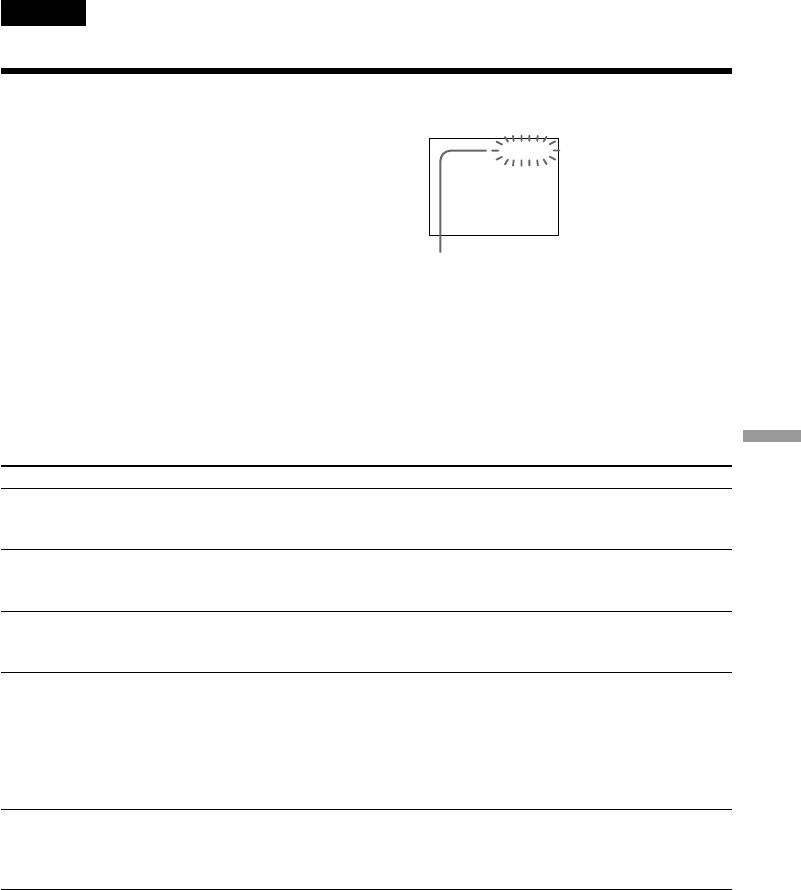
Warning indicators and messages
If indicators and messages appear in the viewfinder, on the LCD screen or in the display window,
check the following:
See the page in parentheses “( )” for more information.
•The warning messages do not appear in the mirror mode.
•The indicators and messages are displayed in yellow.
Warning indicators
The video heads are dirty
Fast flashing:
•You need to clean the heads using the Sony V8-25CLD
cleaning cassette (not supplied) (p. 109).
The battery is dead or
nearly dead
Slow flashing:
Self-diagnosis display (p. 99)
•The battery is nearly dead.
Fast flashing:
C:21:00
•The battery is dead (p. 12).
Moisture condensation has
Warning indicator as to
occurred*
tape
Fast flashing:
Slow flashing:
•Eject the cassette, turn off your
•The tape is near the end.
camcorder, and leave it for
•No tape is inserted (p. 19).*
about 1 hour with the cassette
•The write-protect tab on the
compartment open (p. 108).
cassette is out (red) (p. 20).*
Fast flashing:
You need to eject the cassette
•The tape has run out (p. 19, 33).*
Slow flashing:
•The write-protect tab on the
The lithium battery is weak
cassette is out (red) (p. 20).*
or is not installed (p. 93)
Fast flashing:
•Moisture condensation has
occurred (p. 108).
•The tape has run out (p. 19, 33).*
•The self-diagnosis display
function is activated (p. 99).
Warning messages
CLEANING
The video heads are dirty.
CASSETTE
COPY
You tried to record a picture that has a copyright control signal (p. 91).
INHIBIT
* You hear the melody or beep sound.
100

