Sony DCR-TRV120E – страница 4
Инструкция к Видеокамере Sony DCR-TRV120E
Making your own
Создание Ваших
titles
собственных титров
You can make up to two titles and store them in
Вы можете составить до двух титров и
your camcorder. Each title can have up to 20
сохранить их в памяти Вашей видеокамеры.
characters.
Каждый титр может содержать до 20 символов.
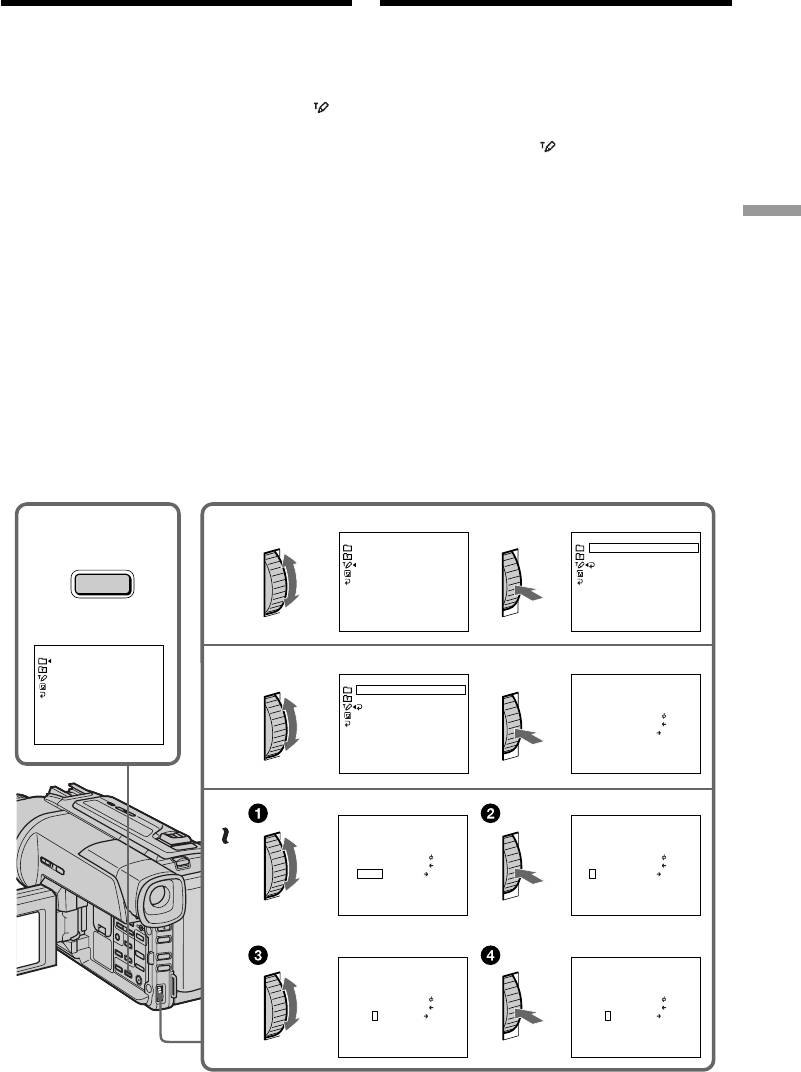
(1)Press TITLE in the standby or PLAYER mode.
(1)Нажмите кнопку TITLE в режиме
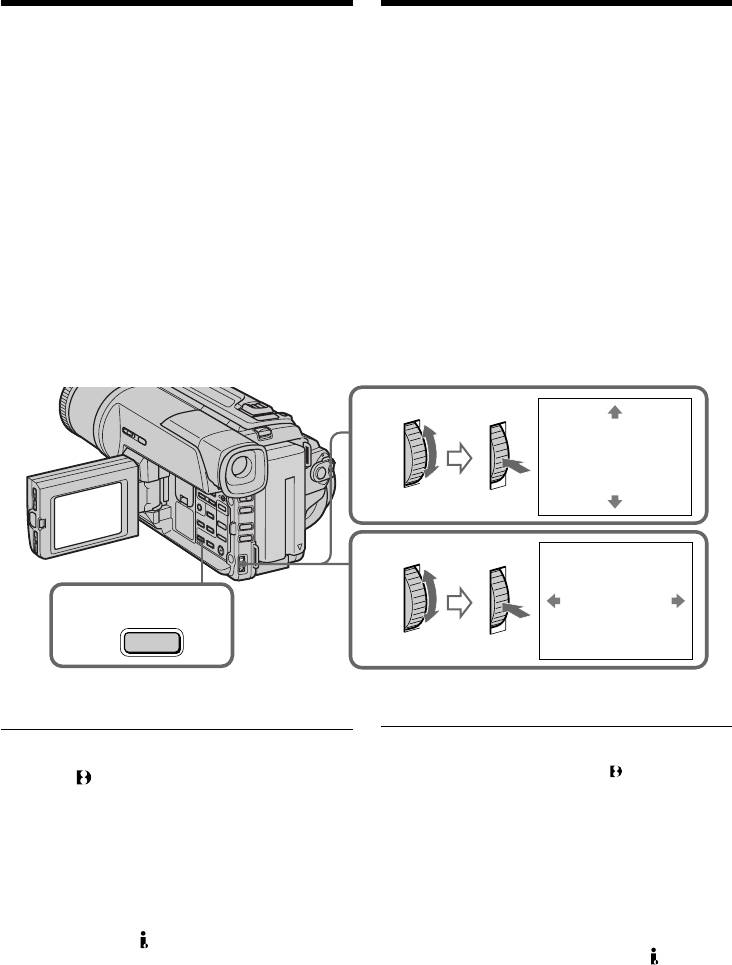
(2)Turn the SEL/PUSH EXEC dial to select ,
ожидания или режиме PLAYER.
then press the dial.
(2)
Поверните диск SEL/PUSH EXEC для
(3)Turn the SEL/PUSH EXEC dial to select the
выбора установки , а затем нажмите диск.
first line (CUSTOM1) or second line
(3)Поверните диск SEL/PUSH EXEC для
(CUSTOM2), then press the dial.
выбора первой строки (CUSTOM1) или
(4)Turn the SEL/PUSH EXEC dial to select the
второй строки (CUSTOM2), а затем
column of the desired character, then press
нажмите диск.
Advanced Recording Operations Усовершенствованные операции съемки
the dial.
(4)Поверните диск SEL/PUSH EXEC для
выбора колонки с нужным символом, а
(5)Turn the SEL/PUSH EXEC dial to select the
затем нажмите диск.
desired character, then press the dial.
(5)
Поверните диск SEL/PUSH EXEC для выбора
(6)Repeat steps 4 and 5 until you have selected
нужного символа, а затем нажмите диск.
all characters and completed the title.
(6)Повторяйте пункты 4 и 5 до тех пор, пока
(7)To finish making your own titles, turn the
Вы не выберите все символы и полностью
SEL/PUSH EXEC dial to select [SET], then
не составите титр.
press the dial. The title is stored in memory.
(7)Для завершения составления своих
(8)Press TITLE to make the title menu disappear.
собственных титров поверните диск SEL/
PUSH EXEC для выбора клманды [SET], а
затем нажмите диск. Титр будет сохранен
в памяти.
(8)Нажмите кнопку TITLE, чтобы исчезло
меню титров.
12
T
I
TLE SET
T
I
TLE SET
CUSTOM1
"
––––––––––
··"
––––––––––––––––––––
CUSTOM2
"
––––––––––
··"
––––––––––––––––––––
TITLE
RETURN
[
T
I
TLE
]
: END
[
T
I
TLE
]
: END
PRESET T
I
TLE
HELLO
!
HAPPY B
I
RTHDAY
HAPPY HOL
I
DAYS
3
T
I
TLE SET
T
I
TLE SET
P 1
CONGRATULAT
I
ONS
!
––––––––––––––––––––
OUR SWEET BABY
– – – – – – – – – – – – – – – – – – – –
––––––––––––––––––––
WEDD
I
NG
RETURN
A B C D E
1 2 3 4 5 $
F
¥
DM
£
VACAT
I
ON
F G H I J
6 7 8 9 0
¿ ¡
” :
THE END
K L M N O À È Ì Ò Ù
[
]
P Q R S T Á É Í Ó Ú
[
P
]
[
T
I
TLE
]
: END
U V W X Y Â Ê Ô
Æ Œ
[
S E T
]
Z
& ? !
Ã Õ Ñ
ç
ß
’ . , / –
Ä Ï Ö Ü Å
[
T
I
TLE
]
: END
[
T
I
TLE
]
: END
4
T
I
TLE SET
P 1
T
I
TLE SET
P 1
– – – – – – – – – – – – – – – – – – – –
– – – – – – – – – – – – – – – – – – – –
A B C D E
1 2 3 4 5 $
F
¥
DM
£
A B C D E
1 2 3 4 5 $
F
¥
DM
£
F G H I J
6 7 8 9 0
¿ ¡
” :
F G H I J
6 7 8 9 0
¿ ¡
” :
K L M N O À È Ì Ò Ù
[
]
K L M N O À È Ì Ò Ù
[
]
6
P Q R S T Á É Í Ó Ú
[
P
]
P Q R S T Á É Í Ó Ú
[
P
]
U V W X Y Â Ê Ô
Æ Œ
[
S E T
]
U V W X Y Â Ê Ô
Æ Œ
[
S E T
]
Z
& ? !
Ã Õ Ñ
ç
ß
Z
& ? !
Ã Õ Ñ
ç
ß
’ . , / –
Ä Ï Ö Ü Å
’ . , / –
Ä Ï Ö Ü Å
[
T
I
TLE
]
: END
[
T
I
TLE
]
: END
T
I
TLE SET
P 1
T
I
TLE SET
P 1
– – – – – – – – – – – – – – – – – – – –
S
– – – – – – – – – – – – – – – – – – –
A B C D E
1 2 3 4 5 $
F
¥
DM
£
A B C D E
1 2 3 4 5 $
F
¥
DM
£
F G H I J
6 7 8 9 0
¿ ¡
” :
F G H I J
6 7 8 9 0
¿ ¡
” :
K L M N O À È Ì Ò Ù
[
]
K L M N O À È Ì Ò Ù
[
]
P Q R S T Á É Í Ó Ú
[
P
]
P Q R S T Á É Í Ó Ú
[
P
]
U V W X Y Â Ê Ô
Æ Œ
[
S E T
]
U V W X Y Â Ê Ô
Æ Œ
[
S E T
]
Z
& ? !
Ã Õ Ñ
ç
ß
Z
& ? !
Ã Õ Ñ
ç
ß
’ . , / –
Ä Ï Ö Ü Å
’ . , / –
Ä Ï Ö Ü Å
[
T
I
TLE
]
: END
[
T
I
TLE
]
: END
61

Создание Ваших собственных
Making your own titles
титров
To change a title you have stored
Для изменения сохраненного в
In step 3, select CUSTOM1 or CUSTOM2,
памяти титра
depending on which title you want to change,
В пункте 3 выберите установку CUSTOM1
then press the SEL/PUSH EXEC dial. Turn the
или CUSTOM2, в зависимости от титра,
SEL/PUSH EXEC dial to select [C], then press
который Вы хотите изменить, а затем
the dial to delete the title. The last character is
нажмите диск SEL/PUSH EXEC. Поверните
erased. Enter the new title as desired.
диск SEL/PUSH EXEC для выбора установки
[C], а затем нажмите диск для удаления
титра. Последний символ будет стерт.
If you take 3 minutes or longer to enter
Введите новый нужный титр.
characters in the standby mode while a
cassette is in your camcorder
The power automatically goes off. The characters
Если при вводе символов пройдет 3 минут
you have entered remain stored in memory. Set
или более в режиме ожидания при
the POWER switch to OFF (CHARGE) once, and
вставленной кассете в Вашу видеокамеру
turn it to CAMERA again, then proceed from
Питание выключится автоматически.
step 1.
Символы, которые Вы ввели, сохранятся в
We recommend setting the POWER switch to
памяти видеокамеры. Установите сначала
PLAYER or removing the cassette so that your
переключатель POWER в положение OFF
camcorder does not automatically turn off while
(CHARGE), а затем снова в положение
you are entering title characters.
CAMERA, а затем начните с пункта 1.
Рекомендуется установить переключатель
If you select [ ]
POWER в положение PLAYER или вынуть
The menu for selecting alphabet and Russian
кассету, чтобы Ваша видеокамера
characters appear. Select [ ] to return to the
автоматически не выключалась во время
previous screen.
ввода символов титра.
To erase a character
Если Вы выбрали установку [ ]
Select [C]. The last character is erased.
Появится меню для выбора алфавита и
русских символов. Для возврата к прежнему
To enter a space
экрану выберите установку [ ].
Select [Z& ?!], then select the blank part.
Для удаления cимвола
Выберите установку [C]. Последний символ
будет стерт.
Для ввода интервала
Выберите знак [Z& ?!], а затем выберите
пустую ячейку.
62
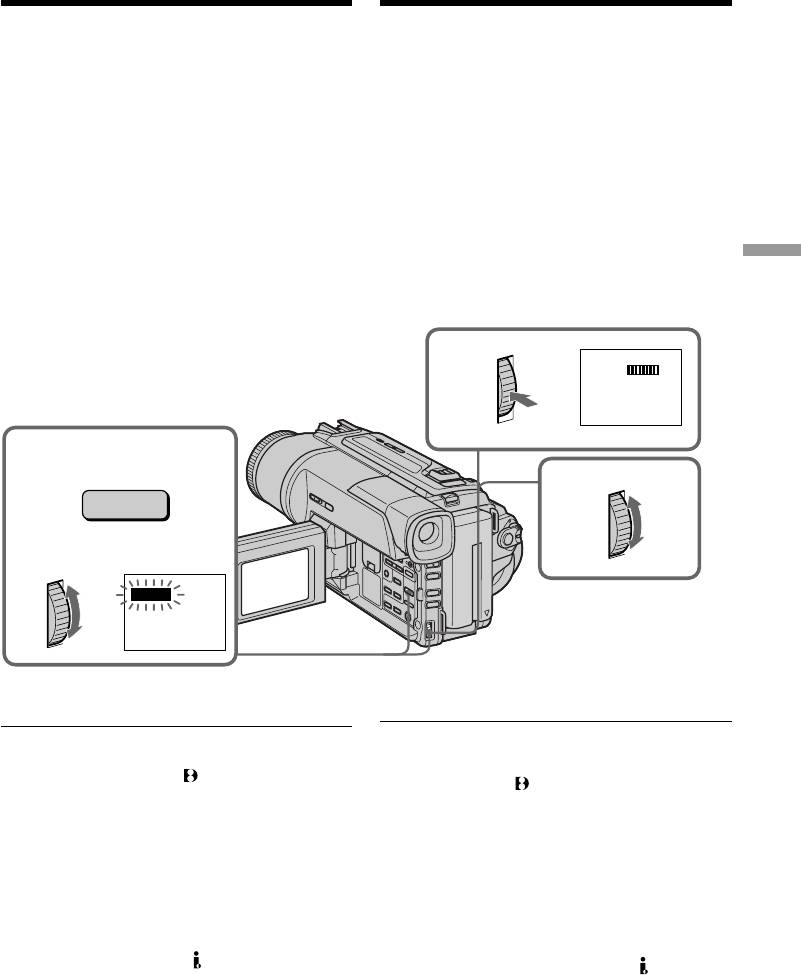
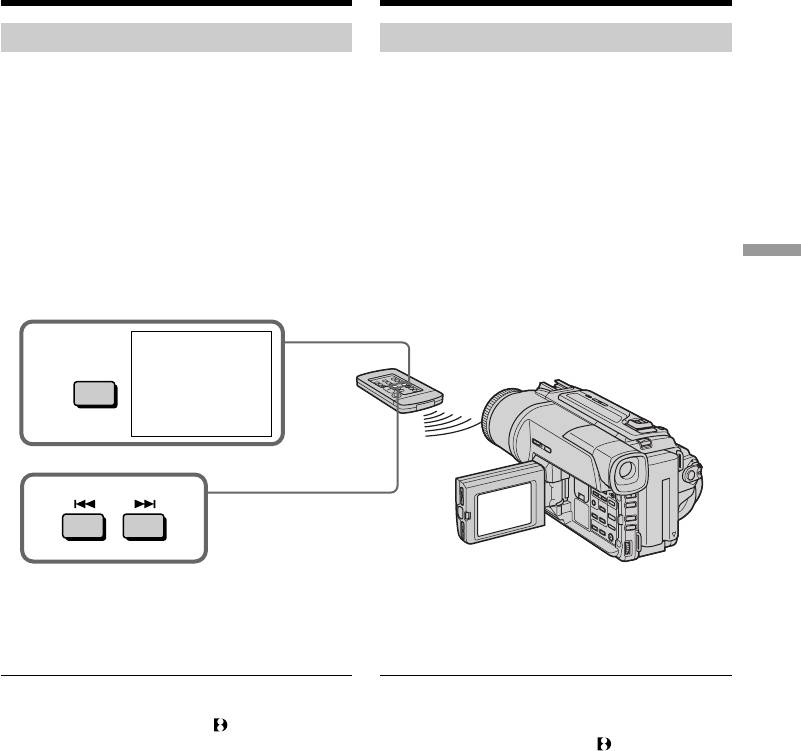
Inserting a scene
Вставка эпизода
You can insert a scene in the middle of a
Вы можете вставить эпизод в середине
recorded tape by setting the start and end points.
записанной ленты путем установки точек
The previously recorded frames between these
начала и окончания. Предыдущие
start and end points will be erased. Use the
записанные кадры между этими точками
Remote Commander for this operation.
начала и окончания будут стерты. Вы можете
выполнить это, используя пульт
дистанционного управления.
Advanced Recording Operations Усовершенствованные операции съемки
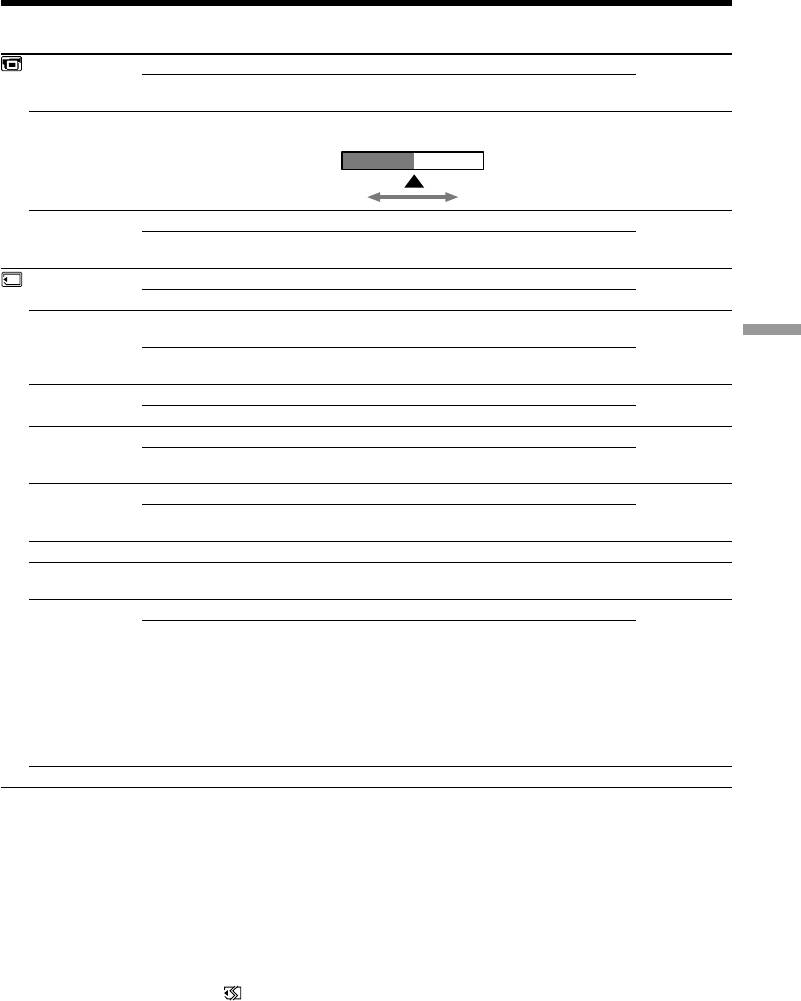
[a]
[b]
(1)While your camcorder is in the standby mode,
(1)В режиме ожидания видеокамеры,
keep pressing EDITSEARCH, and release the
держите нажатой кнопку EDITSEARH и
button at the insert end point [b].
отпустите кнопку в точке окончания
(2)Press ZERO SET MEMORY. The ZERO SET
эпизода [b].
MEMORY indicator flashes and the counter
(2)Нажмите кнопку ZERO SET MEMORY.
resets to zero.
Начнет мигать индикатор ZERO SET
(3)Keep pressing the – 7 side of EDITSEARCH
MEMORY, а счетчик ленты будет
and release the button at the insert start point
установлен в нулевое положение.
[a].
(3)Держите нажатой сторону – 7 кнопки
(4)Press START/STOP to start recording. The
EDITSEARH и отпустите кнопку в точке
scene is inserted. Recording stops
начала эпизода [a].
automatically near the counter zero point.
(4)Нажмите кнопку START/STOP для начала
Your camcorder returns to the standby mode.
записи. Эпизод вставлен. Запись
остановится автоматически в нулевой
точке счетчика. Ваша видеокамера
вернется в режим ожидания.
EDITSEARCH
ZERO SET
MEMORY
Notes
Примечания
•The zero set memory function works only for
• Функция памяти нуля не работает для лент,
tapes recorded in the Digital8 system.
записанных в цифровой системе Digital8 .
•The picture and the sound may be distorted at
• Изображение и звук могут быть искажены в
the end of the inserted section when it is played
конце вставленного эпизода при
back.
воспроизведении.
Если на ленте имеется незаписанный
If a tape has a blank portion in the recorded
участок
portions
Функция памяти нуля может не работать
The zero set memory function may not work
надлежащим образом.
correctly.
63
— Advanced Playback Operations —
—
Усовершенствованные операции воспроизведения
—
Playing back a tape
Воспроизведение ленты с
with picture effects
эффектами изображения
During playback, you can process a scene using
Во время воспроизведения, Вы можете
the picture effect functions: NEG.ART, SEPIA,
видоизменять изображение с помощью
B&W and SOLARIZE.
функций: NEG.ART, SEPIA, B&W и SOLARIZE.
During playback, press PICTURE EFFECT and
Во время воспроизведения, нажмите кнопку
turn the SEL/PUSH EXEC dial until the desired
PICTURE EFFECT и поворачивайте диск SEL/
picture effect indicator (NEG.ART, SEPIA, B&W
PUSH EXEC до тех пор, пока не начнет
or SOLARIZE) appears.
мигать индикатор нужного цифрового
For details of each picture effect function, see
(NEG.ART, SEPIA, B&W и SOLARIZE).
page 48.
Подробные сведения по каждой функции
цифровых эффектов приведены на стр. 48.
PICTURE
EFFECT
NEG. ART
To cancel the picture effect function
Для отмены функции цифровых
Press PICTURE EFFECT.
эффектов
Нажмите кнопку PICTURE EFFECT.
Notes
•The picture effect function works only for tapes
Примечания
recorded in the Digital8 system.
• Функция эффектов изображения работает
•You cannot process externally input scenes
только для лент, записанных в цифровой
using the picture effect function.
системе Digital8 .
•To record pictures that you have processed
• Вы не можете видоизменять изображения
using the picture effect function, record the
от КВМ или телевизора с помощью функции
pictures on the VCR using your camcorder as a
эффектов изображения.
player.
• Для записи изображения с использованием
эффектов изображения, запишите
Pictures processed by the picture effect
изображения на КВМ, используя Вашу
function
видеокамеру в качестве плейера.
Pictures processed by the picture effect function
are not output through the DV OUT jack.
Изображение с эффектами изображения
Сигнал изображения с эффектами
When you set the POWER switch to OFF
изображения не передается через выходное
(CHARGE) or stop playing back
гнездо DV OUT.
The picture effect function is automatically
canceled.
Если Вы установили переключатель
POWER в положение OFF (CHARGE) или
остановили воспроизведение
Функция эффектов изображения будет
автоматически отменена.
64
Playing back a tape
Воспроизведение ленты
with digital effects
с цифровыми эффектами
During playback, you can process a scene using
Во время воспроизведения, Вы можете
видоизменять изображение с помощью
the digital effect functions: STILL, FLASH, LUMI.
функций: STILL, FLASH, LUMI. и TRAIL.
and TRAIL.
(1)
Во время воспроизведения, нажмите кнопку
(1)During playback, press DIGITAL EFFECT
DIGITAL EFFECT и поворачивайте диск SEL/
and turn the SEL/PUSH EXEC dial until the
PUSH EXEC до тех пор, пока не начнет
desired digital effect indicator (STILL,
мигать индикатор нужного цифрового
FLASH, LUMI. or TRAIL) flashes.
эффекта (STILL, FLASH, LUMI. или TRAIL).
(2)Нажмите диск SEL/PUSH EXEС.
(2)Press the SEL/PUSH EXEC dial.
Высветится индикатор цифрового
The digital effect indicator lights up and the
эффекта и появятся полосы. В режиме
bars appear. In the STILL or LUMI. mode, the
STILL или LUMI. Изображение, на котором
image where you press the SEL/PUSH EXEC
Вы нажмете кнопку диск SEL/PUSH EXEС,
dial is stored in memory as a still image.
будет занесено в память как неподвижное
изображение.
(3)Turn the SEL/PUSH EXEC dial to adjust the
Advanced Playback Operations Усовершенствованные операции воспроизведения
(3)Поверните диск SEL/PUSH EXEС для
effect.
регулировки эффекта изображения.
For details of each digital effect function, see
Подробные сведения по каждой функции
page 50.
цифровых эффектов приведены на стр. 50.
2
STILL
1
DIGITAL
EFFECT
3
STILL
To cancel the digital effect function
Для отмены функции цифровых эффектов
Press DIGITAL EFFECT.
Нажмите кнопку DIGITAL EFFECT.
Примечания
Notes
• Функция цифровых эффектов работает
•The digital effect function works only for tapes
только для лент, записанных в цифровой
recorded in the Digital8 system.
системе Digital8 .
•You cannot process externally input scenes
• Вы не можете видоизменять изображения
using the digital effect function.
от КВМ или телевизора с помощью функции
•To record images that you have processed
цифровых эффектов.
using the digital effect function, record the
•
Для записи изображения с цифровыми
images on the VCR using your camcorder as a
эффектами, запишите изображения на КВМ,
используя Вашу видеокамеру в качестве
player.
плейера.
Pictures processed by the digital effect function
Изображение с цифровыми эффектами
Pictures processed by the digital effect function
Сигнал изображения с цифровыми эффектами не
are not output through the DV OUT jack.
передается через выходное гнездо DV OUT.
When you set the POWER switch to OFF
Если Вы установили переключатель
(CHARGE) or stop playing back
POWER в положение OFF (CHARGE) или
The digital effect function is automatically canceled.
остановили воспроизведение
Функция цифровых эффектов будет
автоматически отменена.
65
Enlarging recorded
Увеличение записанных
images – PB ZOOM
изображений – PB ZOOM
You can enlarge moving and still images recorded
Вы можете увеличивать движущиеся и неподвижные
on tapes.
изображения, записанные на ленты.
Besides the operation described here, your
Помимо операций, описанных в данном руководстве,
camcorder can enlarge still images recorded on
Ваша видеокамера позволяет увеличивать
неподвижные изображения, записанные на “Memory
“Memory Stick”s (DCR-TRV320E only).
Stick” (Только DCR-TRV320E).
(1) Press PB ZOOM on your camcorder while you
(1) Нажмите кнопку PB ZOOM на Вашей
are playing back. The image is enlarged, and R r
видеокамере во время воспроизведения.
appears on the LCD screen or in the viewfinder.
Изображение увеличится, а на экране ЖКД или
(2) Turn SEL/PUSH EXEC dial to move the
в видоискателе появится индикация R r.
enlarged image, then press the dial.
(2) Поверните диск SEL/PUSH EXEC для
R : The image moves downwards
перемещения увеличенного изображения, а
r : The image moves upwards
затем нажмите диск.
T t becomes available.
R : Изображения перемещается вниз
r : Изображение перемещается вверх
(3) Turn SEL/PUSH EXEC dial to move the
enlarged image, then press the dial.
T t появится на дисплее.
T : The image moves rightward
(3) Поверните диск SEL/PUSH EXEC для
(Turn the dial downwards.)
перемещения увеличенного изображения, а
t : The image moves leftward
затем нажмите диск.
(Turn the dial upwards.)
T : Изображение перемещается вправо
(поверните диск вниз).
t : Изображение перемещается влево
(поверните диск вверх).
PB ZOOM
2
[
EXEC
]
: T t
PB ZOOM
3
1
PB ZOOM
[
EXEC
]
: r R
To cancel PB ZOOM function
Для отмены функции PB ZOOM
Press PB ZOOM.
Нажмите кнопку PB ZOOM.
Note
Примечание
• Функция PB ZOOM работает только для лент,
•PB ZOOM works only for tapes recorded in the
записанных в системе Digital 8 .
Digital 8 system.
• Вы не можете обрабатывать введенные с
•You cannot process externally input scenes
внешней аппаратуры изображения с помощью
using PB ZOOM function.
функции PB ZOOM.
•
To record pictures that you have processed using
• Для записи изображений, обработанных с
PB ZOOM function, record the pictures on the VCR
помощью функции PB ZOOM, запишите
using your camcorder as a player.
изображения на КВМ с помощью видеокамеры,
используя ее в качесте плейера.
Pictures processed by PB ZOOM function
Изображения, обработанные с помощью
Pictures processed by PB ZOOM function are not
функции PB ZOOM
output through the DV OUT jack.
Изображения, обработанные с помощью функции
PB ZOOM, не передаются через гнездо DV OUT.
When you set POWER switch to OFF (CHARGE)
Если Вы установите переключатель
or stop playing back
POWER в положение OFF (CHARGE) или
PB ZOOM function is automatically canceled.
остановите воспроизведение
Функция PB ZOOM будет автоматически
66
отмемена.
Quickly locating a
Быстрое отыскание эпизода
scene using the zero
с помощью функции памяти
set memory function
нулевой отметки
Your camcorder goes forward or backward to
Ваша видеокамера выполняет продвижение
вперед или назад с автоматической остановкой
automatically stop at a desired scene having a
в нужном эпизоде, где показание счетчика
counter value of “0:00:00”.
равно “0:00:00”.
Use the Remote Commander for this operation.
Вы можете выполнять это с помощью пульта
Use this function, for example, to view a desired
дистанционного управления.
scene later on during playback.
Используйте эту функцию, например, для
просмотра нужного эпизода позже во время
(1)In the playback mode, press DISPLAY.
воспроизведения.
(2)Press ZERO SET MEMORY at the point you
(1) В режиме воспроизведения нажмите кнопку
want to locate later. The counter shows
DISPLAY.
“0:00:00” and the ZERO SET MEMORY
(2) Нажмите кнопку ZERO SET MEMORY в
месте, которое Вы захотите найти позже.
indicator flashes.
Показание счетчика станет равным “0:00:00”,
Advanced Playback Operations Усовершенствованные операции воспроизведения
(3)Press x when you want to stop playback.
и начнет мигать индикатор ZERO SET
(4)Press m to rewind the tape to the counter’s
MEMORY.
zero point. The tape stops automatically when
(3) Нажмите кнопку x, если Вы захотите нажать
the counter reaches approximately zero. The
остановить воспроизведение.
(4)
Нажмите кнопку m для ускоренной
ZERO SET MEMORY indicator disappears
перемотки ленты назад к нулевой точке
and the time code appears.
счетчика. Лента остановится автоматически,
(5)Press N. Playback starts from the counter’s
если счетчик достигнет нулевой отметки.
zero point.
Индикатор ZERO SET MEMORY исчезнет, и
появится код времени.
(5) Нажмите кнопку N. Воспроизведение
начнется с нулевой отметки счетчика.
DISPLAY
ZERO SET MEMORY
Notes
Примечание
•The zero set memory function works only for
• Функция памяти нулевой отметки работает
tapes recorded in the Digital8 system.
только для лент, записанных в цифровой
•When you press ZERO SET MEMORY before
системе Digital8 .
•
Если Вы нажмете кнопку ZERO SET MEMORY до
rewinding the tape, the zero set memory
начала обратной перемотки ленты, то функция
function will be canceled.
памяти нулевой отметки будет отменена.
•There may be a discrepancy of several seconds
• Может быть расхождение в несколько секунд
from the time code.
между кодом времени и действительным
временем.
If a tape has a blank portion in the recorded
potion
Если на ленте между записанными
The zero set memory function may not work
участками имеется незаписанный участок.
correctly.
Функция памяти нулевой отметки может не
работать надлежащим образом.
ZERO SET MEMORY functions also in the
standby mode
Функция ZERO SET MEMORY также
работает в режиме ожидания
When you insert a scene in the middle of a
Если Вы хотите вставить эпизод в середине
recorded tape, press ZERO SET MEMORY at the
записанной ленты, нажмите кнопку ZERO SET
point you want to end the insertion. Rewind the
MEMORY в том месте, где вы хотите закончить
tape to the insert start point, and start recording.
вставку. Перемотайте ленту к месту начала
Recording stops automatically at the tape counter
вставки и начните запись. Запись автоматически
zero point. Your camcorder returns to the
остановится в месте нулевой отметки счетчика
standby mode.
ленты. Ваша видеокамера вернется в режим
ожидания.
67
Searching a recording
by date
Поиск записи по дате
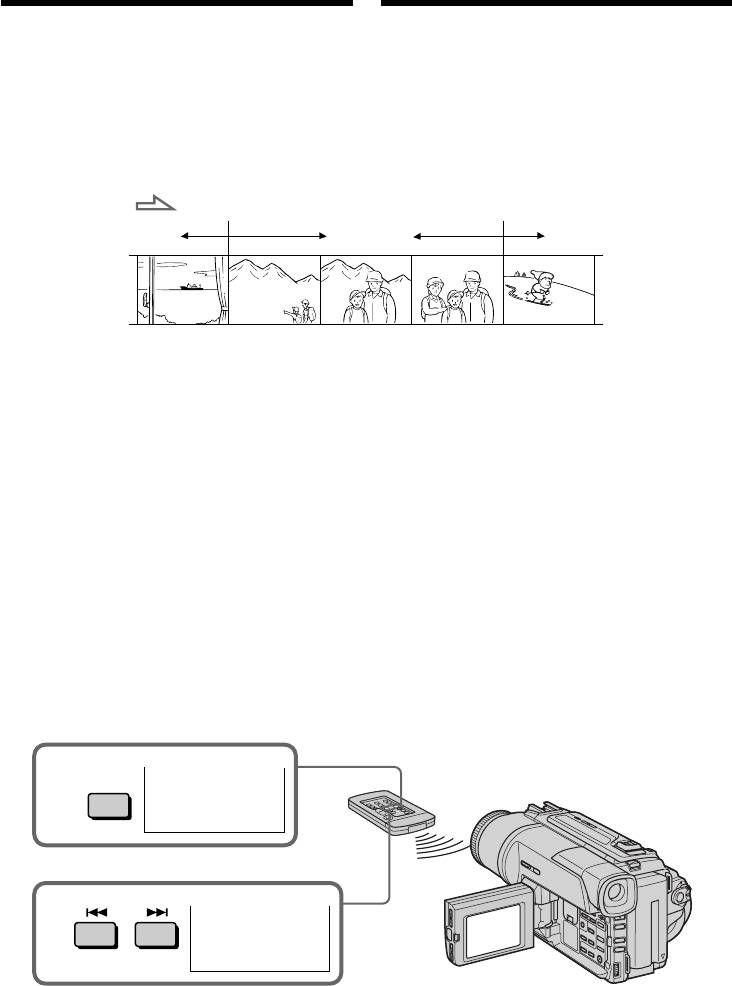
– Date search
– Поиск даты
You can automatically search for the point where
Вы можете выполнять автоматически поиск
the recording date changes and start playback
места, где изменяется дата записи и
from that point (Date search). Use the Remote
начинать воспроизведение с этого места
Commander for this operation.
(поиск даты). Используйте пульт
Use this function to check where recording dates
дистанционного управления для таких
change or to edit the tape at each recording date.
операций.
Используйте эту функцию для проверки, где
изменяются даты записи, или же для
выполнения монтажа ленты в каждом месте
записи даты.
5.7. 20004.7. 2000 31.12. 2000
V
V
V
[a]
[b]
[c]
(1)Установите переключатель POWER в
(1)Set the POWER switch to PLAYER.
положение PLAYER.
(2)Press SEARCH MODE on the Remote
(2)Нажимайте повторно кнопку SEARCH
Commander repeatedly, until the date search
MODE на пульте дистанционного
indicator appears.
управления до тех пор, пока не появится
The indicator changes as follows:
индикатор поиска даты.
DATE SEARCH t PHOTO SEARCH t
Индикатор будет изменяться следующим
PHOTO SCAN
образом: DATE SEARCH t PHOTO
(3)When the current position is [b], press . to
SEARCH t PHOTO SCAN
search towards [a] or press > to search
(3)Если текущее положение соответствует
towards [c]. Your camcorder automatically
варианту [b], нажмите кнопку . для
starts playback at the point where the date
выполнения поиска в направлении [a] или
changes.
нажмите кнопку > для выполнения
Each time you press . or >, the
поиска в направлении [c]. Ваша
camcorder searches for the previous or next
видеокамера автоматически начнет
date.
воспроизведение в месте, где изменяется
дата.
Всякий раз при нажатии кнопки . или
>, видеокамера будет выполнять поиск
предыдущей или следующей даты.
SEARCH
2
DATE
00
MODE
SEARCH
3
DATE
01
SEARCH
Для остановки поиска
To stop searching
Нажмите кнопку x.
Press x.
68

Searching a recording by date
Поиск записи по дате
– Date search
– Поиск даты
Notes
Примечания
•The date search works only for tapes recorded
• Режим поиска даты функционирует только
in the Digital8 system.
для лент, записанных в цифровой системе
•If one day’s recording is less than two minutes,
Digital8 .
your camcorder may not accurately find the
• Если в какой-либо из дней Ваша запись
point where the recording date changes.
продолжалась менее двух минут, Ваша
видеокамера может точно не найти место,
If a tape has a blank portion in the recorded
где изменяется дата записи.
portions
The date search function may not work correctly.
Если на записанной ленте имеются
незаписанные участки
Функция поиска даты будет работать
неправильно.
Advanced Playback Operations Усовершенствованные операции воспроизведения
69
Searching for a photo
Поиск фото
– Photo search/Photo
– Фотопоиск/
scan
Фотосканирование
You can search for the still image recorded on
Вы можете выполнять поиск неподвижного
tape (photo search).
изображения, записанного на ленту
You can also search for still images one after
(фотопоиск).
another and display each picture for five seconds
Вы также можете выполнять поиск
automatically (photo scan). Use the Remote
неподвижных изображений одно за другим и
Commander for these operations.
отображать каждое изображение пять секнд
автоматически (фотосканирование).
Используйте пульт дистанционного
Searching for a photo
управления для этих операций.
(1)Set the POWER switch to PLAYER.
(2)Press SEARCH MODE on the Remote
Поиск фото
Commander repeatedly, until the photo
search indicator appears.
(1)Установите переключатель POWER в
The indicator changes as follows:
положение PLAYER.
DATE SEARCH t PHOTO SEARCH t
(2)Нажимайте повторно на пульте
PHOTO SCAN
дистанционного управления кнопку
(3)Press . or > to select the photo for
SEARCH MODE до тех пор, пока не
playback. Each time you press . or >,
появится индикатор фотопоиска.
the camcorder searches for the previous or
Индикатор будет изменяться следующим
next photo. Your camcorder automatically
образом: DATE SEARCH t PHOTO
starts playback from the photo.
SEARCH t PHOTO SCAN
(3)Нажмите кнопку . или >, чтобы
выбрать фото для воспроизведения.
Всякий раз при нажатии . или >
видеокамера начинает поиск
предыдущего или следующего эпизода.
Ваша видеокамера автоматически начнет
воспроизведение с этого фото.
2
PHOTO
00
SEARCH
SEARCH
MODE
3
PHOTO
01
SEARCH
To stop searching
Для остановки поиска
Press x.
Нажмите кнопку x.
70
Searching for a photo
Поиск фото – Фотопоиск/
– Photo search/Photo scan
Фотосканирование
Scanning photo
Сканирование фото
(1)Set the POWER switch to PLAYER.
(1)Установите переключатель POWER в
(2)Press SEARCH MODE on the Remote
положение PLAYER.
Commander repeatedly, until the photo scan
(2)Нажимайте повторно на пульте
indicator appears.
дистанционного управления кнопку
The indicator changes as follows:
SEARCH MODE до тех пор, пока не
DATE SEARCH t PHOTO SEARCH t
появится индикатор фотосканирования.
PHOTO SCAN
Индикатор будет изменяться следующим
(3)Press . or >.
образом: DATE SEARCH t PHOTO
Each photo is played back for about 5 seconds
SEARCH t PHOTO SCAN
automatically.
(3)Нажмите кнопку . или >.
Каждое фото будет автоматически
Advanced Playback Operations Усовершенствованные операции воспроизведения
отображаться примерно 5 секунд.
2
PHOTO
00
SEARCH
SCAN
MODE
3
To stop scanning
Для остановки сканирования
Press x.
Нажмите кнопку x.
Note
Примечание
The photo search and photo scan work only for
Фотопоиск и фотосканирование
tapes recorded in the Digital8 system.
функционируют только для лент, записанных
в цифровой системе Digital8 .
If a tape has a blank portion in the recorded
portions
Если на записанной ленте имеются
The photo search and photo scan functions may
незаписанные участки
not work correctly.
Функция фотопоиска и фотосканирования
может работать неправильно.
71
— Editing —
— Монтаж —
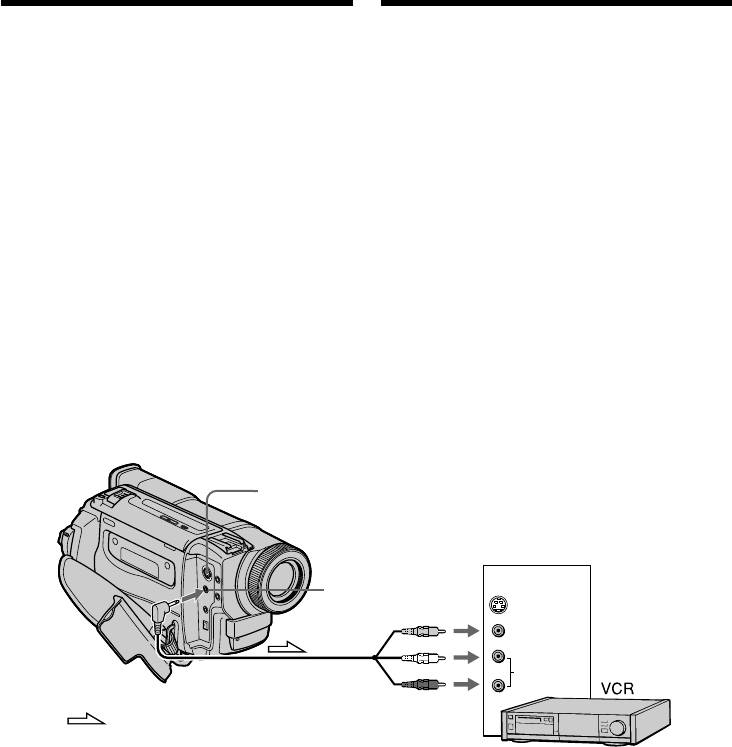
Dubbing a tape
Перезапись ленты
Using the A/V connecting cable
Использование соединительного
Connect your camcorder to the VCR using the
кабеля аудио/видео
A/V connecting cable supplied with your
Подсоедините Вашу видеокамеру к КВМ с
camcorder.
помощью соединительного кабеля аудио/
(1)Insert a blank tape (or a tape you want to
видео, который прилагается к Вашей
record over) into the VCR, and insert the
видеокамере.
recorded tape into your camcorder.
(1)Вставьте незаписанную ленту (или ленту,
(2)Set the input selector on the VCR to LINE.
на которую Вы хотите выполнить запись) в
Refer to the operating instructions of your
КВМ и вставьте записанную ленту в Вашу
VCR for more information.
видеокамеру.
(3)Set the POWER switch to PLAYER.
(2)Установите селектор входного на КВМ в
(4)Play back the recorded tape on your
положение LINE. Более подробные
camcorder.
сведения Вы сможете найти в инструкции
(5)Start recording on the VCR.
по эксплуатации Вашего КВМ.
Refer to the operating instructions of your
(3)Установите переключатель POWER в
VCR for more information.
положение PLAYER.
(4)Начните воспроизведение записанной
ленты на Вашей видеокамере.
(5)Начните запись на Вашем КВМ.
Более подробные сведения Вы сможете
найти в инструкции по эксплуатации
Вашего КВМ.
S VIDEO
IN
AUDIO
/
VIDEO out
/
Выход AUDIO/
S VIDEO
VIDEO
VIDEO
AUDIO
/КВМ
: Signal flow/Передача сигнала
When you have finished dubbing a
Если Вы закончили перезапись ленты
tape
Нажмите кнопку x как на видеокамере, так и
Press x on both your camcorder and the VCR.
на КВМ.
72
Dubbing a tape Перезапись ленты
Be sure to clear the indicators from the screen
Не забудьте удалить индикаторы с экрана
If they are displayed, press the following buttons
Если на экране отображаются индикаторы,
not to record the indicators on the dubbed tape:
нажмите следующие кнопки, чтобы не
•The DISPLAY button.
записывать индикаторы на
•The DATE CODE button.
перезаписываемую ленту:
•The SEARCH MODE button on the Remote
• Кнопка DISPLAY
Commander.
• Кнопка DATE CODE
• Кнопка SEARCH MODE на пульте
You can edit on VCRs that support the
дистанционного управления.
following systems:
8 mm, Hi8, VHS, S-VHS,
Вы можете выполнять монтаж на КВМ,
VHSC, S-VHSC, Betamax, mini
которые поддерживают следующие
DV, DV or Digital8
системы:
8 мм, Hi8, VHS, S-VHS,
If your VCR is a monaural type
VHSC, S-VHSC, Betamax, мини
Editing Монтаж
Connect the yellow plug of the A/V connecting
DV, DV или Digital8
cable to the video input jack and the white or the
red plug to the audio input jack on the VCR or
Если Ваш КВМ монофонического типа
the TV. When the white plug is connected, the
Подсоедините желтый штекер соединительно
left channel audio is output, and the red plug is
кабеля аудио/видео к входному видеогнезду,
connected, the right channel audio is output.
а белый или красный штекер к входному
аудиогнезду на КВМ или телевизоре. Если
If your VCR has an S video jack
подсоединен белый штекер, то выходным
Connect using an S video cable (not supplied) to
сигналом будет звук левого канала, а если
obtain high-quality pictures.
подсоединен красный штекер, то выходным
With this connection, you do not need to connect
сигналом будет звук правого канала.
the yellow (video) plug of the A/V connecting
cable.
Если в Вашем КВМ имеется гнездо S видео
Connect an S video cable (not supplied) to the S
Выполните подсоединение с помощью кабеля
video jacks of both your camcorder and the VCR.
S видео (не прилагается) для получения
высококачественных изображений.
При таком подсоединении Вам не нужно
подсоединять желтый (видео) штекер
соединительного кабеля аудио/видео.
Подсоедините кабель S видео (не
прилагается) к гнездам S видео на Вашей
видеокамере и КВМ.
73
Dubbing a tape Перезапись ленты
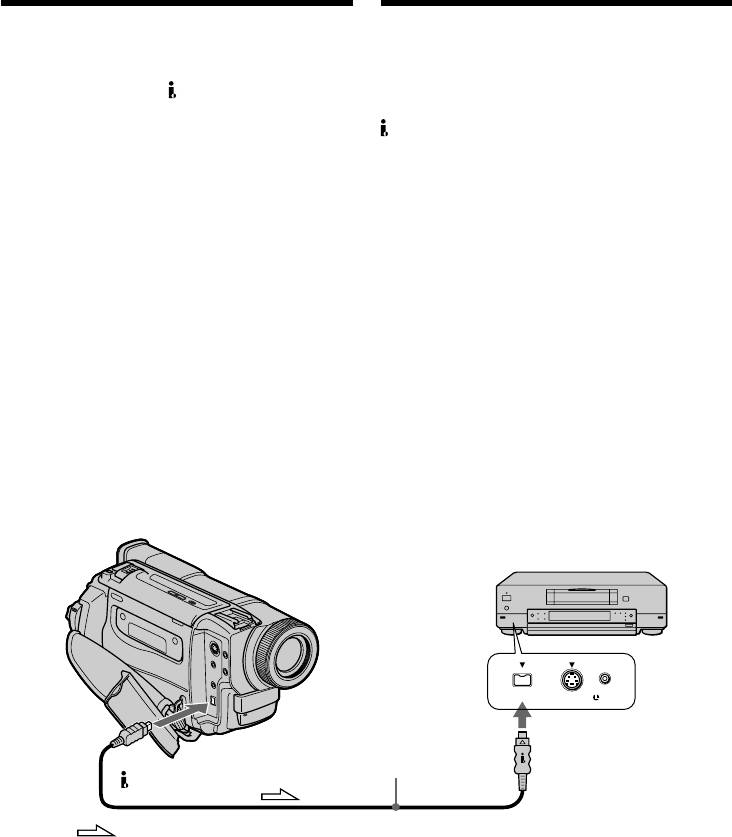
Using the i.LINK cable (DV connecting
Использование кабеля i.LINK
cable)
(соединительный кабель DV)
Simply connect the i.LINK cable (DV connecting
Просто подсоедините кабель i.LINK
cable) (not supplied) to DV OUT and to DV IN/
(соединительный кабель цифрового
OUT of the DV products. With digital-to-digital
видеосигнала DV) (не прилагается) к гнезду
connection, video and audio signals are
DV OUT и гнезду DV IN/OUT цифровых
transmitted in digital form for high-quality
видеоизделий. При цифро-цифровом
editing. You cannot dub the screen indicators.
соединении видео- и аудиосигналы передаются
(1)Insert a blank tape (or a tape you want to
в цифровой форме для последующего
record over) into the VCR, and insert the
высококачественного монтажа. Вы не можете
recorded tape into your camcorder.
выполнить перезапись экранных индикаторов.
(2)Set the input selector on the VCR to DV IN if
(1)Вставьте незаписанную ленту (или ленту,
it is available.
на которую хотите выполнить запись) в
Refer to the operating instructions of your
КВМ и вставьте записанную ленту в Вашу
VCR for more infomation.
видеокамеру.
(3)Set the POWER switch to PLAYER.
(2)Смотрите инструкцию по эесплуатации
(4)Play back the recorded tape on your
Вашего КВМ для получения дальнейшей
camcorder.
информации.
(5)Start recording on the VCR.
(3)Установите переключатель POWER в
Refer to the operating instructions of your
положение PLAYER.
VCR for more infomation.
(4)Начните воспроизведение записанной
ленты на Вашей видеокамере.
(5)Начните запись на КВМ.
Смотрите инструкцию по эесплуатации
Вашего КВМ для получения дальнейшей
информации.
DV
S VIDEO LANC
DV IN/OUT
(not supplied)/
(не прилагается)
DV OUT
: Signal flow/Передача сигнала
When you have finished dubbing a
Если Вы закончили перезапись ленты
tape
Нажмите кнопку x как на Вашей
Press x on both your camcorder and the VCR.
видеокамере, так и на КВМ.
74
Dubbing a tape Перезапись ленты
Note on tapes that are not recorded in the
Примечание относительно лент, которые
Digital8 system
были записаны не в цифровой системе
The picture may fluctuate. This is not a
Digital8
malfunction.
Возможно подрагивание изображения. Это не
является неисправностью.
During playback of tapes recorded in the Hi8/
standard 8 system
Во время воспроизведения ленты,
Digital signals are output as the image signals
записанной в системе Hi8/стандартной
from the DV OUT jack.
системе 8
Цифровые сигналы выводятся в качестве
You can connect one VCR only using the i.LINK
сигналов изображения через выходное
cable (DV connecting cable).
гнездо DV OUT.
See page 125 for details about i.LINK.
Вы можете подсоединить один только
During digital editing
КВМ с помощью кабеля i.LINK
Editing Монтаж
You cannot use PICTURE EFFECT or DIGITAL
(соединительного кабеля DV)
EFFECT button functions.
Подробные сведения относительно i.LINK
приведены на стр. 125.
If you record playback pause picture via the
DV OUT jack
Во время цифрового монтажа
The recorded picture becomes rough. Also,
Вы не можете использовать функции кнопок
when you play back the recorded pictures on
PICTURE EFFECT или DIGITAL EFFECT.
other video equipment, the picture may jitter.
При записи на паузе воспроизводимого
изображения через гнездо DV OUT
Записанное изображение будет искаженным.
Также, при воспроизведении записанных
изображений на другой аппаратуре,
изображение может подрагивать.
75
— Выполнение индивидуальных
— Customizing Your Camcorder —
установок на видеокамере —
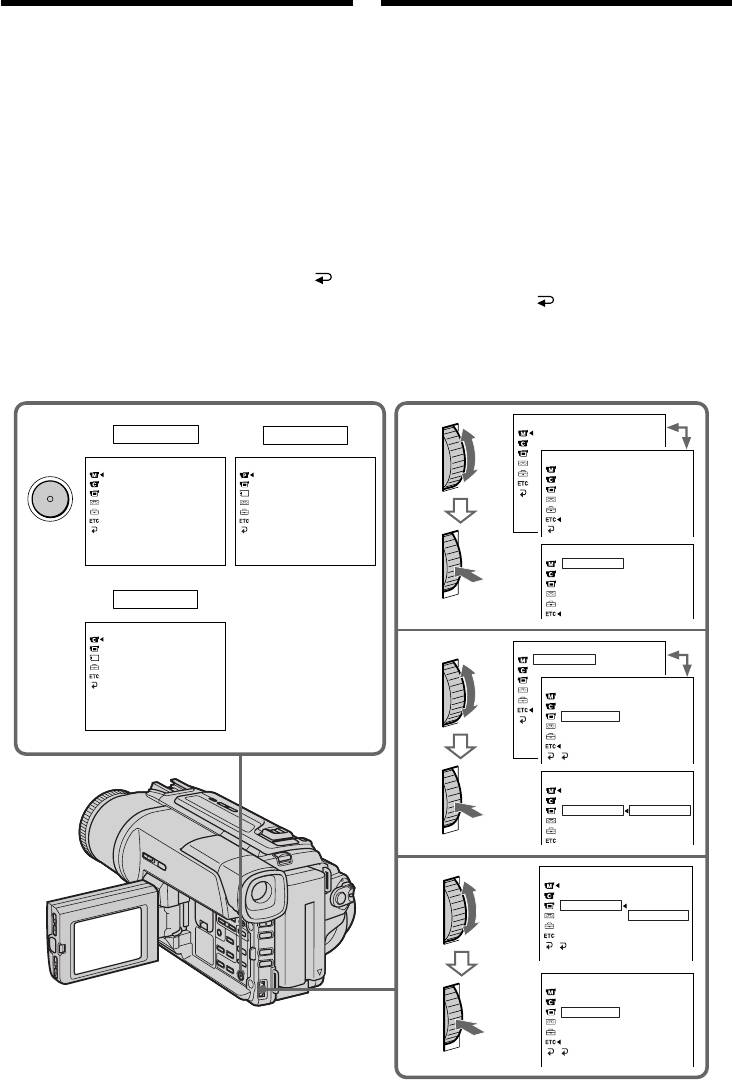
Changing the menu settings
Изменение установок меню
To change the mode settings in the menu
Для изменения установок режима в установках
меню выберите пункты меню с помощью диска
settings, select the menu items with the SEL/
SEL/PUSH EXEC. Установки по умолчанию
PUSH EXEC dial. The default settings can be
можно частично изменить. Сначала выберите
partially changed. First, select the icon, then the
пиктограмму, затем пункт меню, а затем режим.
menu item and then the mode.
(1) В режиме CAMERA, PLAYER или MEMORY
(1)In CAMERA, PLAYER or MEMORY (DCR-
(только DCR-TRV320E) нажмите кнопку MENU.
TRV320E only) mode, press MENU.
(2) Поверните диск SEL/PUSH EXEC для выбора
нужной пиктограммы, а затем нажмите диск
(2)Turn the SEL/PUSH EXEC dial to select the
для выполнения установки.
desired icon, then press the dial to set.
(3) Поверните диск SEL/PUSH EXEC для выбора
(3)Turn the SEL/PUSH EXEC dial to select the
нужной пиктограммы, а затем нажмите диск
desired item, then press the dial to set.
для выполнения установки.
(4)Turn the SEL/PUSH EXEC dial to select the
(4) Поверните диск SEL/PUSH EXEC для выбора
нужной пиктограммы, а затем нажмите диск
desired mode, and press the dial to set.
для выполнения установки.
(5)If you want to change other items, select
(5) Если Вы хотите изменить другие пункты,
RETURN and press the dial, then repeat steps
выберите команду RETURN, а затем
from 2 to 4.
нажмите диск, после чего повторите действия
пунктов 2–4.
For details, see “Selecting the mode setting of
Подробные сведения приведены в разделе
each item” (p. 77).
“Выбор установок режима по каждому пункту”
(стр. 83).
MANUAL SET
1
CAMERA
2
AUTO SHTR
PLAYER
OTHERS
MANUAL SET
MENU
PLAYER SET
WORLD T
I
ME
AUTO SHTR
H
i
F
i SOUND
BEEP
TBC
DNR
COMMANDER
AUD
I
O M
I
X
D
I
SPLAY
NTSC PB
REC LAMP
PB MODE
I
ND
I
CATOR
[
MENU
]
:
END
[
MENU
]
:
END
OTHERS
WORLD T
I
ME
0 HR
BEEP
COMMANDER
D
I
SPLAY
MEMORY
REC LAMP
I
ND
I
CATOR
CAMERA SET
(DCR-TRV320E
D ZOOM
STEADYSHOT
N. S. LIGHT
only)/(Только
OTHERS
3
WORLD T
I
ME
0 HR
DCR-TRV320E)
BEEP
OTHERS
WORLD T
I
ME
BEEP
COMMANDER
ON
[
MENU
]
:
END
D
I
SPLAY
REC LAMP
I
ND
I
CATOR
RETURN
MANUAL SET
WORLD T
I
ME
BEEP
COMMANDER
ON
D
I
SPLAY
OFF
REC LAMP
I
ND
I
CATOR
MANUAL SET
4
WORLD T
I
ME
BEEP
COMMANDER
ON
D
I
SPLAY
OFF
REC LAMP
I
ND
I
CATOR
RETURN
OTHERS
WORLD T
I
ME
BEEP
COMMANDER
OFF
D
I
SPLAY
REC LAMP
I
ND
I
CATOR
RETURN
76
Changing the menu settings
Изменение установок меню
To make the menu display disappear
Для того, чтобы исчезла индикация меню
Press MENU.
Нажмите кнопку MENU.
Menu items are displayed as the following
Пункты меню отображаются в виде
icons:
приведенных ниже пиктограмм:
MANUAL SET
MANUAL SET
CAMERA SET
CAMERA SET
PLAYER SET
PLAYER SET
LCD/VF SET (DCR-TRV320E only)/
LCD/VF SET (только DCR-TRV320E)/
LCD SET (DCR-TRV120E/TRV125E)
LCD SET (DCR-TRV120E/TRV125E)
MEMORY SET (DCR-TRV320E only)
MEMORY SET (только DCR-TRV320E)
TAPE SET
TAPE SET
SETUP MENU
SETUP MENU
OTHERS
OTHERS
English
Customizing Your Camcorder Выполнение индивидуальных установок на видеокамере
Selecting the mode setting of each item z is the default setting.
Menu items differ according to the position of the POWER switch.
The LCD screen and the viewfinder show only the items you can operate at the moment.
POWER
Icon/item
Mode
Meaning
switch
AUTO SHTR
z ON
To automatically activate the electronic shutter when
CAMERA
shooting in bright conditions
OFF
To not automatically activate the electronic shutter even
when shooting in bright conditions
D ZOOM
z OFF
To deactivate digital zoom. Up to 25× zoom is carried
CAMERA
out.
MEMORY
50×
To activate digital zoom. More than 25× to 50× zoom is
performed digitally. (p. 24)
100×∗
To activate digital zoom. More than 25× to 100× zoom is
performed digitally. (p. 24)
16:9WIDE
z OFF
—
CAMERA
ON
To record a 16:9 wide picture (p. 45)
STEADYSHOT
z ON
To compensate for camera-shake
CAMERA
MEMORY
OFF
To cancel the SteadyShot function. Natural pictures are
produced when shooting a stationary object with a
tripod.
N.S. LIGHT
z ON
To use the NightShot Light function (p. 28)
CAMERA
MEMORY
OFF
To cancel the NightShot Light function
* 125× (DCR-TRV125E only)
Notes on the SteadyShot function
•The SteadyShot function will not correct excessive camera-shake.
•Attachment of a conversion lens (not supplied) may influence the SteadyShot function.
If you cancel the SteadyShot function
The SteadyShot off indicator appears. Your camcorder prevents excessive compensation for
camera-shake.
77
Changing the menu settings
POWER
Icon/item
Mode
Meaning
switch
HiFi SOUND
z STEREO
To play back a stereo tape or dual sound track tape
PLAYER
with main and sub sound
1
To play back a stereo tape with the left sound or a
dual sound track tape with main sound
2
To play back a stereo tape with the right sound or a
dual sound track tape with sub sound
TBC*
z ON
To correct jitter
PLAYER
OFF
To not correct jitter. Set TBC to OFF when playing
back a tape on which you have dubbed over and
recorded the signal of a TV game or similar machine.
TBC stands for “Time Base Corrector”.
DNR*
z ON
To reduce picture noise
PLAYER
OFF
To reduce a conspicuous afterimage when the picture
has a lot of movement
DNR stands for “Digital Noise Reduction”.
AUDIO MIX
———
To adjust the balance between the stereo 1 and stereo
PLAYER
2
ST1 ST2
NTSC PB
z ON PAL TV
To playback a tape recorded on your camcorder on a
PLAYER
PAL system TV
NTSC 4.43
To playback a tape recorded in the NTSC colour
system on a TV with the NTSC 4.43 mode
PB MODE
z AUTO
To automatically select the system (Hi8/standard 8
PLAYER
or Digital8 ) that was used to record on the tape,
and play back the tape
/
To play back a tape that was recorded in the Hi8/
standard 8 system when your camcorder does not
automatically distinguish the recording system
*When you play back tapes recorded in the Hi8/standard 8 system only.
Notes on AUDIO MIX
•When playing back a tape recorded in the 16-bit mode, you cannot adjust the balance.
•You can adjust the balance only for tapes recorded in the Digital8 system.
Note on NTSC PB
When you play back a tape on a Multi System TV, select the best mode while viewing the picture on
the TV.
Note on PB MODE
The mode will return to the default setting when:
–you remove the battery pack or power source.
–you turn the POWER switch.
78
Changing the menu settings
POWER
Icon/item
Mode
Meaning
switch
LCD B. L.
z BRT NORMAL
To set the brightness on the LCD screen normal
PLAYER
CAMERA
BRIGHT
To brighten the LCD screen
MEMORY
LCD COLOUR
To adjust the colour on the LCD screen, turning the
PLAYER
SEL/PUSH dial to adjust the following bar.
CAMERA
MEMORY
To lighten
To darken
VF B.L.*
z BRT NORMAL
To set the brightness in the viewfinder normal
PLAYER
CAMERA
BRIGHT
To brighten the viewfinder
MEMORY
CONTINUOUS*
z OFF
Not to record continuously
MEMORY
MULTI SCRN
To record 9 images continuously (p. 97)
QUALITY*
z FINE
To record still images in the fine image quality mode,
PLAYER
using the “Memory Stick”
MEMORY
Customizing Your Camcorder Выполнение индивидуальных установок на видеокамере
STANDARD
To record still images in the standard image quality
mode, using the “Memory Stick”
FLD./FRAME*
z FIELD
To record moving subjects
MEMORY
FRAME
To record stopping subjects in high quality
PRINT MARK*
z OFF
To cancel print marks on still images.
PLAYER
MEMORY
ON
To write a print mark on the recorded still images
you want to print out later
PROTECT*
z OFF
Not to protect still images
PLAYER
MEMORY
ON
To protect selected still iamges against accidental
erasure (p. 116)
SLIDE SHOW*
To play back images in a continuous loop (p. 114)
MEMORY
DELETE ALL*
To delete all the images (p. 119)
PLAYER
MEMORY
FORMAT*
z RETURN
To cancel formatting.
PLAYER
MEMORY
FORMAT
To format an inserted “Memory Stick.”
1. Select FORMAT with the SEL/PUSH EXEC dial,
then press the dial.
2. Turn the SEL/PUSH EXEC dial to select FORMAT,
then press the dial.
3. After “EXECUTE” appears, press the SEL/PUSH
EXEC dial. “FORMATTING” appears during
formatting. “COMPLETE” appears when formatting
is finished.
PHOTO SAVE*
To duplicate still images (p. 107)
PLAYER
*DCR-TRV320E only
Notes on LCD B.L. and VF.B.L.
•When you select BRIGHT, battery life is reduced by about 10 percent during recording.
•When you use power sources other than the battery pack, BRIGHT is automatically selected.
Notes on formatting
•Supplied or optional “Memory Stick”s have been formatted at factory. Formatting with this
camcorder is not required.
•Do not turn the POWER switch or press any button while the display shows FORMATTING.
•You cannot format the “Memory Stick” if the write-protect tab on the “Memory Stick” is set to LOCK.
•Format again if the message “ ” appears.
Formatting erases all information on the “Memory Stick”
Check the contents of the “Memory Stick” before formatting.
•Formatting erases sample images on the “Memory Stick”.
•Formatting erases the protected image data on the “Memory Stick.”
79
Changing the menu settings
POWER
Icon/item
Mode
Meaning
switch
REC MODE
z SP
To record in the SP (Standard Play) mode
PLAYER
CAMERA
LP
To increase the recording time to 1.5 times the SP
mode
AUDIO MODE
z 12BIT
To record or play back in the 12-bit mode (two stereo
PLAYER*
sounds)
CAMERA
16BIT
To record or play back in the 16-bit mode (the one
stereo sound with high quality)
q REMAIN
z AUTO
To display the remaining tape bar:
PLAYER
•for about 8 seconds after your camcorder is turned
CAMERA
on and calculates the remaining amount of tape
•for about 8 seconds after a cassette is inserted and
your camcorder calculates the remaining amount of
tape
•for about 8 seconds after N is pressed in PLAYER
mode
•for about 8 seconds after DISPLAY is pressed to
display the screen indicators
•for the period of tape rewinding, forwarding or
picture search in the PLAYER mode
ON
To always display the remaining tape bar
DATA CODE
z DATE/CAM
To display date, time and recording data during
PLAYER
playback
DATE
To display date and time during playback
Note on REC MODE
When you record on the standard 8 tape, your camcorder records in the SP mode even you select the
LP mode in the menu settings. In this case, the indicator “8 mm TAPE t SP REC, Hi8 TAPE t LP/
SP REC” appears on the LCD screen or in the viewfinder. Use the Hi8 tapes for the LP mode.
Notes on the LP mode
•When you record a tape in the LP mode on your camcorder, we recommend playing the tape on your
camcorder. When you play back the tape on other camcorders or VCRs, noise may occur in images or
sound.
•When you record in the SP and LP modes on one tape or you record some scenes in the LP mode, the
playback image may be distorted or the time code may not be written properly between scenes.
Note on AUDIO MODE
When playing back a tape recorded in the 16-bit mode, you cannot adjust the balance in AUDIO MIX.
*To dub a tape to another VCR
You cannot select AUDIO MODE for tapes recorded in the Digital8 system. You, however, can select
AUDIO MODE when you dub tapes recorded in the Hi8/standard 8 system to another VCR using the
i.LINK cable.
80

")