Sony DCR-TRV120E – страница 7
Инструкция к Видеокамере Sony DCR-TRV120E
Writing a print mark
Запись печатных
– PRINT MARK
знаков – PRINT MARK
– DCR-TRV320E only
– Только DCR-TRV320E
You can specify the recorded still image to print
Вы можете указать записанные изображения
out. This function is useful for printing out still
для распечатки. Эта функция является
полезной для распечатки неподвижных
images later.
изображений позже.
Your camcorder conforms with the DPOF
Ваша видеокамера соответствует стандарту
(Digital Print Order Format) standard for
DPOF (цифровой служебный формат
specifying the still images to print out.
распечатки) для указания неподвижных
изображений для распечатки.
Before operation
Перед началом работы
Insert a “Memory Stick” into your camcorder.
Вставьте “Memory Stick” в Вашу видеокамеру.
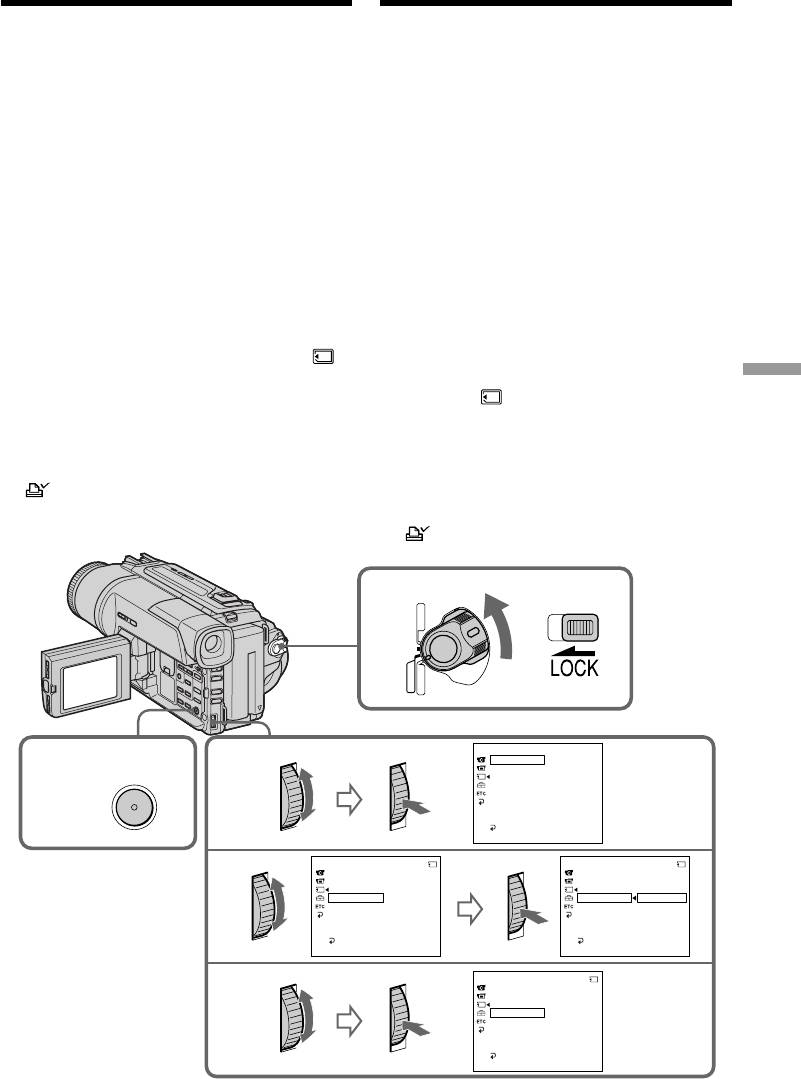
(1)Set the POWER switch to MEMORY or
(1) Установите переключатель POWER в
PLAYER. Make sure that the LOCK is set to
положение MEMORY или PLAYER.
the right (unlock) position.
Убедитесь, что фиксатор LOCK установлен в
правом (незафиксированном) положении.
(2)Play back the image you want to write a print
(2) Воспроизведите изображение, на котором
mark (P. 109).
Вы хотите записать печатный знак (стp. 109).
(3)Press MENU to display the menu.
(3) Нажмите кнопку MENU, чтобы на дисплее
(4)Turn the SEL/PUSH EXEC dial to select ,
появилось меню.
then press the dial.
(4) Поверните диск SEL/PUSH EXEC для выбора
“Memory Stick” operations Операции с “Memory Stick”
(5)Turn the SEL/PUSH EXEC dial to select
установки , а затем нажмите диск.
PRINT MARK, then press the dial.
(5) Поверните диск SEL/PUSH EXEC для выбора
(6)Turn the SEL/PUSH EXEC dial to select ON,
установки PRINT MARK, а затем нажмите
then press the dial.
диск.
(6) Поверните диск SEL/PUSH EXEC для выбора
(7)Press MENU to erase the menu display. The
установки ON, а затем нажмите диск.
mark is displayed beside the data file
(7) Нажмите кнопку MENU для стирания
name of the image with a print mark.
индикации меню. На дисплее появится знак
рядом с названием файла данных
изображения с печатным знаком.
PLAYER
1
(
CHARGE
OFF
)
CAMERA
MEMORY
MEMORY SET
CONT
I
NUOUS
OFF
4
QUAL
I
TY
3,7
MENU
FLD . / FRAME
PR
I
NT MARK
PROTECT
SL
I
DE SHOW
DELETE ALL
FORMAT
RETURN
[
MENU
]
:
END
MEMORY SET
21 / 40
MEMORY SET
21 / 40
CONT
I
NUOUS
CONT
I
NUOUS
5
QUAL
I
TY
QUAL
I
TY
FLD . / FRAME
FLD . / FRAME
PR
I
NT MARK
OFF
PR
I
NT MARK
ON
PROTECT
PROTECT
OFF
SL
I
DE SHOW
SL
I
DE SHOW
DELETE ALL
DELETE ALL
FORMAT
FORMAT
RETURN
RETURN
[
MENU
]
:
END
[
MENU
]
:
END
MEMORY SET
21 / 40
CONT
I
NUOUS
6
QUAL
I
TY
FLD . / FRAME
PR
I
NT MARK
ON
PROTECT
SL
I
DE SHOW
DELETE ALL
FORMAT
RETURN
[
MENU
]
:
END
121

Writing a print mark
Запись печатных знаков
– PRINT MARK
– PRINT MARK
To cancel writing print marks
Для отмены записи печатных знаков
Select OFF in step 6, then press the SEL/PUSH
Выберите установку OFF в пункте 6, а затем
EXEC dial.
нажмите диск SEL/PUSH EXEC.
If the write-protect tab on the “Memory Stick”
Если лепесток защиты записи на “Memory
is set to LOCK
Stick” установлен в положение LOCK
You cannot write print marks on still images.
Вы не можете записать печатные знаки на
неподвижные изображения.
122
— Additional Information —
— Дополнительная информация —
Digital8 system,
Цифровая система Digital8 ,
recording and playback
запись и воспроизведение
What is the “Digital8 system”?
Что такое “Цифровая система Digital8
This video system has been developed to enable
”?
digital recording to Hi8 /Digital8 video
Эта видеосистема была разработана для
cassette .
обеспечения цифровой записи на
видеокассеты Hi8 /Digital8 .
Usable cassette tapes
Используемые кассеты
We recommend using Hi8 /Digital8 video
Рекомендуется использовать видеокассеты
cassette.*
Hi8 /Digital8 .*
The recording time when you use your Digital8
Время записи при использовании Вашей
system camcorder on Hi8 /standard 8
видеокамеры системы Digital8 на ленте Hi8
tape is 2/3 the recording time when using the
/стандартной ленте 8 составляет 2/3
conventional Hi8 /standard 8 system
времени записи при использовании обычной
camcorder. (90 minutes of recording time
видеокамеры Hi8 /видеокамеры
стандартной системы 8 . (90 минут времени
becomes 60 minutes in the SP mode.)
записи станут равными 60 минутам в режиме
* If you use standard 8 tape, be sure to play
SP).
back the tape on this camcorder. Mosaic pattern
* При использовании стандартной ленты 8 ,
noise may appear when you play back standard
ее следует воспроизводить на этой же
8 tape on other VCRs (including other
видеокамере. При воспроизведении
DCR-TRV120E/TRV125E/TRV320E).
стандартной ленты 8 на других КВМ
(включая другие аппараты DCR-TRV120E/
TRV125E/TRV320E) могут появится помехи
Additional Information Дополнительная информация
Note
типа мозаики.
Tapes recorded in the Digital8 system cannot
be played back on Hi8 /standard 8
Примечание
(analog) system machine.
Ленты, записанные в цифровой системе
Digital8 , не могут быть воспроизведены на
is a trademark.
аппаратуре системы Hi8 /стандартной
системы 8 (аналоговой).
is a trademark.
is a trademark.
является фирменным знаком.
является фирменным знаком.
является фирменным знаком.
Playback system
The Digital8 system or Hi8 /standard 8
Система воспроизведения
system is automatically detected before the tape
Цифровая система Digital8 или Hi8
/
is played back.
стандартная система 8 автоматически
During playback of tapes recorded in the Hi8
детектируется перед воспроизведением ленты.
/standard 8 system, digital signals are
Во время воспроизведения лент, записанных
output as the image signals from the DV OUT
в системе Hi8 /стандартной системы 8 ,
jack.
цифровые сигналы выводятся в качестве
сигналов изображения через выходное
гнездо DV OUT.
Display during automatic detection of system
The Digital8 system or Hi8 /standard 8
Индикация во время автоматического
system is automatically detected, and the
детектирования системы
playback system is automatically switched to.
СЦифровая система Digital8 или Hi8 /
During switching of systems, the screen turns
стандартная система 8 автоматически
blue, and the following displays appear. A
детектируется, а система воспроизведения
автоматически включается. Во время
hissing noise also sometimes can be heard.
выключения систем, экран становится
голубым и появляются следующие
t / : During switching from Digital8
индикации. Может быть также слышен
to Hi8 /standard 8
свистящий шум.
/ t : During switching from Hi8 /
t / :
Во время переключения с
standard 8 to Digital8
системы Digital8 на систему Hi8
/стандартную систему 8
/ t : Во время переключения с
системы Hi8 /стандартной
системы 8 на цифровую
систему Digital8
123

Digital8 system, recording and
Цифровая система Digital8 ,
playback
запись и воспроизведение
When you play back
При воспроизведении
Playing back an NTSC-recorded tape
Воспроизведение лент, записанных в системе
You can play back tapes recorded in the NTSC
NTSC
Вы можете воспроизводить ленты, записанные в
video system on the LCD screen, if the tape is
видеосистеме NTSC, на экране ЖКД, если лента
recorded in the SP mode.
записана в режиме SP.
Copyright signal
Сигнал авторского права
When you play back
При воспроизведении
Using any other video camera recorder, you
Используя какую-либо другую видеокамеру, Вы не
cannot record on a tape that has recorded
можете выполнить запись на ленту, на которой
copyright control signals for copyright protection
были записаны контрольные сигналы авторского
of software which is played back on your
права для защиты авторских прав программ,
camcorder.
которые воспроизводятся на Вашей видеокамере.
When you playback a dual
При воспроизведении ленты с
sound track tape
двойной звуковой дорожкой
When you use tapes recorded in the
При использовании лент, записанных
в цифровой системе Digital8
Digital8
system
При воспроизведении ленты в цифровой системе
When you play back a Digital8 system tape
Digital8
, на которую выполнена перезапись ленты
which is dubbed from a dual sound track tape
с двойной звуковой дорожкой, записанной в
recorded in the DV system, set HiFi SOUND to
цифровой видеосистеме DV, установите команду
the desired mode in the menu settings (p. 76).
HiFi SOUND в нужный режим в установках меню
(стр. 76).
Sound from speaker
Звук от динамика
HiFi Sound Playing back Playing back
Режим
Воспроизведение Воспроизведение
Mode a stereo tape a dual sound
звучания
стереофонической ленты с двойной
track tape
HiFi
ленты звуковой дорожкой
STEREO Stereo Main sound and
STEREO
Стереофонический Основной звук и
звук вспомогательный
sub sound
звук
1 Lch Main sound
1 Левый канал Основной звук
2 Rch Sub sound
2 Правый канал
Вспомогательный
звук
When you use a tape recorded in the
При использовании лент, записанных
Hi8/standard 8 system
в системе Hi8/стандартной системе 8
When you play back a dual sound track tape
При воспроизведении ленты с двойной звуковой
recorded in an AFM HiFi stereo system, set HiFi
дорожкой, записанной в стереофонической системе
SOUND to the desired mode in the menu settings
AFM HiFi, установите команду HiFi SOUND в нужный
(p. 76).
режим в установках меню (стр. 76).
Звук от динамика
Sound from speaker
Режим
Воспроизведение Воспроизведение
HiFi Sound Playing back Playing back
звучания
стереофонической ленты с двойной
Mode a stereo tape a dual sound
HiFi
ленты звуковой дорожкой
track tape
STEREO
Стереофонический Основной звук и
звук вспомогательный
STEREO Stereo Main sound and
звук
sub sound
1
Монофонический
Основной звук
1 Monaural Main sound
звук
2 Unnatural Sub sound
2
Необычный звук
Вспомогательный
Sound
звук
Вы не можете записывать программы с двойным
You cannot record dual sound programmes on
звучанием на Вашей видеокамере.
124
your camcorder.

About i.LINK
Относительно i.LINK
The DV jack on this unit is an i.LINK-compliant
Цифровое видеогнездо DV на данном
DV input/output jack. This section describes the
аппарате удовлетворяет стандарту i.LINK и
i.LINK standard and its features.
является совместимым с входным/выходным
гнездом цифровых видеосигналов DV.
What is “i.LINK”?
Данный раздел описывает стандарт i.LINK и
i.LINK is a digital serial interface for handling
его характерные особенности.
digital video, digital audio and other data in two
directions between equipment having the i.LINK
Что такое “i.LINK”?
jack, and for controlling other equipment.
i.LINK является последовательным
i.LINK-compatible equipment can be connected
интерфейсом для обработки цифровых
by a single i.LINK cable. Possible applications are
видеосигналов, цифровых аудиосигналов и
operations and data transactions with various
других данных в двух направлениях между
digital AV equipment.
аппаратурой, имеющей гнездо i.LINK, и для
When two or more i.LINK-compatible equipment
управления другой аппратурой.
are connected to this unit in a daisy chain,
Аппаратура, совместимая с i.LINK может быть
operations and data transactions are possible
подсоединена посредством одного кабеля
with not only the equipment that this unit is
i.LINK. Возможными применениями являются
connected to but also with other devices via the
операции и обработка данных с различными
directly connected equipment.
видами цифровой видеоаппаратуры. Когда
Note, however, that the method of operation
два или более совместимых с i.LINK аппарата
sometimes varies according to the characteristics
подсоединены к данному аппарату, операции
Additional Information Дополнительная информация
and specifications of the equipment to be
и обработка данных возможны не только с
connected, and that operations and data
аппаратурой, которая подсоединена к
transactions are sometimes not possible on some
данному аппарату, но также и с другими
connected equipment.
приборами через непосредственно
подсоединенную аппаратуру. Однако следует
учесть, что метод оперирования иногда
Note
отличается в зависимости от характеристик и
Normally, only one piece of equipment can be
технических условий подсоединенной
connected to this unit by the i.LINK cable (DV
аппаратуры и такие операции и обработка
cable). When connecting this unit to i.LINK-
данных иногда являются невозможными на
compatible equipment having two or more
некоторой подсоединенной аппаратуре.
i.LINK jack (DV jacks), refer to the instruction
manual of the equipment to be connected.
Примечание
Обычно только один аппарат может быть
About the Name “i.LINK”
подсоединен к данному аппарату
i.LINK is a more familiar term for IEEE 1394 data
посредством кабеля i.LINK (цифрового
transport bus proposed by SONY, and is a
видеокабеля DV). При подсоединении
trademark approved by many corporations.
данного аппарата к двум или более
совместимым с i.LINK аппаратам
IEEE 1394 is an international standard
standardized by the Institute of Electrical and
обращайтесь к руководству по эксплуатации
Electronic Engineers.
подсоединеннной аппаратуры.
Относительно названия “i.LINK”
i.LINK является наиболее знакомым
термином, предложенным SONY для шины
пересылки данных, соответствующей
условиям IEEE 1394, а также торговой
маркой, утвержденной многими внутренними
и зарубежными корпорациями.
IEEE 1394 является международным
стандартом, установленным институтом
инженеров по электротехнике и
радиоэлектроинке.
125

About i.LINK
Относительно i.LINK
i.LINK Baud rate
Скорость предачи данных по
каналу i.LINK
i.LINK’s maximum baud rate varies according to
the equipment. Three maximum baud rates are
Максимальная скорость передачи по каналу
defined:
i.LINK варьируется в зависимости от
аппаратуры. Определены три максимальные
S100 (approx. 100Mbps*)
скорости передачи:
S200 (approx. 200Mbps)
S400 (approx. 400Mbps)
S100 (приблиз. 100Мбит/с*)
S200 (приблиз. 200Мбит/с)
S400 (приблиз. 400Мбит/с)
The baud rate is listed under “Specifications” in
the instruction manual of each equipment. It is
Скорость предачи подается в “Технических
also indicated near the i.LINK jack on some
характеристиках” в руководстве по
equipment.
эксплуатации каждой аппаратуры. На
The maximum baud rate of equipment on which
некоторых видах аппаратуры она также
it is not indicated such as this unit is “S100”.
указывается возле гнезда i.LINK.
When units are connected to equipment having a
Максимальная скорость передачи данных
different maximum baud rate, the baud rate
аппаратуры, на которой она не указана, как
sometimes differs from the indicated baud rate.
на этом аппарате, является “S100”.
Когда данный аппарат подсоединяется к
* What is “Mbps”?
другой аппаратуре, у которой другая скорость
Mbps stands for megabits per second, or the
передачи, скорость передачи иногда
amount of data that can be sent or received in
отличается от указанной скорости передачи.
one second. For example, a baud rate of 100Mbps
means that 100 megabits of data can be sent in
* Что такое “Мбит/с”
one second.
Мбит/с означает мегабит в секунду или
количество данных, которое может быть
послано или принято за одну секунду.
i.LINK Functions on this unit
Например, скорость передачи 100 Мбит/с
For details on how to dub when this unit is
означает, что 100 мегабит данных может
connected to other video equipment having DV
быть послано за одну секунду.
jack, see page 74.
Функционирование i.LINK на
This unit can also be connected to other i.LINK
(DV) compatible equipment made by SONY (e.g.
данном аппарате
VAIO series personal computer) other than video
Относительно подробностей перезаписи, когда
equipment.
данный аппарат подсоединен к видеоаппаратуре
Before connecting this unit to a personal
с другим гнездом DV, см. стр. 74.
computer, make sure that application software
Данный аппарат также может быть подсоединен
supported by this unit already installed on the
для использования с другой совместимой с
personal computer.
i.LINK (DV) аппаратурой, отличной от
For details on precautions when connecting this
видеоаппаратуры фирмы SONY (как например,
unit, also refer to the instruction manuals for the
серия персональных компьютеров VAIO).
equipment to be connected.
Подробности о мерах предосторожности при
подсоединении данного аппарата и прикладной
Required i.LINK Cable
программы, поддерживаемой данным
аппаратом, также смотрите в руководстве по
Use the Sony i.LINK 4-pin-to-4-pin cable (during
эксплуатации для подсоединенной аппаратуры.
DV dubbing).
Требуемый кабель i.LINK
i.LINK and are trademarks.
Используйте 4-штырьковый-к-4-штырьковому
кабель i.LINK фирмы Sony (во время
цифровой видеоперезаписи)
126
i.LINK и являются торговыми марками.

Changing the lithium
Замена литиевой
battery in your
батарейки в Вашей
camcorder
видеокамере
When replacing the lithium battery, keep the
При замене литиевой батарейки батарейный
battery pack or other power source attached.
блок или другой источник питания должен
Otherwise, you will need to reset the date, time
быть прикреплен к видеокамере. В
and other items in the menu settings hold in
противном случае Вам понадобится
memory by the lithium battery.
переустанавливать дату, время и другие
пункты в установках меню, хранимых в
Insert the battery with the positive (+) side facing
памяти видеокамеры с помощью литиевой
out. When the battery becomes weak or dead, the
батарейки.
W indicator flashes on the LCD screen or in the
viewfinder for about 5 seconds when you set the
Вставьте батарейку так, чтобы
POWER switch to CAMERA or MEMORY (DCR-
положительный (+) полюс был обращен
TRV320E only). In this case, replace the battery
наружу. Если батарейка станет слабой или
with a Sony CR2025 lithium battery. Use of
разрядится, индикатор W будет мигать на
any other battery may present a risk of fire or
экране ЖКД или в видоискателе около 5
explosion. Discard used batteries according to
секунд, если переключатель POWER
the manufacturer’s instructions.
установлен в положение CAMERA или
MEMORY (только DCR-TRV320E). В этом
случае, замените батарейку на литиевую
батарейку Sony CR2025. Использование
другой батарейки может привести к
Additional Information Дополнительная информация
пожару или взрыву. Ликвидируйте
использованные батарейки в соответствии с
инструкциями предприятия-изготовителя.
(+) (--)-
WARNING
ВНИМАНИЕ
The battery may explode if mistreated. Do not
Если с батарейкой неправильно обращаться,
recharge, disassemble, nor dispose of it in fire.
она может взорваться. Не перезаряжайте, не
разбирайте и не бросайте в огонь батарейку.
Lithium battery
•Keep the lithium battery out of the reach of
Литиевая батарейка
children.
• Храните литиевую батарейку в месте, не
•Should the battery be swallowed, immediately
доступном для детей.
consult a doctor.
• В случае, если кто-либо случайно проглотит
•Wipe the battery with a dry cloth to ensure
батарейку, следует немедленно обратиться
good contact.
к врачу.
• Протрите батарейку сухой тканью для
Lithium battery installed at the factory
обеспечения хорошего контакта.
This battery may not last 1 year.
Литиевая батарейка, установленная на
заводе
Этой батарейки может не хватить на 1 год.
127
Changing the lithium battery in
Замена литиевой батарейки в
your camcorder
Вашей видеокамере
Changing the lithium battery
Замена литиевой батарейки
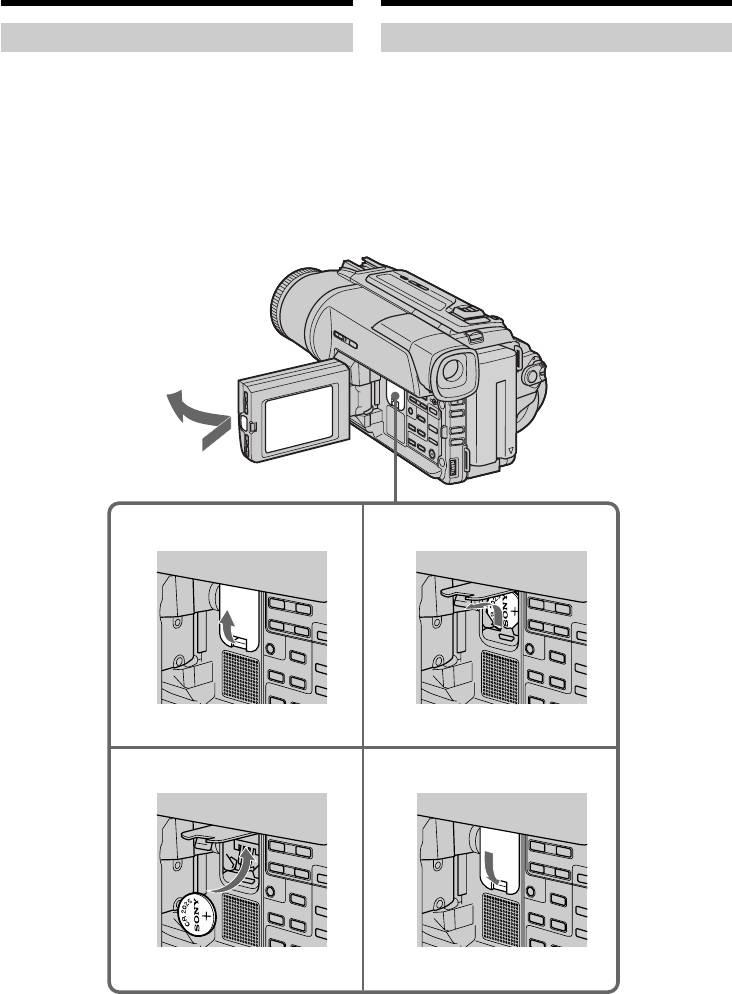
(1)Open the LCD panel and open the lid of the
(1)Откройте панель ЖКД и откройте крышку
lithium battery compartment.
отсека для литиевой батарейки.
(2)Push the lithium battery up once and pull it
(2)Нажмите литиевую батарейку вверх один
out from the holder.
раз и выньте ее из держателя.
(3)Install a Sony CR2025 lithium battery with the
(3)Установите литиевую батарейку Sony
positive (+) side facing out.
CR2025 так, чтобы положительный (+)
(4)Close the lid.
полюс был обращен наружу.
(4)Закройте крышку.
1
1
2
3
4
128
English
Troubleshooting
If you run into any problem using your camcorder, use the following table to troubleshoot the
problem. If the problem persists, disconnect the power source and contact your Sony dealer or local
authorized Sony service facility. If “C:ss:ss” appears on the LCD screen, in the viewfinder or the
display window, the self-diagnosis display function has worked. See page 134.
In the recording mode
Symptom Cause and/or Corrective Actions
START/STOP does not operate.
• The POWER switch is set to OFF (CHARGE), PLAYER or
MEMORY (DCR-TRV320 only).
c Set it to CAMERA. (p. 21)
• The tape has run out.
c Rewind the tape or insert a new one. (p. 19, 33)
• The write-protect tab is set to expose the red mark.
c Use a new tape or slide the tab. (p. 20)
• The tape is stuck to the drum (moisture condensation).
c Remove the cassette and leave your camcorder for at least 1
hour to acclimatize. (p. 146)
The power goes off.
• While being operated in the CAMERA mode, your camcorder
has been in the standby mode for more than 3 minutes.
Additional Information Дополнительная информация
c Set the POWER switch to OFF (CHARGE) and then to
CAMERA again. (p. 21)
The image on the viewfinder screen
• The viewfinder lens is not adjusted.
is not clear.
c Adjust the viewfinder lens. (p. 25)
The SteadyShot function does not
• STEADYSHOT is set to OFF in the menu settings.
work.
c Set it to ON. (p. 76)
The autofocusing function does not
• FOCUS is set to MANUAL.
work.
c Set it to AUTO. (p. 57)
• Shooting conditions are not suitable for autofocus.
c Set FOCUS to MANUAL to focus manually. (p. 57)
The fader function does not work.
• The digital effect function is working.
c Cancel it. (p. 53)
The picture does not appear in the
• The LCD panel is open.
viewfinder.
c Close the LCD panel. (p. 23)
You cannot record in the LP mode.
• The tape is the standard 8 tape.
c Use Hi8 /Digital8 tapes. (p. 80)
(Continued on the following page)
129

Troubleshooting
Symptom Cause and/or Corrective Actions
A vertical band appears when you
• The contrast between the subject and background is too high.
shoot a subject such as lights or a
This is not a malfunction.
candle flame against a dark
background.
A vertical band appears when you
• This is not a malfunction.
shoot a very bright subject.
Some tiny white spots appear on the
• Slow shutter, low lux or Super NightShot mode is activated.
LCD screen or in the viewfinder.
This is not a malfunction.
An unknown picture is displayed on
• If 10 minutes elapse after you set the POWER switch to
the LCD screen or in the viewfinder.
CAMERA or DEMO MODE is set to ON in the menu settings
without a cassette inserted, your camcorder automatically
starts the demonstration.
c Insert a cassette and the demonstration stops.
You can also cancel DEMO MODE. (p. 81)
The picture is recorded in incorrect
• NIGHTSHOT is set to ON.
or unnatural colours.
c Set it to OFF. (p. 28)
Picture appears too bright, and the
• NIGHTSHOT is set to ON in a bright place.
subject does not appear on the LCD
c Set it to OFF, or use the NightShot function in a dark place.
screen or in the viewfinder.
(p. 28)
A horizontal black band appears
• Set STEADYSHOT to OFF in the menu settings (p. 76)
when shooting a TV screen or
computer screen.
In the playback mode
Symptom Cause and/or Corrective Actions
The tape does not move when a
• The POWER switch is set to CAMERA, OFF (CHARGE) or
video control button is pressed.
MEMORY (DCR-TRV320E only).
c Set it to PLAYER. (p. 33)
The playback button does not work.
• The tape has run out.
c Rewind the tape. (p. 33)
There are horizontal lines on the
• The video head may be dirty.
picture or the playback picture is not
c Clean the heads using the Sony V8-25CLD cleaning cassette
clear or does not appear.
(not supplied). (p. 147)
No sound or only a low sound is
• The stereo tape is played back with HiFi SOUND set to 2 in the
heard when playing back a tape.
menu settings.
c Set it to STEREO. (p. 76)
• The volume is turned to minimum.
c Open the LCD panel and press VOLUME +. (p. 33)
• AUDIO MIX is set to ST2 side in the menu settings.
c Adjust AUDIO MIX. (p. 76)
The date search does not work
• The tape has a blank portion in the recorded portion
correctly.
(p. 69)
The picture which is recorded in the
• PB MODE is set to / in the menu settings.
Digital8 system is not played back.
c Set it to AUTO. (p. 76)
The tape which is recorded in the Hi8/
• Set PB MODE to / in the menu settings. (p. 76)
standard 8 system is not played back
correctly.
130

Troubleshooting
In the recording and playback modes
Symptom Cause and/or Corrective Actions
The power does not turn on.
• The battery pack is not installed, or is dead or nearly dead.
c Install a charged battery pack. (p. 12, 13)
• The AC power adaptor is not connected to the mains.
c Connect the AC power adaptor to the mains. (p. 18)
The end search function does not
• The tape was ejected after recording.
work.
• You have not recorded on the new cassette yet.
The end search function does not
• The tape has a blank portion in the beginning or middle.
work correctly.
The battery pack is quickly
• The operating temperature is too low.
discharged.
• The battery pack is not fully charged.
c Charge the battery pack fully again. (p. 13)
• The battery pack is completely dead, and cannot be recharged.
c Replace with a new battery pack. (p. 12)
The battery remaining indicator does
• You have used the battery pack in an extremely hot or cold
not indicate the correct time.
environment for a long time.
• The battery pack is completely dead, and cannot be recharged.
c Replace with a new battery pack. (p. 12)
Additional Information Дополнительная информация
• The battery is dead.
c Use a charged battery pack. (p. 12, 13)
The power goes off although the
• Charge the battery pack fully again so that the indication on the
battery remaining indicator indicates
battery remaining indicator is correct.
that the battery pack has enough
power to operate.
The cassette cannot be removed from
• The power source is disconnected.
the holder.
c Connect it firmly. (p. 13, 18)
• The battery is dead.
c Use a charged battery pack. (p. 12, 13)
The % and Z indicators flash and no
• Moisture condensation has occurred.
functions except for cassette ejection
c Remove the cassette and leave your camcorder for at least 1
work.
hour to acclimatize. (p. 146)
(Continued on the following page)
131

Troubleshooting
When operating using the “Memory Stick”
– DCR-TRV320E only
Symptom Cause and/or Corrective Actions
The “Memory Stick” does not
• The POWER switch is set to CAMERA or OFF (CHARGE).
function.
c Set it to MEMORY. (p. 94)
• “Memory Stick” is not inserted.
c Insert a “Memory Stick”. (p. 93)
Recording does not function.
• The “Memory Stick” has already been recorded to its full
capacity.
c Erase unnecessary images and record again. (p. 118, 96)
• The “Memory Stick” formatted incorrectly is inserted.
c Format the “Memory Stick” on your camcorder or use
another “Memory Stick”. (p. 79)
• The write-protect tab on the “Memory Stick” is set to LOCK.
c Release the lock. (p. 91)
The image cannot be deleted.
• The write-protect tab on the “Memory Stick” is set to LOCK.
c Release the lock. (p. 91)
• The image is protected.
c Cancel image protection. (p. 116)
You cannot format the “Memory
• The write-protect tab on the “Memory Stick” is set to LOCK.
Stick”.
c Release the lock. (p. 91)
Deleting all the images cannot be
• The write-protect tab on the “Memory Stick” is set to LOCK.
carried out.
c Release the lock. (p. 91)
You cannot protect the image.
• The write-protect tab on the “Memory Stick” is set to LOCK.
c Release the lock. (p. 91)
• The image to protect is not played back.
c Press MEMORY PLAY to play back the image. (p. 109)
You cannot write a print mark on the
• The write-protect tab on the “Memory Stick” is set to LOCK.
still image.
c Release the lock. (p. 91)
• The image to write a print mark is not played back.
c Press MEMORY PLAY to play back the image. (p. 109)
The photo save function does not
• The write-protect tab on the “Memory Stick” is set to LOCK.
work.
c Release the lock. (p. 91)
132

Troubleshooting
Others
Symptom Cause and/or Corrective Actions
The Remote Commander supplied
• COMMANDER is set to OFF in the menu settings.
with your camcorder does not work.
c Set it to ON. (p. 76)
• Something is blocking the infrared rays.
c Remove the obstacle.
• The batteries are inserted in the battery holder with the + –
polarities incorrectly matching the + – marks.
c Insert the batteries with the correct polarity. (p. 160)
• The batteries are dead.
c Insert new ones. (p. 160)
The melody or beep sounds for 5
• Moisture condensation has occurred.
seconds.
c Remove the cassette and leave your camcorder for at least 1
hour to acclimatize. (p. 146)
• Some troubles has occurred in your camcorder.
c Remove the cassette and insert it again, then operate your
camcorder.
While charging the battery pack, no
• The AC power adaptor is disconnected.
indicator appears or the indicator
c Connect it firmly. (p. 18)
Additional Information Дополнительная информация
flashes in the display window.
• Something is wrong with the battery pack.
c Contact your Sony dealer or local authorized Sony service
facility.
133
English
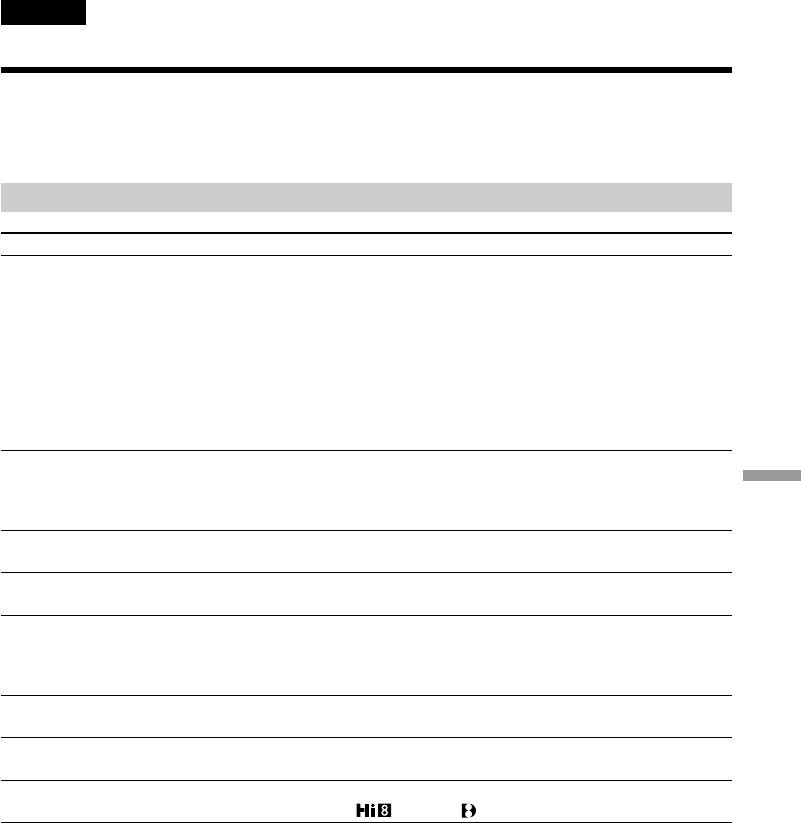
Self-diagnosis display
Your camcorder has a self-diagnosis display function.
LCD screen, viewfinder or
This function displays the current condition of your
display window
camcorder as a 5-digit code (a combination of a letter
and figures) on the LCD screen, in the viewfinder or
C:21:00
in the display window. If a 5-digit code is displayed,
check the following code chart. The last two digits
(indicated by ss) will differ depending on the state
of your camcorder.
Self-diagnosis display
•C:ss:ss
You can service your camcorder
yourself.
•E:ss:ss
Contact your Sony dealer or local
authorized Sony facility.
Five-digit display Cause and/or Corrective Actions
C:04:ss
• You are using a battery pack that is not an “InfoLITHIUM”
battery pack.
c Use an “InfoLITHIUM” battery pack. (p. 17)
C:21:ss
• Moisture condensation has occurred.
c Remove the cassette and leave your camcorder for at least 1
hour to acclimatize. (p. 146)
C:22:ss
• The video heads are dirty.
c Clean the heads using the Sony V8-25CLD cleaning cassette
(not supplied). (p. 147)
C:31:ss
• A malfunction other than the above that you can service has
C:32:ss
occurred.
c Remove the cassette and insert it again, then operate your
camcorder.
c Disconnect the mains lead of the AC power adaptor or
remove the battery pack. After reconnecting the power
source, operate your camcorder.
E:61:ss
• A malfunction that you cannot service has occurred.
E:62:ss
c Contact your Sony dealer or local authorized Sony service
facility and inform them of the 5-digit code.
(example: E:61:10)
If you are unable to rectify the problem even if you try corrective actions a few times, contact your
Sony dealer or local authorized Sony service facility.
134
English
Warning indicators and messages
If indicators and messages appear on the LCD screen, in the viewfinder or in the display window,
check the following:
See the page in parentheses “( )” for more information.
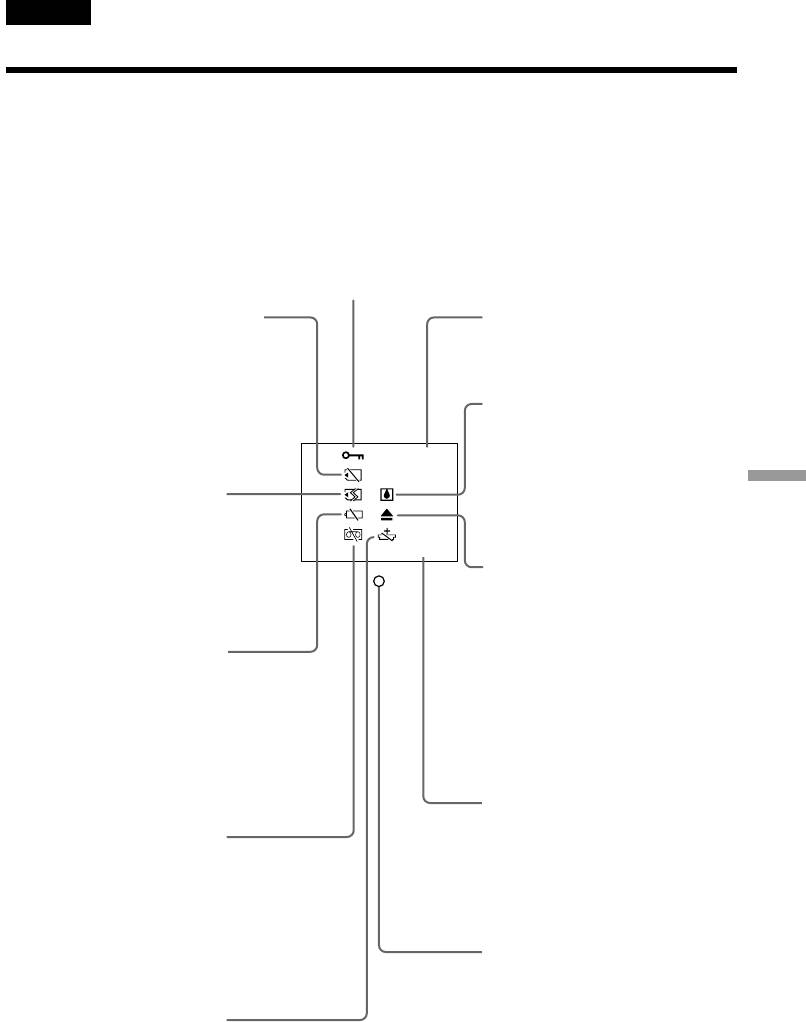
Warning indicators
The still image is protected* (DCR-TRV320E only)
Slow flashing:
•The still image is protected. (p. 116)
Warning indicator as to “Memory
Self-diagnosis display (p. 134)
Stick”*
(DCR-TRV320E only)
Slow flashing:
•No “Memory Stick” is inserted. (p. 93)
Moisture condensation has
Fast flashing:
•The “Memory Stick” is not readable
occurred*
with your camcorder.
Fast flashing:
C:21:00
•Eject the cassette, turn off your
camcorder, and leave it for
Additional Information Дополнительная информация
Warning indicator as to
about 1 hour with the cassette
“Memory stick”*
compartment open. (p. 146)
Fast flashing:
•“Memory Stick” is not
100–0021
formatted correctly. (p. 79)
You need to eject the cassette*
•The “Memory Stick” data is
Slow flashing:
corrupted. (p. 91)
•The write-protect tab on the
cassette is out (red). (p. 20)
The battery is dead or nearly
Fast flashing:
dead
•Moisture condensation has
Slow flashing:
occurred. (p. 146)
•The battery is nearly dead.
•The tape has run out.
(p. 13)
(p. 19, 33)
Fast flashing:
•The self-diagnosis display
•The battery is dead. (p. 13)
function is activated. (p. 134)
Depending on conditions, the E
indicator may flash, even if there
Warning indicator as file
are 5 to 10 minutes remaining.
Slow flashing:
Warning indicator as to tape
•The file is corrupted (P. 91)
Slow flashing:
•The file is unreadable (p. 91)
•The tape is near the end.
•No tape is inserted.* (p. 19)
•The write-protect tab on the cassette
is out (red).* (p. 20)
Warning indicator as to tape or
Fast flashing:
battery**
•The tape has run out.*
Slow flashing:
•The battery is nearly dead.
The lithium battery is weak
•The tape is near the end.
or is not installed (p. 127)
Fast flashing:
•The battery is dead.
•The tape has run out.*
* You hear the melody or beep sound.
** This indicator appears in the viewfinder only.
135
Warning indicators and messages
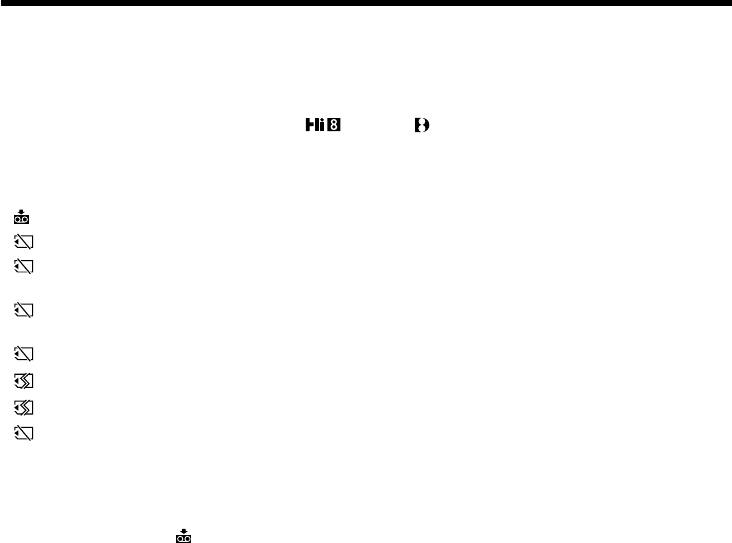
Warning messages
•CLOCK SET Reset the date and time. (p. 89)
•FOR “InfoLITHIUM” Use an “InfoLITHIUM” battery pack. (p. 17)
BATTERY ONLY
•8 mm TAPE t SP REC Use Hi8 /Digital 8 tapes when you record in the LP mode.*
Hi8 TAPE t LP/SP REC
(p. 80)
•Q Z TAPE END The tape has run out.*
•Q NO TAPE Insert a cassette tape.* (p. 19)
• CLEANING CASSETTE** The video heads are dirty. (p. 145)
• FULL The “Memory Stick” is full.* (DCR-TRV320E only) (p. 98)
• - The write-protect tab on the “Memory Stick” is set to LOCK.*
(DCR-TRV320E only) (p. 91)
• NO FILE No still image is recorded on the “Memory Stick”.*
(DCR-TRV320E only) (p. 110)
• NO MEMORY STICK No “Memory Stick” is inserted. (DCR-TRV320E only) (p. 93)
• MEMORY STICK ERROR The “Memory Stick” data is corrupted.* (DCR-TRV320E only)
• FORMAT ERROR Check the type of formatting. (DCR-TRV320E only)
• - DIRECTORY ERROR The “Memory Stick” has more than one directry such
as 100 msdcf.* (DCR-TRV320E only)
* You hear the melody or beep sound.
** The x indicator and “ CLEANING CASSETTE” message appear one after another on the
LCD screen or in the viewfinder.
136
Русский
Поиск и устранение неисправностей
Если у Вас возникла какая-либо проблема при использовании видеокамеры, воспользуйтесь
следующей таблицей для отыскания и устранения проблемы. Если проблема не устраняется,
то следует отсоединить источник питания и обратиться в сервисный центр Sony или в местное
уполномоченное предприятие по обслуживанию изделий Sony. Если на экране ЖКД, в
видоискателе или в окошке дисплея появится индикация “С:ss:ss”, это значит, что
сработала функция дисплея самодиагностики. См. стр. 142.
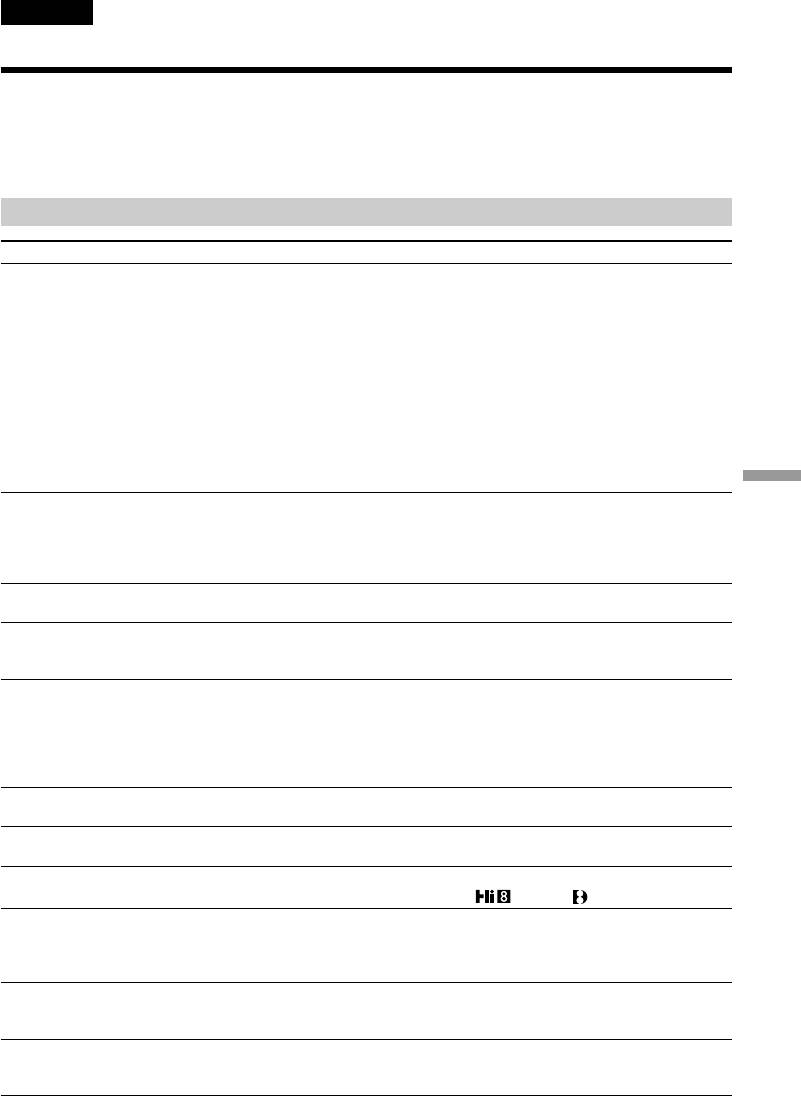
В режиме записи
Возможная неисправность Вероятная причина и/или метод устранения
Не работает кнопка START/STOP.
• Переключатель POWER установлен в положение OFF
(CHARGE), PLAYER или MEMORY (только DCR-TRV320E).
c Установите его в положение CAMERA. (cтр. 21)
• Закончилась лента.
c Перемотайте ленту назад или вставьте новую кассету.
(стр. 19, 33)
• Лепесток защиты записи установлен так, что выставлена
красная метка.
c Используйте новую кассету или передвиньте лепесток.
(стр. 20)
• Лента прилипла к барабану (конденсация влаги).
c Выньте кассету и оставьте видеокамеру примерно на 1
час для акклиматизации. (стр. 146)
Additional Information Дополнительная информация
Выключается питание.
• При работе в режиме CAMERA Ваша видеокамера
находилась в режиме ожидания более 3 минут.
c Установите переключатель POWER в положение OFF
(CHARGE), а затем снова в положение CAMERA.
(стр. 21)
Изображение на экране
• Не отрегулирован объектив видоискателя.
видоискателя является нечетким.
c Отрегулируйте объектив видоискателя. (стр. 25)
Не работает функция устойчивой
• Команда STEADYSHOT установлена в положение OFF в
съемки.
установках меню.
c Установите ее в положение ON (стр. 76)
Не работает функция
• Команда FOCUS установлена в положение MANUAL.
автоматической фокусировки.
c Установите ее в положение AUTO. (cтр. 57)
• Условия съемки являются неподходящими для
автоматической фокусировки.
c Установите команду FOCUS в положение MANUAL для
выполнения фокусировки вручную. (стр. 57)
Не работает функция фейдера.
• Приведена в действие функция цифровых эффектов.
c Отмените ее. (стр. 52)
Изображение не появляется в
• Открыта панель ЖКД.
видоискателе.
c Закройте панель ЖКД. (стр. 23)
Вы не можете выполнять запись в
• Лента является стандартной лентой 8.
режиме LP.
c Используйте ленты Hi8 /Digital8 . (cтр. 80)
Появляется вертикальная черная
• Слишком высокая контрастность между объектом и
полоса при съемке объектов, типа
фоном. В видеокамере нет неисправности.
лампы или пламени свечи на
темном фоне.
Появляется вертикальная черная
• В видеокамере нет неисправности.
полоса при съемке очень ярких
объектов.
На экране ЖКД или в
• Приведен в действие режим медленного затвора, низкой
видоискателе появляются
освещенности или ночной суперсъемки. В видеокамере
маленькие белые точки.
нет неисправности.
(продолжение на сл. стр.)
137
Поиск и устранение неисправностей
Возможная неисправность Вероятная причина и/или метод устранения
На экране ЖКД в видоискателе
• Если пройдет 10 минут после того, как Вы установили
или отображается необычное
переключатель POWER в положение CAMERA или
изображение.
команду DEMO MODE установили в положение ON в
установках меню без вставленной кассеты, Ваша
видеокамера автоматически начнет демонстрацию.
c
Вставьте кассету, и демонстрация остановится.
Вы также можете отменить режим DEMO MODE. (стр. 87)
Изображение записывается с
• Команда NIGHTSHOT установлена в положение ON.
неправильными или
c Установите ее в положение OFF. (стр. 28)
ненатуральными цветами.
Изображение получается
• Команда NIGHTSHOT установлена в положение ON в
слишком ярким, а объект не
ярком месте.
появляется в видоискателе или
c Установите ее в положение OFF или используйте
на экране ЖКД.
функцию ночной съемки в темном месте. (стр. 76)
При выполнении съемки с экрана
• Установите переключатель STEADYSHOT в положение
телевизора или компьютера.
OFF в установках меню (стр. 76).
В режиме воспроизведения
Возможная неисправность Вероятная причина и/или метод устранения
При нажатии кнопки управления
• Переключатель POWER установлен в положение
видеокамерой лента не
CAMERA, OFF (CHARGE) или MEMORY (только DCR-
перемещается.
TRV320E).
c Установите его в положение PLAYER. (cтр. 33)
Не работает кнопка
• Закончилась лента.
воспроизведения.
c Перемотайте ленту назад. (стр. 33)
На изображении имеются
• Возможно, загрязнены видеоголовки.
горизонтальные полосы на
c Почистите видеоголовки с помощью очистительной
изображении, либо
кассеты Sony V8-25CLD (не прилагается). (стр. 147)
воспроизводимое изображение
является нечетким или вовсе не
появляется на экране.
При воспроизведении ленты нет
•
Стереофоническая лента воспроизводится при установленном
звука или же слышен только
переключателе HiFi SOUND в положение 2 в установках меню.
тихий звук.
c Установите его в положение STEREO. (стр. 76)
• Громкость установлена на минимальную величину.
c Откройте панель ЖКД и нажмите кнопку VOLUME +.
(cтр. 33)
• Команда AUDIO MIX установлена в положение ST2 в
установках меню.
c Отрегулируйте функцию AUDIO MIX. (стр. 76)
Функция поиска даты работает
• На ленте между записями имеется незаписанный участок
неправильно.
(стр. 69)
Не воспроизводится
• Команда PB MODЕ установлена в положение / в
изображение, записанное в
установках меню.
цифровой системе Digital8 .
c Установите ее в положение AUTO (стр. 76)
Лента, записанная в системе
•
Установите команду PB MODЕ в положение / (стр. 76)
Hi8/стандартной системе 8,
воспроизводится неправильно.
138

Поиск и устранение неисправностей
В режимах записи и воспроизведения
Возможная неисправность Вероятная причина и/или метод устранения
Не включается питание.
• Не установлен батарейный блок, либо же он разрядился
или почти разрядился.
c Установите заряженный батарейный блок. (стр. 12, 13)
• Сетевой адаптер переменного тока не подсоединен к
сети.
c Подсоедините сетевой адаптер переменного тока к
сети. (стр. 18)
Не работает функция поиска
• После записи кассета была извлечена из видеокамеры.
конца на ленте.
• Запись на новую ленту еще не выполнялась.
Функция поиска конца на ленте
• На ленте имеется незаписанный участок в начале или в
работает неправильно.
середине.
Батарейный блок быстро
• Окружающая температура является слишком низкой.
разряжается.
• Батарейный блок заряжен не полностью.
c Заряди снова молностью батарейный блок. (стр. 13)
• Батарейный блок полностью разряжен и не может быть
перезаряжен.
c Замените его на новый батарейный блок. (стр. 12)
Additional Information Дополнительная информация
Индикатор оставшегося заряда
• Вы использовали длительное время батарейный блок в
батарейного блока показывает
крайне жарких или холодных окружающих условиях.
неправильное время.
• Батарейный блок полностью разряжен и не может быть
перезаряжен.
c Замените его на новый батарейный блок. (стр. 12)
• Батарейный блок разряжен.
c Используйте заряженный батарейный блок. (стр. 12, 13)
Выключается питание, хотя
• Зарядите снова полностью батарейный блок, так чтобы
индикатор оставшегося заряда
индикация оставшегося заряда батарейного блока была
батарейного блока показывает
правильной.
наличие достаточного для работы
заряда.
Кассета не вынимается из
• Отсоединен источник питания.
держателя.
c Подсоедините его плотно. (стр. 13, 18)
• Батарейный блок разряжен.
c Используйте заряженный батарейный блок (стр. 12, 13)
Мигают индикаторы % и Z, и
• Произошла конденсация влаги.
никакие функции, кроме
c Выньте кассету и оставьте Вашу видеокамеру примерно
извлечения кассеты, не работают.
на 1 час для акклиматизации. (стр. 146)
(продолжение на сл. стр.)
139

Поиск и устранение неисправностей
При эксплуатации с “Memory Stick”
– Только DCR-TRV320E
Возможная причина Вероятная причина и/или метод устранения
Не функционирует “Memory Stick”.
•
Переключатель POWER установлен в положение CAMERA
или OFF (CHARGE).
c Установите его в положение MEMORY. (стр. 94)
• Не вставлена “Memory Stick”.
c Вставьте “Memory Stick”. (стр. 93)
Не функционирует запись.
• Емкость “Memory Stick” уже заполнена.
c Сотрите ненужные изображения и запишите снова.
(стр. 118, 96)
• Вставлена “Memory Stick”, отформатированная
неправильно.
c Отформатируйте”Memory Stick” на Вашей видеокамере
или используйте другую “Memory Stick”. (стр. 85)
• Лепесток защиты записи на “Memory Stick” установлен в
положение LOCK.
c Снимите фиксацию. (стр. 91)
Не удаляется изображение.
• Изображение защищено.
c Отмените защиту изображения. (стр. 116)
• Лепесток защиты записи на “Memory Stick” установлен в
положение LOCK.
c Снимите фиксацию. (стр. 91)
Вы не можете отформатировать
• Лепесток защиты записи от стирания на “Memory Stick”
“Memory Stick”.
установлен в положение LOCK.
c Снимите фиксацию (стр. 91)
Не может быть выполнено
• Лепесток защиты записи от стирания на “Memory Stick”
удаление всех изображений.
установлен в положение LOCK.
c Снимите фиксацию. (стр. 91)
Вы не можете защитить
• Лепесток защиты записи от стирания на “Memory Stick”
изображение.
установлен в положение LOCK.
c Снимите фиксацию. (стр. 91)
• Изображение для защиты не воспроизводится.
c Нажмите кнопку MEMORY PLAY для воспроизведения
изображения. (стр. 109)
Вы не можете записать знак
• Лепесток защиты записи от стирания на “Memory Stick”
печати на неподвижном
установлен в положение LOCK.
изображении.
c Снимите фиксацию. (стр. 91)
•
Изображение для записи печатного знака не воспроизводится.
c Нажмите кнопку MEMORY PLAY для воспроизведения
изображения. (стр. 109)
Не работает функция сохранения
• Лепесток защиты записи от стирания на “Memory Stick”
фотоснимков в памяти.
установлен в положение LOCK.
c Снимите фиксацию (стр. 91)
140

")