Sony Xperia C3 Dual D2502 Black: Начало работы
Начало работы: Sony Xperia C3 Dual D2502 Black
Начало работы
О руководстве по эксплуатации
Это руководство по эксплуатации Xperia™ C3 Dual для программного обеспечения
Android™ 5.1. Если вы не знаете, какая версия ОС используется в вашем устройстве, это
можно проверить в меню «Настройки». Дополнительные сведения об обновлениях программного
обеспечения см. в разделе
Обновление устройства
на странице 130 .
Проверка текущей версии программного обеспечения устройства
1
В Начальный экран коснитесь
.
2
Найдите и коснитесь Настройки > О телефоне > Версия Android™.
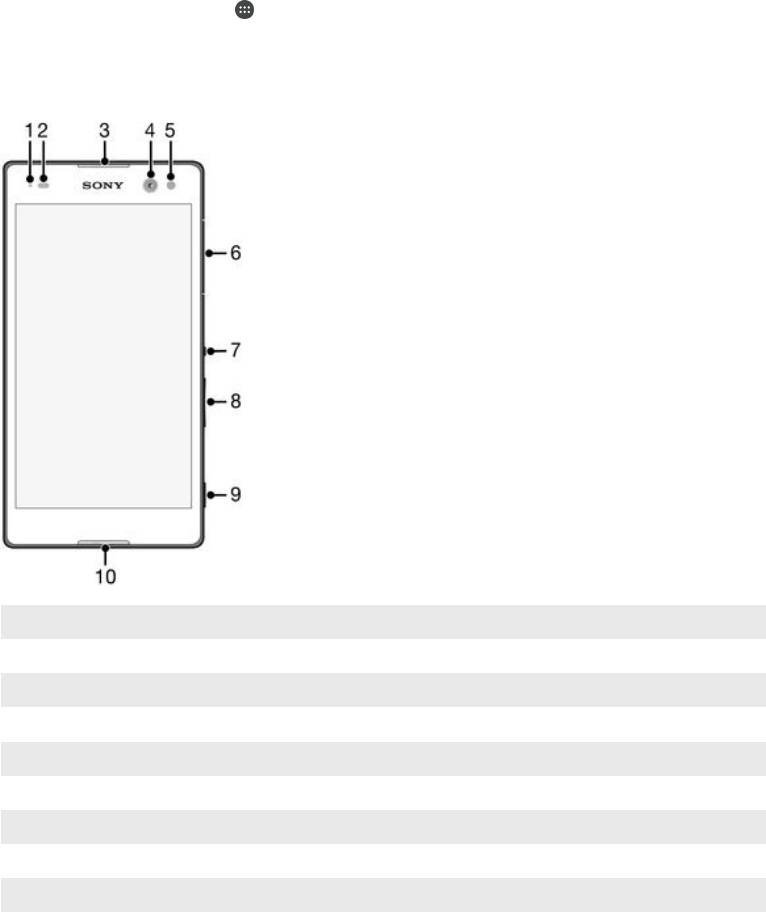
Overview
1
Charging/Notification light
2 Proximity/Light sensor
3 Ear speaker
4 Front camera lens
5 Front camera light
6 Micro SIM card slot cover
7 Power key
8 Volume/Zoom key
9 Camera key
10 Main microphone
7
Это Интернет-версия документа. © Печать разрешена только для частного использования.
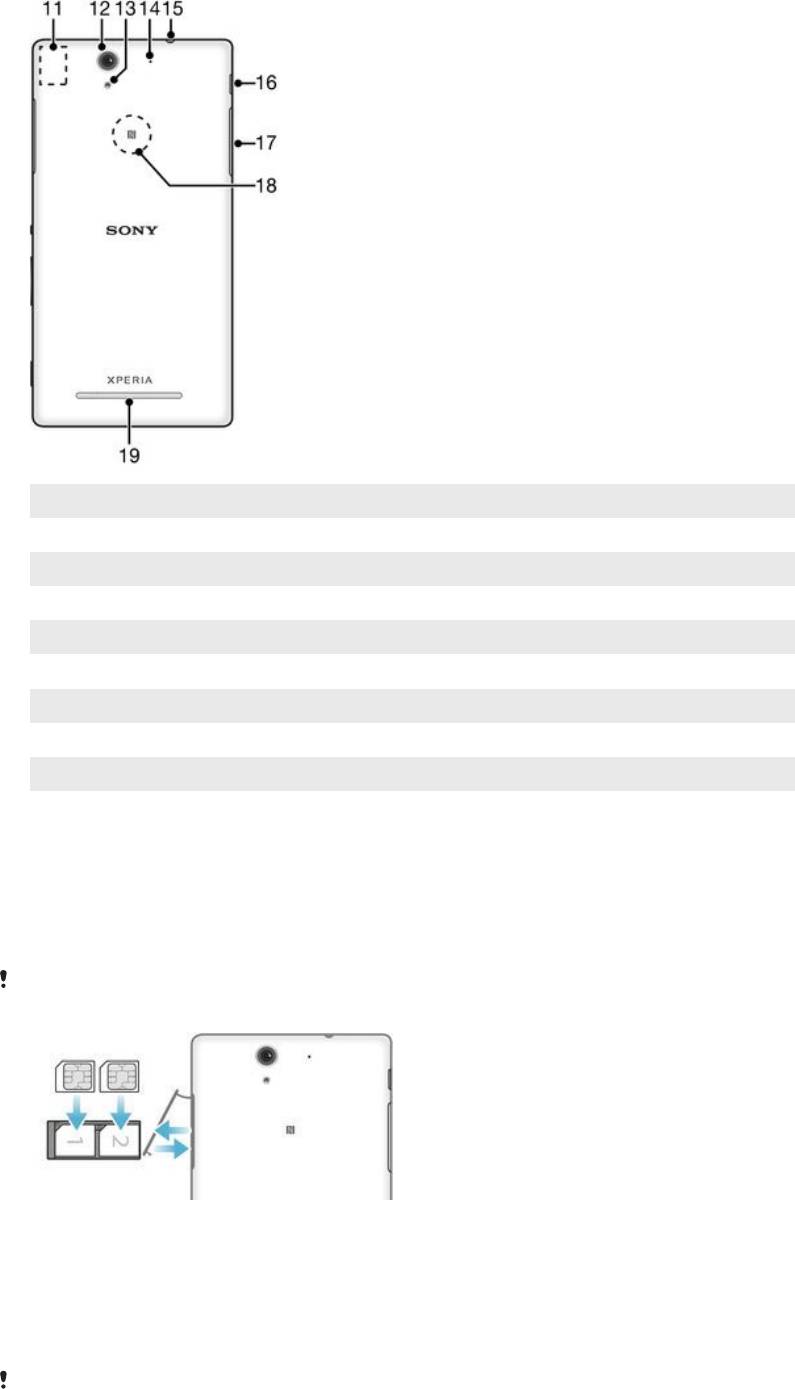
11 Wi-Fi/Bluetooth antenna area
12 Main camera lens
13 Main camera light
14 Second microphone
15 Headset jack
16 Port for charger/USB cable
17 Memory card slot cover
18 NFC™ detection area
19 Speaker
Assembly
A protective plastic sheet is attached to the screen. You should peel off this sheet before using the
touchscreen. Otherwise, the touchscreen might not function properly.
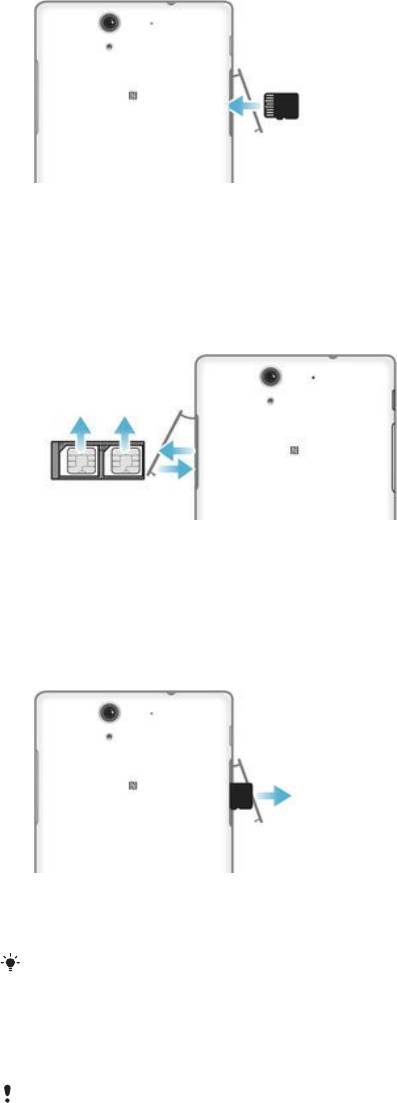
To insert the micro SIM cards
If you pull out the micro SIM card holder while the device is powered on, the device restarts
automatically.
1
Insert a fingernail into the gap between the micro SIM card slots cover and the device, then
detach the cover.
2
Using a fingernail, pull out the micro SIM card holder.
3
Place the micro SIM card on each holder, with the gold-coloured contacts on the micro SIM card
facing up.
4
Insert the micro SIM card holder back into the device.
5
Re-attach the micro SIM card slots cover.
Do not insert an incompatible SIM card into the micro SIM card slot, for example, a nano SIM
card or a non-standard card that you cut by yourself. Doing so could permanently damage
8
Это Интернет-версия документа. © Печать разрешена только для частного использования.
your SIM card or your device. Sony does not warrant and will not be responsible for any
damage caused by the use of incompatible or modified SIM cards.
To insert a memory card
1
Insert a fingernail into the gap between the memory card cover and the device, then detach the
memory card cover.
2
Place the memory card in the memory card slot, with the gold-coloured contacts facing towards
you, then push the memory card all the way into the slot until you hear a locking sound.
3
Re-attach the memory card cover.
To remove the micro SIM cards
1
Detach the micro SIM card slot cover.
2
Pull out the micro SIM card holders from their slots.
3
Remove the micro SIM cards.
4
Insert the micro SIM card holders back into their slots.
5
Re-attach the micro SIM card slot cover.
To remove the memory card
1
Turn off the device and detach the memory card slot cover.
2
Press the memory card inwards and then release it quickly.
3
Re-attach the cover.
Instead of turning off the device, you can leave it on and unmount the memory card from
Настройки > Память > Отключить SD-карту.
Screen protection
Before using your device, remove the transparent protection film by pulling up on the
protruding tab.
It is recommended to protect your device with a Sony-branded screen cover or protector intended for
your Xperia™ model. The use of third party screen protection accessories may prevent your device from
working by covering sensors, lenses, speakers, or microphones and it can invalidate the warranty.
9
Это Интернет-версия документа. © Печать разрешена только для частного использования.
Starting your device for the first time
The first time you start your device, a setup guide opens to help you configure basic settings, sign in to
online accounts and personalise your device. For example, if you have a Sony Entertainment Network
account, you can sign in to it here and get set up straight away.
You can also access the setup guide later from the Settings menu.
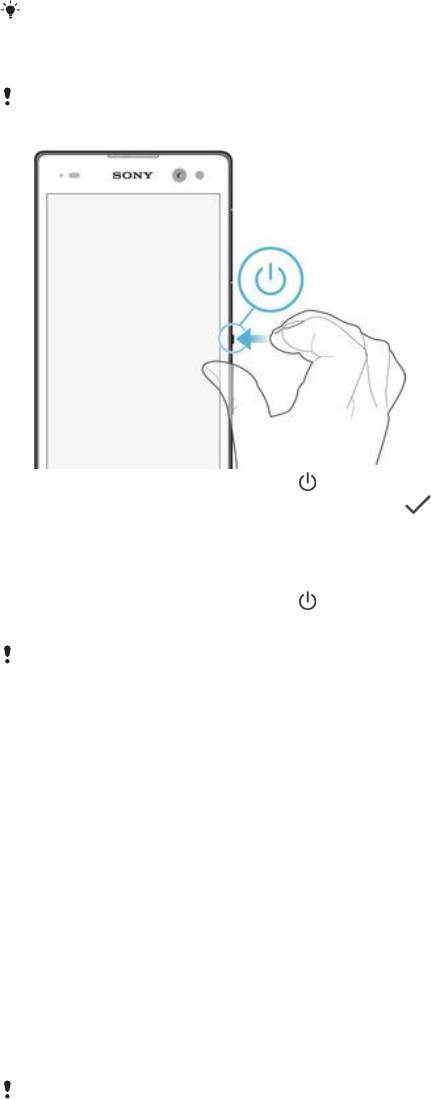
To turn on the device
Make sure that the battery is charged for at least 30 minutes before you turn on the device for
the first time.
1
Press and hold down the power key until the device vibrates.
2
Enter your SIM card PIN when requested, then tap
.
3
Wait a while for the device to start.
To turn off the device
1
Press and hold down the power key until the options menu opens.
2
In the options menu, tap Отключить питание.
It may take a while for the device to shut down.
Why do I need a Google™ account?
Your Xperia™ device from Sony runs on the Android™ platform developed by Google™. A range of
Google™ applications and services is available on your device when you purchase it, for example,
Gmail™, Google Maps™, YouTube™ and the Play Store™ application, which gives you access to the
Google Play™ online store for downloading Android™ applications. To get the most out of these
services, you need a Google™ account. For example, a Google™ account is mandatory if you want to:
•
Download and install applications from Google Play™.
•
Synchronise email, contacts and the calendar using Gmail™.
•
Chat with friends using the Hangouts™ application.
•
Synchronise your browsing history and bookmarks using the Google Chrome™ web browser.
•
Identify yourself as the authorised user after a software repair using Xperia™ Companion.
•
Remotely find, lock or clear a lost or stolen device using the my Xperia™ or Android™ Device Manager
services.
For more information about Android™ and Google™, go to http://support.google.com.
It is crucial that you remember your Google™ account username and password. In some
situations, you may need to identify yourself for security reasons using your Google™ account.
If you fail to give your Google™ username and password in such situations, your device is
locked. Also, if you have more than one Google™ account, make sure to enter the details for
the relevant account.
10
Это Интернет-версия документа. © Печать разрешена только для частного использования.
To set up a Google™ account on your device
1
From your Начальный экран, tap .
2
Find and tap Настройки > Учетные записи > Добавить учетную запись >
Google.
3
Follow the registration wizard to create a Google™ account, or sign in if you already have an
account.
You can also sign in to or create a Google™ account from the setup guide the first time you
start your device. Or you can go online and create an account at
www.google.com/accounts
.
Charging your device
Your device has an embedded, rechargeable battery that should be replaced only by Sony or an
authorised Sony repair centre. You should never try to open or take apart this device yourself. Opening
the device can cause damage that will void your warranty.
The battery is partly charged when the device is shipped from the factory. Depending on how long it was
in the box before you purchased it, the battery level may be quite low. It is therefore recommended that
you charge the battery for at least 30 minutes before starting up your device for the first time. You can still
use your device while it is charging. Read more about how to improve the battery performance in
Управление аккумулятором и электропитанием
on page 21 .
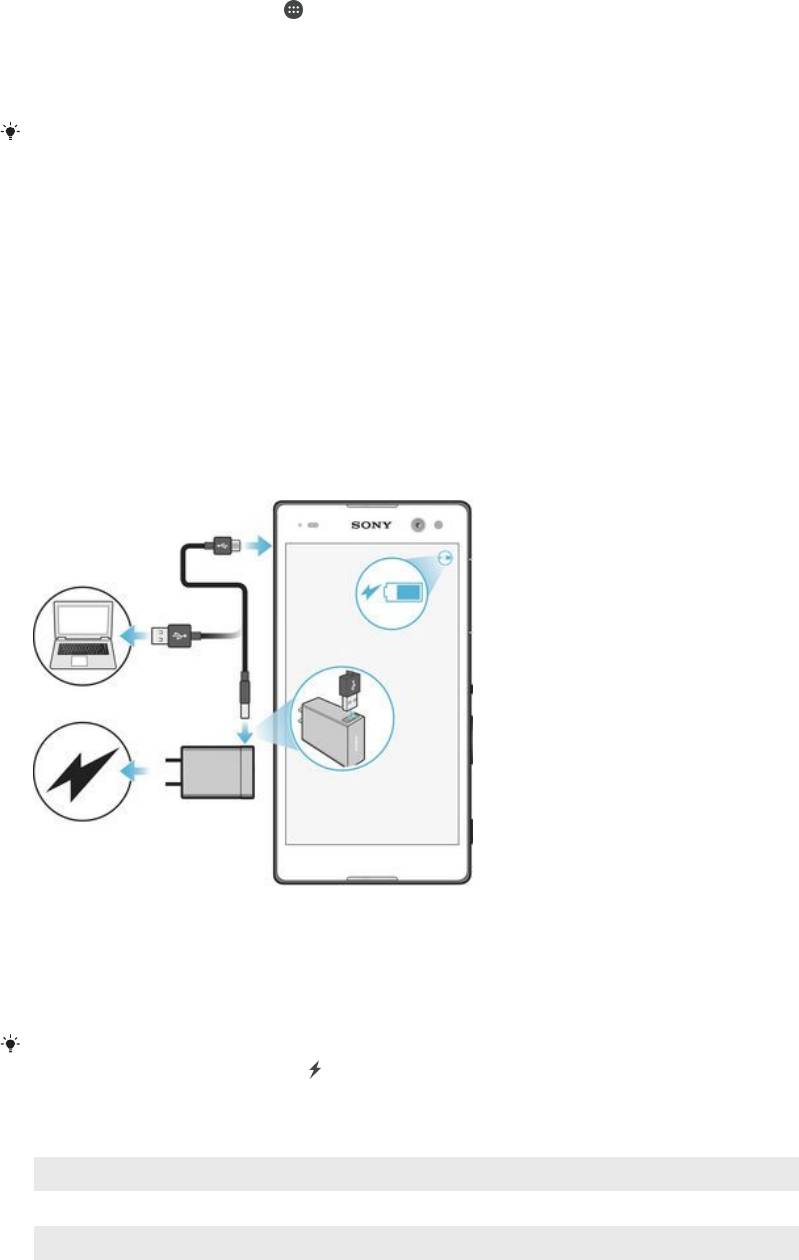
To charge your device
1
Plug the charger into a power outlet.
2
Plug one end of the USB cable into the charger (or into the USB port of a computer).
3
Plug the other end of the cable into the micro USB port on your device, with the USB symbol
facing up. The notification light illuminates when charging begins.
4
When the device is fully charged, disconnect the cable from your device by pulling it straight
outwards. Make sure not to bend the connector.
If the battery is completely discharged, it may take a few minutes before the notification light
illuminates and the charging icon appears.
Battery notification light status
Green
The battery is charging and the battery charge level is greater than 90%
Red The battery is charging and the battery charge level is less than 15%
Orange The battery is charging and the battery charge level is less than 90%
11
Это Интернет-версия документа. © Печать разрешена только для частного использования.
Оглавление
- ™
- Содержание
- Начало работы
- Основы
- Загрузка приложений
- Интернет и сети
- Синхронизация данных на устройстве
- Основные параметры
- Ввод текста
- Вызовы
- Контакты
- Передача сообщений и чат
- Электронная почта
- Музыка
- FM-радио
- Камера
- Фотографии и видео в Альбоме
- Видео
- Связь с устройствами
- Интеллектуальные приложения и функции, экономящие ваше время
- Путешествия и карты
- Календарь и будильник
- Специальные возможности
- Поддержка и техобслуживание

