Panasonic AW-RP555: Operation
Operation: Panasonic AW-RP555

Operation
Turning on the power
1. Set all the power switches of the connected components and the power switch of the
AC adapter to ON.
2. Set this unit’s OPERATE switch to ON.
Power will be supplied to the pan/tilt head system connected to this unit, and the
camera’s initial settings will be performed in sequence.
It takes about 5 seconds to perform the camera’s initial settings for each camera.
The pan/tilt head system cannot be controlled until these settings are completed.
Be sure to set power switches on all connected equipment and AC adapters to
ON before setting the control panel’s OPERATE switch to ON.
When the pan/tilt head system is connected (or changed) and its power is turned on for the
first time, the connected cameras will be initialized. Upon completion of the initialization,
adjust or set the following items. After the items are adjusted or set, proceed to the section
entitled “Setting the travel range (limiters) of the pan/tilt head”.
Once the adjustments are made, there is no need for any re-adjustments unless changes
are made to the pan/tilt head, camera or lens. (The items to the re-set or re-adjusted differ
depending on the unit which is changed.)
23 (E)

Operation
EXTERNAL CONTROL OUT setting
ENGLISH
Set this to ON when connecting the AW-DU600 dial up adapter to the control panel’s TO
PAN/TILT HEAD 1/EXT connector. Normally, set it to OFF.
1. Press the LAMP button while holding down the MEMORY button.
2. The LAMP button’s lamp starts flashing, and the standby status is established.
3. Press the LAMP button to establish the setting mode. The lamps of both the MEMORY
button and LAMP button start flashing, and the status currently set is indicated as
follows:
When the PRESET 5 button lamp is lit:
EXTERNAL CONTROL OUT ON
When the PRESET 10 button lamp is lit:
EXTERNAL CONTROL OUT OFF
4. Press the PRESET 5 button to set to EXTERNAL CONTROL OUT ON.
Press the PRESET 10 button to set to EXTERNAL CONTROL OUT OFF.
The lamps of both the MEMORY button and LAMP button stop flashing, and the setting
mode is exited.
24 (E)

Operation
Adjusting the minimum start speed of the pan/tilt
head
When the pan/tilt head is to be operated manually using the joystick, its minimum start
speed is automatically adjusted to ensure that the pan/tilt head will start moving smoothly
in response to the angle to which the PAN/TILT lever is tilted. (This will reduce the amount
of play in the PAN/TILT lever.)
1. Use the CONTROL button to select the pan/tilt head whose minimum start speed is to
be adjusted.
2. Press the MODE button while holding down the MEMORY button.
3. The MODE button lamp starts flashing, and the standby status is established.
4. Press the MODE button to start the adjustment.
5. While the minimum start speed is being adjusted, the lamps of both the MEMORY
button and MODE button flash.
6. The adjustment is completed when the lamps of both the MEMORY button and MODE
button go off.
7. Repeat steps 2 to 6 for the other pan/tilt heads.
If the lamps of both the MEMORY button and MODE button light up and the adjustment
process ends, check whether the camera mounted on the pan/tilt head is balanced
properly and whether the pan/tilt head cable or other parts are making contact with any
objects in the vicinity before proceeding again from step 2.
When the joystick is operated while the minimum start speed is being adjusted, the
adjustment will be forcibly terminated and only that portion of the setting performed up until
that point will be stored in the memory.
25 (E)

Operation
Adjusting the backlash compensation
ENGLISH
Play in the gears may give rise to backlash when the pan/tilt head is moved. This
adjustment serves to provide compensation for reducing the amount of this backlash.
(Backlash: For instance, after the pan/tilt head has moved from right to left and then come
to a standstill, there is a delay in the start of the movement when it moves in the opposite
direction. This happens because of play in the gears. The same phenomenon also occurs
when the head moves from left to right, up to down or down to up.)
1. Use the CONTROL button to select the pan/tilt head whose backlash compensation is
to be adjusted.
2. Press the MENU button while holding down the MEMORY button.
3. The MENU button lamp starts flashing, and the standby status is established.
4. Press the MENU button to establish the setting mode. The lamps of both the MEMORY
button and MENU button start flashing. If the joystick is operated at this point, the
adjustment will be forcibly terminated.
5. Press the PRESET 1 to 8 buttons to set the compensation amounts. This amount
is lowest for the PRESET 1 button and highest for the PRESET 8 button. When the
PRESET 10 button is pressed, the compensation is set to OFF. When the PRESET 1
to 8 and 10 buttons are pressed, the lamps of both the MEMORY button and MENU
button stop flashing, and the setting mode is exited.
The same backlash compensation values are applied to both panning and tilting.
Use the OFF setting if backlash is not a concern. When making an adjustment, be
absolutely sure to move the pan/tilt head, and perform actual operations to check
whether the compensation amount is appropriate before deciding on the proper
amount. If this amount is excessive, the pan/tilt head will start returning in the
opposite direction as soon as it has been made to come to a standstill.
6. If the compensation amount is inadequate, repeat steps 2 to 5, and find the optimum
setting.
7. Repeat steps 2 to 6 for the other pan/tilt heads.
26 (E)

Operation
Adjusting the minimum start speed of the lens zoom
Perform this adjustment to ensure that the lens zoom will function smoothly in response to
the angle to which the ZOOM lever is tilted when it is used to zoom the lens.
1. Use the CONTROL button to select the pan/tilt head whose lens zoom minimum start
speed is to be adjusted.
2. Press the IRIS button while holding down the MEMORY button.
3. The IRIS button lamp starts flashing, and the standby status is established.
4. Press the IRIS button to establish the setting mode. The lamps of both the MEMORY
button and IRIS button start flashing. If the joystick is operated at this point, the
adjustment will be forcibly terminated.
5. Press the PRESET 1 to 8 buttons to set the compensation amounts. This amount
is lowest for the PRESET 1 button and highest for the PRESET 8 button. When the
PRESET 10 button is pressed, the compensation is set to OFF. When the PRESET 1
to 8 and 10 buttons are pressed, the lamp of the IRIS button stops flashing, and the
setting mode is exited.
6. Move the ZOOM lever slowly and, while monitoring the image on the monitor, check
whether the lens zoom starts moving smoothly.
If the lens zoom fails to starts moving smoothly, repeat steps 2 to 5 and find the
optimum value.
7. Repeat steps 2 to 6 for the other pan/tilt heads.
27 (E)

Operation
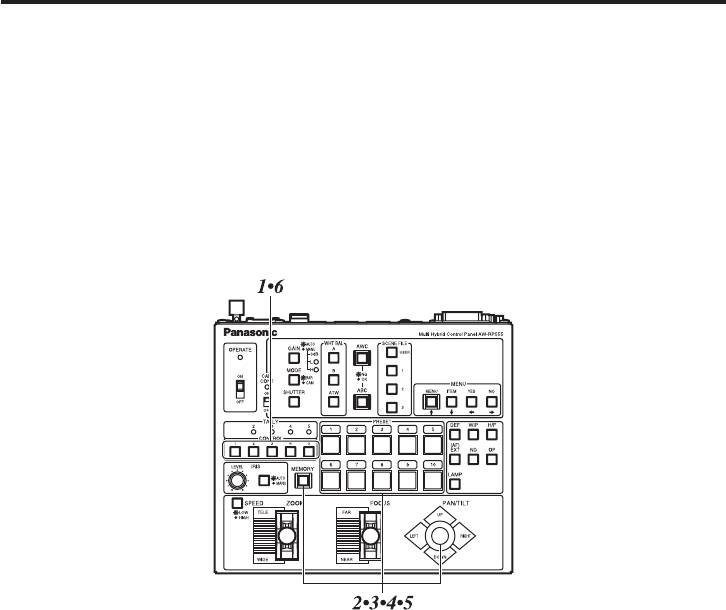
Setting the travel range (limiters) of the pan/tilt head
ENGLISH
Depending on where it has been installed, there may be obstacles within the travel range of
the pan/tilt head system with which the system may come into contact.
The pan/tilt head system may malfunction or an accident may occur if the system comes
into contact with such an obstacle.
Prior to use, be absolutely sure to set the travel range (limiters: upper, lower, left-most and
right-most limits of rotation) of the pan/tilt head system.
Before installing a pan/tilt head as a stand-alone type, set the installation direction
switch inside the pan/tilt head to stand-alone installation. (“Suspended installation” is the
factory setting.)
If this switch is not set properly, the operating directions of the pan/tilt head will be
reversed, and the limits of the pan/tilt head’s travel range (limiters) will not be stored
in the memory properly. For details on how to set the switch, refer to the operating
instructions of the pan/tilt head.
1. Select the pan/tilt head system using the CONTROL button.
2. Set the upper limit position in the travel range.
Operate the PAN/TILT lever on the control panel to rotate the camera to the position
which is to serve as the upper limit position.
Press the PRESET 2 and 3 buttons while holding down the MEMORY button on the
control panel.
When the button 5 lamp lights, the setting is completed.
To cancel the setting, press the PRESET 2 and 3 buttons again while holding down
the MEMORY button. When the setting is cancelled, the button 10 lamp lights.
3. Set the lower limit position in the travel range.
Operate the PAN/TILT lever to rotate the camera to the position which is to serve as
the lower limit position.
Press the PRESET 7 and 8 buttons while holding down the MEMORY button.
When the button 5 lamp lights, the setting is completed.
To cancel the setting, press the PRESET 7 and 8 buttons again while holding down
the MEMORY button. When the setting is cancelled, the button 10 lamp lights.
4. Set the left end position in the travel range.
Operate the PAN/TILT lever to rotate the camera to the position which is to serve as
the left end position.
Press the PRESET 1 and 6 buttons while holding down the MEMORY button.
When the button 5 lamp lights, the setting is completed.
To cancel the setting, press the PRESET 1 and 6 buttons again while holding down
the MEMORY button. When the setting is cancelled, the button 10 lamp lights.
28 (E)
Operation
5. Set the right end position in the travel range.
Operate the PAN/TILT lever to rotate the camera to the position which is to serve as
the right end position.
Press the PRESET 4 and 9 buttons while holding down the MEMORY button.
When the button 5 lamp lights, the setting is completed.
To cancel the setting, press the PRESET 4 and 9 buttons again while holding down
the MEMORY button. When the setting is cancelled, the button 10 lamp lights.
6. Use the CONTROL button to switch the pan/tilt head system, and set the travel ranges
(limiters) for each system concerned.
29 (E)

Operation
Genlock adjustment
ENGLISH
If a camera is to be synchronized with an external signal for use, genlock adjustment must
be performed for the camera and other equipments.
Either the black burst or VBS (video, burst and sync) signal is used for the external sync
signal.
There is no need to perform the genlock adjustment if the camera is not going to be
synchronized with an external signal.
For the genlock adjustments, open the camera menu and perform the settings. Refer to the
instructions accompanying the camera and cable compensator.
Total pedestal adjustment
When more than one camera is to be used, the black level (pedestal level) of the pictures
shot by each of the cameras must be brought into alignment.
Set the black level (pedestal level) using the camera menu. For details, refer to the
instructions accompanying the camera.
30 (E)

Operation
White balance adjustment
The white balance must be adjusted when the equipment is used for the first time, when it
has not been used for a prolonged time or when the lighting conditions or brightness has
changed.
The white balance conditions can be entered in advance into channels A and B.
If the equipment is to be used under conditions which are identical to the entered settings,
it means that no further adjustment need be undertaken since the white balance will be set
simply by pressing the WHITE BAL A button or B button once the white balance has been
adjusted.
When the white balance is adjusted again, the previously entered settings will be deleted
and replaced by the new conditions.
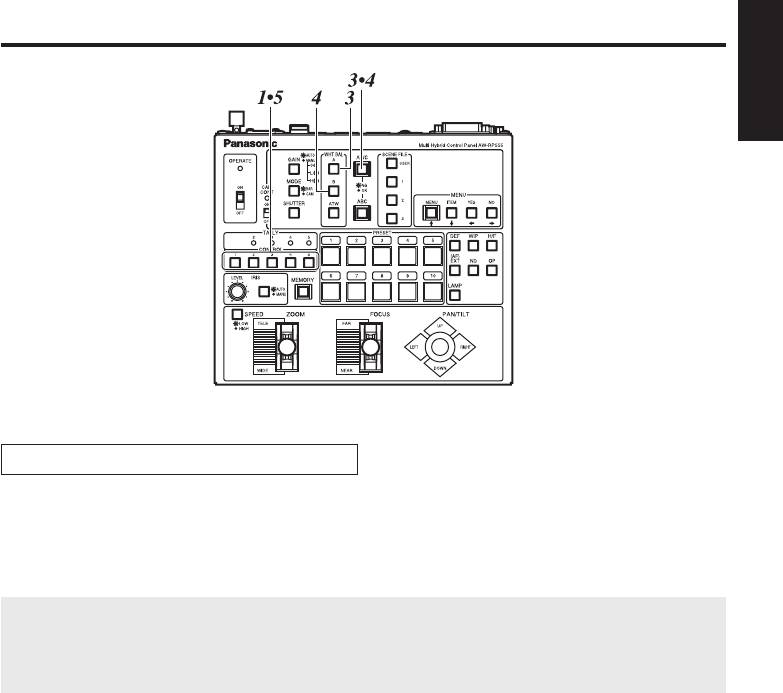
Automatic adjustment of white balance
1. Select the pan/tilt head system using the CONTROL button.
2. Shoot a white object (such as a white wall or handkerchief) to fill the whole screen
using the pan/tilt head system currently selected.
Do not allow shiny, reflective or very bright objects to appear on the screen.
3. Press the WHITE BAL A button, and press the AWC button. The AWC button’s lamp
flashes, and the white balance is automatically adjusted. Once the adjustment has been
performed correctly, the lamp goes off, and the conditions set are entered in channel A.
The AWC button’s lamp will remain lit if it was not possible for the adjustment to be
performed. In this case, change the brightness, iris, object, light source, etc., and
perform the adjustment again.
The AWC button’s lamp goes off even if the white balance adjustment was not
performed correctly in cases where a pan/tilt head system other than the
AW-PH350, AW-PH360 or AW-PH650 is being used.
4. Similarly, enter the conditions set for channel B using the WHITE BAL B button.
5. Select the next pan/tilt head system using the CONTROL button, and continue
adjusting the white balance in each system concerned.
31 (E)
Operation
ENGLISH
Automatic tracing white balance (ATW)
When the WHITE BAL ATW button is pressed during shooting, the ATW button’s lamp
comes on, compensation is provided so that the white balance will be automatically
adjusted even if the light source or colour temperature has changed in order to minimize an
unnatural appearance in the resulting images.
If nothing white is shown on the screen, it may not be possible for the white balance to
be compensated properly.
Similarly, with some light sources or colour temperatures, it may not be possible for the
white balance to be compensated properly.
32 (E)

Operation
Black balance adjustment
The black balance must be adjusted when the equipment is used for the first time, when
it has not been used for a prolonged time, when the ambient temperature has changed
significantly or when one season gives way to another.
If the equipment is to be used under conditions which are identical to the entered settings,
no further adjustments are necessary.
When the black balance is adjusted again, the previously entered settings will be deleted
and replaced by the new conditions.
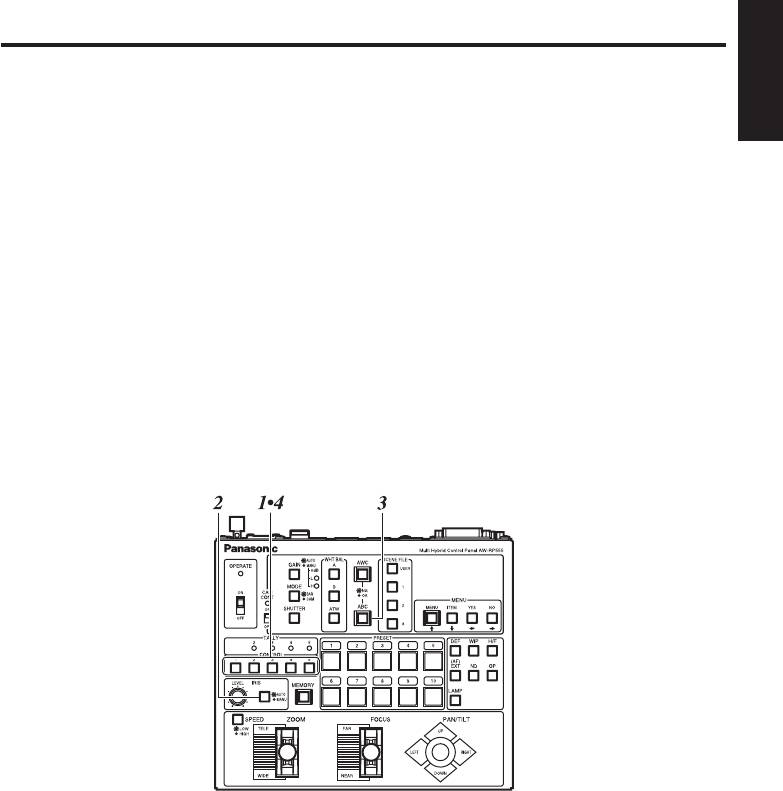
Automatic adjustment of black balance
1. Select the pan/tilt head system using the CONTROL button.
2. Press the IRIS button to set the currently selected pan/tilt head system to the AUTO
mode (the IRIS button’s lamp now comes on).
3. Press the ABC button.
The ABC button’s lamp flashes, the lens iris is automatically stopped down, and the
black balance is automatically adjusted. Once the adjustment has been performed
correctly, the lamp goes off, and the conditions set are entered in the memory.
The ABC button’s lamp will remain lit if it was not possible for the adjustment to be
performed. In this case, repeat the adjustment procedure.
It may not be possible to adjust the black balance if the total pedestal is too low.
In this case, adjust the total pedestal again, and then repeat the black balance
adjustment.
The ABC button’s lamp goes off even if the black balance adjustment was
not performed correctly in cases where a pan/tilt head system other than the
AW-PH350, AW-PH360 or AW-PH650 is being used.
33 (E)
Operation
ENGLISH
4. Select the next pan/tilt head system using the CONTROL button, and continue
adjusting the black balance in each system concerned.
34 (E)

Operation
Preset memory settings
The multi hybrid control panel is equipped with a preset memory function for entering the
positions and settings with which the pan/tilt head system is to shoot.
Preset memory data is entered into PRESET buttons 1 through 10.
Pan/tilt head system’s settings
Pan/tilt head:
Pan/tilt position
Camera:
Zoom, focus, iris (MANU mode only), white balance
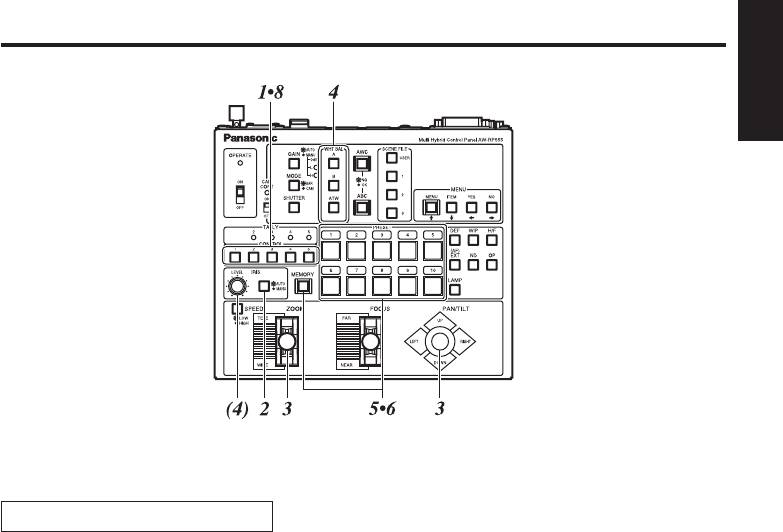
Entering preset memory data
1. Select the pan/tilt head system using the CONTROL button.
2. Use the following buttons to establish the modes.
Press the IRIS button to establish the MANU mode (the IRIS button’s lamp now goes
off).
If the AUTO mode is established, the lens iris position will not be entered.
3. Operate the ZOOM lever and PAN/TILT lever, and on the monitor check the pictures
which are to be shot.
4. Select the white balance from among the A, B and ATW buttons, and adjust the lens iris
using the IRIS LEVEL control.
5. Set the unit to a state in which the MEMORY button is held down.
When the MEMORY button is pressed, those buttons among the PRESET buttons 1
through 10 in which data can be entered start flashing in sequence.
6. While the MEMORY button is held down, press the button in which the preset memory
data is to be entered.
7. If necessary, enter other shooting positions and settings into other buttons among
PRESET buttons 1 through 10 as preset memory data.
8. Select the next pan/tilt head system using the CONTROL button, and continue setting
the preset memory data for each system concerned.
35 (E)
Operation
ENGLISH
Deleting preset memory data
1. Select the pan/tilt head system using the CONTROL button.
2. Press the OP button while holding down the MEMORY button.
3 The OP button lamp starts flashing, and the standby mode is established.
4. Press the OP button to establish the setting mode.
The lamps of the PRESET 1 to 10 buttons start flashing in sequence. If the joystick is
operated at this point, the deletion operation will be forcibly terminated.
5. Press the PRESET buttons whose memory data is to be deleted.
6. If necessary, delete other preset memory data as well.
36 (E)
Оглавление
- 规 格
- Contents
- Introduction
- Parts and their functions
- Connections
- Operation
- Setting and changing the camera menu items
- Attaching the rack mounting adapters
- How to change the position of the connector panel
- Appearance
- Specifications
- Inhalt
- Einleitung
- Teile und ihre Funktionen
- Anschlüsse
- Betrieb
- Einstellen und Ändern der Kameramenüposten
- Anbringen der Rackmontageadapter
- Ändern der Einbauposition der Anschlusstafel
- Aussehen
- Technische Daten
- Table des matières
- Introduction
- Les commandes et leurs fonctions
- Raccordements
- Utilisation
- Réglages et modifications des paramètres des menus de la caméra
- Fixation des adaptateurs de montage en rack
- Modification de la position du panneau des connecteurs
- Aspect extérieur
- Fiche technique
- Sommario
- Introduzione
- Parti e loro funzioni
- Collegamenti
- Operazioni
- Impostazione e modifica delle voci di menu della videocamera
- Utilizzo degli adattatori di montaggio su rack
- Modo di cambiare la posizione del pannello connettori
- Aspetto
- Dati tecnici
- Índice
- Introducción
- Partes y sus funciones
- Conexiones
- Funcionamiento
- Ajuste y cambio de los elementos de menú de la cámara
- Colocación de adaptadores de montaje en estantería
- Cambio de posición del panel de conectores
- Apariencia
- Especificaciones
- Содержание
- Введение
- Компоненты и их функции
- Соединения
- Эксплуатация
- Установка и изменение значений пунктов меню камеры
- Подключение адаптеров стоечного монтажа
- Как изменить положение панели разъемов
- Внешний вид
- Технические характеристики
- 目 录
- 产品介绍
- 附 件
- 部件及其功能
- 连 接
- 操 作
- 设置和更改摄像机菜单项目
- 安装架装适配器
- 如何改变接口面板的位置
- 外部尺寸图
- 规 格
