Panasonic SB-TP100: Assembly and Installation
Assembly and Installation: Panasonic SB-TP100
RQT8573
14
ENGLISH
ESP
AÑOL
Assembly and Installation
Setup the center speaker
(SB-PC100)
• Do not apply an unreasonable force to the net at the front of the
speaker unit. You cannot remove the front net.
• Lay the speakers on a
fl
at surface over a soft cloth when working
on them.
• Tighten the screws
fi
rmly.
Å
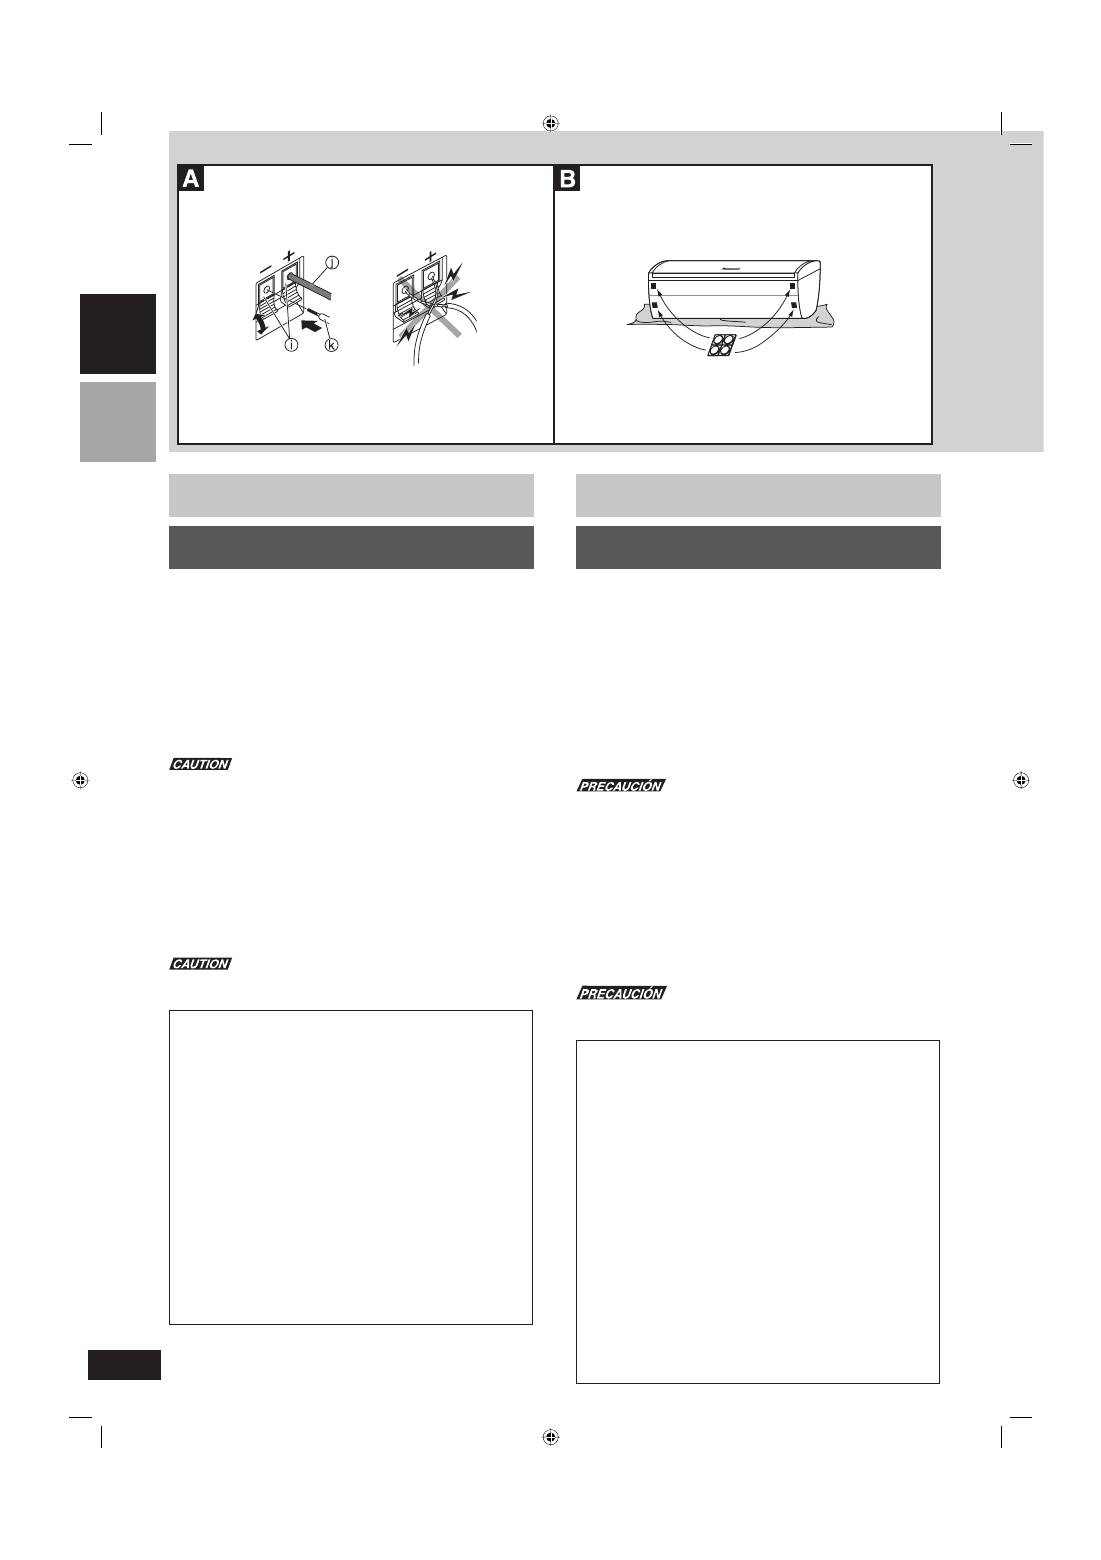
Connect the speaker cable (provided) to the terminals
i
.
Be sure to connect only positive (copper) wire
j
to positive (+) terminal
and negative (silver) wire
k
to negative (–) terminal.
Press the spring lever to open the wire inlet, then insert the lead
before releasing the spring lever.
Never short-circuit positive (+) and negative (–) speaker wires.
ı
Attaching the rubber feet when placing on a surface
Attach the rubber feet to the base of the speaker to prevent vibration
from causing the speaker to move or fall over.
Ç
Attaching to a wall
Attach four rubber feet to the rear of the speaker.
q
Screw (not included)
Screw the wood screw
q
into a thick and hard part of the wall.
The surface must be able to support over 10 k
g
.
Do not attach this speaker to walls or ceilings using methods other
than those described here.
Settings for connecting the recommended ampli
fi
er
to the active subwoofer
When using our SA-XR57 AV control receiver (not included)
First make the following settings.
• Refer to “Setting the Ampli
fi
er” in the instruction manual for the
SA-XR57 AV control receiver.
Setting the speaker (YES/NO) and its size
Speaker to be set
SUBW (subwoofer)
LR (Front)
C (Center)
S (Surround)
SB (Surround back)
Setting item
YES (Connected)
SMALL
SMALL
SMALL
NONE (Not connected)
1-SPK (When one is connected)
2-SPK (When two are connected)
• When connecting one surround back speaker
Connect it to the “left” surround back terminal on the ampli-
fi
er.
• When connecting two surround back speakers
Connect them to the “left” and “right” surround back terminals
on the ampli
fi
er.
Setting the lower region
fi
lter
Selection frequency:
100 (Frequencies of 100 Hz and below
are output to the subwoofer.)
Ensamblaje e instalación
Instalación del altavoz central
(SB-PC100)
• No aplique una fuerza excesiva a la red de la parte delantera del
altavoz. La red delantera no puede desmontarse.
• Coloque los altavoces en una super
fi
cie plana y encima de un paño
blando cuando tenga que hacer algo con ellos.
• Apriete
fi
rmemente los tornillos.
Å
Conecte el cable de altavoz (suministrado) a los terminales
i
.
Asegúrese de conectar solamente el cable positivo (cobre)
j
al ter-
minal positivo (+) y el cable negativo (plata)
k
al terminal negativo
(–).
Presione la palanca de resorte para abrir el ori
fi
cio de entrada
del cable y luego inserte el conductor antes de soltar la palanca
de resorte.
No cortocircuite nunca los cables positivos (+) y negativos (–) de los
altavoces.
ı
Colocación de las patas de goma cuando los altavoces
se ponen encima de una super
fi
cie
Coloque las patas de goma en la base del altavoz para impedir que
las vibraciones desplacen el altavoz o hagan que éste se caiga.
Ç
Colocación en una pared
Coloque las cuatro patas de goma en la parte trasera del altavoz.
q
Tornillo (no suministrado)
Atornille el tornillo
q
de madera en una parte gruesa y dura de la
pared.
La super
fi
cie deberá poder servir de apoyo a más de 10 k
g
.
No coloque este altavoz en una pared o techo utilizando métodos
diferentes de los descritos en este manual.
Ajustes para conectar el ampli
fi
cador recomendado
al altavoz de subgraves activo
Cuando utilice nuestro receptor de control AV modelo SA-XR57
(no suministrado)
Haga primero los ajustes siguientes.
• Consulte “Ajuste del ampli
fi
cador” en el manual de instrucciones
del receptor de control AV modelo SA-XR57.
Ajuste del altavoz (YES/NO) y su tamaño
Altavoz que va a ser
ajustado
SUBW (subgraves)
LR (Delantero)
C (Central)
S (Ambiental)
SB (Ambiental trasero)
Elemento de ajuste
YES (Conectado)
SMALL
SMALL
SMALL
NONE (No conectado)
1-SPK (Cuando está conectado uno)
2-SPK (Cuando están conectados dos)
• Cuando conecte un altavoz de sonido ambiental trasero
Conéctelo al terminal de altavoz de sonido ambiental trasero
“izquierdo” del ampli
fi
cador.
• Cuando conecte dos altavoces de sonido ambiental traseros
Conéctelos a los terminales de altavoces de sonido ambiental
traseros “izquierdos” y “derechos” del ampli
fi
cador.
Ajuste del
fi
ltro pasabajos
Selección de frecuencia:
100 (Las frecuencias de 100 Hz y
menos salen al altavoz de subgraves.)
RQT8573-12lang.indb 14
RQT8573-12lang.indb 14
07/02/2006 18:30:17
07/02/2006 18:30:17
Оглавление
- Caution for AC Mains Lead (For United Kingdom)
- Safety precautions
- Précautions de sécurité
- Location
- Positionnement
- Assembly and Installation
- Montage et installation
- Assembly and Installation
- Montage et installation
- Assembly and Installation
- Montage et installation
- Connections
- Aansluitingen
- Operación del altavoz desubgraves (SB-WA101)
- Utilisation du caisson degraves (SB-WA101)
- Notes
- Remarques
- Sicherheitsmaßnahmen
- Säkerhetsåtgärder
- Aufstellung
- Placering
- Zusammenbau und Montage
- Hopsättning och installation
- Anschlüsse
- Anslutningar
- Bedienung des Subwoofers (SB-WA101)
- Bashögtalarens funktion (SB-WA101)
- Hinweise
- Anmärkningar
- Zalecenia dotycz ą ce bezpiecze ń stwa
- Застережні заходи
- Umíst ě ní
- Розташування
- Sestavení a instalace
- Складання та встановлення
- Sestavení a instalace
- Складання та встановлення
- Sestavení a instalace
- Складання та встановлення
- Zapojení
- Подсоединения
- Obsluha subwooferu (SB-WA101)
- Управление сабвуфером (SB-WA101)
- Poznámky
- Примітки
- Speci fi cations
- Technische Daten
- Технічні характеристики
