Panasonic EY7840: IV. OPERATION
IV. OPERATION : Panasonic EY7840
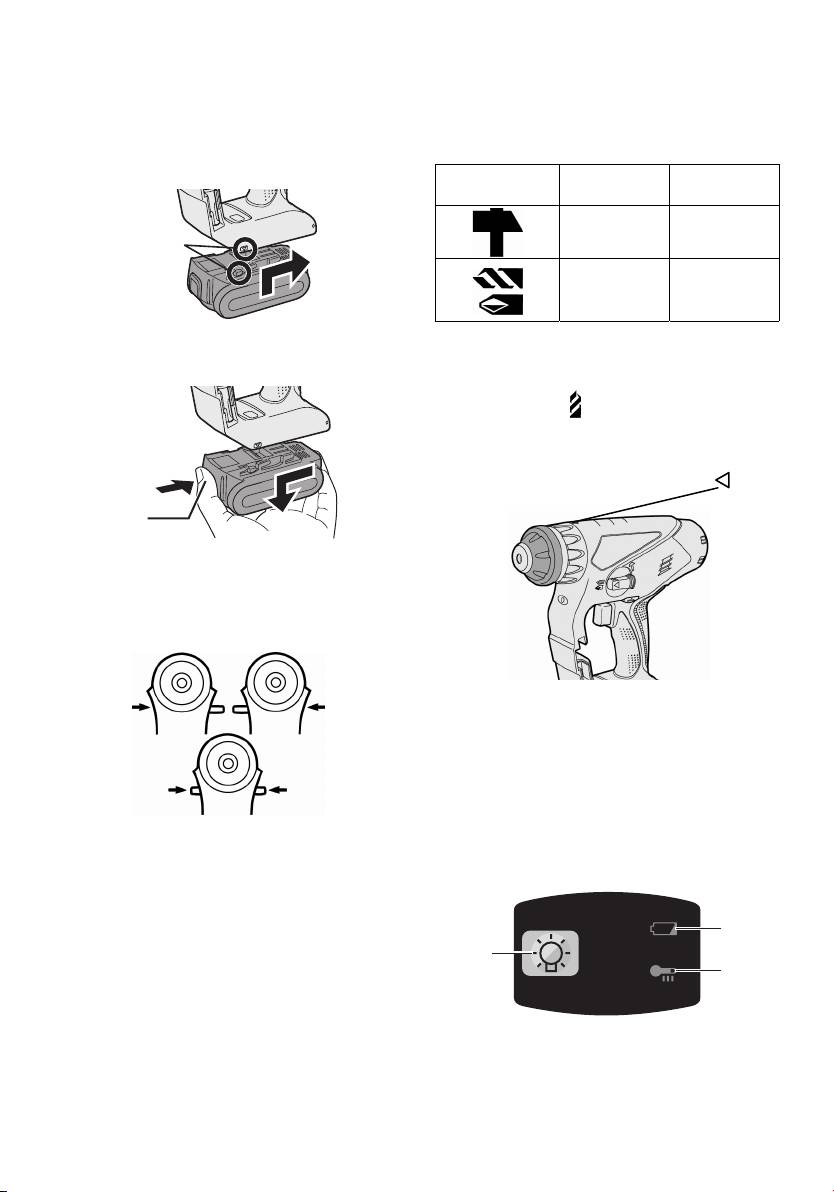
Attaching or Removing Bat-
Hammering/Drilling Switching
tery Pack
Lever
1. To connect the battery pack:
NOTE: Operate the mode change after
Line up the alignment marks and
the motor rotation is completely
attach the battery pack.
stopped.
• Slide the battery pack until it locks
Position of
into position.
Action mode Operation
switching lever
Concrete
Rotation with
Drilling,
hammering
Block Drillin
2. To remove the battery pack:
Push on the button from the front to
release the battery pack.
IV. OPERATION
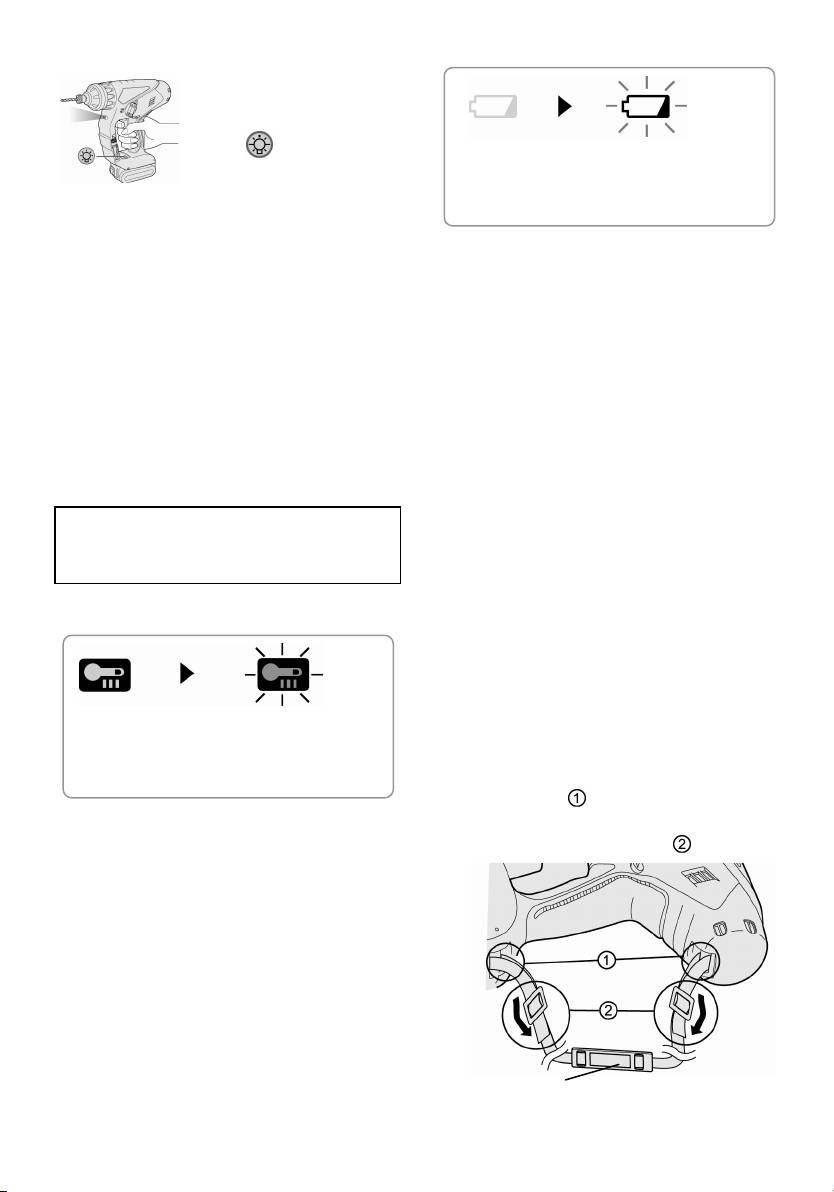
Forward/Reverse Lever
• Be sure to set the lever in the center
to lock it after use.
• Operate the Forward/Reverse lever
after the motor rotation is completely
stopped.
- 7 -
g
Alignment marks
Screw
Rotation only
Fastening,
Drilling
Clutch Torque Setting
Adjust the torque to one of the 5 clutch
settings or “
” position.
CAUTION:
Test the setting before actual operation.
Set the scale at this mark ( ).
Button
Variable Speed Control Trigger
Forward Reverse
To set the center of a hole, pull the
trigger slightly to start the drill rotation
slowly.
The more the speed control trigger is
Lock
pulled, the higher the speed becomes.
Control Panel
(
3
)
(
1
)
(
2
)
(3) Battery low warning lamp
(1) LED light
Before the use of LED
light, always pull the
power switch once.
Press
the LED light
Flashing
Off
on button.
(No charge)
(normal
The light illuminates with
Battery protection
operation)
feature active
very low current, and it
does not adversely affect
The battery protection feature
the performance of the
activates immediately before the
tool during use or its
battery loses its charge, causing the
battery capacity.
battery low warning lamp to flash.
CAUTION:
• If you notice the battery low warning
• The built-in LED light is designed to
illuminate the small work area
lamp flashing, charge the battery
temporarily.
pack immediately.
•
Do not use it as a substitute for a
regular flashlight, since it does not
Installing the Shoulder Strap
have enough brightness.
•
LED light turns off when the tool has
CAUTION:
not been used for 5 minutes.
• Install the shoulder strap firmly to
the main unit of the tool and
Caution : DO NOT STARE INTO BEAM.
check the length of the strap
Use of controls or adjustments or performance
before use.
of procedures other than those specified herein
•
Check the condition of the strap
may result in hazardous radiation exposure.
and do not use if it is cut or torn
etc.
(2) Overheat warning lamp
There is a risk of injury or damage
if used while improperly installed.
• Please wear the shoulder strap
securely on the shoulder.
There is a risk of injury or damage
Off
Flashing: Overheat
if it is accidentally dropped.
(normal
Indicates operation has
operation)
been halted due to battery
1. Pass the strap through the strap
overheatin
holders. (
)
The overheating protection feature
2. Pass the strap through the buckles
halts tool operation to protect the
and adjust the length. (
)
battery pack in the event of
overheating. The overheat warning
lamp on the control panel flashes
when this feature is active.
• If the overheating protection feature
activates, allow the tool to cool
thoroughly (at least 30 minutes). The
tool is ready for use when the
overheat warning lamp goes out.
• Avoid using the tool in a way that
causes the overheating protection
feature to activate repeatedly.
• The shoulder strap can be adjusted
- 8 -
g
.
Shoulder pad

according to the individual.
limited life. If the operation time be-
• Adjust the shoulder pad to the
comes extremely short after recharg-
shoulder.
ing, replace the battery pack with a
• Pull the shoulder strap to make
new one.
sure it is firmly attached to the main
unit of the tool.
Battery Recycling
ATTENTION:
[Battery Pack]
For environmental protection and
recycling of materials, be sure that
For Appropriate Use of
it is disposed of at an officially
Battery pack
assigned location, if there is one in
Li-ion Battery pack (EY9L40/EY9L41)
your country.
• For optimum battery life, store the Li-
ion battery pack following use without
[Battery Charger]
charging it.
Charging
• When charging the battery pack,
confirm that the terminals on the
Cautions for the Li-ion Battery
battery charger are free of foreign
Pack
substances such as dust and water
• If the temperature of the battery pack
etc. Clean the terminals before
falls
approximately below −10°C (14°F),
charging the battery pack if any
charging will automatically stop to
foreign substances are found on the
prevent degradation of the battery.
terminals.
The life of the battery pack terminals
Common Cautions for the Li-
may be affected by foreign
ion/Ni-MH/Ni-Cd Battery Pack
substances such as dust and water
• The ambient temperature range is
etc. during operation.
between 0°C (32°F) and 40°C (104°F).
• When battery pack is not in use,
If the battery pack is used when the
keep it away from other metal objects
battery temperature is below 0°C
like: paper clips, coins, keys, nails,
(32°F), the tool may fail to function
screws, or other small metal objects
properly.
that can make a connection from one
terminal to another.
• Use the charger at temperatures
between 0°C and 40°C, and charge
Shorting the battery terminals together
the battery at a temperature similar to
may cause sparks, burns or a fire.
that of the battery itself. (There should
• When operating the battery pack,
be no more than a 15°C difference
make sure the work place is well
between the temperatures of the
ventilated.
battery and the charging location.)
• When the battery pack is removed
• When charging a cool battery pack
from the main body of the tool, replace
(below 0°C (32°F)) in a warm place,
the battery pack cover immediately in
leave the battery pack at the place
order to prevent dust or dirt from
and wait for more than one hour to
contaminating the battery terminals
warm up the battery to the level of
and causing a short circuit.
the ambient temperature.
• Cool down the charger when charging
more than two battery packs
consecutively.
• Do not insert your fingers into contact
Battery Pack Life
hole, when holding charger or any
other occasions.
The rechargeable batteries have a
- 9 -
4. The charge lamp (green) will flash
CAUTION:
slowly once the battery is approxi-
To prevent the risk of fire or damage
mately 80% charged.
to the battery charger.
5. When charging is completed, the
• Do not use power source from an
charging lamp will start flashing quickly in
engine generator.
green color.
• Do not cover vent holes on the
6. If the temperature of the batter pack is
charger and the battery pack.
0°C or less, charging takes longer to
• Unplug the charger when not in use.
fully charge the battery pack than the
Li-ion Battery Pack
standard charging time.
Even when the battery is fully charged, it
NOTE:
will have approximately 50% of the
Your battery pack is not fully
power of a fully charged battery at
charged at the time of purchase. Be
normal operating temperature.
sure to charge the battery before
use.
7. If the power lamp does not light
immediately after the charger is plugged
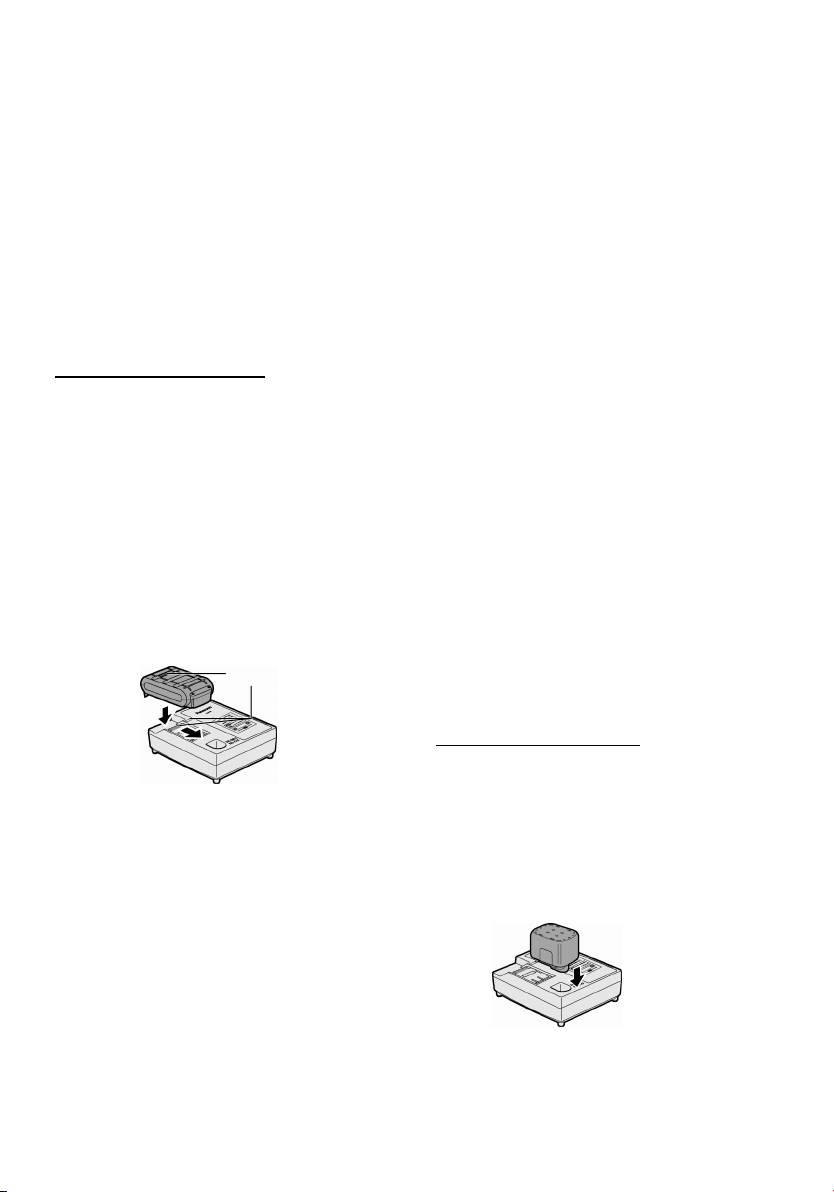
Battery charger (EY0L80)
in, or if after the standard charging time
1. Plug the charger into the AC outlet.
the charging lamp does not flash quickly
in green, consult an authorized dealer.
NOTE:
8. If a fully charged battery pack is
Sparks may be produced when the
plug is inserted into the AC power
inserted into the charger again, the
supply, but this is not a problem in
charging lamp lights up. After several
terms of safety.
minutes, the charging lamp may flash
2. Insert the battery pack firmly into the
quickly to indicate the charging is
charger.
completed.
1 Line up the alignment marks and
place the battery onto the dock on
Ni-MH/Ni-Cd Battery Pack
the charger.
NOTE:
2 Slide forward in the direction of the
When you charge the battery pack
arrow.
for the first time, or after prolonged
storage, charge it for about 24
hours to bring the battery up to full
capacity.
Battery charger (EY0L80)
1. Plug the charger into the AC outlet.
NOTE:
3. During charging, the charging lamp
Sparks may be produced when the
will be lit.
plug is inserted into the AC power
When charging is completed, an
supply, but this is not a problem in
internal electronic switch will
terms of safety.
automatically be triggered to
2. Insert the battery pack firmly into the
prevent overcharging.
charger.
• Charging will not start if the battery pack
is warm (for example, immediately after
heavy-duty operation).
The orange standby lamp will be
flashing until the battery cools down.
Charging will then begin automatically.
- 10 -
A
lignment marks
green color.
3. During charging, the charging lamp
will be lit.
5. If the charging lamp does not light
When charging is completed, an internal
immediately after the charger is
electronic switch will automatically be
plugged in, or if after the standard
triggered to prevent overcharging.
charging time the charging lamp does
•
Charging will not start if the battery
not flash quickly in green, consult an
pack is warm (for example,
authorized dealer.
immediately after heavy-duty
6. If a fully charged battery pack is in-
operation).
serted into the charger again, the
The orange standby lamp will be
charging lamp lights up. After several
flashing until the battery cools down.
minutes, the charging lamp may flash
Charging will then begin
automatically.
quickly to indicate the charging is
4. When charging is completed, the charg-
completed.
ing lamp will start flashing quickly in
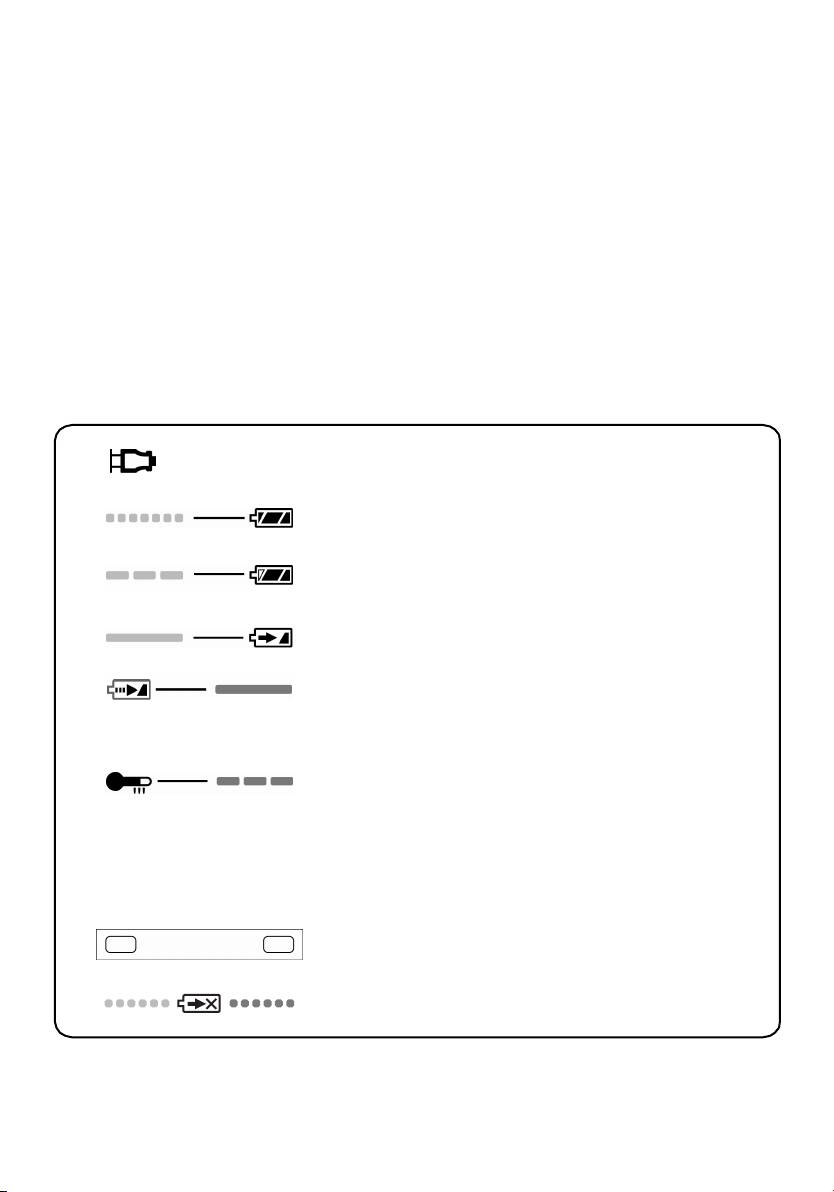
LAMP INDICATIONS
Green Lit
Charger is plugged into the AC outlet.
Ready to charge.
Green Flashing Quickly
Charging is completed. (Full charge.)
Green Flashing
Battery is approximately 80% charged. (Usable charge. Li-
ion only)
Green Lit
Now charging.
Orange Lit
Battery pack is cool.
The battery pack is being charged slowly to reduce the load
on the battery. (Li-ion only)
Orange Flashing
Battery pack is warm. Charging will begin when temperature
of battery pack drops.
If the temperature of the battery pack is –10°C or less, the
charging status lamp (orange) will also start flashing. Charging
will begin when the temperature of the battery pack goes up (Li-
ion only)
Charging Status Lamp
Left: green Right: orange will be displayed.
Both Orange and Green Flashing Quickly
Charging is not possible. Clogged with dust or malfunction of
the battery pack.
- 11 -
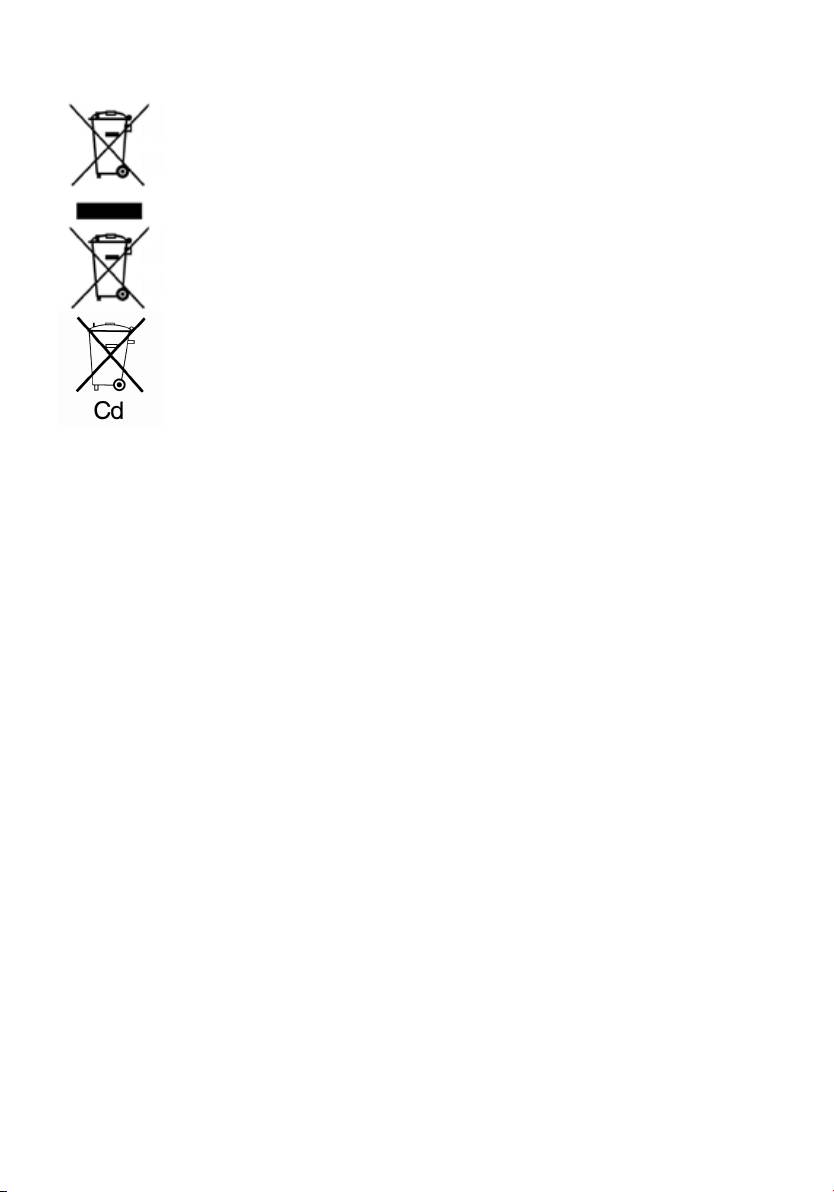
Information for Users on Collection and Disposal of Old
Equipment and used Batteries
These symbols on the products, packaging, and/or accompanying
documents mean that used electrical and electronic products and
batteries should not be mixed with general household waste.
For proper treatment, recovery and recycling of old products and used
batteries, please take them to applicable collection points, in accordance
with your national legislation and the Directives 2002/96/EC and
2006/66/EC.
By disposing of these products and batteries correctly, you will help to
save valuable resources and prevent any potential negative effects on
human health and the environment which could otherwise arise from
inappropriate waste handling.
For more information about collection and recycling of old products and
batteries, please contact your local municipality, your waste disposal
service or the point of sale where you purchased the items.
Penalties may be applicable for incorrect disposal of this waste, in
accordance with national legislation.
For business users in the European Union
If you wish to discard electrical and electronic equipment, please contact your
dealer or supplier for further information.
[Information on Disposal in other Countries outside the
European Union]
These symbols are only valid in the European Union. If you wish to discard these
items, please contact your local authorities or dealer and ask for the correct method
of disposal.
Note for the battery symbol (bottom two symbol examples):
This symbol might be used in combination with a chemical symbol. In this case it
complies with the requirement set by the Directive for the chemical involved.
- 12 -
Оглавление
- I.INTENDED USE
- III. ASSEMBLY
- IV. OPERATION
- V. MAINTENANCE
- VIII. SPECIFICATIONS
- ONLY FOR U. K.
- I.
- III. ZUSAMMENBAU
- IV. BETRIEB
- V. WARTUNG
- VII. GEBRAUCHSEMPFEHLUNG
- . USAGE PREVU
- . MONTAGE
- .
- . ACCESSOIRES
- . CARACTERISTIQUES TECHNIQUES
- . USO PREVISTO
- . MONTAGGIO
- .
- . SPECIFICAZIONI
- . TOEPASSING
- . MONTAGE
- . BEDIENING
- .
- . GEBRUIKSADVIES
- . USO PREVISTO
- . MONTAJE
- .
- . ACCESORIOS
- . ESPECIFICACIONES
- . BEREGNET BRUG
- . MONTERING
- . BETJENING
- .
- . SPECIFIKATIONER
- . AVSEDD ANVÄND-
- . MONTERING
- . DRIFT
- .
- . TILLBEHÖR
- . TEKNISKA SPECIFIKATIONER
- . TILSIKTET BRUK
- . MONTERING
- . BETJENING
- .
- . TILBEHØR
- . SPESIFIKASJONER
- . KÄYTTÖTARKOI-
- . KOKOAMINEN
- . TOIMINTA
- .
- . LISÄLAITTEET
- . TEKNISET TIEDOT
- . ПРИМЕНЕНИЕ
- .СБОРКА
- . ФУНКЦИОНИРОВАНИЕ
- . ОБСЛУЖИВАНИЕ
- . ПРИНАДЛЕЖНОСТИ
- . ТЕХНИЧЕСКИЕ ХАРАКТЕРИСТИКИ
- . ВИКОРИСТАННЯ ЗА
- . ЗБІРКА
- .
- . ОБСЛУГОВУВАННЯ
- . ПРИЛАДДЯ
- . ТЕХНІЧНІ ХАРАКТЕРИСТИКИ
