Panasonic HX015E: Attaching/Detaching the Lens
Attaching/Detaching the Lens: Panasonic HX015E
SQT0244_E.book 6 ページ 2014年4月11日 金曜日 午前9時17分
4 Focus ring
Attaching/Detaching the Lens
Rotate to focus when taking pictures with manual
focus (MF).
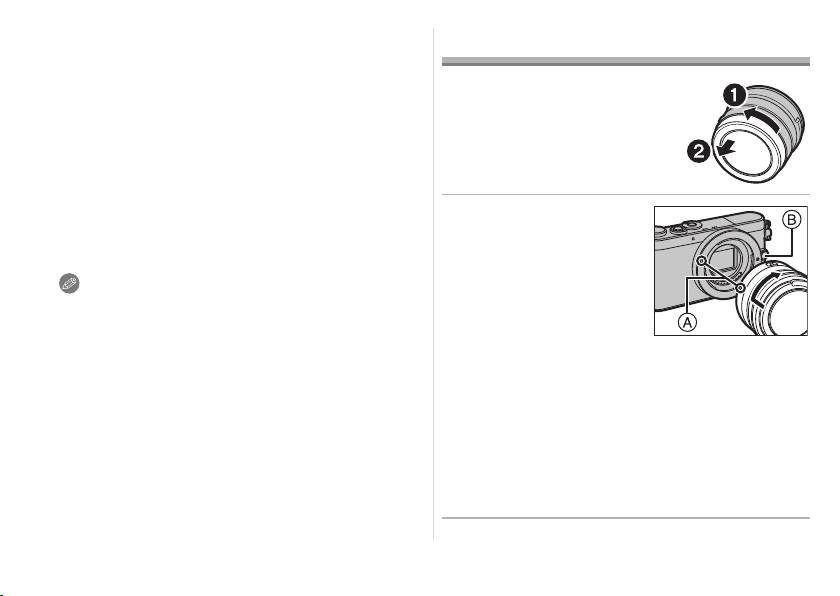
Check that the camera is
5 [AF/MF] switch
turned off.
This allows you to switch between Auto Focus (AF)
≥ Remove the lens rear cap
and Manual Focus (MF). If you set [MF], you can
from the lens.
use the focus ring to adjust the focus.
≥ When either the [AF/MF] switch of the lens or the
∫ Attaching the Lens
setting of the camera is set to [MF], Manual Focus
(MF) is enabled.
Align the lens fitting
6 Lens fitting mark
marks
A on the
7 Contact points
camera body and the
lens and then rotate
Note
the lens in the
≥ When using this lens and the flash to record a
subject very close to the camera, it is possible that
direction of the
a darker shadowed area may appear in the lower
arrow until it clicks.
portion of the picture. This situation is not a
malfunction and is caused when the flash is
• Do not press the lens release button B when
partially blocked by the lens. This situation may be
you attach a lens.
worsened when the lens hood is used.
• Do not try to attach the lens when holding it at an
≥
In very quiet situations Auto Focus operating sounds
angle to the camera body as the lens mount may
may be recorded during motion picture recording.
This is not a malfunction. In such situations,
get scratched.
switching to Manual Focus will improve the situation.
• Check that the lens is attached correctly.
≥ The aperture can be adjusted with the aperture
• Be sure to remove the lens cap when recording.
ring only when a Panasonic digital camera is
attached to the lens. (As of April 2014)
6
SQT0244
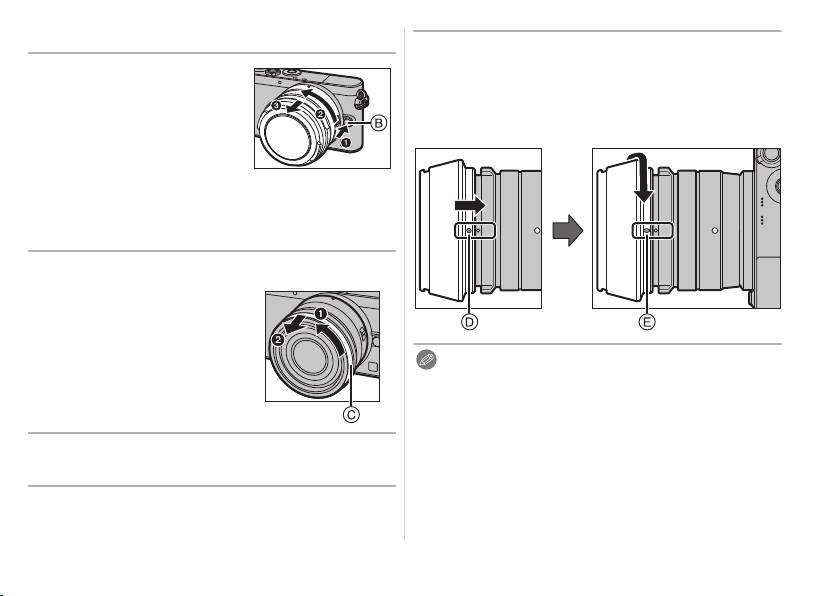
∫ Detaching the Lens
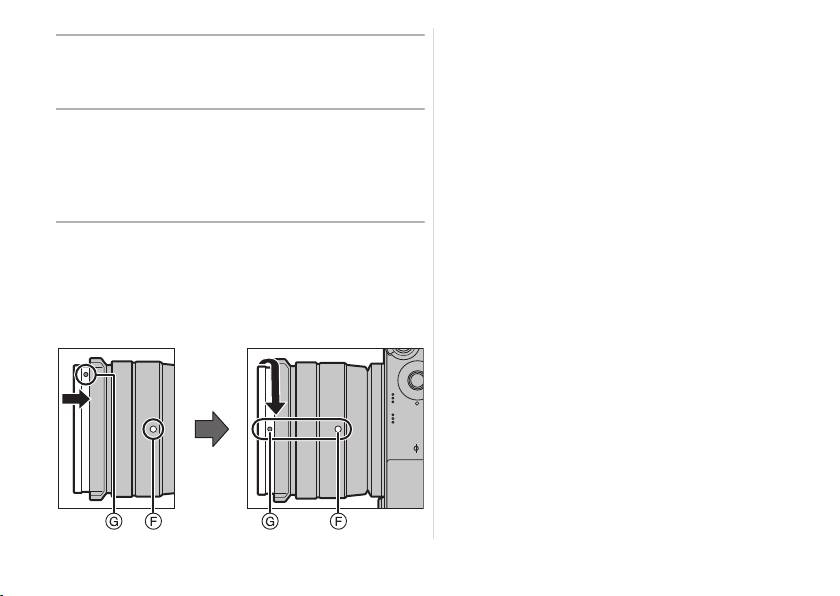
3 Rotate the lens hood in the direction of
the arrow until it clicks into place, and
While pressing on the
align the stop position
E on the lens
lens release button B,
hood with the index on the tip of the lens.
rotate the lens toward
the arrow until it stops
and then remove.
• Attach the lens rear cap so
that the lens contact point does not get scratched.
• Attach the body cap to the camera so no dirt or
dust will get inside the main unit.
∫
Attaching the Lens Hood (Supplied Accessory)
≥ Before attaching the lens
hood, make sure to
remove the lens cap. The
lens hood cannot be
Note
attached unless you
≥
When using this lens and the flash to record a subject
remove the lens cap.
very close to the camera, it is possible that a darker
shadowed area may appear in the lower portion of the
picture. This situation is not a malfunction and is caused
when the flash is partially blocked by the lens. This
1 Rotate the decoration ring C in the
situation may be worsened when the lens hood is used.
direction of the arrow to remove it.
≥ When using the AF assist lamp in the dark, detach
the lens hood.
2 Align the mounting index D on the lens
≥ Make sure to remove the lens hood cap when
hood with the mark on the tip of the lens.
recording an image.
7
SQT0244
23
SQT0244_E.book 7 ページ 2014年4月11日 金曜日 午前9時17分
∫ Attaching Filters
∫ Attaching the decoration ring
≥ Vignetting may occur if using 2 or more
≥ Before attaching the decoration ring, make
MC protectors (optional: DMW-LMC46), PL filters
sure to remove the lens cap.
(optional: DMW-LPL46) or ND filters (optional:
DMW-LND46), or if using thick protectors and/or
1 Align the mounting position G on the
filters.
decoration ring with a position
≥ The filter may become impossible to remove if
approximately 90x away from the lens
excessively tightened, so please refrain from
fitting mark
F to fit the decoration ring
tightening it too strongly.
into place.
≥ It is possible to attach the lens cap with the filter
2 Rotate the decoration ring in the
already attached.
direction of the arrow to align the
≥ When the lens hood is attached to this lens, you
cannot attach a filter to it.
mounting position
G on the decoration
≥ You cannot attach a conversion lens or adaptor to
ring with the lens fitting mark F.
this lens. A filter may be used, but attaching any
other element may cause damage to the lens.
8
SQT0244
12
SQT0244_E.book 8 ページ 2014年4月11日 金曜日 午前9時17分
Оглавление
- Operating Instructions
- Information for Your Safety
- Supplied Accessories
- Names and Functions of
- Attaching/Detaching the Lens
- Cautions for Use
- Specifications
- Informationen für Ihre Sicherheit
- Beiliegendes Zubehör
- Bezeichnungen und Funktionen
- Objektiv ansetzen/abnehmen
- Vorsichtsmaßnahmen
- Spezifikationen
- Précautions à prendre
- Accessoires fournis
- Noms et fonctions des
- Fixation/Retrait de l’objectif
- Précautions d’utilisation
- Spécifications
- Información para su seguridad
- Accesorios suministrados
- Nombres y funciones de
- Unir y quitar el objetivo
- Precauciones para el uso
- Especificaciones
- Informazioni per la sua
- Accessori in dotazione
- Nomi e funzioni dei componenti
- Installazione/Rimozione
- Precauzioni per l’uso
- Specifiche
- 安全注意事項
- 提供的附件
- 元件的名稱及功能
- 安裝 / 取下鏡頭
- 使用時的注意事項
- 規格
- Информация для вашей
- Принадлежности, входящие в комплект
- Названия и функции
- Установка/Снятие объектива
- Предосторожности при
- Технические характеристики
