Panasonic EY7270: III
III: Panasonic EY7270
-
6
-
If the hex quick connect chuck attachment
The Hard impact mode is for selecting
(optional) is attached, the EY7271 impact
maximum torque and rotational speed.
wrench can be used in the same manner
CAUTION:
as driver model EY7270.
Do not press the impact mode button
Symbol Meaning
before rotation has stopped completely.
V
Volts
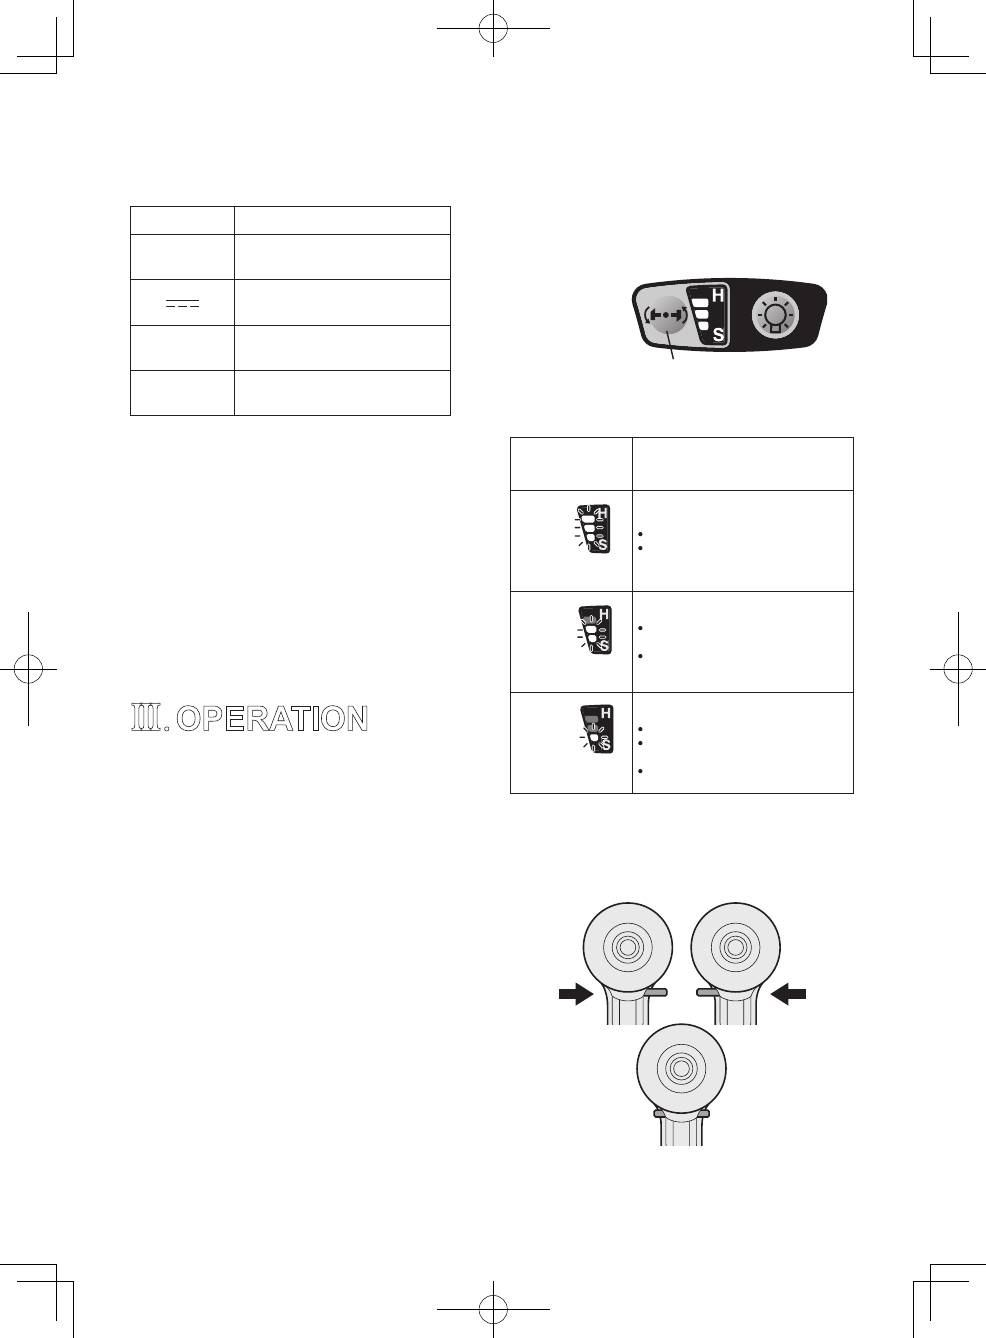
Operation panel
Direct current
n
No load speed
0
Impact mode button
Revolutions or
…/min
reciprocation per minutes
Recommended work guideline table
Impact
Attaching or Removing
Power Mode
Recommended Application
Display
Battery Pack
1. To connect the battery pack:
For hard impact power mode.
H
Insert the battery pack. It snaps into
Fastening long wood screws.
Tightening bolts when installing
place to indicate proper connection.
Approx.
devices, etc.
2. To remove the battery pack:
2800 R.P.M.
(
Max.
)
Press the two battery pack release
For medium impact power mode.
buttons on the sides of the battery pack.
M
Fastening small diameter
Slide the battery pack out of the tool
screws into hard materials.
body.
Driving machine screws when
Approx.
installing devices.
2500 R.P.M.
(
Max.
)
For soft impact power mode.
III
.
OPERATION
S
Installing gypsum board.
Installing soft metal window
Select the Impact Mode
ame.
Approx.
Installinginteriornishings.
2000 R.P.M.
(
Max.
)
The tool has an impact mode selection
feature. By pressing the impact mode
button, the impact strength can be
Switch and Forward/Reverse
selected according to Hard, Medium or
Soft. Pressing the button toggles the mode
Lever Operation
fromHard→Medium→Soft.(Thefactory
default setting is the Hard impact mode.)
In the Soft impact mode the torque is lower
to prevent damaging material caused by
overtightening. This mode is recommended
when you wish to minimize possible damage
to small screw heads or to a soft material
ReverseForward
surface to be fastened by controlling the
variable speed control trigger.
The Medium impact mode also has a lower
torque setting to help prevent damage to
materials caused by overtightening. This
mode is recommended when you wish to
Switch lock
minimize possible damage to screws and
screw heads.
EY7270(EU).indb 6 2006/05/25 13:24:57
-
7
-
CAUTION:
The light illuminates with a very low
To prevent damage, do not operate
current, and it does not adversely affect the
Forward/Reverse lever until the bit
performance of the tool during use or its
comes to a complete stop.
battery capacity.
Forward Rotation Switch
Operation
1. Push the lever for forward rotation.
2. Depress the trigger switch slightly to
start the tool slowly.
3. The speed increases with the amount
of depression of the trigger for efficient
tightening of screws. The brake
operates and the bit stops immediately
when the trigger is released.
4. After use, set the lever to its center
position (switch lock).
Reverse Rotation Switch
The impact mode display on the operation
Operation
panel will turn off in the following cases:
1. Push the lever for reverse rotation. Check
•
5 minutes have passed with no operation;
the direction of rotation before use.
•
During battery replacement.
2. Depress the trigger switch slightly to
If the variable speed control trigger is
start the tool slowly.
pressed, the impact mode display will
3. After use, set the lever to its center
return to the previous setting before the
position (switch lock).
light turned off.
CAUTION:
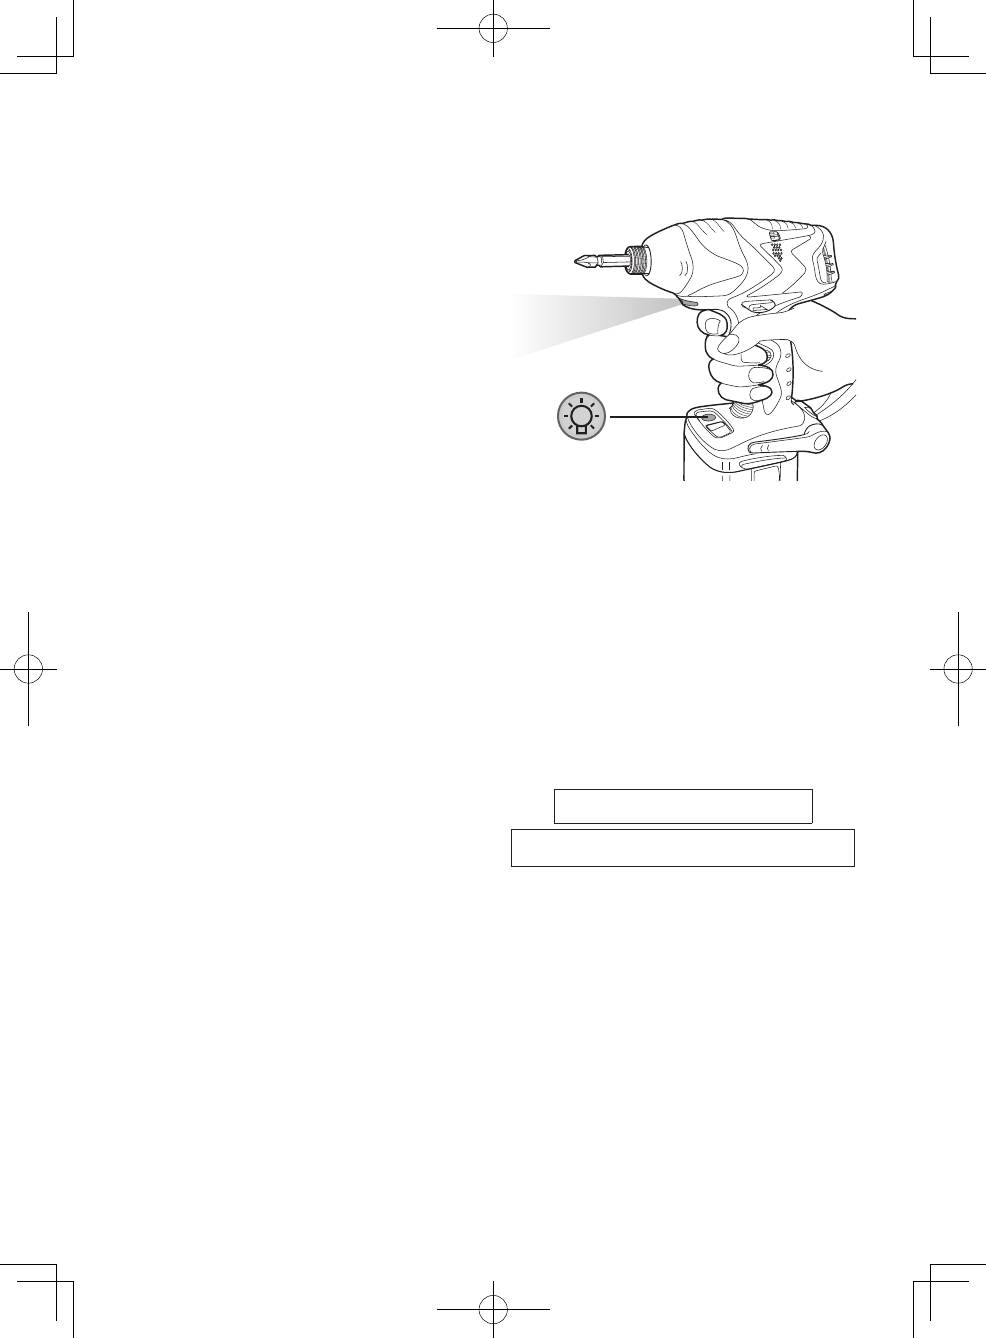
This product has a built-in LED light.
To eliminate excessive temperature
increase of the tool surface, do not
This product is classified as a “Class 1 LED
operate the tool continuously (using two
Product” under EN 60825-1.
or more battery packs consecutively).
Tool needs cool-off time before
CLASS 1 LED PRODUCT
switching to another pack.
Caution: DO NOT STARE INTO BEAM.
LED Light
CAUTION:
How to Use the Belt Hook
The built-in LED light is designed
WARNING:
to illuminate a small work area
• Be sure to attach the belt hook
temporarily.
securely to the main unit with the
Do not use it as a substitute for a
screw firmly fastened. When the belt
regular flashlight, since it does not
hook is not firmly attached to the
provide enough illumination.
main unit, the hook may depart and
Pressing the LED light ON/OFF button will
the main unit may fall.
turn the LED light on and off.
This may result in an accident or injury.
• Be sure to attach the belt hook firmly
If the tool has not been operated for 5
and securely onto a waist belt or
minutes while the LED light is on, the light
other belt. Pay attention so that the
turns off automatically.
unit does not slip off from the belt.
This may result in an accident or injury.
EY7270(EU).indb 7 2006/05/25 13:24:58
-
8
-
• When the main unit is held by the
clockwise, using a flat metal or a flat
belt hook, avoid jumping or running
blade screw driver.
with it. Doing so may cause the hook
3.
Take out the belt hook and insert into
to slip and the main unit to fall.
the other side of the slot on the main
This may result in an accident or injury.
unit.
4. Fasten the screw firmly, turning it
• When the belt hook is not used,
clockwise.
be sure to return it to the storage
position. Otherwise the belt hook
The belt hook can be taken out from the
may catch on something. This may
main unit only when it is at storing position.
result in an accident or injury.
•
When the unit is hooked onto the waist
Appropriate Use of Battery
belt by the belt hook, do not attach a
Pack
bit other than driver bits to the unit.
A sharp-edged object, such as a drill
Ni-MH Battery Pack (EY9201)
bit, may cause injury or an accident.
• Charge the Ni-MH battery fully before
storage in order to ensure a longer
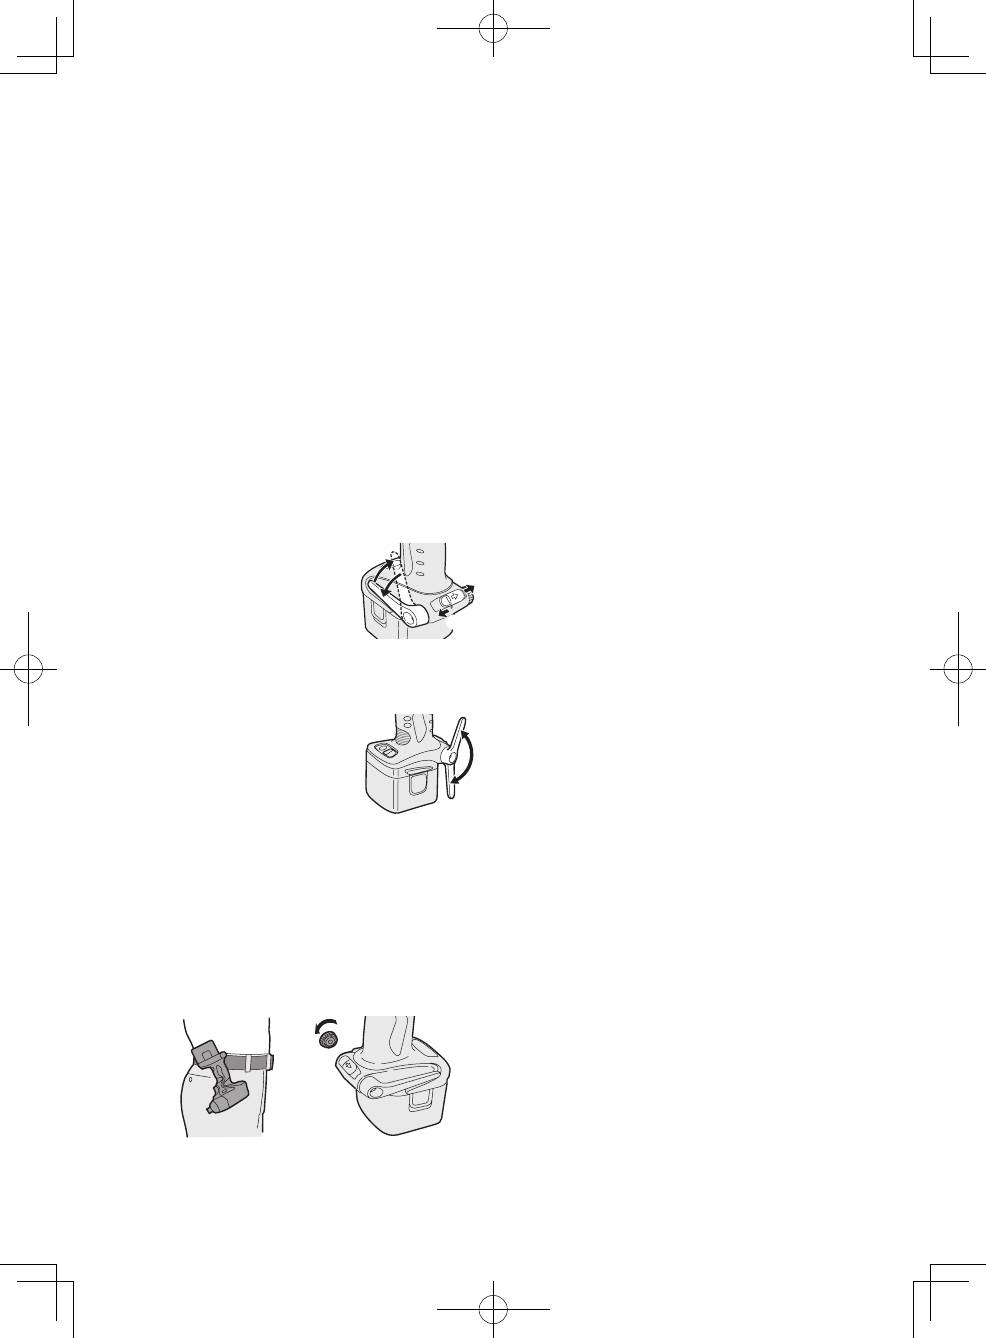
To Set the Belt Hook Angle
service life.
Position
• The ambient temperature range is
1. Slide the belt hook lock lever 1 and
between 0°C (32°F) and 40°C (104°F).
hold it to unlock the belt hook.
If the battery pack is used when the
2. Pull the belt hook from
2
battery temperature is below 0°C
storing position 2 and
1
(32°F), the tool may fail to function
set it.
properly. In that case, charge the
3. Release the belt hook
battery until charging is completed for
3
lock lever to lock the
appropriate functioning of the battery.
angle of belt hook.
• When battery pack is not in use, keep it
4. Make sure the belt hook is firmly locked.
away from other metal objects such as
Also make sure the belt hook lock lever is
paper clips, coins, keys, nails, screws,
firmly locked into position
3
.
or other small metal objects that can
• The belt hook cannot
make a connection from one terminal to
be lock ed in th is
another.
position. Firmly lock it
Short-circuiting the battery terminals
into position before use.
together may cause sparks, burns or a
fire.
To return the belt hook to the storing
• When operating with a Ni-MH battery
position, Follow step 1. and 2. above, then
pack, make sure the area is well
lower the belt hook.
ventilated.
To secure the lock, follow 3 and 4 above.
Battery Pack Life
To Change the Belt Hook
The rechargeable batteries have
Location Side
a limited life. If the operation time
The belt hook can be attached to either
becomes extremely short after
side of the unit.
recharging, replace the battery pack
with a new one.
Battery Recycling
ATTENTION:
For environmental protection and
recycling of materials, be sure
1. Set the belt hook at storing position.
that it is disposed of at an officially
2. Loosen the screw turning it counter-
assigned location, if there is one in
your country.
EY7270(EU).indb 8 2006/05/25 13:25:00
-
9
-
5. If the battery pack is too cool, or the
Charging
battery pack has not been used for a
NOTE:
long time, the charging lamp will light up.
When you charge the battery pack
In this case it takes longer than normal
for the first time, or after prolonged
to fully charge the battery pack.
storage, charge it for about 24 hours
• If a fully charged battery pack is
to bring the battery up to full capacity.
inserted into the charger again, the
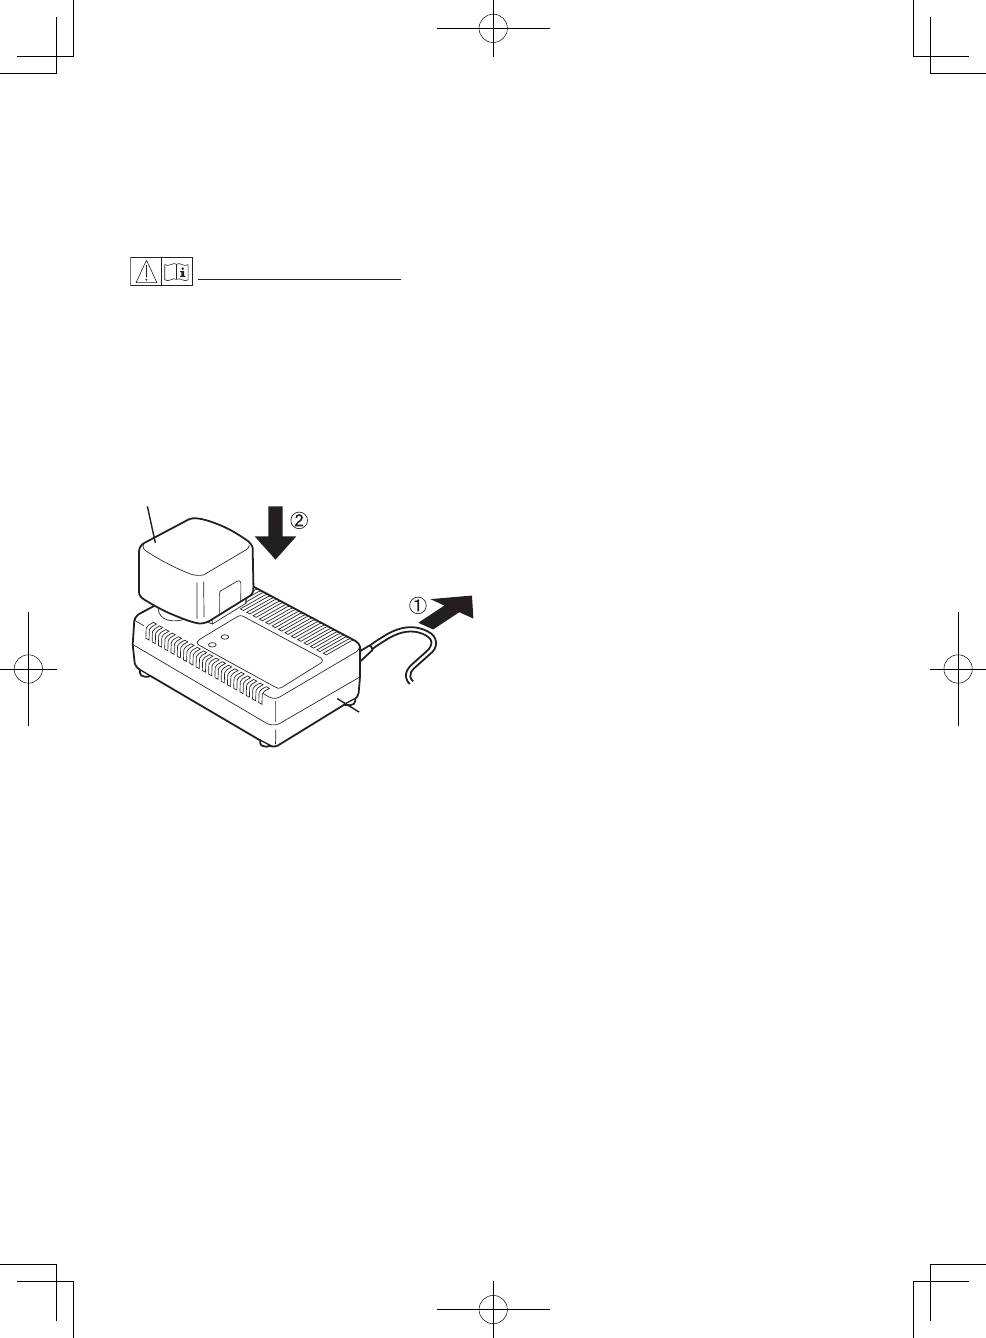
Battery charger (EY0110)
charging lamp lights up. After several
minutes, the charging lamp may flash
1. Plug the charger into the AC outlet.
quickly to indicate that charging is
NOTE:
completed.
Sparks may be produced when the
6.
If the charging lamp does not light
plug is inserted into the AC power
immediately after the charger is plugged
supply, but this is not a problem in
in, or if, after the standard charging time
terms of safety.
passes, the lamp does not go off, consult
an authorized dealer.
2. Insert the battery pack firmly into the
charger.
NOTE:
• When charging a cool battery pack
Battery pack
(below 5°C (41°F)) in a warm place,
leave the battery pack in the place
and wait for more than one hour to
To AC
allow the battery to reach the ambient
outlet
temperature. Otherwise battery pack
may not fully charge.
• Allow the charger to cool down when
charging more than two battery packs
consecutively.
• Do not insert your fingers into contact
Battery
hole when holding charger or at any
charger
other time.
CAUTION:
To prevent fire or damage to the
3. During charging, the charging lamp will
battery charger:
be lit.
• Do not use an engine generator as a
When charging is completed, an internal
power source.
electronic switch will automatically be
• Do not cover vent holes on the
triggered to prevent overcharging.
charger and the battery pack.
• Charging will not start if the battery
• Unplug the charger when not in use.
pack is warm (for example, immediately
after heavy-duty operation).
The orange standby lamp will remain
on until the battery cools down.
Charging will then begin automatically.
4. When charging is completed, the green
charging lamp will start flashing quickly.
EY7270(EU).indb 9 2006/05/25 13:25:02
