Panasonic EY3641: IV
IV: Panasonic EY3641

-
8
-
5) Set the nozzle and install the front cap
CAUTION:
on the tube holder. (Fig. 7)
• Be sure to lock the trigger (“0” position)
when finished working.
6) Push the rack until touching the
cartridge. (Fig. 8)
Speed rate adjustment
For use with sausage pack
0 1 Slow Fast 5
Lock
1) Cut off the tip of nozzle at a point
suitable for the job. (Fig. 3)
2) Pull the rack all the way to rear.
5) The rack will retract slightly when you
(Fig. 4)
release the trigger, so as to prevent
dripping.
3) Unscrew the tube holder from the
housing.
CAUTION:
4) Screw sausage pack adapter on to
• Dripping can occur with small nozzle
piston joint. (Fig. 9)
openings or exceptionally soft sealing
compounds.
NOTE:
6) You can pull the trigger repeatedly to
• Make sure that the plunger rotates
dispense small shots of compound.
smoothly.
As long as you pull the trigger within
5) Install the tube holder on the housing,
1 second of each shot, the rack will
remove the front cap from the tube
move forward slowly without retracting.
holder, and insert the sausage pack.
(Fig. 10)
For hard compounds
• Warm the sealing compounds until the
6) Set the nozzle and install the front cap
compounds become soft.
on the tube holder. (Fig. 11)
• Slow down the speed by selecting the
7) Push the rack until touching the
application speed control.
sausage pack. (Fig. 12)
• Make the nozzle cut diameter bigger.
(Fig. 14)
CAUTION:
IV
. OPERATION
• Make sure the front cap is tightened
securely when working.
How to use the sealing
• Do not touch the rack to avoid getting
gun
your fingers pinched.
• Use the tool only for its intended purpose,
1) Hold the grip while holding the tube
and do not operate it for long periods of
holder. (Fig. 13)
time without interruption, since this may
2) Set the nozzle in the groove, then
damage the sealing gun or cause the
squeeze the switch (L). The rack will
cartridge to jam. Do not insert a cartridge
move forward.
if it is wet, or if the sealing compound has
3) The tube holder can be rotated. This
hardened.
makes sealing application even easier
• If the tool is operated for long periods of
in hard-to-work places.
time, the motor may overheat.
It is therefore recommended to switch it
4) Set rack speed according to work.
off from time to time.
You can easily change speeds while
• The use of flammable materials, even for
working by rotating application speed
cleaning purposes, is not permitted.
control (K) by finger.
ATTENTION:
[Battery Pack]
For environmental protection and recycling
For Appropriate Use of
of materials, be sure that it is disposed of
at an officially assigned location, if there is
Battery pack
one in your country.
Li-ion Battery pack (EY9L41)
[Battery Charger]
• For optimum battery life, store the Li-
ion battery pack following use without
Charging
charging it.
Common Cautions for the
• When charging the battery pack,
confirm that the terminals on the battery
Li-ion/Ni-MH/Ni-Cd Battery
charger are free of foreign substances
Pack
such as dust and water etc. Clean the
terminals before charging the battery
• If the temperature of the battery pack
pack if any foreign substances are
fallsapproximatelybelow−10°C(14°F),
found on the terminals.
charging will automatically stop to
The life of the battery pack terminals
prevent degradation of the battery.
may be affected by foreign substances
• The ambient temperature range is
such as dust and water etc. during
between0°C(32°F)and40°C(104°F).
operation.
If the battery pack is used when the
• When battery pack is not in use, keep
batterytemperatureisbelow0°C(32°F),
it away from other metal objects like:
the tool may fail to function properly.
paper clips, coins, keys, nails, screws,
• When charging a cool battery pack
or other small metal objects that can
(below0°C(32°F))inawarmplace,
make a connection from one terminal to
leave the battery pack at the place and
another.
wait for more than one hour to warm up
Shorting the battery terminals together
the battery to the level of the ambient
may cause sparks, burns or a fire.
temperature.
• When operating the battery pack, make
• Cool down the charger when charging
sure the work place is well-ventilated.
more than two battery packs
• When the battery pack is removed
consecutively.
from the main body of the tool, replace
• Do not insert your fingers into contact
the battery pack cover immediately
hole, when holding charger or any other
in order to prevent dust or dirt from
occasions.
contaminating the battery terminals and
causing a short circuit.
CAUTION:
To prevent the risk of fire or damage to the
battery charger.
• Do not use power source from an engine
generator.
• Do not cover vent holes on the charger
and the battery pack.
• Unplug the charger when not in use.
Battery Pack Life
The rechargeable batteries have a
Li-ion Battery Pack
limited life. If the operation time becomes
extremely short after recharging, replace
NOTE:
the battery pack with a new one.
Your battery pack is not fully charged at the
time of purchase. Be sure to charge the
Battery Recycling
battery before use.
Battery charger (EY0L80)
-
9
-

-
10
-
1. Plug the charger into the AC outlet.
Ni-MH/Ni-Cd Battery Pack
NOTE:
NOTE:
Sparks may be produced when the plug is
When you charge the battery pack for
inserted into the AC power supply, but this
the first time, or after prolonged storage,
is not a problem in terms of safety.
charge it for about 24 hours to bring the
2. Insert the battery pack firmly into the
battery up to full capacity.
charger. (Fig. 15)
Battery charger (EY0L80)
1. Line up the alignment marks and
place the battery onto the dock on
1. Plug the charger into the AC outlet.
the charger.
NOTE:
2. Slide forward in the direction of the
Sparks may be produced when the plug is
arrow.
inserted into the AC power supply, but this
3. During charging, the charging lamp will
is not a problem in terms of safety.
be lit.
2. Insert the battery pack firmly into the
When charging is completed, an internal
charger. (Fig. 16)
electronic switch will automatically be
triggered to prevent overcharging.
3. During charging, the charging lamp will
• Charging will not start if the battery
be lit.
pack is warm (for example,
When charging is completed, an internal
immediately after heavy-duty
electronic switch will automatically be
operation).
triggered to prevent overcharging.
The orange standby lamp will be
• Charging will not start if the battery
flashing until the battery cools down.
pack is warm (for example,
Charging will then begin automatically.
immediately after heavy-duty
operation).
4. The charge lamp (green) will flash
The orange standby lamp will be
slowly once the battery is approximately
flashing until the battery cools down.
80% charged.
Charging will then begin automatically.
5. When charging is completed, the
4. When charging is completed, the
charging lamp will start flashing quickly
charging lamp will start flashing quickly
in green color.
in green color.
6. If the temperature of the battery pack
5. If the charging lamp does not light
is0°Corless,chargingtakeslongerto
immediately after the charger is plugged
fully charge the battery pack than the
in, or if after the standard charging time
standard charging time.
the charging lamp does not flash quickly
Even when the battery is fully charged,
in green, consult an authorized dealer.
it will have approximately 50% of the
power of a fully charged battery at
6. If a fully charged battery pack is
normal operating temperature.
inserted into the charger again, the
charging lamp lights up. After several
7. If the power lamp does not light
minutes, the charging lamp may flash
immediately after the charger is plugged
quickly to indicate the charging is
in, or if after the standard charging time
completed.
the charging lamp does not flash quickly
in green, consult an authorized dealer.
8. If a fully charged battery pack is
inserted into the charger again, the
charging lamp lights up. After several
minutes, the charging lamp may flash
quickly to indicate the charging is
completed.
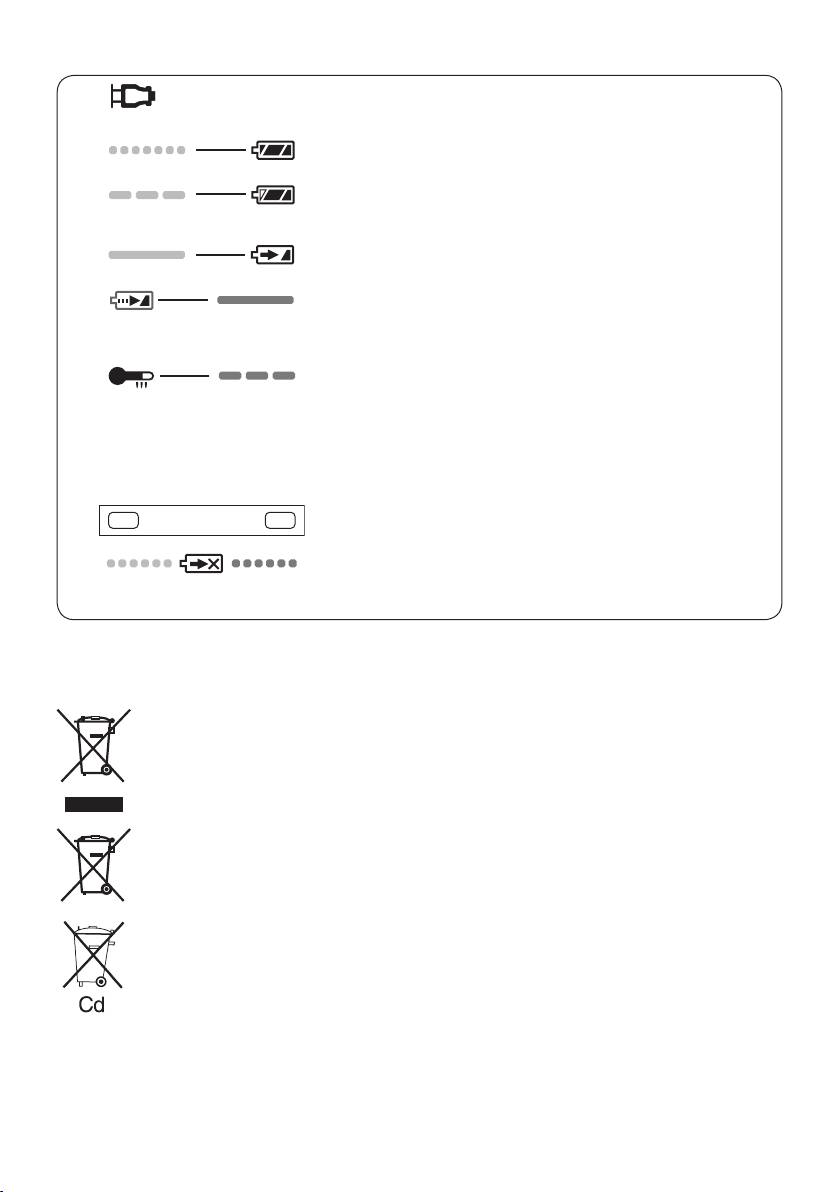
LAMP INDICATIONS
Green Lit
Charger is plugged into the AC outlet.
Ready to charge.
Green Flashing Quickly
Charging is completed. (Full charge.)
Green Flashing
Battery is approximately 80% charged. (Usable charge.
Li-ion only.)
Green Lit
Now charging.
Orange Lit
Battery pack is cool.
The battery pack is being charged slowly to reduce the load
on the battery. (Li-ion only.)
Orange Flashing
Battery pack is warm. Charging will begin when temperature
of battery pack drops.
Ifthetemperatureofthebatterypackis–10°Corless,the
chargingstatuslamp(orange)willalsostartashing.Charging
will begin when the temperature of the battery pack goes up
(Li-ion only).
Charging Status Lamp
Left: green Right: orange will be displayed.
Both Orange and Green Flashing Quickly
Charging is not possible. Clogged with dust or malfunction of
the battery pack.
Information for Users on Collection and Disposal of Old
Equipment and used Batteries
These symbols on the products, packaging, and/or accompanying documents
mean that used electrical and electronic products and batteries should not be
mixed with general household waste.
For proper treatment, recovery and recycling of old products and used batteries,
please take them to applicable collection points, in accordance with your
national legislation and the Directives 2002/96/EC and 2006/66/EC.
By disposing of these products and batteries correctly, you will help to save
valuable resources and prevent any potential negative effects on human health
and the environment which could otherwise arise from inappropriate waste
handling.
For more information about collection and recycling of old products and
batteries, please contact your local municipality, your waste disposal service or
the point of sale where you purchased the items.
Penalties may be applicable for incorrect disposal of this waste, in accordance
with national legislation.
For business users in the European Union
If you wish to discard electrical and electronic equipment, please contact your dealer or
supplier for further information.
-
11
-
