Panasonic CQ-R223W: Remote Control
Remote Control: Panasonic CQ-R223W
E
E
N
Remote Control
N
G
G
L
L
I
I
S
S
H
H
9
10
20
21
CQ-R223W
CQ-R223W
DOLBY B NR
REMOTE
M
O
D
E
TRACK
TUNE
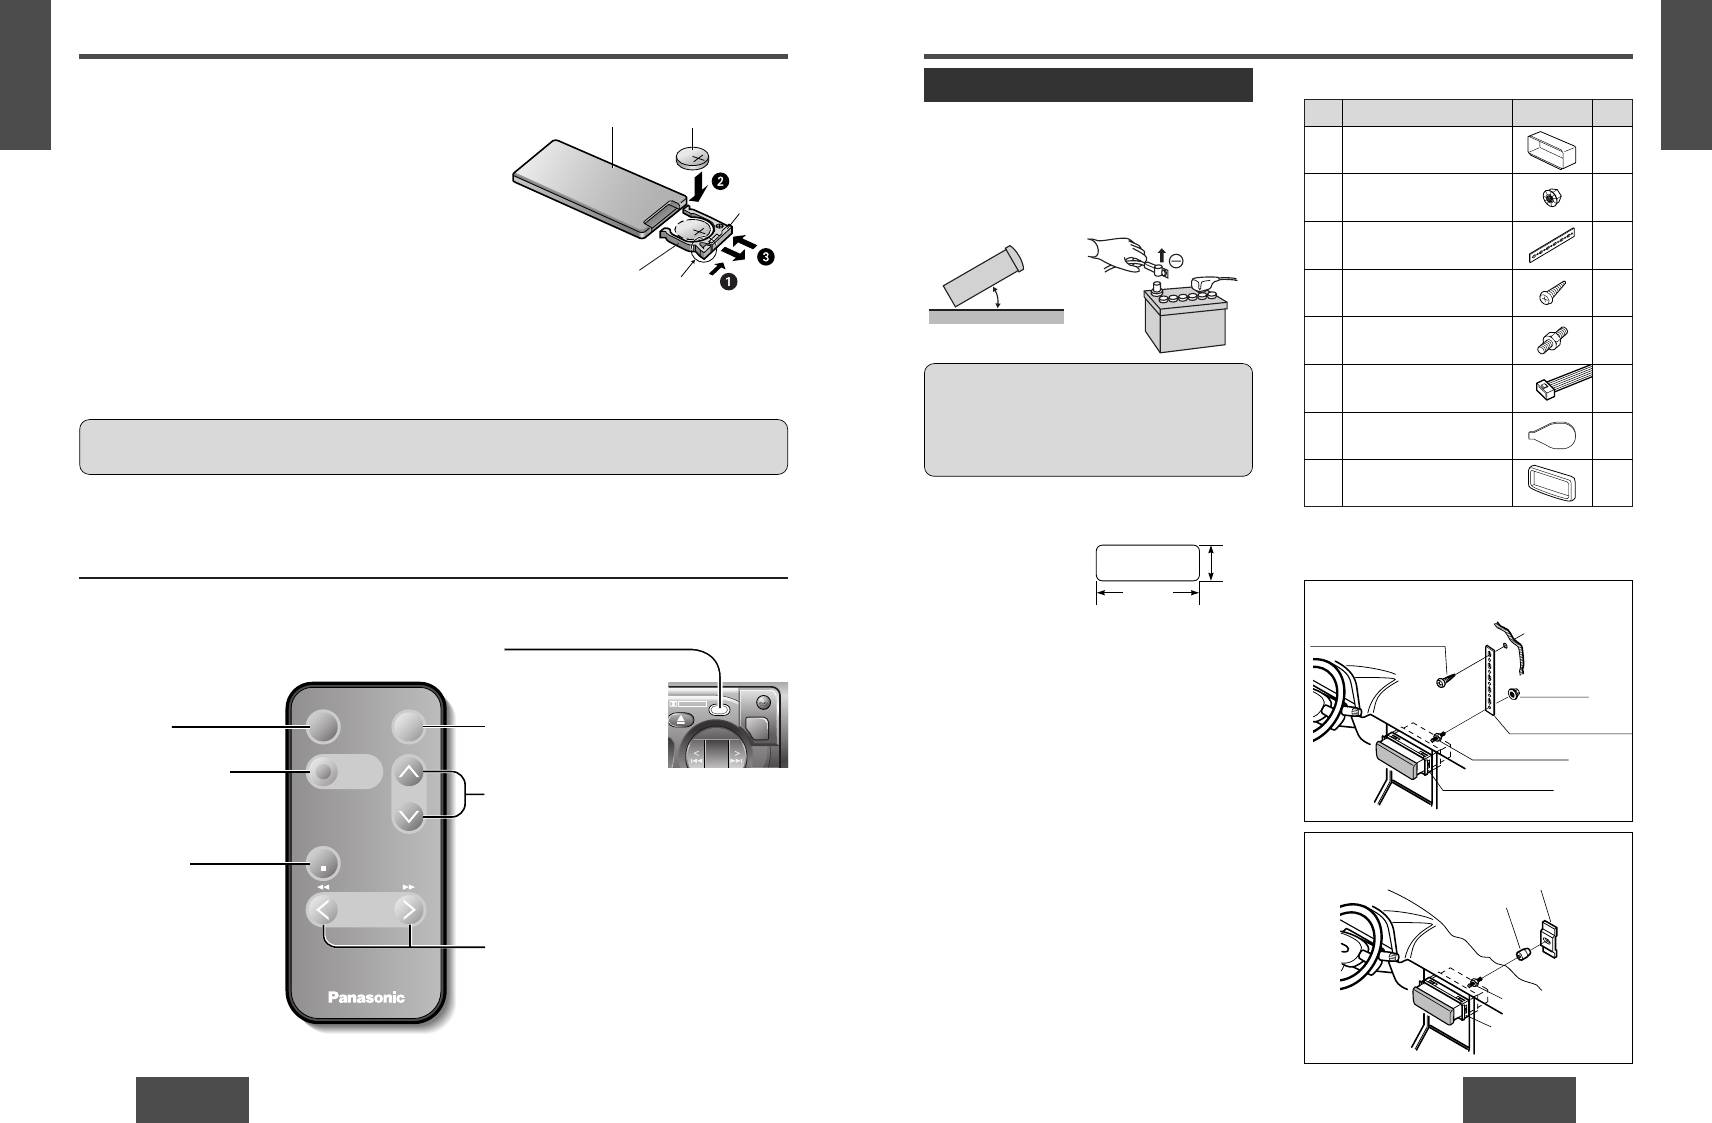
Battery Installation
Lithium battery
Remove the battery holder.
(Back side)
(included)
Press and hook A of the battery holder and then pull it out.
Install the battery on the battery holder.
Set a new battery properly with its “+” side facing up as shown
in the figure.
Position B
Insert the battery holder.
Push the battery holder back into its original position.
Battery holder
Position A
Battery Notes
Remove and dispose of an old battery immediately.
Battery Information:
• Battery type: Panasonic lithium battery (CR2025) (included)
• Battery life: Approximately 6 months with normal use (at room temperature)
Caution: Improper use of batteries may cause overheating, an explosion or ignition, resulting in injury or a fire.
Battery leakage may damage the unit.
(ATT)
PWR
MUTE
MODE
VOL
PRG
BAND/DISC UP
TUNE
TRACK
Car Audio
Installation
Preparation
Installation Hardware
• Before installation, check the radio operation with
antenna and speakers.
• Disconnect the cable from the negative (–) battery
terminal (see caution below).
• Unit should be installed in a horizontal position with
the front end up at a convenient angle, but not more
than 30°.
30˚ or less
Caution: Do not disconnect the battery terminals of
a car with trip or navigational computer since all
user settings stored in memory will be lost.
Instead take extra care with installing the unit to
prevent shorts.
Dashboard Installation
• Do not disassemble or short the battery. Do not throw a battery into a fire.
• Keep batteries away from children to avoid the risk of accidents.
Installation Opening
• Be careful to observe proper local disposal rules when you dispose of batteries.
The unit can be installed
in any dashboard having
an opening as shown at
Control Reference Guide
right. The dashboard
Buttons of the remote control function in the same way as the controls on the main unit of the reference page.
should be 4.5 mm - 6 mm thick in order to be able to
Point the remote control unit at the main unit’s sensor (REMOTE).
support the unit.
Installation Precautions
This product should be installed by a professional
installer, if possible.
[PWR] (power)
[MUTE] (Mute)
In case of difficulty, please consult your nearest
(
➡page 12)
authorized Panasonic Service Center.
[MODE] (Mode (source))
1. This system is to be used only in a 12-volt, DC
(
➡page 14, 18)
[VOL] [}] [{] (Volume)
battery system (car) with negative ground.
(Volume Up/down)
2. Follow the electrical connections carefully (
a page
(
➡page 12)
25). Failure to do so may result in damage to the
unit.
3. Connect the power lead (red) after all other
connections are made.
4. Be sure to connect the battery lead (yellow) to the
positive terminal (+) of the battery or fuse block
[TUNE][TRACK] [a] [] []] [[]
(BAT) terminal.
(Tune/track, selection/search/Fast forward/Fast
5. Insulate all exposed wires to prevent short circuiting.
reverse)
6. Secure all loose wires after installing the unit.
(
➡page 14, 18)
7. Please carefully read the operating and installation
instructions of the respective equipment before
connecting it to this unit.
53 mm
182 mm
r Tapping Screw
Fire Wall of Car
w Hex. Nut
e Rear Support Strap
t Mounting Bolt
q Mounting Collar
(a) Using the Rear Support Strap
Rear Support Bracket
(Provided on the car)
Rubber Cushion
(Option)
t Mounting Bolt
q Mounting Collar
No. Item Diagram Q’ty
q
Mounting Collar
1
w
Hex. Nut (5 mmø)
1
e
Rear Support Strap
1
Tapping Screw
r
1
(5 mmø
× 16 mm)
t
Mounting Bolt (5 mmø)
1
y
Power Connector
1
u
Dismounting Plate
2
i
Trim Plate
1
(b) Using the Rubber Cushion (option)
[BAND] [DISC UP]
(Band/Disc change/play
side change)
(
➡page 14, 18)

