Panasonic CQ-R223W: Anti-Theft System Electrical Connections
Anti-Theft System Electrical Connections: Panasonic CQ-R223W
E
E
N
Anti-Theft System
Electrical Connections
N
G
G
L
L
I
I
S
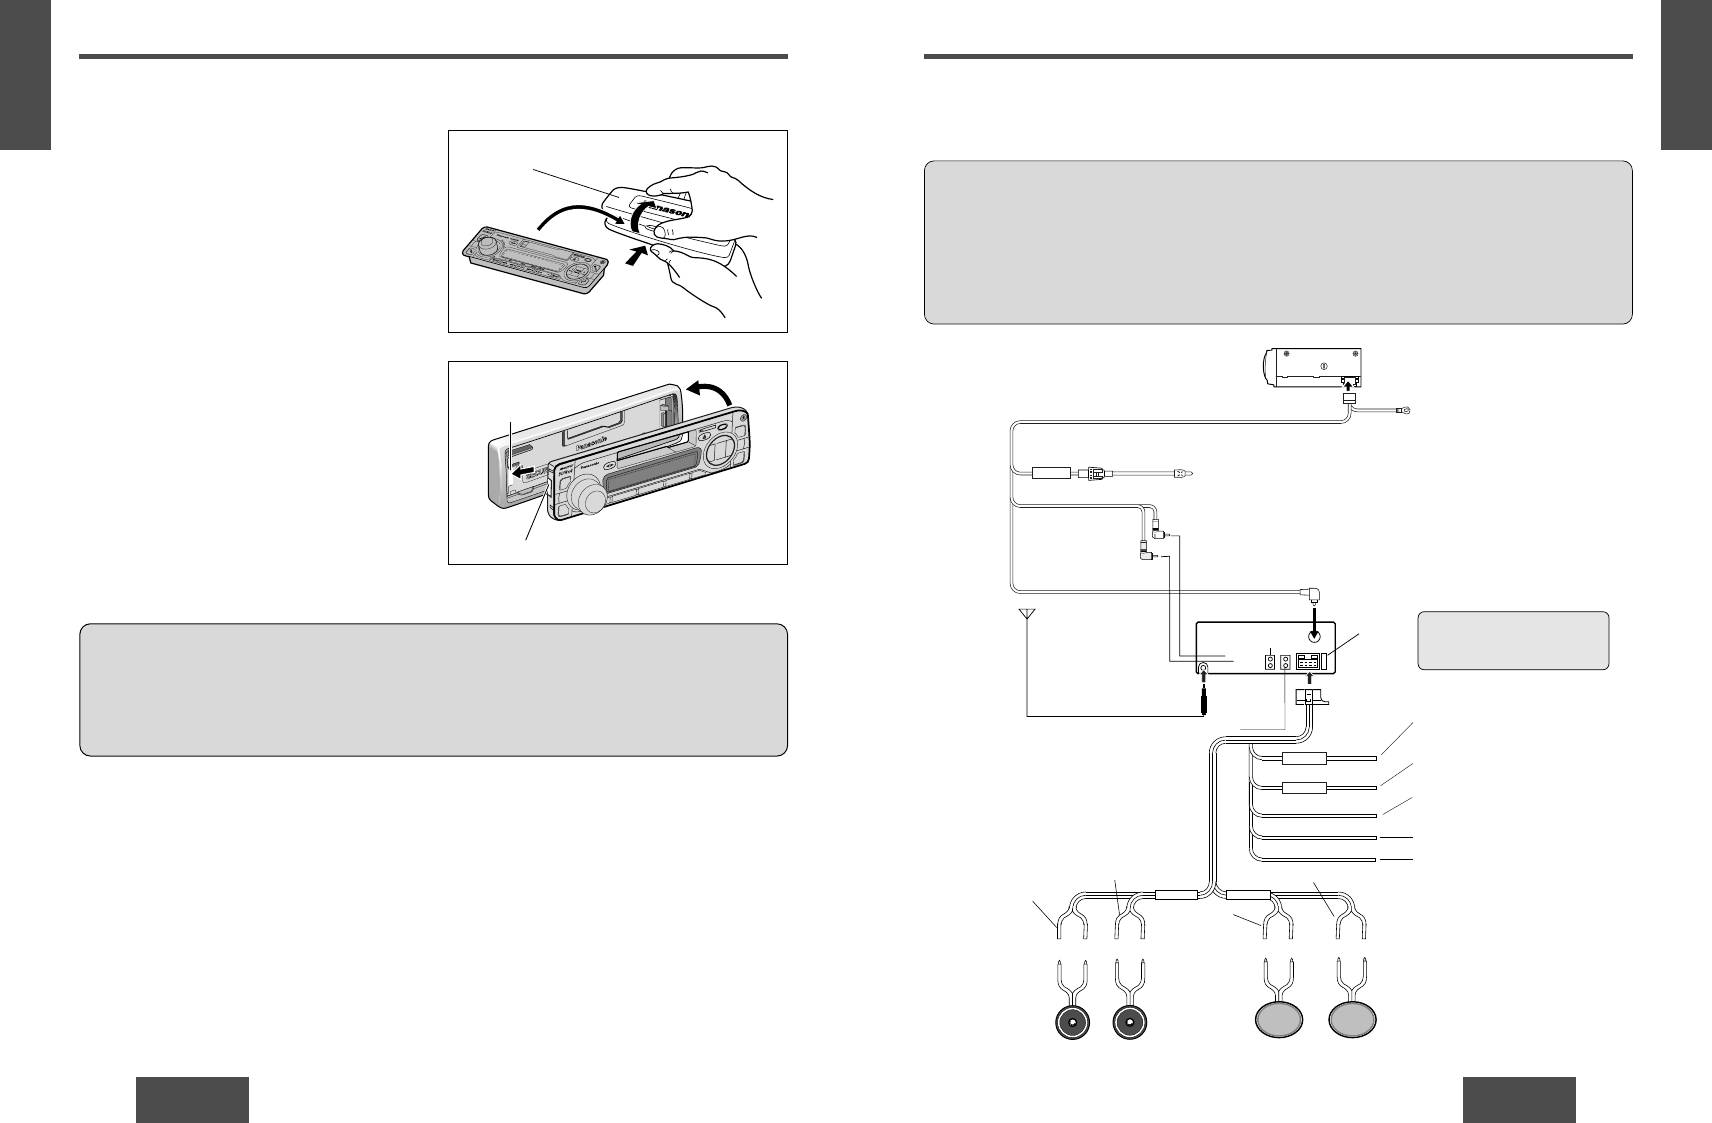
This unit is equipped with a removable face plate. Removing this face plate makes the radio totally inoperable.
S
H
H
13
14
Place the Removable Face Plate
Removable face plate case
into Case
Switch off the power of the unit.
Remove the removable face plate. (➡page 23)
Gently press the bottom of the case and open the
cover. Place the face plate into the case and take it with
you when you leave the car.
Cautions:
• This face plate is not waterproof. Do not expose it to water or excessive moisture.
• Do not remove the face plate while driving your car.
• Do not place the face plate on the dashboard or nearby areas where the temperature rises to high level.
• Do not touch the contacts on the face plate or the main unit, since this may result in poor electrical contacts.
• If dirt or other foreign substances get on the contacts, wipe them off with a clean and dry cloth.
24
25
CQ-R223W
CQ-R223W
D
L
O
Y
B
N
B
R
C
Q
-R
2
2
W
3
Install Removable Face Plate
Slide the left side of the removable face plate in place.
Press the right end of the removable face plate until
Tab
“click” is heard.
Cutout
CD Changer
CX-DP88
Extension Cord
(Option)
Supplied for an optional CD changer
(DIN/BATT/RCA/GND)
Ground Lead
To a clean, bare metallic
part of your car
Fuse(3A)
BATTERY
Battery Lead
To the car battery, continuous
+12V DC
RCA Cord
(L)
(White)
(Red)
CD Changer
DIN Cord
(R)
Control Connector
CQ-R223W
Fuse (15 A)
• If the fuse (rear panel) blows
frequently,there may by something
CD•C-IN
L(White)
wrong with the unit, Consult the shop
R(Red)
where you purchased this unit.
Power
Antenna
Connector
Battery Lead
Pre-Amp. Out Connector
(Rear)
To the car battery, continuous
(Yellow)
+12V DC
BATTERY 15A
ACC Power Lead
(Red)
To ACC power, +12V DC
ACC
Ground Lead
(Black)
To a clean, bare metallic part of
the car chassis
(Blue)
Not Used
(Blue w/White Stripe)
SPEAKER LEAD
External Amplifier
(Gray w/Black Stripe)
(White w/Black
(Violet w/Black Stripe)
Control Power Lead
To an external amplifier
Stripe)
REAR SPFRONT SP
(White)
(Gray)
(Green w/Black
(Green)
Note: This lead is used for power
Stripe)
(Violet)
control when an external power
amplifier is connected. The power
supply of a power amplifier will be
(+)
(+)(–)(–)
(+)(–)(+)(–)
activated when turning on the power of
this unit.
LEFT SPEAKER
RIGHT SPEAKER
LEFT SPEAKER
RIGHT SPEAKER
(FRONT )
(FRONT )
(REAR )
(REAR )
Preparation:
• This unit can be connected to an optional CD changer (CX-DP88). For details consult your nearest Panasonic Service
center.
• For connection to a CD changer, refer to the operating instructions of the CD Changer (CX-DP88).
Cautions:
• This product is designed to operate with a 12 V DC, negative ground battery system.
• To prevent damage to the unit, be sure to follow the connection diagram below.
• Strip about 5mm of the lead ends for connection (only non-ISO connector cords).
• Do not insert the power connector into the unit until the wiring is completed.
• Be sure to insulate any exposed wires from a possible short-circuit from the car chassis. Bundle all cables and
keep cable terminals free from touching any metal parts.
• Remember, if your car has a drive computer or a navigation computer, the data of its memory may be erased when
the battery terminals are disconnected.
❐Wiring Diagram

