Panasonic NV-RX1-2-5 – страница 2
Инструкция к Экшн Камере Panasonic NV-RX1-2-5
NEDERLANDS
■ Waarschuwing bij de batteri]
Bij dit Produkt zijn batterijen geleverd.
Wanneer deze leeg zijn, moet u ze niet
weggooien maar inleveren als KCA.
NEDERLANDS
(De afstandsbediening wordt alleen bij de modelien
NV-RX2EG en NV-RX5EG geleverd.)
Plaatsen van de knoopbatteri]
Trek
de knoopbatterijhouder naar buiten
terwijl u de Stopper 0 indrukt.
Draai de knoopbatterijhouder om en plaats
de knoopbatteri] met het (+) merkteken
naar beneden gericht in de
knoopbatterijhouder totdat deze met een
klik vergrendelt. Controleer dat de polen in
de juiste richting zijn geplaatst [het (-)
merkteken moet naar boven gericht zijn,
naar de open zijde van de
knoopbatterijhouder).
3
Plaats de knoopbatterijhouder in de
afstandsbediening.
■ Vervangen van de knoopbatteri]
De levensduur van de knoopbatteri] is ongeveer een jaar.
Vervang de uitgeputte knoopbatteri] door een nieuwe
CR2025 knoopbatteri].
VOORZICHTIG
Er bestaat explosiegevaar Indien de batteri] op
verkeerde wijze verwisseld wordt.
Gebruik uitsluitend batterijen van hetzelfde of een
geüjkwaardig type zoals aanbevolen door de
fabrikant van de apparatuur. Lever de oude
batterijen in bij het K.C.A. (Klein Chemisch Afval).
РУССКИМ язык
(Устройство дистанционного управления
поставляется только с моделями NV-RX2EG и
NV-RX5EG.)
1 2
Установка пуговичной батарейки
Вытащите батарейный держатель
нажатием на стопор
0
.
Переверните батарейный держатель
вверх дном и вставляйте батарейку с
обращенной вниз полярностью (+) до
тех пор, пока она не защелкнется со
щелчком. Убедитесь в том, что
полярности совмещены правильно
[сторона (—) должна быть обращена
вверх, в направлении открытой стороны
батарейного держателя].
3
Вставьте батарейный держатель в
устройство дистанционного
управления.
■ Замена пуговичной батарейки
Срок службы батарейки составляет приблизительно
один год.
Замените разрядившуюся батарейку новой
батарейкой типа СВ2025.
ВНИМАНИЕ
В случае, если батарейка заменена
неправильно, существует опасность взрыва.
Заменяйте ее только аналогичной или
одинакового типа, рекомендуемого
фирмой-изготовителем оборудования.
Выбрасывайте использованные батарейки в
соответствии с инструкциями фирмы-
изготовителя.
25
(La télécommande est fournie avec les modèles
NV-RX2EG et NV-RX5EG seulement.)
■ Comment utiliser le support de
télécommande
(Pour ranger commodément la télécommande lorsqu’on
sort faire des prises de vues)
Détacher une extrémité de la bandoulière
du caméscope.
Détacher le dispositif de réglage Q
bandoulière.
1 2
3
Tirer la bandoulière dans le sens de la
flèche à travers les deux fentes situées au
dos du support de télécommande.
4
Réinsérer le dispositif de réglage de la
bandoulière.
5
Réattacher la bandoulière sur le
caméscope. (-♦
16
)
6
Insérer fermement la télécommande dans
le support.
ENGLISH
(The Remote Controller comes with NV-RX2EG and
NV-RX5EG only.)
■ How to Use the Remote Controller Holder
(To keep the Remote Controller handy when you go out
shooting)
1
Remove one end of the Shoulder Strap
from the Movie Camera.
2
3
4
5
Remove the Shoulder Strap Adjuster O-
Pull the Shoulder Strap in the direction of
the arrow through the two slits on the back
of the Remote Controller Holder.
Re-insert the Shoulder Strap Adjuster.
Re-attach the Shoulder Strap to the Movie
Camera. (-M6)
Insert the Remote Controller securely into
the Holder.
26

NEDERLANDS
РУССКИМ язык
(De afstandsbediening wordt alleen bij de modellen
NV-RX2EG en NV-RX5EG geleverd.)
■ Gebruiken van de afstandsbedieninghouder
(Voor het binnen handbereik houden van de
afstandsbediening wanneer u buiten gaat opnemen)
Maak een uiteinde van de schouderriem
los van de Movie Camera.
1 2
3
4
5
6
Verwijder de afstelgesp Q van de
schouderriem.
Trek de schouderriem in de richting van de
piJI door de 2 gleuven in de achterkant van
de afstandsbedieninghouder.
Breng de afstelgesp weer op de
schouderriem aan.
Maak de schouderriem weer vast aan de
Movie Camera. (-»17)
Piaats de afstandsbediening stevig in de
afstandsbedieninghouder.
(Устройство дистанционного управления
поставляется только с моделями NV-RX2EG и
МУ-ВХ5ЕС.)
■ Использование держателя устройства
дистанционного управления
(Для хранения устройства дистанционного
управления под рукой когда Вы выходите
производить съемку)
1
Снимите один конец плечевого ремня с
видеокамеры.
Снимите регулятор плечевого ремня О.
Протяните плечевой ремень в
направлении стрелки через две прорези
с обратной стороны держателя
устройства дистанционного управления.
Переподсоедините регулятор плечевого
ремня.
Переподсоедините плечевой ремень к
видеокамере, (ч 17)
Надежно вставьте устройство
дистанционного управления в
держатель.
2
3
4
5
6
27
Prise de vues
|T] Comment filmer à partir du début
d’une cassette
Remarque:
Si on laisse le caméscope dans le mode pause
d’enregistrement pendant plus de 6 minutes, il se met
automatiquement hors circuit afin de protéger ia bande
et d'économiser l'énergie du bloc-batterie. Ce mode
s'appelle “verrouillage d'enregistrement” (la bande reste
en contact avec les têtes vidéo).
Pour reprendre la prise de vues à partir de ce mode,
enfoncer l’interrupteur [POWER] (le caméscope est hors
circuit) puis le sortir de nouveau.
S
i
on laisse le caméscope pendant plus de 48 heures en
mode verrouillage d’enregistrement, ce mode est annulé
et le caméscope se met automatiquement hors circuit.
Lorsque cela se produit, on peut entendre le moteur
fonctionner.
Après avoir fixé le bloc-batterie et avoir retiré le
capuchon de l'objectif, commencer à filmer de la façon
suivante:
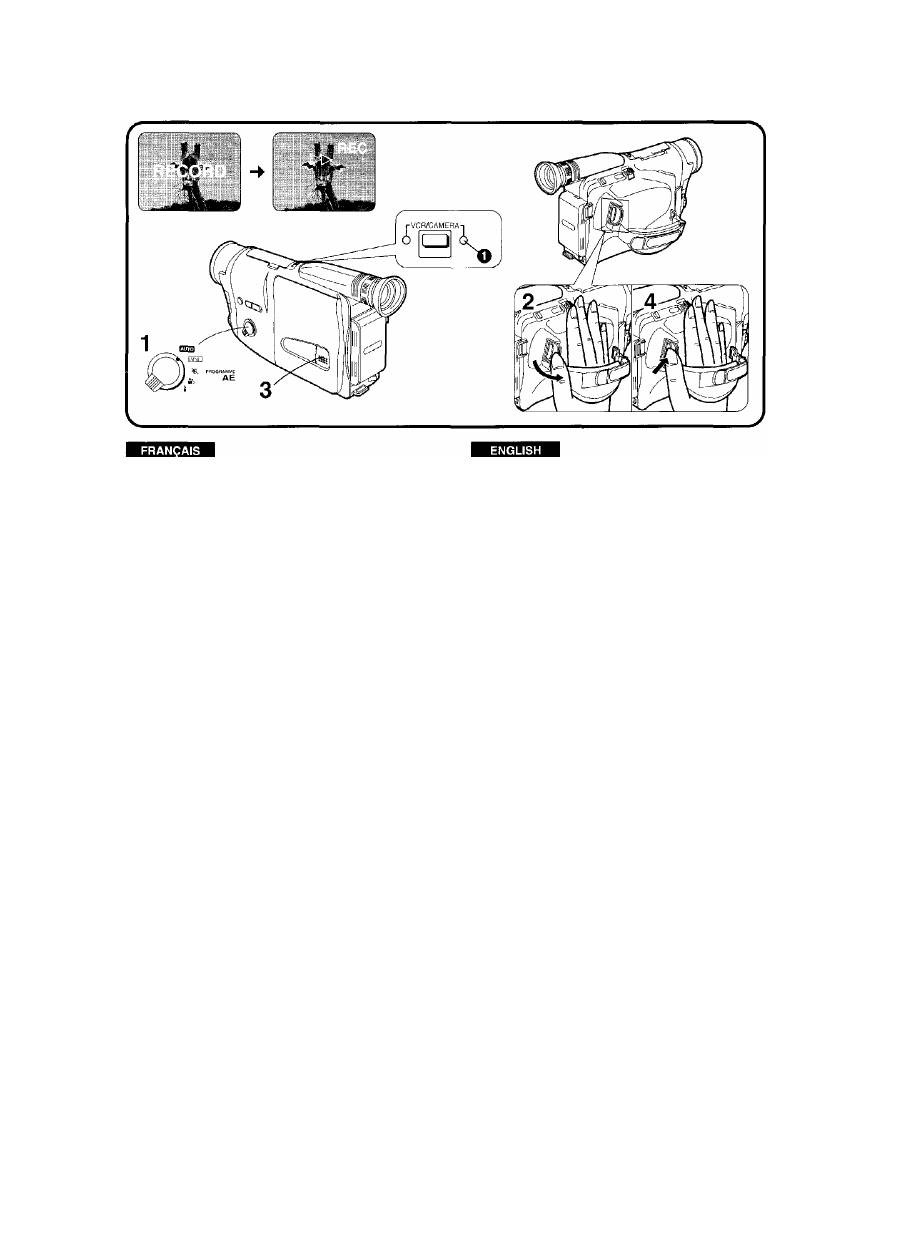
1
S’assurer que le sélecteur [AE] se trouve
“AUTO”.
2
Sortir l’interrupteur [POWER].
(Le caméscope se met en circuit.)
• Le témoin “CAMERA’’ ^ s’allume.
3
Insérer une cassette vidéo munie d’une
languette de protection contre l’effacement.
•Voir “Comment insérer une cassette vidéo”. (-M8)
• L’indication “PAUSE” apparaît dans le viseur.
4
Appuyer sur la touche marche/arrét.
• L’indication de défilement de la bande “>[>” et
l’indication “REC” apparaissent dans le viseur.
L’enregistrement vient de commencer.
(La fonction suivante est disponible sur les
modèles NV-RX2EG et NV-RX5EG seulement.)
• Le témoin de contrôle reste allumé pendant
l’enregistrement.
Shooting
Q] How to Shoot from the Beginning of a
Video Cassette
Note:
If you leave the Movie Camera in the Shooting Pause
Mode for more than 6 minutes, it automatically switches
off to protect the tape and to conserve Battery Pack
power. This condition is called “Recording Lock” (the
tape remains in contact with the video heads).
To resume shooting from this condition, turn in the
[POWER] Switch (the Movie Camera switches off) and
then turn it out again.
If you leave the Movie Camera in the Recording Lock
Mode for more than 48 hours, the Recording Lock Mode
IS cancelled and the Movie Camera automatically
switches itself off. You can hear the motor operating
when this happens.
After attaching the Battery Pack and removing the Lens
Cap, start shooting as follows:
Confirm that the [AE] Selector is set to
“AUTO”.
1 2
Turn out the [POWER] Switch. (The Movie
Camera switches on.)
•The “CAMERA” Indication Lamp O lights.
Insert a video cassette with intact erasure
prevention tab.
•See “How to Insert the Video Cassette”. (-» 18)
•The “PAUSE” Indication appears in the Viewfinder.
Press the Start/Stop Button.
•The Tape Run Indication “[>L>“ and the “REC”
Indication appear in the Viewfinder. You have now
started shooting.
(The following function is only equipped on
NV-RX2EG and NV-RX5EG.)
•The Tally Lamp remains lit during shooting.
28

NEDERLANDS
русский
язык
Opnemen
pT|
Opnemen vanaf het begin van een
Videoband
Opmerking:
Indien u de Movie Camera langer dan 6 minuten in de
opnamepauzefunctie laat staan, schakelt de Movie
Camera zichzelf automatisch uit om de band te
beschermen en om de energie van de accu te sparen.
Deze situatie wordt „opnamevergrendeling" genoemd
(de band blijft in kontakt met de videokoppen).
Om vanuit deze toestand het opnemen te hervatten, de
[POWER] schakelaar naar binnen draaien (de Movie
Camera wordt uitgeschakeld) en vervolgens weer naar
buiten draaien.
Indien u de Movie Camera langer dan 48 uur in de
opnamevergrendelfunctie laat staan, zal de
opnamevergrendelfunctie geannuleerd worden en
schakelt de Movie Camera zichzelf automatisch ult.
Wanneer dit gebeurt, hoort u het geluid van de motor.
Nadat u een accu heeft bevestigd en de lensdop heeft
verwijderd, begint u als voIgt met opnemen;
Controleer of de [AE] keuzeschijf in de
stand „AUTO” is gezet.
Draai de [POWER] schakelaar naar buiten.
(De Movie Camera wordt ingeschakeld.)
• De „CAMERA” Indicatielamp O branden.
Plaats een videoband met een intakt
wispreventielipje.
•ZIe „Plaatsen van de videoband”.
{ - ^
19)
• De „PAUSE” indicatie verschijnt In de zoeker.
Druk de start/stop toets in.
• De bandloop indicatie „[»” en de „REC” indicatie
verschijnt in de zoeker. Het opnemen is nu
begonnen.
(De voigende functie is aileen beschikbaar op
de modellen NV-RX2EG en NV-RX5EG.)
• De opnamelamp blijft tijdens het opnemen
opiichten.
1 2
СЪЕМКИ
pf] Съемка c начала видеокассеты
Примечание:
В случае, если Вы оставили видеокамеру в режиме
съемочной паузы в течение более 6 минут, она
автоматически выключается с целью
предохранения ленты и экономии энергии
батарейного блока,
Это состояние называется “Блокировка на записи"
(лента остается в контакте с видеоголовками).
Для возобновления съемок с этого положения
поверните переключатель [POWER] сначала к
камере (видеокамера выключается), а затем снова
от камеры.
В случае, если Вы оставили видеокамеру в режиме
блокировки на записи на время более 48 часов,
произойдет отмена режима блокировки на записи и
автоматическое отключение видеокамеры. При
этом Вы можете слышать шум работающего мотора.
После прикрепления батарейного блока и снятия
крышки объектива начинайте съемку следующим
образом;
1
Удостоверьтесь в установке
регулятора [АЕ] в положение “AUTO”.
2
Поверните от камеры переключатель
[POWER]. (Видеокамера включается.)
•Высвечивается индикаторная лампа
“CAMERA” О'
3
Вставьте кассету с невыломанным
язычком предохранения записи от
стирания.
•Смотрите раздел “Вставление
видеокассеты”.
(-► 19)
• На ЖКИ видеомониторе появляется индикация
“PAUSE".
4
Нажмите кнопку Старт/Стоп.
• На ЖКИ видеомониторе появляются индикация
движения ленты “>[>'’ и индикация режима
записи “REC”, Сейчас Вы начали съемку.
(Следующей функцией снабжены только
модели NV-RX2EG и NV-RX5EG.)
• Во время съемки сохраняется высвечивание
лампы копирования.
29
FRANÇAIS
ENGLISH
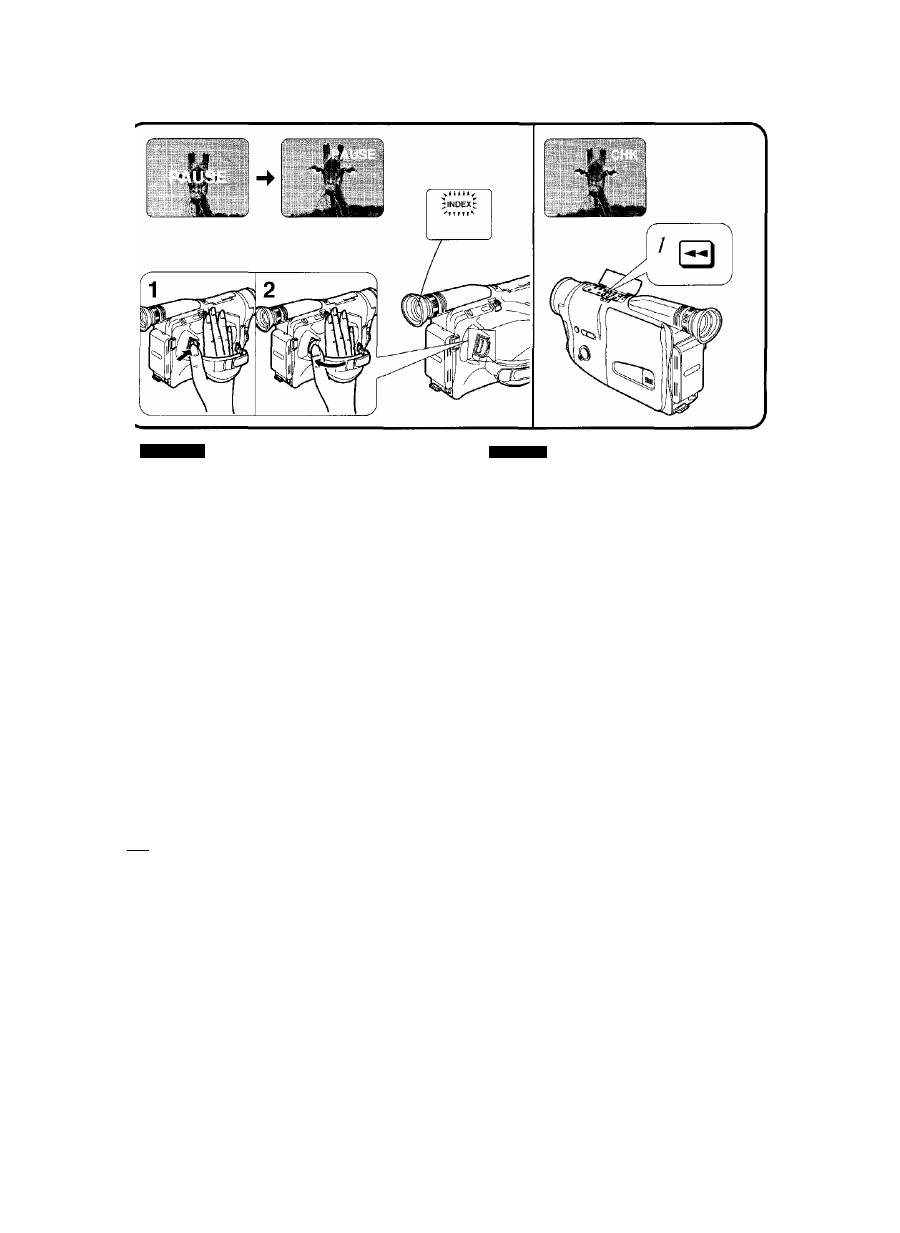
■ Pour arrêter momentanément la prise de
vues
1
Appuyer sur la touche marche/arrêt.
■ Pour arrêter la prise de vues
2
Appuyer sur la touche marche/arrêt pour
arrêter momentanément la prise de vues,
puis enfoncer l’interrupteur [POWER], (Le
caméscope se met hors circuit.)
■ Signaux d’index (VISS)
Les signaux d’index permettent d’utiliser la fonction de
recherche d’index VHS et la fonction d’exploration de la
bande lorsque la bande est lue sur un magnétoscope
équipé de ces fonctions.
Dans les cas suivants, un signal d’index est
enregistré automatiquement et l'indication “INDEX”
clignote brièvement dans le viseur pendant qu'un
signal d’index est enregistré:
• Lorsqu’on amorce la prise de vues pour la première
fois après avoir fixé le bloc-batterie.
• Lorsqu'on recommence la prise de vues après avoir
changé de cassette ou après avoir appuyé sur la
touche [VCR/CAMERA].
|21 Comment vérifier la fin d’une
séquence enregistrée
Pour les
scènes importantes particulièrement,
l’utilisation
de cette fonction de temps en temps pendant les prises
de vues permet de vérifier si la prise de vues se fait
normalement,
Vérifiez une séquence enregistrée en mode pause
d’enregistrement.
1
Appuyer brièvement sur la touche
[◄◄]
tout en regardant dans le viseur.
• L’indication “CHK" apparaît dans le viseur. Les
images des 2 dernières secondes de la séquence
précédemment enregistrée sont reproduites dans
le viseur. Ensuite, le caméscope retourne
automatiquement au mode pause
d’enregistrement. “CHK” signifie vérification.
■ To Pause during Shooting
1
Press the Start/Stop Button.
■ To Stop Shooting
2
After putting the Movie Camera into the
Shooting Pause Mode, turn in the
[POWER] Switch. (The Movie Camera
switches off.)
■ Index Signals (VISS)
Index signals let you use the VHS Index Search or Intro
Scan Function when playing back the tape on a VCR
equipped with these functions.
In the following cases, an index signal is recorded
automatically and the “INDEX” Indication flashes
briefly in the Viewfinder while an index signal is
being recorded:
•When you start recording for the first time after
attaching the Battery Pack.
•When you restart recording after exchanging a video
cassette or after pressing the [VCR/CAMERA] Button.
How to Check the End of a Recorded
Scene
For especially important scenes, use this function from
time to time when shooting to confirm that recording has
been performed correctly.
Check a Recorded Scene while in the Shooting
Pause Mode.
1
Look in the Viewfinder and briefly press
the [◄■4] Button at the same time.
•The “CHK” Indication appears in the Viewfinder.
The final 2 seconds of the last recorded scene are
played back in the Viewfinder before the Movie
Camera returns to the Shooting Pause Mode.
“CHK” means Check.
30

NEDERLANDS
РУССКИМ язык
1
Onderbreken van de opname
Druk de start/sfop toets in.
■ Stoppen met de opname
2
Nadat de Movie Camera in de
opnamepauzefunctie is gezet, draai de
[POWER] schakelaar naar binnen.
(De Movie Camera wordt uitgeschakeld.)
■ Indexsignalen (VISS)
De indexsignalen maken het mogelijk gebruik te maken
van de VHS Index-zoekfunctie of de Intro-Scan functie,
in geval de band wordt weergegeven op een
videorecorder die uitgerust is met deze functies.
in de volgende gevallen wordt een indexsignaal
automatisch opgenomen en knippert de „INDEX”
indicatie kortstondig in de zoeker terwiji het
indexsignaal wordt opgenomen:
•Wanneer na het bevestigen van de accu de opname
voor de eerste maal wordt gestart.
•Wanneer de opname opnieuw wordt gestart nadat de
Videoband is verwisseld of nadat de [VCR/CAMERA]
toets is ingedrukt.
{
2
]
Controleren van het einde van een
opgenomen scène
Bij belangrijke scènes kunt u deze functie van tijd tot tijd
gebruiken om te controleren of de opname op de juiste
wijze is uitgevoerd.
Controleer de opgenomen scènes terwiji de Movie
Camera in de opnamepauzestand Staat.
7
Kijk in de zoeker en druk tegelijkertijd
kortstondig op de toets.
•De „CHK” indicatie wordt in de zoeker afgebeeld.
De laatste 2 seconden van de laatst opgenomen
scène worden in de zoeker weergegeven. Hierna
zai de Movie Camera terugkeren naar de
opnamepauzestand. „CHK” betekent controle.
Прерывание съемки (Съемочная пауза)
Нажмите кнопку Старт/Стоп.
Остановка съемки
После установки видеокамеры в режим
съемочной паузы поверните к камере
переключатель [POWER]. (Видеокамера
выключается.)
■ Сигналы индексации (VISS)
Сигналы индексации делают возможным
использование Вами функций поиска по индексации
VHS или сканирования при воспроизведении ленты
на ВКМ, оснащенном этими функциями.
Сигнал индексации записывается автоматически,
и при записи сигнала индексации в видоискателе
кратковременно мигает индикация “INDEX” в
следующих случаях:
•В случае, если Вы начали первоначальную запись
после присоединения батарейного блока.
• В случае, если Вы возобновили запись после
замены кассеты, а также после нажатия
кнопки
[VCR/CAMERA].
[У| проверка конца записанного
эпизода
Для особо важных сцен используйте эту функцию
при съемке для того, чтобы подтвердить время от
времени правильность осуществления записи.
Проверьте записанные сцены в режиме
съемочной паузы.
1
Кратковременно нажмите кнопку [◄◄],
смотря в видоискатель.
•В видоискателе появляется индикация “СНК”.
В видоискателе воспроизведутся
окончательные 2 секунды последней
записанной сцены. После этого видеокамера
вернется в режим съемочной паузы. Индикация
“СНК” означает “проверка".
31
ENGLISH
Comment faire des reprises naturelles
entre une nouvelle séquence et la
séquence précédente
(Fonction de recherche caméra)
■ Comment ajouter une séquence au bout
d’une autre
La procédure suivante permet de faire des transitions
progressives entre deux séquences.
En mode pause d’enregistrement:
1
Maintenir la touche (ou la touche
[^^]) enfoncée pendant plus de
1 seconde pour rechercher le point à partir
duquel une nouvelle séquence doit être
ajoutée, puis relâcher la touche lorsque ce
point est atteint.
O Eri maintenant enfoncée la touche de
rebobinage [◄◄]:
• L’indication “<Kl” apparaît dans le viseur.
• La séquence est lue en sens arrière à 3 fois la
vitesse normale.
Q
En maintenant enfoncée la touche d’avance
rapide [►►]:
• L’indication •'[>” apparaît dans le viseur.
• La séquence est lue en sens avant à la vitesse
normale.
2
Appuyer sur la touche marche/arrêt.
• L'enregistrement de la nouvelle séquence
s’enclenche alors et la transition progressive avec
la séquence précédente est réalisée.
■ Si vous avez retiré la cassette vidéo après la
prise de vues de la dernière scène:
Réinsérer la cassette vidéo. Appuyer sur la touche
[VCR/CAMERA] pour que le témoin “VCR” s’allume, puis
effectuer l'étape 1 de l'opération décrite ci-dessus. Après
avoir localisé la position de bande à laquelle on veut
joindre le nouvel enregistrement, appuyer sur la touche
[VCR/CAMERA] pour que le témoin "CAMERA” s’allume.
Ensuite, effectuer l'étape 2 de l'opération décrite
ci-dessus pour commencer la prise de vues de la
séquence suivante.
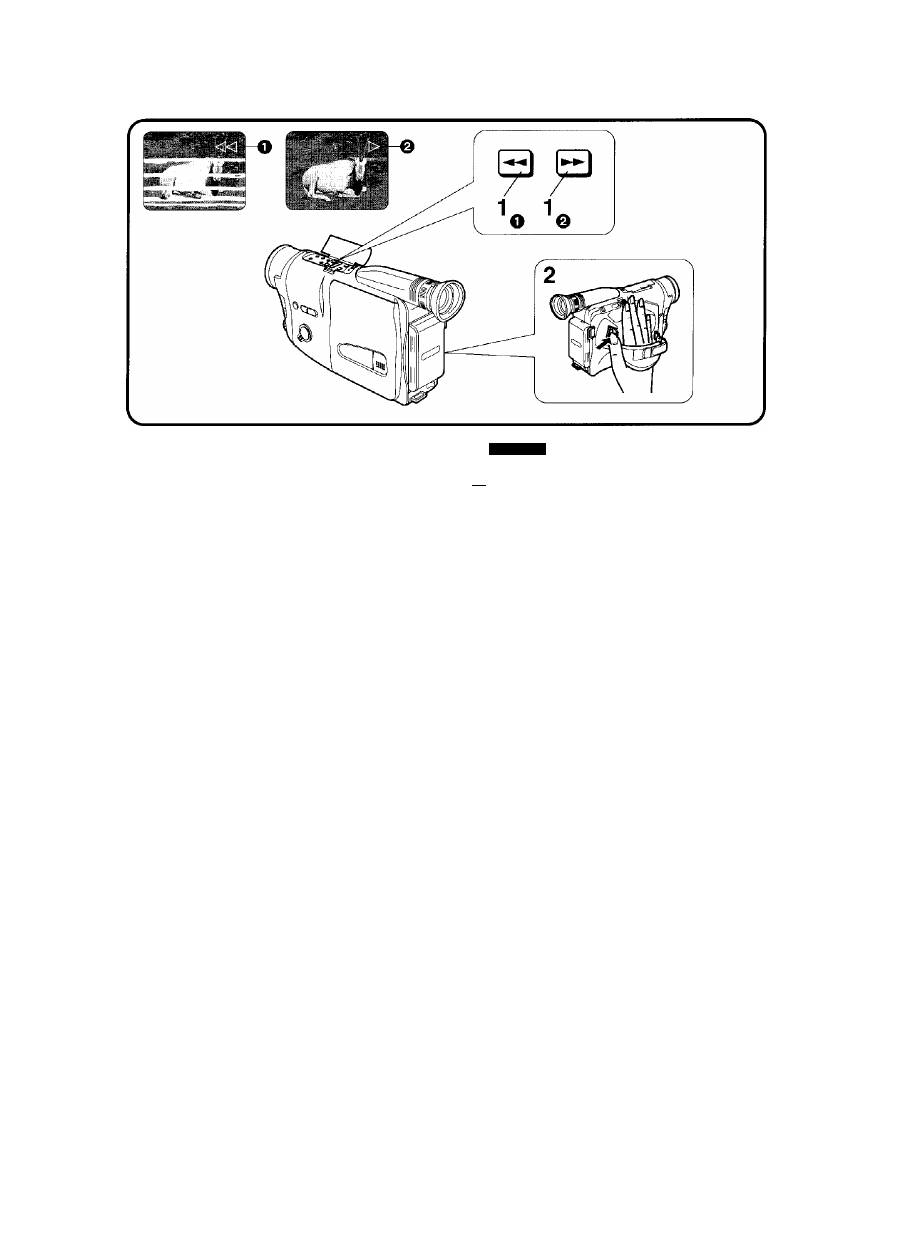
[3| How to Smoothly Join a New Scene to
a Previously Recorded Scene
(Camera Search Function)
■ How to Add a New Scene at the End of a
Previously Shot Scene
The following operation steps assure smooth scene-to-
scene transitions.
In the Shooting Pause Mode:
1
Keep pressing the [-^^] Button (or the
[►►] Button) for more than 1 second to
search for the point where the new
recording is to be joined, and release the
button as soon as this point is found.
O When keeping the Button pressed:
•The Indication “<l<l” appears in the Viewfinder.
•The scene is played back in reverse direction
at 3 times normal speed.
e
When keeping the [►►] Button pressed:
•The Indication appears in the Viewfinder.
•The scene is played back in forward direction
at normal speed.
2
Press the Start/Stop Button.
•You have started shooting the new scene which is
smoothly joined to the previously recorded scene.
■ If You Have Taken out the video cassette
After Shooting the Last Scene:
Reinsert the video cassette. Press the [VCR/CAMERA]
Button so that the "VCR” Indication Lamp lights, and
then perform the above operation step 1.
After you have located the tape position at which the
new recording is to be joined, press the [VCR/CAMERA]
Button so that the “CAMERA" Indication Lamp lights.
Next, perform the above operation step 2 to start
shooting the new scene.
32

NEDERLANDS
РУССКИМ ЯЗЫК
¡3] Soepeie overgangtussen een nieuwe
scène en een voorheen opgenomen
scène (camera-zoekfunctie)
■ Toevoegen van een nieuwe scène aan het
einde van de laatst opgenomen scène
De volgende bedieningsstappen verzekeren een soepeie
overgang tussen scènes.
In de opnamepauzefunctie:
1
Houd de
[◄◄]
toets (of de
[►►]
toets)
gedurende meer dan 1 seconde ingedrukt
om het punt op te zoeken waarachter de
nieuwe scène moet worden opgenomen en
laat de toets los zodra dit punt is
gevonden.
0 Terwijl de toets ingedrukt gehouden wordt:
• De indicatie verschijnt in de zoeker.
• De scène wordt op 3 maal de normale
snelheid in achterwaartse richting
weergegeven.
Q
Terwijl de [►►] toets ingedrukt gehouden wordt:
• De indicatie verschijnt in de zoeker.
• De scène wordt op normale snelheid in
voorwaartse richting weergegeven.
2
Druk de start/stop toets in.
• Het opnemen van de nieuwe scène is begonnen,
waarbij een soepeie overgang tussen de nieuwe
en de voorheen opgenomen scène is verkregen.
■ in het geval u de Videoband heeft verwijderd
na het opnemen van de laatste scène:
Plaats de
Videoband opnieuw.
Druk
de
[VCR/CAMERA]
toets in zodat de
„VCR”
indicatie oplicht en voer
vervolgens de bovenstaande bedieningsstap 1 uit.
Nadat u het punt heeft gevonden waarachter de nieuwe
scène moet worden opgenomen, drukt u de [VCR/
CAMERA] toets in zodat de „CAMERA" indicatie oplicht.
Voer vervolgens de bovenstaande bedieningsstap 2 uit
om met het opnemen van de nieuwe scène te beginnen.
U] Плавное присоединение новой
сцены к предварительно
записанному эпизоду
(Функция поиска)
■ Добавление новой сцены в конце
предыдущей
Нижеследующие пункты гарантируют плавный
переход между сценами.
Выполните нижеследующие пункты в режиме
съемочной паузы:
1
Держите нажатой кнопку
[ < ^ ]
(или
[^^]) более одной секунды для поиска
места, к которому предполагается
присоединение новой записи, и
освободите эту кнопку, как только это
место найдено.
О при нажатой кнопке
• В видоискателе появляется индикация “«!’
•Сцена воспроизводится в обратном
направлении со скоростью, в 3 раза
превышающей нормальную.
Q
при нажатой кнопке [►►]:
• В видоискателе появляется индикация
•Сцена воспроизводится в прямом
направлении с нормальной скоростью.
2
Нажмите кнопку Старт/Стоп.
• Вы начали съемку новой сцены, которая при
этом плавно присоединяется к предыдущей
записанной сцене.
■ В случае, если видеокассета была
вынута после съемки последней сцены:
Вставьте видеокассету снова. Нажмите кнопку
[VCR/CAMERA] таким образом, чтобы высветилась
индикаторная лампа "VCR”, а затем выполните
вышеуказанный
пункт 1.
После определения места, к которому
предполагается присоединение новой записи,
нажмите кнопку [VCR/CAMERA] таким образом,
чтобы высветилась индикаторная лампа "CAMERA”.
Далее, выполните вышеуказанный пункт 2 для
инициирования съемки новой сцены.
33
FRANÇAIS
ENGLISH
(La fonction suivante est disponible sur les modèles
NV-RX2EG et NV-RX5EG seulement.)
[
4
]
Comment Utiliser le commutateur
POWER SAVE
Si on règle le commutateur [POWER SAVE] sur “ON”,
l’indication “APS” est affichée dans le viseur et les
fonctions veille automatique et veille intelligente éviteront
de gaspiller inutilement l’énergie du bloc-batterie et de
filmer accidentellement le sol si on oublie d’arrêter la
prise de vues.
Si on ne désire pas utiliser ces fonctions, placer le
commutateur [POWER SAVE] sur la position “OFF”.
Lors d’un changement d'emplacement entre séquences
ou lorsqu’aucune prise de vues ne doit avoir lieu pendant
un certain temps, il est recommandé de mettre le
caméscope hors circuit à l’aide de l’interrupteur
[POWER].
9 Fonction veille automatique
(en mode pause d’enregistrement)
• Le bloc-batterie peut être utilisé plus longtemps
pour la prise de vues,
• Le caméscope empêche automatiquement la prise
de vues même lorsque la touche marche/arrêt est
pressée accidentellement.
Lorsque le caméscope est incliné vers le bas de plus de
70° environ de sa position normale de prise de vues
horizontale pendant plus de quelques secondes, le
viseur est mis hors circuit et le témoin “VCR” (T) clignote.
■ Pour reprendre la prise de vues
Lorsque le caméscope est remis en position à peu près
horizontale, il se remet automatiquement en mode pause
d’enregistrement et la prise de vues peut reprendre en
appuyant sur la touche marche/arrêt.
Remarques:
• Lorsque la fonction veille automatique est activée, la
mise au point automatique et le moteur du zoom ne
fonctionnent pas,
• Lors de la reprise de l’enregistrement après que cette
fonction ait été activée, le réglage automatique de la
balance des blancs peut ne pas être précis pendant
quelques secondes.
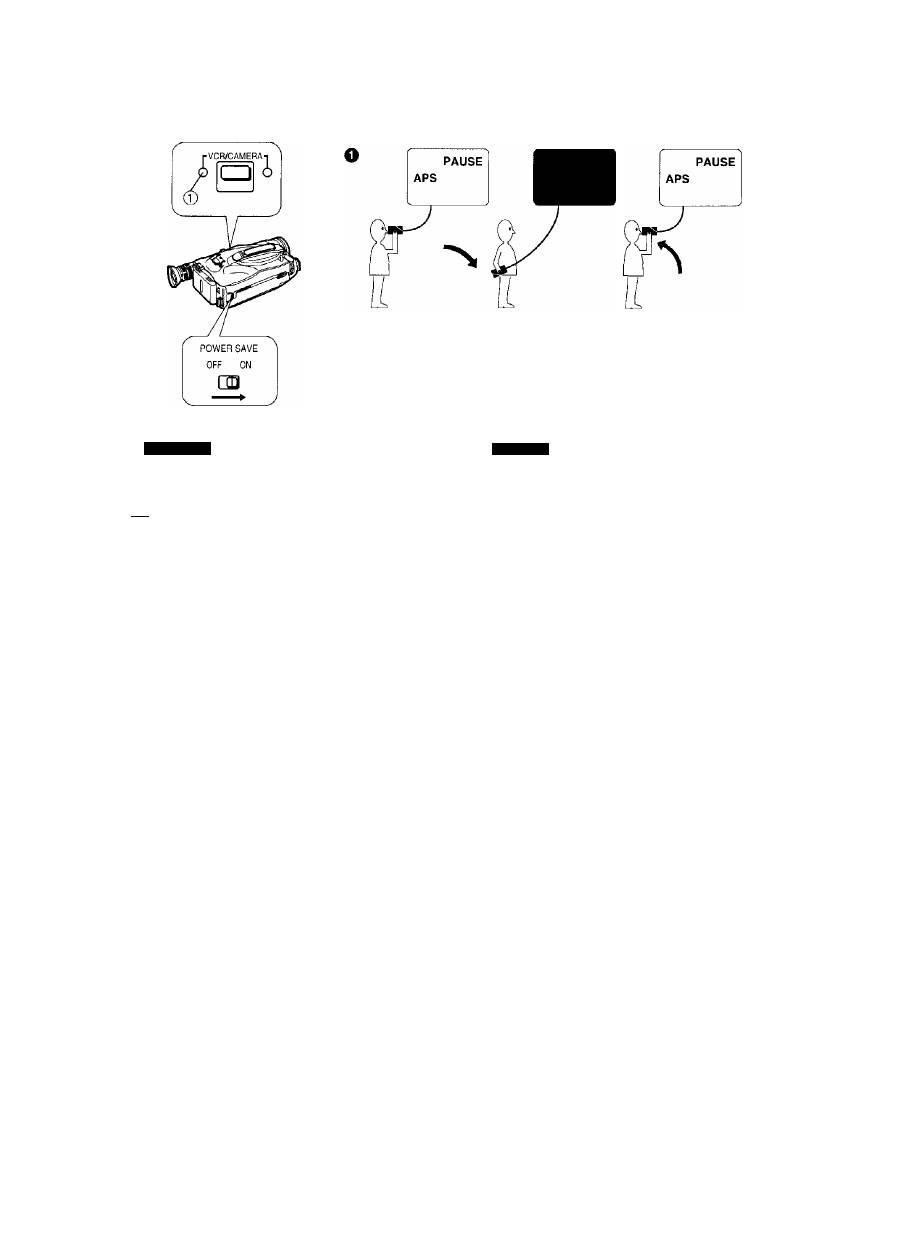
(The following function is only equipped on
NV-RX2EG and NV-RX5EG.)
[
4
] How to Use the POWER SAVE Switch
If you set the [POWER SAVE] Switch to “ON”, the “APS”
Indication is displayed in the Viewfinder, and the Auto
Power Save Function and the Anti-Ground-Shooting
Function prevent you from wasting battery power and
from the accidentally shooting the ground when you
forget to stop shooting.
When you don’t want to use these functions, set the
[POWER SAVE] Switch to “OFF”.
When you are changing locations between scenes or
when you are not planning to shoot for a longer period of
time, it is recommended you turn off the Movie Camera
with the [POWER] Switch.
0
Auto Power Save Function
(in the Shooting Pause Mode)
•The Battery Pack can be used longer for shooting.
•The Movie Camera automatically prevents shooting
even when you accidentally press the Start/Stop
Button.
When you tilt the Movie Camera downwards by more
than about 70° from the normal horizontal shooting
position for more than a few seconds, the Viewfinder
turns off and the “VCR” Indication Lamp (J) flashes.
■ To Resume Shooting
When you return the Movie Camera to an approximately
horizontal position, the Movie Camera is again in the
Shooting Pause Mode and you can restart shooting by
pressing the Start/Stop Button.
Notes:
•When the Auto Power Save Function becomes
activated, the Auto Focus and the Zoom Motor do not
work.
•When you restart the shooting after this function has
become activated, the Auto White Balance Adjustment
may not be precise for the first few seconds.
34

NEDERLANDS
РУССКИМ
язык
(De volgende functie is alleen beschikbaar op de
modellen NV-RX2EG en NV-RX5EG.)
g Gebruik van de POWER SAVE
schakelaar
In het geval de [POWER SAVE] schakelaar in de stand
„ON” wordt gezet, verschijnt de „APS” indicatie in de
zoeker en zullen de automatische
energiebesparingsfunctie en de antigrondopnamefunctie
voorkomen dat accuenergie wordt verspild en per
ongeluk een opname van de grond wordt gemaakt in het
geval u vergeet met opnemen te stoppen.
Zet de [POWER SAVE] schakelaar in de stand „OFF”
indien U deze functies niet wenst te gebruiken.
Wanneer u van opnameplaats verändert of het opnemen
voor een längere tijdspehode onderbreekt, verdient het
aanbeveling de Movie Camera met behulp van de
[POWER] schakelaar uit te schakelen.
0
Automatische energiebesparingsfunctie
(in de opnamepauzefunctie)
• Met de accu kan langer opgenomen worden.
• De Movie Camera voorkomt dat opgenomen wordt,
ook al wordt de start/stop toets abusievelijk
ingedrukt.
Als u de Movie Camera langer dan een paar seconden
meer dan ongeveer 70° naar beneden draait vanuit zijn
normale horizontale opnamestand, wordt de zoeker
uitgeschakeld en gaat het „VCR” indicatielampje (J)
knipperen.
■ Hervatten van de opname
Wanneer u de Movie Camera weer in een ongeveer
horizontale stand houdt, komt de Movie Camera
automatisch in de opnamepauzefunctie te staan en kunt
u het opnemen hervatten door de start/stop toets in te
drukken.
Opmerkingen:
•Als de automatische energiebesparingsfunctie in
werking treedt, zullen de automatische scherpstelling
en de automatische zoomfunctie niet werken.
•Als u opnieuw begint met opnemen nadat deze functie
in werking is getreden, is het mogelijk dat de
automatische witbalansafstelling de eerste paar
seconden niet nauwkeurig werkt.
(Следующей функцией снабжены только модели
NV-RX2EG и NV-RX5EG.)
[4] Использование переключателя
экономии потребляемой мощности
батарей POWER SAVE
Если Вы установите переключатель экономии
потребляемой мощности батарей [POWER SAVE] в
положение "ON”, в видоискателе высвечивается
индикация “APS”, и активизируются функция
экономии потребляемой мощности батарей и
функция предотвращения съемки земли,
предохраняя Вас от расходования мощности
батарей и от случайной съемки земли в случае,
если Вы забыли остановить съемку.
В случае, если Вы не желаете использовать эти
функции, установите переключатель [POWER
SAVE] в положение “OFF”.
При смене местоположения между сценами, либо,
если не планируется производить съемку в течение
длительного периода времени, рекомендуется
выключать видеокамеру с помощью переключателя
[POWER].
О
Автоматическая экономия потребляемой
мощности батарей
(режим съемочной паузы)
• Возможно использование батарейного блока
для съемки в течение более длительного
периода времени.
•Видеокамера автоматически предохранена от
съемки, даже если случайно нажимается
кнопка Старт/Стоп.
В случае, если Вы при съемке наклоняете
видеокамеру вниз от нормального горизонтального
положения на угол более чем
70"’
в течение более
нескольких секунд, видоискатель выключается, и
мигает лампа индикации ‘VCR”(T).
■ Возобновление съемки
В случае, если Вы возвращаете видеокамеру
приблизительно в горизонтальное положение, она
снова входит в режим съемочной паузы, и Вы
можете возобновить съемку нажатием кнопки
Старт/Стоп.
Примечания:
•При активизации автоматическая экономия
потребляемой мощности батарей автоматическая
фокусировка и двигатель трансфокатора не
функционируют.
• При возобновлении вами съемки после
активизации этой функции автоматическая
регулировка баланса белого может быть не
точной в течение первых нескольких секунд.
35
FRANÇAIS
ENGLISH
(La fonction suivante est disponible sur les modèles
NV-RX2EG et NV-RX5EG seulement.)
Q Fonction veille intelligente
(en mode enregistrement)
• Le bloc-batterie peut être utilisé plus longtemps
pour la prise de vues.
• Le caméscope se met automatiquement en mode
pause d'enregistrement pour arrêter la prise de
vues involontaire si l’on oublie d’appuyer sur la
touche marche/arrêt à la fin d’une séquence.
Lorsqu’on incline le caméscope vers le bas de plus de
70' environ de sa position normale de prise de vues
horizontale pendant plus de quelques secondes et:
1) qu’on marche en tenant le caméscope à la main;
2) qu’on incline rapidement le caméscope vers le bas
alors qu’on est immobile;
Le viseur se met hors circuit et le témoin “VCR” clignote.
■ Pour reprendre la prise de vues
Lorsque le caméscope est remis en position à peu près
horizontale, l’indication “CHK” (^vérification) clignote
dans le viseur. La prise de vues ayant pu continuer
pendant plusieurs secondes, rebobiner un peu la bande
à l’aide de la fonction recherche caméra (->
32)
pour
localiser précisément la fin de la dernière séquence
filmée volontairement puis reprendre la prise de vues.
Remarques:
• La fonction veille intelligente est conçue de façon à ne
pas être activée lorsqu’on incline le caméscope
doucement vers le bas pendant la prise de vues,
comme montré ci-dessus (T).
•Cette fonction n’est pas destinée à remplacer l’arrêt
manuel de la prise de vues,
• Lorsque cette fonction est activée, la mise au point
automatique et le moteur du zoom ne fonctionnent pas.
• Lors de la reprise de l’enregistrement après que cette
fonction ait été activée, le réglage automatique de la
balance des blancs peut ne pas être précis pendant
quelques secondes.
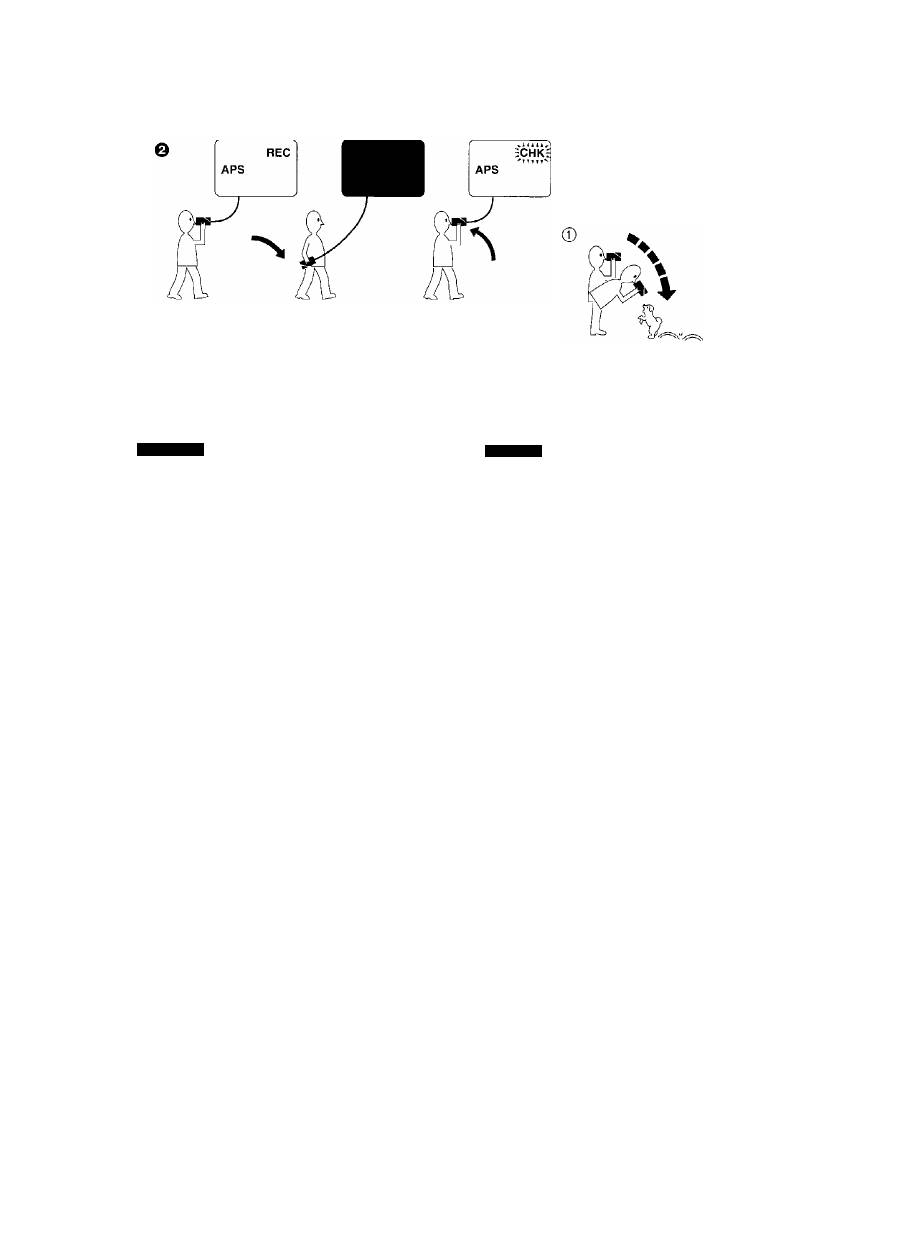
(The following function is only equipped on
NV-RX2EG and NV-RX5EG.)
Q Anti-Ground-Shooting Function
(in the Shooting Mode)
•The Battery Pack can be used longer for shooting.
•The Movie Camera automatically switches over to
the Shooting Pause Mode to stop the unintentional
shooting when you forget to press the Start/Stop
Button at the end of a scene.
When you tilt the Movie Camera downwards by more
than about 70° from the normal horizontal shooting
position for more than a few seconds, and:
1) walk with the Movie Camera held in the hand or;
2) tilt the Movie Camera quickly downwards when not
walking;
the Viewfinder turns off and the “VCR” Indication Lamp
flashes.
■ To Resume Shooting
When you return the Movie Camera to an approximately
horizontal position, the “CHK” (=check) Indication
flashes in the Viewfinder. Since the shooting may have
continued for several seconds, rewind the tape a little
using the Camera Search Function (-►
32)
to locate the
exact end of the last intentionally shot scene, and then
start shooting again.
Notes:
•The Anti-Ground-Shooting Function is designed so that
it does not become activated when you tilt the Movie
Camera slowly downwards during shooting, as shown
above (f).
•This function is not intended to replace the manual
stopping of shooting.
•When this function becomes activated, the Auto Focus
and the Zoom Motor do not work.
•When you restart shooting after this function has
become activated, the Auto White Balance Adjustment
may not be precise for the first few seconds.
36

NEDERLANDS
РУССКИМ язык
(De voigende functie is alleen beschikbaar op de
modellen NV-RX2EG en NV-RX5EG.)
© Antigrondopnamefunctie
(in de opnamefunctie)
• Met de accu kan langer opgenomen worden.
• De Movie Camera schakelt automatisch in de
opnamepauzefunctie om abusievelijk doorgaan met
opnemen te voorkomen, wanneer u vergeet om de
start/stop toets aan het einde van de opname in te
drukken.
Als
U
de Movie Camera langer dan een paar seconden
meer dan ongeveer 70° naar beneden draait vanuit zijn
normale horizontale opnamestand, en:
1) u met de Movie Camera loopt terwiji deze in de hand
wordt gedragen of;
2) u de Movie Camera snel naar beneden draait terwiji u
er niet mee loopt;
schakelt de zoeker uit en gaat het „VCR" indicatielampje
knipperen.
■ Hervatten van de opname
Wanneer u de Movie Camera weer in een ongeveer
horizontale stand houdt, knippert de „CHK” (contrôle)
indicatie in de zoeker. Aangezien het mogelijk is dat het
opnemen gedurende een paar seconden is voortgezet,
spoelt u de band iets terug met behulp van de
camerazoekfunctie (-► 33) om het precieze einde van de
laatste met opzet opgenomen scène te vinden en
vervolgens hervat u het opnemen.
Opmerkingen:
• De antigrondopnamefunctie wordt niet ingeschakeld
wanneer de Movie Camera tijdens het maken van een
opname langzaam naar beneden wordt gedraaid zoals
hierboven aangegeven (T).
• Deze functie is niet bedoeld als vervanging voor het
handmatig stoppen met opnemen.
•Als deze functie in werking treedt, zullen de
automatische scherpstelling en de automatische
zoomfunctie niet werken.
•Als u opnieuw begint met opnemen nadat deze functie
in werking is getreden, is het mogelijk dat de
automatische witbalansafstelling de eerste paar
seconden niet nauwkeurig werkt.
(Следующей функцией снабжены только модели
NV-RX2EG и NV-RX5EG.)
© Функция предотвращения съемки земли
(в режиме съемки)
•Возможно использование батарейного блока
для съемки в течение более длительного
периода времени.
•Видеокамера автоматически переключается в
режим съемочной паузы для остановки
ненамеренной съемки в случае, если Вы
забыли нажать кнопку Старт/Стоп в конце
сцены.
В случае, если Вы при съемке наклоняете
видеокамеру вниз от нормального горизонтального
положения на угол более чем 70° в течение более
нескольких секунд, и:
1) идете с видеокамерой, держа ее в руке, или;
2) быстро наклоняете видеокамеру вниз не при
ходьбе:
видоискатель выключается, и мигает лампа
индикации “VCR".
■ Возобновление съемки
в случае, если Вы возвращаете видеокамеру
приблизительно в горизонтальное положение, в
видоискателе мигает индикация “СНК” (=проверка).
Так как не исключена возможность продолжения
съемки в течение нескольких секунд, немного
перемотайте ленту, используя функцию поиска
(-► 33) с целью нахождения последней намеренно
снятой сцены, и затем возобновите съемку.
Примечания:
•Функция предотвращения съемки земли
разработана таким образом, что она не
активизируется в случае, если Вы наклоняете
видеокамеру при съемке медленно вниз, как
показано выше (J).
•Функция не предназначена для замены остановки
съемки вручную,
• При активизации этой функции автоматическая
фокусировка и двигатель трансфокатора не
функционируют.
•При возобновлении вами съемки после
активизации этой функции автоматическая
регулировка баланса белого может быть не
точной в течение первых нескольких секунд.
37
FRANÇAIS
ENGLISH
Lecture
pT| Lecture dans le viseur
La cassette enregistrée peut être visionnée dans le
viseur.
1
Sortir l’interrupteur [POWER].
(Le caméscope se met en circuit et le
témoin “CAMERA” s’allume.)
2
Appuyer sur la touche [VCR/CAMERA].
• Le témoin “VCR” O s’allume et le témoin
"CAMERA” s’éteint.
3
Appuyer sur la touche
• La bande commence à se rebobiner.
• Lorsque la bande revient au début, le rebobinage
s’arrête automatiquement.
4
Appuyer sur ta touche [►].
• La lecture commence et l’indication “t>” apparaît
dans le viseur.
• Lorsque la bande arrive à la fin, elle se rebobine
automatiquement jusqu'au début.
■ Pour arrêter la lecture
Appuyer sur la touche [■].
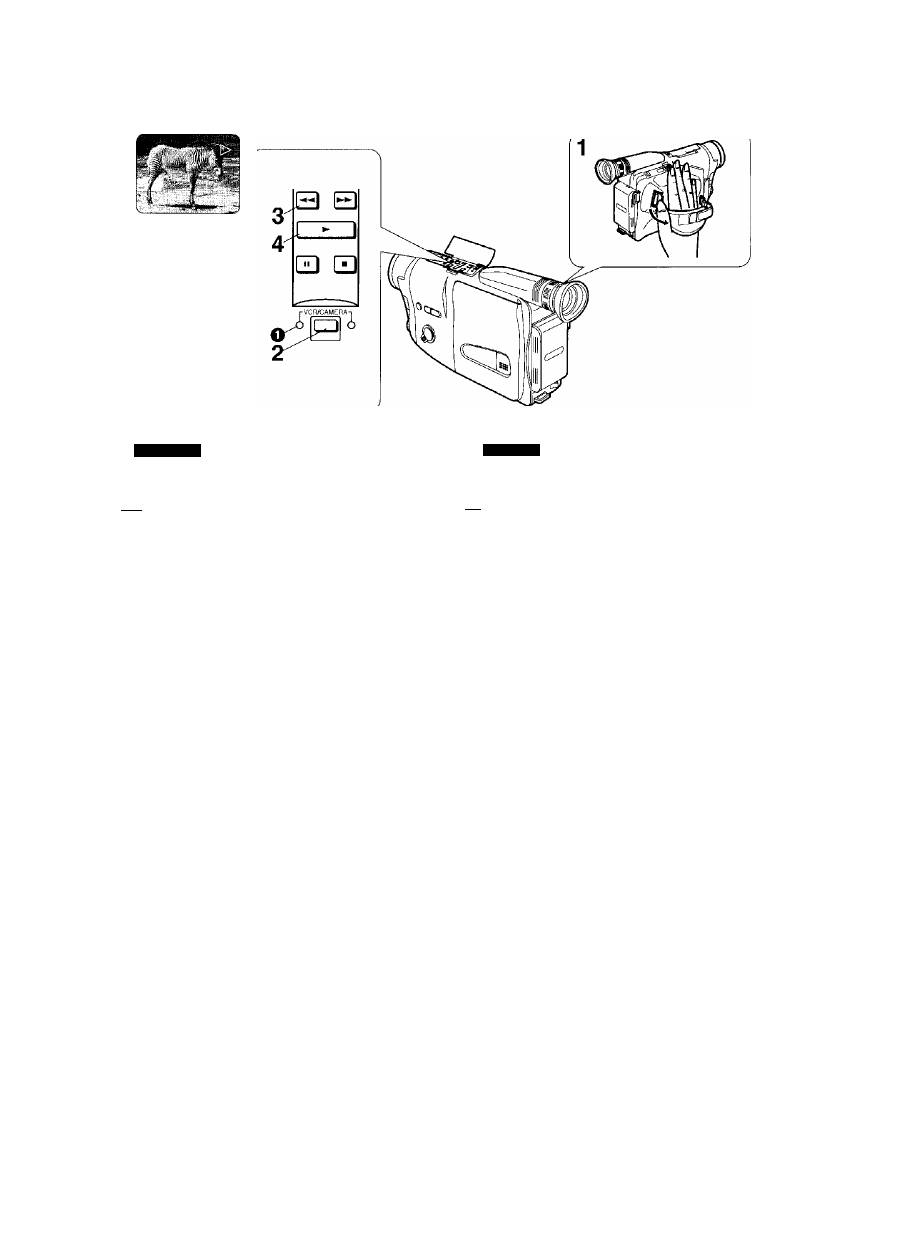
Playback
[T|
How to Play Back Via the Viewfinder
The playback of the recorded tape can be watched in the
Viewfinder.
1
Turn out the [POWER] Switch.
(The Movie Camera switches on and the
“CAMERA” Indication Lamp lights.)
2
Press the [VCR/CAMERA] Button.
•The “VCR” Indication Lamp 0 lights instead of
the “CAMERA” Indication Lamp.
3
Press the
[M<]
Button.
•The tape starts to rewind.
•When the tape reaches the beginning, the
rewinding automatically stops.
4
Press the [►] Button.
• Playback starts.
The Playback Indication “C>” appears in the
Viewfinder.
•When the tape reaches the end, it automatically
rewinds to the beginning.
■ To Stop Playback
Press the
\M]
Button.
38

NEDERLANDS
русский
ЯЗЫК
Weergeven
pn Weergeven via de zoeker
De
weergave van de opgenomen Videoband kan worden
bekeken op de zoeker.
1
Draai de [POWER] schakelaar naar buiten.
(De Movie Camera wordt ingeschakeld en
de „CAMERA” indicatielamp licht op.)
2
Druk de [VCR/CAMERA] toets in.
• De „VCR” indicatielamp Q licht op in plaats van
de „CAMERA” indicatielamp.
3
Druk de toets in.
• Het terugspoelen van de band begint.
•Wanneer het begin van de band bereikt wordt. zai
het terugspoelen automatisch stoppen.
4
Druk de
[►]
toets in.
• Het weergeven begint.
De weergave indicatie „[>” verschijnt in de zoeker.
•Wanneer het einde van de band bereikt wordt, zaI
deze automatisch naar het begin worden
teruggespoeld.
■ Stoppen van de weergave
Druk de [■] toets in.
Воспроизведение
ITI Воспроизведение через
видоискатель
Вы можете просматривать воспроизведение
записанной ленты в видоискателе.
1
Поверните от камеры переключатель
[POWER]. (Видеокамера включается и
загорается индикаторная лампа
“CAMERA”.)
2
Нажмите кнопку [VCR/CAMERA].
• Вместо индикаторной лампы “CAMERA”
высвечивается лампа “VCR’’0.
3
Нажмите кнопку ['4-4].
•Лента начинает перематываться.
•По достижении начала ленты перемотка
автоматически останавливается.
4
Нажмите кнопку [^].
•Начинается воспроизведение.
В видоискателе появляется индикация
воспроизведения
•По достижении конца ленты она будет
автоматически перемотана на начало.
■ Для остановки воспроизведения
Нажмите кнопку [■].
I
39
FRANÇAIS
[y| Lecture sur magnétoscope
(à l’aide de l’adaptateur de cassette
fourni)
Remarques:
1. Ne jamais insérer l'adaptateur de cassette dans un
magnétoscope à moins qu’il ne soit chargé d’une
cassette vidéo.
2. Ne pas insérer cet adaptateur de cassette dans un
magnétoscope et le retirer ensuite sans avoir fait
défiler la bande car celle-ci risque de se détendre.
3. Au moment d’insérer la cassette dans l’adaptateur de
cassette, faire bien attention de ne pas toucher
directement la bande. Retirer la cassette après
chaque utilisation.
4. Il peut être nécessaire de régler la commande
d’alignement du magnétoscope pour obtenir une
qualité d’image optimale.
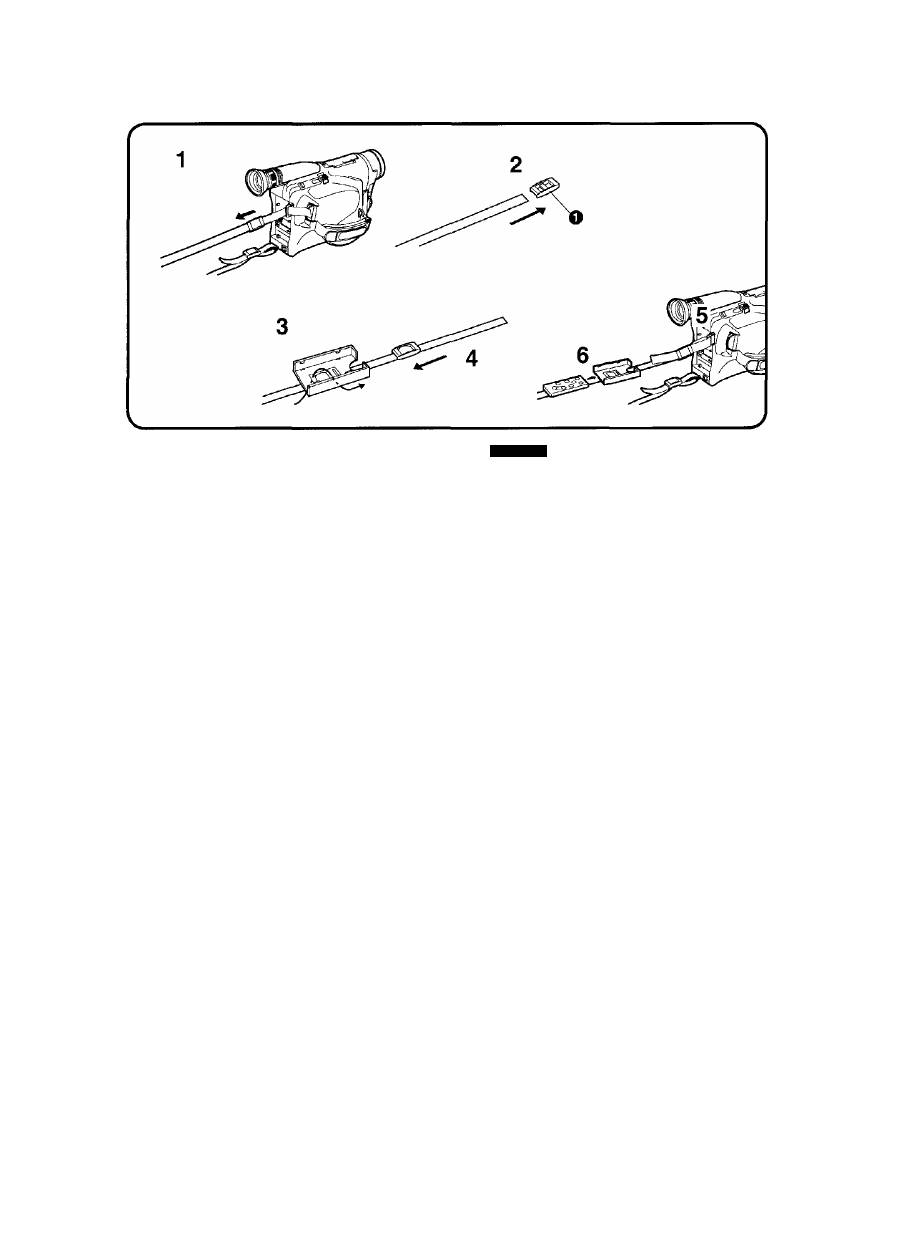
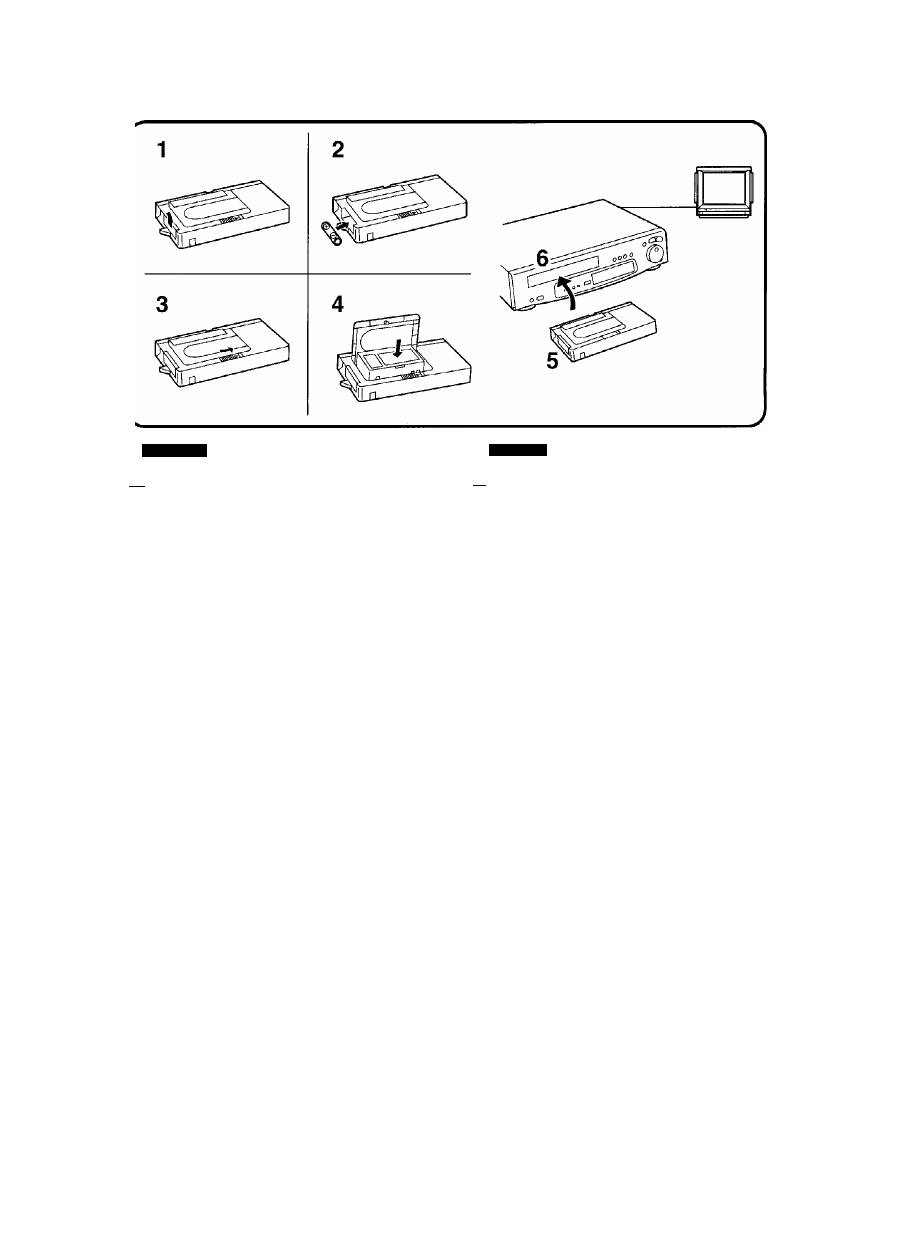
1
Déplacer le couvercle du logement de la
pile vers le haut et l’enlever.
2
Introduire la pile (fournie) et remettre ie
couvercie du iogement de ia piie.
3
Faire glisser le levier d’ouverture dans le
sens de la flèche.
4
Introduire la cassette vidéo enregistrée et
refermer ie couvercie supérieur.
5
Introduire i’adaptateur de cassette dans ie
magnétoscope.
6
Commencer la lecture sur le
magnétoscope.
ENGLISH
in How to Play Back on a VCR
(Using the Supplied Cassette Adaptor)
Notes:
1. Never insert the empty Cassette Adaptor into a VCR
unless it is loaded with a video cassette.
2.
Do not insert the Cassette Adaptor into a VCR and
take it out again without running the tape, because
this could loosen the tape.
3.
When you load the video cassette into the Cassette
Adaptor, be careful not to touch the tape. After use,
take out the video cassette from the Cassette Adaptor.
4. For optimum picture quality, it may be necessary to
adjust the tracking control on the VCR.
1
Push the Battery Compartment Cover
upward and remove it.
2
Insert the supplied battery and then
re-attach the Battery Compartment Cover.
3
Slide the Open Lever in the direction of the
arrow.
4
Insert the recorded video cassette and
close the Top Cover.
5
Insert the Cassette Adaptor into the VCR.
6
Start playback on the VCR.
40
NEDERLANDS
■ Waarschuwing bij de batterij
Bij dit Produkt zijn batterijen geleverd.
Wanneer deze leeg zijn, moet u ze niet
weggooien maar inleveren als KCA.
NEDERLANDS
|T] Weergeven via een Videorecorder
(met behulp van de bijgeleverde
Videobandadapter)
Opmerkingen:
1. Plaats nooit een lege videoband-adapter in de
Videorecorder. Wanneer de adapter geplaatst wordt,
moet er altijd een Videoband in zijn.
2. De Videobandadapter niet in een Videorecorder
plaatsen en weer verwijderen zonder de band te laten
lopen, aangezien de band hierdoor los kan körnen te
zitten.
3. Wees voorzichtig bij het plaatsen van de Videoband in
de Videobandadapter de band niet rechtstreeks aan
te raken. Verwijder na gebruik de Videoband uit de
Videobandadapter.
4. Voor het verkrijgen van een optimale beeldkwaliteit
kan het noodzakelijk zijn de spoorregeling op de
Videorecorder af te stellen.
1
Duw het batterijvak deksel omhoog en
verwijder het.
2
Piaats de bijgeieverde batterij en bevestig
vervolgens het batterijvak deksei.
3
Schuif de open-knop in de richting van de
piji.
4
Piaats de opgenomen Videoband en sluit
het bovendeksei.
5
Piaats de Videobandadapter in de
Videorecorder.
6
Start de weergave op de Videorecorder.
русский
язык
|2] Воспроизведение на
видеомагнитофоне (ВКМ)
(С использованием прилагаемого
кассетного адаптера)
Примечания:
1.
Никогда не вставляйте в ВКМ пустой кассетный
адаптер до тех пор, пока в него не установлена
видеокассета,
2. Не следует после вставления кассетного
адаптера в ВКМ вынимать его без
прокручивания ленты, т.к. это может привести к
провисанию ленты.
3. Соблюдайте осторожность, чтобы не
прикоснуться к ленте при вставлении вами
видеокассеты в кассетный адаптер. Вытащите
видеокассету из кассетного адаптера после
использования.
4. Для получения наилучшего качества
изображения может стать необходимой
подрегулировка контроля трекинга на ВКМ.
1
Нажмите на крышку батарейного
отсека по направлению вверх и
удалите ее.
2
Вставьте прилагаемую батарею, а затем
повторно присоедините крышку
батарейного отсека.
Сдвиньте рычаг для открывания
направлении стрелки.
Вставьте записанную видеокассету и
закройте верхнюю крышку.
Вставьте кассетный адаптер в ВКМ.
Инициируйте воспризведение на ВКМ.
3
4
5
6
41
ENGLISH
[3j Avance rapide ou rebobinage de ia
bande
Effectuer les opérations suivantes avec le caméscope en
mode VCR (le témoin “VCR” s'allume) et en mode arrêt.
■ Avance rapide
1
Appuyer sur la touche
[►►]
pour avancer
rapidement la bande vers l’avant.
• Lorsque la bande arrive à la fin, elle se rebobine
automatiquement jusqu’au début.
■ Rebobinage
2
Appuyer sur la touche pour
rebobiner rapidement la bande vers l’avant.
• Lorsque la bande arrive au début, le rebobinage
s’arrête automatiquement.
[
4
]
Commentéiimineriesdistorsions
d’image en ajustant i’aiignement
■ Pourquoi régler l’alignement
Il est possible que durant la lecture d'une bande
enregistrée, surtout une cassette vidéo enregistrée sur
un autre caméscope, des barres parasites blanches
horizontales
0
apparaissent dans l’image. Cela se
produit si durant la lecture, les têtes détectent les plages
vidéo enregistrées avec un décalage. Le réglage de la
configuration de l’alignement des têtes s’appelle réglage
de l'alignement.
1
Appuyer simultanément sur les touches
[◄ TRACKING] et [TRACKING ►].
Remarque:
Si la qualité de l’image ne s’améliore pas lorsqu’on
appuie simultanément sur les deux touches, faire le
réglage en appuyant uniquement sur la touche
[<
TRACKING] ou bien sur la touche [TRACKING ►].
(Il peut être impossible d’éliminer complètement ces
barres parasites.)
^ How to Rewind or Fast-Forward the
Tape
Perform the following operations with the Movie Camera
in the VCR Mode (“VCR” Indication Lamp lights) and in
the Stop Mode.
■ For Fast-Forwarding
1
Press the Button to wind the tape
forward at high speed.
•When the tape reaches the end, it automatically
rewinds to the beginning.
■ For Rewinding
2
Press the [^4^] Button to rewind the tape
at high speed.
•When the tape reaches the beginning, the
rewinding automatically stops.
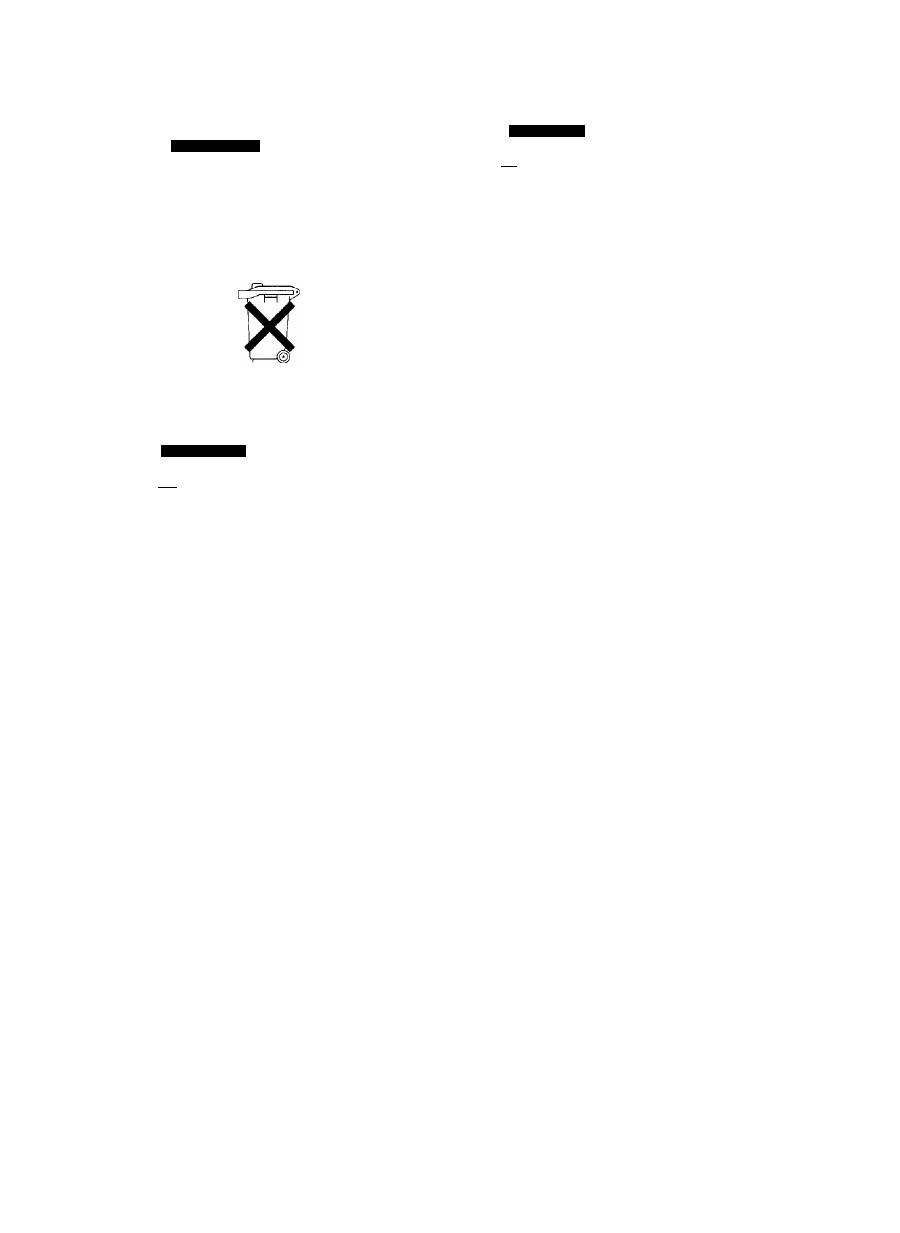
|~4] How to Eliminate Picture Distortions
by Adjusting the Tracking
■ Purposeof the Tracking Adjustment
When playing back a recorded tape, especially a video
cassette recorded on another Movie Camera, horizontal
white noise bars ^ may appear in the picture. This
occurs when the video heads don't precisely trace the
recorded video tracks during playback. Adjusting the
tracking pattern of the heads is called tracking
adjustment.
7
Press both the [4 TRACKiNG] and the
[TRACKING ►] Button simultaneously.
Note:
If pressing both buttons simultaneously does not improve
the picture quality, adjust by pressing the
[4
TRACKING] or [TRACKING ►] Button individually,
(It may not be possible to remove the noise bars
completely.)
42

NEDERLANDS
русский
язык
[3] Terugspoelen en vooruitspoelen van
de Videoband
Voer de volgende bedieningen uit terwiji de Movie
Camera in de VCR functie Staat (de „VCR” indicatielamp
licht op) en in de stopstand Staat.
■ Voor vooruitspoelen
1
Druk de toets in om de band met
hoge snelheid vooruit te spoelen.
•Wanneer het einde van de band bereikt wordt, zal
deze automatisch naar het begin worden
teruggespoeld.
■ Voor terugspoelen
2
Druk de ['^'4] toets in om de band met
hoge snelheid terug te spoelen.
•Wanneer het begin van de band bereikt wordt, zal
het terugspoelen automatisch stoppen.
|T| Afstellen van de spoorregeling om
beeldstoringen te voorkomen
■ Doei van de afstelling van de spoorregeling
Wanneer u een opgenomen videoband weergeeft, met
name een videoband die op een andere Movie Camera
is opgenomen, kunnen horizontale witte storingsstrepen
0
in het beeid verschijnen. Dit komt voor wanneer de
Videokoppen de opgenomen videosporen op de band
niet precies volgen tijdens weergave. Het afstellen van
het spoorvolgingspatroon van de videokoppen heet
afstelling van de spoorregeling.
1
Druk zowel de
[4
TRACKING] als de
[TRACKING ►] toets tegelijkertijd in.
Opmerking:
Indien het tegelijkertijd indrukken van de beide toetsen
geen verbetering in de beeidkwaliteit opievert, stelt u de
spoorregeling af door de
[4
TRACKING] toets of de
[TRACKING ►] toets afzonderlijk in te drukken.
(Het is mogelijk dat de storingsstrepen niet geheel
verdwijnen.)
[Щ
Ускоренная перемотка ленты в
прямом и обратном направлениях
Следующие операции следует выполнять, когда
видеокамера находится в режиме ВКМ
(высвечивается индикаторная лампа ‘VCR’’) или в
режиме остановки.
■ Для ускоренной перемотки в прямом
направлении
1
Для ускоренной перемотки в прямом
направлении нажмите кнопку [^^].
• По достижении конца ленты она будет
автоматически перемотана на начало.
■ Для ускоренной перемотки в обратном
направлении
2
Для ускоренной перемотки в обратном
направлении нажмите кнопку [
44
].
•По достижении начала ленты она
автоматически остановится,
|~4] Устранение искажений
изображения посредством
регулировки трекинга
■ Цель регулировки трегинга
Горизонтинтальные белые штрихи d могут
появиться на изображении при воспризведении
записанной ленты, особенно в случае ленты,
записанной на другой видеокамере. Это явление
происходит вследствие неточного отслеживания
видеоголовками записанных видеодорожек при
воспроизведении. Подрегулировка отслеживания
головками дорожек и называется регулировкой
трекинга.
/ Нажмите одновременно обе кнопки
[4
TRACKING] и [TRACKING ►].
Примечание:
Если нажатием обоих кнопок одновременно не
удается улучшить качество изображения, то
следует попытаться подрегулировать трекинг
нажатием одной из кнопок
[4
TRACKING] и
[TRACKING ►].
(Возможна ситуация, в которой полное удаление
шумовых полос невозможно.)
43
FRANÇAIS
ENGLISH
Utilisation des fonctions repérage
avant, repérage arrière et arrêt sur
image pendant une lecture normale
Remarques:
1. Le son n'est reproduit qu’en lecture normale.
2. En mode repérage avant, repérage arrière ou arrêt
sur image, des barres parasites horizontales O
apparaissent sur les images, ou les images peuvent
être en noir et blanc ou déformées. Ceci est normal; il
ne s’agit pas d’un mauvais fonctionnement.
■ Pour une lecture en repérage avant
1
Maintenir la touche
enfoncée.
• L’indication du mode avance
rapide/repérage avant apparaît dans le viseur.
• Pour reprendre la lecture normale, relâcher la
touche [►►].
■ Pour une lecture en repérage arrière
2
Maintenir la touche
enfoncée.
• L’indication “<]<]” du mode rebobinage/repérage
arrière apparaît dans le viseur.
• Pour reprendre la lecture normale, relâcher la
touche
■ Pour un arrêt sur image
3
Appuyer sur la touche [11].
• L’indication
“II”
du mode arrêt sur image apparaît
dans le viseur.
• Pour reprendre la lecture normale, appuyer à
nouveau sur la touche [11].
•Si on laisse le caméscope en mode arrêt sur
image pendant 6 minutes environ, il passe
automatiquement en mode arrêt de manière à
protéger la bande et les têtes vidéo.
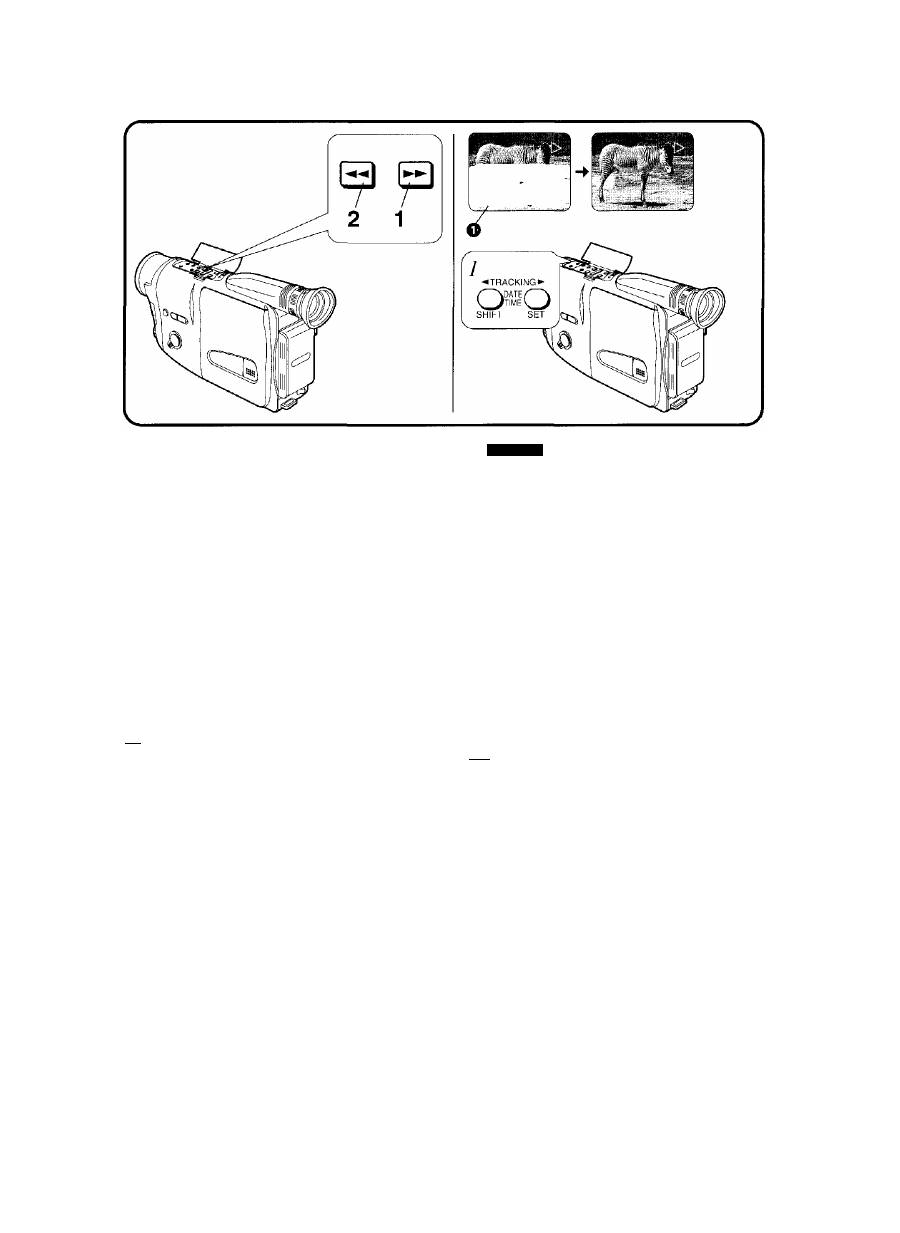
\W\
How to Use the Cue, Review and
still
Playback Functions During Normal
Playback
Notes:
1. The sound is played back only during normal
playback.
2. In the Cue, Review and Still Playback Modes,
horizontal noise bars O appear in the picture, or the
picture may become black and white or distorted.
However, this is normal and not an indication of a
malfunction.
■ For Cue Playback
1
Keep pressing the Button.
•The Fast Forward/Cue Mode Indication
appears in the Viewfinder.
•To resume normal playback, release the [►►]
Button.
■ For Review Playback
2
Keep pressing the
[ M M ]
Button.
•The Rewind/Review Mode Indication “<]<]”
appears in the Viewfinder.
•To resume normal playback, release the
Button.
■ For Still Playback
3
Press the [II] Button.
•The Still Playback Mode Indication
“I I”
appears in
the Viewfinder.
•To Resume Normal Playback, press the
[I I]
Button again.
• If you leave the Movie Camera in the Still
Playback Mode for about 6 minutes, it switches
over to the Stop Mode to protect the tape and the
video heads.
44
