Sony KV-32FX68K: Connecting Optional Equipment
Connecting Optional Equipment: Sony KV-32FX68K
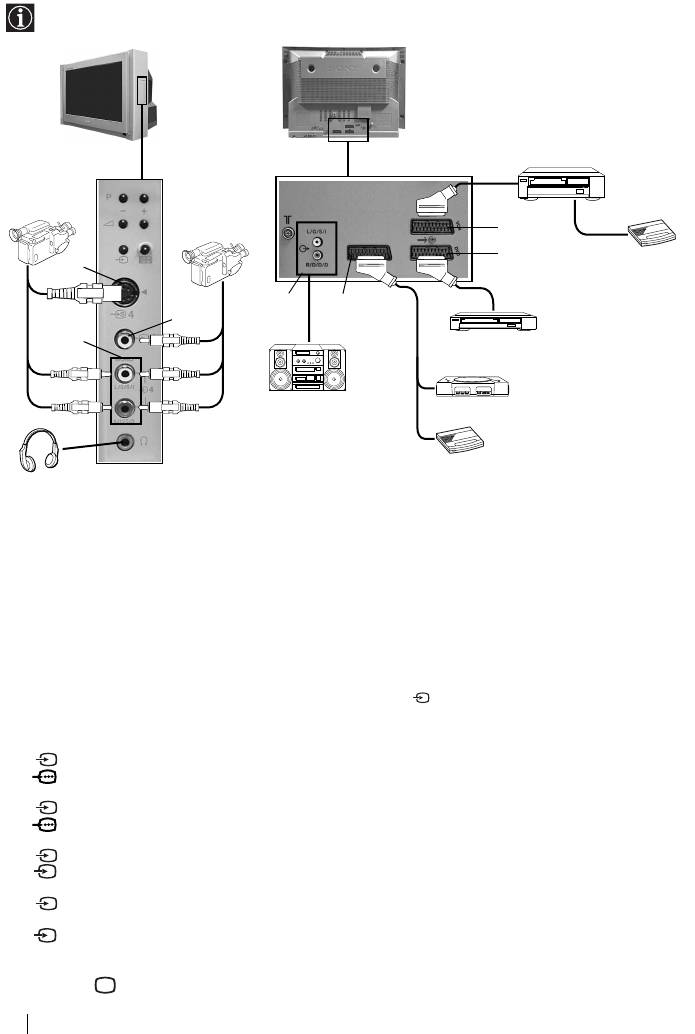
Connecting Optional Equipment
Using the following instructions you can connect a wide range of optional equipment to your TV set.
(Connecting cables are not supplied).
S VHS/Hi8/
DVC
8mm/Hi8/
camcorder
DVC
VCR
camcorder
G
F
Decoder
A
D
E
B
C
DVD
1
2
Hi-fi
“PlayStation”*
* “PlayStation” is a product of
Sony Computer Entertainment, Inc.
Decoder
* “PlayStation” is a trademark of
Sony Computer Entertainment, Inc.
• When you connect the headphones, the TV speakers will automatically be muted.
• To avoid picture distortion, do not connect external equipment to connectors A and B at the same time.
• Do not connect a Decoder to the Scart F.
• Games that use a “GUN” attachment to point at the screen do not work correctly due to 100Hz technology
used in this television.
Using Optional Equipment
1 Connect your equipment to the designated TV socket.
2 Switch on the connected equipment.
3 To watch the picture of the connected equipment, press the button repeatedly until the correct input
symbol appears on the screen.
Symbol Input Signals
1 •Audio / video input signal through the Scart connector E
1 •RGB input signal through the Scart connector E. This symbol appears only
if an RGB source has been connected.
2 •Audio / video input signal through the Scart connector F.
2 •RGB input signal through the Scart connector F. This symbol appears only
if an RGB source has been connected.
3 •Audio/video input signal through the Scart connector G.
S
3 •S Video Input signal through the Scart connector G. This symbol appears only if an S Video
source has been connected.
4 •Video input signal through the phono socket B and Audio input signal
through C.
S
4 •S Video Input signal through the front S Video input jack A and Audio signal through C.
This symbol appears only if an S Video source has been connected.
4 Press the button on the remote control to return to the normal TV picture.
18
Additional Information
Connecting a VCR:
To connect a VCR, please refer to the section “Connecting the aerial and VCR” of this instruction
manual. We recommend you connect your VCR using a scart lead. If you do not have a scart
lead, tune in the VCR test signal to the TV programme number “0” by using the “Manual Programme
Preset” option. (for details of how to manually programme these presets, see page 13, step a).
Refer to your VCR instruction manual to find out how to find the output channel of your VCR.
Connecting a VCR that supports Smartlink:
Smartlink is a direct link between the TV set and the VCR. For more information on Smartlink, please
refer to the instruction manual of your VCR.
If you use a VCR that supports Smartlink, please connect the VCR to the TV using a Scart lead to the
Scart i3/r3 G.
If you have connected a decoder to the Scart i3/r3 G or through a
VCR connected to this Scart:
Select the “Manual Programme Preset” option in the “Set Up” menu and after entering the “Decoder**”
option, select “On” (by using or ). Repeat this option for each scrambled signal.
**This option is only available depending on the country you have selected in the “Language/Country”
menu.
Left Hi-Fi
Right Hi-Fi
Connecting to external Audio Equipment:
speaker
speaker
Plug in your Hi-Fi equipment to the audio output sockets D if
you wish to amplify the audio output from TV. Next , using the
menu system, select the “Set Up” menu, enter the “Detail Set
Up” menu and set “TV Speakers” to “Off”.
Audio level of the external speakers can be modified by
pressing the volume buttons on the remote control. Also treble
and bass settings can be modified through the “Sound
Adjustment” menu.
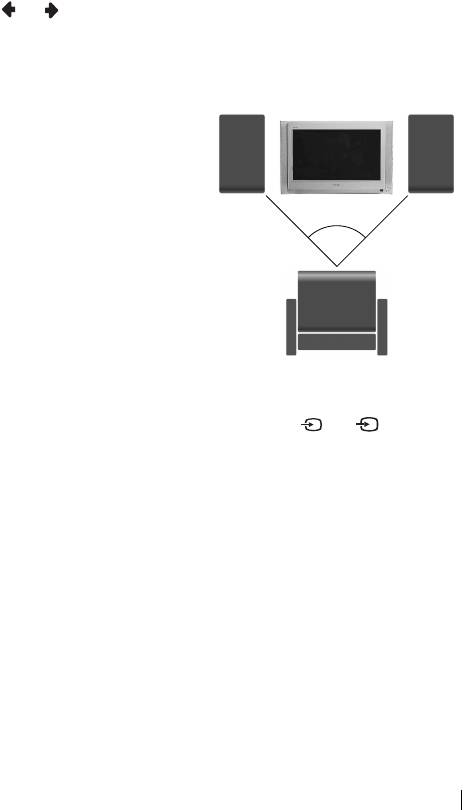
~50°
To enjoy “Dolby Virtual” sound effect through your
Hi-Fi equipment:
Place the speakers of your equipment in front of your listening
position and beside the TV set but keeping a distance of 50 cm
between each speaker and the TV set.
Then by using the menu system, select the menu “Sound
Adjustment”. Next select “Dolby Virtual” on the “Effect”
Your sitting position
option.
For Mono Equipment
Connect the phono plug to the L/G/S/I socket on the front of the TV and select 4 or 4 input signal
S
using the instructions above. Finally, refer to the “Sound Adjustment” section of this manual and select
“Dual Sound” “A” on the sound menu screen.
Additional Information
19
Оглавление
- Introduction
- Safety Information
- Overview of Remote Control Buttons
- Overview of TV Buttons
- Switching On the TV and Automatically Tuning
- Introducing and Using the Menu System
- Teletext
- Connecting Optional Equipment
- Remote Control Configuration for VCR/DVD
- Specifications
- Troubleshooting
- Увод
- Техника на безопасност
- Основно описание на бутоните на телевизора
- Включване и автоматично настройване на телевизора
- Увод и боравене със системата от менюта
- Телетекст
- Свързване на допълнителни апарати
- Конфигуриране на пулта за дистанционно управление на DVD или Видео апарата
- Характеристики
- Отстраняване на неизправности
- Úvod
- Bezpečnostní opatření
- Všeobecný přehled tlačítek dálkového ovladače
- Všeobecný přehled tlačítek televizoru
- Zapnutí a automatické naladění TV
- Úvod a použití různých menu
- Teletext
- Připojení přídavných zařízení
- Instalace dálkového ovládání pro DVD nebo video
- Technické údaje
- Řešení problémů
- Bevezetés
- Biztonsági előírások
- A távvezérlő gombjainak áttekintése
- A televízió gombjainak általános leírása
- A TV bekapcsolása és automatikus hangolás
- Bevezetés a képernyő menürendszereibe és azok használata
- Teletext
- Választható készülékek csatlakoztatása
- A távvezérlő beállítása DVD-hez vagy videomagnóhoz
- Műszaki jellemzők
- Problémamegoldás
- Wprowadzenie
- Informacje dotyczące bezpieczeństwa
- Ogólny przegląd przycisków pilota
- Ogólny przegląd przycisków telewizora
- Włączanie telewizora i automatyczne programowanie
- Wprowadzenie do systemu menu na ekranie
- Telegazeta
- Podłączanie dodatkowych urządzeń
- Konfigurowanie pilota do nastawiania DVD lub magnetowidu
- Dane techniczne
- Rozwiązywanie problemów
- Введение
- Общие правила техники безопасности
- Общее описание кнопок телевизора
- Введение и работа с системой меню
- Телетекст
- Подключение дополнительных устройств
- Настройка пульта дистанционного управления для DVD или видеомагнитофона
- Спецификации
- Выявление неисправностей

