Pioneer SVM-1000: PERFORM UTILITY SETUP
PERFORM UTILITY SETUP: Pioneer SVM-1000
01_SVM-1000_En.book 36 ページ 2007年10月16日 火曜日 午前9時22分
PERFORM UTILITY SETUP
PERFORM UTILITY SETUP
Set up MIDI
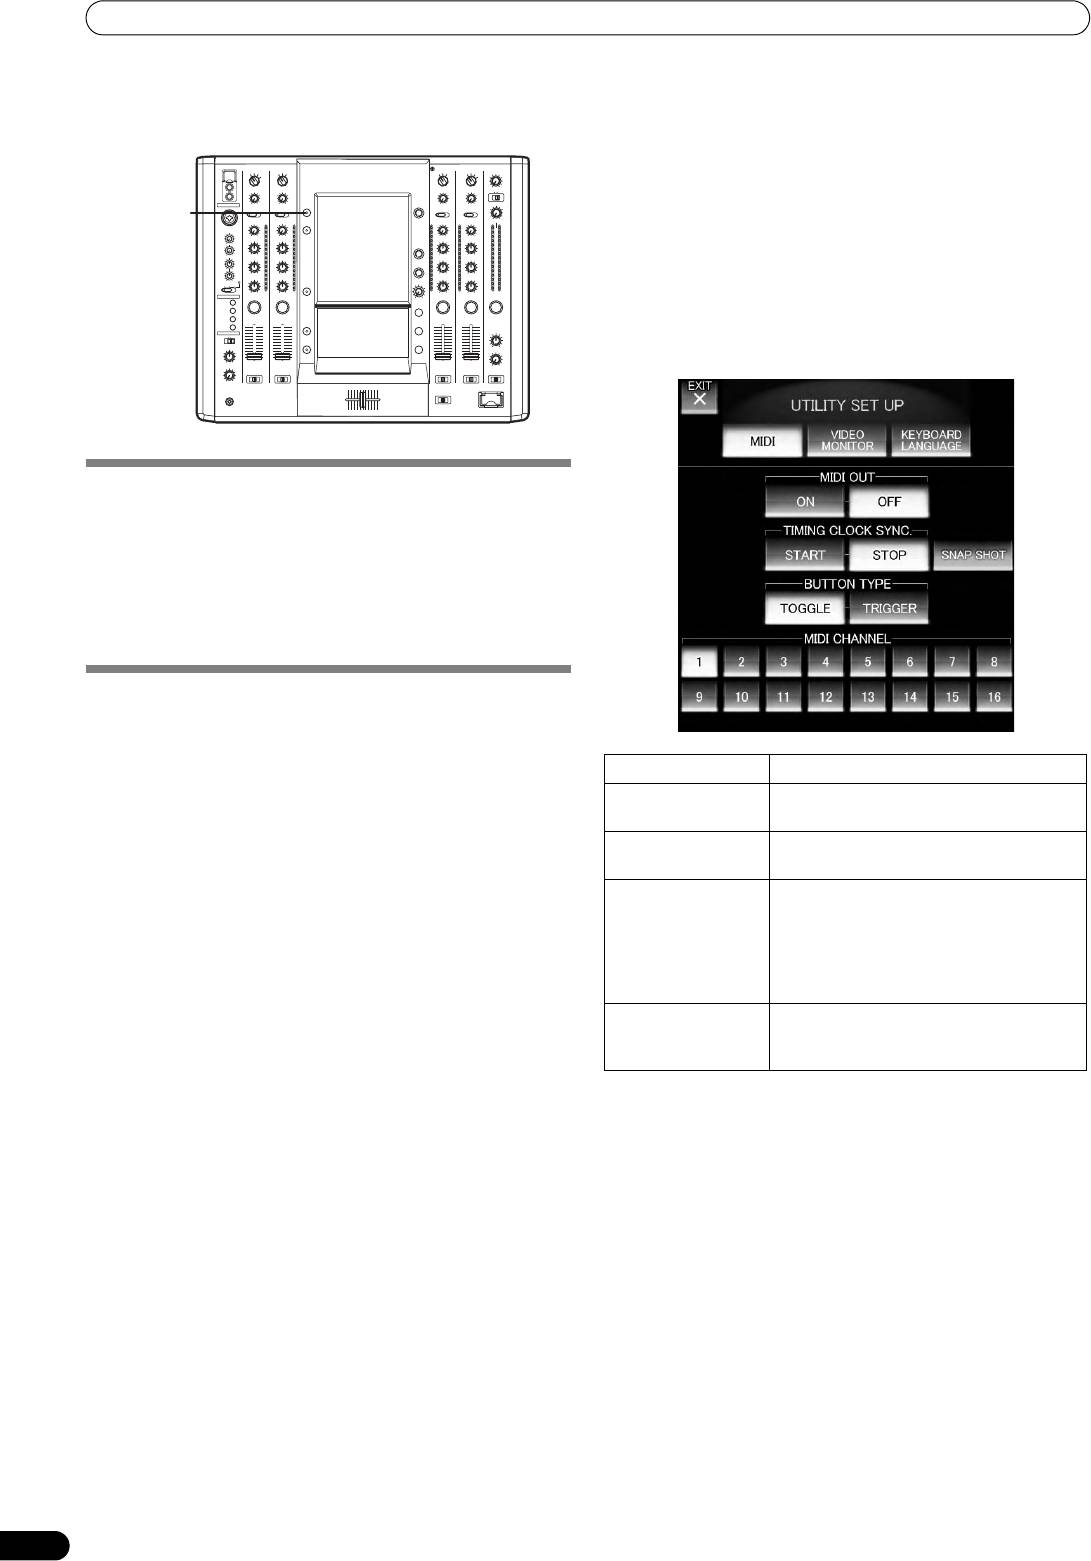
1 Hold the UTILITY (SET UP) button depressed.
The MIDI setup mode will be initiated.
UTILITY
(SET UP)
2 Touch [MIDI].
HI
The MIDI setup screen will be displayed.
3 Touch each applicable button.
Touch each applicable button on the screen to operate the
MIDI setup.
10
9
10
6
7
8
8
9
5
6
7
5
4Touch [EXIT].
4
4
2
3
3
1
2
0
1
0
This will end the MIDI setup mode.
MIDI SETTINGS
MIDI is an acronym for “Musical Instrument Digital Interface” and
refers to a protocol developed for the exchange of data between
electronic instruments and computers.
A MIDI cable is used to connect components equipped with MIDI
connectors to enable the transmission of data.
The SVM-1000 will use the MIDI function to send operational
information for hardware and BPM (timing clock).
SYNCHRONIZING AUDIO SIGNALS TO
EXTERNAL SEQUENCER, OR USING
SVM-1000 INFORMATION TO OPERATE
AN EXTERNAL SEQUENCER
MIDI OUT Switches the MIDI signal ON/OFF.
1 Use a commercially available MIDI cable to connect the
TIMING CLOCK
Switches the MIDI timing clock
SVM-1000’s MIDI OUT connector to the MIDI sequencer’s
SYNC.
synchronization between start and stop.
MIDI IN connector.
SNAP SHOT Current MIDI information regarding dials
• Use to connect the USB MIDI output connector of the SVM-
and buttons is transmitted.
1000 to a USB port on your computer. Supported operating
systems include Windows Vista, Windows XP or Mac OSX.
BUTTON TYPE Select the method in which the MIDI
• For details regarding computer setup, refer to the
signal is transmitted. Options include
instruction manual for your computer and operating system.
toggle type and trigger type. In the trigger
For application setup instructions, refer to the instruction
type, any MIDI codes set to OFF will not be
manual for the application involved.
sent, and MIDI codes set to ON will be
• Set the MIDI sequencer’s synch mode to “Slave”.
sent each time the button is pressed.
• MIDI sequencers that do not support MIDI timing clock
cannot be synchronized.
MIDI CHANNEL Changes the MIDI channel. Configures
• Synch may not be achieved if the track’s BPM cannot be
MIDI channels (1-16) and stores them in
detected and measured stably.
memory.
• BPM values set with the TAP mode can also be used to
output the timing clock.
2 Set the MIDI OUT to ON in the MIDI setup.
• The output range of the MIDI timing clock is 40 BPM to 250
BPM.
Note:
The BPM may not be measured correctly with some tracks.
Synchronize the computer application to the audio
signals, or operate the computer application using
the operation data for the SVM-1000.
1 Connect the USB MIDI output connector of the SVM-1000 to
your computer using the USB cable.
• Perform the MIDI settings for the application program. For
further information, refer to the instruction manual for
application program.
• Supported operating systems include Windows XP and Mac
OSX.
36
En
01_SVM-1000_En.book 37 ページ 2007年10月16日 火曜日 午前9時22分
PERFORM UTILITY SETUP
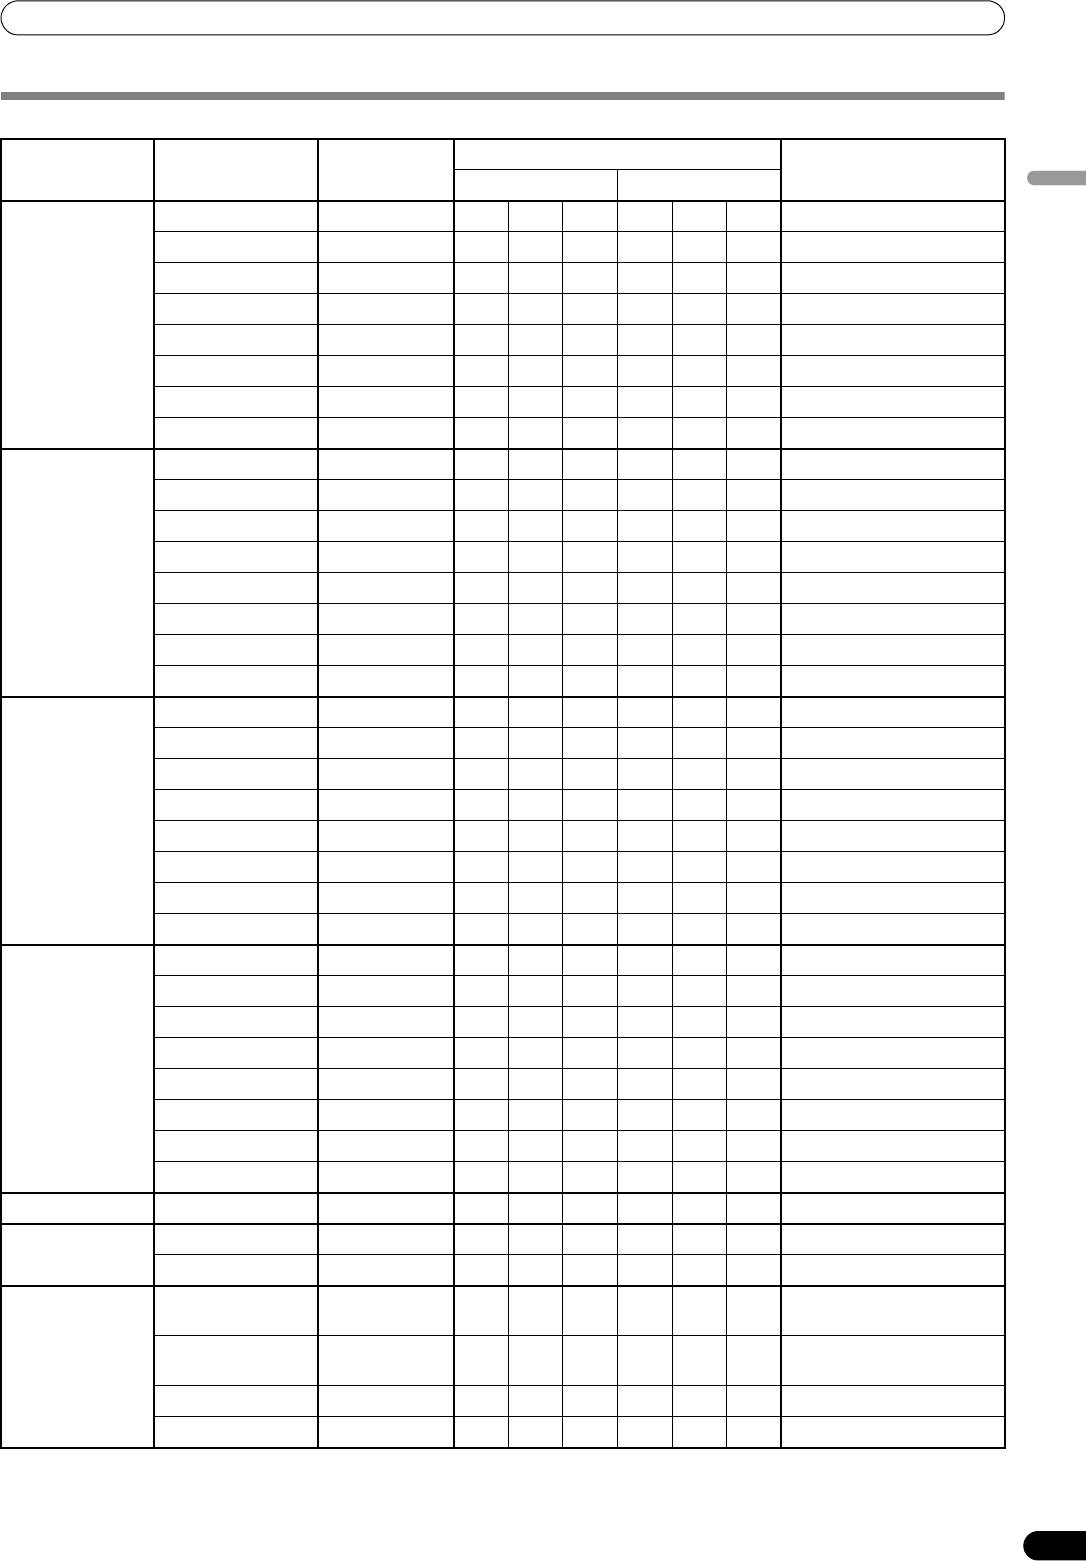
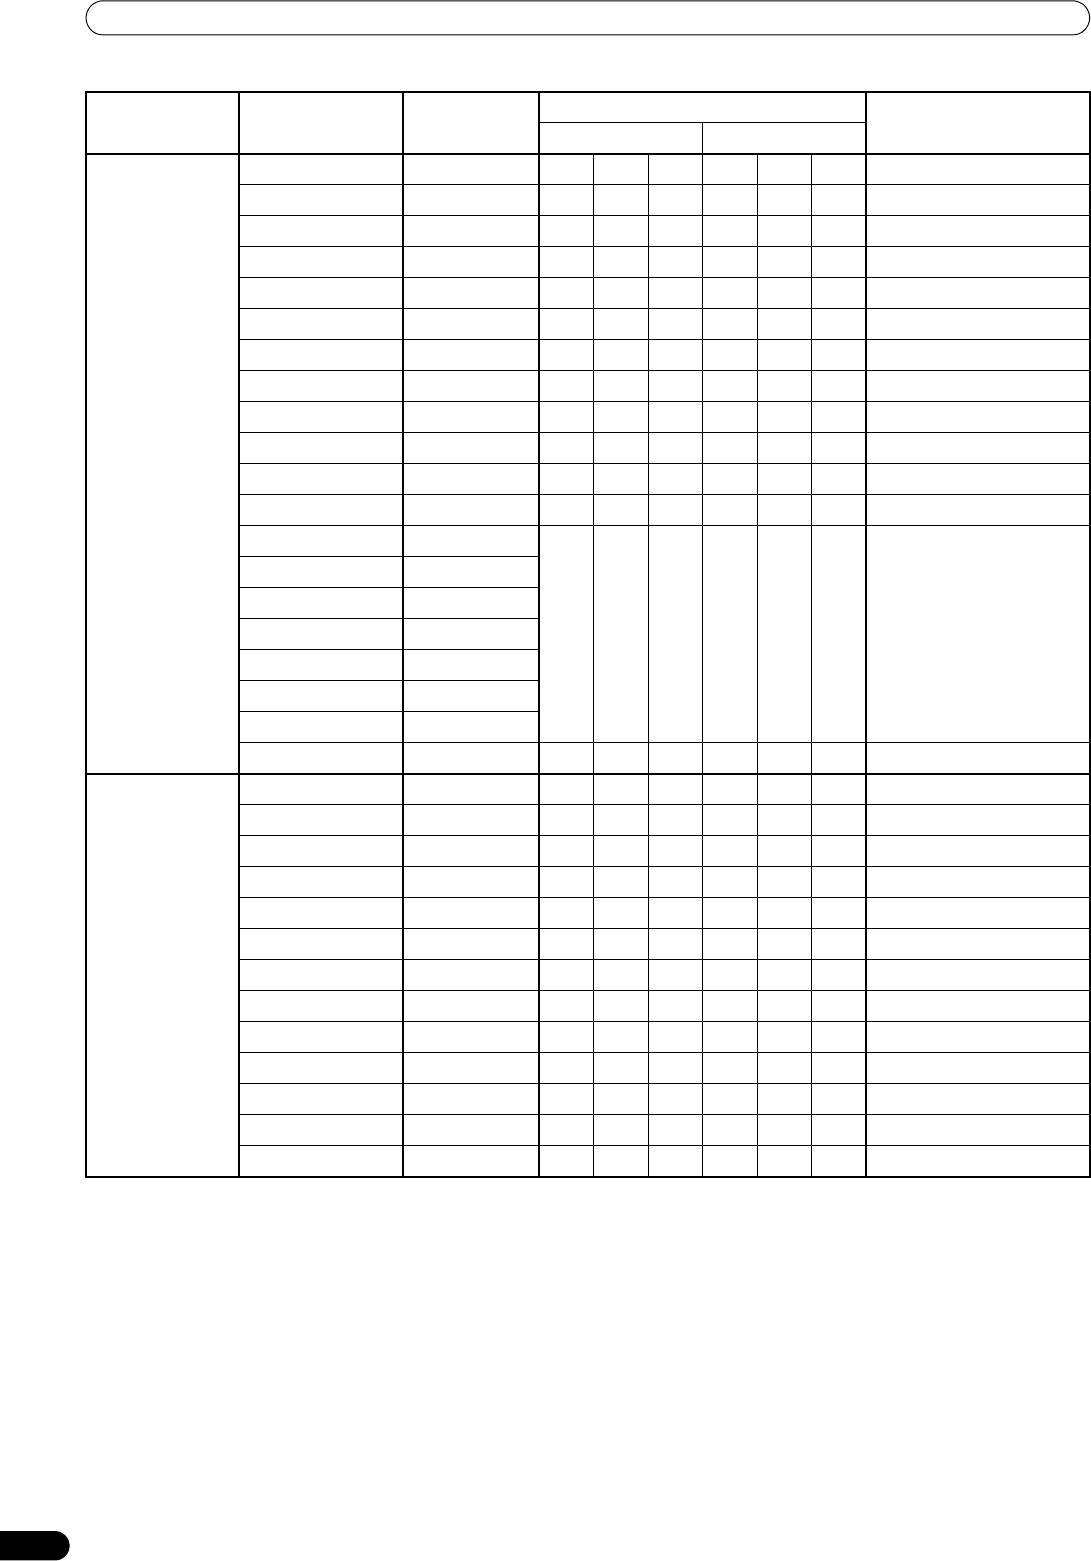
MIDI CODE LIST
MIDI Message
Category Switch Name Switch Type
Commnets
MSB LSB
English
Video TRIM VR Bn 31 dd 0 to 127
Audio TRIM VR Bn 01 dd 0 to 127
HI VR Bn 02 dd 0 to 127
MID VR Bn 03 dd 0 to 127
CH1
LOW VR Bn 04 dd 0 to 127
CUE BTN Bn 46 dd OFF=0, ON=127
FADER VR Bn 11 dd 0 to 127
CF ASSIGN SW Bn 41 dd 0, 64, 127
Video TRIM VR Bn 32 dd 0 to 127
Audio TRIM VR Bn 06 dd 0 to 127
HI VR Bn 07 dd 0 to 127
MID VR Bn 08 dd 0 to 127
CH2
LOW VR Bn 09 dd 0 to 127
CUE BTN Bn 47 dd OFF=0, ON=127
FADER VR Bn 12 dd 0 to 127
CF ASSIGN SW Bn 42 dd 0, 64, 127
Video TRIM VR Bn 33 dd 0 to 127
Audio TRIM VR Bn 0C dd 0 to 127
HI VR Bn 0E dd 0 to 127
MID VR Bn 0F dd 0 to 127
CH3
LOW VR Bn 15 dd 0 to 127
CUE BTN Bn 48 dd OFF=0, ON=127
FADER BTN Bn 13 dd 0 to 127
CF ASSIGN SW Bn 43 dd 0, 64, 127
Video TRIM VR Bn 34 dd 0 to 127
Audio TRIM VR Bn 50 dd 0 to 127
HI VR Bn 51 dd 0 to 127
MID VR Bn5Cdd 0 to 127
CH4
LOW VR Bn 52 dd 0 to 127
CUE BTN Bn 49 dd OFF=0, ON=127
FADER VR Bn 14 dd 0 to 127
CF ASSIGN SW Bn 44 dd 0, 64, 127
CROSS FADER CROSS FADER VR Bn 0B dd 0 to 127
CH CURVE SW Bn 5E dd 0, 64, 127
FADER CURVE
CROSS CURVE SW Bn 5F dd 0, 64, 127
Video MASTER
VR Bn 38 dd 0 to 127
LEVEL
Audio MASTER
VR Bn 18 dd 0 to 127
MASTER
LEVEL
BALANCE VR Bn 17 dd 0 to 127
CUE BTN Bn 4A dd OFF=0, ON=127
37
En
01_SVM-1000_En.book 38 ページ 2007年10月16日 火曜日 午前9時22分
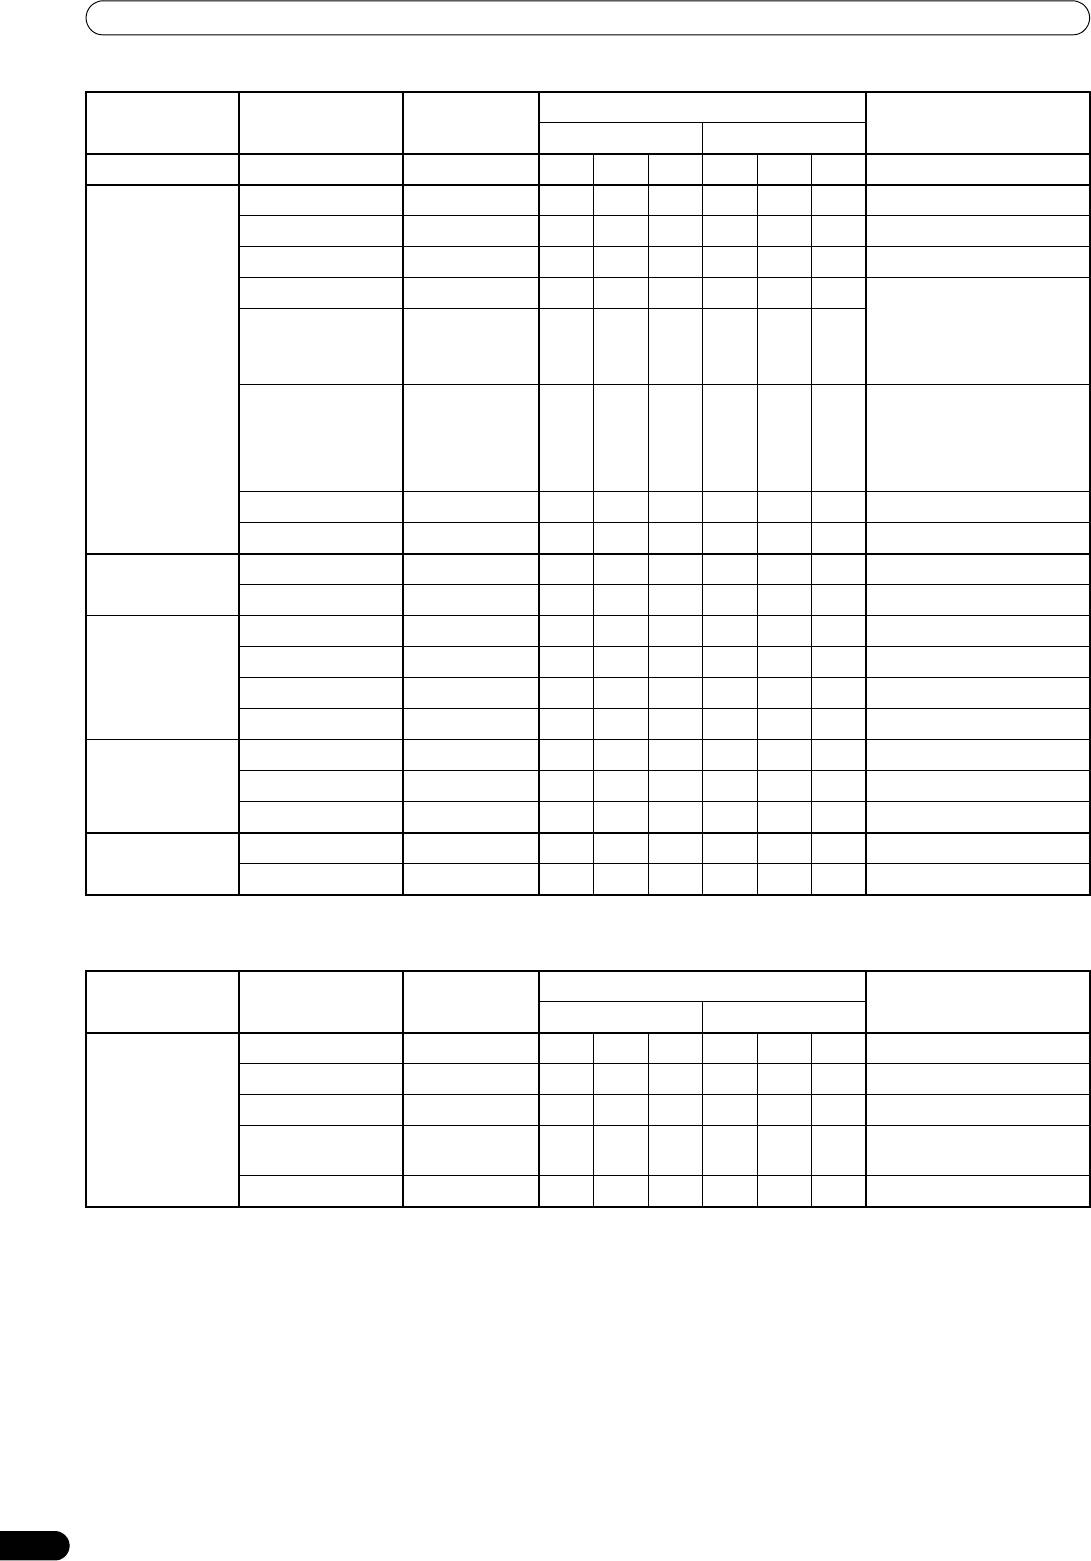
PERFORM UTILITY SETUP
MIDI Message
Category Switch Name Switch Type
Commnets
MSB LSB
BOOTH MONITOR VR Bn 19 dd 0 to 127
AUTO/TAP BTN Bn 45 dd OFF=0, ON=127
TAP BTN Bn 4E dd OFF=0, ON=127
EFFECT CUE BTN Bn 4B dd OFF=0, ON=127
CH SELECT SW For EFFECT SELECT and
CHANNEL SELECT, the
logical sum of both values
CHARACTER
SW Cn pc
is sent (EFFECT SELECT is
SELECT
EFFECT
not implemented).
PARAMETER 1 value;
FLANGER, PHASER, FILTER
TIME SW Bn 0D MSB Bn 2D LSB
changed to 1/2 value;
minus values are
converted to positive.
LEVEL/DEPTH VR Bn 5B dd 0 to 127
EFFECT ON/OFF BTN Bn 40 dd OFF=0, ON=127
MIC HI VR Bn 1E dd 0 to 127
LOW VR Bn 1F dd 0 to 127
FADER START BTN Bn 58 dd OFF=0, ON=127
BTN Bn 59 dd OFF=0, ON=127
(FADER START)
BTN Bn 5A dd OFF=0, ON=127
BTN Bn 5D dd OFF=0, ON=127
MIXING VR Bn 1B dd 0 to 127
(HEAD PHONES)
LEVEL VR Bn 1A dd 0 to 127
Timing Clock FB
START BTN FA
MIDI
STOP BTN FC
* The MIDI SNAP SHOT outputs all MIDI commands except MIDI START/STOP.
CENTER PANEL AREA
MIDI Message
Category Switch Name Switch Type
Commnets
MSB LSB
UTILITY BTN — — — — — —
VIDEO EQ BTN ——————
JPEG VIEWER BTN — — — — — —
VIDEO SOLO
BTN ——————
MODE
FADER AV SYNC BTN — — — — — —
38
En
01_SVM-1000_En.book 39 ページ 2007年10月16日 火曜日 午前9時22分
PERFORM UTILITY SETUP
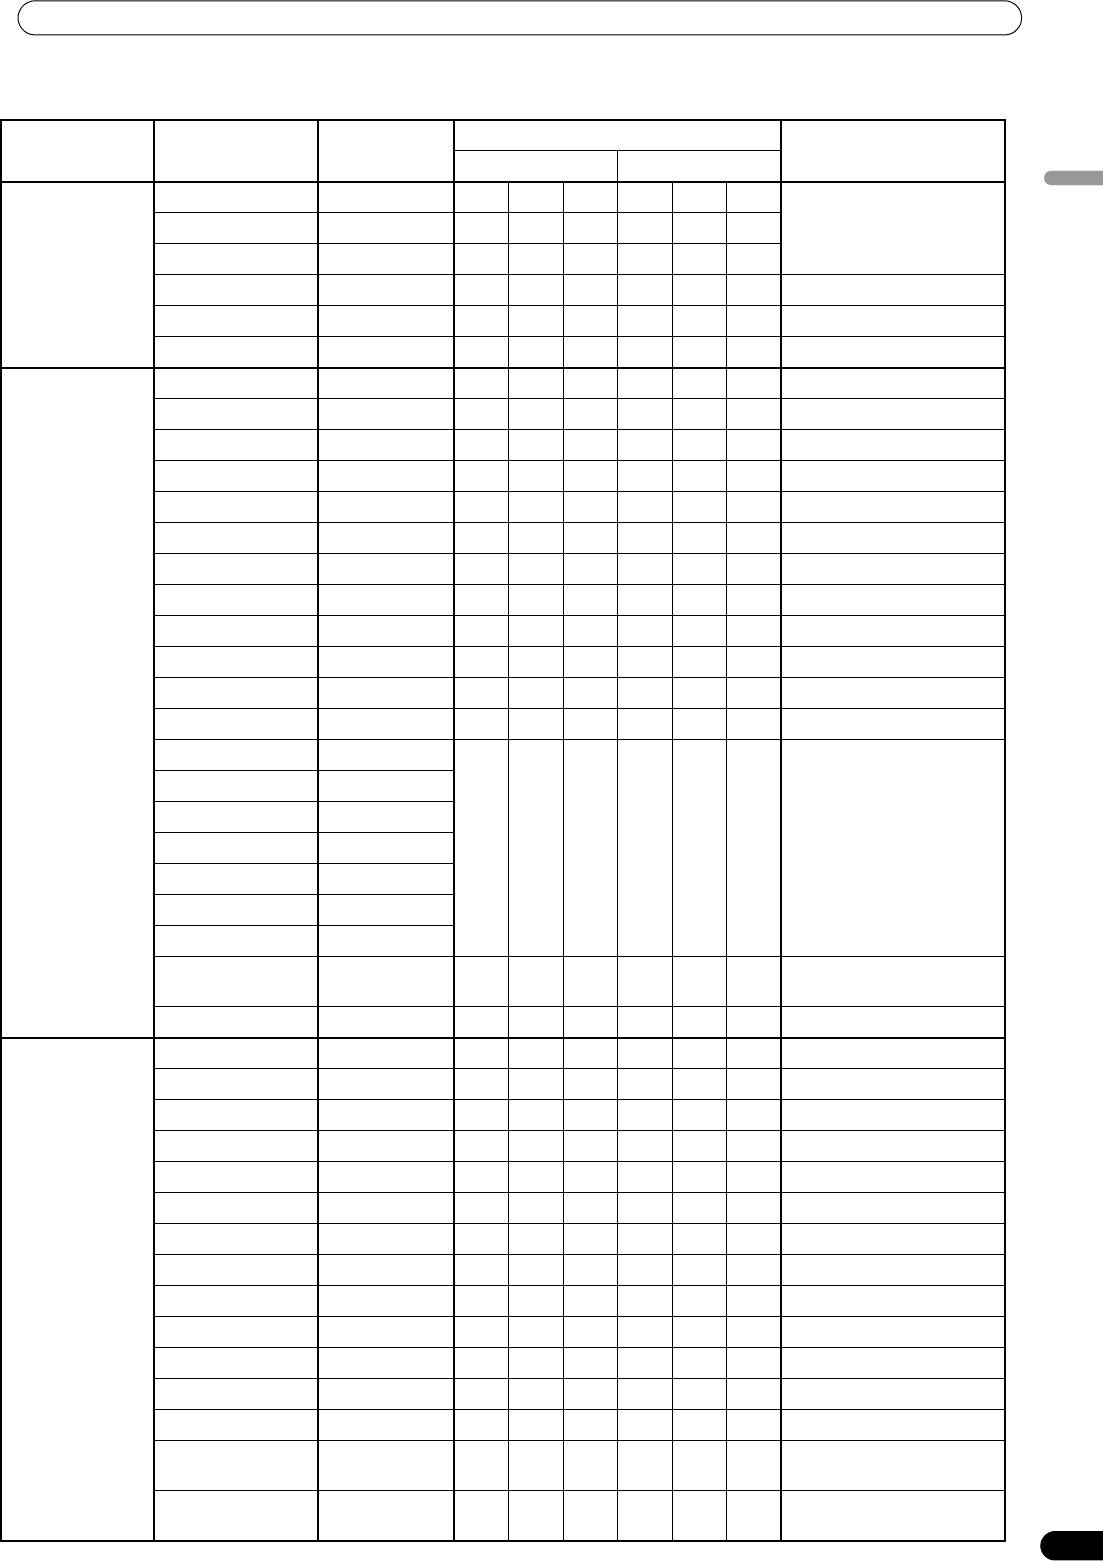
GUI BUTTONS
MIDI Message
Category Switch Name Switch Type
Commnets
MSB LSB
BEAT EFFECT BTN — — —
English
Changing the category
TOUCH EFFECT BTN — — —
inevitably causes an effect
program change.
TEXT EFFECT BTN — — —
EFFECT
CATEGORY
Audio BTN — — —
AV BTN — — —
Video BTN — — —
DELAY BTN 9n 41 dd OFF=0, ON=127
ECHO BTN 9n 42 dd OFF=0, ON=127
PAN BTN 9n 43 dd OFF=0, ON=127
TRANS BTN 9n 44 dd OFF=0, ON=127
FILTER BTN 9n 45 dd OFF=0, ON=127
FLANGER BTN 9n 46 dd OFF=0, ON=127
PHASER BTN 9n 47 dd OFF=0, ON=127
REVERB BTN 9n 48 dd OFF=0, ON=127
ROBOT BTN 9n 49 dd OFF=0, ON=127
CHORUS BTN 9n 4A dd OFF=0, ON=127
ROLL BTN 9n 4B dd OFF=0, ON=127
BEAT EFFECT
REV ROLL BTN 9n 4C dd OFF=0, ON=127
Beat BUTTON 1 BTN
Beat BUTTON 2 BTN
Beat BUTTON 3 BTN
The motion of the TIME/
Beat BUTTON 4 BTN
Bn 0D MSB Bn 2D LSB
PARAMETER dial can be
replicated by the button
Beat BUTTON 5 BTN
Beat BUTTON 6 BTN
Beat BUTTON 7 BTN
CHARACTER ON/
BTN — — —
OFF
BPM AUTO/TAP BTN — — —
RIPPLE BTN 9n 51 dd OFF=0, ON=127
LENS BTN 9n 52 dd OFF=0, ON=127
SPOT BTN 9n 53 dd OFF=0, ON=127
RADIATION BTN 9n 54 dd OFF=0, ON=127
CUBE BTN 9n 55 dd OFF=0, ON=127
BLOCK BTN 9n 56 dd OFF=0, ON=127
KALEIDO BTN 9n 57 dd OFF=0, ON=127
TWIST BTN 9n 58 dd OFF=0, ON=127
TOUCH EFFECT
ZOOM BTN 9n 59 dd OFF=0, ON=127
DROP BTN 9n 5A dd OFF=0, ON=127
BLUR BTN 9n 5B dd OFF=0, ON=127
DISTORTION BTN 9n 5C dd OFF=0, ON=127
HOLD BTN 9n 50 dd OFF=0, ON=127
TOUCH FX
VR Bn 1C dd 0 to 127
MONITOR X
TOUCH FX
VR Bn 3C dd 0 to 127
MONITOR Y
39
En
01_SVM-1000_En.book 40 ページ 2007年10月16日 火曜日 午前9時22分
PERFORM UTILITY SETUP
MIDI Message
Category Switch Name Switch Type
Commnets
MSB LSB
RANDOM BTN 9n 60 dd OFF=0, ON=127
ZOOM BTN 9n 61 dd OFF=0, ON=127
BLOCK BTN 9n 62 dd OFF=0, ON=127
ROTATION BTN 9n 63 dd OFF=0, ON=127
CRUSH BTN 9n 64 dd OFF=0, ON=127
SLIDE BTN 9n 65 dd OFF=0, ON=127
BANK1 BTN — — —
BANK2 BTN — — —
BANK3 BTN — — —
BANK4 BTN — — —
TEXT EFFECT
BANK5 BTN — — —
TEXT EDIT BTN — — —
Beat BUTTON 1 BTN
Beat BUTTON 2 BTN
Beat BUTTON 3 BTN
The motion of the TIME/
Beat BUTTON 4 BTN
Bn 0D MSB Bn 2D LSB
PARAMETER dial can be
replicated by the button
Beat BUTTON 5 BTN
Beat BUTTON 6 BTN
Beat BUTTON 7 BTN
BPM AUTO/TAP — — —
CH1 MONITOR — — —
CH2 MONITOR — — —
CH3 MONITOR — — —
CH4 MONITOR — — —
FADE BTN 9n 70 dd OFF=0, ON=127
WIPE BTN 9n 71 dd OFF=0, ON=127
CROSS FADER
SWITCH BTN 9n 72 dd OFF=0, ON=127
CHROMA-B BTN 9n 73 dd OFF=0, ON=127
CHROMA-G BTN 9n 74 dd OFF=0, ON=127
LUMINANCE BTN 9n 75 dd OFF=0, ON=127
TRANS-A BTN Bn 4C dd OFF=0, ON=127
TRANS-B BTN Bn 4D dd OFF=0, ON=127
CROSS FADER VR 9n 7A dd 0 to 127
40
En
01_SVM-1000_En.book 41 ページ 2007年10月16日 火曜日 午前9時22分
PERFORM UTILITY SETUP
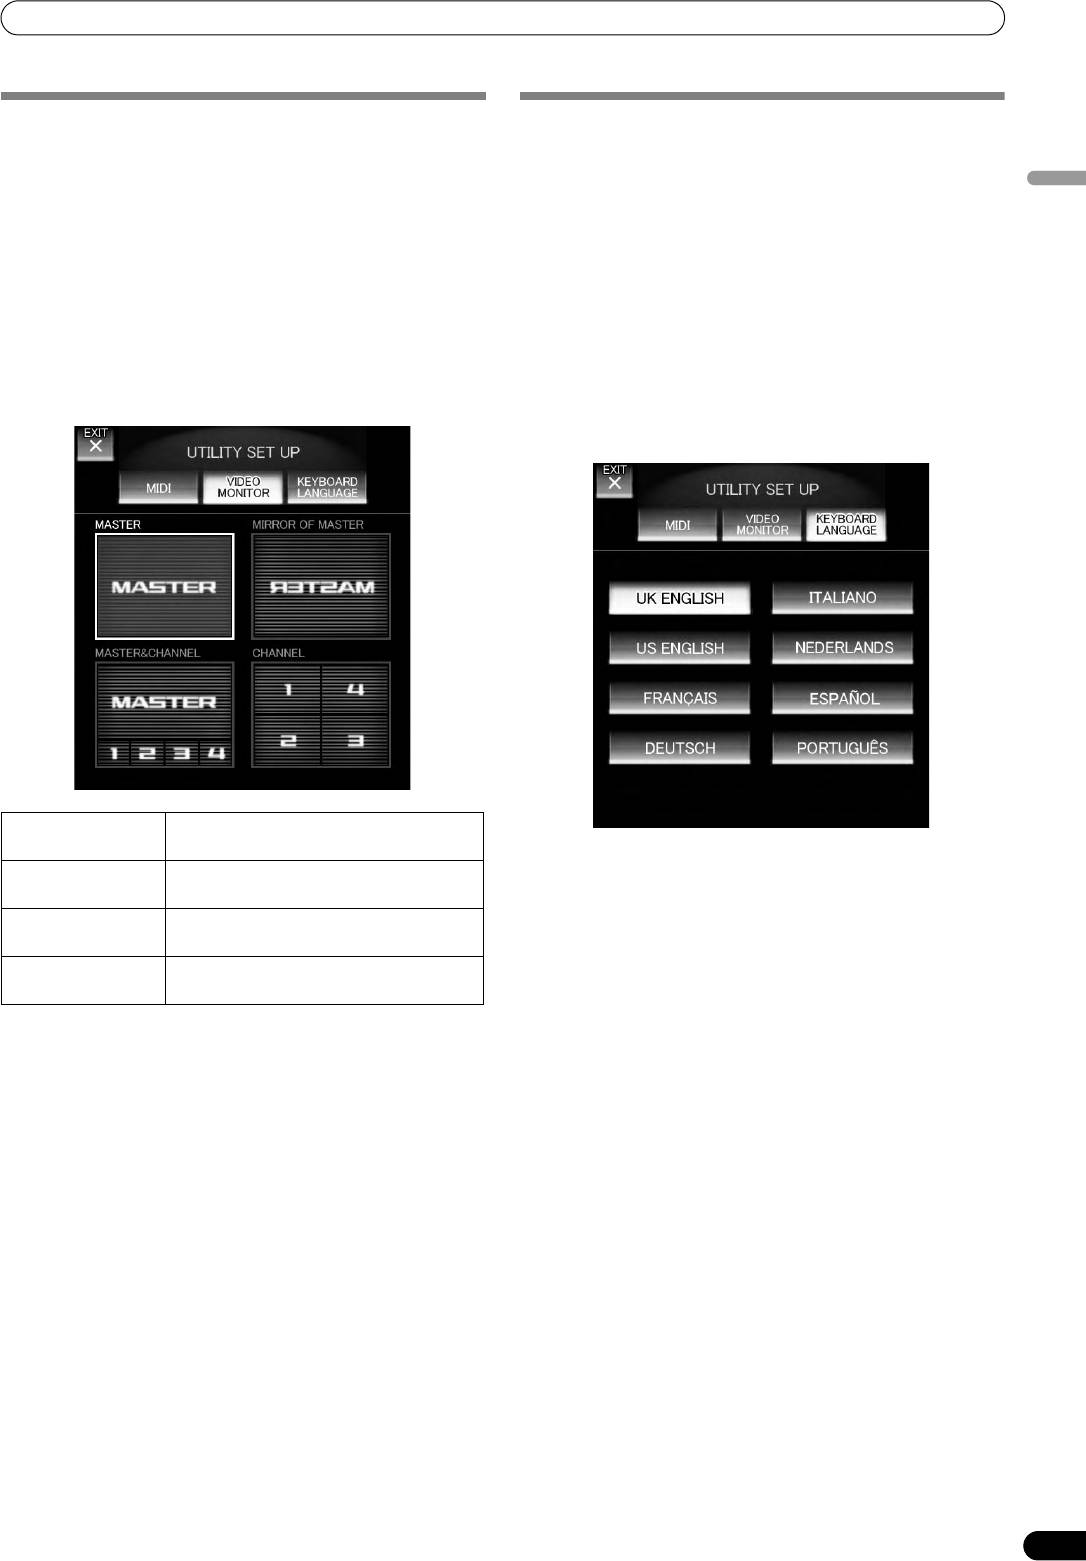
PERFORM VIDEO MONITOR SETUP
KEYBOARD LANGUAGE SETUP
Set the video monitor output method.
By connecting a keyboard to the USB connector, text can be
entered through the keyboard during text edit mode (P. 22). Follow
Video monitor setup
these steps to set up the connected keyboard type.
English
1 Hold the UTILITY (SET UP) button depressed.
Keyboard language setup
This will initiate the utility setup mode.
2 Touch [VIDEO MONITOR].
1 Hold the UTILITY (SET UP) button depressed.
The video monitor setup screen will be displayed.
This initiates the utility setup mode.
• When turning the power ON, [MASTER] will be selected.
2 Touch [KEYBOARD LANGUAGE].
The keyboard language setup screen will be displayed.
3 Touch each applicable button.
Touch each applicable button on the screen to operate the
• When turning the power ON, [UK ENGLISH] will be selected.
video monitor setup.
3 Touch each applicable button.
4Touch [EXIT].
Touch each applicable button on the perform keyboard
This will end the utility setup mode.
language setup.
4Touch [EXIT].
This will end the utility setup mode.
MASTER The master output is sent directly to the
monitor output.
* With keyboards other than those listed, the characters
MIRROR OF
The master output is flipped horizontally
actually appearing may be different from those pressed.
MASTER
and sent to the monitor output.
MASTER &
Both master output and channel output
CHANNEL
are sent to the monitor output.
CHANNEL All channels’ outputs are sent to the
monitor output.
41
En
Оглавление
- Contents
- CONFIRM FEATURES ACCESSORIES
- NAMES AND FUNCTIONS OF PARTS
- CONNECTIONS
- BASIC OPERATIONS
- USING THE VIDEO FADER FUNCTION
- USING THE EFFECT FUNCTION
- USING THE JPEG VIEWER
- THE VIDEO EQUALIZER FUNCTION
- FADER START FUNCTION
- PERFORM UTILITY SETUP
- HARDWARE SETUP
- TROUBLESHOOTING
- SPECIFICATIONS
- Contenu
- VÉRIFICATION DES CARACTÉRISTIQUES ACCESSOIRES
- NOMS ET FONCTIONS DES ORGANES
- CONNEXIONS
- DÉMARCHES DE BASE
- UTILISATION DE LA FONCTION DE FONDU VIDÉO
- UTILISATION DE LA FONCTION D’EFFET
- UTILISATION DU VISUALISEUR JPEG
- FONCTION D’ÉGALISEUR VIDÉO
- FONCTION DE DÉPART EN FONDU
- EXÉCUTION DE LA CONFIGURATION UTILITAIRE
- CONFIGURATION DU MATÉRIEL
- GUIDE DE DÉPANNAGE
- FICHE TECHNIQUE
- Inhaltsverzeichnis
- ÜBERPRÜFEN DES VORSICHTSHINWEISE MITGELIEFERTEN ZUR HANDHABUNG ZUBEHÖRS
- MERKMALE
- BEZEICHNUNG UND FUNKTION DER BEDIENELEMENTE
- ANSCHLÜSSE
- GRUNDLEGENDE BEDIENUNGSVERFAHREN
- VERWENDUNG DER VIDEOFADER-FUNKTION
- VERWENDUNG DER EFFEKTFUNKTION
- VERWENDUNG DES JPEG VIEWER
- DIE VIDEO EQUALIZER-FUNKTION
- FADER-STARTFUNKTION
- AUSFÜHRUNG DES UTILITY-SETUP
- HARDWARE-SETUP
- STÖRUNGSBESEITIGUNG
- TECHNISCHE DATEN
- Indice
- CONTROLLO DEGLI CARATTERISTICHE ACCESSORI
- NOME DELLE VARIE PARTI E LORO FUNZIONE
- COLLEGAMENTI
- OPERAZIONI DI BASE
- USO DELLA FUNZIONE DI DISSOLVENZA VIDEO
- USO DEGLI EFFETTI
- USO DI JPEG VIEWER
- LA FUNZIONE DI EQUALIZZAZIONE VIDEO
- FUNZIONE DI INIZIO DELLA DISSOLVENZA
- IMPOSTAZIONE DELL'UTILITY DI PERFORMANCE
- IMPOSTAZIONI HARDWARE
- DIAGNOSTICA
- CARATTERISTICHE TECNICHE
- Inhoud
- CONTROLEER DE WAARSCHUWINGEN ACCESSOIRES I.V.M. HET GEBRUIK
- KENMERKEN
- BENAMING EN FUNCTIE VAN DE BEDIENINGSORGANEN
- AANSLUITINGEN
- BASISBEDIENING
- GEBRUIK VAN DE VIDEOFADERFUNCTIE
- GEBRUIK VAN DE EFFECTFUNCTIE
- GEBRUIK VAN DE JPEG VIEWER
- DE VIDEO-EQUALIZER FUNCTIE
- FADERSTARTFUNCTIE
- UTILITY-INSTELLINGEN
- APPARATUUR-INSTELLINGEN
- VERHELPEN VAN STORINGEN
- TECHNISCHE GEGEVENS
- Índice
- CONFIRMACIÓN DE CARACTERÍSTICAS LOS ACCESORIOS
- NOMENCLATURA Y FUNCIONES DE LOS CONTROLES
- CONEXIONES
- OPERACIONES BÁSICAS
- EMPLEO DE LA FUNCIÓN DE FUNDIDO DE VÍDEO
- EMPLEO DE LA FUNCIÓN DE EFECTOS
- EMPLEO DE JPEG VIEWER
- FUNCIÓN DEL ECUALIZADOR DE VÍDEO
- FUNCIÓN DE INICIO CON FUNDIDO
- EFECTÚE LA CONFIGURACIÓN DE UTILIDADES
- CONFIGURACIÓN DE DISPOSITIVOS
- SOLUCIÓN DE PROBLEMAS
- ESPECIFICACIONES
- Содержание
- ПРОВЕРКА НАЛИЧИЯ ФУНКЦИОНАЛЬНЫЕ ПРИНАДЛЕЖНОСТЕЙ ОСОБЕННОСТИ
- ЭЛЕМЕНТЫ УСТРОЙСТВА И ИХ ФУНКЦИИ
- ПОДКЛЮЧЕНИЯ
- ОСНОВНЫЕ ОПЕРАЦИИ
- ПОЛЬЗОВАНИЕ ФУНКЦИЕЙ ВИДЕОФЕЙДЕРА
- ПОЛЬЗОВАНИЕ ФУНКЦИЕЙ НАЛОЖЕНИЯ ЭФФЕКТОВ
- ПОЛЬЗОВАНИЕ ОБОЗРЕВАТЕЛЕМ JPEG (JPEG VIEWER)
- ФУНКЦИЯ ВИДЕОЭКВАЛАЙЗЕРА
- ФУНКЦИЯ ЗАПУСКА ПО ФЕЙДЕРУ
- ВЫПОЛНИТЕ НАСТРОЙКУ ПРОГРАММЫ
- НАСТРОЙКА ОБОРУДОВАНИЯ
- УСТРАНЕНИЕ НЕПОЛАДОК
- ТЕХНИЧЕСКИЕ ХАРАКТЕРИСТИКИ


