Pioneer VSX-1021: инструкция
Раздел: Бытовая, кухонная техника, электроника и оборудование
Тип: Домашний кинотеатр
Инструкция к Домашнему кинотеатру Pioneer VSX-1021
En
2
The exclamation point within an equilateral
triangle is intended to alert the user to the
presence of important operating and
maintenance (servicing) instructions in the
literature accompanying the appliance.
The lightning flash with arrowhead symbol,
within an equilateral triangle, is intended to
alert the user to the presence of uninsulated
“dangerous voltage” within the product’s
enclosure that may be of sufficient
magnitude to constitute a risk of electric
shock to persons.
CAUTION:
TO PREVENT THE RISK OF ELECTRIC
SHOCK, DO NOT REMOVE COVER (OR
BACK). NO USER-SERVICEABLE PARTS
INSIDE. REFER SERVICING TO QUALIFIED
SERVICE PERSONNEL.
CAUTION
RISK OF ELECTRIC SHOCK
DO NOT OPEN
IMPORTANT
D3-4-2-1-1_A1_En
WARNING
This equipment is not waterproof. To prevent a fire or
shock hazard, do not place any container filled with
liquid near this equipment (such as a vase or flower
pot) or expose it to dripping, splashing, rain or
moisture.
D3-4-2-1-3_A1_En
WARNING
Before plugging in for the first time, read the following
section carefully.
The voltage of the available power supply differs
according to country or region. Be sure that the
power supply voltage of the area where this unit
will be used meets the required voltage (e.g., 230 V
or 120 V) written on the rear panel.
D3-4-2-1-4*_A1_En
WARNING
To prevent a fire hazard, do not place any naked flame
sources (such as a lighted candle) on the equipment.
D3-4-2-1-7a_A1_En
VENTILATION CAUTION
When installing this unit, make sure to leave space
around the unit for ventilation to improve heat radiation
(at least 40 cm at top, 10 cm at rear, and 20 cm at each
side).
WARNING
Slots and openings in the cabinet are provided for
ventilation to ensure reliable operation of the product,
and to protect it from overheating. To prevent fire
hazard, the openings should never be blocked or
covered with items (such as newspapers, table-cloths,
curtains) or by operating the equipment on thick carpet
or a bed.
D3-4-2-1-7b*_A1_En
Operating Environment
Operating environment temperature and humidity:
+5 °C to +35 °C (+41 °F to +95 °F); less than 85 %RH
(cooling vents not blocked)
Do not install this unit in a poorly ventilated area, or in
locations exposed to high humidity or direct sunlight (or
strong artificial light)
D3-4-2-1-7c*_A1_En
If the AC plug of this unit does not match the AC
outlet you want to use, the plug must be removed
and appropriate one fitted. Replacement and
mounting of an AC plug on the power supply cord of
this unit should be performed only by qualified
service personnel. If connected to an AC outlet, the
cut-off plug can cause severe electrical shock. Make
sure it is properly disposed of after removal.
The equipment should be disconnected by removing
the mains plug from the wall socket when left unused
for a long period of time (for example, when on
vacation).
D3-4-2-2-1a_A1_En
CAUTION
The
STANDBY/ON
switch on this unit will not
completely shut off all power from the AC outlet.
Since the power cord serves as the main disconnect
device for the unit, you will need to unplug it from the
AC outlet to shut down all power. Therefore, make
sure the unit has been installed so that the power
cord can be easily unplugged from the AC outlet in
case of an accident. To avoid fire hazard, the power
cord should also be unplugged from the AC outlet
when left unused for a long period of time (for
example, when on vacation).
D3-4-2-2-2a*_A1_En
This product is for general household purposes. Any
failure due to use for other than household purposes
(such as long-term use for business purposes in a
restaurant or use in a car or ship) and which requires
repair will be charged for even during the warranty
period.
K041_A1_En
D3-4-2-1-2-2*_A2_En
Replacement and mounting of an AC plug on the power supply cord of this unit should be performed only by qualified
service personnel.
IMPORTANT: THE MOULDED PLUG
This appliance is supplied with a moulded three pin mains plug for your safety and convenience. A 10 amp fuse is fitted in this plug.
Should the fuse need to be replaced, please ensure that the replacement fuse has a rating of 10 amps and that it is approved by ASTA or BSI
to BS1362.
Check for the ASTA mark
or the BSI mark
on the body of the fuse.
If the plug contains a removable fuse cover, you must ensure that it is refitted when the fuse is replaced. If you lose the fuse cover the plug
must not be used until a replacement cover is obtained. A replacement fuse cover can be obtained from your local dealer.
If the fitted moulded plug is unsuitable for your socket outlet, then the fuse shall be removed and the plug cut off and disposed of
safely. There is a danger of severe electrical shock if the cut off plug is inserted into any 13 amp socket.
If a new plug is to be fitted, please observe the wiring code as shown below. If in any doubt, please consult a qualified electrician.
IMPORTANT: The wires in this mains lead are coloured in accordance with the following code:
Blue : Neutral Brown : Live
As the colours of the wires in the mains lead of this appliance may not correspond with the coloured markings identifying the terminals in
your plug, proceed as follows;
The wire which is coloured BLUE must be connected to the terminal which is marked with the
letter
N
or coloured BLACK.
The wire which is coloured BROWN must be connected to the terminal which is marked with the
letter
L
or coloured RED.
How to replace the fuse:
Open the fuse compartment with a screwdriver and replace the fuse.
Information for users on collection and disposal of old equipment and used batteries
These symbols on the products, packaging, and/or accompanying documents mean
that used electrical and electronic products and batteries should not be mixed with
general household waste.
For proper treatment, recovery and recycling of old products and used batteries,
please take them to applicable collection points in accordance with your national
legislation.
By disposing of these products and batteries correctly, you will help to save valuable
resources and prevent any potential negative effects on human health and the
environment which could otherwise arise from inappropriate waste handling.
For more information about collection and recycling of old products and batteries,
please contact your local municipality, your waste disposal service or the point of sale
where you purchased the items.
These symbols are only valid in the European Union.
For countries outside the European Union:
If you wish to discard these items, please contact your local authorities or dealer and
ask for the correct method of disposal.
K058a_A1_En
Symbol examples
for batteries
Symbol for
equipment
Pb

En
3
Thank you for buying this Pioneer product. This
Quick Start Guide includes instructions for basic
connections and operations to allow simple
use of the receiver. For detailed descriptions of
the receiver, see the “Operating Instructions”
provided on the included CD-ROM. The operating
instructions can also be downloaded from the
Pioneer website (http://www.pioneer.eu).
When using a Mac OS, place the CD-ROM in a
CD drive and then double-click on the CD-ROM
icon to find the PDF file (Operating Instructions).
Contents
01 Before you start
Checking what’s in the box ............................ 4
Loading the batteries ...................................... 4
About using AVNavigator
(included CD-ROM) ........................................ 4
Remote control ............................................... 5
02 Connecting your equipment
Connecting your equipment .......................... 6
Determining the speakers’ application ........ 6
Placing the speakers ...................................... 7
Connecting the speakers ............................... 7
Installing your speaker system ...................... 8
Selecting the Speaker system ....................... 9
About the audio connection .......................... 9
About the video converter .............................. 9
About HDMI .................................................. 10
Connecting your TV and playback
components .................................................. 11
Connecting an HDD/DVD recorder, BD
recorder and other video sources ............... 12
Connecting a satellite/cable receiver or
other set-top box ........................................... 13
Connecting other audio components ......... 13
Connecting AM/FM antennas ..................... 14
MULTI-ZONE setup ....................................... 14
Connecting to the network through
LAN interface ................................................ 15
Connecting to a wireless LAN ..................... 15
Plugging in the receiver ............................... 15
03 Basic Setup
Canceling the demo display ........................ 16
Automatically conducting optimum
sound tuning (Full Auto MCACC) ............... 16
Operation Mode Setup ................................. 17
04 Basic playback
Playing a source ........................................... 19
Listening in surround sound ....................... 19
Playing an iPod ............................................. 19
Playing a USB device ................................... 20
Listening to the radio .................................... 20
Playback with HOME MEDIA GALLERY
inputs ............................................................. 21
Bluetooth
ADAPTER for Wireless
Enjoyment of Music ...................................... 21
Flow of settings on the receiver
Flow for connecting and setting the receiver
The unit is a full-fledged AV receiver equipped with an abundance of functions and terminals. It can
be used easily after following the procedure below to make the connections and settings.
Required setting item
:
1
,
2
,
3
,
4
,
5
,
7
,
9
!
These items are included in this Quick Start Guide.
Setting to be made as necessary
:
6
,
8
,
10
,
11
,
12
!
These items are explained in the “Operating Instructions” provided on the included CD-ROM.
Important
The receiver’s initial settings can be made
on the computer using
Wiring Navi
on the
AVNavigator CD-ROM included with the
receiver. In this case, virtually the same con-
nections and settings as in steps
2
,
3
,
4
,
5
,
6
,
7
and
8
can be made interactively. For instruc-
tions on using AVNavigator, see
About using
AVNavigator (included CD-ROM)
on page 4 .
1 Before you start
!
Checking what’s in the box
on page 4
!
Loading the batteries
on page 4
j
2 Determining the speakers’ application
(page 6)
!
7.1 channel surround system (Front height)
!
7.1 channel surround system (Front wide)
!
7.1 channel surround system & Speaker B
connection
!
5.1 channel surround system & Front Bi-
amping connection (High quality surround)
!
5.1 channel surround system & ZONE 2
connection (Multi Zone)
j
3 Connecting the speakers
!
Placing the speakers
on page 7
!
Connecting the speakers
on page 7
!
Installing your speaker system
on page 8
!
Bi-amping your speakers
on page 8
j
4 Connecting the components
!
About the audio connection
on page 9
!
About the video converter
on page 9
!
Connecting your TV and playback components
on page 11
!
Connecting AM/FM antennas
on page 14
!
Plugging in the receiver
on page 15
j
5 Power On
j
6 Changing the OSD display language
(OSD Language)
j
7 MCACC speaker settings
!
Automatically conducting optimum sound
tuning (Full Auto MCACC)
on page 16
j
8 The Input Setup menu
(When using connections other than the recom-
mended connections)
j
9 Basic playback (page 19)
j
10 Adjusting the sound and picture
quality as desired
!
Using the various listening modes
!
Better sound using Phase Control
!
Measuring the all EQ type (SYMMETRY/ALL
CH ADJ/FRONT ALIGN)
!
Changing the channel level while listening
!
Switching on/off the Acoustic Calibration
EQ, Auto Sound Retriever or Dialog
Enhancement
!
Setting the PQLS function
!
Setting the Audio options
!
Setting the Video options
j
11 Other optional adjustments and
settings
!
Control with HDMI function
!
The Advanced MCACC menu
!
The System Setup and Other Setup menus
j
12 Making maximum use of the remote
control
!
Operating multiple receivers
!
Setting the remote to control other
components
Installing AVNavigator
1 Load the included AVNavigator
CD-ROM into your computer’s CD drive.
!
The installation screen is displayed. Proceed
to step 2.
!
If the installation screen does not appear,
double-click on the CD-ROM icon then start
the installer (AVNV_XXX_xxx.exe).
2 Follow the instructions on the screen
to install.
When “Finish” is selected, installation is
completed.
3 Remove the included AVNavigator
CD-ROM from the computer’s CD drive.
Handling the CD-ROM
Operating Environment
!
This CD-ROM can be used with Microsoft
®
Windows
®
XP/Vista/7.
!
A browser is at times used for AVNavigator
functions. The supported browser is Microsoft
Internet Explorer 6, 7 and 8. With other
browsers, some functions may be limited or
the display may not appear properly.
Precautions For Use
!
This CD-ROM is for use with a personal
computer. It cannot be used with a DVD
player or music CD player. Attempting to play
this CD-ROM with a DVD player or music
CD player can damage speakers or cause
impaired hearing due to the large volume.
License
!
Please agree to the “Terms of Use” indicated
below before using this CD-ROM. Do not use if
you are unwilling to consent to the terms of its
use.
Terms of Use
!
Copyright to data provided on this CD-ROM
belongs to PIONEER CORPORATION.
Unauthorized transfer, duplication, broadcast,
public transmission, translation, sales,
lending or other such matters that go beyond
the scope of “personal use” or “citation” as
defined by Copyright Law may be subject
to punitive actions. Permission to use this
CD-ROM is granted under license by PIONEER
CORPORATION.
General Disclaimer
!
PIONEER CORPORATION does not
guarantee the operation of this CD-ROM with
respect to personal computers using any
of the applicable OS. In addition, PIONEER
CORPORATION is not liable for any damages
incurred as a result of use of this CD-ROM
and is not responsible for any compensation.
The names of private corporations, products
and other entities described herein are the
registered trademarks or trademarks of their
respective firms.
Using AVNavigator
1 Click [AVNavigator] on the desktop to
launch AVNavigator.
AVNavigator is launched and
Wiring Navi
starts up. The language selection screen
appears. Follow the instructions on the screen
to make the connections and automatic
settings.
Wiring Navi
only starts up automatically the
first time AVNavigator is launched.
2 Select and use the desired function.
AVNavigator includes the following functions:
!
Wiring Navi
– Guides you through
connections and initial settings in dialog
fashion. High precision initial settings can be
made easily.
En
4
01
Before you start
Before you start
Checking what’s in the box
Please check that you’ve received the following
supplied accessories:
!
Setup microphone (cable: 5 m)
!
Remote control unit
!
AAA size IEC R03 dry cell batteries (to confirm
system operation) x2
!
AM loop antenna
!
FM wire antenna
!
iPod cable
!
Power cord
!
Warranty card
!
CD-ROM (AVNavigator)
!
These quick start guide
Loading the batteries
The batteries included with the unit are to check
initial operations; they may not last over a long
period. We recommend using alkaline batteries
that have a longer life.
WARNING
!
Do not use or store batteries in direct sunlight
or other excessively hot place, such as inside a
car or near a heater. This can cause batteries
to leak, overheat, explode or catch fire. It
can also reduce the life or performance of
batteries.
CAUTION
Incorrect use of batteries may result in such
hazards as leakage and bursting. Observe the
following precautions:
!
Never use new and old batteries together.
!
Insert the plus and minus sides of the
batteries properly according to the marks in
the battery case.
!
Batteries with the same shape may have
different voltages. Do not use different
batteries together.
!
When disposing of used batteries, please
comply with governmental regulations or
environmental public instruction’s rules that
apply in your country or area.
About using AVNavigator
(included CD-ROM)
The included AVNavigator CD-ROM contains
Wiring Navi
allowing you to easily make the
receiver’s connections and initial settings in
dialog fashion. High precision initial settings
can be completed easily simply by following the
instructions on the screen to make the connec-
tions and settings.
There are also other features enabling easy use
of various functions, including an Interactive
Manual that operates in association with the
receiver, updating of various types of software,
and MCACC Application that lets you check the
MCACC measurement results on 3D graphs.
En
5
01
Before you start
!
Interactive Manual
– Automatically displays
the pages explaining the functions that have
been operated on the receiver. It is also
possible to operate the receiver from the
Interactive Manual.
!
Glossary
– Displays glossary pages.
!
MCACC Appli
– Displays Advanced
MCACC measurement results vividly on the
computer.
There are special operating instructions
for MCACC Application. These instructions
are included in the AVNavigator
Interactive Manual
’s menus. Refer to them
when using MCACC Application.
!
Software Update
– Allows various types of
software to be updated.
!
Settings
– Used to make various
AVNavigator settings.
!
Detection
– Used to detect the receiver.
Note
To use the AVNavigator of another model, first
uninstall (delete) this receiver’s AVNavigator,
then install the AVNavigator of the other model.
Deleting the AVNavigator
You can use the following method to uninstall
(delete) the AVNavigator from your PC.
%
Delete from the Control Panel of the
PC.
From the Start menu, click “Program”
d
“PIONEER CORPORATION”
d
“AVNavigator(VSX-1021 or VSX-921)”
d
“Uninstall”.
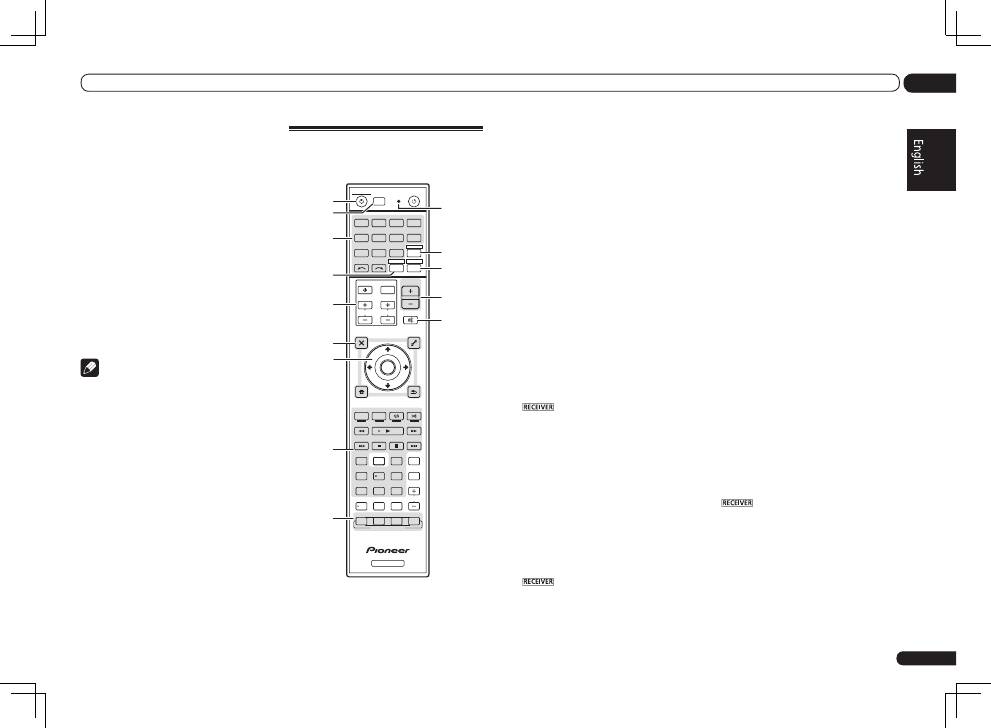
Remote control
This section explains how to operate the remote
control for the receiver.
RECEIVER
D.ACCESS
CH LEVEL A.ATT
LISTENING MODE
DIMMER
SIGNAL SEL MCACC SLEEP
TV / DTV
MPX
PQLS
PHASE CTRL
STATUS
PGM
iPod CTRL
HOME
MENU
TUNE
TUNE TOOLS
LIST
CH
TV CONTROL
INPUT
INPUT SELECT
iPod
USB
SAT
TUNER
VIDEO
TV CTRL
ZONE 2
ADPT
CD
TV
RCU SETUP
SOURCE
RECEIVER MULTI
OPERATION
BDR
BD
DVD
DVR
HMG
HDMI
RECEIVER
MUTE
MASTER
VOLUME
VOL
PRESET
TOP MENU
BAND
GUIDE
T.EDIT
VIDEO
PARAMETER
AUDIO
PARAMETER
ENTER
PRESET
RETURN
PTY
SEARCH
MENU
AUTO / ALC /
DIRECT
STEREO STANDARD ADV SURR
AUDIO
INFO
CLASS
ENTER
DISP
HDD
DVD
5
4
6
8
0
7
9
1
3
/ CLR
CH
22
S.RETRIEVER
2
1
2,3
4
5
9
10
6
7
8
11
13
12
14
15
The remote has been conveniently color-coded
according to component control using the follow-
ing system:
!
White
– Receiver control, TV control
!
Blue
– Other controls (See the Operating
Instructions in CD-ROM for detail.)
1
u
RECEIVER
This switches between standby and on for this
receiver.
2 MULTI OPERATION
Use this button to perform multi operations.
3 RCU SETUP
Use to input the preset code when making
remote control settings and to set the remote
control mode.
4 Input function buttons
Press to select control of other components.
Use
INPUT SELECT
c
/
d
to select the input
function (page 19).
5 ZONE 2
Switch to perform operations in
ZONE 2
.
6 TV CONTROL buttons
These buttons are dedicated to control the TV
assigned to the
TV CTRL
button.
7 Receiver setting buttons
Press
first to access:
!
AUDIO PARAMETER
– Use to access the
Audio options.
!
VIDEO PARAMETER
– Use to access the
Video options.
!
HOME MENU
– Use to access the Home
Menu.
!
RETURN
– Press to confirm and exit the
current menu screen.
8
i
/
j
/
k
/
l
/ENTER
Use the arrow buttons when setting up your
surround sound system and the Audio or Video
options.
9 Receiver Control buttons
Press
first to access:
!
PHASE CTRL
– Press to switch on/off Phase
Control.
!
STATUS
– Press to check selected receiver
settings.
!
PQLS
– Press to select the PQLS setting.
!
S.RETRIEVER
– Press to restore CD quality
sound to compressed audio sources.
!
SIGNAL SEL
– Use to select an input signal.
!
MCACC
– Press to switch between MCACC
presets.
!
SLEEP
– Use to put the receiver in sleep
mode and select the amount of time before
sleep.
!
CH LEVEL
– Press repeatedly to select a
channel, then use
k
/
l
to adjust the level.
!
A.ATT
– Attenuates (lowers) the level of an
analog input signal to prevent distortion.
!
DIMMER
– Dims or brightens the display.
10 LISTENING MODE controls
!
AUTO/ALC/DIRECT
– Switches between
Auto Surround, Auto Level Control mode and
Stream Direct mode.
!
STEREO
– Press to select stereo playback
mode.
!
STANDARD
– Press for Standard decoding
and to switch various modes (
2
Pro Logic,
Neo:6, etc.) (page 19).
!
ADV SURR
– Use to switch between the
various surround modes (page 19).
11 Remote control LED
Lights when a command is sent from the
remote control.
12 TV CTRL
Set the preset code of your TV’s manufacturer
when controlling the TV.
13
Switches the remote to control the receiver
(used to select the white commands).
Switch to perform operations in the main zone.
Also use this button to set up surround sound.
14 MASTER VOLUME +/–
Use to set the listening volume.
15 MUTE
Mutes the sound or restores the sound if it has
been muted (adjusting the volume also restores
the sound).
Оглавление
- Contents
- Before you start
- Connecting your equipment
- Basic Setup
- Basic playback
- Table des matières
- Avant de commencer
- Raccordement de votre équipement
- Configuration de base
- Lecture de base
- Inhaltsverzeichnis
- Vor der Inbetriebnahme
- Anschluss der Geräte
- Grundlegende Einrichtung
- Grundlegende Wiedergabe
- Contenuto
- Prima di iniziare
- Collegamento dell’apparecchio
- Impostazioni di base
- Riproduzione di base
- Inhoud
- Voordat u begint
- De apparatuur aansluiten
- Basisinstellingen
- Basisbediening voor afspelen
- Contenido
- Antes de comenzar
- Conexión del equipo
- Configuración básica
- Reproducción básica
- Содержание
- Перед началом работы
- Подключение оборудования
- Основная настройка
- Основные операции воспроизведения
