Pioneer VSX-1021: Basic playback
Basic playback: Pioneer VSX-1021
En
19
04
Basic playback
Basic playback
Playing a source
Here are the basic instructions for playing a
source (such as a DVD disc) with your home
theater system.
CH
TV CONTROL
INPUT
INPUT SELECT
iPod
USB
TUNER
VIDEO
ADPT
HMG
CD
TV
RCU SETUP
SOURCE
RECEIVER
MULTI
OPERATION
BDR
SAT
BD
DVD
DVR
HDMI
RECEIVER
TV CTRL
ZONE2
MUTE
MASTER
VOLUME
VOL
RECEIVER
D.ACCESS
CH LEVEL A.ATT
LISTENING MODE
DIMMER
SIGNAL SEL MCACC SLEEP
MIDNIGHT
TV / DTV
MPX
PQLS
AUTO / ALC /
DIRECT
STEREO STANDARD ADV SURR
AUDIO
INFO
CLASS
ENTER
DISP
5
4
6
8
0
7
9
1
3
/ CLR
CH
22
S.RETRIEVER
2
1 Switch on your system components
and receiver.
Start by switching on the playback compo-
nent (for example a DVD player), your TV and
subwoofer (if you have one), then the receiver
(press
u
RECEIVER
).
Make sure that the TV’s video input is set to this
receiver.
2 Select the input function you want to
play.
You can use the input function buttons on the
remote control,
INPUT SELECT
, or the front
panel
INPUT SELECTOR
dial.
!
If you need to manually switch the input
signal type press
SIGNAL SEL
.
3 Press
to the receiver operation
mode.
4 Press AUTO/ALC/DIRECT
(AUTO SURR/ALC/STREAM DIRECT) to
select ‘AUTO SURROUND’ and start
playback of the source.
If you’re playing a Dolby Digital or DTS surround
sound source, you should hear surround sound.
If you are playing a stereo source, you will only
hear sound from the front left/right speakers in
the default listening mode.
!
You may need to check the digital audio
output settings on your DVD player or digital
satellite receiver. It should be set to output
Dolby Digital, DTS and 88.2 kHz / 96 kHz PCM
(2 channel) audio, and if there is an MPEG
audio option, set this to convert the MPEG
audio to PCM.
5 Use the MASTER VOLUME +/– to adjust
the volume level.
Listening in surround sound
Using this receiver, you can listen to any source
in surround sound.
Standard surround sound
This receiver provide basic surround sound for
stereo and multichannel sources.
RECEIVER
D.ACCESS
CH LEVEL A.ATT
LISTENING MODE
DIMMER
AUTO / ALC /
DIRECT
STEREO
STANDARD ADV SURR
CLASS
ENTER
8
0
7
9
/ CLR
CH
%
While listening to a source, press
STANDARD (STANDARD SURROUND).
If necessary, press repeatedly to select a listen-
ing mode.
Using the Advanced surround
effects
The Advanced surround effects can be used for
a variety of additional surround sound effects.
%
Press ADV SURR
(ADVANCED SURROUND) repeatedly to
select a listening mode.
Playing an iPod
This receiver has the
iPod iPhone iPad USB
terminal that will allow you to control playback
of audio content from your iPod using the con-
trols of this receiver.
!
This receiver is compatible with the audio
and video of the iPod nano (audio only for the
iPod nano 1G/2G), iPod fifth generation (audio
only), iPod classic, iPod touch, iPhone and
iPad. However, some of the functions may be
restricted for some models. The receiver is not
compatible with the iPod shuffle.
!
This receiver has been developed and tested
for the software version of iPod/iPhone/iPad
indicated on the website of Pioneer (http://
pioneer.jp/homeav/support/ios/eu/).
!
Installing software versions other than
indicated on the website of Pioneer to your
iPod/iPhone/iPad may result in incompatibility
with this receiver.
!
iPod, iPhone and iPad are licensed for
reproduction of non-copyrighted materials
or materials the user is legally permitted to
reproduce.
!
Features such as the equalizer cannot
be controlled using this receiver, and we
recommend switching the equalizer off before
connecting.
!
Pioneer cannot under any circumstances
accept responsibility for any direct or indirect
loss arising from any inconvenience or loss
of recorded material resulting from the iPod
failure.
!
When listening to a track on the iPod in the
main zone, it is possible to control the sub
zone, but not to listen to a different track in
the sub zone from the one playing in the main
zone.
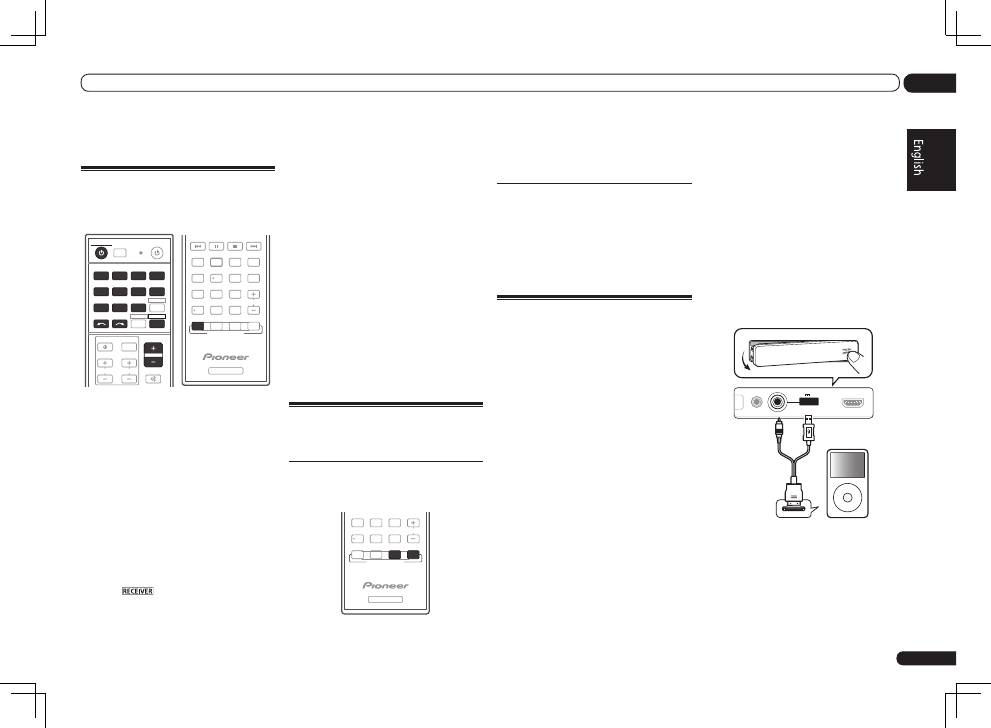
1 Switch the receiver into standby then
use the supplied iPod cable to connect
your iPod to the iPod iPhone iPad USB
terminal on the front panel of this
receiver.
In case of VSX-1021
MCACC
SETUP MIC
iPod
iPhone
iPad
USB
5V 2.1 A
HDMI 2 INPUT
MENU
CONTROL
ON / OFF
iPod
iPod cable
(supplied)
En
20
04
Basic playback
5 Use
i
/
j
and ENTER to select the track
to be played, then press the
d
button.
Basic playback controls
!
Press
iPod USB
to switch the remote control
to the iPod/USB operation mode.
iPod CTRL
HOME
MENU TUNE
TUNE TOOLS
LIST
PRESET
TOP MENU
BAND
GUIDE
T.EDIT
VIDEO
PARAMETER
AUDIO
PARAMETER
ENTER
PRESET
RETURN
PTY
SEARCH
SIGNAL SEL MCACC SLEEP
TV / DTV
MPX
PQLS
PHASE CTRL
STATUS
PGM
MENU
AUDIO
INFO
DISP
HDD
DVD
5
4
6
1
3
22
S.RETRIEVER
2
Listening to the radio
1 Press TUNER to select the tuner.
2 Use BAND to change the band (FM or
AM), if necessary.
3 Tune to a station.
There are three ways to do this:
!
Automatic tuning
– Press and hold
TUNE
i
/
j
for about a second. The receiver will
start searching for the next station.
!
Manual tuning
– To change the frequency
one step at a time, press
TUNE
i
/
j
.
!
High speed tuning
– Press and hold
TUNE
i
/
j
for high speed tuning. Release the
button at the frequency you want.
Improving FM sound
If the
TUNED
or
STEREO
indicator doesn’t
light when tuning to an FM station because the
signal is weak, press
MPX
to switch the receiver
into mono reception mode.
Using Neural Surround
This feature uses Neural Surround
TM
technolo-
gies to achieve optimal surround sound from
FM radio.
!
While listening to FM radio, press
AUTO/ALC/DIRECT
for Neural Surround.
!
The
Neural Surround
mode can be selected
also with
STANDARD
.
Saving station presets
If you often listen to a particular radio station,
it’s convenient to have the receiver store the
frequency for easy recall whenever you want to
listen to that station.
1 Tune to a station you want to
memorize.
2 Press T.EDIT (TUNER EDIT).
The display shows
PRESET MEMORY
, then a
blinking memory class.
3 Press CLASS to select one of the seven
classes, then press PRESET
k
/
l
to select
the station preset you want.
4 Press ENTER.
After pressing
ENTER
, the preset class and
number stop blinking and the receiver stores
the station.
Listening to station presets
1 Press TUNER to select the tuner.
2 Press CLASS to select the class in which
the station is stored.
3 Press PRESET
k
/
l
to select the
station preset you want.
In case of VSX-921
MCACC
SETUP MIC
L AUDIO R
VIDEO
VIDEO 2 INPUT
iPod
iPhone
iPad
USB
5V 2.1 A
MENU
CONTROL
ON / OFF
iPod
iPod cable
(supplied)
2 Press
u
RECEIVER to switch on the
receiver and your TV.
3 Press iPod USB on the remote control
to switch the receiver to the iPod/USB.
4 Use
i
/
j
to select ‘Music’ from the
iPod Top menu.
5 Use
i
/
j
and ENTER to select the track
to be played, then press the
d
button.
Basic playback controls
!
Press
iPod USB
to switch the remote control
to the iPod/USB operation mode.
iPod CTRL
HOME
MENU TUNE
TUNE TOOLS
LIST
PRESET
TOP MENU
BAND
GUIDE
T.EDIT
VIDEO
PARAMETER
AUDIO
PARAMETER
ENTER
PRESET
RETURN
PTY
SEARCH
SIGNAL SEL MCACC SLEEP
TV / DTV
MPX
PQLS
PHASE CTRL
STATUS
PGM
MENU
AUDIO
INFO
DISP
HDD
DVD
5
4
6
1
3
22
S.RETRIEVER
2
Playing a USB device
It is possible to play files using the USB inter-
face on the front of this receiver.
!
Compatible USB devices include external
magnetic hard drives, portable flash memory
drives (particularly key drives) and digital audio
players (MP3 players) of format FAT16/32.
!
Pioneer cannot guarantee compatibility
(operation and/or bus power) with all USB
mass storage devices and assumes no
responsibility for any loss of data that may
occur when connected to this receiver.
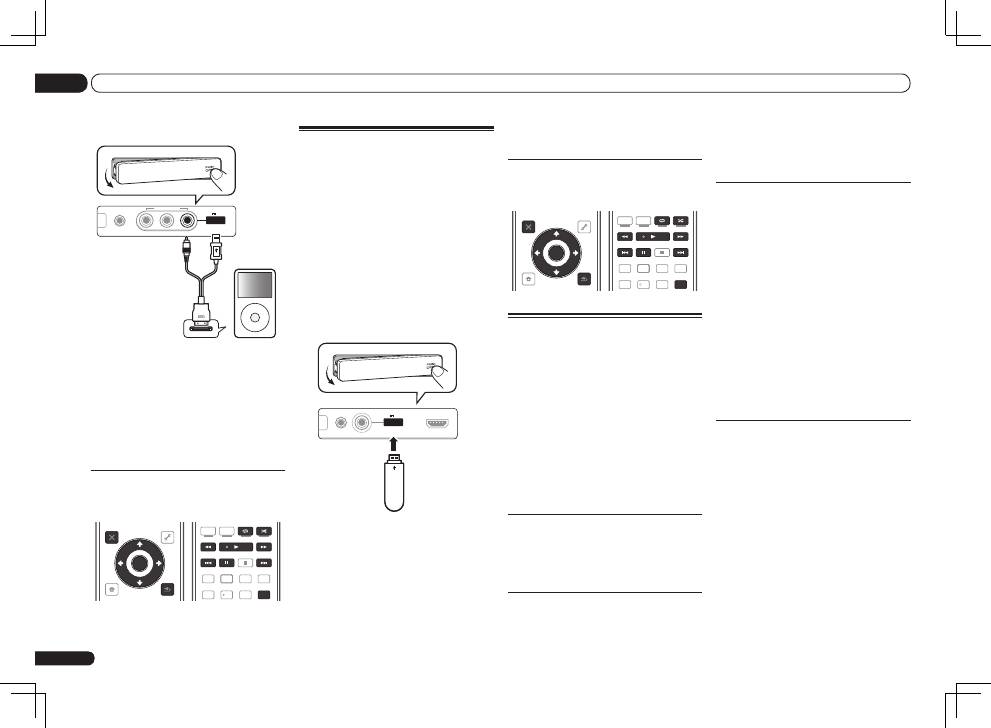
1 Switch the receiver into standby
then connect your USB device to the
USB terminal on the front panel of this
receiver.
CONTROL
ON / OFF
MCACC
SETUP MIC
iPod
iPhone
iPad
USB
5V 2.1 A
HDMI 2 INPUT
USB mass
storage device
2 Press
u
RECEIVER to switch on the
receiver and your TV.
!
Make sure the receiver is in standby when
disconnecting the USB device.
3 Press iPod USB on the remote control
to switch the receiver to the iPod/USB.
4 Use
i
/
j
to select ‘Music’ from the
USB Top menu.

En
21
04
Basic playback
Playback with HOME MEDIA
GALLERY inputs
This receiver’s Home Media Gallery function
allows you to listen to audio files or listen to
Internet radio stations on a computer or other
component connected to the receiver’s LAN
terminal.
!
Photo or video files cannot be played back.
!
With Windows Media Player 11 or Windows
Media Player 12, you can even play back
copyrighted audio files on this receiver.
1 Connect the LAN terminal on this
receiver to the LAN terminal on your
router.
See
Connecting to the network through LAN
interface
on page 15 .
2 Press HMG to select Home Media
Gallery as the input function.
3 Use
i
/
j
to select the category you
want to play back, and then press ENTER.
!
Internet Radio
– Internet radio
!
Server Name
– Server components on the
network
!
Favorites
– Favorite songs currently being
registered
!
Recently played
– Internet Radio listening
history (most recent 20 incidents)
4 Use
i
/
j
to select the folder, music
files or Internet radio station to play back,
and then press ENTER.
5 Repeat step 4 to play back the desired
song.
Playing back audio files stored on
components on the network
!
Press
HMG
to switch the remote control to the
HOME MEDIA GALLERY
operation mode.
iPod CTRL
HOME
MENU TUNE
TUNE TOOLS
LIST
PRESET
TOP MENU
BAND
GUIDE
T.EDIT
VIDEO
PARAMETER
AUDIO
PARAMETER
ENTER
PRESET
RETURN
PTY
SEARCH
SIGNAL SEL MCACC SLEEP
TV / DTV
MPX
PQLS
PHASE CTRL
STATUS
PGM
MENU
AUDIO
INFO
DISP
HDD
DVD
5
4
6
1
3
22
S.RETRIEVER
2
Bluetooth
ADAPTER for
Wireless Enjoyment of Music
This receiver
Remote control
operation
Music data
Bluetooth
®
ADAPTER
Bluetooth
wireless
technology
enabled device:
cell phone
Bluetooth
wireless
technology
enabled device:
Digital music
player
Device not
equipped with
Bluetooth
wireless
technology:
Digital music
player
+
Bluetooth
audio
transmitter
(sold commercially)
MASTER
VOLUME
STANDBY/ON
INPUT
SELECTOR
PUSH
OPEN
iPod iPhone iPad
DIRECT CONTROL
SOUND
RETRIEVER AIR
ADVANCED
SURROUND
STANDARD
SURROUND
AUTO SURR/ALC/
STREAM DIRECT
PHONES
SPEAKERS
CONTROL – MULTI-ZONE – ON/OFF
BAND
TUNER EDIT
TUNE
PRESET
ENTER
iPod iPhone iPad
HDMI
ADVANCED
MCACC
FL OFF
R CD-R/TAPE ZONE 2
IN
CD
L
R
L
R
IN
L
R
OUT
DVD IN
DVR/BDR IN
FM UNBAL
75
FRONT
CENTER
SURROUND
SURROUND BACK / ZONE 2
R
L
R
L
R
L
(Single)
AM LOOP
(
CD
)
(
DVD
)
T VIDEO
DVD
(
DVR/BDR
)
(
TV/SAT
)
COAXIAL
(10/100)
LAN
O
PRE OUT
SPEAKERS
ANTENNA
OPTICAL
ASSIGNABLE
ASSIGNABLE
OUT
SUBWOOFER
IN
1
IN
2
IN
1
IN
2
SELECT
SELECT
CAUTION:
SPEAKER IMPEDANCE
6 -16 .
ATTENTION:
ENCEINTE D’IMPEDANCE DE
6 -16 .
F
A
DC OUTPUT
for WIRELESS LAN
(OUTPUT 5 V
0.1 A MAX)
ADAPTER PORT
(OUTPUT 5 V 0.6 A MAX)
Bluetooth
® ADAPTER
Refer to the Operating Instructions in CD-ROM
for instructions on how to connect and setup
the
Bluetooth
ADAPTER and how to play music.
The
Bluetooth
®
word mark and logos are reg-
istered trademarks owned by Bluetooth SIG,
Inc. and any use of such marks by PIONEER
CORPORATION is under license. Other trade-
marks and trade names are those of their
respective owners.
©
2011 PIONEER CORPORATION. All rights
reserved.
Fr
2
Ce point d’exclamation, placé dans un
triangle équilatéral, a pour but d’attirer
l’attention de l’utilisateur sur la présence,
dans les documents qui accompagnent
l’appareil, d’explications importantes du
point de vue de l’exploitation ou de
l’entretien.
Ce symbole de l’éclair, placé dans un
triangle équilatéral, a pour but d’attirer
l’attention de l’utilisateur sur la présence, à
l’intérieur du coffret de l’appareil, de
“tensions dangereuses” non isolées d’une
grandeur suffisante pour représenter un
risque d’électrocution pour les êtres
humains.
ATTENTION :
POUR ÉVITER TOUT RISQUE
D’ÉLECTROCUTION, NE PAS ENLEVER LE
COUVERCLE (NI LE PANNEAU ARRIÈRE).
AUCUNE PIÈCE RÉPARABLE PAR
L’UTILISATEUR NE SE TROUVE À
L’INTÉRIEUR. CONFIER TOUT ENTRETIEN À
UN PERSONNEL QUALIFIÉ UNIQUEMENT.
ATTENTION
DANGER D´ELECTROCUTION
NE PAS OUVRIR
IMPORTANT
D3-4-2-1-1_A1_Fr
AVERTISSEMENT
Cet appareil n’est pas étanche. Pour éviter les risques
d’incendie et de décharge électrique, ne placez près de
lui un récipient rempli d’eau, tel qu’un vase ou un pot
de fleurs, et ne l’exposez pas à des gouttes d’eau, des
éclaboussures, de la pluie ou de l’humidité.
D3-4-2-1-3_A1_Fr
AVERTISSEMENT
Avant de brancher l’appareil pour la première, lisez
attentivement la section suivante.
La tension de l’alimentation électrique disponible
varie selon le pays ou la région. Assurez-vous que
la tension du secteur de la région où l’appareil sera
utilisé correspond à la tension requise (par ex. 230
V ou 120 V), indiquée sur le panneau arrière.
D3-4-2-1-4*_A1_Fr
AVERTISSEMENT
Pour éviter les risques d’incendie, ne placez aucune
flamme nue (telle qu’une bougie allumée) sur
l’appareil.
D3-4-2-1-7a_A1_Fr
PRÉCAUTION DE VENTILATION
Lors de l’installation de l’appareil, veillez à laisser un
espace suffisant autour de ses parois de manière à
améliorer la dissipation de chaleur (au moins 40 cm sur
le dessus, 10 cm à l’arrière et 20 cm de chaque côté).
AVERTISSEMENT
Les fentes et ouvertures du coffret sont prévues pour la
ventilation, pour assurer un fonctionnement stable de
l’appareil et pour éviter sa surchauffe. Pour éviter les
risques d’incendie, ne bouchez jamais les ouvertures et
ne les recouvrez pas d’objets, tels que journaux, nappes
ou rideaux, et n’utilisez pas l’appareil posé sur un tapis
épais ou un lit.
D3-4-2-1-7b*_A1_Fr
Milieu de fonctionnement
Température et humidité du milieu de fonctionnement :
De +5 °C à +35 °C (de +41 °F à +95 °F) ; Humidité
relative inférieure à 85 % (orifices de ventilation non
obstrués)
N’installez pas l’appareil dans un endroit mal ventilé ou
un lieu soumis à une forte humidité ou en plein soleil
(ou à une forte lumière artificielle).
D3-4-2-1-7c*_A1_Fr
Si la fiche d’alimentation secteur de cet appareil ne
convient pas à la prise secteur à utiliser, la fiche doit
être remplacée par une appropriée. Ce
remplacement et la fixation d’une fiche secteur sur le
cordon d’alimentation de cet appareil doivent être
effectués par un personnel de service qualifié. En cas
de branchement sur une prise secteur, la fiche de
coupure peut provoquer une sérieuse décharge
électrique. Assurez-vous qu’elle est éliminée
correctement après sa dépose.
L’appareil doit être déconnecté en débranchant sa
fiche secteur au niveau de la prise murale si vous
prévoyez une période prolongée de non utilisation
(par exemple avant un départ en vacances).
D3-4-2-2-1a_A1_Fr
ATTENTION
L’interrupteur
STANDBY/ON
de cet appareil ne
coupe pas complètement celui-ci de sa prise secteur.
Comme le cordon d’alimentation fait office de
dispositif de déconnexion du secteur, il devra être
débranché au niveau de la prise secteur pour que
l’appareil soit complètement hors tension. Par
conséquent, veillez à installer l’appareil de telle
manière que son cordon d’alimentation puisse être
facilement débranché de la prise secteur en cas
d’accident. Pour éviter tout risque d’incendie, le
cordon d’alimentation sera débranché au niveau de
la prise secteur si vous prévoyez une période
prolongée de non utilisation (par exemple avant un
départ en vacances).
D3-4-2-2-2a*_A1_Fr
Ce produit est destiné à une utilisation domestique
générale. Toute panne due à une utilisation autre qu'à
des fins privées (comme une utilisation à des fins
commerciales dans un restaurant, dans un autocar
ou sur un bateau) et qui nécessite une réparation
sera aux frais du client, même pendant la période de
garantie.
K041_A1_Fr
K058a_A1_Fr
Pb
Information à destination des utilisateurs sur la collecte et l’élimination des
équipements et batteries usagés
Ces symboles qui figurent sur les produits, les emballages et/ou les documents
d’accompagnement signifient que les équipements électriques et électroniques et
batteries usagés ne doivent pas être jetés avec les déchets ménagers et font l’objet
d’une collecte sélective.
Pour assurer l’enlèvement et le traitement appropriés des produits et batteries
usagés, merci de les retourner dans les points de collecte sélective habilités
conformément à la législation locale en vigueur.
En respectant les circuits de collecte sélective mis en place pour ces produits, vous
contribuerez à économiser des ressources précieuses et à prévenir les impacts
négatifs éventuels sur la santé humaine et l’environnement qui pourraient résulter
d’une mauvaise gestion des déchets.
Pour plus d’information sur la collecte et le traitement des produits et batteries
usagés, veuillez contacter votre municipalité, votre service de gestion des déchets
ou le point de vente chez qui vous avez acheté ces produits.
Ces symboles ne sont valables que dans les pays de l’Union Européenne.
Pour les pays n’appartenant pas à l’Union Européenne :
Si vous souhaitez jeter ces articles, veuillez contacter les autorités ou revendeurs
locaux pour connaître les méthodes d’élimination appropriées.
Exemples de marquage
pour les batteries
Marquage pour les
équipements
Оглавление
- Contents
- Before you start
- Connecting your equipment
- Basic Setup
- Basic playback
- Table des matières
- Avant de commencer
- Raccordement de votre équipement
- Configuration de base
- Lecture de base
- Inhaltsverzeichnis
- Vor der Inbetriebnahme
- Anschluss der Geräte
- Grundlegende Einrichtung
- Grundlegende Wiedergabe
- Contenuto
- Prima di iniziare
- Collegamento dell’apparecchio
- Impostazioni di base
- Riproduzione di base
- Inhoud
- Voordat u begint
- De apparatuur aansluiten
- Basisinstellingen
- Basisbediening voor afspelen
- Contenido
- Antes de comenzar
- Conexión del equipo
- Configuración básica
- Reproducción básica
- Содержание
- Перед началом работы
- Подключение оборудования
- Основная настройка
- Основные операции воспроизведения
