Kingston Technology DataTraveler DT400: инструкция
Раздел: Профоборудование
Тип: Аппарат
Инструкция к Аппарату Kingston Technology DataTraveler DT400
DT400 - Migo QuickStart v1.3
Quick
Start Guide
DataTraveler 400 — Migo
Find the language and latest version of the Quick Start Guide
for your Kingston® DataTraveler® 400 — Migo® here.
DataTraveler 400
— Migo Quick Start Guide v1.3
Simplified Chinese . . . . .
Traditional Chinese . . . .
Hindi . . . . . . . . . . . . . . . . . .
Arabic . . . . . . . . . . . . . . . . .
. . . . . . . . . . . . For instructions in English
. . . . . . . . . . . . . . . . . . Para instrucciones en español
. . . . . . . . . Für Anleitungen in Deutsch
. . . . . . . . . . . . . . . . . . Pour des instructions en français
. . . . . . . . . . . . . . . . . . Istruzioni in italiano
. . . . . . . . . . . .Por as instruções em português
. . . . . . . . . . . . . . . . . . Voor instructies in het Nederlands
. . . . . . . . . . . . . . . . . . Instrukcje w języku polskim
. . . . . . . . . . . . . . . . . . Для инструкции на русском
. . . . . . . . . . . . . . . . . . Turkce talimatlar icin
. . . . . . . . . . . . . . . . . . Korean
. . . . . . . . . . . . . . . . . . Japanese
. . . . . . . . . . . . . . . . . . Thai

DT400 - Migo QuickStart v1.3
Quick Start
DataTraveler® 400 - Migo (DT400)
For hardware installation, please refer to the hardware installation instructions included with
the DT400.
System Requirements
Operating System:
Microsoft Windows Vista®, XP SP1 and SP2, and 2000 SP4
Email:
Microsoft Outlook 2000, 2002, 2003, and 2007 with POP3/SMTP and Exchange Server*,
Lotus Notes 6.5 and 7.0 with POP3/SMTP and Domino*, Outlook Express 5.0 and 6.0, Windows
Mail and Mozilla Thunderbird 1.5 and 2.0
Web Browser:
Windows Internet Explorer 5.0 - 7.0 and Mozilla Firefox 1.5 and 2.0
* Remote Systems require VPN connection
Creating Migo Profile(s) on Your Host Computer
Insert the DT400 into the computer’s USB port.
1.
The DT400 will appear in My Computer (Computer in Vista) as Kingston (Removable
2.
Disk in Windows 2000). Double-click on the Kingston drive to access the Migo
application.
Double-click MigoSync.exe (Figure 1) to launch Migo.
3.
Figure 1: MigoSync.exe
After the Migo files extract to your computer, the MigoSync Welcome will appear (Figure 2).
4.
Figure 2: MigoSync Welcome
Click
5.
START
to
launch the MigoSync Profile Wizard.
Accept the license agreement to continue.
6.
Now create a nickname for your new Migo Profile (Figure 3).
7.
Figure 3: Migo Profile Nickname
Click
8.
NEXT
to continue.
You can include your Internet Home Page, Favorites, and other Internet settings into
9.
your Migo profile by selecting, “Include my Browser settings…” Place a checkmark
next to the available Browser(s) (e.g. Internet Explorer, Mozilla Firefox) you would
like to synchronize into your Migo Profile. (Figure 4). Click
NEXT
to continue.
Figure 4: Internet Settings
TIP
Helpful Hints are
available via the
right side of the
Migo Wizard.
DT400 - Migo QuickStart v1.3
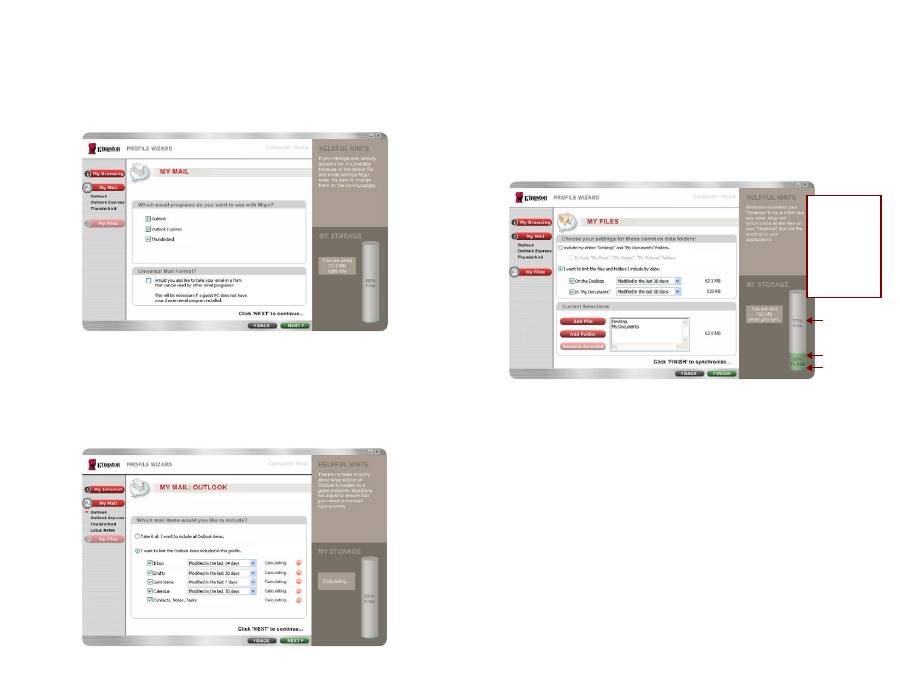
Next you will select e-mail client(s) for synchronization (Figure 5). Place a checkmark next
10.
to the email programs you would like to synchronize (e.g. Microsoft Outlook, Outlook
Express, Mozilla Thunderbird, Lotus Notes, Universal Mail*). Click
NEXT
to configure your
E-mail settings.
*Note: View the Help File via the MigoSync application for additional Universal Mail information.
Figure 5: Adding email accounts
To include all Microsoft Outlook, Outlook Express, Mozilla Thunderbird and/or
11.
Lotus Notes - Inbox, Drafts, Sent, etc., items into your Migo Profile, select “Take it
all...” If you prefer to synchronize items created within a specific time frame, select “I
want to limit the ___ items…” Click on the dropdown arrows to select a time frame
for each item (Figure 6). Click
NEXT
to continue.
Figure 6: Email Configuration
Note: If you have chosen to limit the mail items, removing the checkmark displayed next to
an item will remove it from Synchronization.
Now you will configure your data files for synchronization (Figure 7). To include
12.
all of the files located on your Desktop and in your My Documents folder, select
“Include my entire “Desktop” and “My Documents” folders.” If selected, you will be
given the option to “Exclude “My Music”, “My Videos”, “My Pictures” folders.”
Note: The “Exclude “My Music”, “My Videos”, “My Pictures” Folders” option is not supported
in Windows Vista.
Figure 7: Adding Files
13. Click
NEXT
to continue.
14. Click
FINISH
to synchronize the selected files and folders, internet settings, and
email items onto the Drive.
Login to your Migo Profile on a Guest Computer
Insert the DT400 - Migo into an available USB port.
1.
The DT400 will appear in My Computer (Computer in Vista) as Kingston
2.
(Removable Disk in Windows 2000). Double-click on Kingston to access the
MigoSync application.
Double-click MigoSync.exe to launch Migo.
3.
TIP
The My Storage Tank on
the right side of the wizard
displays available and
used space, and space
required for files to be
synchronized. As you add
files for synchronization,
the My Storage Tank will
automatically adjust. If the
tank turns red, step back
and select fewer files for
synchronization.
(Grey) Available space
(Green) Files to be
synchronized.
(Purple) Used space
DT400 - Migo QuickStart v1.3
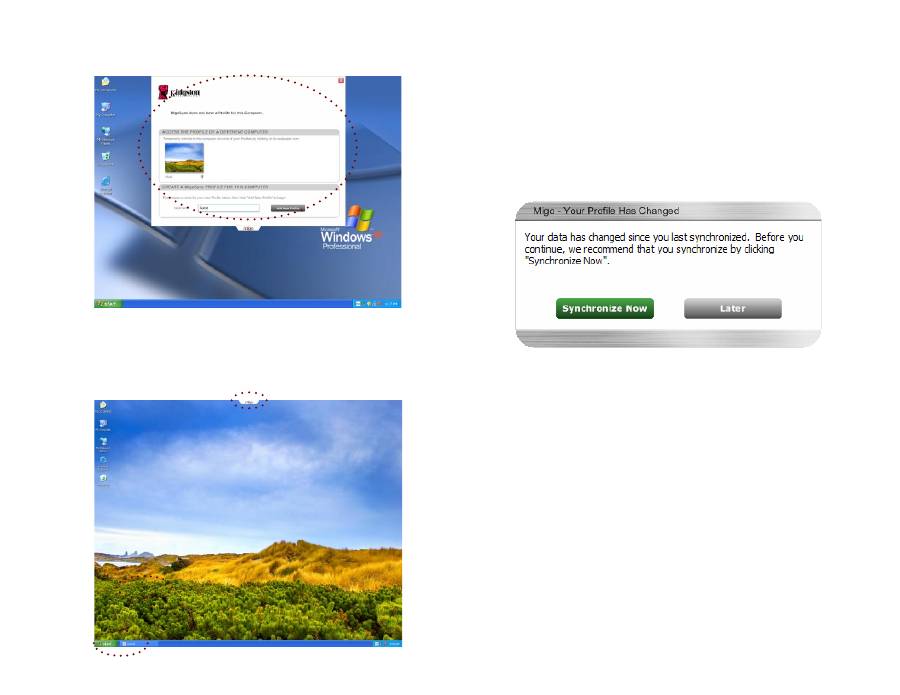
The Migo Tab will appear at the top of the Desktop (Figure 8). Click on the Migo
4.
Profile (Desktop) picture to login to your Migo Profile.
Figure 8: Migo Tab
Once the Migo Profile loads, you can work on your files and emails just as you
5.
would on your host computer.
Click on the Migo Tab or click the Logout button on the Taskbar to logout of the
6.
Migo Profile (Figure 9).
Figure 9: Migo Logout
Synchronize Your Data with your Host Computer
Insert the DT400 into an available USB port
1.
The DT400 will appear in My Computer (Computer in Vista) as Kingston (Removable
2.
Disk in Windows 2000). Double-click on the Kingston drive to access the MigoSync
application.
Double-click MigoSync.exe to launch Migo.
3.
A “Your Profile Has Changed” window will appear (Figure 10).
4.
Click
5.
SYNCHRONIZE NOW
to update your home computer with the changes
made to the files and emails in your Migo Profile.
Figure 10: Your Profile Has Changed
Once synchronization is complete, a Migo Message will appear with a
6.
confirmation.
For complete instructions, refer to the Help File via the MigoSync application.
DT400 - Migo QuickStart v1.3
Inicio rápido
DataTraveler® 400 - Migo (DT400)
Para la instalación del hardware, consulte las instrucciones de instalación incluidas con el
DT400.
Requisitos del sistema
Sistemas operativos:
Microsoft Windows Vista®, XP (SP1 y SP2), y 2000 (SP4)
Correo electrónico:
Microsoft Outlook (2000, 2002, 2003 y 2007 con POP3/SMTP y Exchange
Server)*, Lotus Notes 6.5 y 7.0 con POP3/SMTP y Domino*, Outlook Express (5.0 y 6.0), Windows
Mail, y Mozilla Thunderbird 1.5 y 2.0
Navegador de internet:
Windows Internet Explorer (5.0 – 7.0) y Mozilla Firefox (1.5 y 2.0)
* Los sistemas remotos requieren una conexión a VPN
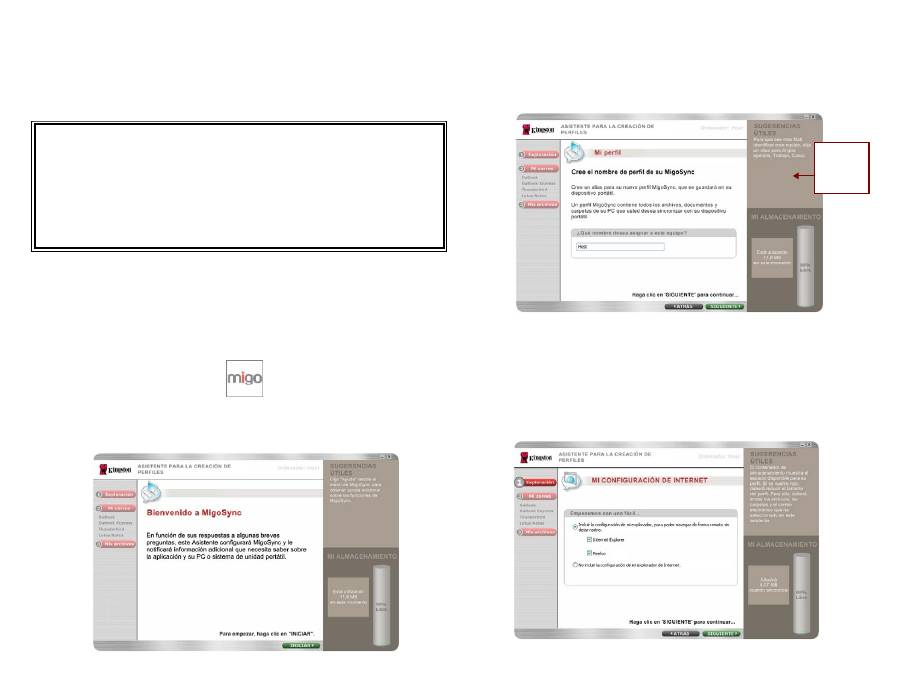
Creación de perfiles Migo en su ordenador
Conecte el DT400 a un puerto USB del ordenador.
1.
El DT400 aparecerá en Mi Pc (Ordenador en Vista) como Kingston (Disco extraíble
2.
en Windows 2000). Haga doble clic en la unidad Kingston para acceder a la
aplicación Migo.
Haga doble clic en MigoSync.exe (Figura 1) para iniciar Migo.
3.
Figura 1: MigoSync.exe
Una vez extraídos los archivos de Migo en el ordenador, aparecerá la pantalla de
4.
bienvenida de MigoSync (Figura 2).
Figura 2: Bienvenido a MigoSync
Haga clic en
5.
INICIAR
para iniciar el asistente para la creación de perfiles en
MigoSync.
Antes de continuar, debe aceptar el contrato de licencia.
6.
Cree un alias para su nuevo perfil en Migo (Figura 3).
7.
Figura 3: Alias de su perfil en Migo
Haga clic en
8.
SIGUIENTE
para continuar.
Puede incluir su página de inicio en Internet, sus favoritos y otras configuraciones
9.
de Internet en su perfil Migo seleccionando “Incluir la configuración de mi
explorador…”. Ponga una marca de verificación al lado del (de los) navegador(es)
(p.ej. Internet Explorer, Mozilla Firefox) que desee sincronizar con su perfil de
Migo. (Figura 4). Haga clic en
SIGUIENTE
para continuar.
Figura 4: Configuración de Internet
CONSEJO
A la derecha
del Asistente de
Migo encontrará
consejos útiles
DT400 - Migo QuickStart v1.3
A continuación podrá escoger el programa de correo electrónico que desee
10.
sincronizar. Coloque una marca de verificación al lado de los programas de
correo electrónico (Figura 5) que desee sincronizar (p.ej Microsoft Outlook,
Outlook Express, Mozilla Thunderbird, Lotus Notes, Universal Mail*). Haga
clic en
SIGUIENTE
para configurar sus ajustes de correo electrónico.
Nota: consulte el archivo de ayuda de la aplicación MigoSync para obtener información
adicional sobre Universal Mail)
Figura 5: Añadir cuentas de correo electrónico
Para incluir todos los elementos de Entrada, Borrador, Enviados, etc. de Microsoft
11.
Outlook, Outlook Express, Lotus Notes y/o Mozilla Thunderbird en su Perfil de
Migo, seleccione “Seleccionar todo”. Si desea sincronizar elementos creados dentro
de unos límites de tiempo específicos, seleccione “Deseo limitar los elementos …”.
Haga clic en el menú desplegable para seleccionar un límite temporal para cada
elemento (Figura 6). Haga clic en
SIGUIENTE
para continuar.
Figura 6: Configuración del correo electrónico
Nota: Si ha elegido limitar los elementos de correo, cuando elimina la marca de verificación
que aparece al lado de un elemento, éste no se incluye en la sincronización.
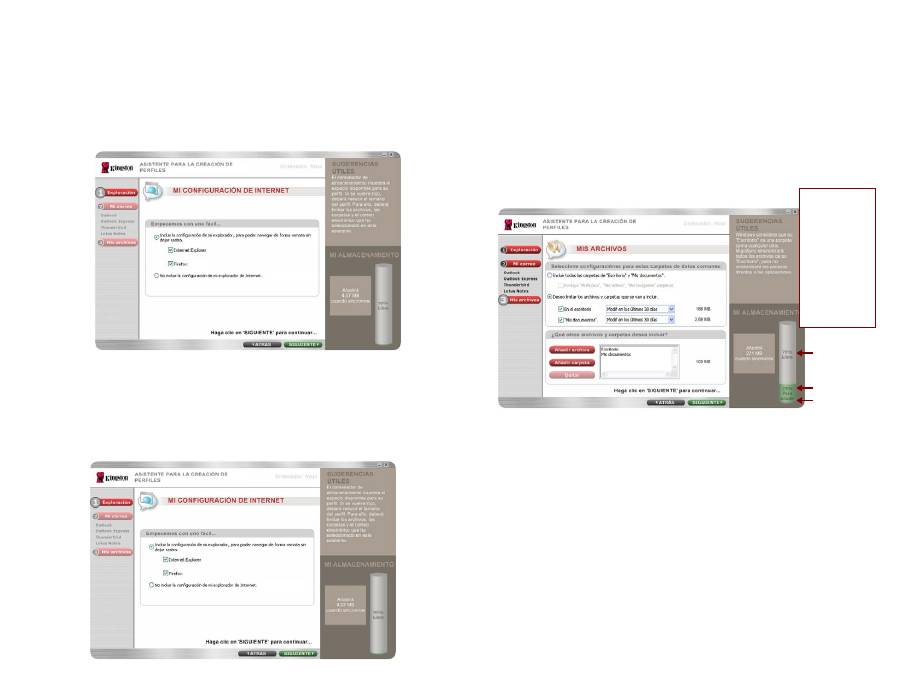
Ahora configurará sus archivos de datos para la sincronización (Figura 7). Para
12.
incluir todos los archivos situados en su Escritorio y en su carpeta Mis documentos,
seleccione “Incluir todas las carpetas de “Escritorio” y “Mis Documentos”. Si lo
selecciona, tendrá la opción de “Excluir las carpetas “Mi música”, “Mis vídeos” y “Mis
imágenes”
Nota: La opción “Excluir las carpetas “Mi música”, “Mis vídeos” y “Mis imágenes”” no está
disponible en Windows Vista.
Figura 7: Configuración de archivos
Haga clic en
13.
SIGUIENTE
para continuar.
Haga clic en
14.
TERMINAR
para sincronizar los archivos y carpetas, la configuración
de internet y los elementos del correo electrónico en el DT400.
Acceso a su perfil de Migo desde un ordenador como invitado
Conecte el DT400 a un puerto USB disponible.
1.
El DT400 aparecerá en Mi Pc (Ordenador en Vista) como Kingston (Disco extraíble
2.
en Windows 2000). Haga doble clic en Kingston para acceder a la aplicación
MigoSync.
Haga doble clic en MigoSync.exe para ejecutar Migo.
3.
CONSEJO
El depósito de “Mi
almacenamiento” situado
a la derecha indica el
espacio disponible y
el utilizado, así como
el espacio necesario
para la sincronización
del archivo. Cuando se
añadir archivos para
sincronizar, el depósito de
“Mi almacenamiento” se
ajusta automáticamente.
Si el depósito cambia a
color rojo, vuelva atrás
y seleccione menos
archivos para sincronizar.
(Gris) Espacio disponible
(Verde) Archivos que
van a sincronizarse
(Morado) Espacio utilizado
DT400 - Migo QuickStart v1.3
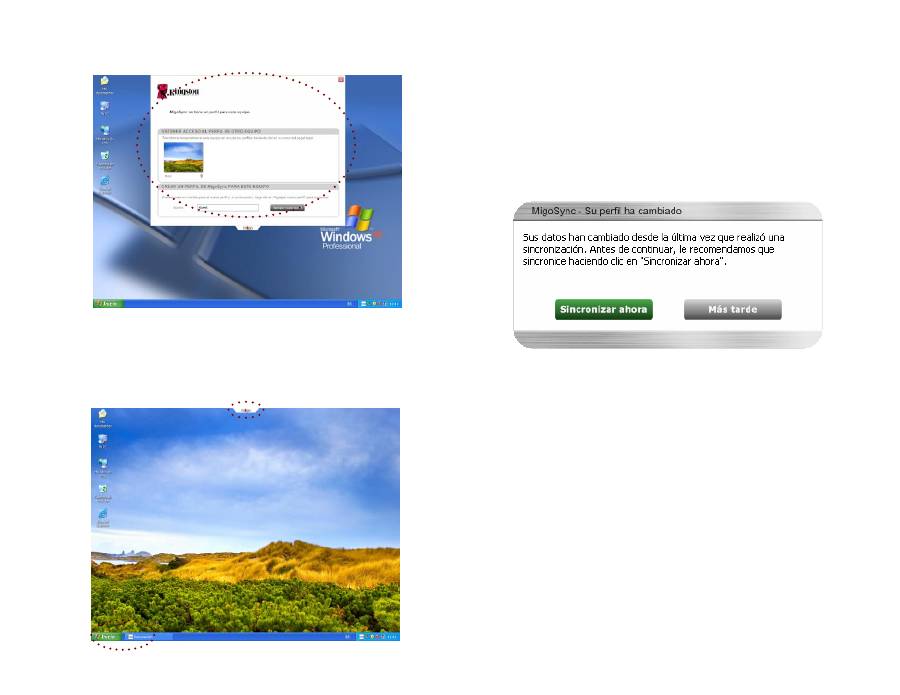
En la parte superior 4. del escritorio aparecerá la pestaña de Migo (Figura 8). Haga
4.
clic en la imagen del perfil de Migo (escritorio) para acceder a su perfil de Migo.
Figura 8: Migo Tab
Una vez que se ha cargado el perfil de Migo, puede trabajar con sus archivos y
5.
correos electrónicos de la misma manera que en el ordenador de su casa.
Haga clic en la pestaña de Migo o en el botón de Desconexión que encontrará en
6.
la Barra de tareas para salir del perfil de Migo (Figura 9).
Figura 9: Migo Logout
Sincronización de sus datos con su ordenador doméstico
Conecte el DT400 a un puerto USB disponible.
1.
El DT400 aparecerá en Mi Pc (Ordenador en Vista) como Kingston (Disco extraíble
2.
en Windows 2000). Haga doble clic en la unidad Kingston para acceder a la
aplicación Migo.
Haga doble clic en MigoSync.exe para ejecutar Migo.
3.
Aparecerá una pantalla que indicará “Su perfil ha cambiado” (Figura 10).
4.
Haga clic en
5.
SINCRONIZAR AHORA
para actualizar su ordenador con los cambios
realizados en los archivos y en los correos electrónicos en su Perfil de Migo.
Figura 10: Su perfil ha cambiado
Una vez finalizada la sincronización aparecerá un Mensaje Migo de confirmación.
6.
Para obtener las instrucciones completas, consulte el archivo de ayuda de Migo a través de
la aplicación Migo.
