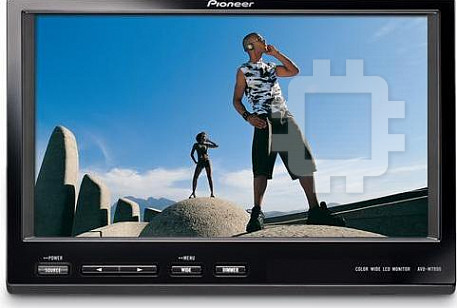
Pioneer AVD-W7900: инструкция
Раздел: Авто, мото оборудование и транспорт
Тип: Автомобильный Дисплей
Характеристики, спецификации
Инструкция к Автомобильному Дисплей Pioneer AVD-W7900
Оглавление
- Содержание
- Меры предосторожности ВАЖНЫЕ МЕРЫ ПРЕДОСТОРОЖНОСТИ Для обеспечения безопасности движения
- Использование дисплея, подключенного к VIDEO OUTPUT Во избежание разрядки аккумуляторной батареи
- Перед началом эксплуатации Посетите наш сайт В случае возникновения неполадок Сведения об этом устройстве
- Перед началом эксплуатации Защита жидкокристал- Изменение настроек изображения лического экрана Установка и демонтаж дисплея Настройка ЖК экрана для удобного просмотра Изменение широкоформатного режима
- Установка дисплея Демонтаж дисплея Перезагрузка микропроцессора
- Перед началом эксплуатации
- Описание элементов устройства Дисплей Управление данным устройством
- Управление данным устройством Основные операции Изменение широкоформатного режима Включение и выключение питания Выбор источника сигнала
- Управление данным устройством Включение настройки регулятора освещенности Настройка
- Выбор формата видеосигнала
- Соединения
- Установка и подключение
- Схема подключения Установка и подключение
- Установка Демонтаж дисплея Установка с помощью монтажной рамки
- Правильное использование дисплея Жидкокристаллический (ЖК) экран Рекомендации по обращению с дисплеем
- Уход за дисплеем Маленькая люминесцентная лампа
- Технические характеристики

English NederlandsItalianoFrançaisDeutschEspañol Русский
Owner’s Manual
Mode d’emploi
7-INCH REAR SEAT ENTERTAINMENT DISPLAY
AFFICHAGE DIVERTISSANT 7 POUCES POUR
SIEGES ARRIERE
AVD-W7900
This product conforms to new cord colors.
Los cables de este producto son conformes a un nuevo
código de colores.
Dieses Produkt entspricht den neuen Kabelfarben.
Ce produit respecte un nouveau code de couleur des
câbles.
Questo prodotto è conforme ai nuovi codici colori.
De kleuren van de snoeren van dit toestel zijn gewijzigd.
Данное устройство соответствует новым
требованиям к цвету проводов.

Contents
Thank you for buying this Pioneer product.
Please read through these operating instructions so you will know how to operate
your model properly. After you have finished reading the instructions, k eep this man-
ual in a safe place for future reference.
Precautions
Additional Information
Using the display correctly 14
IMPORTANT SAFEGUARDS 3
– Handling the display 14
To ensure safe driving 3
– Liquid crystal display (LCD) screen 14
– When using a display connected to
– Keeping the display in good
VIDEO OUTPUT 3
condition 14
To avoid battery exhaustion 4
– Small fluorescent tube 15
Specifications 16
Before You Start
About this unit 5
Visit our website 5
In case of trouble 5
To protect the LCD screen 5
For viewing LCD comfortably 6
– Changing the wide screen size 6
– Changing the picture adjustment 6
Installing and removing the display unit 6
– Installing the display unit 6
– Removing the display unit 7
Resetting the microprocessor 7
Operating this unit
What’s What 8
– Display unit 8
Basic Operations 8
– Power ON/OFF 8
– Selecting a source 8
– Changing the wide screen mode 8
– Switching the dimmer setting 9
Setup 9
– Changing the picture adjustment 9
– Selecting the video format 10
Connection and installation
Connections 11
– Connection Diagram 12
Installation 13
– Mounting with flush mounting
bracket 13
– Removing the display unit 13
2
En
Section
Precautions
01
English
to the risk of electric shock or other ha-
IMPORTANT SAFEGUARDS
zards.
Please read all of these instructions regarding
your display and retain them for future refer-
ence.
WARNING
1 Read this manual fully and carefully be-
! NEVER install this display in a location
fore operating your display.
where it is visible by the driver. Doing so
2 Keep this manual handy as a reference for
can cause the driver to be distract by
operating procedures and safety informa-
images while the vehicle is in motion.
tion.
! Use of this display is subject to all govern-
3 Pay close attention to all warnings in this
ment laws regarding placement or use.
manual and follow the instructions care-
! PIONEER does not accept any liability for
fully.
any problems, damage or loss incurred as
4 Do not allow other persons to use this sys-
a result of the display being used with an
tem until they have read and understood
incorrect setting or in violation of any gov-
the operating instructions.
ernment laws.
5 Do not install the display where it may (i)
obstruct the driver’s vision, (ii) impair the
performance of any of the vehicle’s oper-
ating systems or safety features, includ-
ing air bags, hazard lamp buttons or (iii)
impair the driver’s ability to safely oper-
To ensure safe driving
ate the vehicle.
6 As with any accessory in your vehicle’s in-
WARNING
terior, the display should not divert your
! To avoid the risk of accident and the potential
attention from the safe operation of your
violation of applicable laws, rear display units
vehicle. If you experience difficulty in op-
should not be in a location where it is a visible
erating the system or reading the display,
distraction to the driver.
please park safely before making adjust-
! This display is designed solely for use from
ments.
the rear seats. NEVER install the display in a
7 Please remember to wear your seat belt at
location that enables the driver to watch
all times while operating your vehicle. If
images while driving.
you are ever in an accident, your injuries
! In some countries or states the viewing of
can be considerably more severe if your
images on a display inside a vehicle even by
seat belt is not properly buckled.
persons other than the driver may be illegal.
Where such regulations apply, they must be
obeyed and display units should not be used.
WARNING
! Do not attempt to install or service your
display by yourself. Installation or servi-
When using a display
cing of the display by persons without
connected to VIDEO OUTPUT
training and experience in electronic
This unit’s VIDEO OUTPUT is for connection
equipment and automotive accessories
of a display to enable passengers in the rear
may be dangerous and could expose you
seats to watch the DVD or TV.
3
En
Section
01
Precautions
WARNING
NEVER install the rear display in a location that
enables the driver to watch the DVD or TV while
driving.
To avoid battery exhaustion
Be sure to run the vehicle engine while using
this unit. Using this unit without running the
engine can result in battery drainage.
4
En
Section
Before You Start
02
English
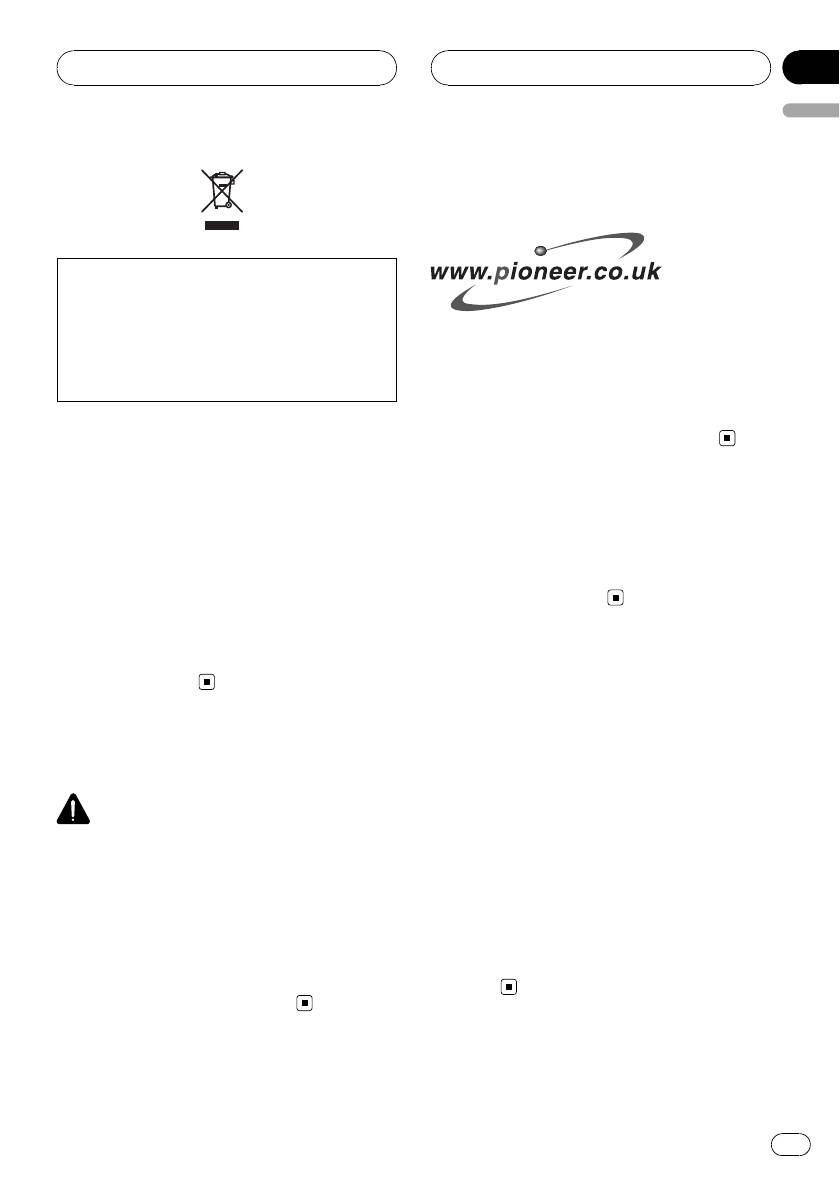
Visit our website
Visit us at the following site:
If you want to dispose this product, do not mix
it with general household waste. There is a se-
parate collection system for used electronic
! Register your product. We will keep the de-
products in accordance with legislation that re-
tails of your purchase on file to help you
quires proper treatment, recovery and recy-
refer to this information in the event of an
cling.
insurance claim such as loss or theft.
! We offer the latest information about
Private households in the member states of
Pioneer Corporation on our website.
the EU, in Switzerland and Norway may return
their used electronic products free of charge
to designated collection facilities or to a retai-
ler (if you purchase a similar new one).
In case of trouble
For countries not mentioned above, please
contact your local authorities for the correct
Should this product fail to operate properly,
method of disposal.
contact your dealer or nearest authorized
By doing so you will ensure that your disposed
Pioneer Service Station.
product undergoes the necessary treatment,
recovery and recycling and thus prevent po-
tential negative effects on the environment
and human health.
To protect the LCD screen
! Do not allow direct sunlight to fall on the
display when this unit is not being used.
Extended exposure to direct sunlight can
About this unit
result in LCD screen malfunction due to
the resulting high temperatures.
CAUTION
! When using a cellular phone, keep the an-
! Do not allow this unit to come into contact
tenna of the cellular phone away from the
with liquids. Electrical shock could result.
display to prevent disruption of the video by
Also, damage to this unit, smoke, and over-
the appearance of spots, colored stripes,
heating could result from contact with liquids.
etc.
! Keep this manual handy as a reference for op-
! Never touch the screen with anything be-
erating procedures and precautions.
sides your finger when operating the touch
! Always keep the volume low enough so that
panel function. The screen can scratch
you can hear sounds from outside the vehicle.
easily.
! Protect this unit from moisture.
5
En
Section
02
Before You Start
object or the like. This can cause system
For viewing LCD comfortably
breakdown.
Due to its construction, the viewing angle of
! Be careful not to touch terminals on the dis-
the LCD screen is limited. You can adjust it by
play unit or on the cable. Doing so may cause
changing either screen size or picture adjust-
connection failures. If any terminals are dirty,
ment.
wipe them with a clean dry cloth.
Changing the wide screen size
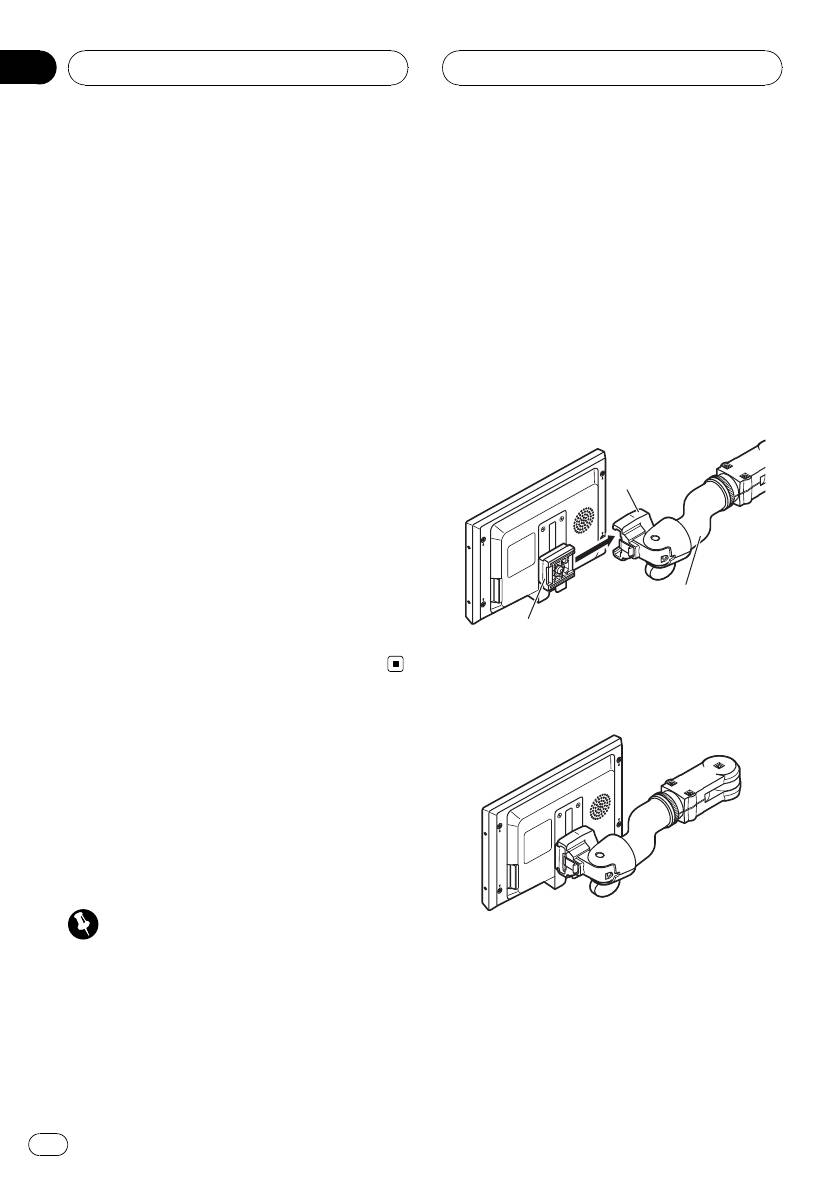
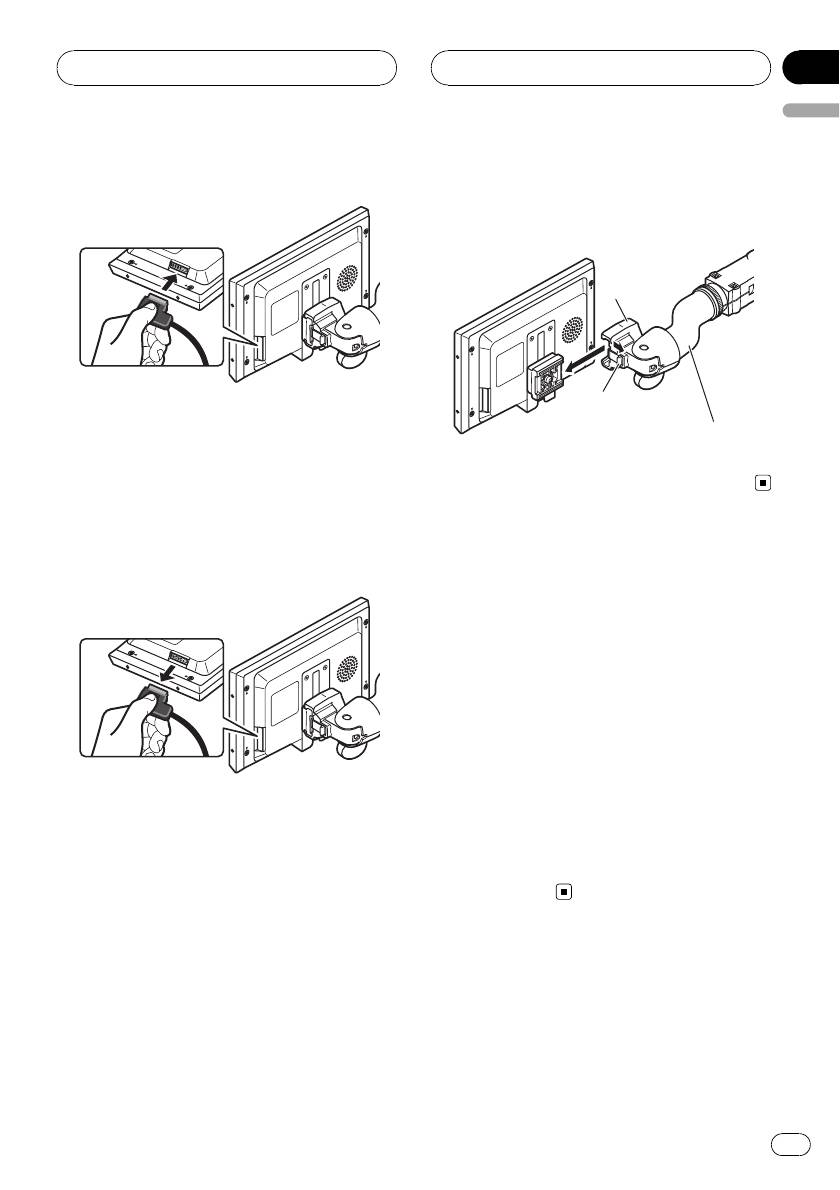
Installing the display unit
By changing the screen size from 4:3 to 16:9,
1 Align the bracket into the grooves of
you can adjust the screen so that the screen
the base.
can fit to the video image you are playing.
For details concerning operation, refer to
Changing the wide screen mode on page 8.
Base
Changing the picture adjustment
You can make the best adjustment to the pic-
ture display by changing BRIGHTNESS,
CONTRAST, COLOR and HUE. You can also
Mounting arm
dim or enlight the overall picture image using
(sold separately)
DIMMER.
Bracket
For details concerning operation, refer to
Changing the picture adjustment on page 9.
2 Slide the display unit until it clicks into
place.
Installing and removing
the display unit
The mounting arm described below is sold se-
parately. For more information on the installa-
tion, refer to the mounting kit owner’s manual
or consult your nearest dealer.
Important
! To prevent failure, be sure to turn the ignition
switch or system power OFF before installing
or removing the display unit. Also take care
not to grip the screen or buttons too firmly
and not to drop the display unit.
! Do not let any water get on the terminals on
the display unit or on the cable and do not
allow the terminals to be shorted by a metal
6
En
Section
Before You Start
02
English
3 Connect the cable to the display unit.
2 Unlock the lock release lever, then slide
the display unit and detach it from the
base.
Base
Lock release lever
Mounting arm
(sold separately)
Removing the display unit
To deter theft of the display unit, remove the
display unit when leaving the vehicle.
1 Hold down the release section and un-
plug the connector.
Resetting the microprocessor
You can reset the microprocessor to its initial
settings.
The microprocessor must be reset under the
following conditions:
! Prior to using this unit for the first time
after installation
! If the unit fails to operate properly
! When strange or incorrect messages ap-
pear on the display
1 Press SOURCE/POWER and hold until
the unit turns off.
2 Hold down SOURCE/POWER and d
simultaneously.
7
En
Basic Operations
Power ON/OFF
Turning the unit on
% Press SOURCE/POWER to turn the unit
on.
When you select a source, the unit is turned
on.
Turning the unit off
% Press SOURCE/POWER and hold until
the unit turns off.
What’s What
Note
Display unit
Take off your headphones when turning the dis-
1 SOURCE/POWER button
play unit on or off. If you leave your headphones
This unit is turned on by selecting a source.
on, a noise may be heard when the volume is
Press to cycle through all the available
high.
sources.
Press and hold to turn the unit off.
Selecting a source
2 c/d buttons
You can select a source you want to listen to.
Press to change the settings when the
! This unit is equipped with two video inputs,
setup menu is displayed.
VIDEO 1 INPUT and VIDEO 2 INPUT.
3 WIDE/MENU button
% Press SOURCE/POWER to select a
Press to select a desired mode for enlarging
source.
a 4:3 picture to a 16:9 one.
Press SOURCE/POWER repeatedly to switch
Press and hold to display the setup menu.
between the following sources:
VCR1 (VCR1)—VCR2 (VCR2)
4 DIMMER button
Press to switch between the dimmer levels.
Changing the wide screen mode
5 IR transmitter
You can listen to stereo audio with sepa-
You can select a desired mode for enlarging a
rately sold cordless headphones (e.g., SE-
4:3 picture to a 16:9 one.
IRM290).
% Press WIDE/MENU to select the desired
setting.
Press WIDE/MENU repeatedly to switch be-
tween the following settings:
FULL (full)—JUST (just)—CINEMA (cinema)—
ZOOM (zoom)—NORMAL (normal)
1
3
4
2
5
Section
03
Operating this unit
8
En

Section
Operating this unit
03
English
FULL (full)
Switching the dimmer setting
A 4:3 picture is enlarged in the horizontal direc-
To prevent the display from being too bright at
tion only, giving you a 4:3 TV picture (normal pic-
night or when the ambient brightness be-
ture) without any omissions.
comes dark, you can dim the display.
JUST (just)
% Press DIMMER to select the desired
The picture is enlarged slightly at the center and
level.
the amount of enlargement increases horizontally
Press DIMMER repeatedly to switch between
to the ends, enabling you to enjoy a 4:3 picture
the following levels:
without sensing any disparity even on a wide
DIMMER HIGH (high)—DIMMER MID (mid)
screen.
—DIMMER LOW (low)
CINEMA (cinema)
The picture is enlarged by the same proportion as
FULL or ZOOM in the horizontal direction and by
Setup
an intermediate proportion between FULL and
Changing the picture adjustment
ZOOM in the vertical direction; ideal for a cine-
ma-sized picture (wide screen picture) where cap-
You can adjust BRIGHTNESS (brightness),
tions lie outside.
CONTRAST (contrast), COLOR (color) and
HUE (hue) for each source.
ZOOM (zoom)
A 4:3 picture is enlarged in the same proportion
1 Press WIDE/MENU and hold to display
both vertically and horizontally; ideal for a cine-
the setup menu.
ma-sized picture (wide screen picture).
BRIGHTNESS appears on the display.
NORMAL (normal)
2 Press WIDE/MENU to display the ad-
A 4:3 picture is displayed as it is, giving you no
justment function names.
sense of disparity since its proportions are the
Press WIDE/MENU repeatedly to switch be-
same as that of the normal picture.
tween the following adjustment functions:
BRIGHTNESS (brightness)—CONTRAST (con-
trast)—COLOR (color)—HUE (hue)—
Notes
COLOR SYSTEM (color system)—Exit from
! When video is viewed in a wide screen mode
the setup menu
that does not match its original aspect ratio, it
may appear different.
3 Press c or d to adjust the selected
! Remember that using the wide mode feature
item.
of this system for commercial or public view-
Each press of c or d increases or decreases
ing purposes may constitute an infringement
the level of selected item. +24 to –24 is dis-
on the author’s rights protected by the Copy-
played as the level is increased or decreased.
right Law.
! BRIGHTNESS – Adjust the black intensity
! The video image will appear coarser when
! CONTRAST – Adjust the contrast
viewed in CINEMA or ZOOM mode.
! COLOR – Adjust the color saturation
! HUE – Adjust the tone of color (red is em-
phasized or green is emphasized)
9
En

Section
03
Operating this unit
# If you do not operate the function within about
eight seconds, the display is automatically re-
turned.
Selecting the video format
When this unit is connected to an AV equip-
ment, you need to adjust the video format sui-
table to that AV equipment.
1 Press WIDE/MENU and hold to display
the setup menu.
BRIGHTNESS appears on the display.
2 Press WIDE/MENU to display
COLOR SYSTEM.
Press WIDE/MENU repeatedly to switch be-
tween the following adjustment functions:
BRIGHTNESS (brightness)—CONTRAST (con-
trast)—COLOR (color)—HUE (hue)—
COLOR SYSTEM (color system)—Exit from
the setup menu
3 Press c or d to select the desired video
format.
Each press of c or d selects the video format
in the following order:
AUTO—PAL—PAL-M—SECAM—NTSC
# If AUTO is selected, NTSC, PAL, PAL-M and
SECAM are automatically identified and dis-
played.
# Broadcast reception may be inferior when
AUTO is selected.
# If you do not operate the function within about
eight seconds, the display is automatically re-
turned.
10
En
Section
Connection and
04
installation
English
! Use of this unit in conditions other than the
CAUTION
following could result in fire or malfunction.
! PIONEER does not recommend that you in-
— Vehicles with a 12-volt battery and negative
stall or service your display unit yourself. In-
grounding.
stalling or servicing the product may expose
! To prevent a short-circuit, overheating or mal-
you to risk of electric shock or other hazards.
function, be sure to follow the directions
Refer all installation and servicing of your dis-
below.
play unit to authorized Pioneer service person-
— Disconnect the negative terminal of the
nel.
battery before installation.
! Secure all wiring with cable clamps or electri-
— Secure the wiring with cable clamps or ad-
cal tape. Do not allow any bare wiring to re-
hesive tape. To protect the wiring, wrap ad-
main exposed.
hesive tape around them where they lie
! Do not drill a hole into the engine compart-
against metal parts.
ment to connect the yellow cable of the dis-
— Place all cables away from moving parts,
play unit to the vehicle battery. Engine
such as gear shift and seat rails.
vibration may eventually cause the insulation
— Place all cables away from hot places,
to fail at the point where the wire passes from
such as near the heater outlet.
the passenger compartment into the engine
— Do not pass the yellow cable through a
compartment. Take extra care in securing the
hole into the engine compartment to con-
wire at this point.
nect to a battery.
! Make sure that cables will not interfere with
— Cover any disconnected cable connectors
moving parts of the vehicle, such as the gear-
with insulating tape.
shift, parking brake or seat sliding mechan-
— Do not remove RCA caps if RCA cables are
ism.
not used.
! Do not shorten any cables. If you do, the pro-
— Do not shorten any cables.
tection circuit may fail to work properly.
— Never cut the insulation of the power cable
of this unit in order to share the power
with other devices. Current capacity of the
cable is limited.
Connections
— Use a fuse of the rating prescribed.
Important
Cord function may differ according to the pro-
! When this unit is installed in a vehicle without
duct, even if cord color is the same. When con-
ACC (accessory) position on the ignition
necting this system, be sure to check all
switch, red cable must be wired to the term-
manuals and connect cords correctly.
inal that can detect the operation of the igni-
tion key. Otherwise, battery drain may result.
A
C
C
F
O
F
N
O
F
F
N
O
S
O
S
T
T
A
A
R
R
T
T
ACC posi-
No ACC po-
tion
sition
11
En
Section
04
Connection and
installation
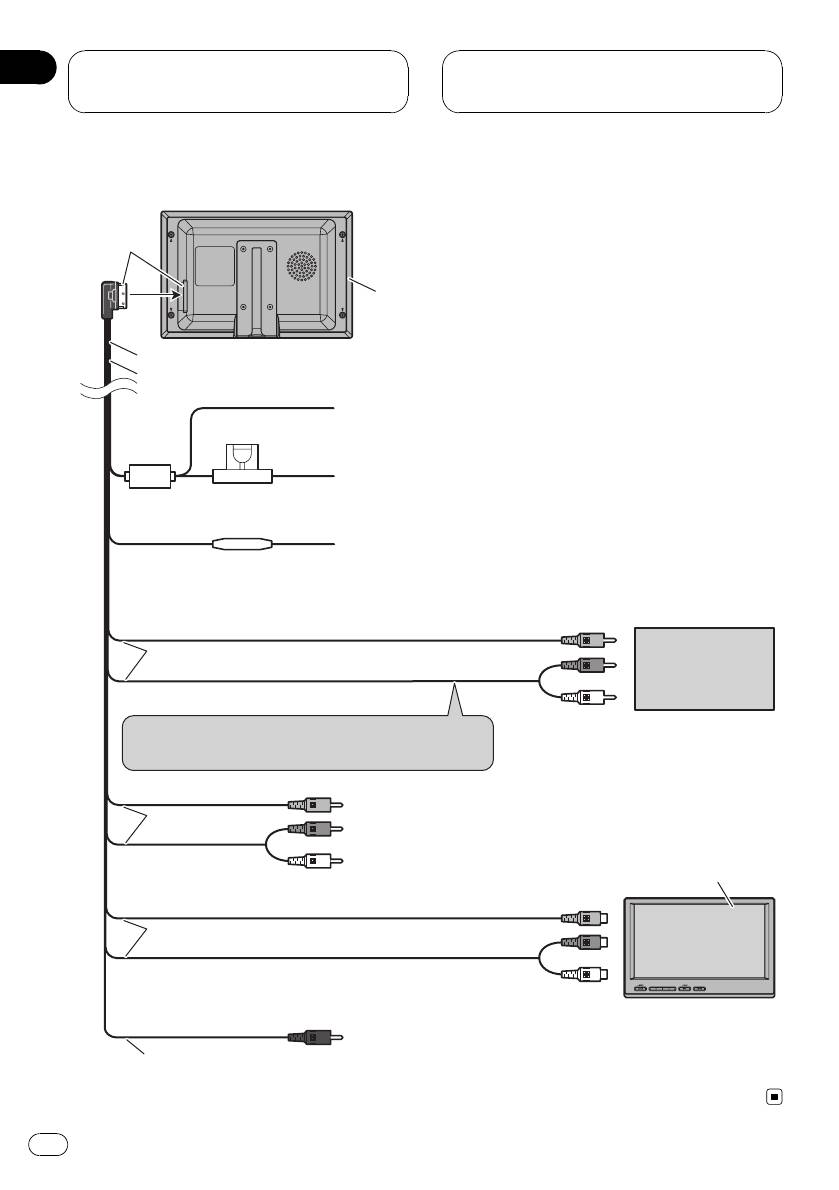
Connection Diagram
Black
Display unit
4 m
Power cable
Black (chassis ground)
Connect to a clean, paint-free metal location.
Fuse (4 A)
Yellow
Connect to the constant 12 V supply terminal.
Fuse resistor
Red
Connect to terminal controlled by ignition switch (12 V DC).
Connect to video output
Video 1 input (VIDEO 1 INPUT)
3 m
External video
component
(sold separately)
Audio 1 input (AUDIO 1 INPUT)
Connect to audio outputs
Connect to the terminal which is not interlocked to
the volume adjustment.
Video 2 input (VIDEO 2 INPUT)
3 m
Audio 2 input (AUDIO 2 INPUT)
AVD-W7900
(sold separately)
Connect to video 1 input
Video output (VIDEO OUTPUT)
3 m
Audio output (AUDIO OUTPUT)
Connect to audio 1 input
Remote control signal output (REMOTE CONTROLLER
3 m
SIGNAL OUTPUT): Not used.
12
En
Section
Connection and
04
installation
English
Installation
Important
! Check all connections and systems before
final installation.
! Do not use unauthorized parts. Use of un-
authorized parts may cause malfunctions.
! Consult your dealer if installation requires dril-
ling of holes or other modifications to the vehi-
# Never apply with much force to the display
cle.
unit, the mounting bracket or the release plates
! Do not install this unit where :
as this may damage it.
— it may interfere with operation of the vehi-
cle.
— it may cause injury to a passenger as a re-
sult of a sudden stop.
Mounting with flush mounting
bracket
1 Install securely the mounting bracket in
a safety location by using the supplied tap-
ping screws (M4 × 12).
2 Place the display unit into the mount-
ing bracket until it clicks.
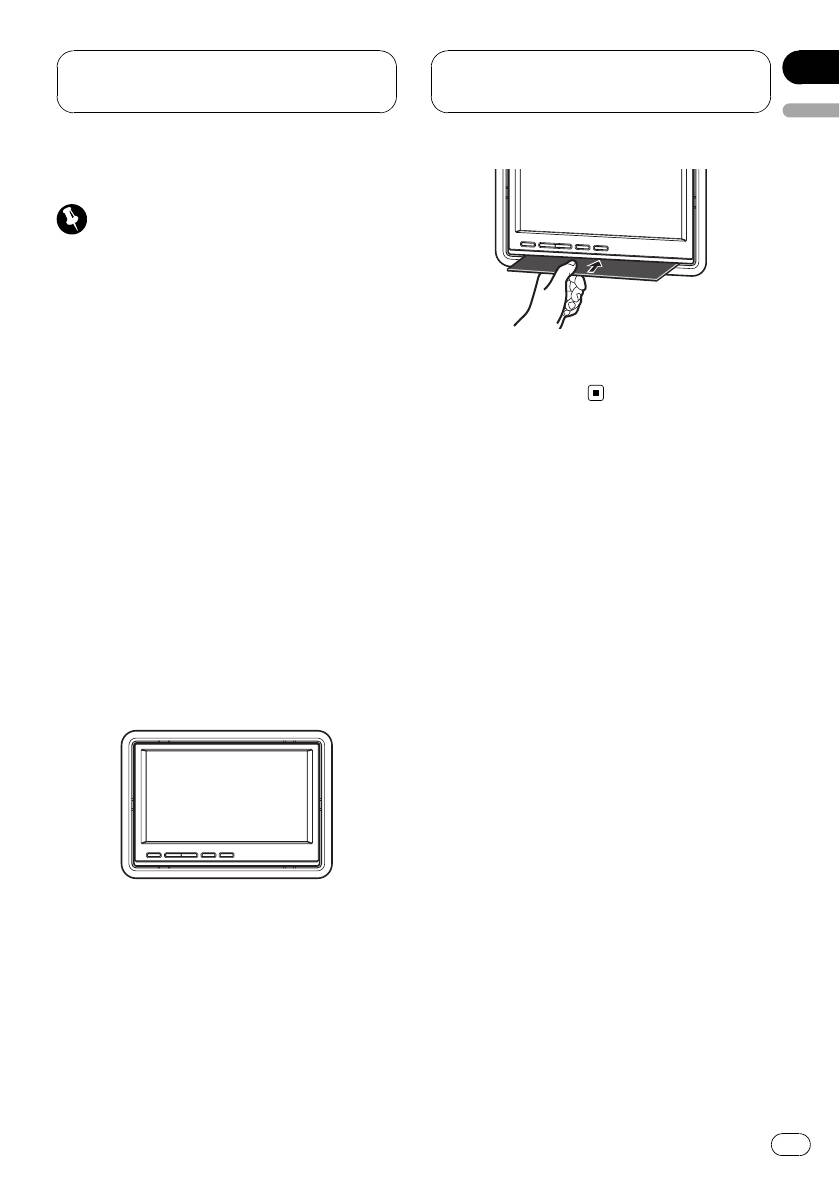
Removing the display unit
% Insert the release plates to gaps be-
tween the display unit and the mounting
bracket.
The display unit will be released.
13
En

Appendix
Additional Information
Using the display correctly
Liquid crystal display (LCD) screen
! If the display is installed near the vent of an
CAUTION
air conditioner, make sure that air from the
! If liquid or foreign matter should get inside
air conditioner is not blowing on it. Heat
this unit, turn off the power immediately and
from the heater may damage the LCD
consult your dealer or the nearest authorized
screen, and cool air from the cooler may
PIONEER Service Station. Do not use the unit
cause moisture to form inside the display
in this condition because doing so may result
resulting in possible damage. Also, if the
in a fire, electric shock, or other failure.
display is cooled down by the cooler, the
! If you notice smoke, a strange noise or smell,
screen may become dark, or the life span
or any other abnormal signs from the display,
of the small fluorescent tube used inside
turn off the power immediately and consult
the display may be shortened.
your dealer or the nearest authorized
! Small black dots or white dots (bright dots)
PIONEER Service Station. Using this unit in
may appear on the LCD screen. These are
this condition may result in permanent da-
due to the characteristics of the LCD
mage to the system.
screen and do not indicate a problem with
! Do not disassemble or modify this unit, as
the display.
there are high-voltage components inside
! At low temperatures, the LCD screen may
which may cause an electric shock. Be sure
be dark for a while after the power is turned
to consult your dealer or the nearest author-
on.
ized PIONEER Service Station for internal in-
! The LCD screen will be difficult to see if it is
spection, adjustments or repairs.
exposed to direct sunlight.
! When using a portable phone, keep the an-
tenna of the portable phone away from the
Handling the display
display to prevent disruption of the video by
! When the display is subjected to direct sun-
the appearance of spots, colored stripes,
light for a long period of time, it will be-
etc.
come very hot resulting in possible
damage to the LCD screen. When not
using this unit, avoid exposing it to direct
Keeping the display in good
sunlight.
condition
! The display should be used within the tem-
! When removing dust from the screen or
perature ranges shown below.
cleaning the display, first turn the system
Operating temperature range: -20 °C to +60
power off, then wipe with a soft dry cloth.
°C
! When wiping the screen, take care not to
Storage temperature range: -40 °C to +95
scratch the surface. Do not use harsh or
°C
abrasive chemical cleaners.
At temperatures higher or lower than the
operating temperature range the display
may not operate normally.
! The LCD screen of this unit is exposed in
order to increase its visibility within the ve-
hicle. Please do not press strongly on it as
this may damage it.
! Do not push the LCD screen with much
force as this may scratch it.
14
En

Appendix
Additional Information
English
Small fluorescent tube
! A small fluorescent tube is used inside the
display to illuminate the LCD screen.
— The fluorescent tube should last for ap-
proximately 10 000 hours, depending on
operating conditions. (Using the display
at low temperatures reduces the service
life of the fluorescent tube.)
— When the fluorescent tube reaches the
end of its useful life, the screen will be
dark and the image will no longer be
projected. If this happens, consult your
dealer or the nearest authorized
PIONEER Service Station.
15
En
Appendix
Additional Information
Specifications
General
Power source ............................. 14.4 V DC (10.8 V to 15.1 V
allowable)
Grounding system ................... Negative type
Max. current consumption
..................................................... 0.7 A
Storage temperature range
..................................................... -40 °C to +95 °C
Display unit
Dimensions (W × H × D) ...178 × 118 × 32 mm
Weight .......................................... 480 g
Screen size/aspect ratio ....... 7.0 inch wide/16:9
(effective display area: 154
× 87 mm)
Pixels ............................................. 336 960 (1 440 × 234)
T ype ................................................ TFT active matrix, transmis-
sive type
Color system .............................. NTSC/PAL/PAL-M/SECAM
compatible
Video input level ....................... 1.0 Vp-p/75 W
Max. audio input level ........... 1.5 Vrms/22 kW
Video output level .................... 1.0 Vp-p/75 W
Max. audio output level ........ 1.5 Vrms/1 kW
Operating temperature range
..................................................... -20 °C to +60 °C
Installation bezel
Dimensions (W × H × D) ...201 × 141 × 35 mm
Weight .......................................... 100 g
Note
Specifications and the design are subject to mod-
ifications without notice due to improvements.
16
En
Contenido
Gracias por haber comprado este producto Pioneer.
Lea con detenimiento esta s instrucciones sobre el funcionamiento del aparato,
para que pueda darle el mejor uso posible. Una vez que las haya leído, conserve
este manual en un lugar seguro para consultarlo en el futuro.
Español
Precauciones
– Diagrama de conexión 29
Instalación 30
INSTRUCCIONES DE SEGURIDAD
– Montaje con carcasa 30
IMPORTANTES 18
– Retirada de la unidad de display 30
Para garantizar la conducción segura del
vehículo 18
Información adicional
– Al utilizar un display conectado con la
Uso correcto del display 31
salida VIDEO OUTPUT 19
– Manejo del display 31
Para evitar la descarga de la batería 19
– Pantalla de visualización de cristal
líquido (LCD) 31
Antes de comenzar
– Mantenimiento del display en buen
Acerca de esta unidad 20
estado 32
Visite nuestro sitio Web 20
– Tubo fluorescente pequeño 32
En caso de problemas 20
Especificaciones 33
Para proteger la pantalla LCD 20
Para visualizar la pantalla LCD con
comodidad 21
– Cambio del modo panorámico 21
– Cambio del ajuste de la imagen 21
Instalación y retirada de la unidad de
display 21
– Instalación de la unidad de display 22
– Retirada de la unidad de display 22
Reinicialización del microprocesador 22
Utilización de esta unidad
Qué es cada cosa 24
– Display 24
Funciones básicas 24
– Encendido y apagado 24
– Selección de una fuente 24
– Cambio del modo panorámico 24
– Cambio del ajuste del atenuador de
luz 25
Configuración 25
– Cambio del ajuste de la imagen 25
– Selección del formato de vídeo 26
Conexión e instalación
Conexiones 27
17
Es
Sección
01
Precauciones
cualificación y experiencia en equipos
INSTRUCCIONES DE
electrónicos y accesorios para automóvi-
SEGURIDAD IMPORTANTES
les puede ser peligrosa y puede exponerle
Lea todas estas instrucciones sobre el display
al riesgo de sufrir una descarga eléctrica u
y consérvelas para consultarlas en el futuro.
otros peligros.
1 Lea todo este manual con suma atención
antes de utilizar el display.
2 Conserve este manual a mano para que
ADVERTENCIA
pueda consultar los procedimientos de
! NUNCA instale este display en un lugar en
operación y la información sobre seguri-
el que sea visible para el conductor. De lo
dad cuando sea necesario.
contrario, el conductor podría distraerse
3 Preste mucha atención a todas las adver-
con las imágenes mientras el vehículo está
tencias que se indican en este manual y
en movimiento.
siga las instrucciones con cuidado.
! La utilización de este display está sujeta a
4 No permita que otras personas utilicen
todas las leyes gubernamentales al respec-
este sistema hasta que hayan leído y com-
to de la ubicación o el uso.
prendido las instrucciones sobre el funcio-
! PIONEER no acepta ninguna responsabili-
namiento del aparato.
dad por cualquier tipo de problemas, daños
5 No instale el display en un lugar que (i)
o pérdidas incurridas como resultado de un
pueda obstaculizar la visión del conduc-
uso inadecuado del display o la violación
tor, (ii) pueda alterar el funcionamiento de
de cualquier ley gubernamental.
los sistemas operativos o los dispositivos
de seguridad del vehículo, en particular
las airbags y los botones de luces de se-
guridad o (iii) pueda afectar la capacidad
del conductor para manejar el vehículo de
Para garantizar la conducción
manera segura.
6 Al igual que cualquier accesorio ubicado
segura del vehículo
en el interior del vehículo, el display no
debe desviar su atención de la conducción
ADVERTENCIA
segura del vehículo. Si tiene dificultades
! Para evitar el riesgo de accidente y la posible
para utilizar el sistema o leer el display,
violación de las leyes pertinentes, las unida-
aparque en un lugar seguro antes de
des de display trasero no deben ubicarse en
hacer algún ajuste.
un lugar que distraiga la atención visual del
7 Recuerde usar siempre el cinturón de se-
conductor.
guridad cuando conduzca el vehículo. En
! El display está diseñado únicamente para su
caso de accidente, las lesiones pueden ser
uso en los asientos traseros. NUNCA instale
mucho más graves si el cinturón de segu-
el display en un lugar que permita al conduc-
ridad no está debidamente abrochado.
tor ver imágenes mientras conduce.
ADVERTENCIA
! No trate de instalar o reparar el display
usted mismo. L a instalación o la repara-
ción del display por parte de personas sin
18
Es

Sección
Precauciones
01
! En algunos países o estados, puede ser ilícita
la visualización de imágenes en un display
dentro de un vehículo, incluso por otras perso-
nas que no sean el conductor. En los casos en
que resulten aplicables, estas normas deben
Español
respetarse y no deben usarse las unidades de
display.
Al utilizar un display conectado
con la salida VIDEO OUTPUT
La salida VIDEO OUTPUT de esta unidad sirve
para conectar un display que permita a los pa-
sajeros de los asientos traseros ver un DVD o
un programa de TV.
ADVERTENCIA
NUNCA instale el display trasero en un lugar
que permita al conductor ver un DVD o un pro-
grama de TV mientras conduce.
Para evitar la descarga de
la batería
Asegúrese de que el motor del vehículo esté
en marcha cuando utilice esta unidad. En
caso contrario, se podría agotar la batería.
19
Es
Sección
02
Antes de comenzar
! Mantenga siempre el volumen lo suficiente-
mente bajo como para que pueda escuchar
los sonidos que provienen del exterior del ve-
hículo.
! Proteja esta unidad de la humedad.
Si desea deshacerse de este producto, no lo
mezcle con los residuos generales de su
hogar. De conformidad con la legislación vi-
gente, existe un sistema de recogida distinto
Visite nuestro sitio Web
para los productos electrónicos que requieren
Visítenos en el siguiente sitio:
un procedimiento adecuado de tratamiento,
recuperación y reciclado.
Las viviendas privadas en los estados miem-
bros de la UE, en Suiza y Noruega pueden de-
volver gratuitamente sus productos
! Registre su producto. Conservaremos los
electrónicos usados en los centros de recolec-
datos de su compra archivados para que
ción previstos o bien en una tienda minorista
pueda consultar esta información en caso
(si adquieren un producto similar nuevo).
de que deba efectuar un reclamo a la com-
En el caso de los países que no se han men-
pañía de seguros por pérdida o robo.
cionado en el párrafo anterior, póngase en
! En nuestro sitio Web ofrecemos la informa-
contacto con las autoridades locales a fin de
ción más reciente acerca de Pioneer
conocer el método de eliminación correcto.
Corporation.
Al actuar siguiendo estas instrucciones, se
asegurará de que el producto eliminado se so-
meta a los procesos de tratamiento, recupera-
ción y reciclaje necesarios, evitando de este
En caso de problemas
modo efectos potencialmente negativos en el
entorno y la salud humana.
En caso de que este producto no funcione co-
rrectamente, comuníquese con su concesio-
nario o el Servicio técnico oficial Pioneer más
próximo a su domicilio.
Acerca de esta unidad
PRECAUCIÓN
! No permita que esta unidad entre en contacto
Para proteger la pantalla LCD
con líquidos. Eso podría producir una descar-
! Mantenga el display fuera del alcance de la
ga eléctrica. Además, el contacto con líquidos
luz solar directa cuando no se utilice esta
puede causar daños en esta unidad, humo y
unidad. La exposición prolongada a la luz
recalentamiento.
solar puede causar un fallo de funciona-
! Conserve este manual a mano para que
miento de la pantalla LCD como conse-
pueda consultar los procedimientos de opera-
cuencia de las altas temperaturas
ción y las precauciones cuando sea necesa-
generadas.
rio.
20
Es


