Pioneer DJM-350-W: инструкция
Раздел: Музыкальное Оборудование
Тип: Микшерный Пульт
Инструкция к Микшерному Пульту Pioneer DJM-350-W
DJ MIXER
TABLE DE MIXAGE
DJ-MISCHPULT
MIXER PER DJ
DJM-350
DJ MENGPANEEL
MESA DE MEZCLAS DJ
DJ микшерный пульт
http://www.prodjnet.com/support/
The Pioneer website listed above provides answers to frequently asked questions, information about
software, and other up-to-date data of assistance to our customers.
Le site Web de Pionner ci-dessus fournit des réponses aux questions souvent posées, des informations
au sujet des logiciels et d’autres données mises à jour afin de venir en aide à notre clientèle.
Auf der oben angegebenen Pioneer-Website werden unseren Kunden Antworten auf häufig gestellte
Fragen, Informationen über Software und weitere Unterstützung mit neuesten Daten angeboten.
Operating Instructions
Mode d’emploi
Bedienungsanleitung
Istruzioni per l’uso
Handleiding
Manual de instrucciones
Инструкции по эксплуатации
DRB1501-D
1
Thank you for buying this Pioneer product. Please read through these operating instructions so you will know how to operate your model prop-
erly. After you have finished reading the instructions, put them away in a safe place for future reference.
In some countries or regions, the shape of the power plug and power outlet may sometimes differ from that shown in the explanatory drawings.
However the method of connecting and operating the unit is the same.
2
En
DRB1501-D
2
IMPORTANT
CAUTION
RISK OF ELECTRIC SHOCK
DO NOT OPEN
The lightning flash with arrowhead symbol,
CAUTION:
The exclamation point within an equilateral
within an equilateral triangle, is intended to
TO PREVENT THE RISK OF ELECTRIC
triangle is intended to alert the user to the
alert the user to the presence of uninsulated
SHOCK, DO NOT REMOVE COVER (OR
presence of important operating and
“dangerous voltage” within the product’s
BACK). NO USER-SERVICEABLE PARTS
maintenance (servicing) instructions in the
enclosure that may be of sufficient
INSIDE. REFER SERVICING TO QUALIFIED
literature accompanying the appliance.
magnitude to constitute a risk of electric
SERVICE PERSONNEL.
shock to persons.
D3-4-2-1-1_A1_En
Replacement and mounting of an AC plug on the power supply cord of this unit should be performed only by qualified
service personnel.
IMPORTANT: THE MOULDED PLUG
This appliance is supplied with a moulded three pin mains plug for your safety and convenience. A 5 amp fuse is fitted in this plug.
Should the fuse need to be replaced, please ensure that the replacement fuse has a rating of 5 amps and that it is approved by ASTA or BSI to
BS1362.
Check for the ASTA mark or the BSI mark on the body of the fuse.
If the plug contains a removable fuse cover, you must ensure that it is refitted when the fuse is replaced. If you lose the fuse cover the plug
must not be used until a replacement cover is obtained. A replacement fuse cover can be obtained from your local dealer.
If the fitted moulded plug is unsuitable for your socket outlet, then the fuse shall be removed and the plug cut off and disposed of
safely. There is a danger of severe electrical shock if the cut off plug is inserted into any 13 amp socket.
If a new plug is to be fitted, please observe the wiring code as shown below. If in any doubt, please consult a qualified electrician.
IMPORTANT: The wires in this mains lead are coloured in accordance with the following code:
Blue : Neutral Brown : Live
As the colours of the wires in the mains lead of this appliance may not correspond with the coloured markings identifying the terminals in
your plug, proceed as follows;
The wire which is coloured BLUE must be connected to the terminal which is marked with the
letter N or coloured BLACK.
The wire which is coloured BROWN must be connected to the terminal which is marked with the
letter L or coloured RED.
How to replace the fuse: Open the fuse compartment with a screwdriver and replace the fuse.
D3-4-2-1-2-2*_A2_En
If you want to dispose this product, do not mix it with general household waste. There is a separate collection system for used
electronic products in accordance with legislation that requires proper treatment, recovery and recycling.
Private households in the member states of the EU, in Switzerland and Norway may return their used electronic products free of charge to
designated collection facilities or to a retailer (if you purchase a similar new one).
For countries not mentioned above, please contact your local authorities for the correct method of disposal.
By doing so you will ensure that your disposed product undergoes the necessary treatment, recovery and recycling and thus prevent potential
negative effects on the environment and human health.
K058b_A1_En

En
3
DRB1501-D
32
WARNING
If the AC plug of this unit does not match the AC
This equipment is not waterproof. To prevent a fire or
outlet you want to use, the plug must be removed
shock hazard, do not place any container filled with
and appropriate one fitted. Replacement and
liquid near this equipment (such as a vase or flower
mounting of an AC plug on the power supply cord of
pot) or expose it to dripping, splashing, rain or
this unit should be performed only by qualified
moisture.
service personnel. If connected to an AC outlet, the
D3-4-2-1-3_A1_En
cut-off plug can cause severe electrical shock. Make
sure it is properly disposed of after removal.
WARNING
The equipment should be disconnected by removing
Before plugging in for the first time, read the following
the mains plug from the wall socket when left unused
section carefully.
for a long period of time (for example, when on
The voltage of the available power supply differs
vacation).
according to country or region. Be sure that the
D3-4-2-2-1a_A1_En
power supply voltage of the area where this unit
will be used meets the required voltage (e.g., 230 V
or 120 V) written on the rear panel.
CAUTION
D3-4-2-1-4*_A1_En
The switch on this unit will not completely shut off
all power from the AC outlet. Since the power cord
WARNING
serves as the main disconnect device for the unit,
To prevent a fire hazard, do not place any naked flame
you will need to unplug it from the AC outlet to shut
sources (such as a lighted candle) on the equipment.
down all power. Therefore, make sure the unit has
D3-4-2-1-7a_A1_En
been installed so that the power cord can be easily
unplugged from the AC outlet in case of an accident.
WARNING
To avoid fire hazard, the power cord should also be
Slots and openings in the cabinet are provided for
unplugged from the AC outlet when left unused for a
ventilation to ensure reliable operation of the product,
long period of time (for example, when on vacation).
and to protect it from overheating. To prevent fire
D3-4-2-2-2a*_A1_En
hazard, the openings should never be blocked or
covered with items (such as newspapers, table-cloths,
POWER-CORD CAUTION
curtains) or by operating the equipment on thick carpet
Handle the power cord by the plug. Do not pull out the
or a bed.
plug by tugging the cord and never touch the power
D3-4-2-1-7b*_A1_En
cord when your hands are wet as this could cause a
Operating Environment
short circuit or electric shock. Do not place the unit, a
Operating environment temperature and humidity:
piece of furniture, etc., on the power cord, or pinch the
+5 °C to +35 °C (+41 °F to +95 °F); less than 85 %RH
cord. Never make a knot in the cord or tie it with other
(cooling vents not blocked)
cords. The power cords should be routed such that they
Do not install this unit in a poorly ventilated area, or in
are not likely to be stepped on. A damaged power cord
locations exposed to high humidity or direct sunlight (or
can cause a fire or give you an electrical shock. Check
strong artificial light)
the power cord once in a while. When you find it
D3-4-2-1-7c*_A1_En
damaged, ask your nearest PIONEER authorized
service center or your dealer for a replacement.
S002*_A1_En

How to read this manual
The names of displays, menus, and buttons in this manual are
enclosed in brackets. (e.g. [MASTER] channel, [ON/
OFF], [File] menu)
Before start
Features .......................................................................................................5
System setup example ................................................................................5
What’s in the box .........................................................................................5
Connections
Names of terminals.....................................................................................6
Connecting the input/
output terminals ....................................................7
Operations
Control panel ...............................................................................................8
About the power switch of this unit ...........................................................9
Basic operations (mixer section) ...............................................................9
Monitoring the sound over headphones (headphones section) ..........11
Using the effect function (master effect section) ..................................11
Using a microphone or external device (MIC/
AUX section)
...........................11
Recording the performance (USB recording section) ..........................12
About the auto standby function .............................................................12
Additional information
Troubleshooting ........................................................................................14
About errors ...............................................................................................15
About USB devices/
files usable on this unit ..........................................15
About the exemption clauses ..................................................................16
Specifications ............................................................................................16
4
En
DRB1501-D
4
English
Before start
Features
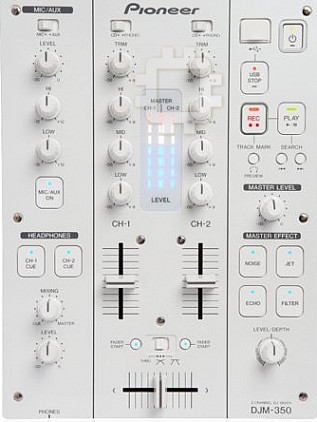
This unit is a DJ mixer that carries over the technology of the Pioneer DJM series, the world standard in club sound. It is a standard type unit
equipped with the basic functions required for mixing, enabling full-fledged DJ play easily.
USB recording
MIC/
AUX INPUT
With this unit, the sound of DJ performances can easily be recorded
This unit is equipped with a microphone/
auxiliary input allowing con-
on USB devices (portable flash memory devices, etc.). The recorded
nection of a microphone or external device (sampler, portable audio
sound can also be played on this unit.
device, etc.). DJ play is possible using up to three sets of inputs: CH-1
(channel 1), CH-2 (channel 2) and MIC/
AUX (microphone/
auxiliary
channel).
3-band equalizer
This unit is equipped with a 3-band equalizer allowing the volume of
FADER START
the high, medium and low frequency ranges to be adjusted separately.
Not only can the tone be adjusted to your tastes, the sound for a cer-
When connected to a Pioneer DJ player with a control cord (included
tain range can be turned completely off by turning the control all the
with the DJ player), playback on the DJ player can be started by oper-
way counterclockwise (isolator function).
ating this unit’s fader (Fader Start Play).
MASTER EFFECT (GATE, CRUSH, JET,
FILTER)
This unit is equipped with four effect buttons allowing the sound to
be changed in various ways. The mood of the sound can be modified
easily, simply by pressing a button and turning the control.
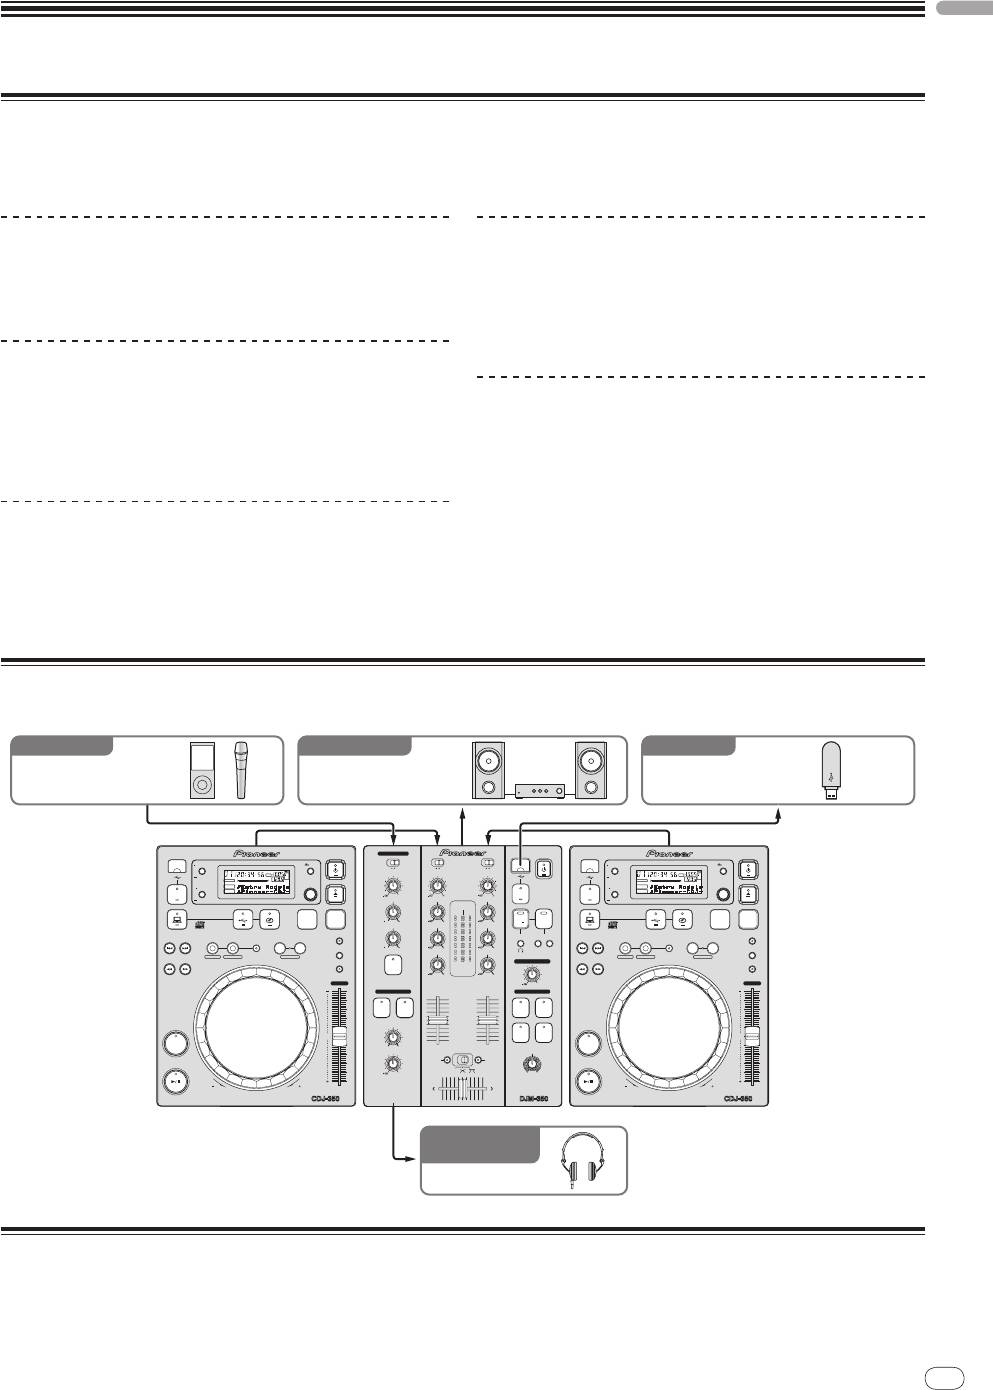
System setup example
A DJ system like the one shown on the diagram below can be achieved by combining this unit with a DJ player and peripheral equipment.
En
5
DRB1501-D
5
For audio output For recordingFor audio input
Portable audio device/
Component, amplifier,
USB device
microphone
powered speaker, etc.
MIC /AUX
TIME MODE
BACK
REMAIN
MS
FTEMPO %
MIC
AUX
CD
PHONO
CD
PHONO
TIME MODE
BACK
LOCK
16
LEVEL
TRIMTRIM
REMAIN
MS
FTEMPO %
AUTO CUE
AUTO CUE
LOCK
16
A.CUE
BPM
A.CUE
BPM
DISPLAY
INFO
SELECT PUSH
DISPLAY
INFO
SELECT PUSH
BROWSE
STOP
USB
0
9
9
USB
STOP
USB
BROWSE
UTILITY
DISC
STOP
HI
HI
HI
UTILITY
DISC
SOURCE SELECT
CH- 1 CH- 2
MASTER
BPM
SOURCE SELECT
MP3/AAC
PLAYLIST
LOCK
12
12
9
9
REC
PLAY
MP3/AAC
PLAYLIST
LOCK
BPM
WAV/AIFF
LOW
MID
MID
WAV/AIFF
TRACK SEARCH
IN/CUE OUT
RELOOP/EXIT
BEAT LOOP
VINYL MODE
TRACK MARK SEARCH
TRACK SEARCH
IN/CUE OUT
RELOOP/EXIT
BEAT LOOP
VINYL MODE
LOOP
12
12
9
9
LOOP
SEARCH
OUT ADJUSTHOT LOOP
LOOP DRIVE
TEMPO RANGE
LOW
LOW
PREVIEW
OUT ADJUSTHOT LOOP
LOOP DRIVE
TEMPO RANGE
MASTER TEMPO
MIC/AUX
MASTER LEVEL
SEARCH
ON
LEVEL
MASTER TEMPO
9
9
TEMPO
CH- 1
CH-2
0
TEMPO
HEADPHONES
MASTER EFFECT
CUE
CH-1
CH-2
CUE
GATE JET
MIXING
0
FILTERCRUSH
0
CUE
CUE MASTER
CUE
LEVEL
LEVEL/DEPTH
FADER
FADER
PLAY/PAUSE
START
START
PLAY/PAUSE
0
THRU
REVFWD
MULTI PLAYER
2 CHANNEL DJ MIXER
REVFWD
MULTI PLAYER
PHONES
CDJ-350CDJ-350 DJM-350
For checking the
audio input/output
Headphones
What’s in the box
! Power cable
! Warranty card
! Operating instructions (this document)
Оглавление
- Before start
- Connections
- Operations
- Additional information
- Informations préliminaires
- Raccordements
- Opérations
- Informations supplémentaires
- Vor der Inbetriebnahme
- Anschlüsse
- Bedienungen
- Zusätzliche Informationen
- Prima di cominciare
- Collegamenti
- Operazioni
- Informazioni aggiuntive
- Alvorens te beginnen
- Aansluitingen
- Bediening
- Aanvullende informatie
- Antes de empezar a usar la unidad
- Conexiones
- Operaciones
- Información adicional
- До начала
- Подключения
- Операции
- Дополнительная информация


