Pioneer VSX-S500-S: инструкция
Раздел: Бытовая, кухонная техника, электроника и оборудование
Тип: Ресивер/Усилитель
Инструкция к Ресиверу/Усилителю Pioneer VSX-S500-S
VSX-S500-K/-S
AUDIO/VIDEO MULTI-CHANNEL RECEIVER
Quick Start Guide
RECEPTEUR AUDIOVISUEL MULTICANAL
Guide rapide
SINTOAMPLIFICATORE AUDIO/VIDEO MULTICANALE
Guida di avvio rapido
AUDIO/VIDEO MULTIKANAALS RECEIVER
Snelstartgids
RECEPTOR AUDIO-VIDEO MULTICANAL
Guía de inicio rápido
AUDIO-/VIDEO- MEHRKANAL-RECEIVER
Kurzanleitung
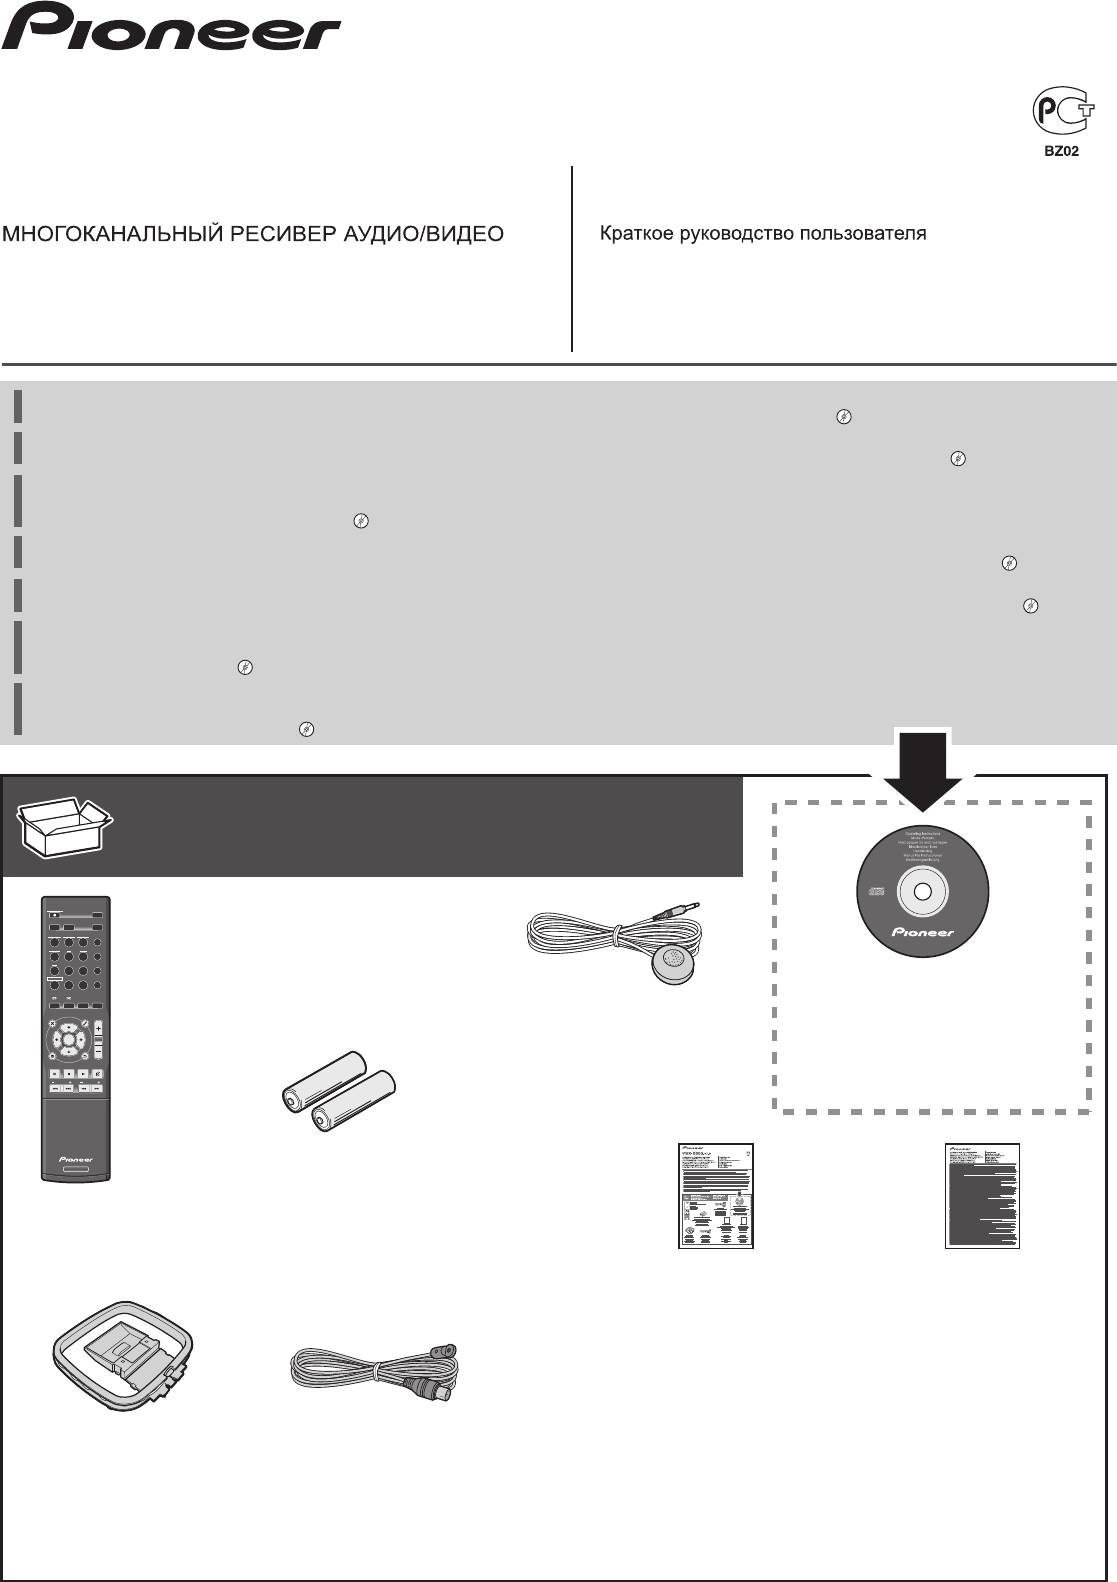
Thank you for buying this Pioneer product. This Quick Start Guide includes instructions for basic connections and operations to allow simple use of the
receiver. For detailed descriptions of the receiver, see the “Operating Instructions” provided on the included CD-ROM ( ).
Merci pour l’achat de ce produit Pioneer. Ce guide rapide contient les instructions relatives aux raccordements et opérations de base permettant une
utilisation simple de ce récepteur. Pour des descriptions plus détaillées du récepteur, référez-vous au “Mode d’emploi” sur le CD-ROM ( ) fourni.
Благодарим вас за приобретение данного изделия Pioneer. В данном Кратком руководстве пользователя содержатся инструкции по основным
подключениям и операциям для упрощенного использования ресивера. Подробное описание ресивера см. в «Инструкции по эксплуатации»,
содержащихся на поставляемом CD-ROM ( ).
Vi ringraziamo per avere acquistato questo prodotto Pioneer. Questa Guida di avvio rapido comprende istruzioni per i collegamenti fondamentali e per le
operazioni essenziali di questo ricevitore. Per una descrizione dettagliata del ricevitore, vedere le “Istruzioni per l’uso” contenute nel CD-ROM ( ) accluso.
Hartelijk dank voor de aanschaf van dit Pioneer product. In deze snelstartgids vindt u de instructies voor de basisaansluitingen en de basisbediening voor een
eenvoudig gebruik van de receiver. Voor meer gedetailleerde informatie wordt u verwezen naar de “Handleiding” die op de bijgeleverde CD-ROM ( ) staat.
Muchas gracias por haber adquirido este producto de Pioneer. Esta Guía de inicio rápido incluye instrucciones para hacer las conexiones y operaciones
básicas que le permitirán hacer un uso sencillo del receptor. Para conocer una descripción detallada del receptor, consulte el “Manual de instrucciones”
suministrado con el CD-ROM ( ) incluido.
Vielen Dank, dass Sie sich für dieses Pioneer-Produkt entschieden haben. Die Kurzanleitung enthält Anweisungen für grundlegende Verbindungen und
Bedienvorgänge, um eine einfache Bedienung des Receivers zu ermöglichen. Detaillierte Beschreibungen des Receivers finden Sie in der „Bedienungsanlei-
tung“ auf der mitgelieferten CD-ROM ( ).
What’s in the box
Inhoud van de doos
Contenu du carton d’emballage
Contenido de la caja
Комплект поставки
Lieferumfang
Contenuto della confezione
VSX-S500
STANDBY/ON
Remote Control
ECO
D AUX A AUX
S.RTRV
Télécommande
iPod
USB
NETWORK
ADAPTER
AUTO
DIRECT
/
TUNER BD DVD
STANDARD
ALC
/
Пульт дистанционного управления
CD
STB GAME
SURR
ADV
Telecomando
RECEIVER
TV
PORTABLE
SOUND
WING
Afstandsbediening
CD-ROM (Operating instructions)
SLEEP SP-AB
DIMMER
AUDIO
STATUS
DISP
Mando a distancia
CD-ROM (Mode d’emploi)
Setup microphone
MENU
TOP
MENU
TOOLS
VOL
Fernbedienung
CD-ROM (Инструкции по эксплуатации)
Microphone de configuration
ENTER
CD-ROM (Istruzioni per l’uso)
Установочный микрофон
CTRL
iPod
CD-ROM (Handleiding)
HOME MENU
PTY
RETURN
BAND MUTE
Impostazione microfono
CD-ROM (Manual de instrucciones)
PRESET
TUNE
Microfoon voor instellen
CD-ROM (Bedienungsanleitung)
Micrófono de configuración
Mikrofon für die Einstellung
AAA size IEC R03 dry cell batteries x2
RECEIVER
Piles à anode sèche AAA IEC R03 x 2
Сухие батарейки размера AAA IEC R03, 2 шт.
Pile a secco AAA IEC R03 x2
AAA/IEC/R03 drogecelbatterijen x2
Pilas secas AAA, IEC R03 x 2
AAA/IEC/R03 Trockenbatterien x2
These quick start guide
Safety Brochure
Le présent Guide de démarrage
Instructions de sécurité
Это краткое руководство пользователя
Брошюра по технике безопасности
Guida per l’avvio rapido
Istruzioni per la sicurezza
Deze Quick Start-gids
Folder veiligheid
Esta guía de inicio rápido
Folleto de seguridad
Diese Kurzanleitung
Sicherheitsbroschüre
AM loop antenna
FM wire antenna
Power cord
Warranty card
Antenne cadre AM
Antenne filaire FM
Cordon d’alimentation
Carte de garantie
Рамочная антенна АМ
Проволочная антенна FM
Кабель питания
Гарантийный сертификат
Antenna AM a telaio
Antenna FM a filo
Cavo di alimentazione
Documento di garanzia
AM-raamantenne
FM-draadantenne
Netsnoer
Garantiebewijs
Antena de cuadro de AM
Antena de hilos de FM
Cable de alimentación
Tarjeta de garantía
MW-Rahmenantenne
UKW-Drahtantenne
Netzkabel
Garantiekarte
VSX-S500SYXCNQSG設変book.indb1VSX-S500SYXCNQSG設変book.indb1 2012/04/2314:39:382012/04/2314:39:38
English
Flow of settings on the receiver
VENTILATION CAUTION
When installing this unit, make sure to leave space
around the unit for ventilation to improve heat radiation
(at least 10 cm at top, 5 cm at rear, and 5 cm at each
side).
WARNING
Slots and openings in the cabinet are provided for
ventilation to ensure reliable operation of the product,
and to protect it from overheating. To prevent fire
hazard, the openings should never be blocked or
covered with items (such as newspapers, table-cloths,
curtains) or by operating the equipment on thick carpet
or a bed.
D3-4-2-1-7b*_A1_En
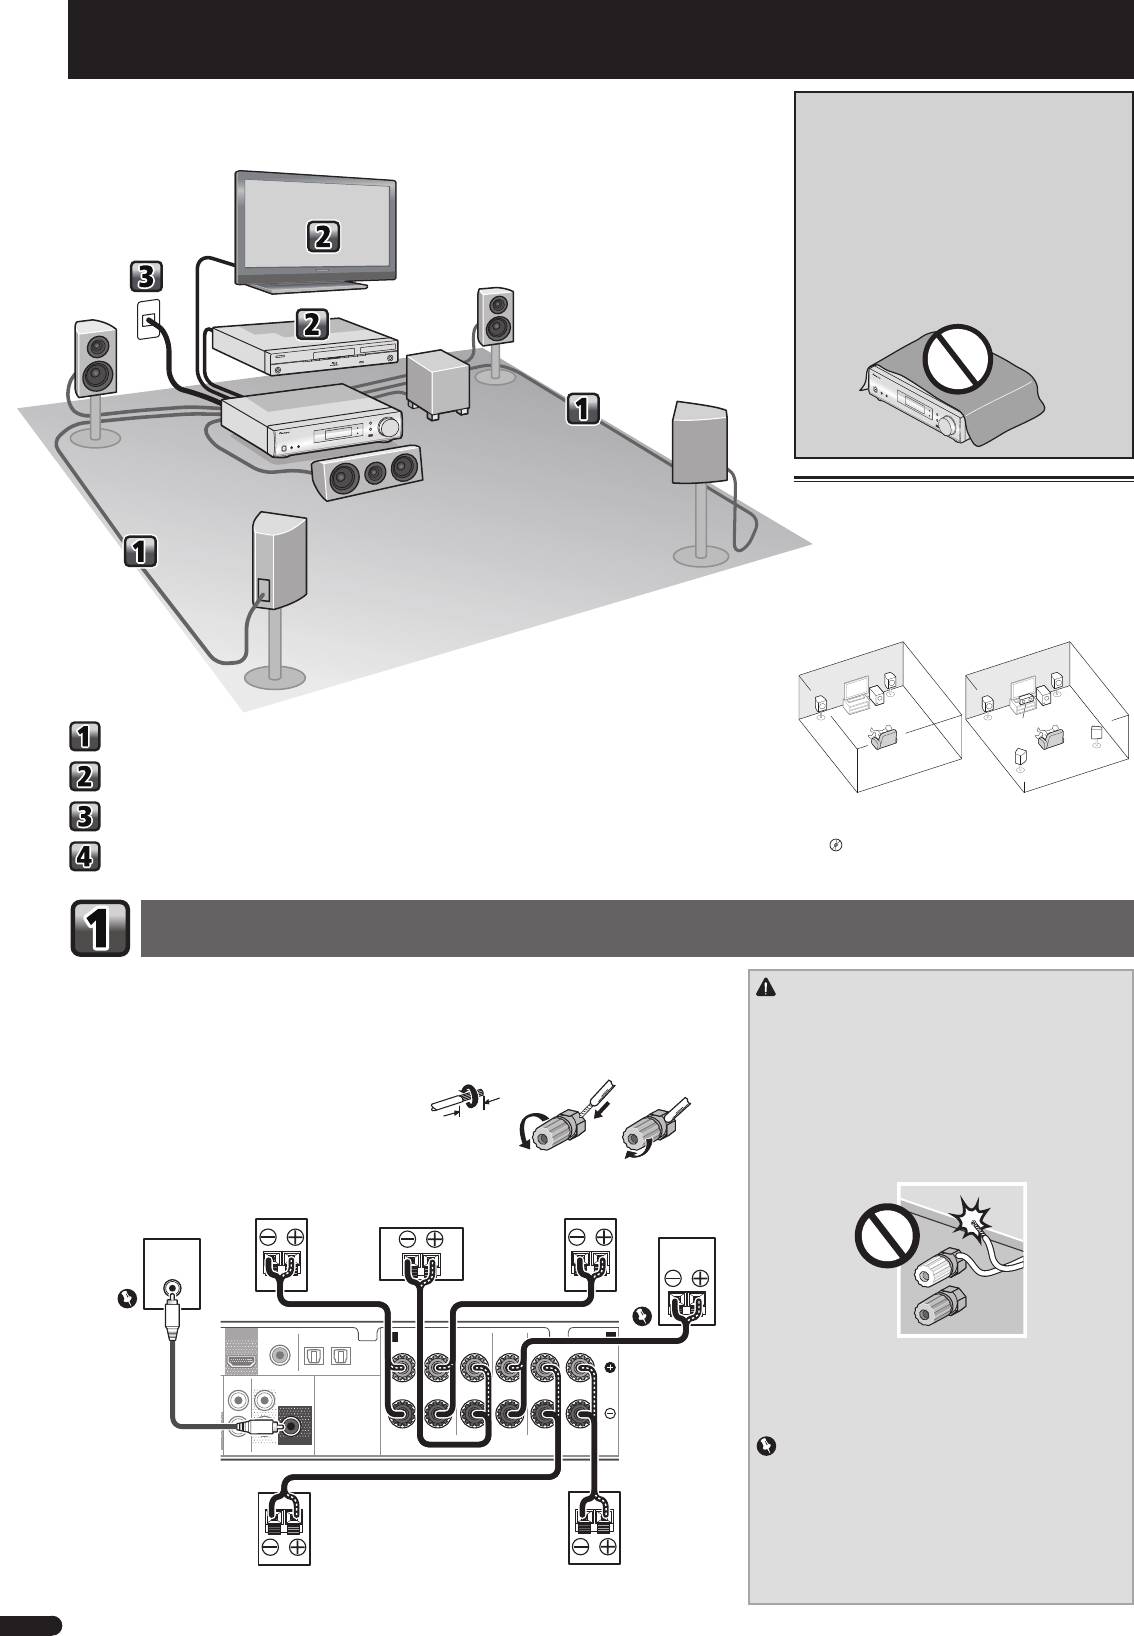
Placing the speakers
The receiver will work with just two stereo speakers (the
front speakers in the diagram) but using at least three
speakers is recommended, and a complete setup is
best for surround sound.
To achieve the best possible surround sound, install
your speakers as shown below.
2.1 channel surorund system: 5.1 channel surorund system:
R
R
L
L
SW
SW
C
Connecting the speakers
SR
SL
Connecting a TV and playback component
• In addition, surround back speakers, front height
Plugging the receiver
speakers or Speaker B can also be connected.
"Connect the surround back or front height
Basic setup
speakers"
Connecting the speakers
Make sure you connect the speaker on the right to the right (R) terminal and the speaker on the left to the
left (L) terminal. Also make sure the positive and negative (+/–) terminals on the receiver match those on
CAUTION
the speakers.
• These speaker terminals carry
HAZARDOUS LIVE
voltage.
You can use speakers with a normal impedance between 4
Ω
and 16
Ω
.
To prevent the risk of electric shock when connecting or
disconnecting the speaker cables, disconnect the power
Bare wire connections
cord before touching any uninsulated parts.
12 3
1
Twist exposed wire strands together.
• Make sure that all the bare speaker wire is twisted
together and inserted fully into the speaker terminal. If
2
Loosen terminal and insert exposed wire.
any of the bare speaker wire touches the back panel it
3
Tighten terminal.
may cause the power to cut off as a safety measure.
• Do not allow the speaker cable core to come into contact
with the receiver body.
OUT
OPTICAL
– If the speaker cable core comes into contact with any
ANALOG
SURR BACK/
metal portion of the receiver’s body, it may damage the
AUX
FRONT HEIGHT
AUDIO
L
speakers and cause smoke and fire.
(
Single
)
Insert speaker cables securely into the terminals and
check that the cable does not come out of easily.
IN
R
SUBWOOFER
PRE OUT
SPEAKERS
Important
• SPEAKERS SUBWOOFER terminals are Pioneer’s passive
subwoofer S-SLW500 connection terminals. If using
another model of subwoofer, be sure to use a model with
built-in amp and connect to the PREOUT SUBWOOFER
terminal.
• Please connect either passive or powered subwoofers,
as connecting both makes it impossible to achieve the
correct sound effect.
2
En
G
The unit is a full-fledged AV receiver equipped with an
abundance of functions and terminals. It can be used
TV
easily after following the procedure below to make the
connections and settings.
L
Front left
Blu-ray Disc player R
Front right
SW
Subwoofer
This receiver
C
Center
SR
Surround right
SL
Surround left
10 mm
Powerd
Front Right
Center
Front Left
Subwoofer
Subwoofer
S-SLW500
LINE LEVEL
INPUT
COAXIAL
A
FRONT
CENTER
SUBWOOFER/
SURROUND
/
SURR BACK
B
RL
RL
CD IN TV IN
DIGITAL AUX IN
R Bi-Amp L
Be sure to complete
all connections before
connecting this unit to
the AC power source.
Surround
Surround
Right
Left
VSX-S500SYXCNQSG設変book.indb2VSX-S500SYXCNQSG設変book.indb2 2012/04/2314:39:572012/04/2314:39:57
English
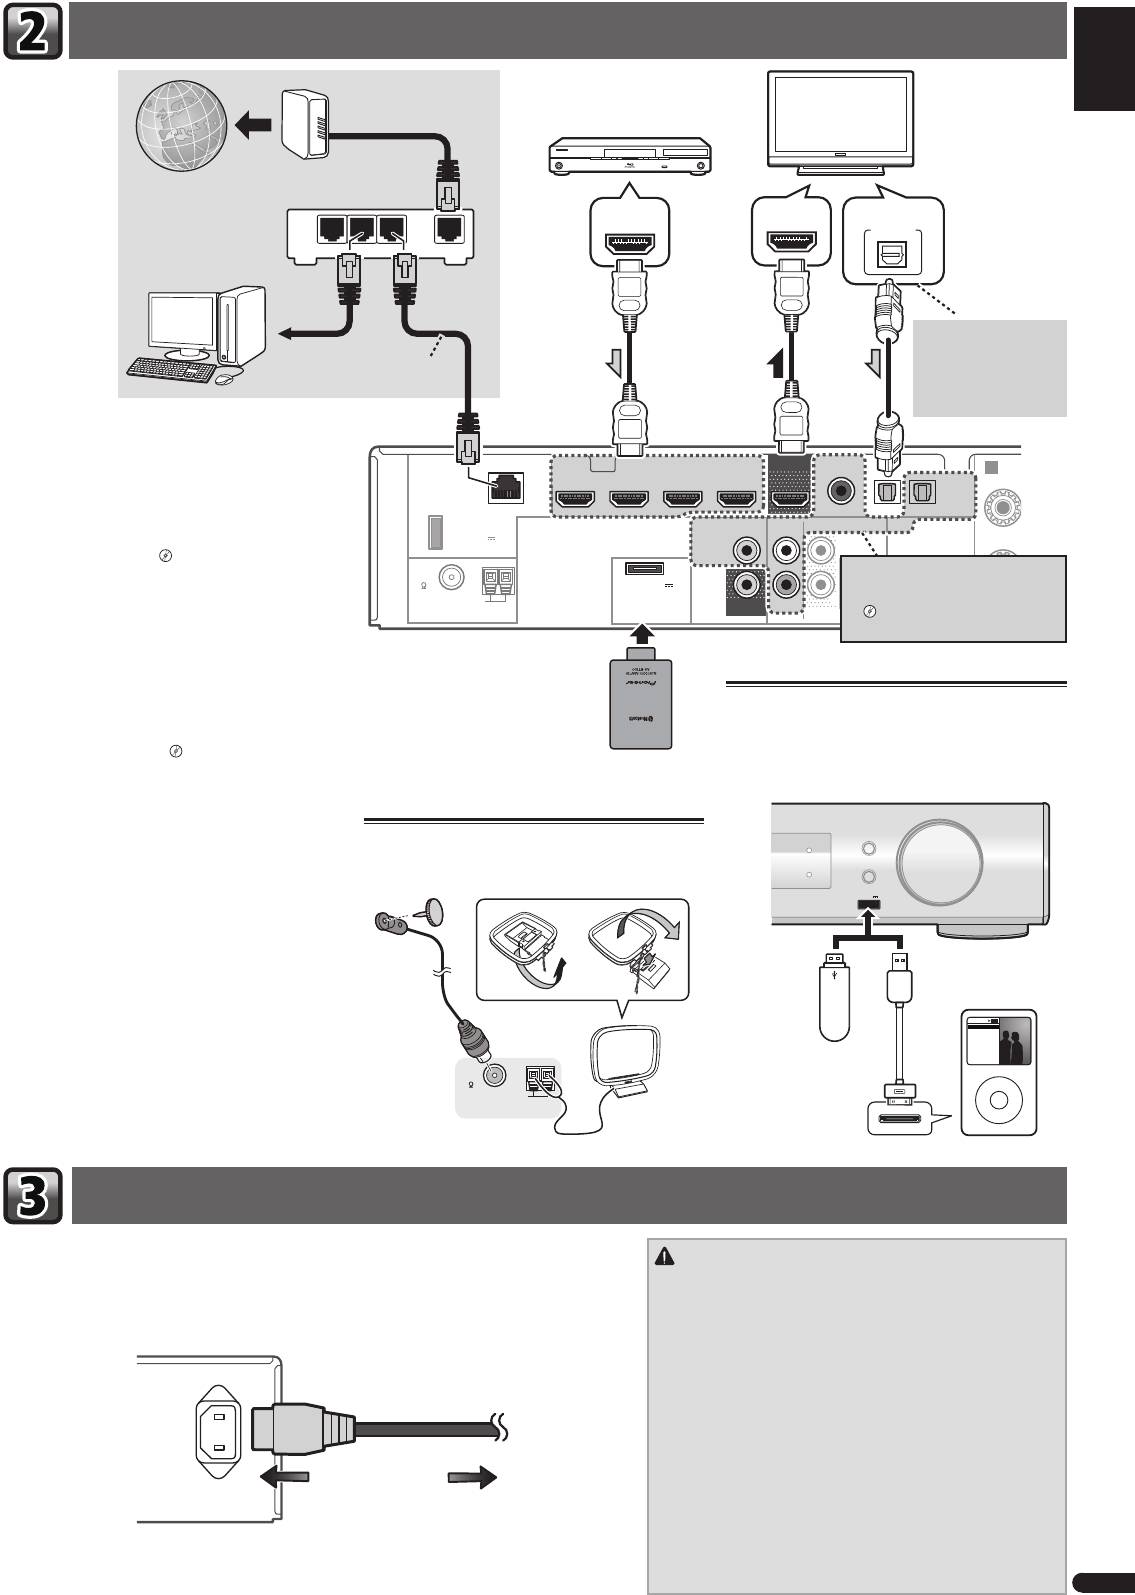
Connecting a TV and playback component
Français
Italiano
LAN
(
10/100
)
STB IN GAME INBD/BDR IN
DVD / DVR IN
OUT
COAXIAL
F
OPTICAL
Nederlands
HDMI
CD IN
TV IN
DIGITAL AUX IN
DC OUTPUT
for WIRELESS LAN
VIDEO
(
ANALOG
ANALOG
SURR BACK/
)
AUDIO
AUX
AUX
FRONT HEIGHT
(
OUTPUT 5 V
ASSIGNABLE
0.6 A MAX
)
L
IN
(
Single
)
FM
UNBAL
75
(
OUTPUT 5 V
0.1 A MAX
)
AM LOOP
MONITOR
R
IN
SUBWOOFER
ADAPTER PORT
OUT
PRE OUT
Español
Deutsch
Plugging the receiver
3
En
R
Modem
HDMI/DVI-compatible components
(Blu-ray Disc player, etc.)
HDMI/DVI-compatible TV
Internet
HDMI OUT
HDMI IN
DIGITAL AUDIO OUT
OPTICAL
LAN
Router
321
WAN
If the TV does not support
the HDMI Audio Return
to LAN port
Channel function, this
LAN cable
connection is required to
(sold separately)
listen to the TV sound over
the receiver.
If you have an HDMI or DVI (with HDCP) equipped
component (Blu-ray Disc player, etc.), you can connect
A
it to this receiver using a commercially available HDMI
R
cable.
If the TV and playback components support the Control
with HDMI feature, the convenient Control with HDMI
functions can be used.
"Control with HDMI
function"
If the device you wish to connect does
not have an HDMI output terminal, it
• The following connection/setting is required to listen
can be connected via these terminals.
to the sound of the TV over this receiver.
"Connecting your DVD player with
– If the TV does not support the HDMI Audio Return
no HDMI output"
Channel function, connect the receiver and TV
with audio cables (as shown).
– If the TV supports the HDMI Audio Return Channel
function, the sound of the TV is input to the
Bluetooth® ADAPTER
Connecting your iPod/iPhone or USB
receiver via the HDMI terminal, so there is no need
AS-BT100 or AS-BT200
device
to connect an audio cable. In this case, set
ARC
at
(sold separately)
HDMI Setup to ON.
Switch the receiver into standby, and then connect your
"HDMI Setup"
iPod/iPhone or USB device to the iPod iPhone USB
terminal on the front panel.
AUDIO/ VIDEO MULTI-CHANNEL RECEIVER
VSX
-S500
Refer to the Operating Instructions in CD-ROM for
INPUT SELECTOR
Connecting antennas
MCACC
instructions on how to connect and setup the Bluetooth
MASTER
ADAPTER and how to play music.
Connect FM wire antenna and the the AM loop antenna
DIRECT CONTROL
iPod iPhone
HDMI
VOLUME
as shown below.
iPod iPhone
USB
5 V
1
A
USB mass
iPod/iPhone
storage device
Music
Playlists
Genius >
Artists
The Bluetooth® word mark and logos are registered
Songs
Albums
Audiobooks
Composers
Genres
Radio
trademarks owned by Bluetooth SIG, Inc. and any use
FM
of such marks by PIONEER CORPORATION is under
UNBAL
USB cable (for iPod
MENU
75
AM LOOP
connection)
license. Other trademarks and trade names are those of
ANTENNA
their respective owners.
Only plug in after you have connected all your components to this receiver, including the speakers.
CAUTION
1
Plug the supplied power cord into the AC IN socket on the back of the receiver.
• Handle the power cord by the plug part. Do not pull out the
2
Plug the other end into a power outlet.
plug by tugging the cord, and never touch the power cord
when your hands are wet, as this could cause a short circuit
or electric shock. Do not place the unit, a piece of furniture, or
other object on the power cord or pinch the cord in any other
way. Never make a knot in the cord or tie it with other cables.
AC IN
The power cords should be routed so that they are not likely to
be stepped on. A damaged power cord can cause a fire or give
you an electric shock. Check the power cord once in a while.
If you find it damaged, ask your nearest Pioneer authorized
independent service company for a replacement.
• Do not use any power cord other than the one supplied with
this unit.
To power outlet
• Do not use the supplied power cord for any purpose other than
that described below.
• The receiver should be disconnected by removing the mains
plug from the wall socket when not in regular use, e.g., when
on vacation.
VSX-S500SYXCNQSG設変book.indb3VSX-S500SYXCNQSG設変book.indb3 2012/04/2314:39:592012/04/2314:39:59
Оглавление
- Flow of settings on the receiver
- Connecting a TV and playback component
- Basic setup
- Basic playback
- Organigramme des réglages sur le récep-
- Raccordement d’un téléviseur et de périphériques de lecture
- Confi guration de base
- Lecture de base
- Порядок выполнения настроек на ресивере
- Подключение телевизора и компонентов воспроизведения
- Основная настройка
- Основные операции воспроизведения
- Flusso delle impostazioni del ricevitore
- Connettere una TV e componenti playback
- Impostazioni di base
- Riproduzione di base
- Stroomschema voor de instellingen op de
- Aansluiting van uw TV en weergave-apparatuur
- Basisinstellingen
- Basisbediening voor afspelen
- Organigrama de ajustes del receptor
- Conexión de componentes de reproducción y de un TV
- Confi guración básica
- Reproducción básica
- Ablauf der Einstellungen auf dem Receiver
- Anschließen eines Fernsehers und von Wiedergabe-Geräten
- Grundeinstellungen
- Standard-Wiedergabe
