Pioneer S-CN301-LR: инструкция
Раздел: Бытовая, кухонная техника, электроника и оборудование
Тип: Домашний кинотеатр
Инструкция к Домашнему кинотеатру Pioneer S-CN301-LR

1
En
ඵᖑᏣقಜ
ᐈձКь
S-CN301-LR
(États-Unis)
S-CN301-LR.book 1 ページ 2012年2月10日 金曜日 午後4時37分
2
En
Thank you for buying this Pioneer product.
Please read through these operating instructions so you will know how to operate your model properly. After you have finished reading the
instructions, put them away in a safe place for future reference.
Before you start
• The nominal impedance of this speaker system is 6
Ω
.
Connect the speaker system to an amplifier with a load
impedance ranging 6
Ω
(a model with “6
Ω
” displayed on the
speaker output terminals).
In order to prevent damage to the speaker system resulting from
input overload, please observe the following precautions:
• Do not supply power to the speaker system in excess of the
maximum permissible input.
• When using a graphic equalizer to emphasize loud sounds in
the high-frequency range, do not use excessive amplifier
volume.
• Do not try to force a low-powered amplifier to produce loud
volumes of sound (the amplifier’s harmonic distortion will be
increased, and you may damage the speaker).
Caution: installation
• Switch off and unplug your AV equipment and consult the
instructions when connecting up components. Make sure you
use the correct connecting cables.
• Do not install the speaker system in areas exposed to direct
sunlight nor near heating appliances. Such conditions may
result in shrinkage of the wood materials and finish, leading to
deformation of the enclosure, discoloration, or damage to the
speakers.
Conditions considered unpleasant by humans are
detrimental to speakers as well. Providing a comfortable
environment for the speakers will assist them in
demonstrating their best performance. Please maintain the
usage environment as follows:
Temperature: 15
º
C to 25
º
C (59
º
F to 77
º
F)
Relative Humidity: 35 % to 65 % (winter)
40 % to 70 % (summer)
• When using room air-conditioners or stoves to rapidly cool
or heat room spaces, take precautions to avoid excessive
dehumidification.
• Avoid placing the speaker near areas such as windows, as
outside air can cause condensation to occur within the
speaker.
Caution: in use
• Do not use the speaker to output distorted sound for long
periods of times. This can result in a fire hazard.
• Do not sit or stand on the speaker, or let children play on the
speaker.
• Do not put large or heavy objects on top of the speaker.
• The speaker has a built-in auto recovery circuit breaker that
protects it from signal overloads. If the speaker is muted due
to an excessive signal input, turn down amplifier volume and
wait a few seconds. The circuit breaker will automatically
switch off and turn the speakers back on.
Cleaning the speaker cabinet
With normal use, wiping with a dry cloth should be sufficient to
keep the cabinet clean. If necessary, clean with a cloth dipped in
a neutral cleanser diluted five or six times with water, and wrung
out well. Do not use furniture wax or cleansers.
Never use thinners, benzine, insecticide sprays or other chemicals
on or near this unit since these will corrode the surfaces.
For U.S. model
For European model
WARNING:
Handling the cord on this product or
cords associated with accessories sold with the
product may expose you to chemicals listed on
proposition 65 known to the State of California and
other governmental entities to cause cancer and
birth defect or other reproductive harm.
D36-P5_B1_En
If you want to dispose this product, do not mix it with general household waste. There is a separate collection system for used
electronic products in accordance with legislation that requires proper treatment, recovery and recycling.
Private households in the member states of the EU, in Switzerland and Norway may return their used electronic products free of charge to
designated collection facilities or to a retailer (if you purchase a similar new one).
For countries not mentioned above, please contact your local authorities for the correct method of disposal.
By doing so you will ensure that your disposed product undergoes the necessary treatment, recovery and recycling and thus prevent potential
negative effects on the environment and human health.
K058b_A1_En
S-CN301-LR.book 2 ページ 2012年2月10日 金曜日 午後4時37分
3
En
E
ng
lis
h
How to install
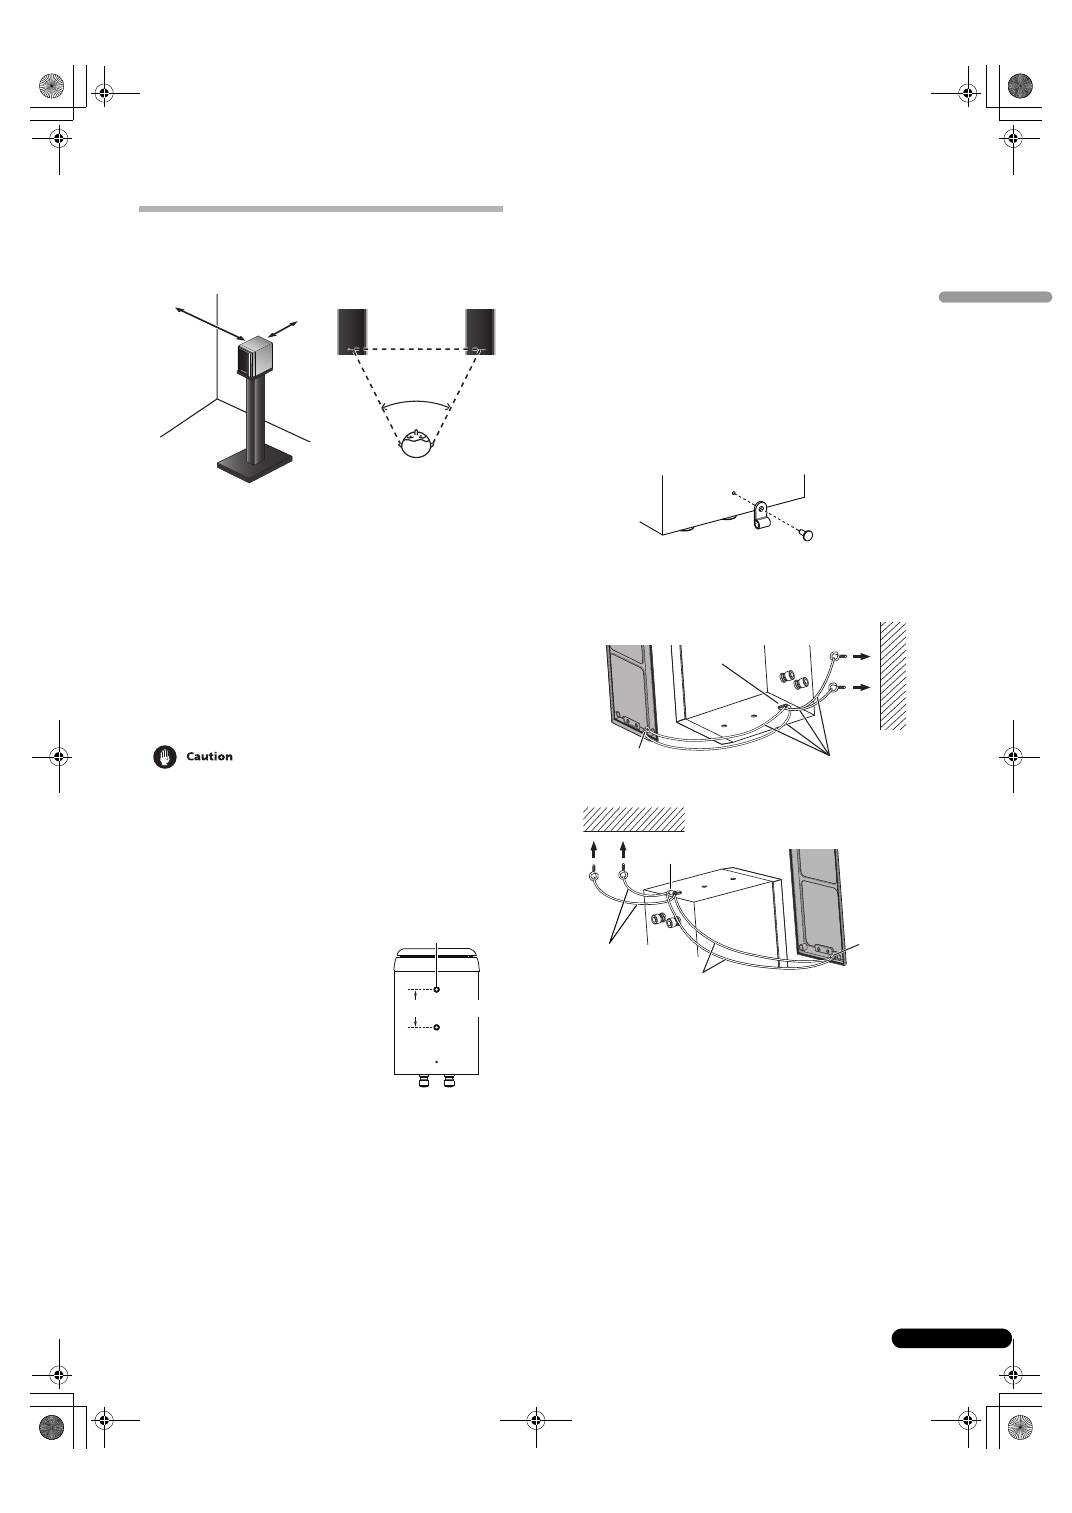
Choosing where to place the speaker systems
• Sounds played through speaker systems are easily affected in
subtle ways by the conditions in the listening space.
• For best sound, choose a solid floor upon which to place the
speakers, and position the speakers as illustrated above. The
level of low sounds can be adjusted by moving the speakers
closer to or further from the back wall. Adjust the speakers so
that they are equidistant from their respective side walls to
assure balanced sound.
• Place the left and right speakers equal distances from your
listening position for good stereo sound. Use speaker cords of
the same length for each speaker.
• If the room has a lot of reverberation, we recommend hanging
heavy fabric on the walls, and/or putting a carpet on the floor
to damp the sound. For best results, cover walls completely.
• Do not place the speaker on an unstable surface. It could
present a hazard if it falls, as well as damaging the equipment.
• These speakers are bookshelf-type speakers which will give
their best performance when placed on a solid, level surface
off the floor. Placing the speakers directly on the floor will
result in boomy, undefined sound. Ideally, the tweeters should
be at about ear level when seated in your listening position.
• This unit has two screw holes on the
bottom panel. These holes are
meant for joint use with speaker
brackets and speaker stands;
speaker brackets are commercially
available and can be used to mount
the speakers on a wall or ceiling. The
diagram on the right shows the
spacing and size of the holes. When
choosing a speaker bracket, make
sure that it can hold at least 2.9 kg (6
lbs 6 oz.). Please read through the
safety cautions on this operating
instruction, also the instructions
that come with the bracket. Speakers that are not mounted
properly are a hazard.
Mounting the Safety support fixture
• Make sure that the wall you intend to mount the speakers on
is strong enough to support them.
• Pass a commercially-available strong cord through the safety
support fixture to securely support the speaker to the wall. Be
sure that the wall to which you fasten the speaker is strong
enough to support the weight of the speaker. After fastening
the speaker, make sure that it does not fall over.
• Do not attach the safety support fixture directly to the wall. It
should only be used in conjunction with strong cord to prevent
the speaker from falling.
• Do not install your speakers overhead on the ceiling or wall.
The grill is designed to be detachable, and as such it may fall
and cause damage or personal injury if installed overhead.
• Using the accessory screws, fasten the safety support fixtures
to the holes in the bottom of the speakers.
Examples of mounting the speaker system using the
safety support fixture
Mounting on the wall
Mounting on the ceiling
• Loosen the screw on the grille’s back once, then bind the
strong cord around the screw several times and tighten the
screw.
• Pass two strong cords through the safety support fixture, and
fasten the speaker to the wall or ceiling as shown above.
• If you mount the speakers on the wall or ceiling, first make
sure that the mounting surface can bear at least 2.9 kg (6 lbs
6 oz.). If you’re unsure of the load capability, please seek
professional advice.
• When installing the speaker on the ceiling, the speaker will be
upside down. Even so, putting the grille in the proper way (the
way you can read Pioneer logo in the right way) is
recommended.
• After installing, make sure the speakers are securely fixed.
50 cm
(19
11
/
16
in.)
from the side
wall
20 cm
(7
7
/
8
in.)
from the
back wall
50º to 60º
Use M5 screws.
The screw hole depth:
9 mm (
3
/
8
in.)
60 mm (2
3
/
8
in.)
Grille
Speaker’s rear view
Safety support fixture
Screw
Strong cords
Speaker’s rear view
Safety support fixture
Grille
Screw
Strong cords
Strong cords
S-CN301-LR.book 3 ページ 2012年2月10日 金曜日 午後4時37分
Оглавление
- Before you start
- How to install
- Connections
- Specifications
- Avant de commencer
- Méthode d’installation
- Connexions
- Fiche technique
- Vor der Inbetriebnahme
- Installationsverfahren
- Anschlüsse
- Prima di cominciare
- Norme di installazione
- Collegamenti
- Dati tecnici
- Voordat u begint
- Installatie
- Aansluitingen
- Technische gegevens
- Antes de comenzar
- Modo de instalación
- Conexiones
- Especificaciones
- Antes de começar
- Como instalar
- Ligações
- Especificações
- Innan du startar
- Placering
- Anslutningar
- Specifikationer
- Inden du begynder
- Installationsanvisninger
- Tilslutninger
- Tekniske specifikationer
- Før du går i gang
- Installering
- Tilkoblinger
- Spesifikasjoner
- Ennen kuin aloitat
- Asennus
- Liitännät
- Tekniset tiedot
- Перед началом эксплуатации
- Правила установки
- Соединения
- Технические характеристики
- 開始之前
- 如何安裝
- 連接
- 規格
- PIONEER CORPORATION
