Pioneer KRL-46V: инструкция
Раздел: Бытовая, кухонная техника, электроника и оборудование
Тип: Домашний кинотеатр
Инструкция к Домашнему кинотеатру Pioneer KRL-46V
KRL46V_C1C4.pdf 2008/07/04 13:09:26
Примечание:
В соответствии со статьей 5 Закона Российской Федерации “О защите прав потребителя” и
Указанием Правительства Российской Федерации № 720 от 16 июня 1997 года, корпорация
Pioneer Europe NV устанавливает условие на следующую продолжительность срока
службы официально поставляемых на Российский рынок товаров.
Аудио и видеооборудование: 7 лет
Переносное аудиооборудование: 6 лет
Другое оборудование (наушники, микрофон и т.д.): 5 лет
Автомобильная электроника: 6 лет
D3-7-10-6_A_Ru
Discover the benefits of registering your product online at
http://www.pioneer.co.uk
(or http://www.pioneer.eu).
Découvrez les nombreux avantages offerts en enregistrant votre produit en ligne
maintenant sur
http://www.pioneer.fr
(ou http://www.pioneer.eu).
Bitte nutzen Sie die Möglichkeit zur Registrierung Ihres Produktes unter
http://www.pioneer.de
(oder http://www.pioneer.eu)
Registra il tuo prodotto su
http://www.pioneer.it
(o http://www.pioneer.eu) e
scopri subito quali vantaggi puoi ottenere!
Ontdek nu de voordelen van online registratie! Registreer uw Pioneer product via
C
http://www.pioneer.nl - http://www.pioneer.be
(of http://www.pioneer.eu)
M
Registre su producto en
http://www.pioneer.es
(o en http://www.pioneer.eu)
Descubra los beneficios de registrarse on-line:
Y
Зарегистрируйте Baшe изделие на
http://www.pioneer-rus.ru
(или
CM
http://www.pioneer.eu). Oзнакомьтесь с преимуществами регистрации в Интернет
MY
CY
CMY
K
PIONEER CORPORATION
4-1, Meguro 1-Chome, Meguro-ku, Tokyo 153-8654, Japan
Корпорация Пайонир
4-1, Мегуро 1-Чоме, Мегуро-ку, Токио 153-8654, Япония
PIONEER ELECTRONICS (USA) INC.
P.O. BOX 1540, Long Beach, California 90801-1540, U.S.A. TEL: (800) 421-1404
PIONEER ELECTRONICS OF CANADA, INC.
300 Allstate Parkway, Markham, Ontario L3R 0P2, Canada TEL: 1-877-283-5901, 905-479-4411
PIONEER EUROPE NV
Haven 1087, Keetberglaan 1, B-9120 Melsele, Belgium TEL: 03/570.05.11
PIONEER ELECTRONICS ASIACENTRE PTE. LTD.
253 Alexandra Road, #04-01, Singapore 159936 TEL: 65-6472-7555
PIONEER ELECTRONICS AUSTRALIA PTY. LTD.
178-184 Boundary Road, Braeside, Victoria 3195, Australia, TEL: (03) 9586-6300
PIONEER ELECTRONICS DE MEXICO S.A. DE C.V.
Blvd.Manuel Avila Camacho 138 10 piso Col.Lomas de Chapultepec, Mexico, D.F. 11000 TEL: 55-9178-4270
K002_Ru
Published by Pioneer Corporation.
Copyright © 2008 Pioneer Corporation.
All rights reserved.
Publication de Pioneer Corporation.
© 2008 Pioneer Corporation.
Tous droits de reproduction et de traduction réservés.
Printed in Spain
<TINS-D818WJZZ>
Imprimé en Espagne
1101
96
(1023.4)
(575.6)
(575,6)
(1023,4)
761
453
63 698
(122.5)
(122,5)
550
325
400
175
400

ENGLISH
OPERATION MANUAL
•
The illustrations and the OSD (On-Screen Display) in this operation manual are for explanation purposes and may vary slightly
from the actual operations.
•
The examples used throughout this manual are based on the KRL-46V model.
Contents
ENGLISH
Contents ............................................................................. 1
Menu operation................................................................ 29
Introduction ........................................................................ 2
What is the HOME MENU? ......................................... 29
Dear Pioneer customer ................................................. 2
Common operations .............................................. 29
Important Safety Precautions ........................................ 2
Basic adjustment ............................................................. 30
Remote control unit.......................................................3
Picture Settings ........................................................... 30
Controlling other equipment using the supplied
AV SELECTION ...................................................... 31
remote control unit ................................................ 4
Sound Settings ........................................................... 31
Trademarks ................................................................... 8
Power Save Settings ................................................... 31
TV (Front view) .............................................................. 9
Channel Settings ......................................................... 32
TV (Rear view) ............................................................... 9
Auto Installation ..................................................... 32
Preparation ...................................................................... 10
Digital channel settings .......................................... 32
Supplied accessories .................................................. 10
Analogue channel settings ..................................... 33
Attaching the stand unit .............................................. 10
Password/Parental lock settings ............................ 34
Inserting the batteries .................................................. 11
Language Settings (language, subtitle, multi audio) ..... 34
Using the remote control unit ...................................... 11
Useful Viewing functions ................................................ 35
Cautions regarding the remote control unit ............. 11
Selecting the picture size ............................................ 35
Installation precautions .......................................... 12
Selecting the WSS (Wide Screen Signalling)
Quick guide ...................................................................... 13
picture size automatically ..................................... 35
Initial installation overview ............................................ 13
Selecting the WSS (Wide Screen Signalling)
Before turning on the power........................................ 14
picture size manually ........................................... 35
Bundling the cables ............................................... 14
Selecting the picture size manually ......................... 35
Initial auto installation .................................................. 15
Selecting the recording picture size manually ......... 36
Checking signal strength and channel strength ...... 15
Selecting the HDMI picture size automatically ........ 36
Watching TV ..................................................................... 16
Other picture and audio settings ................................. 36
Daily operation ............................................................ 16
Adjusting image position ........................................ 36
Switching on/off ..................................................... 16
Reducing noise on the screen ................................ 36
Switching between analogue and
Automatic volume adjustment ................................ 36
digital broadcasts ................................................ 16
Emphasising dialogue ............................................ 36
Changing channels ................................................ 16
Outputting audio only ............................................. 36
Selecting an external video source ......................... 16
Display Settings .......................................................... 37
Selecting a sound mode ........................................ 16
Channel display ..................................................... 37
EPG (Electronic Programme Guide) ............................. 17
Time and Title display ............................................ 37
EPG Overview ............................................................. 17
Other useful features ...................................................... 38
Useful settings for using EPG ...................................... 17
Setting when using external devices ........................... 38
Selecting a programme using EPG.............................. 18
Input source settings ............................................. 38
Timer recording using EPG ......................................... 19
Skipping specified inputs ....................................... 38
Cancelling the timer recording ..................................... 19
Colour system settings .......................................... 38
Teletext ....................................................................... 20
Additional features ...................................................... 38
Using the MHEG-5 application (UK only) ..................... 20
Connecting a PC .............................................................. 39
Connecting external devices .......................................... 21
Connecting a PC ........................................................39
Introduction to connections ......................................... 21
Displaying a PC image on the screen .......................... 39
HDMI connection ................................................... 22
Selecting the picture size ....................................... 39
Component connection ......................................... 22
Adjusting the PC image automatically .................... 40
S-VIDEO/VIDEO connection .................................. 22
Adjusting the PC image manually ........................... 40
SCART connection ................................................ 23
Selecting input resolution ............................................ 40
Controlling devices with SCART using i/o link.A ..... 23
RS-232C port specifications ....................................... 41
Speaker/amplifier connection ................................. 24
PC compatibility chart ................................................. 42
Inserting a smart card ................................................. 25
RS-232C command list............................................... 42
HDMI CONTROL .............................................................. 26
Appendix .......................................................................... 43
Controlling HDMI devices using HDMI CONTROL ....... 26
Troubleshooting .......................................................... 43
HDMI CONTROL connection ...................................... 27
Updating your TV via DVB-T ....................................... 44
HDMI CONTROL Setup .............................................. 27
Reset .......................................................................... 44
Operating an HDMI CONTROL device ........................ 28
Identification................................................................ 44
Specifications .............................................................45
End of life disposal ...................................................... 46
1
KRL46V_GB.indd 1 2008/07/09 14:08:32
Introduction
Dear Pioneer customer
Thank you for your purchase of the Pioneer Flat screen TV. To ensure safety and many years of trouble-free
operation of your product, please read the Important Safety Precautions carefully before using this product.
Important Safety Precautions
•
Cleaning—Unplug the AC cord from the AC outlet before cleaning the product. Use a damp cloth to clean the product. Do not
use liquid cleaners or aerosol cleaners.
•
Water and moisture—Do not use the product near water, such as bathtub, washbasin, kitchen sink, laundry tub, swimming pool
and in a wet basement.
•
Do not place vases or any other water-filled containers on this product. The water may spill onto the product
causing fire or electric shock.
•
Stand—Do not place the product on an unstable cart, stand, tripod or table. Doing so can cause the product
to fall, resulting in serious personal injuries as well as damage to the product. Use only a cart, stand, tripod,
bracket or table recommended by the manufacturer or sold with the product. When mounting the product on
a wall, be sure to follow the manufacturer’s instructions. Use only the mounting hardware recommended by the
manufacturer.
•
When relocating the product placed on a cart, it must be moved with utmost care. Sudden stops, excessive
force and uneven floor surface can cause the product to fall from the cart.
•
Ventilation—The vents and other openings in the cabinet are designed for ventilation. Do not cover or block
these vents and openings since insufficient ventilation can cause overheating and/or shorten the life of the
product. Do not place the product on a bed, sofa, rug or other similar surface, since they can block ventilation
openings. This product is not designed for built-in installation; do not place the product in an enclosed place
such as a bookcase or rack, unless proper ventilation is provided or the manufacturer’s instructions are
followed.
•
The LCD panel used in this product is made of glass. Therefore, it can break when the product is dropped or
impact applied. If the LCD panel is broken, be careful not to be injured by broken glass.
•
Heat sources—Keep the product away from heat sources such as radiators, heaters, stoves and other heat-
generating products (including amplifiers).
•
To prevent fire, never place any type of candle or naked flames on the top or near the TV set.
•
To prevent fire or shock hazard, do not place the AC cord under the TV set or other heavy items.
•
Do not display a still picture for a long time, as this could cause an afterimage to remain.
•
There is power consumption always if main plug is connected.
•
Entering of objects and liquids - Never insert an object into the product through vents or openings. High voltage
flows in the product, and inserting an object can cause electric shock and/ or short internal parts. For the same
reason, do not spill water or liquid on the product.
•
Servicing—Do not attempt to service the product yourself. Removing covers can expose you to high voltage and
other dangerous conditions. Request a qualified person to perform servicing.
The LCD panel is a very high technology product, giving you fine picture details.
Due to the very large number of pixels, occasionally a few non-active pixels may appear on the screen as a fixed point of
blue, green or red. This is within product specifications and does not constitute a fault.
Precautions when transporting the TV
Be sure to always carry the TV by two people holding it with two hands—one hand on each side of the TV.
WARNING:
This is a Class A product. In a domestic
environment this product may cause radio
interference in which case the user may be required
to take adequate measures.
2
KRL46V_GB.indd 2 2008/07/09 14:08:32

Introduction
TV
1
INPUT
1 2 3 4
2
5 6 7 8
3
TV DTV
RADIO
14
1 2 3
4
4 5 6
7 8 9
INFO
5
0
P.INFO
15
6
CH RETURN
7
P
16
DVD TOPMENU/
8
EXIT
GUIDE
EPG
9
17
10
ENTER
HOME
MENU
RETURN
11
18
MENU
12
HDMI REC STOP
CTRL
19
SCREEN
AV
CM SKIP
SIZE
SELECTION
TOOLS
DVD
HDD
20
SOURCE
SELECT
TV
DVD
13
21
STB DVR VCR
22
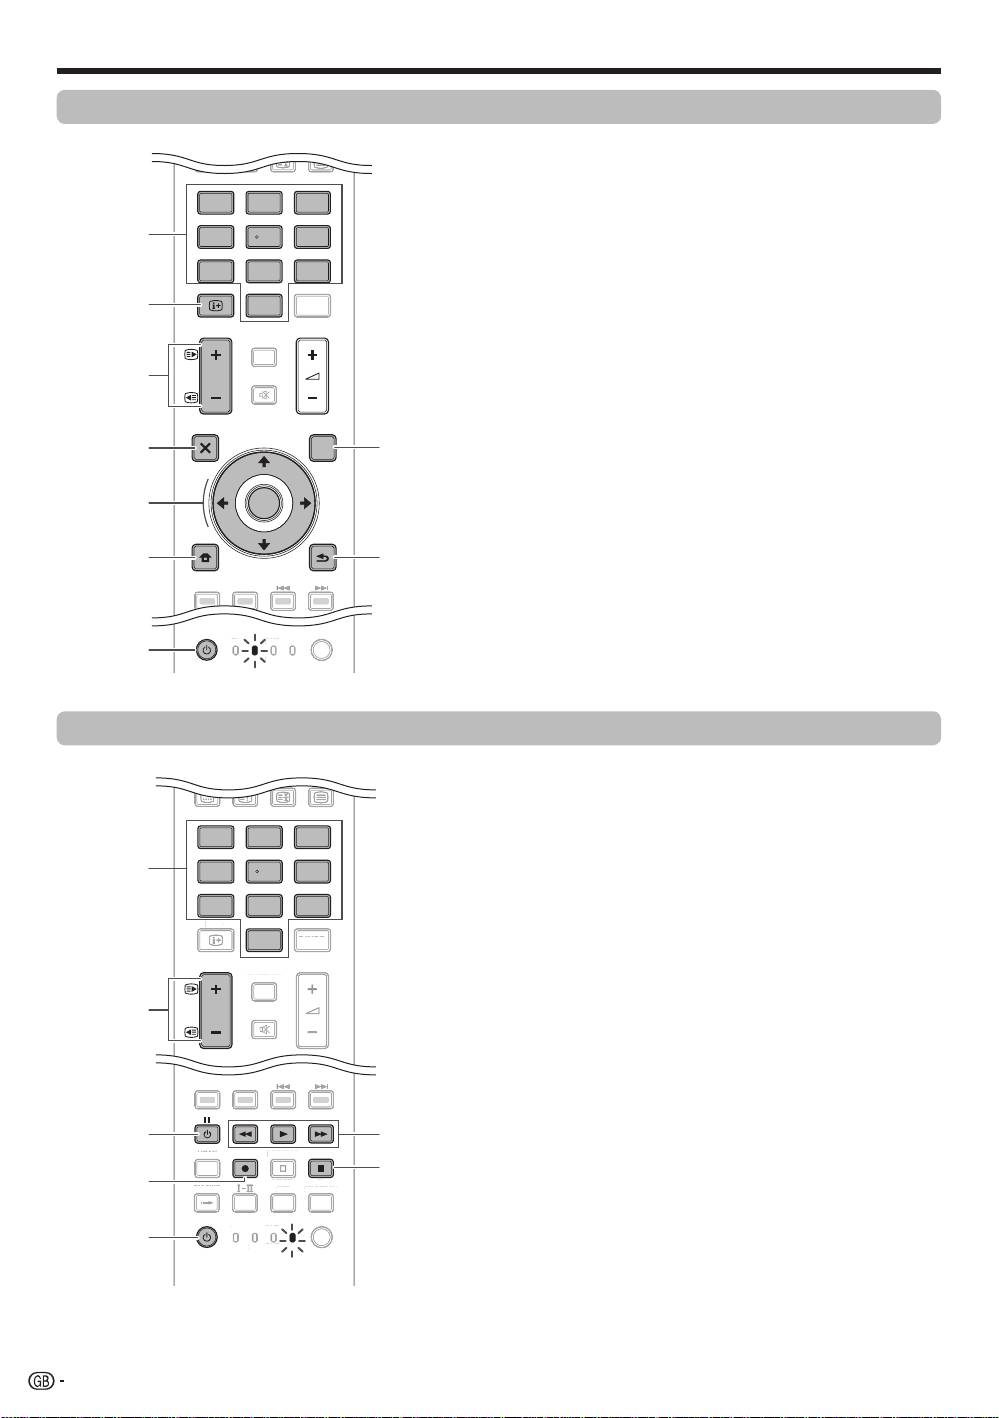
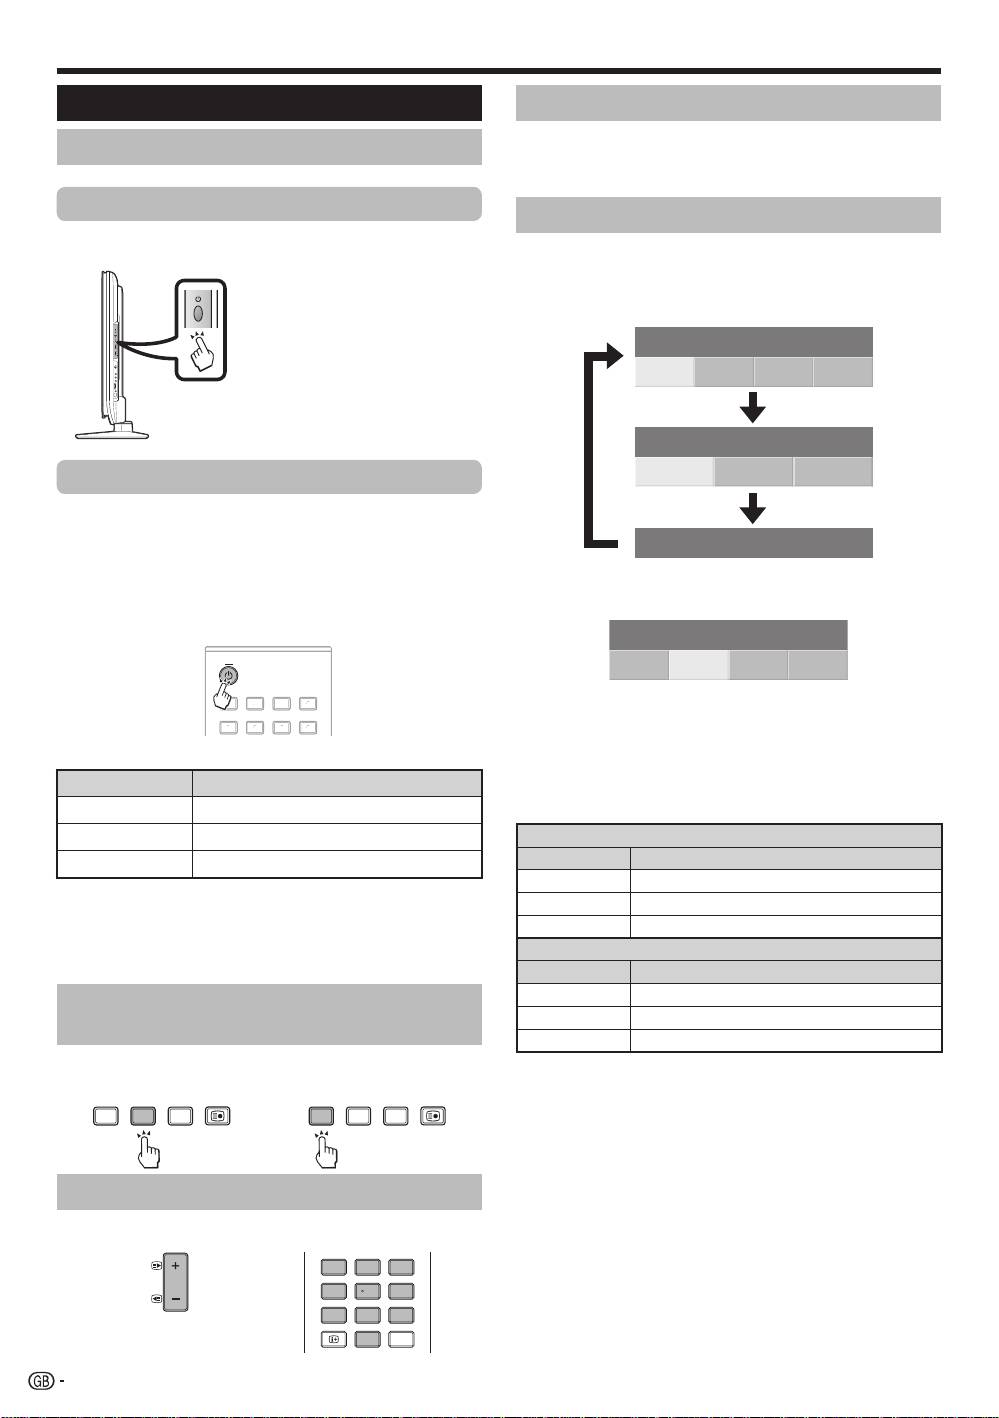
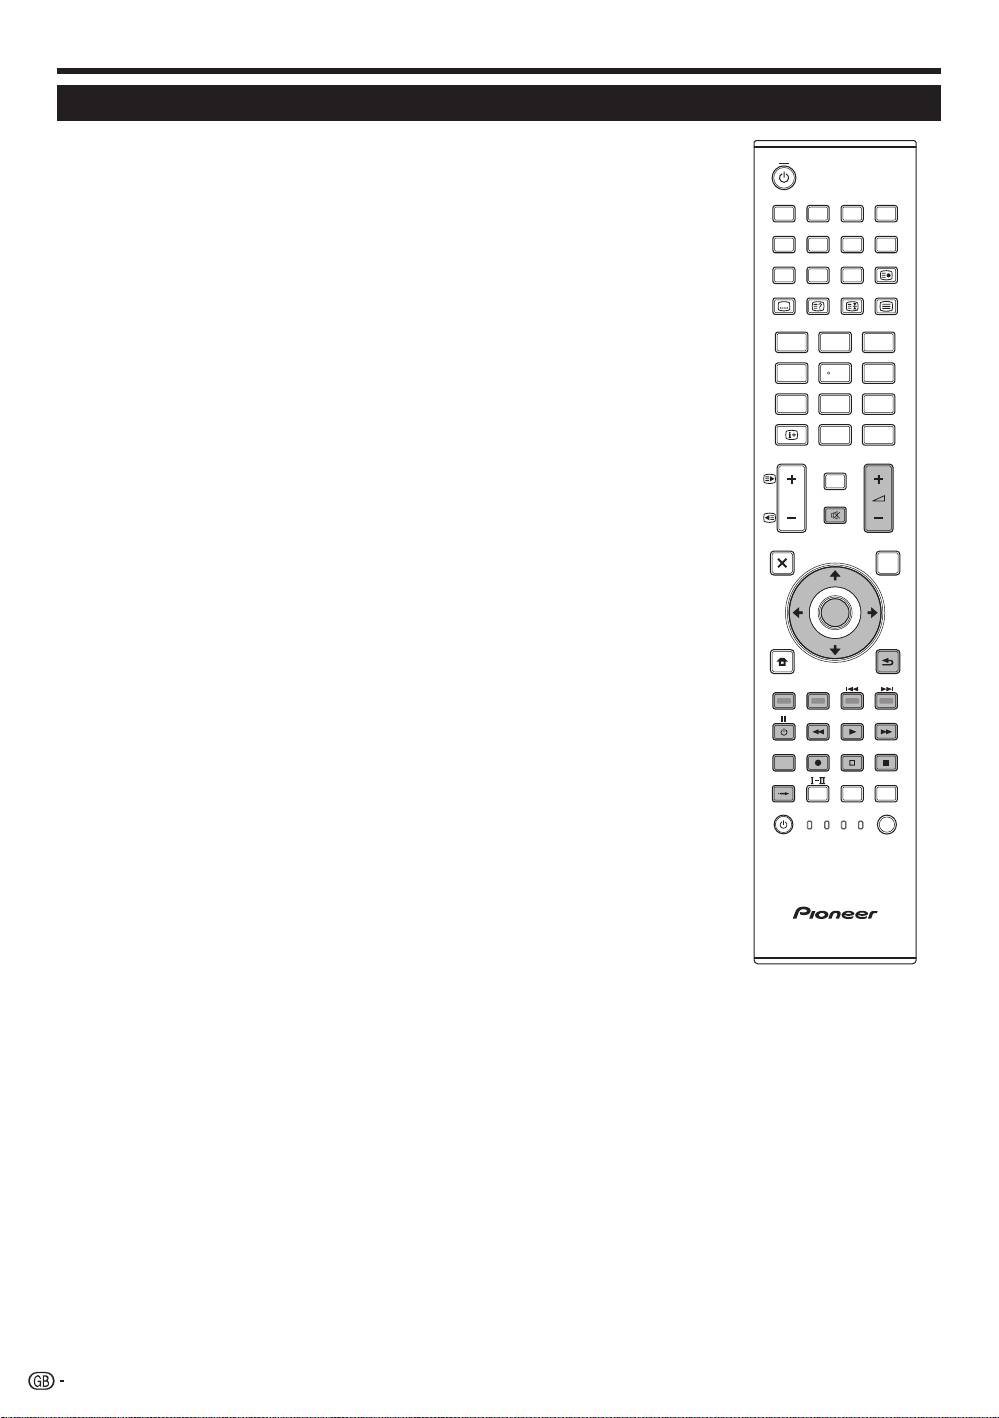
Remote control unit
1
a (TV) (Standby/On)
R
Buttons for useful operations
(Page 16)
1 (Subpage)
2
INPUT1–8
(Page 20)
Select an input source (Page 16).
[ (Subtitle)
3
Buttons for mode switch
Switch subtitle languages on/off
(Pages 20 and 34).
T
V
Press to access conventional
k (
Reveal hidden
Teletext)
analogue TV mode.
(Page 20)
DTV
3 (Freeze/Hold)
Press to access digital TV mode.
Press to freeze a moving image on
the screen.
RADIO
Teletext: Stop updating teletext
DTV
: Switch between Radio and
pages automatically or release the
Data mode.
hold mode.
•
When only data broadcasting (no
radio broadcasting) is transmitted
m (
Teletext)
by DVB, the radio broadcasting
ATV
: Display analogue teletext (Page
will be skipped.
20).
DTV: Select MHEG-5 and teletext for
4
0–9 numeric buttons
DTV (Page 20).
Set the channel.
Enter desired numbers.
T
P. INFO
Set the page in teletext mode.
Press to display programme
•
When the five Nordic countries
information which is transmitted
(Sweden, Norway, Finland,
through digital video broadcasting in
Denmark, or Iceland) are selected
the upper left corner of the screen
in the country setting from “Auto
(DTV only).
Installation” (page 32), DTV
Y
ik/l (Volume)
services are four digits. When
Increase/decrease TV volume.
another country is selected, DTV
U
EP
G
services are three digits.
DTV: Display the EPG scr
een (Pages
5
p (
INF
O)
17–19).
Press to display the station
I
6 (
RETURN)
information (channel number, signal,
Retur
n to the previous “HOME
etc.) in the upper right corner of the
MENU” screen.
screen (Page 37).
O
Buttons for HDMI CONTROL
6
CH RETURN
If external equipment is connected
Press to return to the previously
via HDMI cables and is HDMI
selected channel or external input.
CONTROL compatible, you can use
7
Pk/l (e/f)
these HDMI CONTROL buttons. See
Select the TV channel.
pages 26 and 28 for details.
Select the page in teletext mode.
P
Buttons for picture adjustments
8
e (
Mute)
SC
REEN S
IZE
TV sound on/off.
Select a screen size (Pages 35 and
9
g (EX
IT)
39).
Exit the “HOME MENU” screen.
AV SELEC
TION
0
a/b/c/d (Cursor)
Select a video setting (Page 31).
Select a desired item on the setting
A
SELEC
T
screen.
Switch the selection among TV,
ENTER
S
TB, DVD/DVR, and VCR, so that
Execute a command within the
you can control other connected
“HOME MENU” screen.
W
Colour (Red/Green/Yellow/Blue)
equipment, using the supplied
ATV/DTV: Display the programme
buttons
remote control unit (Page 4–7).
list when no other “HOME MENU”
The coloured buttons are
S
t (Sound mode)
screen is running.
correspondingly used to select the
Select a sound multiplex mode
coloured items on the screen (e.g.
Q
h (H
OME
MENU)
(Page 16).
EPG, MHEG-5, Teletext).
“HOME MENU” screen on/off.
E
a (SOURC
E)
(Pages 6–7)
NOTE
Press and hold both 9 and 18 on the remote control unit to show “100Hz” demonstration in a dual screen.•
3
KRL46V_GB.indd 3 2008/07/09 14:08:32
Introduction
Controlling other equipment using
the supplied remote control unit
Using the supplied remote control unit, you can control
other equipment in connection: a set-top box (STB),
DVD player, DVD/HDD recorder (DVR), BD player or
VCR.
Before using this function, you need to preset the
supplied remote control unit with the manufacture
code of the equipment to be controlled. When you
then want to control the equipment, press S
ELEC
T
on the remote control unit to select an appropriate
mode depending on the equipment; the selection is
switched among TV,
STB, DVD/DVR, and VCR. The
corresponding mode indicators on the remote control
unit show the currently selected mode.
TV
INPUT
1 2 3 4
5 6 7 8
TV DTV
RADIO
1 2 3
4 5 6
7 8 9
INFO
0
P.INFO
CH RETURN
P
DVD TOPMENU/
EXIT
GUIDE
EPG
ENTER
HOME
MENU
RETURN
MENU
HDMI REC STOP
CTRL
SCREEN
AV
CM SKIP
SIZE
SELECTION
TOOLS
DVD
HDD
SOURCE
SELECT
TV
DVD
STB DVR VCR
NOTE
When you control a BD player, select the DVD/DVR
mode.
Presetting manufacture codes
Press SELECT on the remote control unit
to select the STB, DVD/DVR, or VCR mode
depending on the equipment.
After confirming that the indicator of the
previously selected mode goes off, press and
hold S
ELEC
T, and then press 1 on the remote
control unit.
The corresponding mode indicator flashes.
Press 0–9 to enter a three-digit manufacture
code.
See the manufacture code list to identify an
appropriate code. The mode indicator lights up
for approximately one second and then goes off;
presetting the manufacture code is completed.
TV
INPUT
1 2 3 4
5 6 7 8
TV DTV
RADIO
1 2 3
4 5 6
7 8 9
INFO
0
P.INFO
DVD TOPMENU/
EXIT
GUIDE
EPG
CTRL
SCREEN
AV
CM SKIP
SIZE
SELECTION
TOOLS
DVD
HDD
SOURCE
SELECT
TV
DVD
STB DVR VCR
NOTE
•
If you perform no operation for approximately one
minute while a mode indicator is flashing, the code
presetting procedure is quitted.
•
If you enter a code not listed in the table, a mode
indicator flashes quickly for approximately one
second and then flashes as before.
•
To quit the code presetting procedure halfway
while a mode indicator is flashing, you may press
S
ELEC
T on the remote control unit.
•
The factory default manufacture codes for the STB,
DVD/DVR, and VCR modes are “000”, “100”, and
“500” respectively.
Manufacture codes
*
You may not be able to control some equipment
in the tables partially or entirely with the supplied
remote control unit.
STB
000 PIONEER 1 (factory default)
001 PIONEER 2
002 CANAL SATELLITE
•
003 HUMAX
004 PACE 1
005 PACE 2
006 QUALI-TV
1
007 SKY DIGITAL
DVD
2
100 PIONEER 1 (factory default)
101 PIONEER 2
102 AKAI
•
103 DENON
3
104 HITACHI
•
105 JVC
106 KENWOOD 1
107 KENWOOD 2
108 PANASONIC 1
109 PANASONIC 2
110 PHILIPS 1
111 PHILIPS 2
112 SAMSUNG
113 SHARP
114 SONY 1
115 SONY 2
116 SONY 3
117 THOMSON
118 TOSHIBA
119 YAMAHA
4
KRL46V_GB.indd 4 2008/07/09 14:08:33

Introduction
DVR
VCR
200 PIONEER 1
527 PHILIPS 2
201 PIONEER 2
528 PHILIPS 3
202 PIONEER 3
529 SANYO
203 PANASONIC
530 SAMSUNG 1
204 PHILIPS 1
531 SAMSUNG 2
205 PHILIPS 2
532 SAMSUNG 3
206 SHARP
533 SAMSUNG 4
207 SONY
534 SHARP
208 TOSHIBA
535 SONY 1
536 SONY 2
BD
537 SONY 3
300 PIONEER
538 SONY 4
301 LG
539 SONY 5
302 PANASONIC
540 SONY 6
303 SAMSUNG
541 SONY 7
304 SONY
542 THOMSON
305 TOSHIBA
543 TOSHIBA
VCR
500 PIONEER 1 (factory default)
501 PIONEER 2
502 AIWA 1
503 AIWA 2
504 AKAI 1
505 AKAI 2
506 AKAI 3
507 DAEWOO
508 GRUNDIG 1
509 GRUNDIG 2
510 GRUNDIG 3
511 GRUNDIG 4
512 HITACHI 1
513 HITACHI 2
514 HITACHI 3
515 JVC 1
516 JVC 2
517 JVC 3
518 JVC 4
519 JVC 5
520 LOEWE 1
521 LOEWE 2
522 MATSUI
523 ORION
524 PANASONIC 1
525 PANASONIC 2
526 PHILIPS 1
5
KRL46V_GB.indd 5 2008/07/09 14:08:33
Introduction
Using with other equipment (STB)
TV
INPUT
1 2 3 4
5 6 7 8
TV DTV
RADIO
1 2 3
4 5 6
7 8 9
INFO
0
P.INFO
CH RETURN
P
DVD TOPMENU/
EXIT
GUIDE
EPG
ENTER
HOME
MENU
RETURN
MENU
SOURCE
SELECT
TV
DVD
STB DVR VCR
TV
D
T
V
RADI
O
1
2
3
4
5
6
7
8
TV
IN
PUT
P
.
INF
O
C
H RETURN
TV
D
V
R
V
CR
D
V
D
S
ELE
C
1
2
3
4
8
5
6
9
T
7
Using with other equipment (VCR)
TV
INPUT
1 2 3 4
5 6 7 8
TV DTV
RADIO
1 2 3
4 5 6
7 8 9
INFO
0
P.INFO
CH RETURN
P
HDMI REC STOP
CTRL
SCREEN
AV
CM SKIP
SIZE
SELECTION
TOOLS
DVD
HDD
SOURCE
SELECT
TV
DVD
STB DVR VCR
TV
D
TV
R
ADIO
1
2
3
4
5
6
7
8
TV
I
N
P
UT
P.
INF
O
INFO
C
H RET
U
R
N
C
TR
L
HD
M
I
R
E
C
S
T
OP
HDD
A
V
S
ELE
C
TI
ON
C
M SKIP
D
V
D
TOO
L
S
SCREEN
S
IZE
TV
ST
B
D
V
R
D
V
D
S
ELE
CT
1
2
3
6
7
4
5
E
STB (set-top box) control buttons
When in the STB mode, the buttons on the remote
control unit function as below.
1
0–9
Function as the numeric buttons.
2
INFO
Press to display information on the current broadcasting.
3
Pk/l
Press to tune in a higher or lower channel.
4
E
XIT
Pr
ess to exit the broadcasting menu screen or the
broadcasting guide screen.
5
ENTER
Press to activate the selected function.
a/b/c/d
Press to select items on the broadcasting menu screen
or the broadcasting guide screen.
6
MENU
Press to display the broadcasting menu screen.
7
S
OURC
E a
Turns the set-top box on and off.
8
GUID
E
Press to display the broadcasting guide screen.
9
RETURN
When the broadcasting menu screen is in display, press
to restore the immediately previous screen.
E
VCR control buttons
When in the VCR mode, the buttons on the remote
control unit function as below.
1
0–9
Function as the numeric buttons.
2
Pk/l
Press to select channels of the TV tuner on the VCR.
3
l (
PAUSE/STILL)
Set pauses and still pictur
es.
4
p (REC)
Start r
ecording.
5
SOURCE a
Turn the power of the VCR on and off.
6
m (
REW)
Rewind the tape and allows pictur
e search.
n (PLAY)
Start playback.
o (FF)
Fast-forwar
d the tape and allows picture search.
7
r (S
TOP)
Stop playback.
6
KRL46V_GB.indd 6 2008/07/09 14:08:34

Introduction
Using with other equipment (DVD/DVR)
TV
INPUT
1 2 3 4
5 6 7 8
TV DTV
RADIO
1 2 3
4 5 6
7 8 9
INFO
0
P.INFO
CH RETURN
P
DVD TOPMENU/
EXIT
GUIDE
EPG
ENTER
HOME
MENU
RETURN
MENU
HDMI REC STOP
CTRL
SCREEN
AV
CM SKIP
SIZE
SELECTION
TOOLS
DVD
HDD
SOURCE
SELECT
TV
DVD
STB DVR VCR
TV
DTV
R
ADI
O
1
2
3
4
5
6
7
8
TV
I
N
PU
T
P
.INF
O
INF
O
C
H RETUR
N
EXIT
C
TR
L
HD
M
I
R
E
C
S
T
OP
C
M SKIP
TV
ST
B
VCR
S
ELE
CT
1
2
9
3
4
10
11
12
5
13
14
6
15
7
16
8
E
DVD/DVR control buttons
When in the DVD/DVR mode, the buttons on the
remote control unit function as below.
1
0–9
Function as the numeric buttons.
2
Pk/l (DVD/HDD recorder (DV
R) only)
Press to change the channel of the tuner built in the
DVD/HDD recorder (DVR).
3
ENTER
Press to activate the selected function.
a/b/c/d
Press to select items on the DVD menu screen.
4
MENU
Press to display the DVD menu.
5
l (
PAUSE/STILL)
Set pauses and still pictures.
6
p (REC) (DVD/HDD r
ecorder (DVR) only)
Start recording.
7
TOOLS (Pioneer BD player only)
Press to display the “TOOLS” menu.
8
SOURC
E a
Turn on and off the power of the DVD player or DVD/HDD
recorder (DVR).
9
DVD TOP
MENU
When this button is pressed, the DVD top menu will
appear.
0
RETURN
When the DVD menu is in display, press to restore the
immediately previous screen.
Q
j (CH
APTER SEARCH)
Each time you press, you move back to the start of the
previous chapter.
W
k (CHAPTER S
EARCH)
Each time you press, you move ahead to the start of the
next chapter.
E
m (SCAN)
Pr
ess to go backward.
n (PLAY)
Start playback.
o (SCAN)
Pr
ess for fast forward.
R
r (STOP)
Pr
ess to stop playback or recording. With some DVD
players or DVD/HDD recorders (DVRs), pressing the
button twice may open the disc tray.
REC STOP (DVD/HDD recorder (DVR) only)
Press p and r at the same time to stop recording. This
operation is available for only Pioneer and Sony DVD/
HDD recorders (DVRs).
T
HDD (DVD/HDD recorder (DV
R) only)
Press to select the hard disk (HDD) for playback or
recording.
Y
DVD (DVD/HDD recorder (DV
R) only)
Press to select the DVD for playback or recording.
NOTE
•
You can control a BD player in the DVD/DVR mode.
•
The DVD player, DVD/HDD recorder (DVR) or BD
player cannot be selected at the same time.
7
KRL46V_GB.indd 7 2008/07/09 14:08:35
Introduction
Trademarks
•
“HDMI, the HDMI logo and High-Definition Multimedia Interface are trademarks or
registered trademarks of HDMI Licensing LLC.”
•
Manufactured under license from Dolby Laboratories.
•
“Dolby” and the double-D symbol are trademarks of Dolby Laboratories.
•
TruSurround XT, SRS and h symbol are trademarks of SRS Labs, Inc.
•
TruSurround XT technology is incorporated under license from SRS Labs, Inc.
The “HD ready 1080P” Logo is a trademark of EICTA.•
•
The DVB logo is the registered trademark of the Digital Video Broadcasting—
DVB—project.
“x.v.Colour” and are trademarks of Sony Corporation.•
8
KRL46V_GB.indd 8 2008/07/09 14:08:36
Introduction
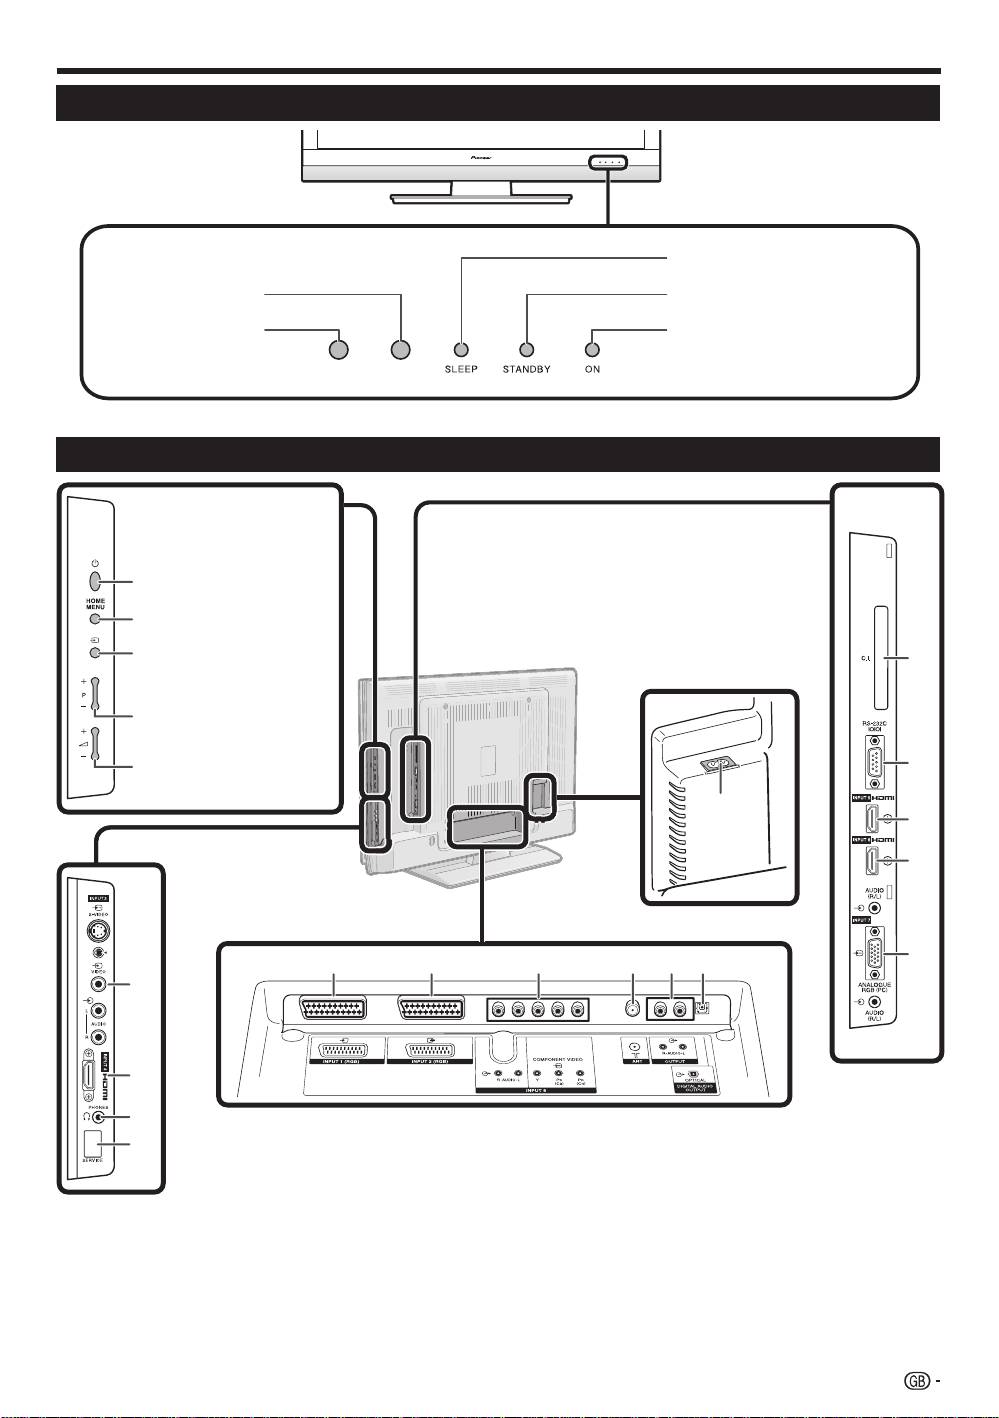
TV (Front view)
RLS*
RLS = Room Light Sensor*
TV (Rear view)
1
AC INPUT terminal
7
INPUT2 (RGB) terminal
12
COMMON INTERFACE slot
2
INPUT3 terminals
8
INPUT8 (COMPONENT/AUDIO)
13
RS-232C terminal
3
INPUT4 (HDMI) terminal
terminal
14
INPUT5 (HDMI) terminal
4
PHONES (Headphones)
9
ANT (aerial) terminal
15
INPUT6 (HDMI/AUDIO) terminals
5
SERVICE socket
10
OUTPUT (AUDIO) terminals
16
INPUT7 (ANALOGUE RGB/AUDIO)
6
INPUT1 (RGB) terminal
11
DIGITAL AUDIO OUTPUT terminal
terminals
12
13
1
14
15
16
6 7 8 9 10 11
2
3
4
5
SLEEP indicator
STAN
DBY indicator
Remote control
ON indicator
sensor
a
(Power) button
HOME MENU button
b (INPUT SOURCE)
button
P (k/l) Programme
[channel] buttons
i (k/l)
Volume buttons
WARNING:
Excessive sound pressure from
earphones and headphones can cause
hearing loss.
9
KRL46V_GB.indd 9 2008/07/09 14:08:37
Preparation
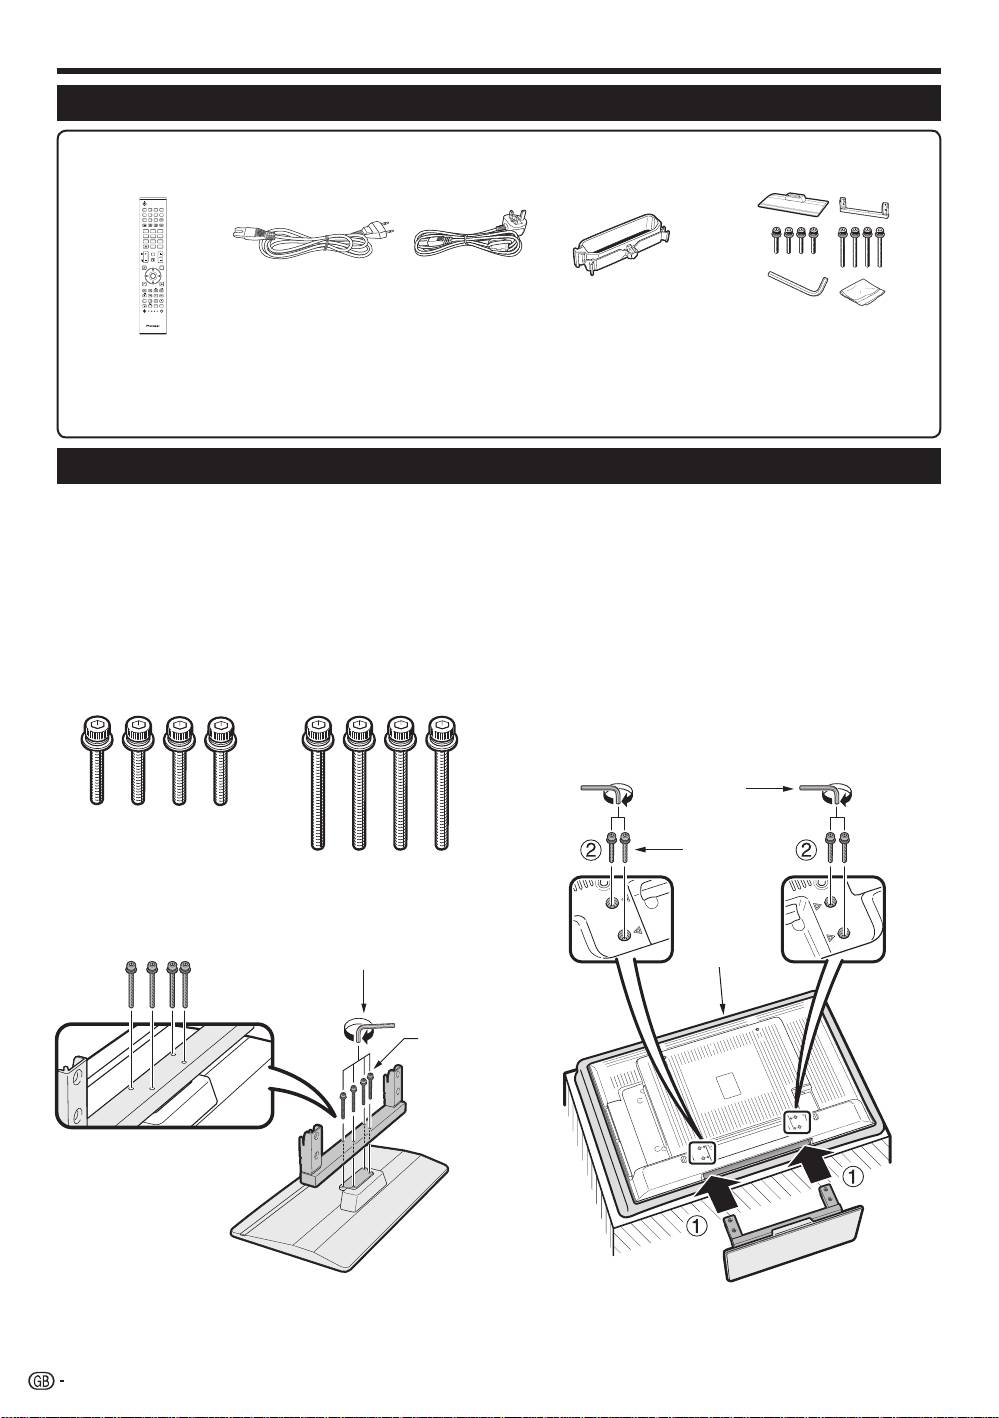
Supplied accessories
Remote control unit
AC cord (g2) Stand unit (g1)Cable clamp (g1)
(g1)
Pages 3 and 11 Page 10
Page 14Page 14
•
Operation manual (This publication)
“AA” size alkaline battery (g2) ... Page 11•
•
Warranty card
Attaching the stand unit
•
Before attaching (or detaching) the stand, unplug the AC cord from the AC INPUT terminal.
•
Before performing work, spread cushioning over the surface on which you will be laying the TV. This will prevent
it from being damaged.
CAUTION
•
Attach the stand in the corr
ect direction.
•
Be sure to follow the instructions. Incorrect installation of the stand may result in the TV falling over.
1
Confirm that there are eight screws (four short
3
1
Insert the stand into the openings on the
screws and four long screws) with the stand
bottom of the TV. (Hold the stand so it will
unit.
not drop from the edge of the base area.)
2
Insert and tighten the four short screws into
the four holes on the rear of the TV
Hex key
Short
screw
2
Attach the supporting post for the stand unit
onto the base using the four long screws with
the hex key (supplied) as shown.
Soft
Hex key
cushion
Long
screw
NOTE
•
To detach the stand unit, perform the steps in reverse
order.
10
TV
1 2 3 4
INPUT
5 6 7 8
TV
DTV
RADIO
1 2 3
4 5 6
INFO
7 8 9
0
P.INFO
CH RETURN
P
EXIT
DVD TOPMENU/
GUIDE
EPG
HOME
ENTER
MENU
RETURN
MENU
CTRL
HDMI REC STOP
CM SKIP
SCREEN
SIZE
SELECTION
AV
SOURCE
TV
TOOLS
DVD
DVD
SELECT
HDD
STBDVR VCR
KRL46V_GB.indd 10 2008/07/09 14:08:38
Preparation
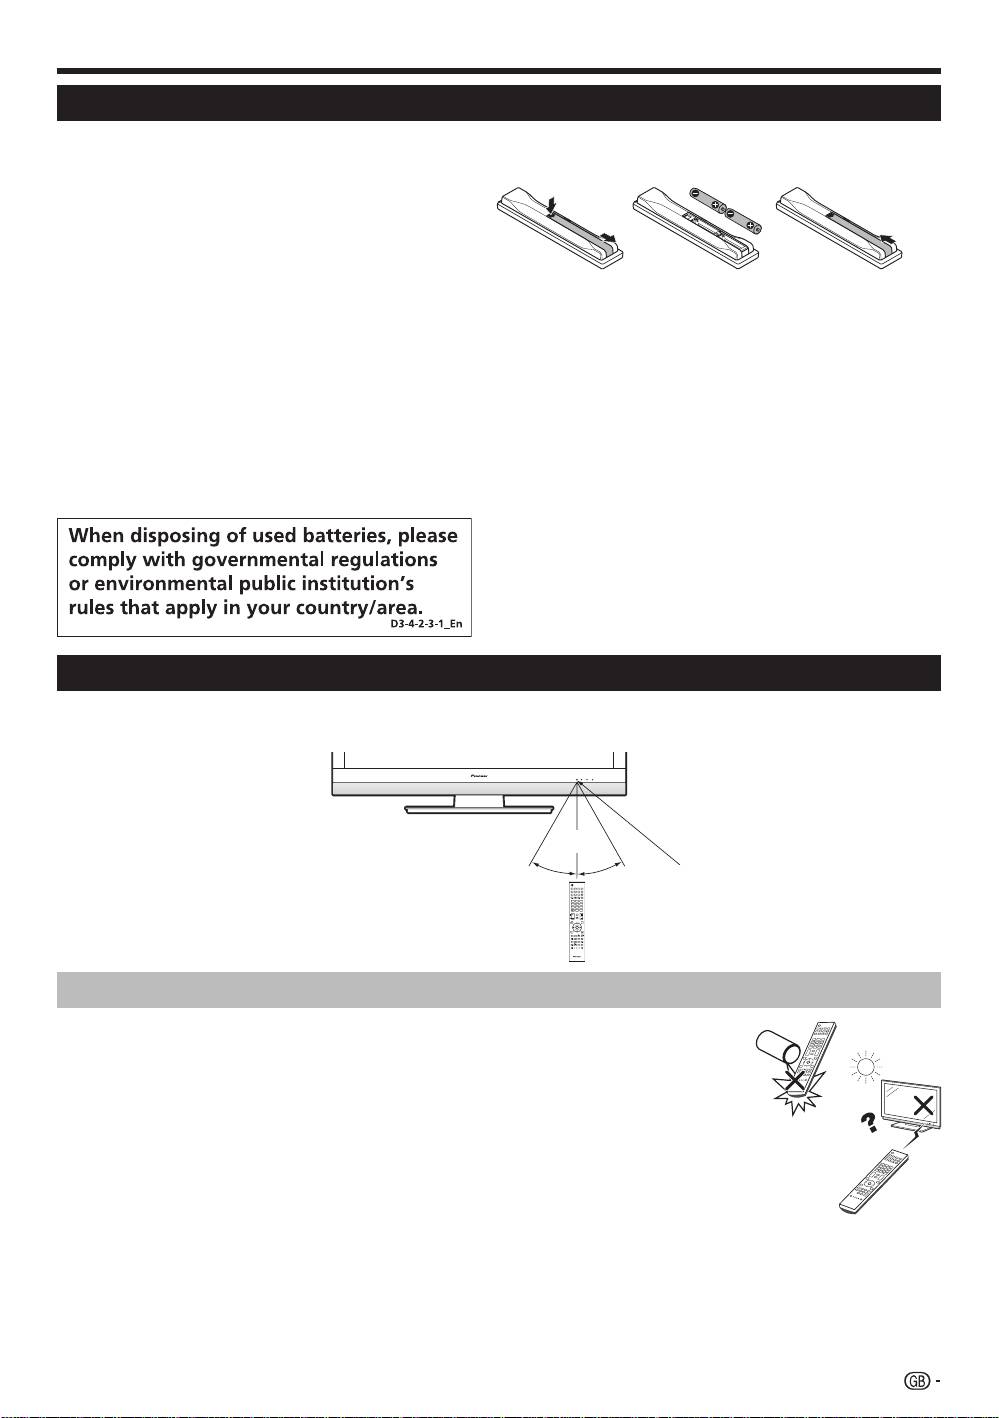
Inserting the batteries
Before using the TV for the first time, insert two supplied “AA” size alkaline batteries. When the batteries become
depleted and the remote control unit fails to operate, replace the batteries with new “AA” size batteries.
1
Open the battery cover.
2
Insert two supplied “AA” size alkaline batteries.
•
Place batteries with their terminals corresponding to the
(e) and (f) indications in the battery compartment.
3
Close the battery cover.
CAUTION
Improper use of batteries can result in chemical leakage or explosion. Be sure to follow the instructions below.
•
Do not mix batteries of different types. Different types of batteries have different characteristics.
•
Do not mix old and new batteries. Mixing old and new batteries can shorten the life of new batteries or cause
chemical leakage in old batteries.
•
Remove batteries as soon as they have worn out. Chemicals that leak from batteries can cause a rash. If you
find any chemical leakage, wipe thoroughly with a cloth.
•
The batteries supplied with this product may have a shorter life expectancy due to storage conditions.
•
If you will not be using the remote control unit for an extended period of time, remove the batteries from it.
•
When replacing the batteries, use alkaline batteries instead of zinc-carbon ones.
Cautions regarding the remote control unit
•
Do not expose the remote control unit to shock. In addition, do not expose the
remote control unit to liquids, and do not place in an area with high humidity.
•
Do not install or place the remote control unit under direct sunlight. The heat may
cause deformation of the unit.
•
The remote control unit may not work properly if the remote control sensor of the
TV is under direct sunlight or strong lighting. In such cases, change the angle of the
lighting or the TV, or operate the remote control unit closer to the remote control
sensor.
TV
30° 30°
1 2 3 4
INPUT
TV
5 6 7 8
DTV
RADIO
INFO
4 5 6
1 2 3
7 8 9
0
P
CH RETURN
P.INFO
EXIT
DVD TOPMENU/
GUIDE
EPG
HOME
MENU
ENTER
MENU
RETURN
CTRL
HDMI REC STOP
SOURCE
CM SKIP
TV
TOOLS
DVD
DVD
SCREEN
SIZE
SELECTION
SELECT
HDD
AV
STBDVR VCR
Using the remote control unit
Use the remote control unit by pointing it towards the remote control sensor. Objects between the remote control
unit and sensor may prevent proper operation.
5 m
Remote control sensor
11
KRL46V_GB.indd 11 2008/07/09 14:08:39
Preparation
Side view
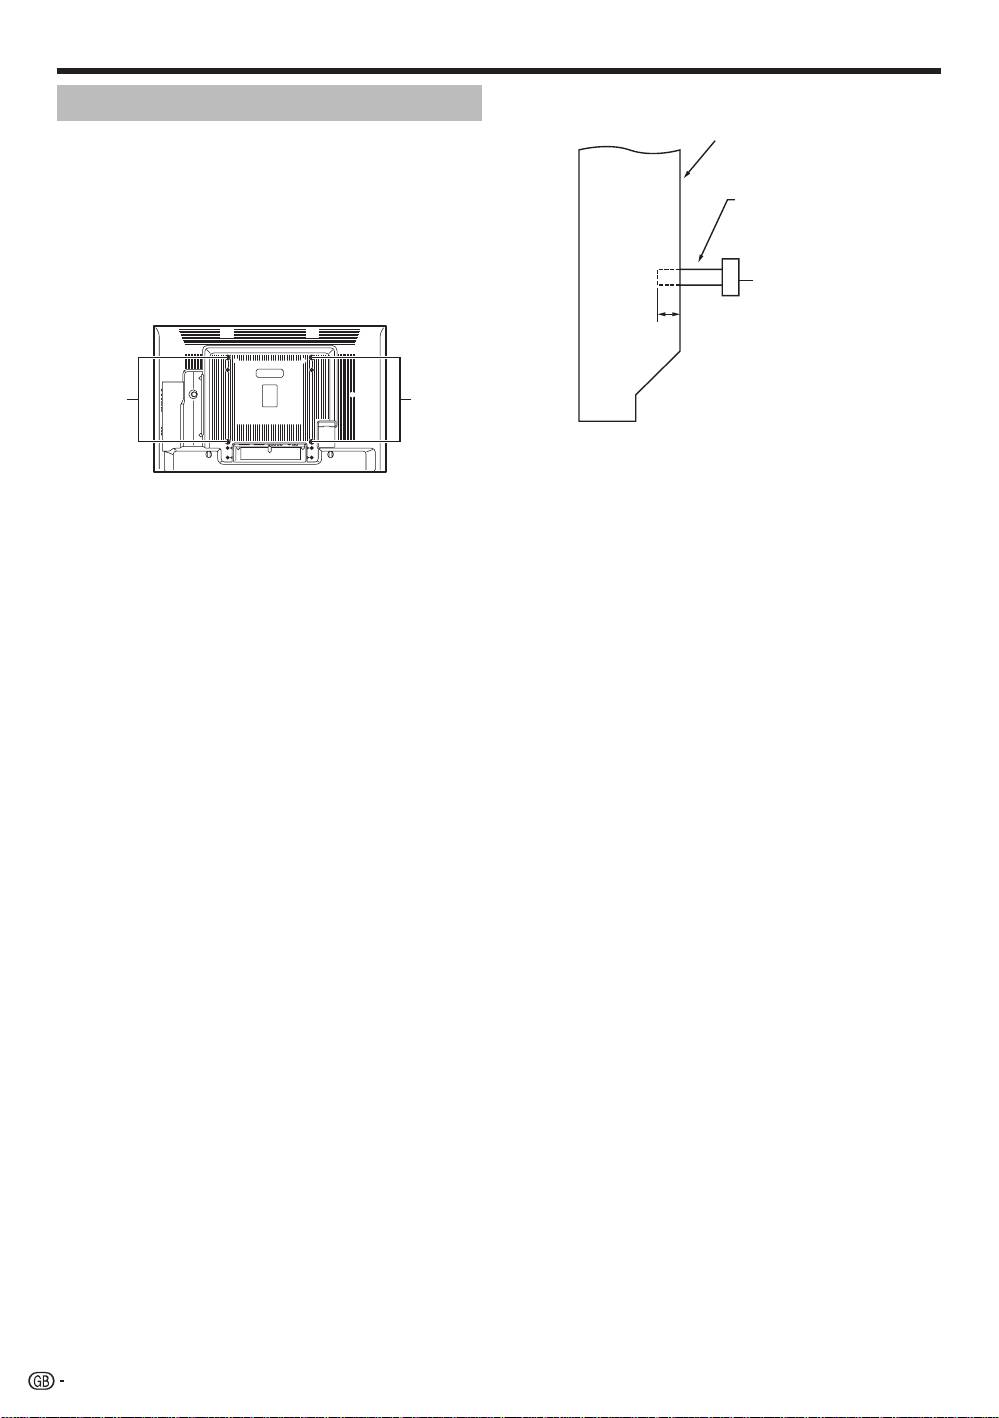
Installation precautions
Mounting surface
Observe the following precautions when installing with
any items such as the optional stand.
Mounting bracket
When using other stands, brackets or equivalent
Flat
(or equivalent item)
items
screen
•
Consult your dealer.
TV
•
The following mounting holes can be used for the
installation.
M6 screw
Rear view
12 mm to 15 mm
M
ounting
Mounting
holes
holes
NOTE
•
The mounting holes can be used after removing the
black seals and the screws.
CAUTION
•
Use M6 screws, which go 12 mm to 15 mm in
depth fr
om the mounting surface of the flat screen
TV. See the side view shown to the right.
•
Be careful not to block the ventilation opening at the
rear of the flat screen TV.
•
Be sure to install the flat screen TV on a flat surface
because the LCD panel used in this product is made
of glass.
•
The screw holes other than the illustrations above
are to be used only for the specified products. Never
use them for mounting non-specified products.
NOTE
•
Pioneer shall not be liable for any personal injury
or product damage that results from the use of
mounting items.
12
KRL46V_GB.indd 12 2008/07/09 14:08:40
Quick guide
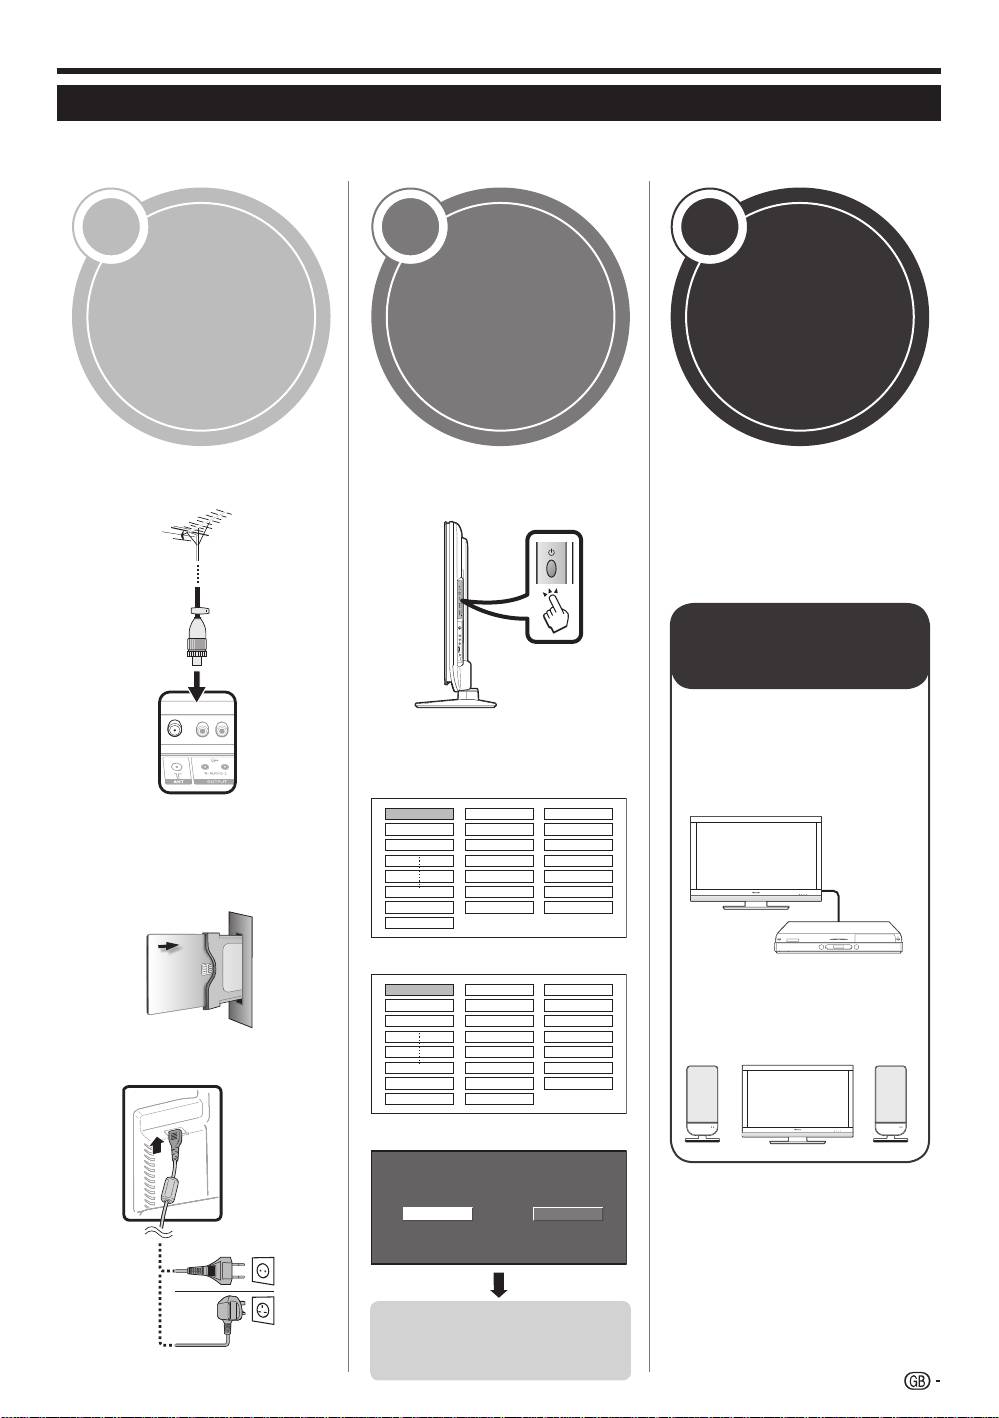
Initial installation overview
Follow the steps below one by one when using the TV for the first time. Some steps may not be necessary
depending on your TV installation and connection.
1 2 3
Connect an aerial cable to the
Turn on the power using a on
ANT terminal (Page 14).
the TV (Page 16).
Run the initial auto installation
(Page 15).
Language setting
If necessary, insert a smart
card into the Common
Interface slot to watch
scrambled broadcasts (Pages
14 and 25).
Connect the AC cord to the TV
(Page 14).
English
Italiano
Svenska
Country setting
Austria A B/G
Finland
FIN
B/G
Greece GR B/G
Channel search setting
Analogue SearchDigital Search
Power on and
Preparation
run the auto
Watch T
V
installation
Congratulations!
N
ow you can watch T
V.
If necessary, adjust the aerial
to attain maximum signal
reception (Page 15).
Connect
external devices
Connect external
devices such as a
DVD player/recorder
4
as instructed (Pages
21–23).
4
Connect external
audio devices such as
speakers/amplifier as
instructed (Pages 21
and 24).
4
Start searching
channels
13
KRL46V_GB.indd 13 2008/07/09 14:08:42

Quick guide
Before turning on the power
1
Carefully insert the
CA Module in the
Common Interface
slot with the contact
side forward.
2
The logo on the CA
Module must be
facing forward from
the rear of the TV.
Standard DIN45325
plug (IEC 169-2)
Place the TV close to the
75 q coaxial cable
AC outlet, and keep the
power plug within reach.
Ferrite Core*
(For Europe, except
U.K. and Eire)
Supplying power to the aerial
You must supply power to the aerial in order to
AC cord
receive digitally/terrestrially broadcast stations after
connecting the aerial cable to the ANT terminal on
the rear of the TV.
(For U.K. and Eire)
1
Press h and the “HOME MENU” screen displays.
2
Press a/b to select “Setup”.
3
Press a/b to select “Antenna Setup-DIGITAL”, and
then press ENTER.
4
Press a/b to select “Supply Voltage”, and then press
* Ferrite Core
ENTER.
The Ferrite Core should be permanently attached
5
Press c/d to select “On”, and then press ENTER.
and never removed from the AC cord.
Bundling the cables
Cable clamp
Bundle the cables with
the clamp.
14
KRL46V_GB.indd 14 2008/07/09 14:08:43
Quick guide
Initial auto installation
When the TV is powered on for the first time after
purchase, the initial auto installation wizard appears.
Follow the menus and make the necessary settings
one after another.
Press a on the TV.
The initial auto installation wizard appears.
Setting the OSD language.
English
Italiano
Svenska
Press a/b/c/d to select the desired language,
and then press ENTER.
Setting the country (Location of the TV).
Austria A B/G
Finland
FIN
B/G
Greece GR B/G
Press a/b/c/d to select your country or area,
and then press ENTER.
This setting screen only appears during the first
installation.
Starting channel search.
Analogue SearchDigital Search
The TV searches for, sorts and stores all the
receivable TV stations according to their settings
and the connected aerial.
To abort the initial auto installation in progress, press
6 (RETURN).
NOTE
If you turn off the power on the TV after performing step 4,
the initial auto installation wizard does not appear. The auto
installation function allows you to execute the installation
again from the “Setup” menu (Page 32).
The initial auto installation wizard will go off if you leave
the TV unattended for 30 minutes before searching for
channels in step 5.
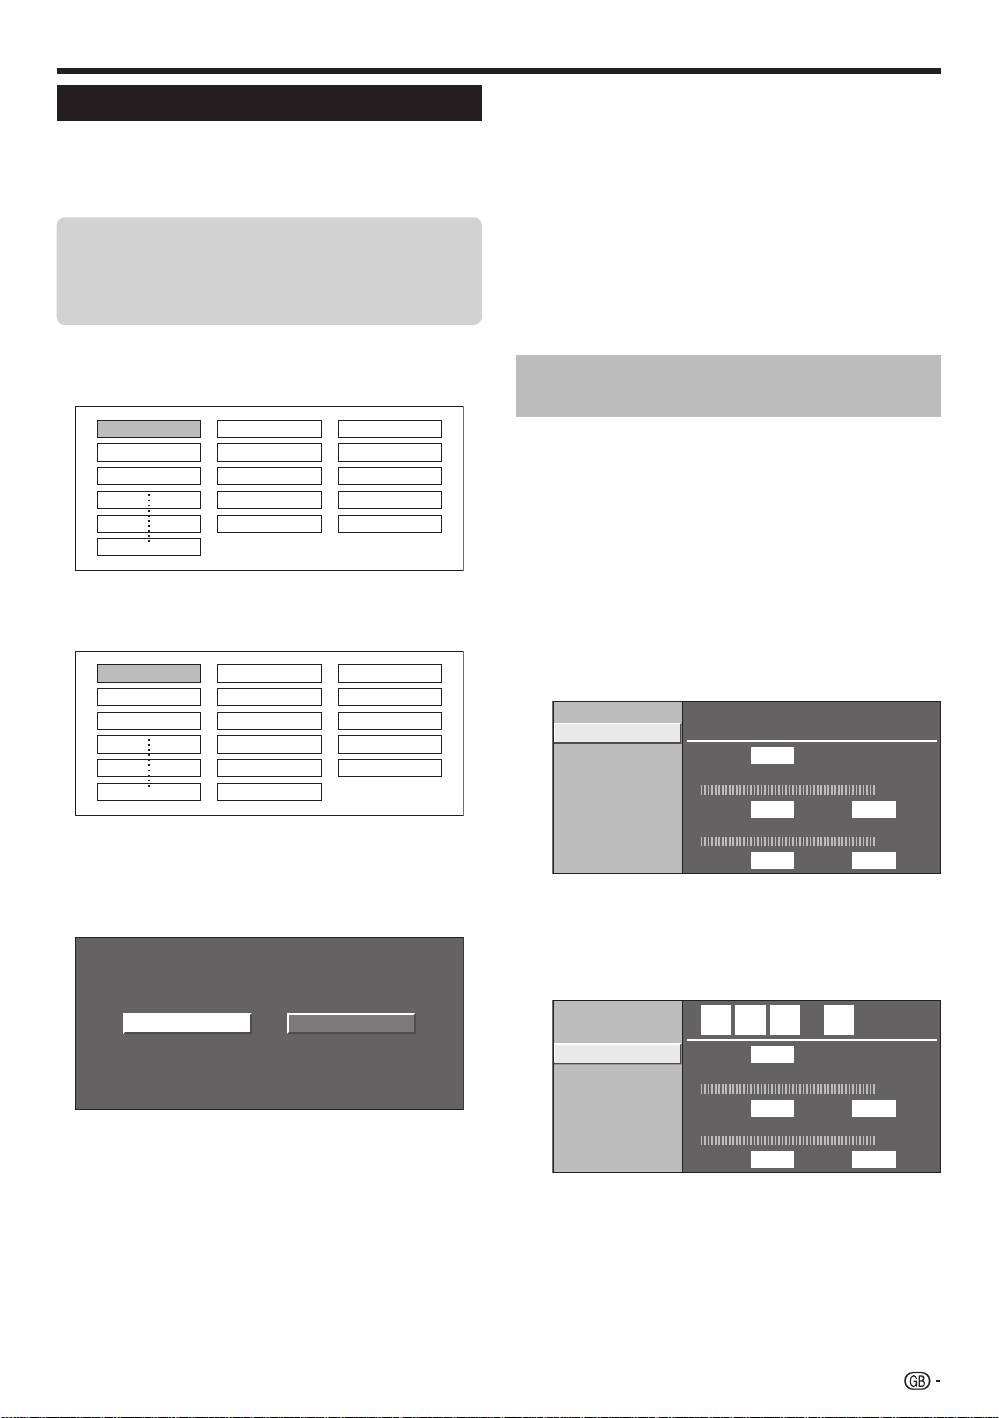
1
•
Checking signal strength and
2
channel strength
If you install a DVB-T aerial for the first time or relocate
it, you should adjust the alignment of the aerial to
receive a good reception while checking the antenna
setup screen.
Press h and the “HOME MENU” screen
displays.
Press a/b to select “Setup”.
Press a/b to select “Antenna Setup-DIGITAL”,
and then press ENTER.
3
Checking signal strength
Press a/b to select “Signal Strength”.
•
4
Press c/d to select “Digital Search” or
“Analogue Search”, and then press ENTER.
•
If you want to search for more broadcasts, execute
“Additional Search” from the “Programme Setup”
menu (Pages 32 and 33).
•
To watch both analogue broadcasts and digital
broadcasts, you should perform the channel search
setting for each format.
EXAMPLE
•
If you execute “Digital Search” in the initial auto
installation wizard, you should perform “Analogue
Search” from “Auto Installation” under the “Setup”
menu.
Supply Voltage
Signal Strength
Channel Strength
CH No. 21
Signal Strength
Current Max.0
0
Quality
Current Max.0 0
Checking channel strength
Press a/b to select “Channel Strength”, and
then press ENTER.
You can input a specified frequency band using the
0–9 numeric buttons.
Supply Voltage
4 7 4 . 0
MHz
Signal Strength
Channel Strength
CH No. 21
Signal Strength
Current Max.0
0
Quality
Current Max.0 0
5
•
•
Confirm the following before turning
on the power
E
Is the aerial cable connected?
•
E
Is the AC cord plugged in?
1
2
3
E
E
•
4
Position and align the aerial so that the
maximum possible values for “Signal Strength”
and “Quality” are obtained.
NOTE
•
The values of “Signal Strength” and “Quality” indicate when
to check the appropriate alignment of the aerial.
15
KRL46V_GB.indd 15 2008/07/09 14:08:44
Watching TV
Selecting a sound mode
DTV mode:
If multi sound modes are received, each time you
press t the mode switches as follows.
Audio (ENG) : STEREO
L/R L R LR
Audio (ENG) : CH A
CH A CH B CH AB
Audio (ENG) : MONO
Press c/d to select L or R sound when the STEREO
or DUAL MONO screen is displayed.
Audio (ENG) : STEREO
L/R L R LR
E
NOTE
•
The sound mode screen disappears in six seconds.
•
Selectable items vary depending on the received broadcasts.
E
ATV mode:
Each time you press t, the mode switches as
shown in the following tables.
NICAM TV broadcasts selection
Signal Selectable items
Stereo
NICAM STEREO, MONO
Bilingual
NICAM CH A, NICAM CH B, NICAM CH AB, MONO
Monaural
NICAM MONO, MONO
A2 TV broadcasts selection
Signal Selectable items
Stereo
STEREO, MONO
Bilingual
CH A, CH B, CH AB
M
onaural
MONO
E
EWatching digital
Watching analogue
NOTE
broadcasts
broadcasts
•
When no signal is input, the sound mode will display “MONO”.
TV DTV
RADIO
TV DTV
RADIO
P
TV
INPUT
1 2 3 4
5 6 7 8
TV DTV
RADIO
1 2 3
4 5 6
7 8 9
INFO
0
P.INFO
MENU
CM SKIP
SOURCE
HOME
MENU
EXIT
CTRL
HDMI REC STOP
P
TV
TOOLS
CH RETURN
STB DVR VCR
ENTER
DVD
SCREEN
DVD
SIZE
DVD TOPMENU/
SELEC TION
RETURN
SELECT
GUIDE
HDD
EPG
AV
Daily operation
Switching on/off
Turning on/off the power
Press a on the TV.
Switch it off by pressing a on the TV.
Standby mode
To standby mode
If the TV is switched on, you can switch it to standby
by pressing a (TV)
on the remote control unit.
Switching on from standby
From standby, press a (TV) on the remote control unit.
TV
INPUT
1 2 3 4
5 6 7 8
MENU
CM SKIP
SOURCE
HOME
MENU
EXIT
HDMI REC STOP
CTRL
TV DTV
INFO
4 5 6
7 8 9
1 2 3
P
TV
TOOLS
CH RETURN
STB DVR VCR
ENTER
0
DVD
SCREEN
RADIO
DVD
SIZE
DVD TOPMENU/
P.INFO
SELEC TION
SELECT
GUIDE
RETURN
EPG
HDD
AV
TV
D
TV
RADI
O
1
2
3
4
5
6
7
8
I
N
PU
T
4
5
6
7
8
9
1
2
3
0
P.INF
O
INF
O
P
C
H RETUR
N
EXIT
DVD T
O
PMENU
/
G
UID
E
EP
G
ENTER
H
O
M
E
M
EN
U
MENU
R
ET
URN
C
TRL
HD
M
I
RE
C
S
T
OP
HDD
AV
S
ELE
C
TI
ON
C
M SKIP
D
V
D
T
OO
L
S
S
CREE
N
S
IZE
SOU
R
C
E
TV
STB
D
V
R
V
CR
D
V
D
S
ELE
CT
Selecting an external video source
Once the connection is made, press INPUT1–8 on the
remote control unit or b on the TV to switch over to
the appropriate external source.
NOTE
•
When turning off the power using
a on the TV, EPG data (Electronic
programme guide) will be lost, and
programmed timer recordings will
not be performed by the TV.
E
E
TV indicator status
TV indicator Status
ON (Blue)
Power on
STAN
DBY (Red)
Standby
SLEEP (Orange)
Sleep timer is on
NOTE
•
If you are not going to use this TV for a long period of time, be sure
to remove the AC cord from the AC outlet.
•
A small amount of electric power is still consumed even when a is
turned off.
Switching between analogue and
digital broadcasts
Changing channels
With Pk/l:
With 0–9:
16
KRL46V_GB.indd 16 2008/07/09 14:08:46
Watching TV
Useful functionsE
Common Operation
Press h and the “HOME MENU” screen
displays.
Press a/b to select “Digital Setup”.
Press a/b to select “EPG Setup”, and then
press ENTER.
REC Picture Size
[16:9 TV]
Download Setup
[Yes]
EPG Setup
Subtitle
CI Menu
Press a/b to select the desired item, and then
press ENTER (Example: “EPG Setup”, “Display
Range Setup”, etc.).
EPG Setup
Display Range Setup
Genre Icon Setup
Yes No
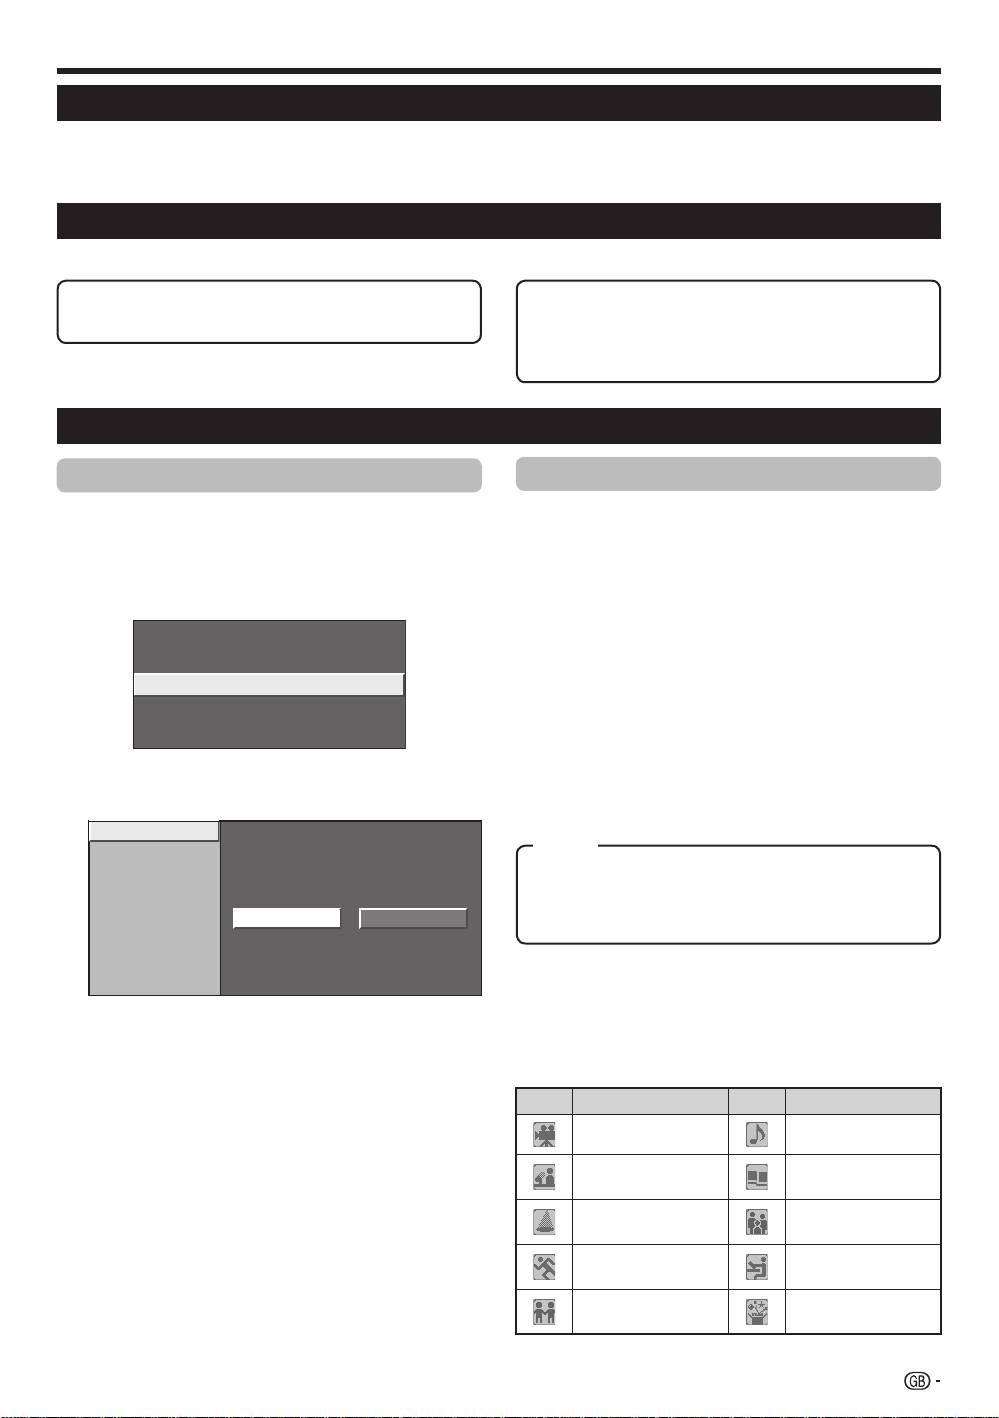
EPG (Electronic Programme Guide)
EPG (Electronic Programme Guide) is a programme list that is displayed on the screen. With the EPG, you can
check the schedule of DTV/RADIO/DATA, view detailed information about them, tune to an event currently on-air
and set a timer for future events.
EPG Overview
Basic functionsE
E
Select a programme using EPG (Page 18)
E
Search for a programme by category (Page 18)
E
Check programme information (Page 18)
E
Search for a programme by date and time
(Page 18)
E
Timer recording using EPG (Page 19)
Useful settings for using EPG
EPG display settings
1
E
EPG Setup (setting for receiving EPG
data)
2
If you want to use the EPG for digital stations, select
3
“Yes”. The EPG data must be automatically captured
while the TV is in standby mode. After setting to “Yes”,
it may take some time to turn off the power using the
remote control unit due to the process of the data
capture.
NOTE
•
If the TV main power is switched off, the EPG data will not
be captured.
4
E
Display Range Setup
The “Display Range Setup” allows you to select three
types of time spans for display on the screen.
Item
Mode1: Displays six hours of programme information.
Mode2: Displays three hours of programme information.
Mode3: Changes to the EPG display format with a
vertical time span.
E
Genre Icon Setup
You can grey out or place a mark on desired genres
and smoothly search for programmes you frequently
5
Press a/b/c/d to select or adjust the desired
watch.
item, and then press ENTER (Example: “Yes”,
“No”, etc.).
E
Genre Icon List
Icon Genre Icon Genre
Movie/Drama Music/Ballet/Dance
Arts/Culture (without
News/Current affairs
music)
Social/Political
Show/Game show
Issues/Economics
Education/Science/
Sports
Factual Topics
Children’s/Youth
Leisure hobbies
programmes
17
KRL46V_GB.indd 17 2008/07/09 14:08:47
Check programme information
Press a/b/c/d to select the programme you
want to check.
Press Red button.
040
BBC News 24 BBC News
10 : 00AM - 1 : 00 AM
Programme Info.
The BBC’s rolling news service with headlines every 15 minutes.
R
Back to EPG
B
Next
10 AM 11 0 PM 1 2 3
BBC TWO 002
BBC THREE 007
This is BBC THREE
This is BBC THREE
BBC FOUR 010
BBC FIVE 012
CBBC Channel 030
BBC NEWS BBC NEWS
BBC 1 061
BB22 062
BBC NEWS 24 340
BBC NEWS BBC NEWS
BBCi 351
BBCi BBCi
Press ENTER to tune to the selected programme.
Search a programme in a category
Press Green button.
Press a/b to select the desired genre, and
then press ENTER.
Press a/b to select a programme you want to
watch, and then press ENTER.
[Today] 0-12 [Today] 12-0 [Tue] 20 0-12 [Tue] 20 12-0
Movie/Drama
10 : 50 AM - 11 : 05 AMMon 19/05CBBC Cahnnel 030 time
News/Current affairs
10 : 50 AM - 11 : 10 AMMon 19/05BBC TWO 002 School is Lock
Show/Game show
11 : 05 AM - 11 : 20 AMMon 19/05CBBC Cahnnel 030 Words and Pictures
Sports
Children’s/Youth programmes
Music/Ballet/Dance
Arts/Culture (without music)
Social/Political Issues/Economics
Education/Science/Factual Topics
Leisure hobbies
3
Search for a programme by date/time
1
Press Yellow button.
Press c/d to select the desired time span, and
2
then press ENTER.
3
4
1
2
3
•
Refer to page 17 for the genre setting.
Search by Time
Today
0 AM -
6 AM -
0 PM -
6 PM -
6 AM
0 PM
6 PM
0 AM
Next
: Select Time
OK
: Enter
R
Back to EPG
G
Enter
Y
+1 Week
B
Next
10 AM 11 0 PM 1 2 3
BBC TWO 002
BBC THREE 007
This is BBC THREE
This is BBC THREE
BBC FOUR 010
BBC FIVE 012
CBBC Channel 030
BBC NEWS BBC NEWS
BBC 1 061
BB22 062
BBC NEWS 24 340
BBC NEWS BBC NEWS
SIT 1 994
Watching TV
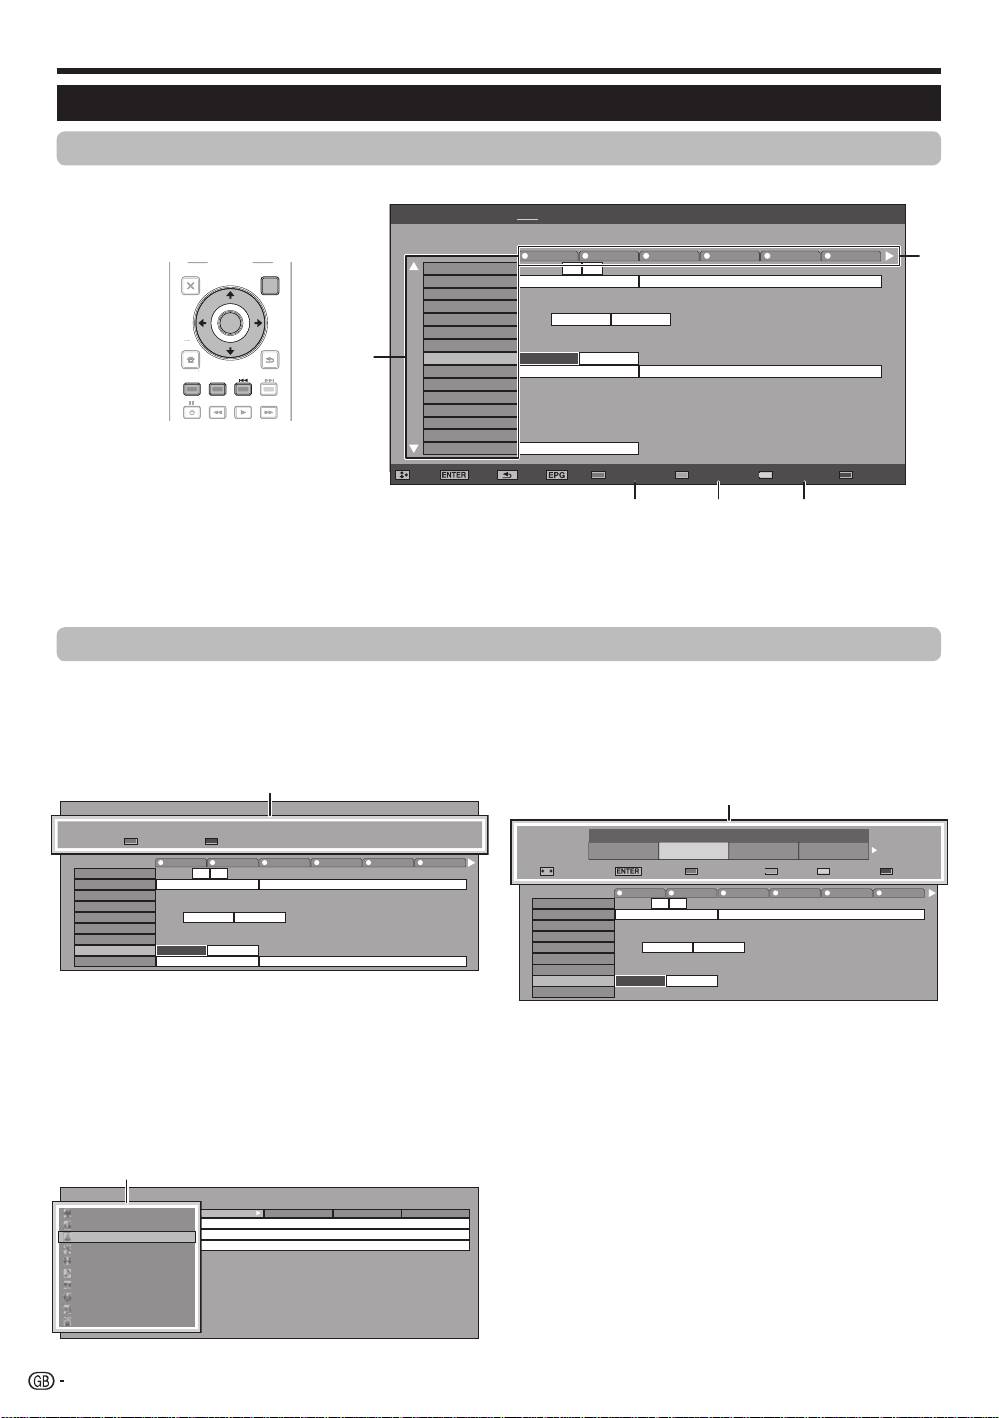
Selecting a programme using EPG
Basic Operation
The illustrations on this page are explained using three digit services.
E
Display/Close the EPG screen
Press EPG.
E
Select a programme
1
Select the time span
Press c/d to select the time span you want to search.
•
Continue to press d to display programmes in the next time span.
2
Select the desired programme
Press a/b to select the desired programme.
•
If a or b are displayed on the left of the services, continue to press a/b to display next or previous screen.
Selecting a programme
5
1
2
3
Press a/b to select the desired programme,
and then press ENTER.
NOTE
•
When you select a programme outside of the current time
span, the timer setting screen is displayed (Page 19).
18
EPG [Mon]16/04 10:57 AM[DTV-TV] Today (Tue)20 (Wed)21 (Thu)22 (Fri)23 (Sat)24 (Sun)25 (Mon)26
040
BBC News 24 BBC News
10 : 00AM - 1 : 00 AM
10 AM 11 0 PM 1 2 3
BBC TWO 002
BBC THREE 007
This is BBC THREE
This is BBC THREE
BBC FOUR 010
BBC FIVE 012
CBBC Channel 030
BBC NEWS BBC NEWS
BBC 1 061
BB22 062
BBC NEWS 24 340
BBC NEWS BBC NEWS
BBCi 351
BBCi BBCi
SIT 1 994
SIT 2 995
SIT 3 996
SIT 4 997
SIT 5 998
BBC ONE 999
This is BBC THREE
: Select : Enter : Back : Exit Programme info. Search By Genre Search By Date Timer List
1
2
3 4 5
TV
INPUT
1 2 3 4
5 6 7 8
TV DTV
RADIO
1 2 3
4 5 6
7 8 9
INFO
0
P.INFO
CH RETURN
P
DVD TOPMENU/
EXIT
GUIDE
EPG
ENTER
HOME
MENU
RETURN
MENU
CM SKIP
SOURCE
HDMI REC STOP
CTRL
TV
TOOLS
STB DVR VCR
DVD
SCREEN
DVD
SIZE
SELEC TION
SELECT
HDD
AV
TV
D
TV
RADI
O
1
2
3
4
5
6
7
8
TV
I
N
P
U
T
4
5
6
7
8
9
1
2
3
0
P
.INFO
I
NF
O
P
C
H RET
U
R
N
EXIT
HOME
MEN
U
MEN
U
RETURN
C
TRL
H
DM
I
RE
C
S
T
OP
HDD
AV
S
ELE
C
TI
O
N
C
M
S
KI
P
D
V
D
TOO
L
S
SC
REE
N
S
IZ
E
SOU
R
CE
TV
ST
B
DVR
V
C
R
D
V
D
SELECT
Programme Information
Search by Time
Today
0 - 6 6 -12 12 - 18 18 - 0
Next
: Select Time
: Enter
Back to EPG
Enter +1 Week
Next
Programme Info.
The BBC’s rolling news service with headlines every 15 minutes.
Back to EPG
Next
Movie/Drama
News/Current affairs
Show/Game show
Sports
Children’s/Youth programmes
Music/Ballet/Dance
Arts/Culture (without music)
Social/Political Issues/Economics
Education/Science/Factual Topics
Leisure hobbies
Date/Time
Genre
KRL46V_GB.indd 18 2008/07/09 14:08:49

Watching TV
Timer recording using EPG
You can record TV programmes using data from the
EPG.
Press EPG.
Pr
ess a/b/c/d to select the programme you
want to record, and then press ENTER.
Press c/d to select the preferred timer setting,
and then press ENTER.
Watch Record No
Cancelling the timer recording
1
Press EPG.
2
Press a/b/c/d to select the programme on
1
timer setup, and then press ENTER.
2
3
Press c/d to select “Cancel”, and then press
ENTER.
3
4
Press c/d to select “Yes”, and then press
ENTER.
E
Cancelling using the Blue button on the
remote control unit
•
If you select “No”, the TV returns to the EPG screen.
1
Press EPG.
2
Press Blue button to display the timer recording
E
Watching a programme at a set time
screen.
1
Press c/d to select “Watch”, and then press
3
Press a/b to select a programme with a set
ENTER.
timer recording you want to change, and then
2
Press c/d to select “Yes”, and then press
press ENTER.
ENTER.
4
Press c/d to select “Cancel” and then press
•
The selected TV programme is marked with an icon.
ENTER.
E
Recording a programme at a set time
5
Press c/d to select “Yes”, and then press
ENTER.
1
Press c/d to select “Record”, and then press
ENTER.
2
Press c/d to select the preferred timer
recording type, and then press ENTER.
Item
i/o link.A: Records a programme at a set time when a
device compatible with i/o link.A is connected.
VHS tape: Records a programme at a set time when a
device compatible with VHS tape is connected.
3
Press c/d to select “Yes”, and then press
ENTER.
•
The selected TV programme is marked with an icon.
NOTE
•
Refer to pages 21–23 for connecting external devices.
19
KRL46V_GB.indd 19 2008/07/09 14:08:49
Watching TV
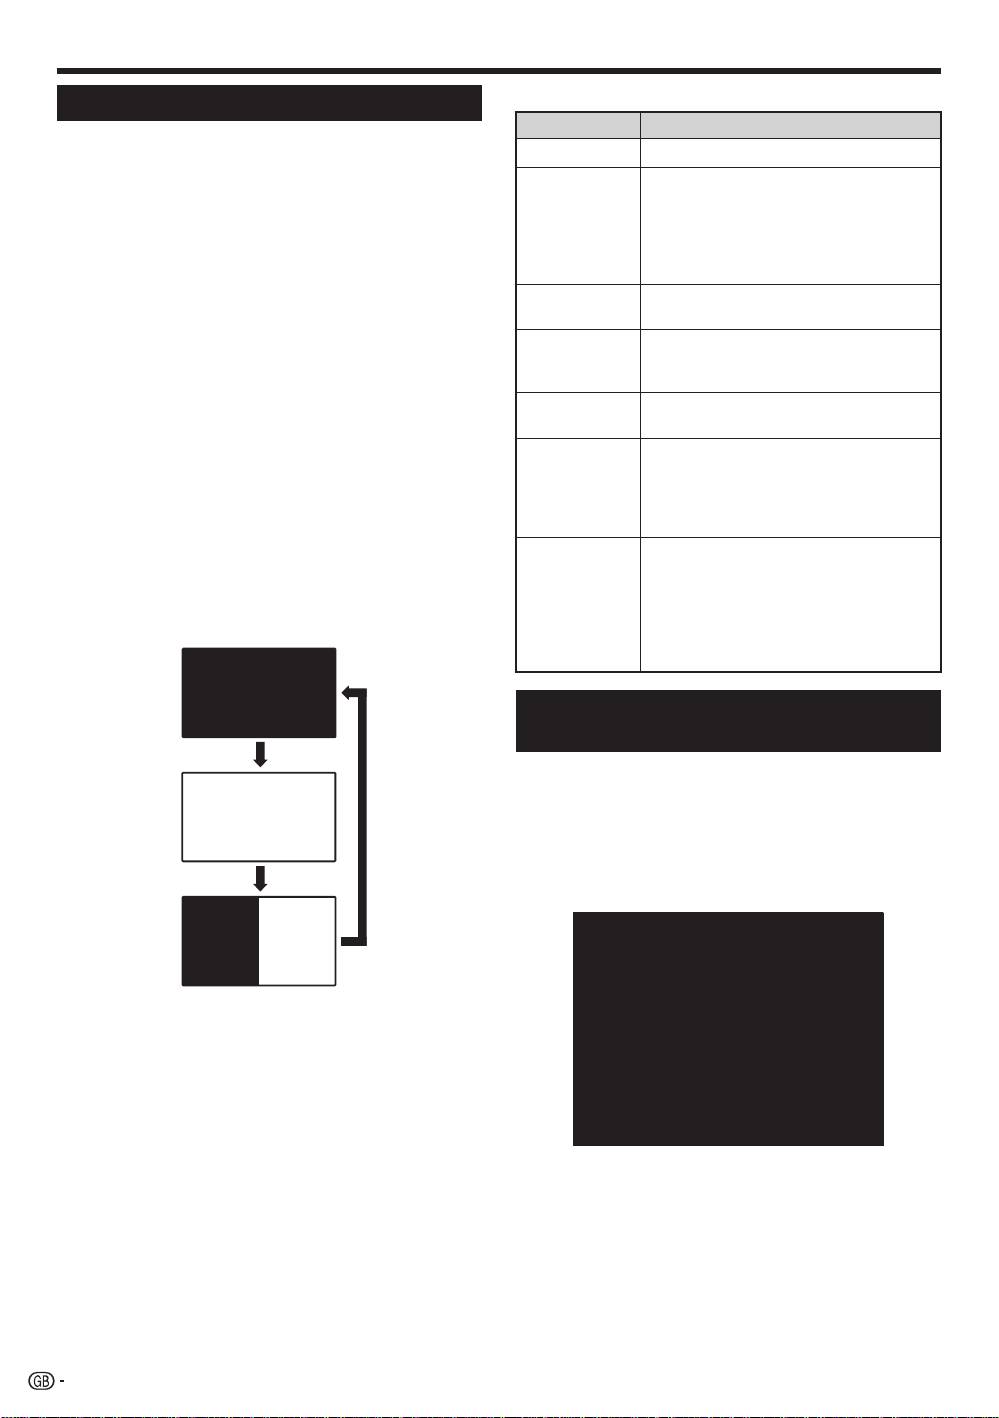
Buttons for teletext operations
Teletext
Buttons Description
What is Teletext?
Pk/l (e/f)
Increase or decrease the page number.
Teletext broadcasts pages of information and
entertainment to specially equipped TV. Your TV
Colour (Red/
Select a group or block of pages
receives teletext signals broadcast by a TV network,
Green/Yellow/
displayed in the coloured brackets at
Blue)
the bottom of the screen by pressing
and decodes them into graphical format for viewing.
the corresponding Colour (Red/Gr
een/
News, weather and sports information, stock
Yellow/Blue) buttons on the remote
exchange prices and programme previews are among
control unit.
the many services available.
0–9
Directly select any page from 100 to 899
Turning Teletext on/off
by using the 0–9 numeric buttons.
1
Select a TV channel or external source providing
k (Reveal
Reveal or hide hidden information such
a teletext programme.
hidden
as an answer to a quiz.
Teletext)
2
Press m to display the Teletext.
•
Many stations use the TOP operating system, while
3 (Freeze/
Stop updating teletext pages
some use FLOF (e.g. CNN). Your TV supports both
Hold)
automatically or release the hold mode.
these systems. The pages are divided into topic
[ (Subtitle
Display the subtitle or exit the subtitle
groups and topics. After switching on the teletext, up
for Teletext)
screen.
to 2,000 pages are stored for fast access.
•
Subtitles will not be displayed when
•
Each time you press m, the screen switches as
the service does not contain subtitle
shown below.
information.
•
Press m again to display the teletext on the right
screen and the normal image on the left screen.
1 (Subpage)
Reveal or hide subpages.
•
If you select a programme with no teletext signal, “No
•
Red button: Move to the pr
evious
Teletext available” displays.
subpage.
•
The same message displays during other modes if no
•
Green button: Move to the following
teletext signal is available.
subpage.
•
These two buttons are shown on the
screen by the symbols “e” and “f”.
Using the MHEG-5 application (UK
only)
Some services bring you programmes with the MHEG
(Multimedia and Hypermedia Expert Group) application
TELETEXT
encoded, letting you experience DTV interactively.
If provided, the MHEG-5 application will start when you
press m.
Sample MHEG-5 screen
TELETEXT
NOTE
•
Teletext will not work if the selected signal type is
RGB (Page 38).
20
KRL46V_GB.indd 20 2008/07/09 14:08:50

Connecting external devices
E
Before connecting ...
•
Be sure to turn off the TV and any devices before making any connections.
•
Firmly connect a cable to a terminal or terminals.
•
Carefully read the operation manual of each external device for possible connection types. This also helps you
get the best possible audiovisual quality to maximise the potential of the TV and the connected device.
•
Refer to page 39 for connecting a PC to the TV.
Introduction to connections
The TV is equipped with the terminals as shown below. Find the cable corresponding the TV’s terminal and
connect the device.
NOTE
•
The cables illustrated in pages 21–24 are commercially available items.
HDMI device
(Page 22)
HDMI-certified cable
DVI/HDMI Cable
ø 3.5 mm stereo minijack cable
Game console or
camcorder (P
age 22)
S-video cable*
or
or
AV cable*
Audio cable
Video recording device
(Pages 22 and 23)
Component cable
SCART cable
Audio device
(Page 24)
Audio cable
or
Optical audio cable
When using an S-video cable, you also need to connect an audio cable (R/L).*
21
KRL46V_GB.indd 21 2008/07/09 14:08:52
Connecting external devices
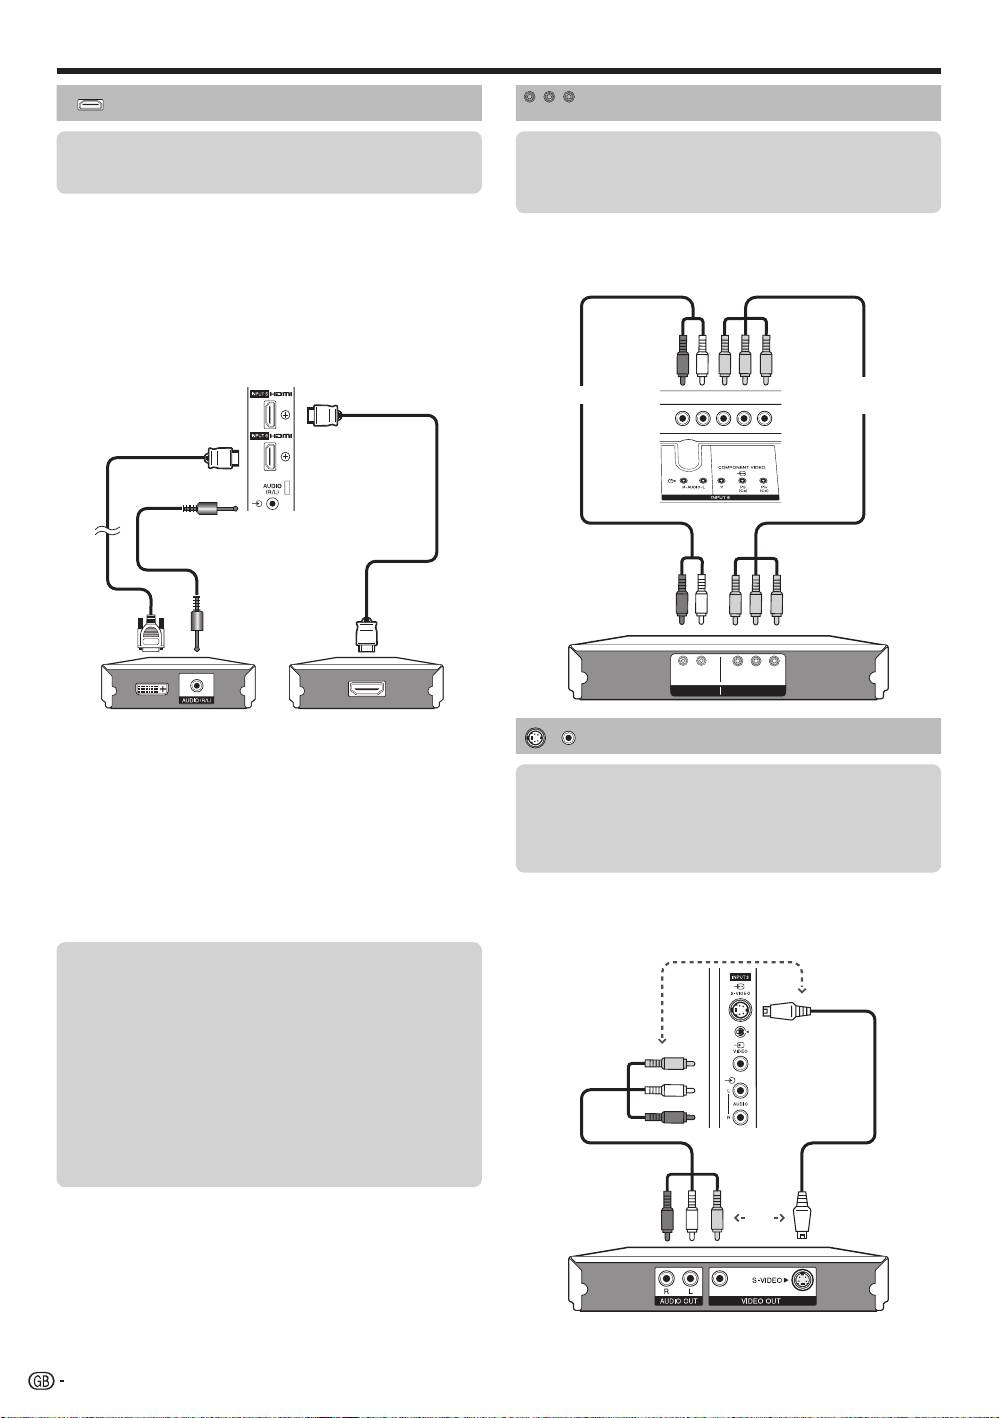
HDMI connection
Component connection
The HDMI connections (High Definition Multimedia
Interface) permit digital video and audio transmission
You will enjoy accurate colour reproduction and high
via a connection cable from a player/recorder. The
quality images through the INPUT8 terminal when
digital picture and sound data are transmitted without
connecting a DVD player/recorder or other device.
data compression and therefore lose none of their
quality. Analogue/digital conversion is no longer
necessary in the connected devices, which also would
result in quality losses.
DVI/HDMI conversion
Using an DVI/HDMI adapter cable, the digital video
signals of a DVD can also be played via the compatible
HDMI connection. The sound must be fed in additionally.
•
When connecting a DVI/HDMI conversion adapter/cable to the
HDMI terminal, the image may not come in clearly.
Both HDMI and DVI use the same HDCP copy
protection method.
NOTE
•
If a connected HDMI device is HDMI CONTROL compatible,
you can take advantage of versatile functions (Pages 26–28).
•
Video noise may occur depending on the type of HDMI cable used.
Make sure to use a certified HDMI cable.
•
When playing the HDMI image, the best possible format for the
picture will be detected and set automatically.
Supported video signal:
576i, 576p, 480i, 480p, 1080i, 720p, 1080p
See page 42 for PC signal compatibility.
LR PR
Y PB
(
CB)
(
CR)
COMPONENTAUDIO
Example of connectable devices
Example of connectable devices
DVD player/recorder E Blu-ray player/recorderE
E
VCR E DVD player/recorder
E
Blu-ray player/recorder
Component
Audio cable
cable
DVI/HDMI cable
HDMI-certified
cable
ø 3.5 mm stereo minijack
cable
S-VIDEO/VIDEO connection
Example of connectable devices
E
VCR E DVD player/recorder
E
Blu-ray player/recorder
E
Game console E Camcorder
You can use the INPUT3 terminal when connecting to
a game console, camcorder, a DVD player/recorder or
other device.
or
E
After connecting
HDMI Audio Select
After connecting, you must set the audio signal
compatible with the cable you use for the HDMI
device.
1
Go to “HOME MENU” > “Option” > “HDMI
Audio Select”.
2
Select “Digital” for audio signals via the
HDMI terminal. Select “Analogue” for audio
AV cable
S-video cable
signals via the AUDIO jack (INPUT6).
or
NOTE
•
When using an S-video cable, you also need to connect an
audio cable (R/L).
22
•
INPUT3: The S-VIDEO terminal has priority over the VIDEO terminal.
Y PB
PR
(
CB)
(
CR)
INPUT 4 or 5
KRL46V_GB.indd 22 2008/07/09 14:08:52
Connecting external devices
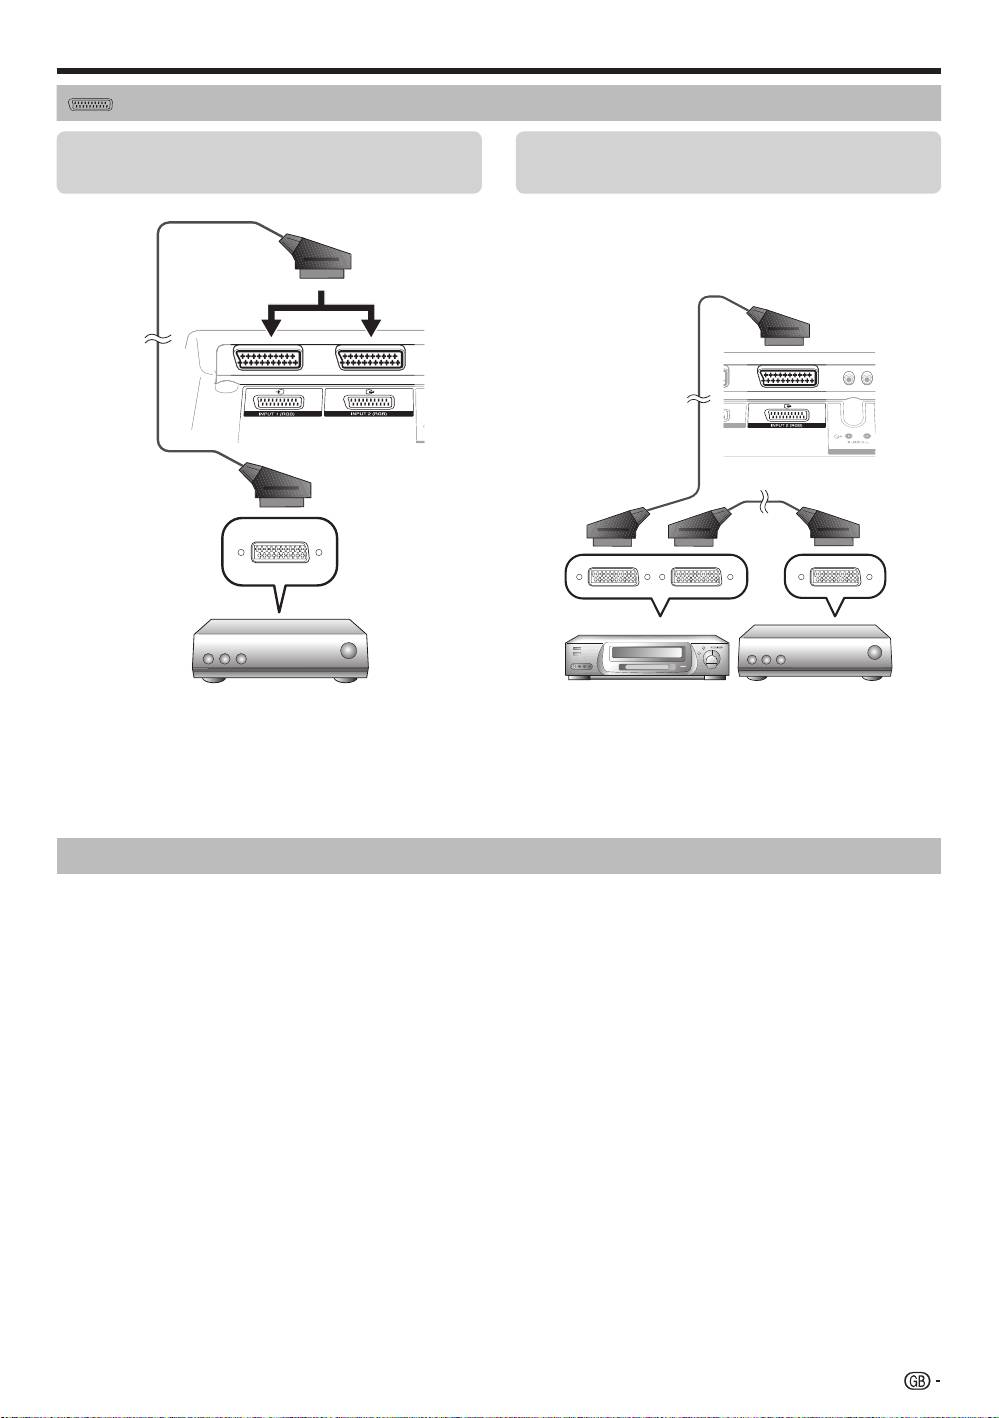
SCART connection
Example of connectable devices
Example of connectable devices
DecoderE
VCR E DVD player/recorderE
E
When using the INPUT2 (SCART) terminal
If your VCR supports TV-VCR advanced AV Link
systems, you can connect the VCR using a fully wired
SCART cable.
SCART cable
SCART cable
SCART cable
Decoder
DecoderVCR
NOTE
•
In cases when the decoder needs to receive a signal from the TV, make sure to select the appropriate input terminal to which
the decoder is connected in “Manual Adjust” in the “Analogue Setting” menu (Page 33).
•
TV-VCR advanced AV Link systems may not be compatible with some external sources.
•
You cannot connect the VCR with Decoder using a fully wired SCART cable when selecting “Y/C” under “INPUT2” in the
“Input Select” menu.
Controlling devices with SCART using i/o link.A
This TV incorporates four typical i/o link.A functions for smooth connections between the TV and other audiovisual
equipment.
One Touch Play
While the TV is in standby mode, it automatically turns on and plays back the image from the audiovisual source
(e.g. VCR, DVD player/recorder).
TV Standby
When the TV enters standby mode, the connected audiovisual equipment (e.g. VCR, DVD player/recorder) enters
standby mode as well.
WYSIWYR (What You See Is What You Record)
When the remote control unit of the connected VCR has the WYSIWYR button, you can automatically start
recording by pressing the WYSIWYR button.
Preset Download
Automatically transfers the channel preset information from the tuner on the TV to the one on the connected
audiovisual equipment (e.g. VCR) via the INPUT2 terminal.
NOTE
•
Refer to the operation manuals of external equipment for details.
•
The i/o link.A function works only when audiovisual equipment is connected to the INPUT2 terminal with a fully wired SCART
cable.
•
The use of the
i/o link.A
function is only possible if the TV has enforced a complete auto installation with the connected
audiovisual equipment (Page 15, Initial auto installation).
The availability of the
i/o link.A
function depends on the audiovisual equipment used. Depending on the manufacturer and type
of equipment used, it is possible that the described functions may be completely or partially unusable.
23
KRL46V_GB.indd 23 2008/07/09 14:08:53
Connecting external devices
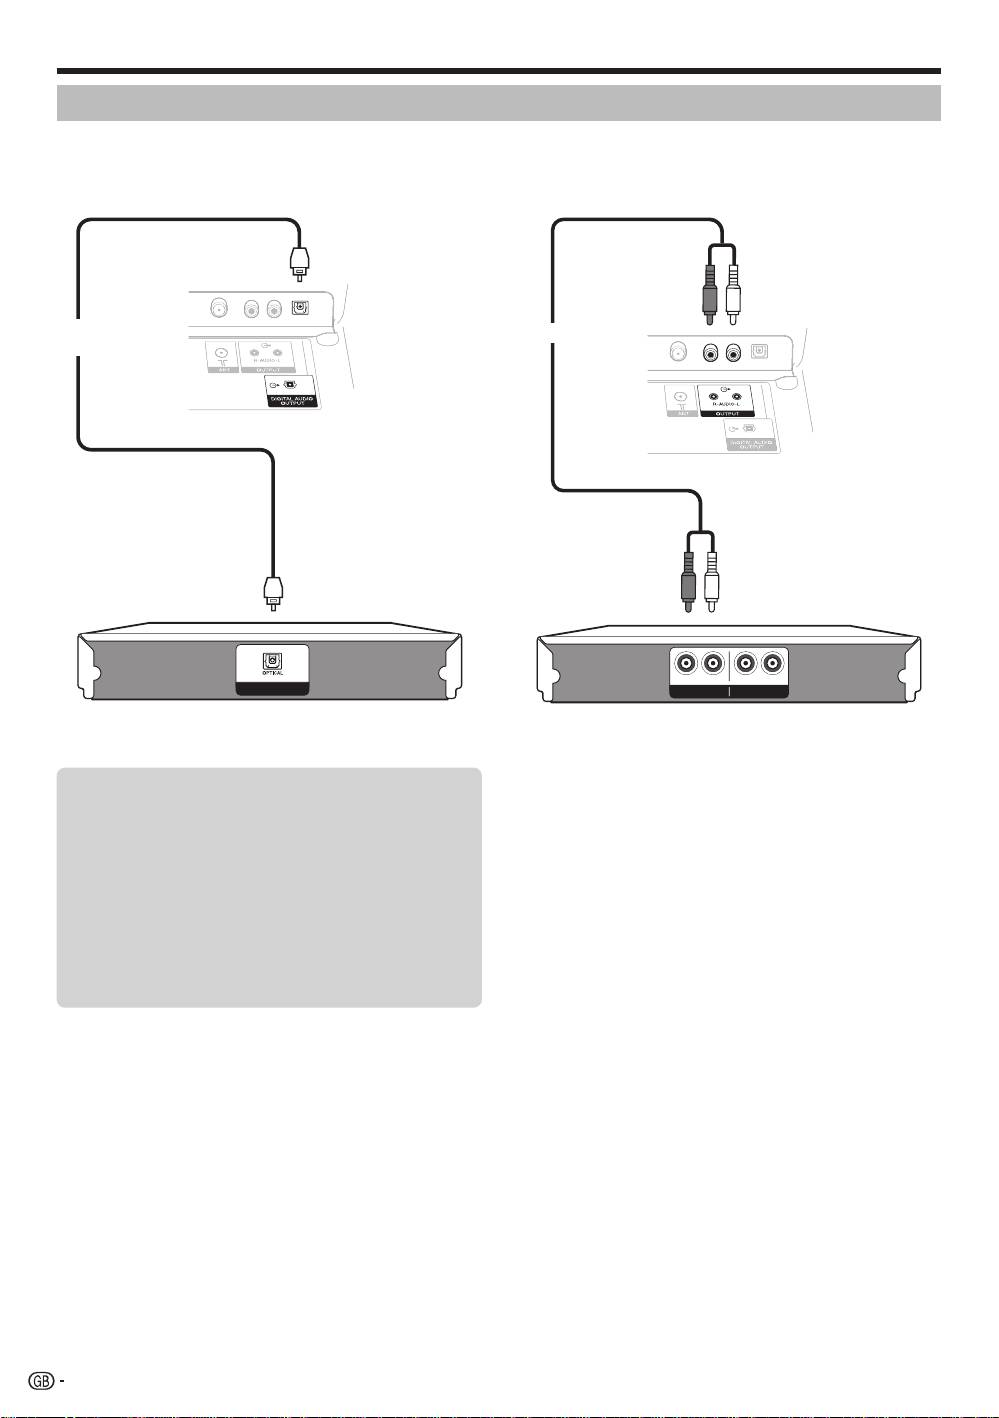
Speaker/amplifier connection
Connect an amplifier with external speakers as shown below.
E
EConnecting an amplifier with digital audio
Connecting an amplifier with analogue
input
audio input
E
After connecting
Digital audio output setting
After connecting an amplifier with digital audio
input and external speakers as shown, you should
set an audio output format compatible with
the programme you are watching or the device
connected.
Go to “HOME MENU” > “Option” > “Digital
Audio Output” > select “PCM” or “Dolby
Digital”.
DIGITAL AUDIO IN
LR
LR
AUX1 IN
AUX OUT
Optical AUDIO
Audio cable
cable
Amplifier with
Amplifier with
digital audio input
analogue audio input
24
KRL46V_GB.indd 24 2008/07/09 14:08:53
Connecting external devices
Checking CA Module information
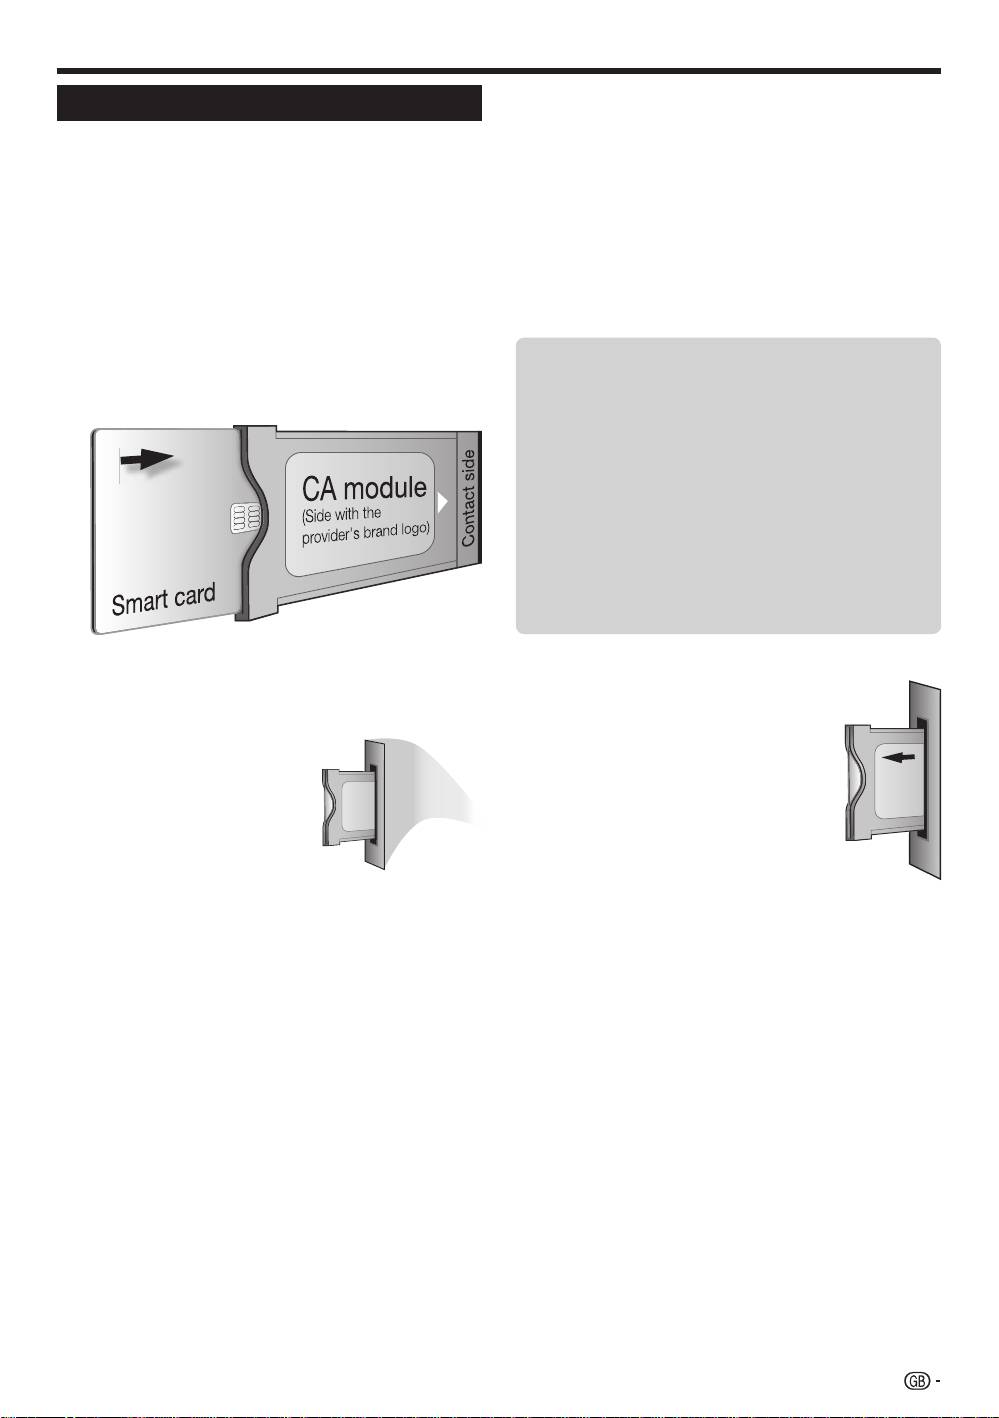
Inserting a smart card
NOTE
In order to receive coded digital stations, a Common
•
Make sure that the CA Module is properly inserted.
Interface Module (CA Module) and a smart card must
•
This menu is only available for digital stations.
be inserted in the Common Interface slot of the TV
1
Press h and the “HOME MENU” screen
(Page 14).
displays.
The CA Module and the smart card are not supplied
accessories. They are usually available from your
2
Press a/b to select “Digital Setup”.
dealers.
•
The content of this menu depends on the provider of
the CA Module.
Inserting the smart card into the CA Module
3
Press a/b to select “CI Menu”, and then press
1
With the side with the gold coloured contact
ENTER.
chip facing the side of the CA Module marked
with the provider’s logo, push the smart card
E
Module
into the CA Module as far as it will go. Note the
General information on CA Module displays.
direction of the arrow printed on the smart card.
E
Menu
Adjustment parameters of each smart card
displays.
E
Enquiry
You can input numerical values such as passwords
here.
NOTE
•
The content of each screen depends on the provider of
the CA Module.
Inserting the CA Module in the Common
Removing the CA Module
Interface slot
1
Remove the cover from the rear of
the TV.
2
Carefully insert the CA
2
Remove the module from the TV.
Module in the Common
3
Replace the cover.
Interface slot with the
contact side forward. The
logo on the CA Module
must be facing forward
from the rear of the TV.
Do not use excessive
force. Make sure the
module is not bent in the
process.
25
KRL46V_GB.indd 25 2008/07/09 14:08:54
HDMI CONTROL
Controlling HDMI devices using HDMI CONTROL
What is HDMI CONTROL?
Using the HDMI CEC (Consumer Electronics Control) protocol, with HDMI CONTROL
you can interactively operate compatible system devices (AV amplifier, DVD player/
recorder, Blu-ray player/recorder) using a single remote control unit.
What you can do with HDMI CONTROL
4
One Touch Recording
You do not have to search for the remote control unit of your recording device. Press the
E or the REC STOP
q buttons to start/stop recording what you see on the recorder.
4
One Touch Play
When the TV is in standby mode, it will automatically turn on and play back the image
from the HDMI source.
4
Single remote control operation
HDMI CONTROL automatically recognises the connected HDMI device and you can
control the TV and the devices as if using a universal remote control unit.
4
Operating Title list of external devices
In addition to displaying the TV’s own Timer list (Page 18), you can also call up the
external player’s Top menu or Pioneer BD Player’s/Pioneer Recorder’s Title list provided
that the devices support HDMI CONTROL.
4
Multiple control of HDMI devices
You can select which HDMI device to operate using the HDMI CTRL button.
NOTE
•
When you use HDMI CONTROL, make sure to use a certified HDMI cable.
•
Point the remote control unit toward the TV, not to the connected HDMI device.
•
Video noise may occur depending on the type of HDMI cable used. Make sure to use a certified
HDMI cable.
•
Up to three HDMI recording devices, one AV amplifier and two players can be connected using
this system.
•
These operations affect the HDMI device selected as the current external source. If the device
does not operate, turn on the device and select the appropriate external source using INPUT1–8
on the remore control unit or b on the TV.
•
After unplugging connection cables or changing the connection pattern, turn on all connected
HDMI devices before turning on the TV. Confirm that picture and audio are correctly output by
selecting “INPUT4”, “INPUT5” or “INPUT6” using INPUT1–8 on the remore control unit or b
on the TV.
•
The KURO LINK function name used on the web and in catalogues is referred to as HDMI
CONTROL in the operating instructions and on the product.
26
TV
INPUT
1 2 3 4
5 6 7 8
TV DTV
RADIO
1 2 3
4 5 6
7 8 9
INFO
0
P.INFO
CH RETURN
P
DVD TOPMENU/
EXIT
GUIDE
EPG
ENTER
HOME
MENU
RETURN
MENU
HDMI REC STOP
CTRL
SCREEN
AV
CM SKIP
SIZE
SELECTION
TOOLS
DVD
HDD
SOURCE
SELECT
TV
DVD
STB DVR VCR
KRL46V_GB.indd 26 2008/07/09 14:08:55
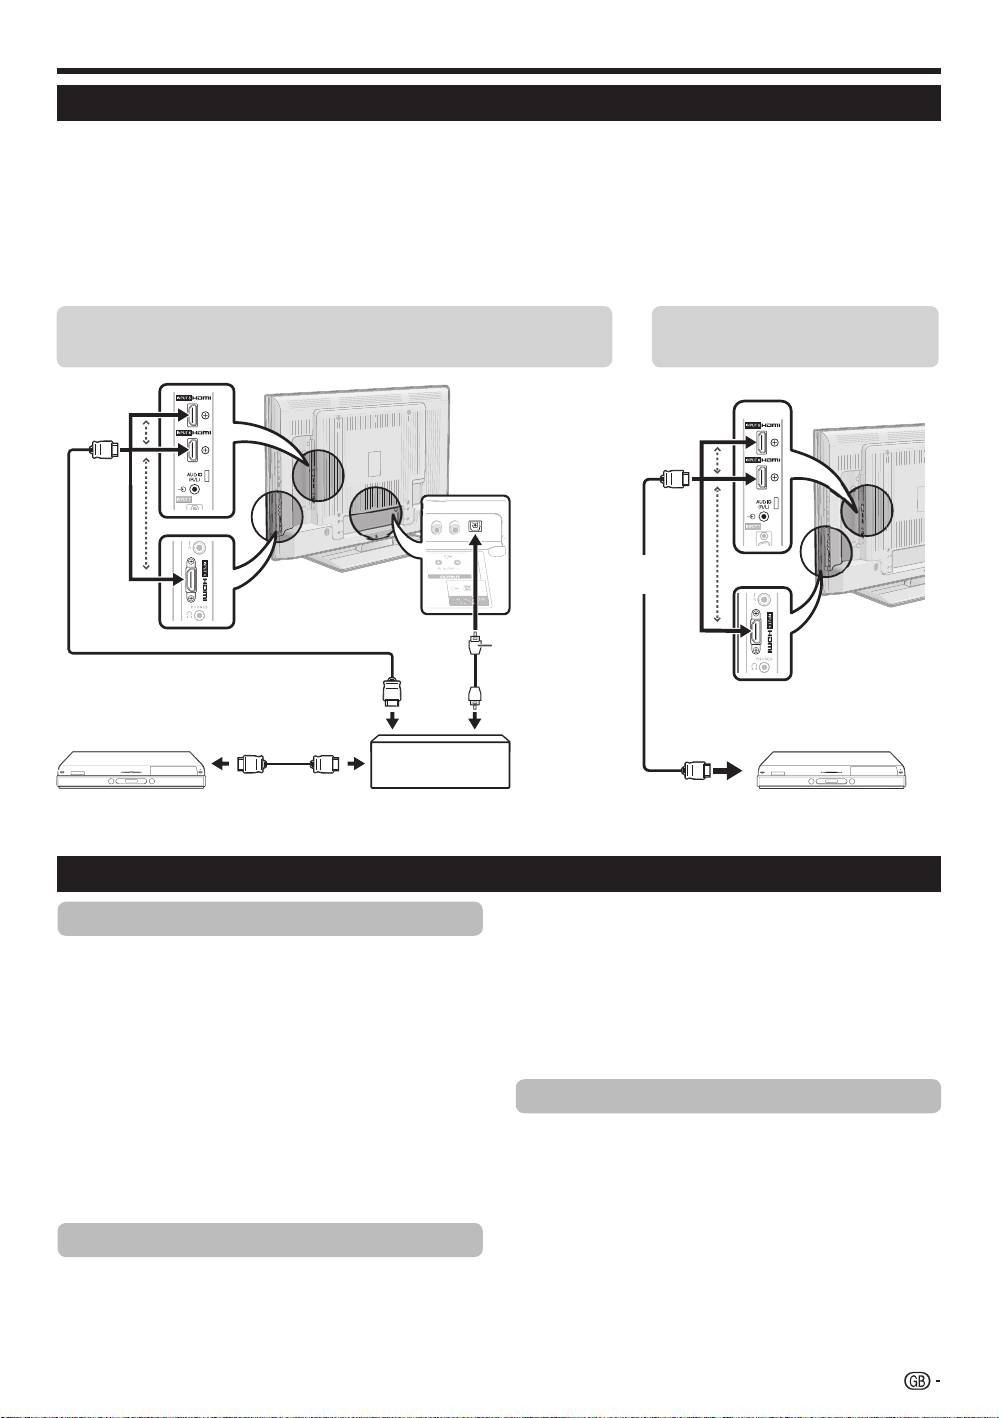
HDMI CONTROL
HDMI CONTROL connection
First connect the Pioneer AV Sound system or a Pioneer BD Player/Pioneer Recorder that supports the HDMI
CEC protocol.
NOTE
•
Refer to the operation manual of the device to be connected for further details.
•
After unplugging connection cables or changing the connection pattern, turn on the power of the TV after all relevant devices’
power have been turned on. Change the external input source by pressing INPUT1–8, select the appropriate external source
and verify the audiovisual output.
•
The cables illustrated in the following explanation are commercially available items.
Connecting a Pioneer BD Player/Pioneer Recorder via
Connecting a Pioneer BD
the Pioneer AV Sound system
Player/Pioneer Recorder only
HDMI-certified
cable
Optical audio
cable
HDMI-certified cable
HDMI-certified cable
Pioneer BD Player/
Pioneer AV Sound
Pioneer BD Player/
Pioneer Recorder
system
Pioneer Recorder
HDMI CONTROL Setup
1
Repeat steps 1 to 3 in HDMI CONTROL.
HDMI CONTROL
2
Press a/b to select “Auto Power On”, and then
Set to “On” to enable HDMI CEC functions. When
press ENTER.
turning on the power while “HDMI CONTROL” is set
3
Press c/d to select “On”, and then press
to “On”, the connected HDMI devices’ power will be
ENTER.
turned on in conjunction with the TV.
1
Press h and the “HOME MENU” screen displays.
NOTE
•
The factory default for this item is “Off”.
2
Press a/b to select “Option”.
3
Press a/b to select “HDMI CONTROL Setup”,
Selecting recorder
and then press ENTER.
Here, you can select a recorder for the recording from
4
Press a/b to select “HDMI CONTROL”, and
several connected recorders.
then press ENTER.
1
Repeat steps 1 to 3 in HDMI C
ONTROL.
5
Press c/d to select “On”, and then press
ENTER.
2
Press a/b to select “Selecting Recorder”, and
then press ENTER.
Auto Power On
3
Select the recorder, and then press ENTER.
If this is activated, the One Touch Play function
NOTE
is enabled. While the TV is in standby mode, it
•
If you have connected the Pioneer AV Sound system
automatically turns on and plays back the image from
between the TV and a Pioneer Recorder, the external
the HDMI source.
source’s indication changes (e.g. from “INPUT5” to
“INPUT5 (Sub)”).
27
KRL46V_GB.indd 27 2008/07/09 14:08:56

HDMI CONTROL
Operating an HDMI CONTROL
device
HDMI CONTROL allows you to operate the HDMI-
connected device with a single remote control unit.
Press n to start playback of a title.
See below, the section “Playback of titles using
HDMI CONTROL” if you want to start playback using
the list of the titles of the Pioneer BD Player/Pioneer
Recorder.
Press o to fast forward.
Press m to reverse.
Press r to stop.
Press a (TV)
to turn the HDMI-connected
device on/off.
Recording via the Pioneer Recorder EPG
(only for recorders)
You can call up the CEC-compatible recorder’s EPG and
preset timer recordings using the TV’s remote control unit.
Press HDMI CTRL.
HDMI CONTROL Menu
Recorder EPG
Top Menu/Title List
Media change
Switch to AV Sound
Switch to TV Sound
Sound mode change
Setup Menu
Model select
3
Select the desired medium, such as DVD
recorder or HDD. The media type changes every
time you press ENTER.
NOTE
•
This function may not work depending on the connected
recording devices.
1
•
Listening with the Pioneer AV Sound system
You can choose to listen to the TV sound only from the
Pioneer AV Sound system.
2
1
Press HDMI C
TRL.
2
Press a/b to select “Switch to AV Sound”, and
then press ENTER.
•
The sound from the TV speaker and headphone
terminal is silenced and only the sound from the
Pioneer AV Sound system is audible.
Listening with the TV Sound system
You can choose to listen to the TV sound only from the
TV Sound system.
1
Press HDMI C
TRL.
1
2
Press a/b to select “Switch to TV Sound”, and
then press ENTER.
Manually changing the Pioneer AV Sound
system’s sound mode
1
Press HDMI CTRL.
2
Press a/b to select “Sound mode change”.
3
The sound mode changes every time you press
ENTER.
2
Press a/b to select “Recorder EPG”, and then
•
Refer to the operation manual of the Pioneer AV
press ENTER.
Sound system for details.
•
The external input source switches and the recorder’s
EPG is displayed.
Calling up the menu of an external device
3
Select the programme to record.
connected with the TV via HDMI
•
Refer to the operation manual of the recorder for details.
You can call up the menu of an HDMI CEC-compatible
Playback of titles using HDMI CONTROL
external device (player, recorder, decoder, etc.) using
This section explains how to play back a title in the
the “Setup Menu” function.
Pioneer BD Player/Pioneer Recorder.
1
Press HDMI C
TRL.
1
Press HDMI C
TRL.
2
Press a/b to select “Setup Menu”, and then
2
Press a/b to select “Top Menu/Title List”, and
press ENTER.
then press ENTER.
•
The linked recorder now powers on and the TV
NOTE
automatically selects the appropriate external input source.
•
If a connected device does not have this function or the
•
The title list data from the connected Pioneer BD
device is in a status where the menu cannot be displayed
Player/Pioneer Recorder displays.
(recording, entering standby, etc.), this function may not be
available.
3
Select the title with a/b/c/d, and then press
n.
HDMI device selection
Selecting media type for CEC-compatible
If multiple HDMI devices are connected in a daisy
recorder
chain, you can specify which device to control here.
If your recorder has multiple storage media, select the
1
Press HDMI C
TRL.
media type here.
2
Press a/b to select “Model select”, and then
1
Press HDMI C
TRL.
press ENTER. The HDMI device changes every
2
Press a/b to select “Media change”, and then
time you press ENTER.
press ENTER.
28
KRL46V_GB.indd 28 2008/07/09 14:08:57
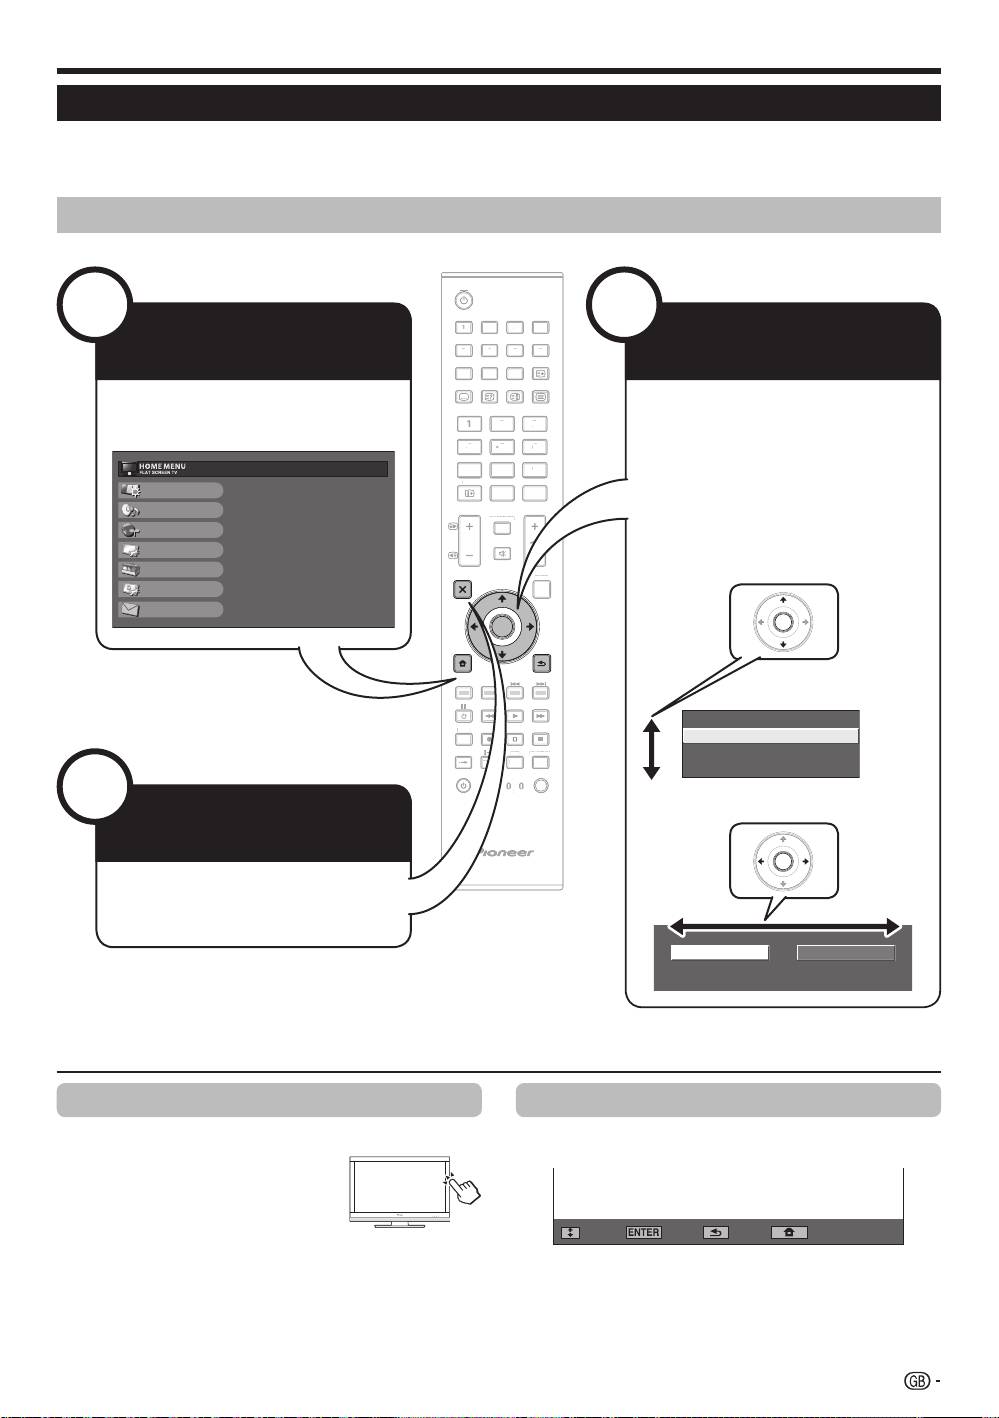
TV
INPUT
1 2 3 4
5 6 7 8
TV DTV
RADIO
1 2 3
4 5 6
7 8 9
INFO
0
P.INFO
CH RETURN
P
DVD TOPMENU/
EXIT
GUIDE
EPG
ENTER
HOME
MENU
RETURN
MENU
HDMI REC STOP
CTRL
SCREEN
AV
CM SKIP
SIZE
SELEC TION
TOOLS
DVD
HDD
SOURCE
TV
DVD
SELECT
STB DVR VCR
TV
D
T
V
RADI
O
1
2
3
4
5
6
7
8
TV
I
N
P
U
T
4
5
6
7
8
9
1
2
3
0
P
.INFO
I
NF
O
P
C
H RET
U
R
N
DVD T
O
PMENU
/
G
U
IDE
E
P
G
C
TRL
H
DM
I
RE
C
S
T
OP
HDD
AV
S
ELE
C
TI
O
N
C
M
S
KI
P
D
V
D
T
OO
L
S
SC
REE
N
S
IZ
E
SOU
R
CE
TV
ST
B
DVR
V
C
R
D
V
D
SELECT
Menu operation
1
Picture
Sound
Power Control
Setup
Option
Digital Setup
Information
No Signal Off
[Disable]
No Operation Off
[Disable]
Ecology
Sleep Timer
Analogue SearchDigital Search
What is the HOME MENU?
•
You need to call up the OSD to perform settings for the TV. The OSD for the settings is called “HOME MENU”.
•
The “HOME MENU” enables various settings and adjustments.
•
The “HOME MENU” can be operated with the remote control unit.
Common operations
2
3
NOTE
•
“HOME MENU” options differ in the selected input modes, but the operating procedures are the same.
•
The screens in the operation manual are for explanation purposes (some are enlarged, others cropped) and may vary slightly from the actual screens.
•
Items with 4 cannot be selected for various reasons.
Operation without a remote control unit
About the Guide Display
This function is useful when there is no remote control
The Guide Display at the bottom of the screen shows
unit within your reach.
operations with the OSD.
1
Press HOME
MENU and
the “HOME MENU” screen
displays.
2
Press Pk/l instead of a/b or ik/l
instead of c/d to select the item.
3
Press b to complete the setting.
NOTE
•
The “HOME MENU” screen will disappear if left unattended
for several seconds.
: Select : Enter : End: Back
The bar above is an operational guide for the remote
control unit. The bar will change in accordance with
each menu setting screen.
ENTER
Display the HOME
Select an item
MENU Screen
Press h and the “HOME MENU”
Press a/b/c/d to select/adjust
screen displays.
the desired menu, and adjust the
item to the desired level, and then
press ENTER.
Press 6 to return to the previous
“HOME MENU” page.
Exit the HOME
MENU screen
The operation will exit the “HOME
MENU” screen if you press g (
EX
IT)
before it is completed.
29
ENTER
Selecting in the menuE
Selecting optionsE
KRL46V_GB.indd 29 2008/07/09 14:08:59
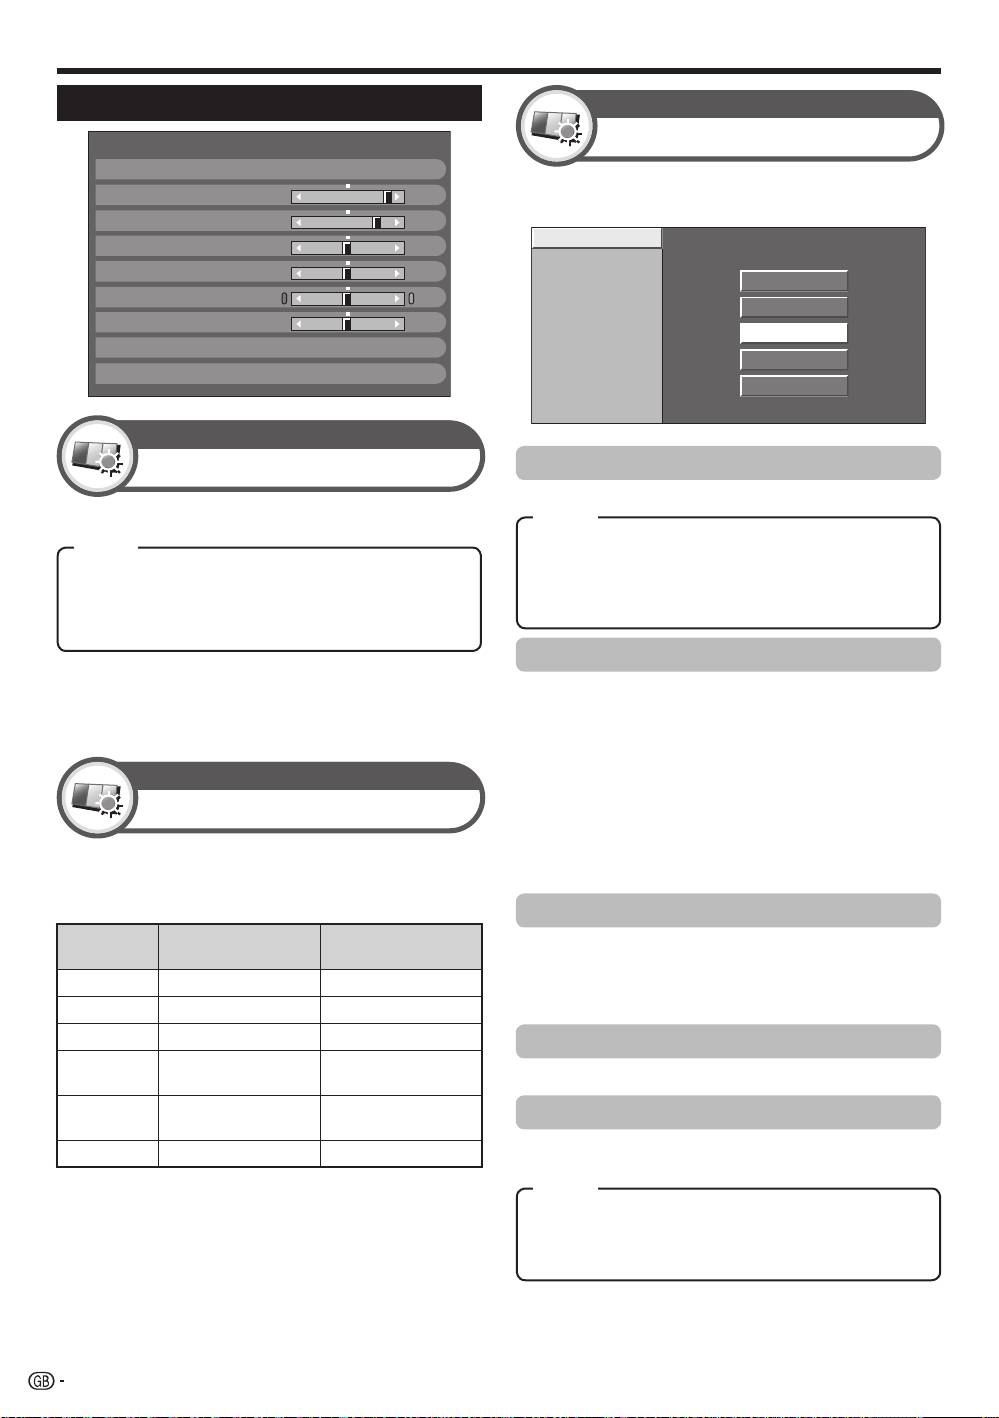
Basic adjustment
This TV provides various advanced functions for
optimising the picture quality.
NOTE
•
When set to “On”, the TV senses the surrounding light and
automatically adjusts the backlight brightness. Make sure no
object obstructs the RLS, which could affect its ability to sense
surrounding light.
Colour Temp.
100Hz
PureCinema
High
Active Contrast
Mid-High
3D-Y/C
Middle
Monochrome
Mid-Low
Range of RLS
Low
Picture Settings
Colour Temp.
Adjusts the colour temperature to give the best white image.
NOTE
•
“3D-Y/C” may not operate depending on the input signal type or
when the input signal is noisy.
•
“3D-Y/C” has even more effect on composite video signals (CVBS).
DYNAMIC
RLS [Off]
Backlight [+14] –16
+16
Contrast
[+30]
0
+40
Brightness
[0]
–30
+30
Colour
[0]
–30
+30
Tint
[0]
–30
+30
Sharpness
[0]
–10
+10
Pro Adjust
Reset
Picture
Pro Adjust
Picture
RLS
Automatically adjusts the brightness of the screen.
Item
High: White with bluish tone.
Item
Mid-High:
Intermediate tone between “High” and “Middle”.
Off: The brightness is fixed at the value set in “Backlight”.
Middle: Natural tone.
On: Automatically adjusts.
Mid-Low:
Intermediate tone between “Middle” and “Low”.
On:Display: Displays the RLS effect on the screen while
Low: White with reddish tone.
adjusting the brightness of the screen.
100Hz
“100Hz” technology provides superior solutions for
digital display picture quality removing motion blur.
NOTE
•
Press and hold both g and 6 on the remote control unit to show
Picture
“100Hz” demonstration in a dual screen format.
•
This effect is greater on fast moving images.
•
“100Hz” will have no effect in the following cases;
Picture adjustments
1) The type of signal received is a PC signal.
2) An OSD is being displayed.
Adjusts the picture to your preference with the
3) Teletext is activated.
•
If images appear blurred, set the “PureCinema” to “Off”.
following picture settings.
Adjustment items
PureCinema
Selectable
Automatically detects a film-based source (originally
c button d button
items
encoded at 24 or 25 frames per second, depending on
Backlight
The screen dims The screen brightens
the vertical frequency), analyses it and then recreates
each still film frame for high-definition picture quality.
Contrast
For less contrast For more contrast
Brightness
For less brightness For more brightness
Active Contrast
For less colour
For more colour
Colour
Automatically adjusts the contrast of an image according to the scene.
intensity
intensity
Skin tones become
Skin tones become
3D-Y/C
T
int
purplish
greenish
Provides high quality images with minimal dot crawl and
Sharpness
For less sharpness
For more sharpness
cross colour noise by detecting changes in the image.
Item
Standard: Normal adjustment.
Fast:
Sets the optimum image quality for fast-moving images.
Slow:
Sets the optimum image quality for slow-moving images.
Off: No detecting.
30
KRL46V_GB.indd 30 2008/07/09 14:08:59
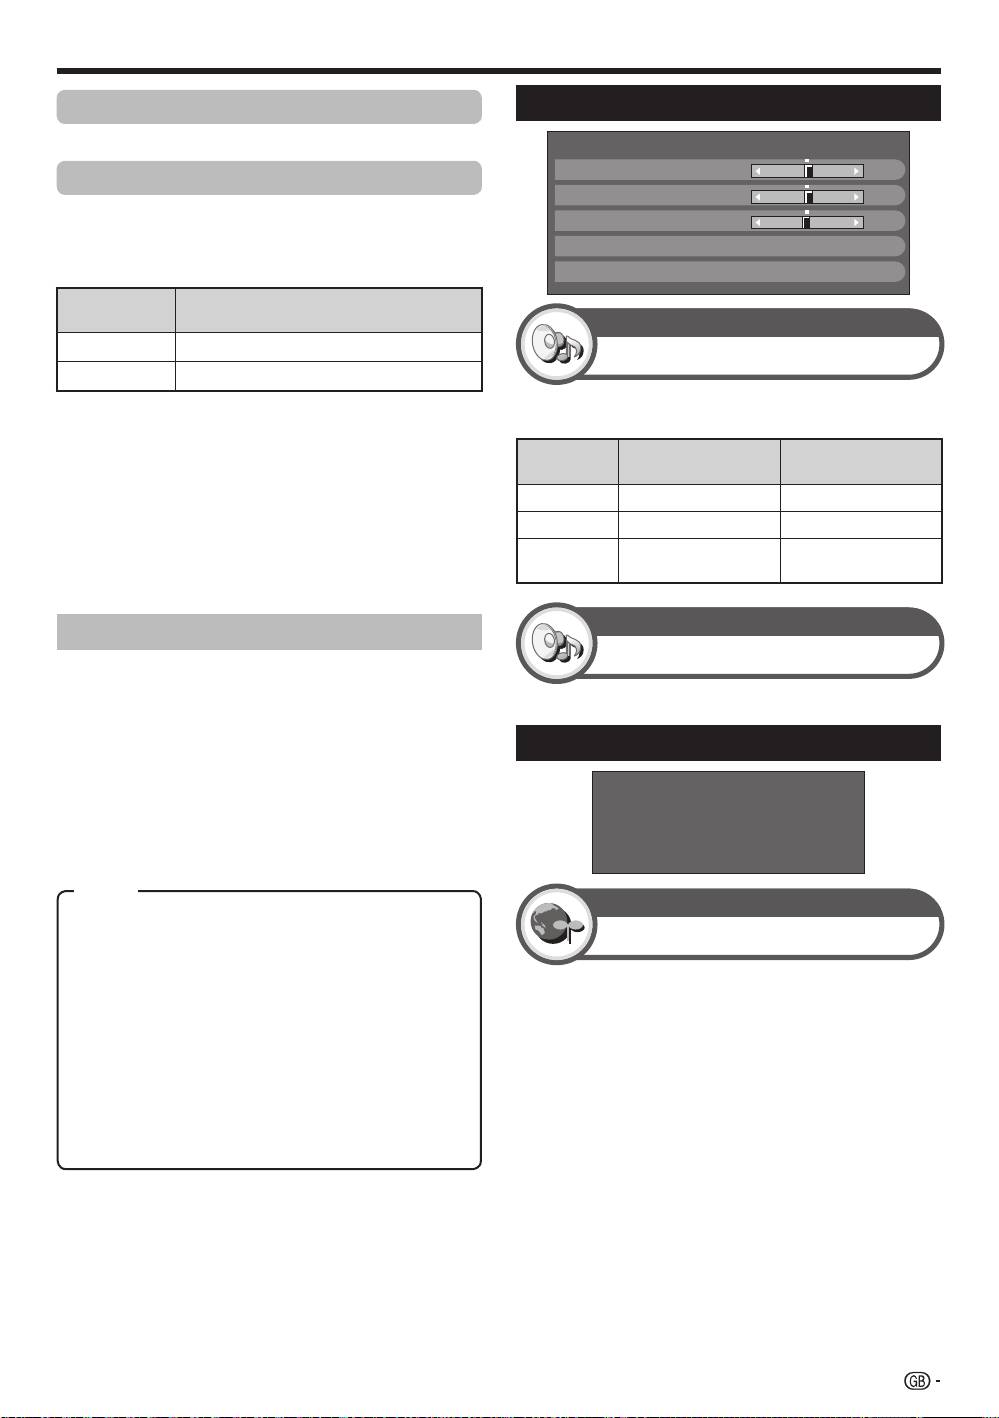
Basic adjustment
Monochrome
Sound Settings
For viewing a colour video in black & white.
Range of RLS
The brightness level range of the RLS’s automatic
adjustments can be set according to your preferences.
The adjustment range of the RLS can be set to a
maximum of e16 and a minimum of f16.
Selectable
Description
items
M
ax.
f
16 thr
ough e16
M
in.
f
16 thr
ough e16
NOTE
•
This function is available only when the “RLS” setting is set
to “On” or “On:Display”.
•
The maximum setting cannot be set to a smaller number
than the minimum setting.
•
The minimum setting cannot be set to a bigger number
than the maximum setting.
•
The maximum and minimum settings cannot be set to the
same number.
•
Depending on the brightness of the surrounding light, the
RLS might not operate if the adjustment range is small.
AV SELECTION
AV SELECTION gives you several viewing options to
choose from to best match the system environment,
which can vary due to factors like room-brightness,
type of programme watched or the type of image input
from external equipment.
1
Press AV S
ELEC
TION.
2
Each time you press AV SELEC
TION, the mode
changes.
•
You can also switch the mode on the “Picture” and
“Sound” menu screen by pressing AV SELECTION.
NOTE
•
The item marked with * is available only when selecting
“INPUT4”, “INPUT5”, “INPUT6” or “INPUT7” using
INPUT1–8 on the remore control unit or b on the TV.
•
The item marked with ** is available only when accepting
an “x.v.Colour” signal through an HDMI terminal.
DYNAMIC
Treble
[ 0] –15
+15
Bass
[ 0]
–15
+15
Balance
[ 0]
L
R
Surround
[Off]
Reset
Sound
Sound adjustment
Sound
Surround
This function allows you to enjoy realistic live sound.
Power Save Settings
Power Control
STANDARD: For a highly defined image in a normally
bright room.
No Signal Off
MOVIE: For viewing a movie in a darkened room.
GAME: For playing of video games.
When set to “Enable”, the TV will automatically enter
PC*: For PC.
standby mode if there is no signal input for 15 minutes.
x.v.Colour**: Produce realistic colour on the TV screen
•
Five minutes before the TV enters standby mode, the
unlike any other signal.
remaining time displays every minute.
USER
: Allows you to customise settings as desired. You
can set the mode for each input source.
NOTE
DYNAMIC (Fixed): For a clear-cut image emphasising
•
Even if a TV programme finishes, this function may not
high contrast for sports viewing (The “Picture” and
operate because of interference from other TV stations or
“Sound” settings cannot be adjusted).
other signals.
DYNAMIC: For a clear-cut image emphasising high
contrast for sports viewing.
No Signal Off
[Disable]
No Operation Off
[Disable]
Ecology
Sleep Timer
You can adjust the sound quality to your preference
with the following settings.
Selectable
c button d button
items
Treble
For weaker treble For stronger treble
Bass
For weaker bass For stronger bass
Balance
Decrease audio from
Decrease audio from
the right speaker
the left speaker
Item
31
KRL46V_GB.indd 31 2008/07/09 14:09:00
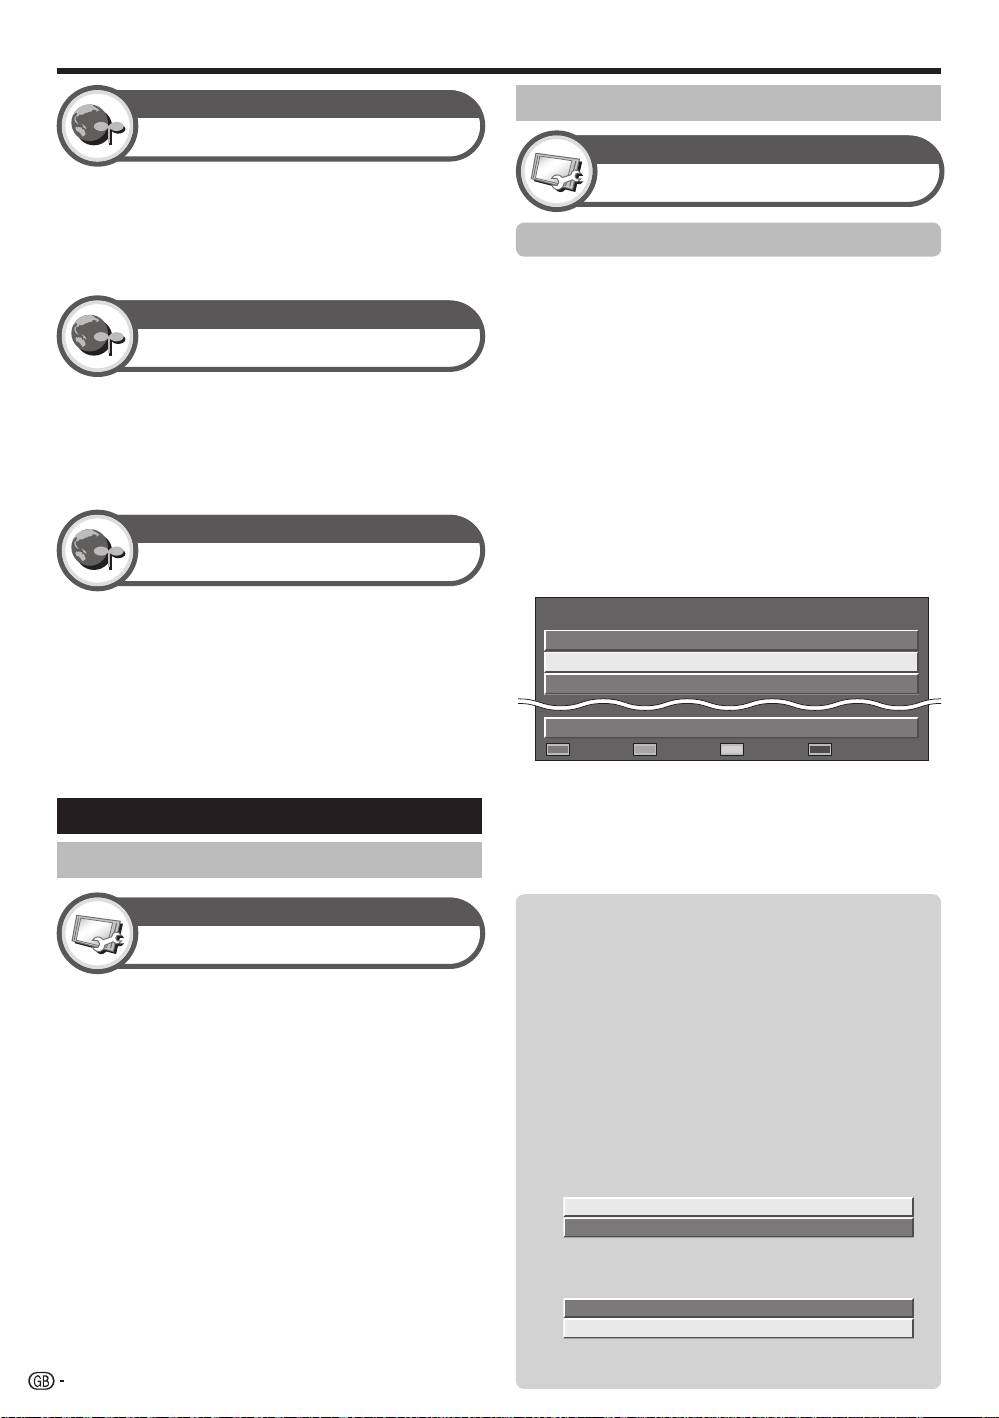
Basic adjustment
Power Control
No Operation Off
Setup
The TV will automatically enter standby mode if no
Programme Setup
operations are performed during the time span you set
(“30min.” or “3hr.”).
•
Five minutes before the TV enters standby mode, the
Digital Setting
remaining time displays every minute in the lower-left
You can reconfigure the DTV service settings
corner of the screen.
automatically or manually.
Power Control
Additional Search
Ecology
Use this menu to add new services automatically after
auto installation has been completed.
When set to “Yes”, the TV activates the following
Manual Search
power saving mode.
Add new services within a specified frequency band.
•
“RLS” set to “On” (Page 30).
Enter the frequency using 0–9 numeric buttons.
•
“Standby Mode” set to “Mode2” (Page 38).
You can perform “Manual Search” with a service number
•
“No Signal Off” set to “Enable” (Page 31).
only when the five Nordic countries have been selected in
•
“No Operation Off” set to “3hr.” (Page 32).
the country setting.
Power Control
Manual Adjust
Sleep Timer
Configure various settings for each service using the
Colour (Red/Green/Yellow/Blue) buttons.
Allows you to set a time when the TV automatically
enters standby mode.
NOTE
•
Select “Off” to cancel the sleep timer.
•
When the time has been set, countdown automatically
starts.
•
Five minutes before the preset of time expires, the
remaining time displays each minute in the lower-left corner
of the screen.
Channel Settings
Auto Installation
Setup
Auto Installation
The TV automatically detects and stores all available
services in your area. This function also allows you to
perform the channel setting for digital and analogue
individually and reconfigure the settings after the initial
auto installation has been completed.
After selecting “Yes” on the screen, you can set
language and channel search the same as in the
initial auto installation. Follow steps 2, 4 and 5
on page 15.
NOTE
•
You cannot set the country setting in “Auto Installation” in
the “Setup” menu. If you want to reconfigure the country
setting, automatically execute initial auto installation after
executing “Reset” from the “Setup” menu.
•
The current country setting is displayed on the screen.
Service
Service
CH
EPG
Old
Lock
No.
Name
Skip
Skip
LCN
DTV 993
SIT 3
DTV 994 ✔ ✔ SIT 2
DTV 995 ✔ SIT 1
DTV 999 HD Monosco
: Lock : CH Skip : EPG Skip : Sort
Digital channel settings
E
E
•
•
E
1
Press a/b to select the desired service.
2
Press the colour button on the remote control unit
corresponding with the item you want to reconfigure.
•
The 4 mark indicates the operation is set to on. Each
time the colour button is pressed, you can switch the
corresponding operation on/off.
Buttons for Manual Adjust operation
Lock: Press Red button.
When the service is locked, you must enter your PIN
whenever you tune to the service.
CH Skip: Press Green button.
Services with a 4 mark are passed over when pressing
Pe/f on the TV or remote control unit.
EPG Skip: Press Yellow button.
Services with a 4 mark are passed over in the Electronic
Programme Guide (EPG).
Sort: Press Blue button.
The item position of services can be sorted.
Press a/b to select the service whose item
position you want to move, and then press ENTER.
32
DTV 994 ✔ ✔ SIT 2
DTV 995 ✔ SIT 1
Press a/b to move it to the desired position,
and then press ENTER.
DTV 994
SIT 1
✔
DTV 995
SIT 2
✔ ✔
1
2
3
Repeat steps 1 and 2 until all desired service
items are sorted.
KRL46V_GB.indd 32 2008/07/09 14:09:01

Basic adjustment
Skip
Analogue channel settings
Channels with “Skip” set to “On” are passed over
when using Pk/l even if selected while watching the
Setup
image from the TV.
Programme Setup
Decoder
When connecting a decoder to the TV, you need to
select “INPUT1” or “INPUT2”.
Analogue Setting
You can reconfigure the analogue TV channels settings
NOTE
automatically or manually.
The factory preset value is “Off”.•
Lock
E
Additional Search
You can block the viewing of any channel.
Use this menu to add new channels automatically after
auto installation has been made.
NOTE
•
Start searching channels after selecting the colour system
•
See “Child Lock” for setting a PIN.
and sound system.
•
When “Lock” is set to “On” for a channel, “Child lock has
E
Manual Adjust
been activated” displays, and the image and sound of the
channel are blocked.
Use this menu to set up analogue TV channels
•
When pressing 6 while “Child lock has been activated”
manually.
displays, the PIN input window will display. Inputting the
After selecting “Yes” on the screen, press a/b/
correct PIN unlocks the “Child Lock” temporarily until the
power is turned off.
c/d to select the channel you want to set and
then press ENTER.
E
Sort
Fine
Channel positions can be sorted freely.
You can adjust the frequency to the desired position.
1
Press c/d to select “Yes”, and then press
ENTER.
NOTE
2
Press a/b/c/d to select the channel you
•
Adjust while checking the background picture as a
reference.
want to move, and then press ENTER.
•
Instead of pressing c/d to adjust the frequency, you
3
Press a/b/c/d to move it to the desired
can set by directly entering the frequency number of the
position, and then press ENTER.
channel with 0–9 numeric buttons.
4
Repeat steps 2 and 3 until all desired channels
EXAMPLE
are sorted.
•
179.25 MHz: Press 1 s 7 s 9 s 2 s 5.
E
Erase Programme
•
49.25 MHz: Press 4 s 9 s 2 s 5 s ENTER.
Channels can be erased individually.
Colour sys.
1
Press c/d to select “Yes”, and then press
Select the optimum colour system to receive (“Auto”,
ENTER.
“PAL”, “SECAM”).
2
Press a/b/c/d to select the channel you
Sound sys. (Broadcasting systems)
want to erase, and then press ENTER.
Select the optimum sound systems (Broadcasting
•
A message window pops up.
systems) to receive (“B/G”, “D/K”, “I”, “L/L’”).
3
Press c/d to select “Yes”, and then press
ENTER to erase the selected channel. All the
Label
subsequent channels move up.
When a TV channel sends its Network Name, the
4
Repeat steps 2 and 3 until all desired channels
“Auto Installation” detects the information and assigns
are erased.
a name to it. However, you can change channel names
individually.
1
Press a/b/c/d to select each character of
the new name for the channel, and then press
ENTER.
2
Repeat step 1 above until the name is fully spelt
out.
NOTE
•
The name can be five characters or less.
•
If a channel name is less than five characters, select “END”
to set the channel name.
33
KRL46V_GB.indd 33 2008/07/09 14:09:02
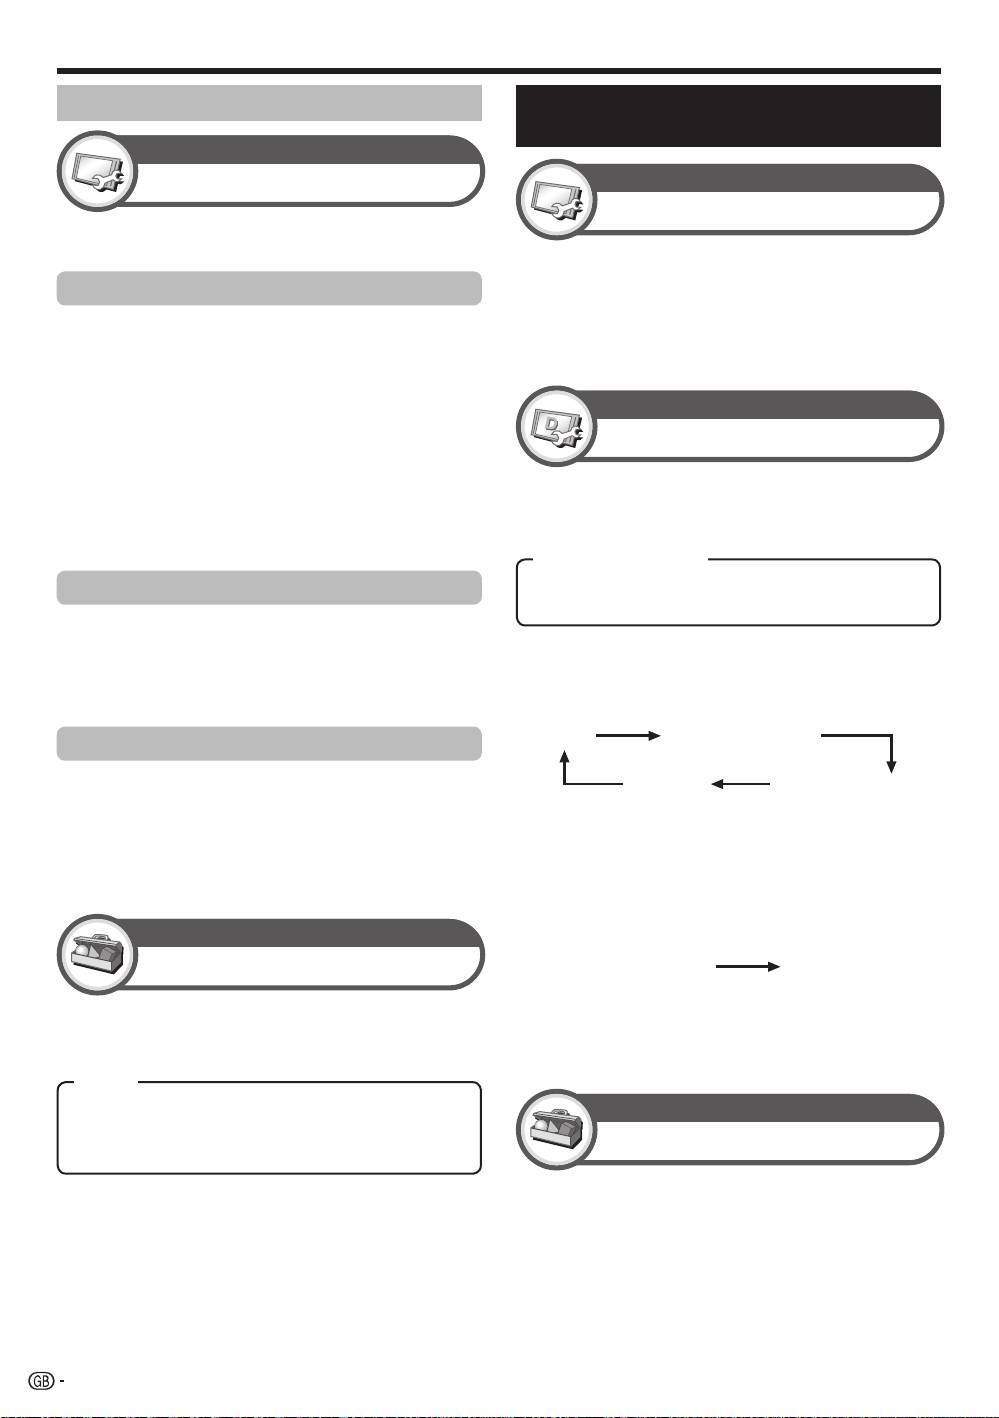
Basic adjustment
Password/Parental lock settings
Language Settings (language,
subtitle, multi audio)
Setup
Setup
Child Lock
Language
Allows you to use a PIN to protect certain settings
from being accidentally changed.
You can select a OSD language from the “Setup”
menu. Select from among 22 languages (Czech,
Change PIN
Danish, Dutch, English, Estonian, Finnish, French,
Register a four-digit password number to use the
German, Greek, Hungarian, Italian, Latvian, Lithuanian,
“Child Lock” function.
Norwegian, Polish, Portuguese, Russian, Slovak,
Slovene, Spanish, Swedish, Turkish).
1
Enter the four-digit number as a PIN using 0–9
numeric buttons.
Digital Setup
2
Enter the same four-digit number as in step 1 to
confirm.
Subtitle
•
“The system PIN has been changed successfully” displays.
NOTE
Set up to two preferred subtitle languages (including
•
To view a locked channel, you must enter the PIN (See pages 32
subtitles for the hearing impaired) to display if subtitles
and 33 for locking channels from viewing in DTV and ATV mode).
are available.
When you select a locked channel, a PIN prompt message pops
up. Press 6 to display the PIN input window.
Cancel PIN
E
1st Language E 2nd Language
E
For hearing impaired
Allows you to reset your PIN.
E
Switching subtitle languages
NOTE
•
As a precautionary measure, make a note of your PIN on the
Each time you press [ on the remote control unit, the
back of this operation manual, cut it out and keep it in a safe
subtitle switches.
place that children cannot reach.
Parental rating
This function allows DTV services to be restricted.
It prevents children from watching violent or sexual
scenes that may be harmful.
NOTE
•
“Universal viewing” and “Parental approval pref.” are ratings used
exclusively in France.
•
Refer to page 46 for details about ratings.
Option
Key Lock
This function allows you to lock the buttons on the TV
NOTE
or remote control unit in order to prohibit children from
•
Subtitles will not be displayed when the service does not contain
changing the channel or volume.
subtitle information.
Off: Unlocks the buttons.
Option
RC Control Lock: Locks all buttons on the remote control unit.
Button Control L
ock: Locks the buttons on the TV except the
Digital Audio Language
power switch.
Set up to three preferred multi audio languages to
NOTE
•
You cannot set both “RC Control Lock” and “Button Control Lock”
display if the audio languages are available.
at the same time.
E
Switching the multi audio languages
E
Cancelling the lock
Each time you press t on the remote control unit,
Press the HOME MENU button on the TV and set to
the audio language switches.
“Off” to cancel the “RC Control Lock”. Press the h
button on the remote control unit and set to “Off” to
cancel the “Button Control Lock”.
•
Refer to page 29 for menu operation using the h button on the TV.
1st LanguageOff
• • • • • •
2nd Language
1st Language1st Language
(For hearing impaired)
Selectable items
E
Set “For hearing impaired” to “Yes”
Subtitles for the hearing impaired have priority over
each of the subtitle language settings (Example: “1st
Language”, “2nd Language”, etc.).
EXAMPLE
Item
34
KRL46V_GB.indd 34 2008/07/09 14:09:02
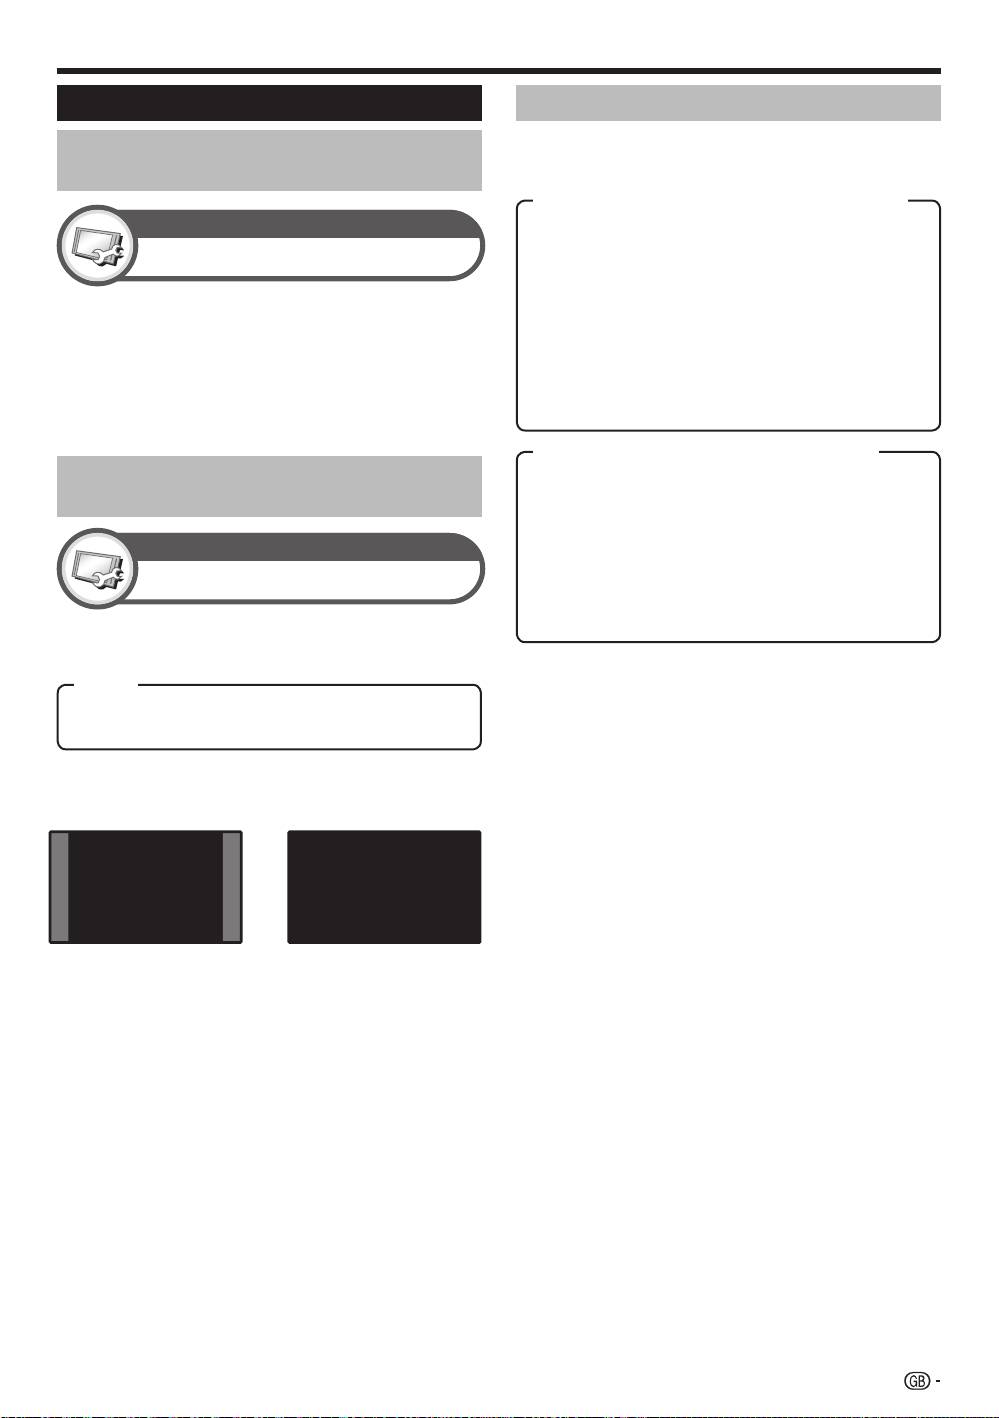
Useful Viewing functions
Selecting the picture size
Selecting the picture size manually
You can select the picture size. Selectable picture size
Selecting the WSS (Wide Screen
varies with the type of signal received.
Signalling) picture size automatically
Item (for SD [Standard-Definition] signals)
Setup
4:3: Keeps the original aspect ratio in a full screen display.
CINEMA 14:9: For 14:9 letterbox pictures. A thin side bar
WSS
appears on each side, and you may also see bars on
the top and bottom with some programmes.
WIDE: In this mode, the picture is stretched toward each
The “WSS” allows the TV to switch automatically
side of the screen.
among the different picture size.
FULL: For 16:9 squeeze pictures.
ZOOM: For 16:9 letterbox pictures. Bars may appear on
NOTE
the top and bottom with some programmes.
•
Use SCREEN SIZE if an image does not switch to the
CINEMA: For 14:9 letterbox pictures. Bars may appear
appropriate picture size. When the broadcast signal
on the top and bottom with some programmes.
contains no “WSS” information, the function will not work
even if enabled.
Item (for HD [High-Definition] signals)
Selecting the WSS (Wide Screen
FULL: Displays with an Overscan image. Crops all sides
of screen.
Signalling) picture size manually
Underscan: Displays with an Underscan image only
when receiving a 720p signal. Displays with the High-
Setup
Definition image adjusted optimally. Noise may appear
on the edge of the screen with some programmes.
4:3 Mode
Dot by Dot: Displays an image with the same number
of pixels on the screen when receiving 1080i/1080p
signals only.
The “WSS” signal has 4:3 auto-switching that allows
you to select between “4:3” and “WIDE”.
NOTE
•
Some items do not appear depending on the type of
Item
received signal.
4:3: Normal range keeping 4:3 or 16:9 aspect ratio.
WIDE: Wide image without side bars.
1
Press SCREEN SIZE.
•
The SCREEN SIZE menu displays.
•
The menu lists the SCREEN SIZE options selectable
WSS signal 4:3 screen
for the type of video signal currently received.
4:3 mode “WID
E”4:3 mode “4:3”
2
Press SCREEN SIZE or a/b while the
SCREEN SIZE menu displays on the screen.
•
As you toggle the options, each is immediately
reflected on the screen. There is no need to press
ENTER.
Basically, if you set “WSS” to “On” in the “Setup”
menu, the optimum SCREEN S
IZE is automatically
chosen for every broadcast, VCR or DVD player/
recorder.
NOTE
•
Even if you select your desired SCREEN SIZE manually,
the TV may automatically switch to the optimum SCREEN
SIZE depending on the signal received when “WSS” is set
to “On”.
35
KRL46V_GB.indd 35 2008/07/09 14:09:03
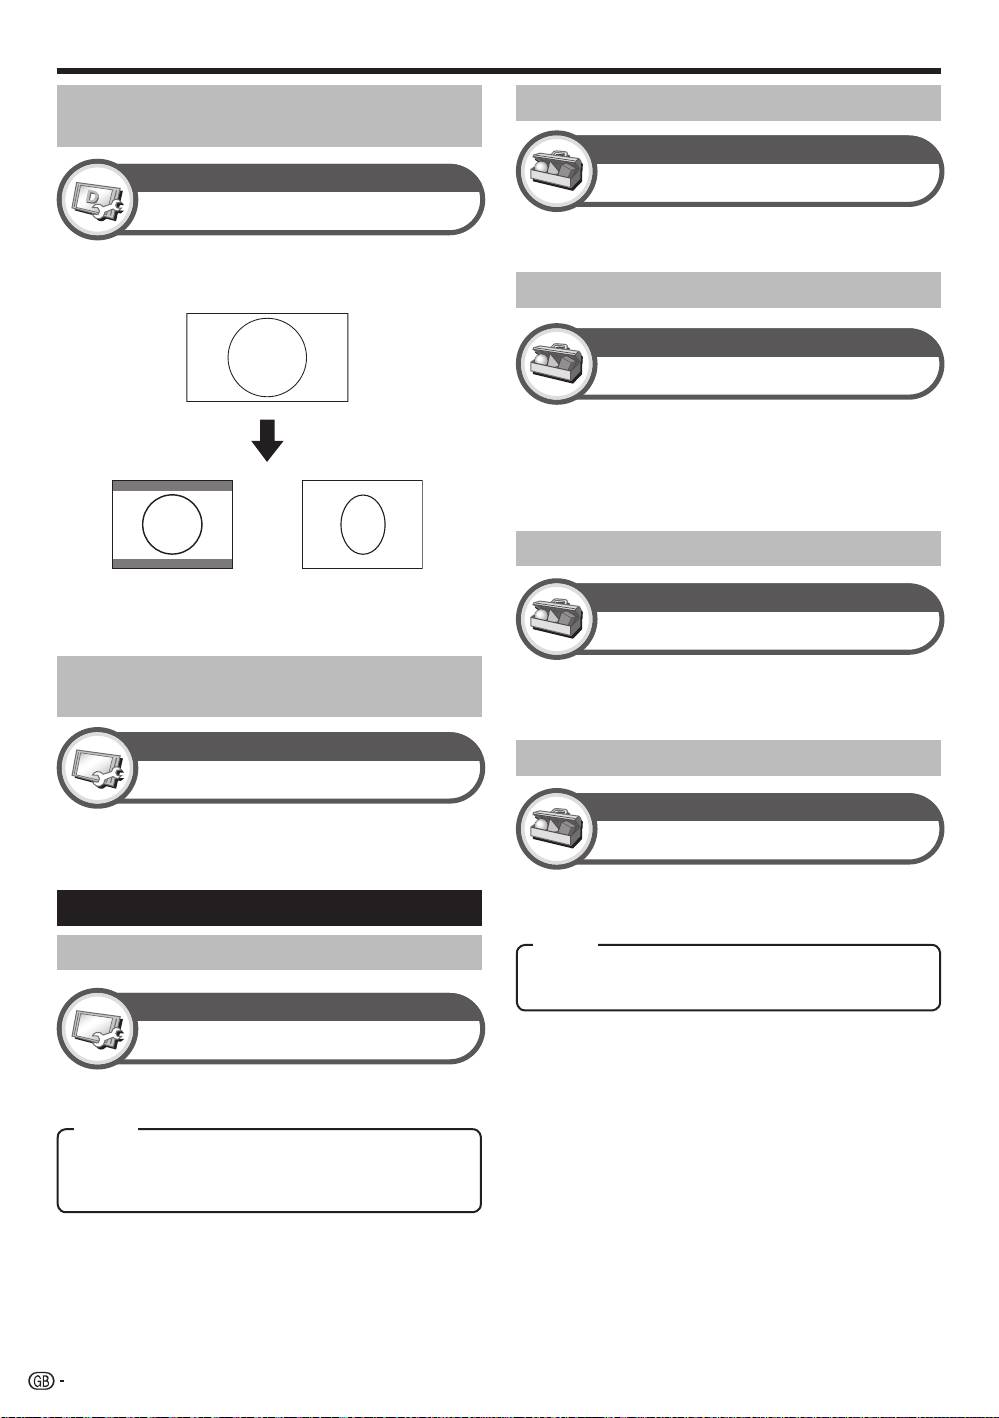
Useful Viewing functions
Selecting the recording picture
Reducing noise on the screen
size manually
Option
Digital Setup
DNR
REC Picture Size
“DNR” (Digital Noise Reduction) produces a clearer
image (“Off”, “High”, “Low”).
You can use this menu to set the appropriate picture
size for viewing a 16:9 format TV programme on a 4:3
TV.
Automatic volume adjustment
Option
Auto Volume
Different sound sources sometimes do not have the
same volume level, such as a programme and its
commercial breaks. The Automatic Volume Control
(Auto Volume) reduces this problem by equalizing
levels.
Emphasising dialogue
Setting to “4:3 TV” Setting to “16:9 TV”
Option
NOTE
•
This function must be set before recording.
Clear Voice
Selecting the HDMI picture size
This function emphasises speech against background
noise for greater clarity. It is not recommended for
automatically
music sources.
Setup
Outputting audio only
HDMI Auto View
Option
This function allows you to automatically change to the
appropriate picture size when viewing an HDMI signal
Audio Only
using the INPUT4, 5 and 6 terminals.
When listening to music from a music programme, you
can set the TV off and enjoy audio only.
Other picture and audio settings
Item
Adjusting image position
Off: Both screen images and audio are output.
On: Audio is output without a screen image.
Setup
Position
For adjusting a picture’s horizontal and vertical
position.
Item
H-Pos.: Centres the image by moving it to the left or
right.
V-Pos.: Centres the image by moving it up or down.
NOTE
•
Adjustments are stored separately for each input source.
•
Depending on the input signal type or SCREEN SIZE
setting, a position setting may not be available.
36
KRL46V_GB.indd 36 2008/07/09 14:09:03

Useful Viewing functions
Option
Time Display
Time Display
This function allows you to display the clock time in the
lower-right corner of the screen.
*
Four digit numbers (e.g. 0001) are displayed after
selecting the five Nordic countries in the country
setting.
Time Format
E
Time display in channel information
You can display the time information included in DTV
You can select the time format (either “24HR” or “AM/
and teletext broadcasts.
PM”) for the clock time.
NOTE
Option
•
Skip step 1 if receiving DTV broadcasts.
1
Select a TV channel (The time information is
Game Play Time
automatically captured).
2
Press p. The channel display will appear on
This function allows you to display the elapsed time on
the TV.
the screen when AV SELEC
TION is set to “GAME”.
3
Press p again within the several seconds
that the channel display is on the screen. Time
information will be shown in the lower-right
corner of the screen for several seconds.
4
Even when you change the TV channel, you can
display the time information with steps 2 and 3
above.
Option
NOTE
•
If acquired successfully, the time information will appear in
Programme Title Display
the upper-right corner of the screen by pressing h.
This function allows you to display programme
information such as the title and airtime by tuning a
channel.
NOTE
•
This function is available only when the DTV mode is
selected.
BBC2
DTV
001
Audio (ENG) STEREO :
Video 1080i :
Subtitle ENG 1/3:
New Information
BBC1
ATV
01
PAL I
NICAM STEREO
Subtitle Teletext Off:
New Information
Display Settings
Time and Title display
Channel display
You can display the channel information by pressing
p on the remote control unit.
DTV Mode ATV Mode
Item
On: Displays the clock time.
On (half-hourly): Displays the clock time in 30-minute
increments.
Off: Hides the clock time.
Item
On: Under connecting a game console to the TV, the
elapsed time is displayed in 30-minute increments
in the lower-left corner of the screen after AV
SELECTION is set to “GAME”.
Off: Hides the time.
37
KRL46V_GB.indd 37 2008/07/09 14:09:04
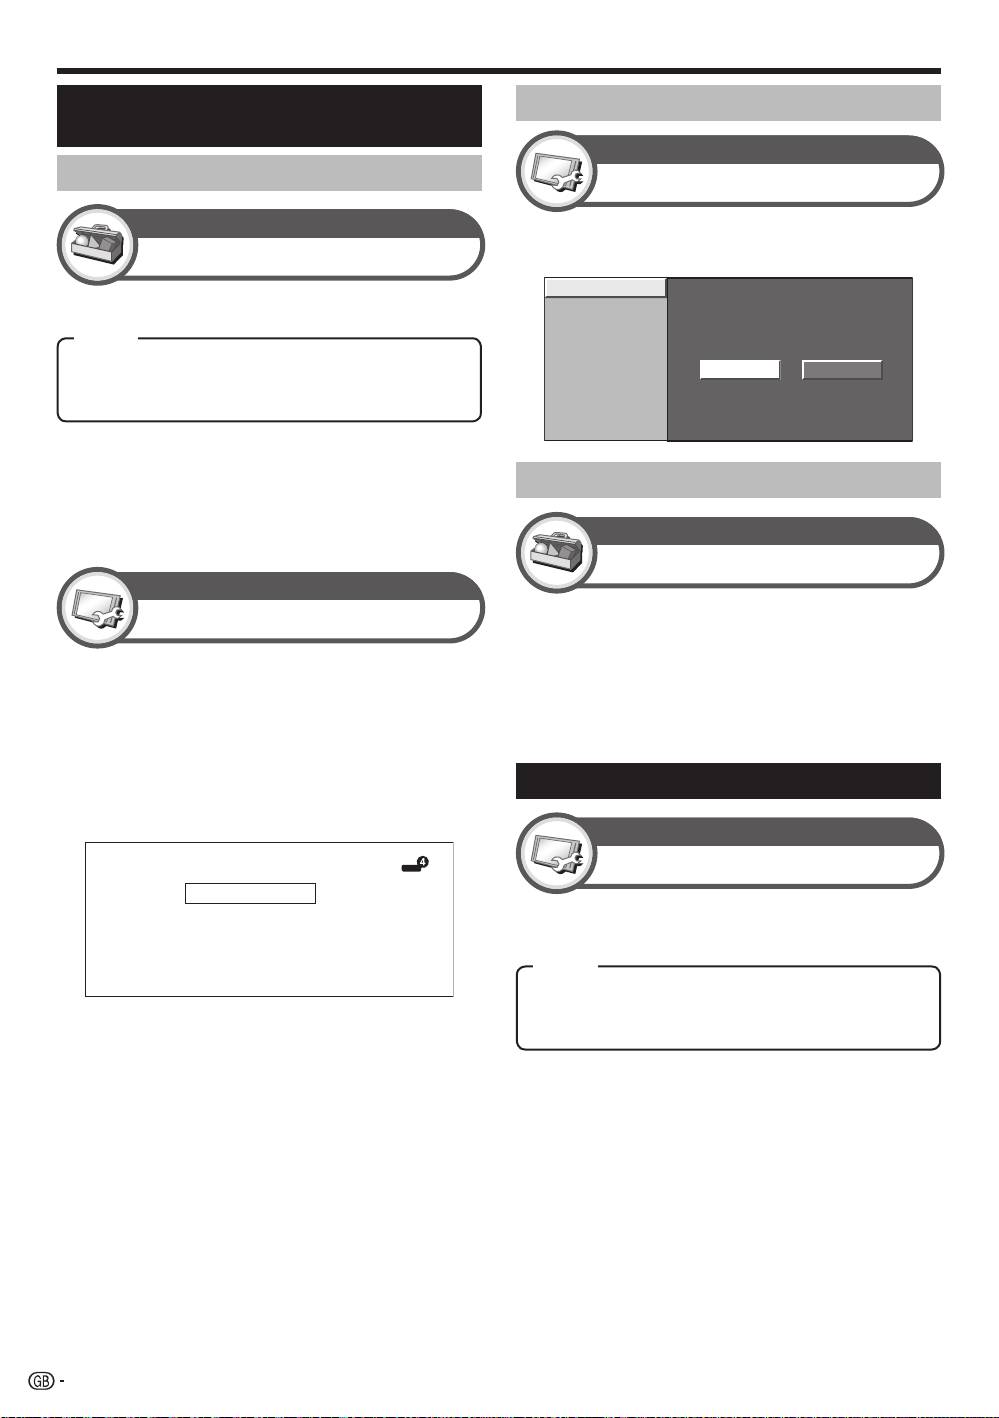
Other useful features
Option
Input Select
For setting the signal type of external equipment.
NOTE
•
If no (colour) image displays, try changing to another
signal type.
•
Check the operation manual of the external equipment for
the signal type.
•
When the signal type is set to “Auto”, the input terminal
where a cable is connected is automatically selected.
Setup
Input Label
You can label each input source with a custom
description.
Press INPUT1–8 on the remote control unit or
b on the TV to select the desired input source.
Go to “HOME MENU” > “Setup” > “Input Label”.
Press a/b/c/d to select each character of
the new name for the input source, and then
press ENTER.
DVD
A
B
C
D
E
F
G
H
I
J
CLEAR
K
L
M
N
O
P
Q
R
S
T
BACK
U
V
W
X
Y
Z
+
– _
.
0 1 2 3 4 5 6 7 8 9
END
Setup
Input Skip
This setting allows you to skip the SCART, HDMI or
RGB input on the Input Source Selection operation.
1
2
3
4
Repeat until the label is fully spelt out.
NOTE
•
The label can be six characters or less.
•
When you want to set an input source label of less than six
characters, select “END” to set the name.
•
You cannot change labels if the input source is “TV”.
INPUT1 (SCART)
INPUT2 (SCART)
INPUT4 (HDMI)
INPUT5 (HDMI)
INPUT6 (HDMI)
Y es
No
INPUT7 (RGB)
Setting when using external
Skipping specified inputs
devices
Input source settings
Item
INPUT1: Y/C, CVBS, RGB
INPUT2: Y/C, CVBS, RGB
INPUT3: Auto, S-VIDEO, VIDEO
Colour system settings
Option
Colour System
You can change the colour system to one that is
compatible with the image on the screen.
NOTE
•
The factory preset value is “Auto”.
•
If “Auto” is selected, the colour system for each channel
is automatically set. If an image does not display clearly,
select another colour system (e.g. “PAL”, “SECAM”).
Additional features
Setup
Standby Mode
You can reduce the TV’s start-up time after turning on
the power with the remote control unit.
Item
Mode1: The TV quickly starts up from standby. 30 W or
more of power consumption is required during standby.
Mode2: Power consumption is small during standby.
38
KRL46V_GB.indd 38 2008/07/09 14:09:05
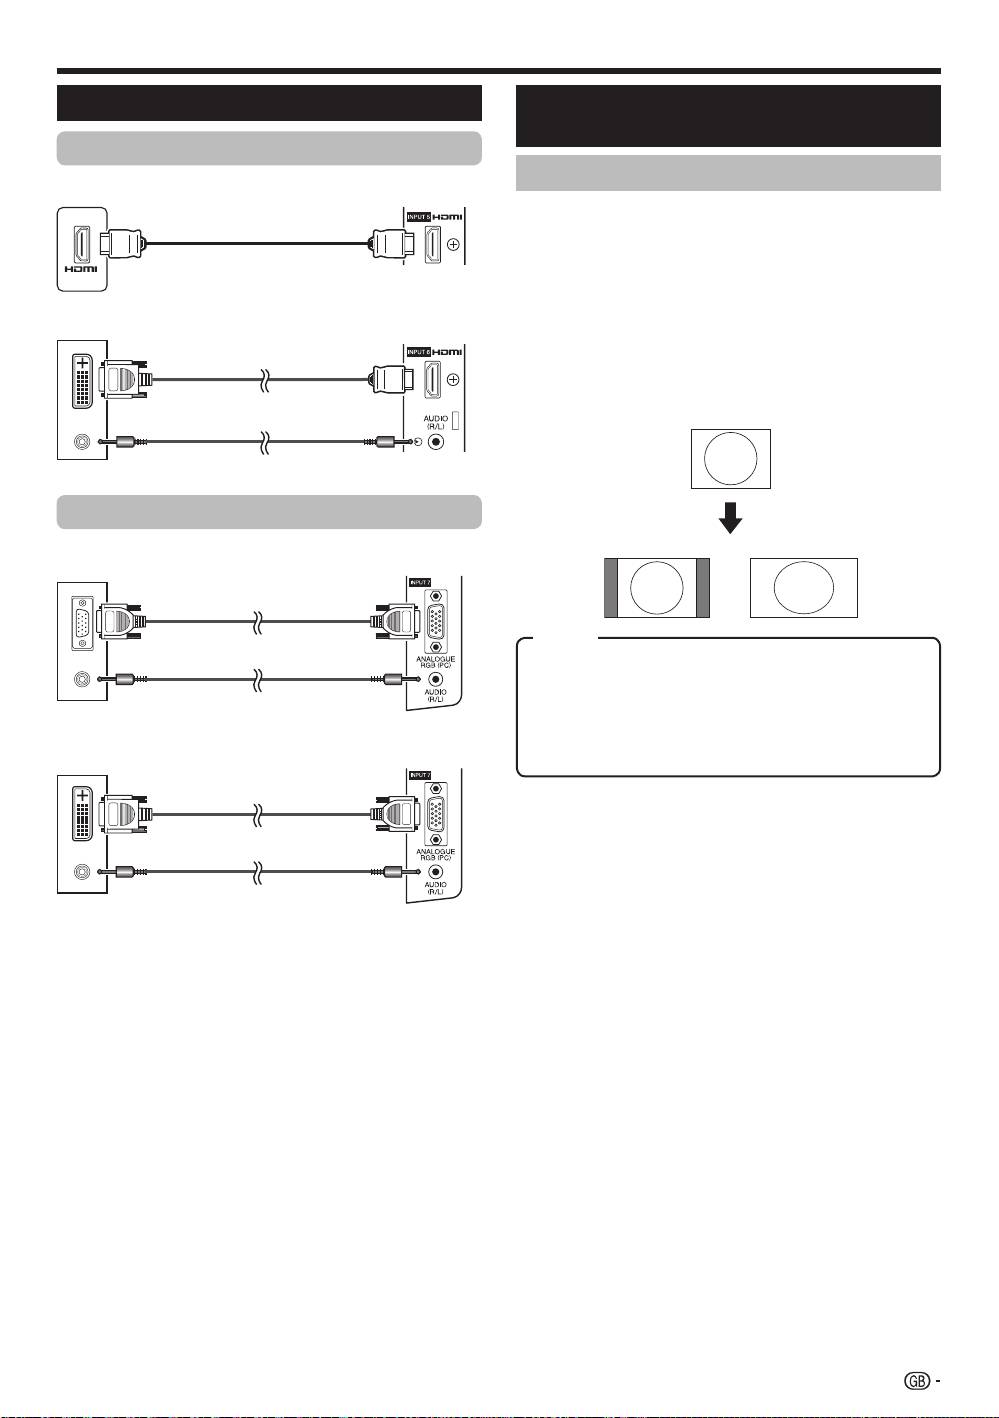
Connecting a PC
Connecting a PC
Displaying a PC image on the
screen
HDMI Connection
Selecting the picture size
PC
INPUT 4 or 5
You can select the picture size.
HDMI-certified cable
1
Press SCREEN S
IZE.
•
The SCREEN SIZE menu displays.
2
Press SCREEN SIZE or a/b to select a
desired item on the menu.
PC
INPUT 6
NOTE
DVI/HDMI cable
•
Connect the PC before making adjustments.
•
Selectable picture size may vary with input signal type.
EXAMPLE
ø 3.5 mm stereo minijack cable
Analogue Connection
4:3 FULL
INPUT 7PC
RGB cable
Item
FULL: An image fully fills the screen.
CINEMA:
For 14:9 letterbox pictures. Bars may appear
ø 3.5 mm stereo minijack cable
on the top and bottom with some programmes.
4:3: Keeps the original aspect ratio in a full screen display.
Dot by Dot: Displays an image with the same number of
PC
INPUT
7
pixels on the screen.
DVI/RGB conversion cable
NOTE
•
Refer to page 35 for AV signals (480i/480p/576i/576p/
720p/1080i/1080p). The ANALOGUE RGB (PC) terminal
(INPUT7) is not compatible with 480i/576i/1080p signals.
ø 3.5 mm stereo minijack cable
NOTE
•
The PC input terminals are DDC1/2B-compatible.
•
Refer to page 42 for a list of PC signals compatible with
the TV.
•
A Macintosh adaptor may be required for use for some
Macintosh computers.
•
When connecting to a PC, the input signal type is
automatically detected except 1,024 g 768 and 1,360 g
768 signals. Refer to Selection input resolution on page
40.
39
KRL46V_GB.indd 39 2008/07/09 14:09:06
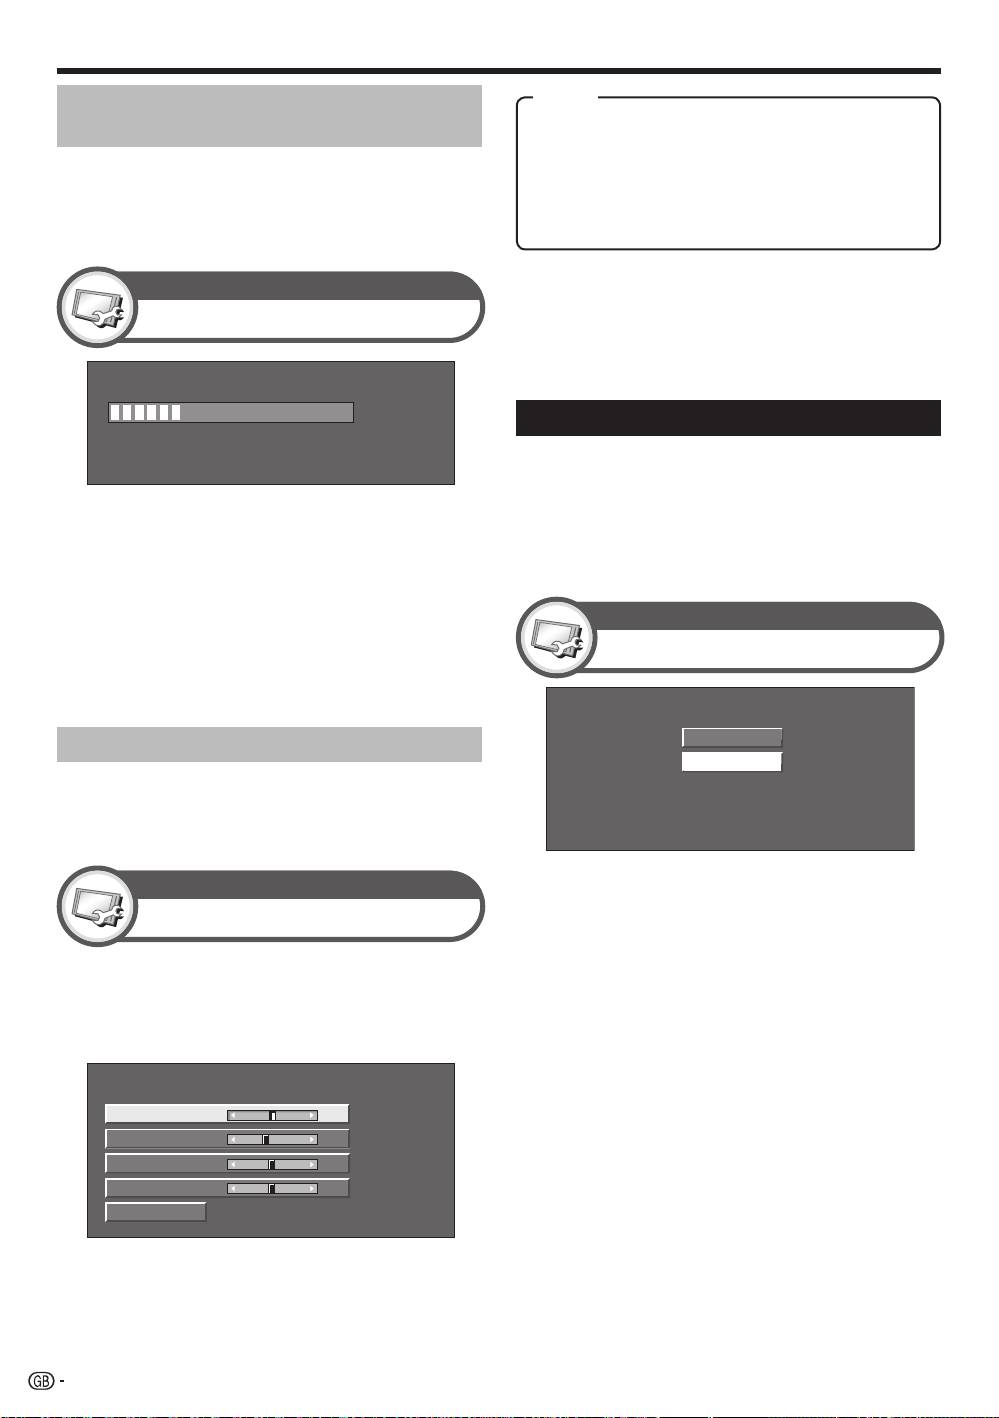
Connecting a PC
1
Press a/b to select the specific adjustment
item.
2
Press c/d to adjust the item to the desired
position.
H-Pos. [ 90] a b
V-Pos.
[ 39]
a b
Clock
[ 90]
a b
Phase
[ 20]
a b
Reset
NOTE
•
You can only select the “Input Signal” on the “Setup” menu
when receiving one of the two input signals listed above.
1024 x 768
1360 x 768
NOTE
•
For resetting all adjustment items to the factory preset
values, press a/b to select “Reset”, and then press
ENTER.
•
“Clock” and “Phase” in the “Fine Sync.” menu can be
adjusted only when inputting analogue signals through the
INPUT7 terminal.
Selecting input resolution
•
Some input signals may have to be registered
manually to display properly.
•
The pairs of input signals (resolutions) in the list
below are not distinguishable when received. In such
cases, you have to set the correct signal manually.
After setting once, it will display when the same
signal (resolution) is input again.
Setup
Input Signal
(Example)
Setup
Fine Sync.
30%
Item
Adjusting the PC image
H-Pos.: Centres the image by moving it to the left or
automatically
right.
V-Pos.: Centres the image by moving it up or down.
This function enables the screen to be automatically
Clock: Adjusts when the image flickers with vertical
adjusted to its best possible condition when the
stripes.
analogue terminals of the TV and PC are connected
Phase: Adjusts when characters have low contrast or
with a commercially available DVI/RGB conversion
when the image flickers.
cable, etc.
Setup
Auto Sync.
NOTE
•
When “Auto Sync.” is successful, “Auto Sync completed
successfully” displays. If not, “Auto Sync.” failed.
•
“Auto Sync.” may fail even if “Auto Sync completed
successfully” displays.
•
“Auto Sync.” may fail if the PC image has low resolution,
has unclear (black) edges, or is moved while executing
“Auto Sync.”.
•
Be sure to connect the PC to the TV and switch it on
before starting “Auto Sync.”.
•
“Auto Sync.” can be executed only when inputting
analogue signals through the INPUT7 terminal.
Adjusting the PC image manually
Ordinarily you can easily adjust the picture as
necessary to change image position using “Auto
Sync.”. In some cases, however, manual adjustment is
needed to optimise the image.
40
KRL46V_GB.indd 40 2008/07/09 14:09:07
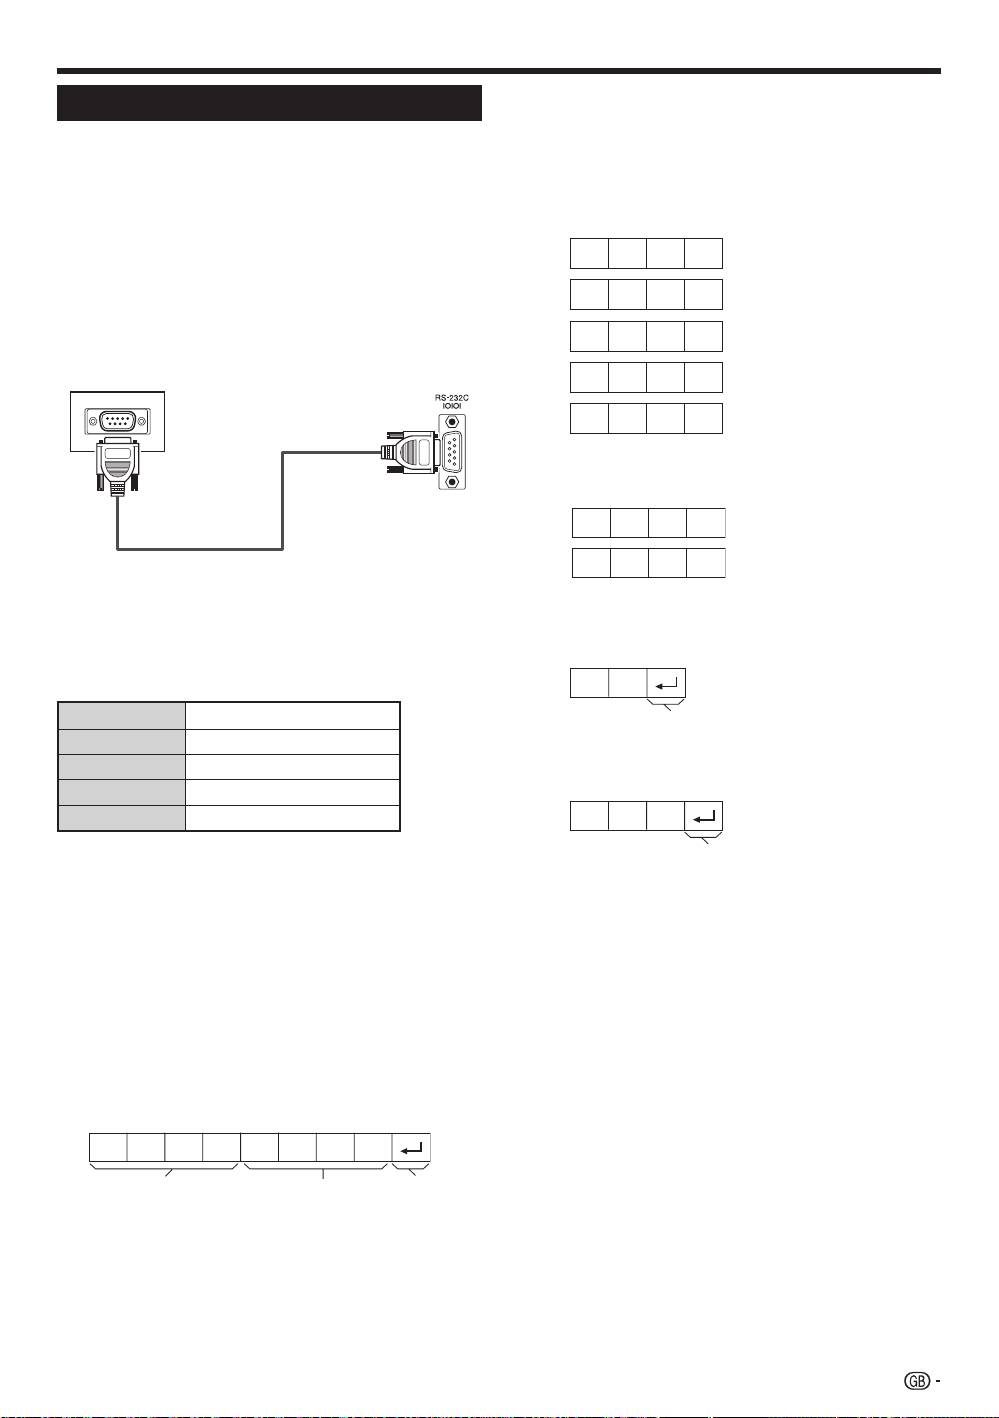
Connecting a PC
C1 C2 C3 C4 P1 P2 P3 P4
Communication conditions
Set the RS-232C communications settings on the PC
to match the TV’s communications conditions. The
TV’s communications settings are as follows:
Baud rate:
9,600 bps
Data length:
8 bits
Parity bit:
None
Stop bit:
1 bit
Flow control:
None
Communication procedure
Send the control commands from the PC via the RS-
232C connector.
The TV operates according to the received command
and sends a response message to the PC.
Do not send multiple commands at the same time.
Wait until the PC receives the OK response before
sending the next command.
Make sure to send “A” with the carriage return and
confirm that “ERR” returns before operating.
Command format
0
0 0 0 9
– 3 0
1 0 0
0 0 5 5
?
? ? ? ?
O K
E R R
Parameter
RS-232C port specifications
Input the parameter values, aligning left, and fill with
blank(s) for the remainder (Be sure that four values are
PC Control of the TV
input for the parameter).
•
When a programme is set, the TV can be controlled
When the input parameter is not within an adjustable
from the PC using the RS-232C terminal. The input
range, “ERR” returns (Refer to “Response code
signal (PC/video) can be selected, the volume
format”).
can be adjusted and various other adjustments
and settings can be made, enabling automatic
programmed playing.
•
Use an RS-232C serial control cable (cross type)
(commercially available) for the connections.
NOTE
•
This operation system should be used by a person who is
accustomed to using PCs.
When “?” is input for some commands, the present
setting value responds.
RS-232C serial control cable
(cross type)
Response code format
Normal response
Return code (0DH)
Problem response (communication error or incorrect
command)
Return code (0DH)
After sending the return code (0DH), make sure to
send the line feed (0AH) as well.
Eight ASCII codes eCR
Command four-digits Parameter four-digits Return code
Command four-digits: Command. The text of four
characters.
Parameter four-digits: Parameter 0–9, blank, ?
41
KRL46V_GB.indd 41 2008/07/09 14:09:08
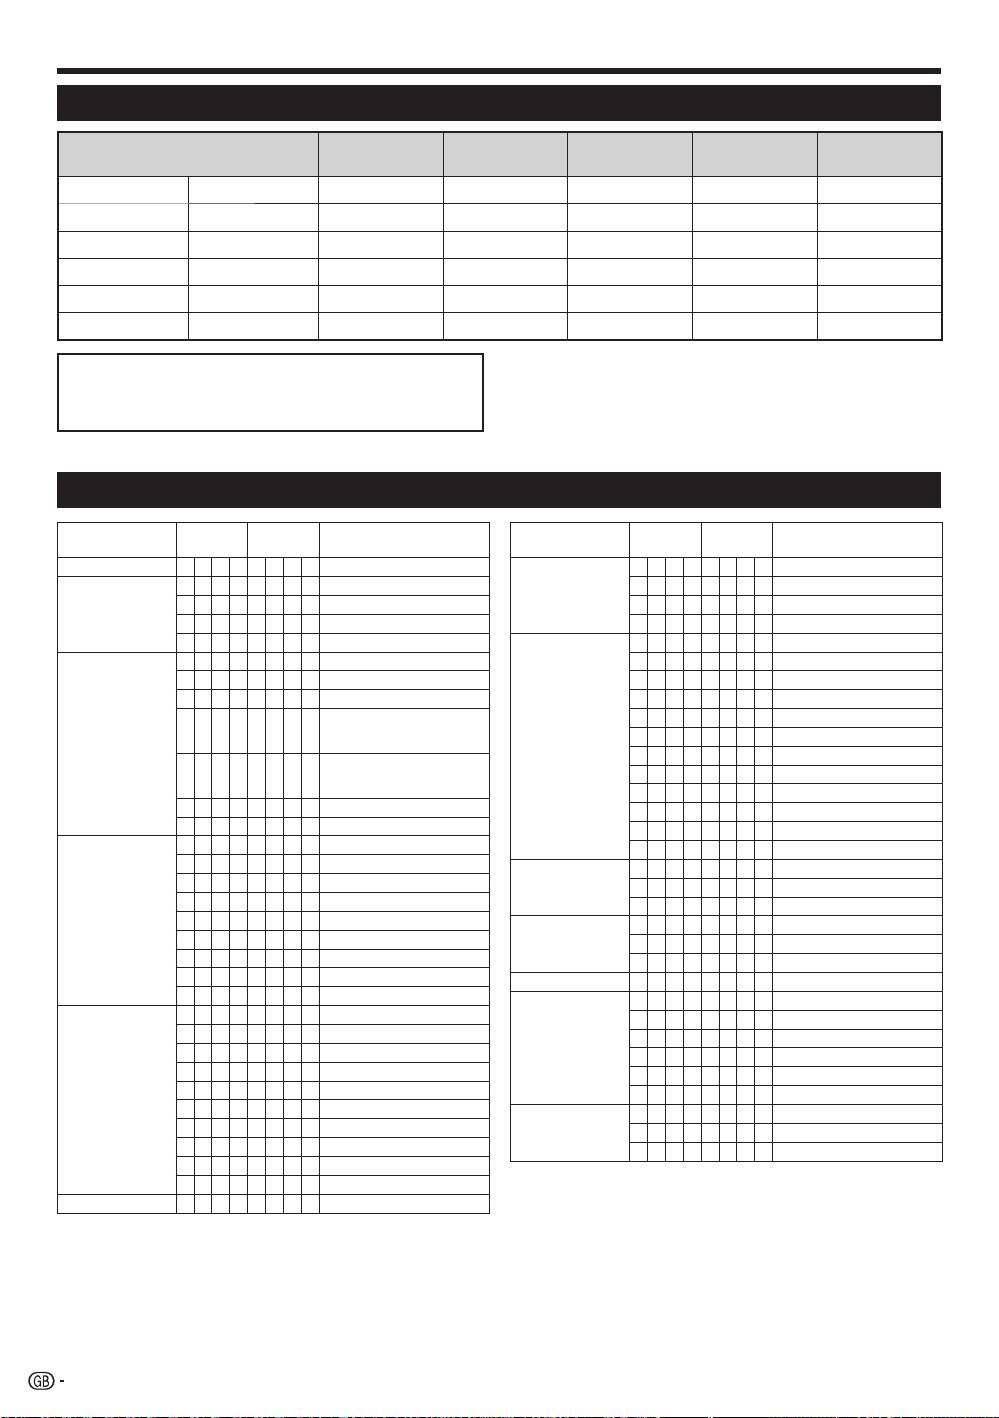
Connecting a PC
PC compatibility chart
Horizontal
Vertical
A
nalogue (D-
V
ESA
Resolution
Digital (HDMI
)
Frequency
Frequency
Sub)
Standard
VGA
640 g 480
31.5 kHz 60 Hz
4 4 4
SVGA
800 g 600
37.9 kHz 60 Hz
4 4 4
XGA
1,024 g 768
48.4 kHz 60 Hz
4 4 4
WXGA
1,360 g 768
47.7 kHz 60 Hz
4 4 4
SXGA
1,280 g 1,024
64.0 kHz 60 Hz
4 4 4
SXGA+
1,400 g 1,050
65.3 kHz 60 Hz
4 4
NOTE
VGA, SVGA, XGA, WXGA, SXGA and SXGA+ are
•
This TV has only limited PC compatibility, correct operation
registered trademarks of International Business
can only be guaranteed if the video card conforms exactly
Machines Corporation.
to the VESA 60 Hz standard. Any variations from this
standard will result in picture distortions.
RS-232C command list
CONTROL ITEM COMMAND PARAMETER CONTROL CONTENTS
CONTROL ITEM COMMAND PARAMETER CONTROL CONTENTS
POWER SETTING P O W R 0 _ _ _ POWER OFF
POSITION H P O S * * * _ H-POSITION (AV/PC)
INPUT SELECTION A I T G D _ _ _ _ INPUT SWITCHING (TOGGLE)
V P O S * * * _ V-POSITION (AV/PC)
I T V D _ _ _ _ TV (CHANNEL FIXED)
C L C K * * * _ CLOCK (0–180)
I D T V _ _ _ _ DTV (CHANNEL FIXED)
P H S E * * _ _ PHASE (0–40)
I A V D * _ _ _ INPUT1–8 (1–8)
SCREEN SIZE W I D E 0 _ _ _ TOGGLE (AV)
CHANNEL D C C H * * _ _ TV DIRECT CHANNEL (1–99)
W I D E 1 _ _ _ 4:3 (AV)
C H U P _ _ _ _ CHANNEL UP
W I D E 2 _ _ _ CINEMA 14:9 (AV)
C H D W _ _ _ _ CHANNEL DOWN
W I D E 3 _ _ _ WIDE (AV)
D T V D * * * _ THREE DIGIT DTV DIRECT
W I D E 4 _ _ _ FULL (AV)
CHANNEL (1–999) (Non-Nordic
W I D E 5 _ _ _ ZOOM (AV)
countries)
W I D E 6 _ _ _ CINEMA (AV)
D T V D * * * * FOUR DIGIT DTV DIRECT
CHANNEL (1–9999) (Nordic
W I D E 7 _ _ _ 4:3 (PC)
countries only)
W I D E 8 _ _ _ CINEMA (PC)
D T U P _ _ _ _ DTV CHANNEL UP
W I D E 9 _ _ _ FULL (PC)
D T D W _ _ _ _ DTV CHANNEL DOWN
W I D E 1 0 _ _ DOT by DOT (AV/PC)
INPUT SELECTION B I N P 1 0 _ _ _ INPUT1 (Y/C)
W I D E 1 1 _ _ UNDERSCAN (AV)
I N P 1 1 _ _ _ INPUT1 (CVBS)
MUTE M U T E 0 _ _ _ TOGGLE
I N P 1 2 _ _ _ INPUT1 (RGB)
M U T E 1 _ _ _ MUTE ON
I N P 2 0 _ _ _ INPUT2 (Y/C)
M U T E 2 _ _ _ MUTE OFF
I N P 2 1 _ _ _ INPUT2 (CVBS)
SURROUND A C S U 0 _ _ _ SURROUND TOGGLE
I N P 2 2 _ _ _ INPUT2 (RGB)
A C S U 1 _ _ _ SURROUND ON
I N P 3 0 _ _ _ INPUT3
A C S U 2 _ _ _ SURROUND OFF
I N P 3 1 _ _ _ INPUT3 (S-VIDEO)
AUDIO CHANGE A C H A _ _ _ _ TOGGLE
I N P 3 2 _ _ _ INPUT3 (VIDEO)
SLEEP TIMER O F T M 0 _ _ _ OFF
AV SELECTION A V M D 0 _ _ _ TOGGLE
O F T M 1 _ _ _ SLEEP TIMER 30 MIN
A V M D 1 _ _ _ STANDARD
O F T M 2 _ _ _ SLEEP TIMER 1 HOUR
A V M D 2 _ _ _ MOVIE
O F T M 3 _ _ _ SLEEP TIMER 1 HOUR 30 MIN
A V M D 3 _ _ _ GAME
O F T M 4 _ _ _ SLEEP TIMER 2 HOUR
A V M D 4 _ _ _ USER
O F T M 5 _ _ _ SLEEP TIMER 2 HOUR 30 MIN
A V M D 5 _ _ _ DYNAMIC (Fixed)
TEXT T E X T 0 _ _ _ TEXT OFF
A V M D 6 _ _ _ DYNAMIC
T E X T 1 _ _ _ TEXT ON (TOGGLE)
A V M D 7 _ _ _ PC
D C P G * * * _
DIRECT PAGE JUMP (100–899)
A V M D 8 _ _ _ x.v.Colour
A V M D ? ? ? ? 1–8
VOLUME V O L M * * _ _ VOLUME (0–60)
42
KRL46V_GB.indd 42 2008/07/09 14:09:09

Appendix
Troubleshooting
Problem Possible Solution
No power.•
•
Check if you pressed a (TV)
on the remote control unit.
If the indicator on the TV lights up red, press a (TV)
.
•
Is the AC cord disconnected?
•
Check if you pressed a on the TV.
The TV cannot be operated.• External influences such as lightning, static electricity, etc., may cause improper operation. In this
•
case, operate the TV after first turning off the power, or unplugging the AC cord and re-plugging
it in after one or two minutes.
Remote control unit does not operate.•
•
Are batteries inserted with polarity (e, f) aligned?
•
Are batteries worn out? (Replace with new batteries.)
•
Are you using it under strong or fluorescent lighting?
•
Is a fluorescent light illuminating to the remote control sensor?
Picture is cut off.• Is the image position correct?
•
•
Are screen mode adjustments (SC
REEN S
IZE) such as picture size made correctly? (Pages 35
and 39)
• Adjust the picture tone.
Strange colour, light colour, or dark
•
colour, or colour misalignment.
•
Is the room too bright? The picture may look dark in a room that is too bright.
•
Check the “Colour System” setting (Pages 33 and 38).
Power is suddenly turned off.• The TV’s internal temperature has increased.
•
Remove any objects blocking the vent or clean.
•
Is the “Sleep Timer” set? Select “Off” from the “Sleep Timer” menu (Page 32).
•
Is “No Signal Off” or “Ecology” activated?
No picture.• Are connections to external equipment correct? (Pages 21–23)
•
•
Is the input signal type selected correctly after connection? (Page 38)
•
Is the correct input source selected? (Page 16)
•
Is a non-compatible signal being input? (Page 42)
•
Is the picture adjustment correct? (Pages 30–31)
•
Is the aerial connected properly? (Page 14)
•
Is “On” selected in “Audio Only”? (Page 36)
No sound.• Is the volume too low?
•
•
Make sure that headphones are not connected.
•
Check if you pressed e on the remote control unit.
• This is not a malfunction. This happens when the cabinet slightly expands and contracts
The TV sometimes makes a cracking
•
sound.
according to changes in temperature. This does not affect the TV’s performance.
Cautions regarding use in high and low temperature environments
•
When the TV is used in a low temperature space (e.g. room, office), the picture may leave trails or appear slightly delayed.
This is not a malfunction, and the TV will recover when the temperature returns to normal.
•
Do not leave the TV in a hot or cold location. Also, do not leave the TV in a location exposed to direct sunlight or near a
heater, as this may cause the cabinet to deform and the LCD panel to malfunction.
Storage temperature: e5 °C to e35 °C.
Information on the software license for this product
Software composition
The software included in this product is comprised of various software components whose individual copyrights are held by
Pioneer or by third parties.
Software developed by Pioneer and open source software
The copyrights for the software components and various relevant documents included with this product that were developed
or written by Pioneer are owned by Pioneer and are protected by the Copyright Act, international treaties, and other relevant
laws. This product also makes use of freely distributed software and software components whose copyrights are held by
third parties. These include software components covered by a GNU General Public License (hereafter GPL), a GNU Lesser
General Public License (hereafter LGPL) or other license agreement.
Obtaining source code
Some of the open source software licensors require the distributor to provide the source code with the executable software
components. GPL and LGPL include similar requirements. For information on obtaining the source code for the open source
software and for obtaining the GPL, LGPL, and other license agreement information, contact your local Pioneer Customer Service.
We are unable to answer any questions about the source code for the open source software. The source code for the
software components whose copyrights are held by Pioneer is not distributed.
Acknowledgements
The following open source software components are included in this product:
• linux kernel • modutils • glibc • zlib • libpng
43
KRL46V_GB.indd 43 2008/07/09 14:09:09
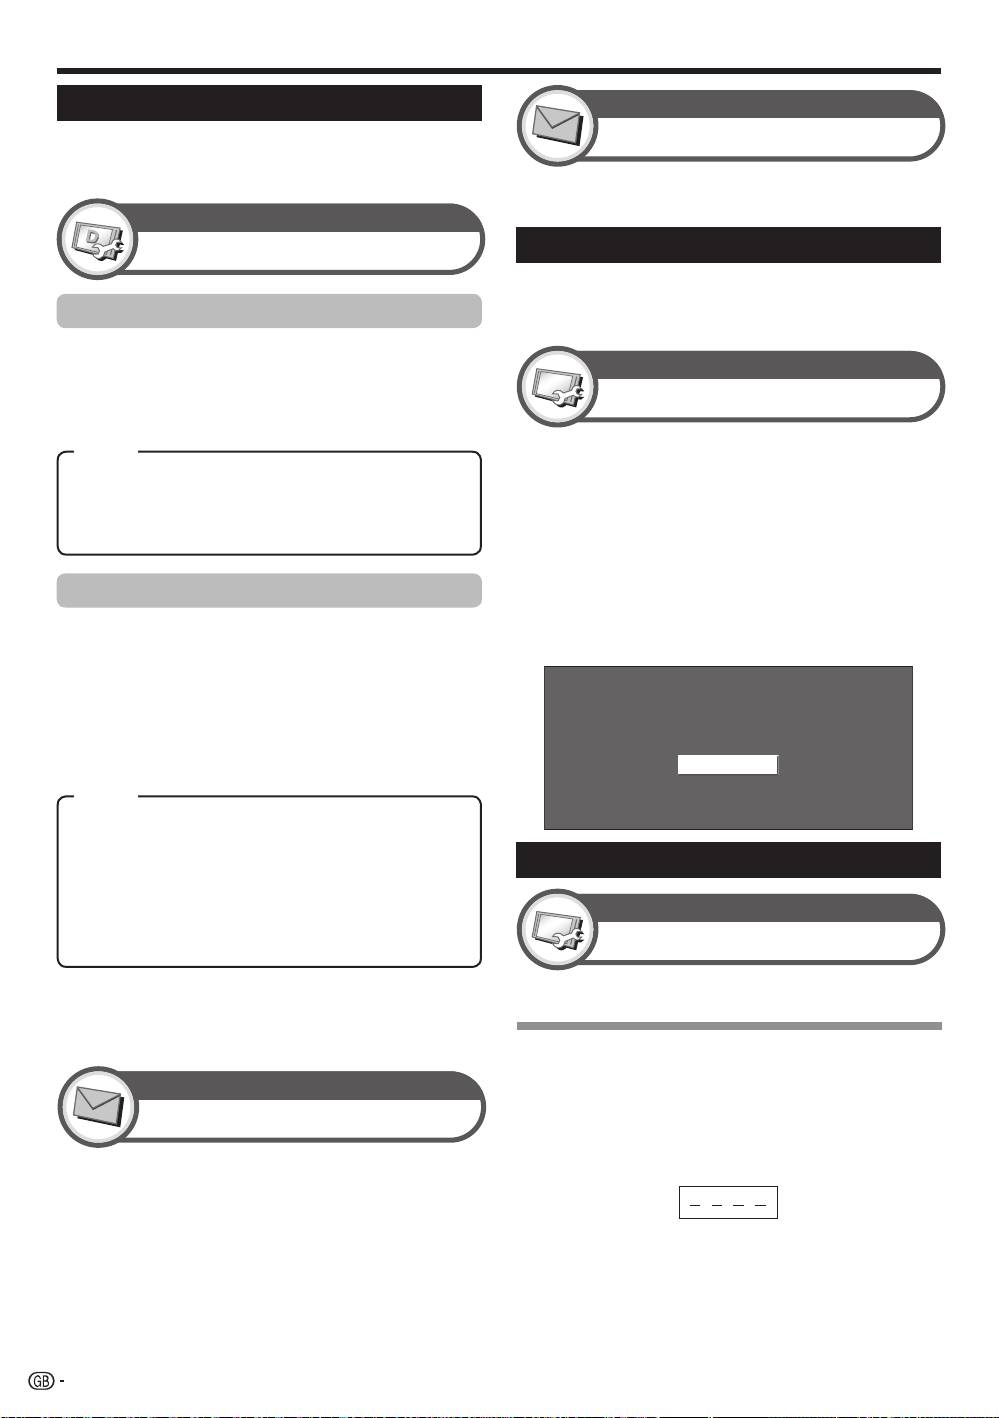
Appendix
Digital Setup
Download Setup
Go to “HOME MENU” > “Setup” > “Reset”.
Press c/d to select “Yes”, and then press
ENTER.
“Now, TV will restart automatically. OK?” displays on
the screen.
Press c/d to select “Yes”, and then press
ENTER.
“Now initialising...” displays on the screen and blinks.
After the reset has completed, the power shuts
off and then comes back on. The screen will have
returned to its original settings.
Information
Message List
Now initialising...
Updating your TV via DVB-T
Information
Ensure that your TV software version is always up to
Receiver Report
date. From time to time Pioneer will make updated TV
base software and DVB software available.
Display reports regarding failures and changes for
timer settings.
Reset
If complex adjustments are made so that the settings
cannot be restored to normal, you can reset the
Searching for updates*
settings to the factory preset values.
*
All countries except UK and Sweden are set to “No”
for this function.
Setup
The TV automatically determines whether a new
software version is available when the TV is in standby
Reset
mode.
1
Item
2
Yes: Automatically searches for new software updates
available when the TV is in standby mode.
•
No: Does not search for update information.
Now: Checks if there is new software immediately.
3
Downloading the software
•
•
You can select the method of update.
1
If the software is updated, the confirmation
message “New download information has been
detected.” appears.
•
If the TV receives the update service while in standby
mode, a confirmation message displays after turning
on the power.
2
Follow the screen prompts.
Item
Yes: Starts downloading immediately. It takes
approximately one hour to update. You cannot carry
out other operations while downloading.
Identification
•
Cancels the download by pressing ENTER on the
remote control unit when “Discontinue” is displayed on
the screen during the update.
Setup
No: Starts downloading automatically several minutes
after entering standby mode.
Identification
NOTE
You can check the TV ID on the screen for reporting to
•
The TV must remain in standby mode for download. Do not
customer service.
turn off the power using a on the TV.
•
Updating the software may take some time.
CLEARING THE PIN
1
Go to “HOME MENU” > “Setup”.
2
Press a/b to select “Auto Installation”,
“Programme Setup”, “Child Lock” or “Reset”,
and then press ENTER. The PIN input window
When new software is detected, you can confirm the
will display.
update information and download the software from
“Message List”.
3
Press and hold both ik and Pk on the TV
NOTE
•
When the TV succeeds at downloading new software,
simultaneously until the message appears on
the message is updated in the “Message List” of the
the screen.
“Information” menu.
•
The software update will not be carried out if there is no
new software available at the specified download time.
44
KRL46V_GB.indd 44 2008/07/09 14:09:10
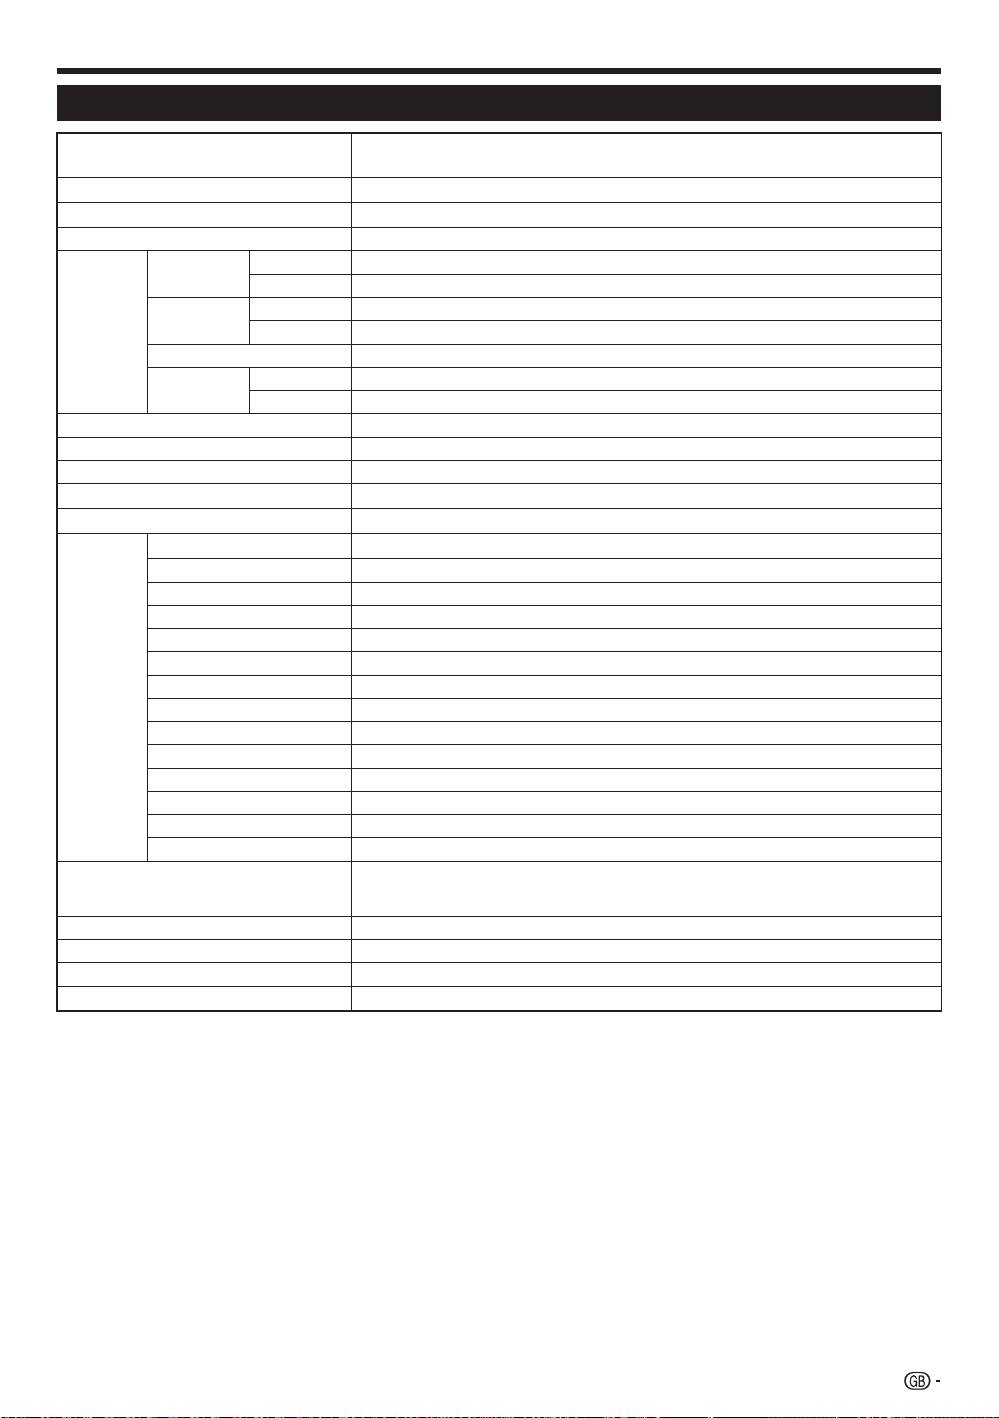
Appendix
Specifications
46o Flat scr
een TV,
Item
Model: K
RL
-46V
LCD panel
46o Advanced Super View & BLACK TFT LCD
Resolution
2 073 600 pixels (1 920 g 1 080)
Video Colour System PAL/SECAM/NTSC 3.58/NTSC 4.43/PAL 60
TV Function TV-Standard Analogue CCIR (B/G, D/K, I, L/L’)
Digital DVB-T (OFDM)
Receiving
VHF/UHF E2–E12 ch (VHF), E21–E69 ch (UHF), F2–F10 ch, I21–I69 ch, IR A–IR J ch (Digital: E5–E69 ch)
Channel
CATV Hyper-band, S1–S41 ch
TV-Tuning System Auto Preset 999 ch: non-Nordic / 9999 ch: Nordic (ATV: 99 ch), Auto Label, Auto Sort
Audio Analogue NICAM/A2
Digital MPEG AUDIO
2
Brightness 450 cd/m
Backlight life 60 000 hours (when “Backlight” is set to the default position)
Viewing angles H: 176°, V: 176°
Audio Power
15 W g 2
Speaker
(100 mm g 40 mm) g 4
Terminals ANT
UHF/VHF 75 q Din type (Analogue & Digital)
RS-232C D-Sub 9 pin male connector
INPUT1 SCART (AV input, Y/C input, RGB input, TV output)
INPUT2 SCART (AV input/monitor output, Y/C input, AV Link, RGB input)
INPUT3 S-VIDEO (Y/C input), RCA pin (AV input)
INPUT4 HDMI
INPUT5 HDMI
INPUT6 HDMI, Ø 3.5 mm jack
INPUT7 15 pin mini D-sub, Ø 3.5 mm jack
INPUT8 COMPONENT IN: Y/P
B
(C
B
)/P
R
(C
R
), RCA pin (AUDIO R/L)
DIGITAL AUDIO OUTPUT Optical SPDIF Digital audio output
C. I. (Common Interface) EN50221, R206001
OUTPUT RCA pin (AUDIO R/L)
Headphones Ø 3.5 mm jack (Audio output)
OSD language Czech, Danish, Dutch, English, Estonian, Finnish, French, German, Greek, Hungarian, Italian,
Latvian, Lithuanian, Norwegian, Polish, Portuguese, Russian, Slovak, Slovene, Spanish,
Swedish, Turkish
Power Requirement AC 220–240 V, 50 Hz
Power Consumption 253 W (0.5 W Standby) (Method IEC60107)
Weight 25.5 kg (Without stand), 30.5 kg (With stand)
Operating temperature
0 °C to e40 °C
•
As a part of our policy of continuous improvement, Pioneer reserves the right to make design and specification
changes for product improvement without prior notice. The performance specification figures indicated are
nominal values of production units. There may be some deviations from these values in individual units.
NOTE
•
Refer to the inside back cover for dimensional drawings.
45
KRL46V_GB.indd 45 2008/07/09 14:09:10
End of life disposal
Rating table for Child Lock
AGE
4 5 6 7 8 9 10 11 12 13 14 15 16 17 18
Universal viewing
4
— —
— — — — — — — — — — — —
Parental appr
oval pref.
4 4 4 4 4
— — — — — — — — — —
X-rated
4 4 4 4 4 4 4 4 4 4 4 4 4 4 4
Universal viewing Parental approval pref. X-rated
Universal viewing
— — —
Parental appr
oval pref.
4
— —
X-rated
4 4
—
Information for users on collection and disposal of old equipment and used batteries
Symbol for
These symbols on the products, packaging, and/or accompanying documents mean
equipment
that used electrical and electronic products and batteries should not be mixed with
general household waste.
For proper treatment, recovery and recycling of old products and used batteries,
please take them to applicable collection points in accordance with your national
legislation.
By disposing of these products and batteries correctly, you will help to save valuable
Symbol examples
resources and prevent any potential negative effects on human health and the
for batteries
environment which could otherwise arise from inappropriate waste handling.
For more information about collection and recycling of old products and batteries,
please contact your local municipality, your waste disposal service or the point of sale
where you purchased the items.
These symbols are only valid in the European Union.
For countries outside the European Union:
If you wish to discard these items, please contact your local authorities or dealer and
ask for the correct method of disposal.
Pb
K058a_A1_En
Broadcasted
rating
User-
adjusted rating
Br
oadcasted
rating
User-
adjusted rating
46
KRL46V_GB.indd 46 2008/07/09 14:09:10

Memo
47
KRL46V_GB.indd 47 2008/07/09 14:09:10

Memo
48
KRL46V_GB.indd 48 2008/07/09 14:09:10

FRANÇAIS
MODE D’EMPLOI
•
Les illustrations et l’OSD (On-Screen Display = affichages à l’écran) dans ce mode d’emploi sont fournis à titre explicatif et
peuvent être légèrement différents des opérations réelles.
•
Les exemples utilisés dans ce mode d’emploi reposent sur le modèle KRL-46V.
Table des matières
Table des matières ............................................................ 1
Utilisation des menus ...................................................... 29
Introduction ........................................................................ 2
Qu’est-ce que le HOME MENU ? ................................ 29
Cher client Pioneer ........................................................ 2
Opérations courantes ............................................ 29
Précautions de sécurité importantes ............................. 2
Réglage de base .............................................................. 30
Télécommande ............................................................. 3
Réglages de l’image.................................................... 30
Commande d’autres appareils au
AV SELECTION ...................................................... 31
moyen de la télécommande fournie ....................... 4
Réglages du son ......................................................... 31
Marques ....................................................................... 8
Réglages de l’économie d’énergie .............................. 31
Téléviseur (Vue de face)................................................. 9
Réglages des canaux numériques ......................... 32
Téléviseur (Vue de dos) ................................................. 9
Réglages des canaux analogiques ......................... 33
Préparation ...................................................................... 10
Réglages du mot de passe/contrôle parental ......... 34
Accessoires fournis ..................................................... 10
Réglages de la langue (langue, sous-titre, multi audio)
... 34
Pose de l’ensemble du socle ...................................... 10
Fonctions de visualisation pratiques ............................. 35
Insertion des piles ....................................................... 11
Sélection de la taille d’image ....................................... 35
FRANÇAIS
Utilisation de la télécommande .................................... 11
Sélection automatique de la taille d’image WSS
Précautions sur la télécommande .......................... 11
(Signalisation grand écran)................................... 35
Précautions de montage ........................................ 12
Sélection manuelle de la taille d’image WSS
Guide rapide ..................................................................... 13
(Signalisation grand écran)................................... 35
Présentation de la première mise en service ................ 13
Sélection manuelle de la taille d’image ................... 35
Avant de mettre le téléviseur sous tension ................... 14
Sélection manuelle de la taille d’image
Assemblage des câbles ......................................... 14
d’enregistrement ................................................. 36
Auto installation initiale ................................................ 15
Sélection automatique de la taille d’image HDMI .... 36
Vérification de la force du signal
Autres réglages Image et Audio .................................. 36
et de la force du canal ......................................... 15
Réglage de la position de l’image ........................... 36
Regarder la télévision ..................................................... 16
Réduction du bruit à l’écran ................................... 36
Opérations quotidiennes ............................................. 16
Réglage automatique du volume ............................ 36
Mise sous/hors tension .......................................... 16
Accentuation des dialogues ................................... 36
Commutation entre les chaînes analogiques et
Sortie audio uniquement ........................................ 36
numériques ......................................................... 16
Réglages de l’affichage ............................................... 37
Changement de canal ............................................ 16
Affichage du canal ................................................. 37
Sélection d’une source vidéo externe ..................... 16
Affichage de l’heure et de la date ........................... 37
Sélection du mode sonore ..................................... 16
Autres fonctions pratiques ............................................. 38
EPG (Electronic Programme Guide =
Réglage lors de l’utilisation d’appareils externes .......... 38
guides des programmes électronique) ...................... 17
Réglages de la source d’entrée .............................. 38
Aperçu d’EPG ............................................................. 17
Omission d’entrée spécifique ................................. 38
Réglages pratiques pour utiliser EPG .......................... 17
Réglages du système couleur ................................ 38
Sélection d’un programme à l’aide d’EPG ................... 18
Fonctionnalités supplémentaires ................................. 38
Enregistrement par minuterie à l’aide d’EPG ............... 19
Branchement d’un ordinateur ........................................ 39
Annuler l’enregistrement programmé........................... 19
Branchement d’un ordinateur...................................... 39
Télétexte ..................................................................... 20
Affichage de l’image d’un ordinateur
Utilisation de l’application MHEG-5
sur l’écran du téléviseur ............................................ 39
(Royaume-Uni uniquement) ...................................... 20
Sélection de la taille de l’image .............................. 39
Raccordement d’appareils externes ............................. 21
Réglage automatique de l’image de l’ordinateur ..... 40
Présentation des branchements .................................. 21
Réglage manuel de l’image de l’ordinateur ............. 40
Connexion HDMI ................................................... 22
Sélection de la résolution d’entrée .............................. 40
Connexion Composantes ...................................... 22
Spécifications du port RS-232C .................................. 41
Connexion S-VIDEO/VIDEO ................................... 22
Tableau des ordinateurs compatibles .......................... 42
Connexion PÉRITEL ............................................... 23
Liste de commande RS-232C ..................................... 42
Contrôle des appareils PÉRITEL avec i/o link.A ...... 23
Annexe .............................................................................. 43
Raccordement d’enceinte/amplificateur ................. 24
Guide de dépannage .................................................. 43
Insertion d’une carte à mémoire .................................. 25
Mise à jour du téléviseur via DVB-T ............................. 44
HDMI CONTROL .............................................................. 26
Réinitial. ...................................................................... 44
Commande d’appareils HDMI à l’aide d’HDMI
Identification................................................................ 44
CONTROL ................................................................ 26
Fiche technique ..........................................................45
Connexion HDMI CONTROL ....................................... 27
Mise au rebut en fin de vie .......................................... 46
Réglage HDMI CONTROL ........................................... 27
Commande d’un appareil HDMI CONTROL ................ 28
1
KRL46V_FR.indd 1 2008/07/09 14:03:31
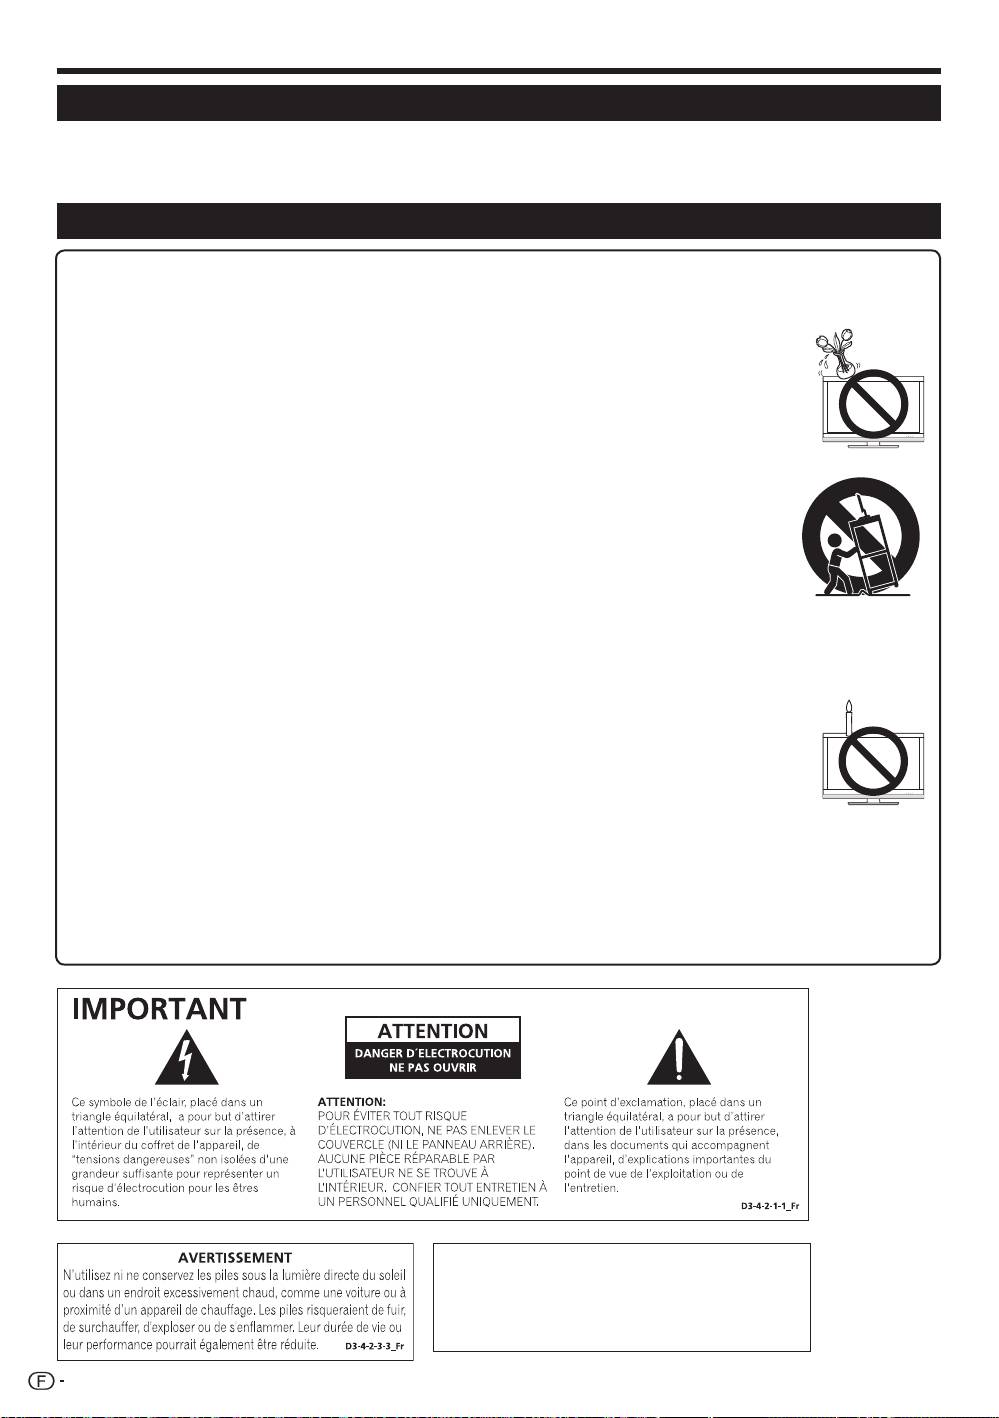
Introduction
Cher client Pioneer
Nous vous remercions pour votre achat de ce téléviseur à écran plat Pioneer. Pour en assurer la sécurité et le bon
fonctionnement pendant de longues années, veuillez lire attentivement les Précautions de sécurité importantes
avant de l’utiliser.
Précautions de sécurité importantes
•
Nettoyage — Débranchez le cordon secteur de la prise électrique avant de nettoyer l’appareil. Utilisez un chiffon mouillé pour le
nettoyer. N’utilisez pas de produits nettoyant liquides ou en aérosols.
•
Eau et humidité — N’utilisez pas l’appareil à proximité de l’eau, près d’une baignoire, d’un lavabo, d’un évier, d’une machine à
laver, d’une piscine et dans un sous-sol humide.
•
Ne placez pas de vases ou tout autre récipient rempli d’eau sur cet appareil.
L’eau pourrait se renverser sur celui-ci et entraîner un incendie ou une électrocution.
•
Support — Ne placez pas l’appareil sur un chariot, un support, un trépied ou une table instable. Ceci risquerait
de causer la chute de l’appareil et de provoquer par là des blessures graves et d’endommager l’appareil. Utilisez
uniquement un chariot, un support, un trépied, une applique ou une table recommandés par le fabriquant ou
vendus avec l’appareil. Pour monter l’appareil sur un mur, suivez les instructions du fabricant. N’utilisez que du
matériel recommandé par ce dernier.
•
Pour déplacer l’appareil placé sur un chariot, procédez au transport avec précaution. Des arrêts brusques, une force
excessive ou des irrégularités de la surface du sol peuvent provoquer la chute de l’appareil.
•
Ventilation — Les évents et autres ouvertures du coffret sont destinés à la ventilation. Ne les recouvrez pas
et ne les bloquez pas car une ventilation insuffisante risque de provoquer une surchauffe et/ou de réduire la
durée de vie de l’appareil. Ne placez pas l’appareil sur un lit, un sofa, un tapis ou une autre surface similaire
risquant de bloquer les ouvertur
es de ventilation. Ce produit n’est pas conçu pour êtr
e encastré ; ne le placez
pas dans des endroits clos comme une bibliothèque ou une étagère, sauf si une ventilation adéquate est
prévue ou si les instructions du fabricant sont respectées.
•
Le panneau LCD utilisé dans cet appareil est en verre. Il peut donc se briser s’il tombe ou s’il subit un choc.
Veillez à ne pas vous blesser avec des éclats de verre si le panneau LCD vient à se briser.
•
Sources de chaleur — Éloignez l’appareil des sources de chaleur comme les radiateurs, les chauffages et autres appareils
produisant de la chaleur (y compris les amplificateurs).
•
Afin d’empêcher tout incendie, ne placez jamais une bougie ou autres flammes nues au dessus ou près de l’ensemble du téléviseur.
•
Afin d’empêcher tout incendie ou électrocution, ne placez pas le cordon secteur sous l’ensemble du téléviseur ou autres objets
volumineux.
•
N’affichez pas une image fixe pendant une période prolongée, sous peine de laisser une image rémanente à l’écran.
•
Il y a toujours consommation d’énergie si la prise principale est branchée.
•
Introduction d’objets étrangers ou de liquide - N’introduisez aucun objet dans les ouvertures de l’appareil. Des
tensions élevées existent à l’intérieur de l’appareil, en sorte que le contact d’un objet avec les points portés à
haute tension peut entraîner un incendie, ou encore vous exposer à une secousse électrique. Pour les mêmes
raisons, ne renversez ni eau ni autre liquide sur l’appareil.
•
Entretien — Ne tentez pas de procéder vous-même à l’entretien de l’appareil. La dépose des couvercles risque
de vous exposer à de hautes tensions et d’autres situations dangereuses. Faites appel à un technicien qualifié pour l’entretien.
Le panneau LCD est un appareil de très haute technologie vous offrant des détails fins de l’image.
Dû au grand nombre de pixels, un certain nombre de pixels non actifs peuvent apparaître occasionnellement à l’écran sous la
forme de point fixe bleu, vert ou rouge. Ceci rentre dans les spécifications du produit et ne constitue pas un défaut.
Précautions lors du transport du téléviseur
Veillez à toujours le transporter à deux, en le tenant à deux mains — une main de chaque côté du téléviseur.
AVERTISSEMENT :
Ce produit fait partie de la Classe A. Dans un
environnement domestique, il peut provoquer des
interférences radio, auquel cas l’utilisateur pourra
être obligé de prendre les mesures adéquates.
2
KRL46V_FR.indd 2 2008/07/09 14:03:31
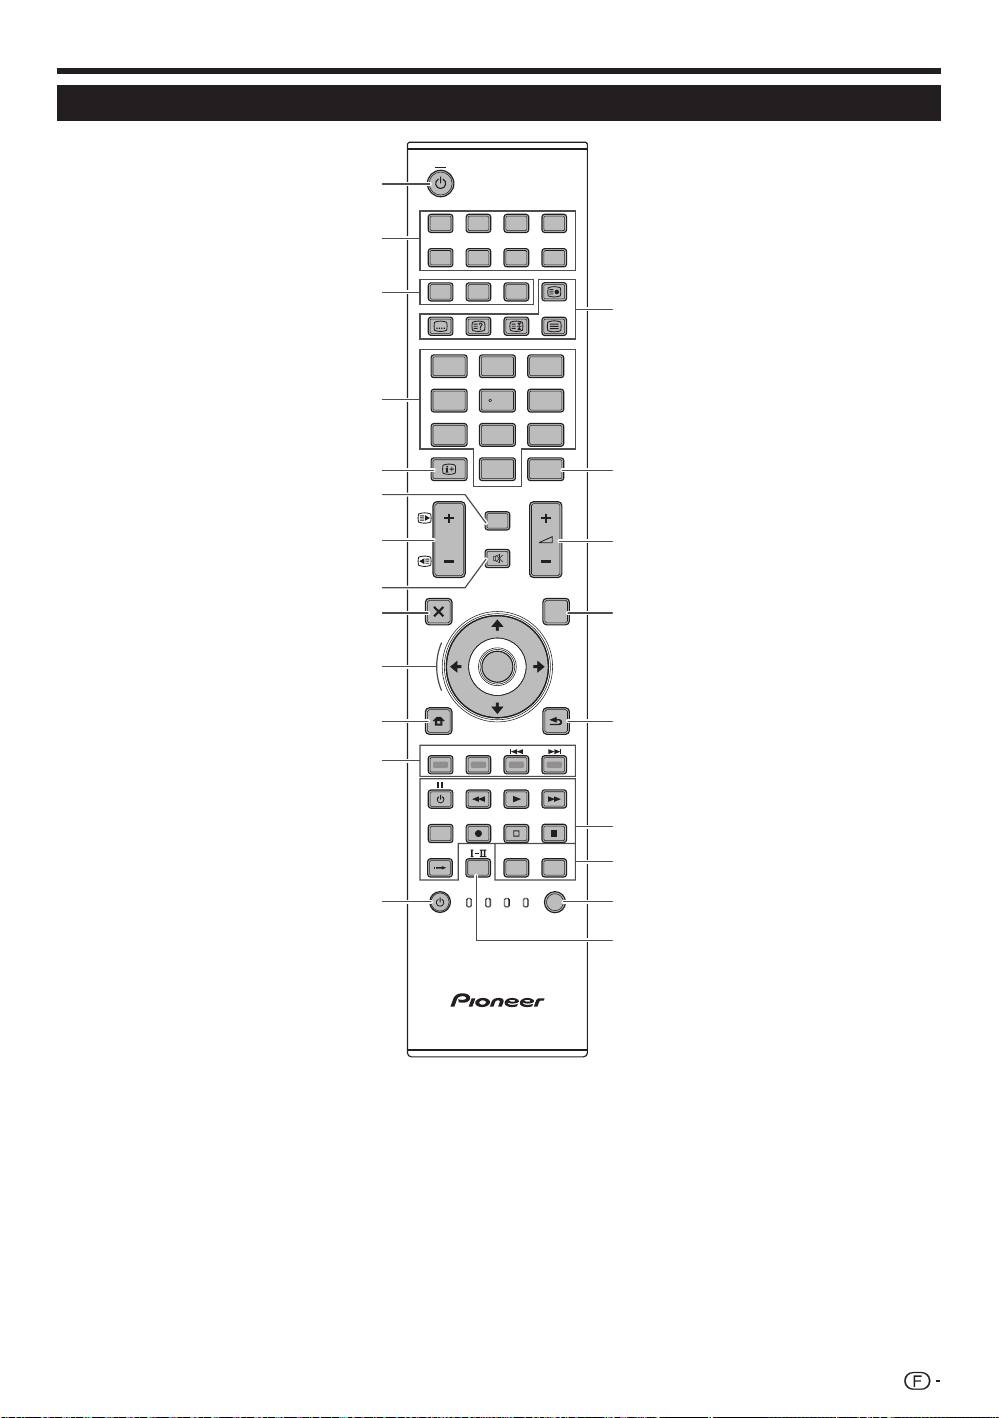
Introduction
TV
1
INPUT
1 2 3 4
2
5 6 7 8
3
TV DTV
RADIO
14
1 2 3
4
4 5 6
7 8 9
INFO
5
0
P.INFO
15
6
CH RETURN
7
P
16
DVD TOPMENU/
8
EXIT
GUIDE
EPG
9
17
10
ENTER
HOME
MENU
RETURN
11
18
MENU
12
HDMI REC STOP
CTRL
19
SCREEN
AV
CM SKIP
SIZE
SELECTION
TOOLS
DVD
HDD
20
SOURCE
SELECT
TV
DVD
13
21
STB DVR VCR
22
Télécommande
1
a (TV) (Attente/Marche)
R
Touches pour les opérations
(Page 16)
pratiques
2
INPUT1–8
1 (Sous-page)
Sélectionne une source d’entrée
(Page 20)
(Page 16).
[ (Sous-titre)
3
Touches de changement de
Active/désactive les langues des
mode
sous-titres (Pages 20 et 34).
TV
k (Révèle le télétexte masqué)
Appuyez sur cette touche pour
(Page 20)
accéder au mode télévision
3 (Geler/Maintenir)
analogique traditionnel.
Appuyez sur cette touche pour faire
DTV
un arrêt sur image sur une image
Appuyez sur cette touche pour
animée.
accéder au mode télévision numérique.
Télétexte
: Interr
ompt la mise à jour
automatique des pages télétexte ou
RADIO
libère le mode de maintien.
DTV : Bascule entre le mode Radio
et Données.
m (Télétexte)
•
Lorsque seule la diffusion des
ATV
: Affiche le télétexte analogique
données (pas de radiodiffusion)
(Page 20).
est transmise par DVB, la
DTV : Sélectionne MHEG-5 et le
radiodiffusion est sautée.
télétexte pour la télévision numérique
(DTV) (Page 20).
4
Touches numériques 0–9
Pour sélectionner le canal.
T
P. INFO
Entrez les numéros de votre choix.
Appuyez sur cette touche pour
Règle la page en mode Télétexte.
afficher les informations sur les
•
Si vous sélectionnez les cinq pays
émissions transmises par diffusion
nordiques (la Suède, la Norvège, la
vidéo numérique dans le coin
Finlande, le Danemark ou l’Islande)
supérieur gauche de l’écran (DTV
pour le réglage Pays dans le menu
uniquement).
« Autoinstallation » (page 32), les services
Y
ik/l (Volume)
DTV sont de quatre chiffres. Pour les
Augmente/baisse le volume sonore
autres pays, ils sont de trois chiffres.
du téléviseur.
5
p (INFO)
U
EPG
Appuyez sur cette touche pour afficher
DTV
: Affiche l’écran EPG (Pages
les informations sur la chaîne (numéro
17–19).
de canal, signal, etc.) dans le coin
I
6 (RETURN)
supérieur droit de l’écran (Page 37).
Revient à l’écran du « HOME
6
CH RETURN
MENU
» précédent.
Appuyez sur cette touche pour
O
Touches pour HDMI CONTROL
revenir à l’entrée externe ou au canal
Si un appareil externe est raccordé
précédemment sélectionné.
par l’intermédiaire de câbles HDMI
7
Pk/l (e/f)
et est compatible avec HDMI
Sélectionne le canal télévisé.
CONTROL, vous pouvez utiliser ces
Sélectionne la page en mode Télétexte.
touches HDMI CONTROL. Voir page
8
e (Sourdine)
26 et 28 pour les détails.
Marche/arrêt du son du téléviseur.
P
Touches pour les réglages
9
g (EXIT)
d’image
Pour quitter l’écran « HOME MENU ».
SCREEN SIZE
0
a/b/c/d (Curseur)
Sélectionne une taille d’écran (Pages
Sélectionne la rubrique désirée sur
W
Touches de couleur (Rouge/
35 et 39).
l’écran de réglage.
Verte/Jaune/Bleue)
AV SELECTION
ENTER
Les touches de couleur servent à
Sélectionne un réglage vidéo (Page 31).
Exécute une commande au sein de
sélectionner les rubriques colorées
A
SELECT
l’écran du « HOME MENU
».
équivalentes sur l’écran (EPG,
Commute la sélection entre TV,
ATV/DTV : Affiche la liste des
MHEG-5, Télétexte par ex.).
STB, DVD/DVR et VCR, pour vous
émissions lorsqu’aucun autre écran
E
a (SOURCE)
permettre de commander, au moyen
du « HOME MENU » n’est exécuté.
(Page 6–7)
de la télécommande fournie, d’autres
Q
h (HOME MENU)
appareils raccordés (Page 4–7).
Marche/arrêt de l’écran du «
HOME
S
t (Mode sonore)
MENU ».
Sélectionne le mode son multiplex
(Page 16).
REMARQUE
Maintenez enfoncés 9 et 18 de la télécommande pour afficher la démonstration « 100Hz » dans un double écran.•
3
KRL46V_FR.indd 3 2008/07/09 14:03:31
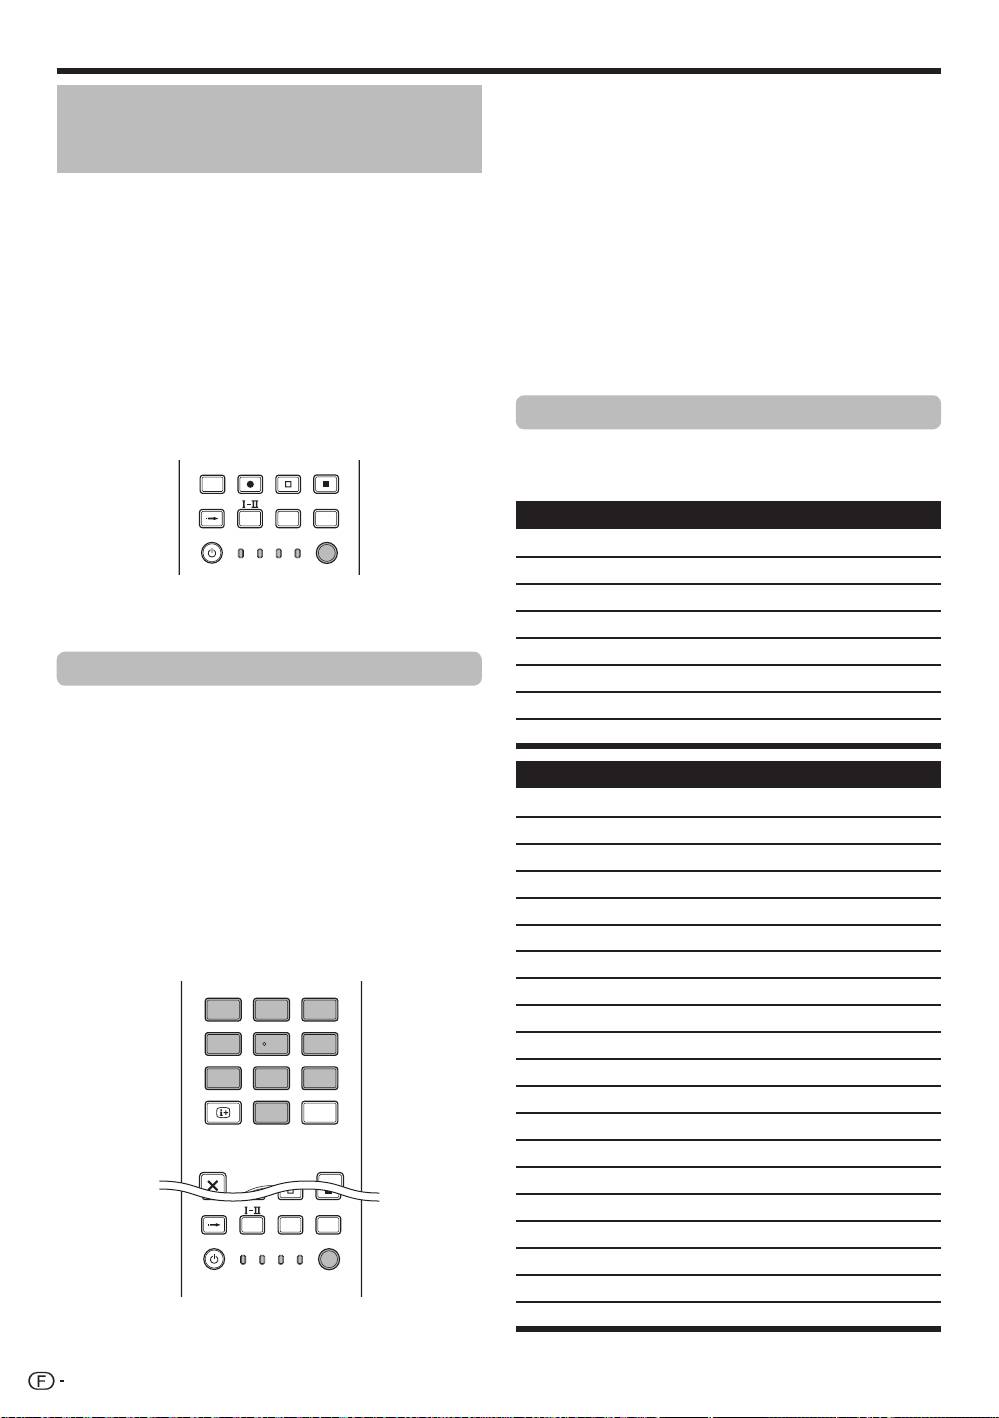
Introduction
Commande d’autres appareils
au moyen de la télécommande
fournie
Vous pouvez commander d’autres appareils raccordés
au moyen de la télécommande fournie : un boîtier
décodeur (STB), un lecteur DVD, un enregistreur DVD/
HDD (DVR), un lecteur BD ou un magnétoscope.
Avant d’utiliser cette fonction, il est nécessaire de
programmer la télécommande fournie avec le code
fabricant de l’appareil que vous souhaitez commander.
Pour commander l’appareil, appuyez sur SELECT de
la télécommande pour sélectionner le mode convenant
à l’appar
eil
; la sélection passe de TV, STB, DVD/
DVR à VCR. Les témoins de mode correspondant
sur la télécommande indiquent le mode actuellement
sélectionné.
TV
INPUT
1 2 3 4
5 6 7 8
TV DTV
RADIO
1 2 3
4 5 6
7 8 9
INFO
0
P.INFO
CH RETURN
P
DVD TOPMENU/
EXIT
GUIDE
EPG
ENTER
HOME
MENU
RETURN
MENU
HDMI REC STOP
CTRL
SCREEN
AV
CM SKIP
SIZE
SELECTION
TOOLS
DVD
HDD
SOURCE
SELECT
TV
DVD
STB DVR VCR
REMARQUE
Pour commander un lecteur BD, sélectionnez le
mode DVD/DVR.
Programmation des codes fabricant
Appuyez sur SELECT de la télécommande pour
sélectionner le mode STB, DVD/DVR ou VCR
selon l’appareil.
Après avoir confirmé que le témoin du mode
précédemment sélectionné est éteint, maintenez
enfoncé SELECT, puis appuyez sur 1 de la
télécommande.
Le témoin de mode correspondant clignote.
Appuyez sur 0–9 pour saisir le code fabricant à
trois chiffres.
Consultez la liste des codes fabricant afin de trouver
un code adéquat. Le témoin de mode s’allume
pendant environ une seconde, puis s’éteint ; la
programmation du code fabricant est terminée.
TV
INPUT
1 2 3 4
5 6 7 8
TV DTV
RADIO
1 2 3
4 5 6
7 8 9
INFO
0
P.INFO
DVD TOPMENU/
EXIT
GUIDE
EPG
CTRL
SCREEN
AV
CM SKIP
SIZE
SELECTION
TOOLS
DVD
HDD
SOURCE
SELECT
TV
DVD
STB DVR VCR
REMARQUE
•
Si vous n’effectuez aucune opération pendant
environ une minute, alors qu’un témoin de mode
clignote, la procédure de programmation de code
est annulée.
•
Si vous saisissez un code ne figurant pas dans le
tableau, un témoin de mode clignote rapidement
pendant environ une seconde, puis se remet à
clignoter normalement.
•
Pour quitter la procédure de programmation du
code pendant qu’un témoin de code clignote, vous
pouvez appuyer sur SELECT de la télécommande.
•
Les codes fabricant par défaut pour les modes STB,
DVD/DVR et VCR sont r
espectivement «
000 »,
« 100 » et « 500 ».
Codes fabricant
*
Il se peut que vous ne puissiez pas commander en
partie ou en totalité tous les appareils figurant dans
les tableaux au moyen de la télécommande fournie.
Boîtier décodeur (STB)
000 PIONEER 1 (par défaut)
001 PIONEER 2
002 CANAL SATELLITE
•
003 HUMAX
004 PACE 1
005 PACE 2
1
006 QUALI-TV
007 SKY DIGITAL
2
DVD
100 PIONEER 1 (par défaut)
101 PIONEER 2
•
102 AKAI
3
103 DENON
•
104 HITACHI
105 JVC
106 KENWOOD 1
107 KENWOOD 2
108 PANASONIC 1
109 PANASONIC 2
110 PHILIPS 1
111 PHILIPS 2
112 SAMSUNG
113 SHARP
114 SONY 1
115 SONY 2
116 SONY 3
117 THOMSON
118 TOSHIBA
119 YAMAHA
4
KRL46V_FR.indd 4 2008/07/09 14:03:32

Introduction
DVR
Magnétoscope
200 PIONEER 1
527 PHILIPS 2
201 PIONEER 2
528 PHILIPS 3
202 PIONEER 3
529 SANYO
203 PANASONIC
530 SAMSUNG 1
204 PHILIPS 1
531 SAMSUNG 2
205 PHILIPS 2
532 SAMSUNG 3
206 SHARP
533 SAMSUNG 4
207 SONY
534 SHARP
208 TOSHIBA
535 SONY 1
536 SONY 2
BD
537 SONY 3
300 PIONEER
538 SONY 4
301 LG
539 SONY 5
302 PANASONIC
540 SONY 6
303 SAMSUNG
541 SONY 7
304 SONY
542 THOMSON
305 TOSHIBA
543 TOSHIBA
Magnétoscope
500 PIONEER 1 (par défaut)
501 PIONEER 2
502 AIWA 1
503 AIWA 2
504 AKAI 1
505 AKAI 2
506 AKAI 3
507 DAEWOO
508 GRUNDIG 1
509 GRUNDIG 2
510 GRUNDIG 3
511 GRUNDIG 4
512 HITACHI 1
513 HITACHI 2
514 HITACHI 3
515 JVC 1
516 JVC 2
517 JVC 3
518 JVC 4
519 JVC 5
520 LOEWE 1
521 LOEWE 2
522 MATSUI
523 ORION
524 PANASONIC 1
525 PANASONIC 2
526 PHILIPS 1
5
KRL46V_FR.indd 5 2008/07/09 14:03:32
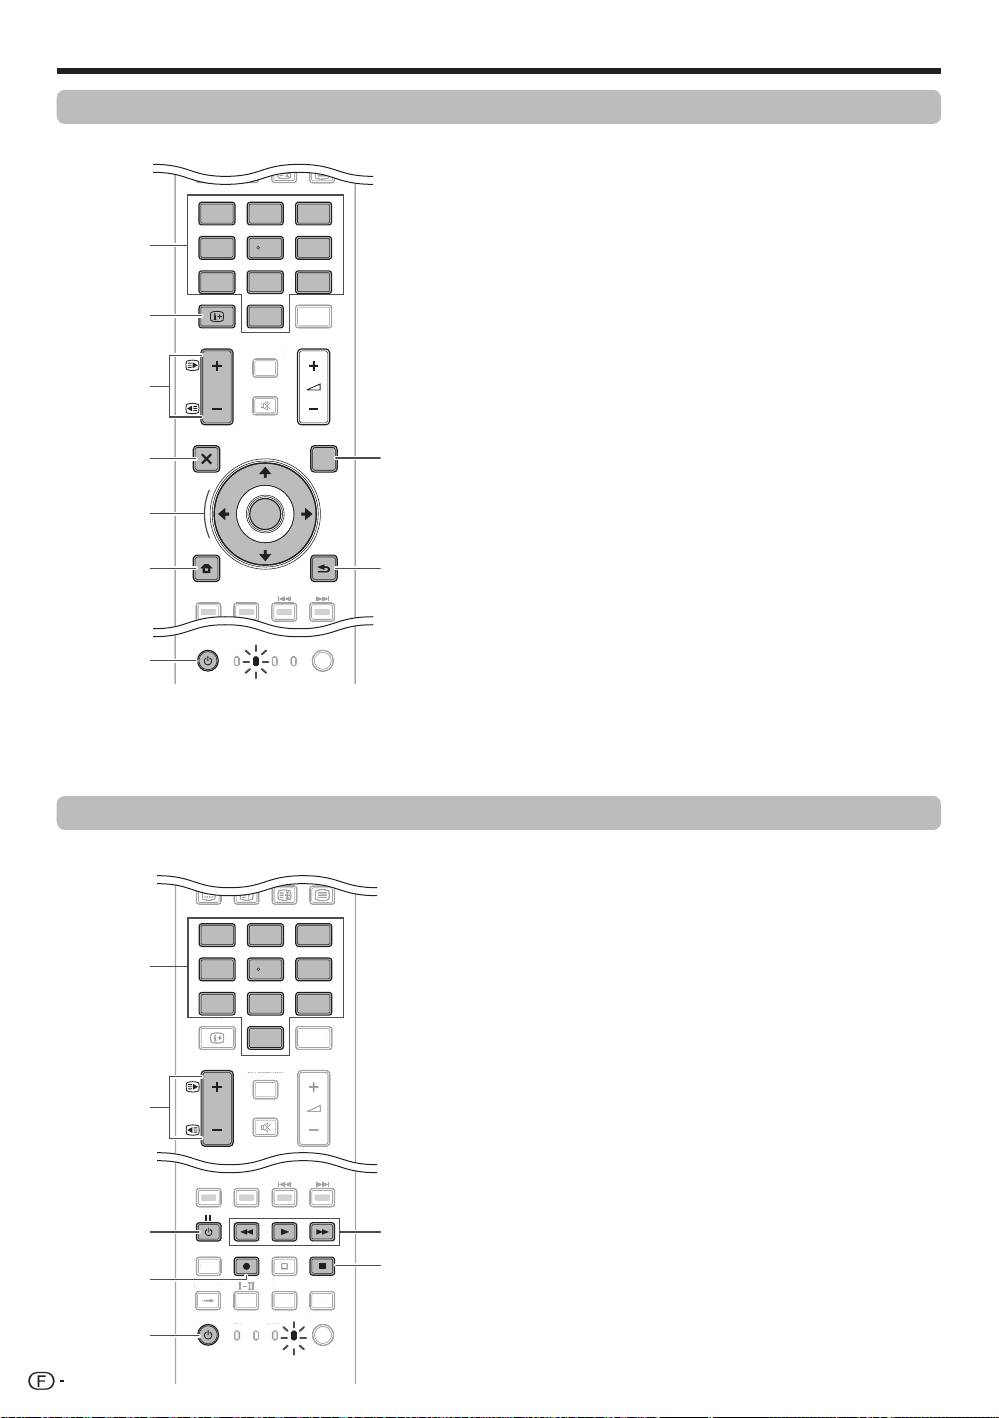
Introduction
Utilisation de la télécommande avec un autre appareil (STB)
E
Touches de commande STB (Boîtier
décodeur)
En mode STB, les touches de la télécommande
fonctionnent comme suit.
1
0–9
Fonctionnent comme des touches numériques.
2
INFO
Appuyez sur cette touche pour afficher les informations
sur l’émission actuelle.
3
Pk/l
Appuyez sur cette touche pour syntoniser sur une chaîne
supérieure ou inférieure.
4
EXIT
Appuyez sur cette touche pour quitter l’écran de menu
des émissions ou l’écran du guide des émissions.
5
ENTER
Appuyez sur cette touche pour activer la fonction sélectionnée.
a/b/c/d
Appuyez sur cette touche pour sélectionner les éléments sur
l’écran de menu des émissions ou l’écran du guide des émissions.
6
MENU
Appuyez sur cette touche pour afficher l’écran de menu
des émissions.
7
SOURCE a
Active ou désactive le boîtier décodeur.
8
GUIDE
Appuyez sur cette touche pour afficher l’écran du guide
des émissions.
9
RETURN
Lorsque l’écran de menu des émissions est affiché,
appuyez sur cette touche pour rétablir l’écran
immédiatement précédent.
TV
INPUT
1 2 3 4
5 6 7 8
TV DTV
RADIO
1 2 3
4 5 6
7 8 9
INFO
0
P.INFO
CH RETURN
P
HDMI REC STOP
CTRL
SCREEN
AV
CM SKIP
SIZE
SELECTION
TOOLS
DVD
HDD
SOURCE
SELECT
TV
DVD
STB DVR VCR
TV
D
TV
R
ADIO
1
2
3
4
5
6
7
8
TV
I
N
P
UT
P.
INF
O
INFO
C
H RET
U
R
N
C
TR
L
HD
M
I
R
E
C
S
T
OP
HDD
A
V
S
ELE
C
TI
ON
C
M SKIP
D
V
D
TOO
L
S
SCREEN
S
IZE
TV
ST
B
D
V
R
D
V
D
S
ELE
CT
1
2
3
6
7
4
5
Utilisation de la télécommande avec un autre appareil (magnétoscope)
TV
INPUT
1 2 3 4
5 6 7 8
TV DTV
RADIO
1 2 3
4 5 6
7 8 9
INFO
0
P.INFO
CH RETURN
P
DVD TOPMENU/
EXIT
GUIDE
EPG
ENTER
HOME
MENU
RETURN
MENU
SOURCE
SELECT
TV
DVD
STB DVR VCR
TV
D
T
V
RADI
O
1
2
3
4
5
6
7
8
TV
IN
PUT
P
.
INF
O
C
H RETURN
TV
D
V
R
V
CR
D
V
D
S
ELE
C
1
2
3
4
8
5
6
9
T
7
E
Touches de commande du
magnétoscope (VCR)
En mode VCR, les touches de la télécommande
fonctionnent comme suit.
1
0–9
Fonctionnent comme des touches numériques.
2
Pk/l
Appuyez sur cette touche pour sélectionner les chaînes
du tuner TV sur le magnétoscope.
3
l (PAUSE/IMAGE FIXE)
Suspend la lecture et fige les images.
4
p (ENR)
Lance l’enregistrement.
5
SOURCE a
Allume ou éteint le magnétoscope.
6
m (REMBOBINAGE)
Rembobine la cassette et permet la recherche d’image.
n (LECTURE)
Lance la lecture.
o (AVANCE RAPIDE)
Avance rapidement la cassette et permet la recherche
d’image.
7
r (ARRÊT)
Arrête la lecture.
6
KRL46V_FR.indd 6 2008/07/09 14:03:33
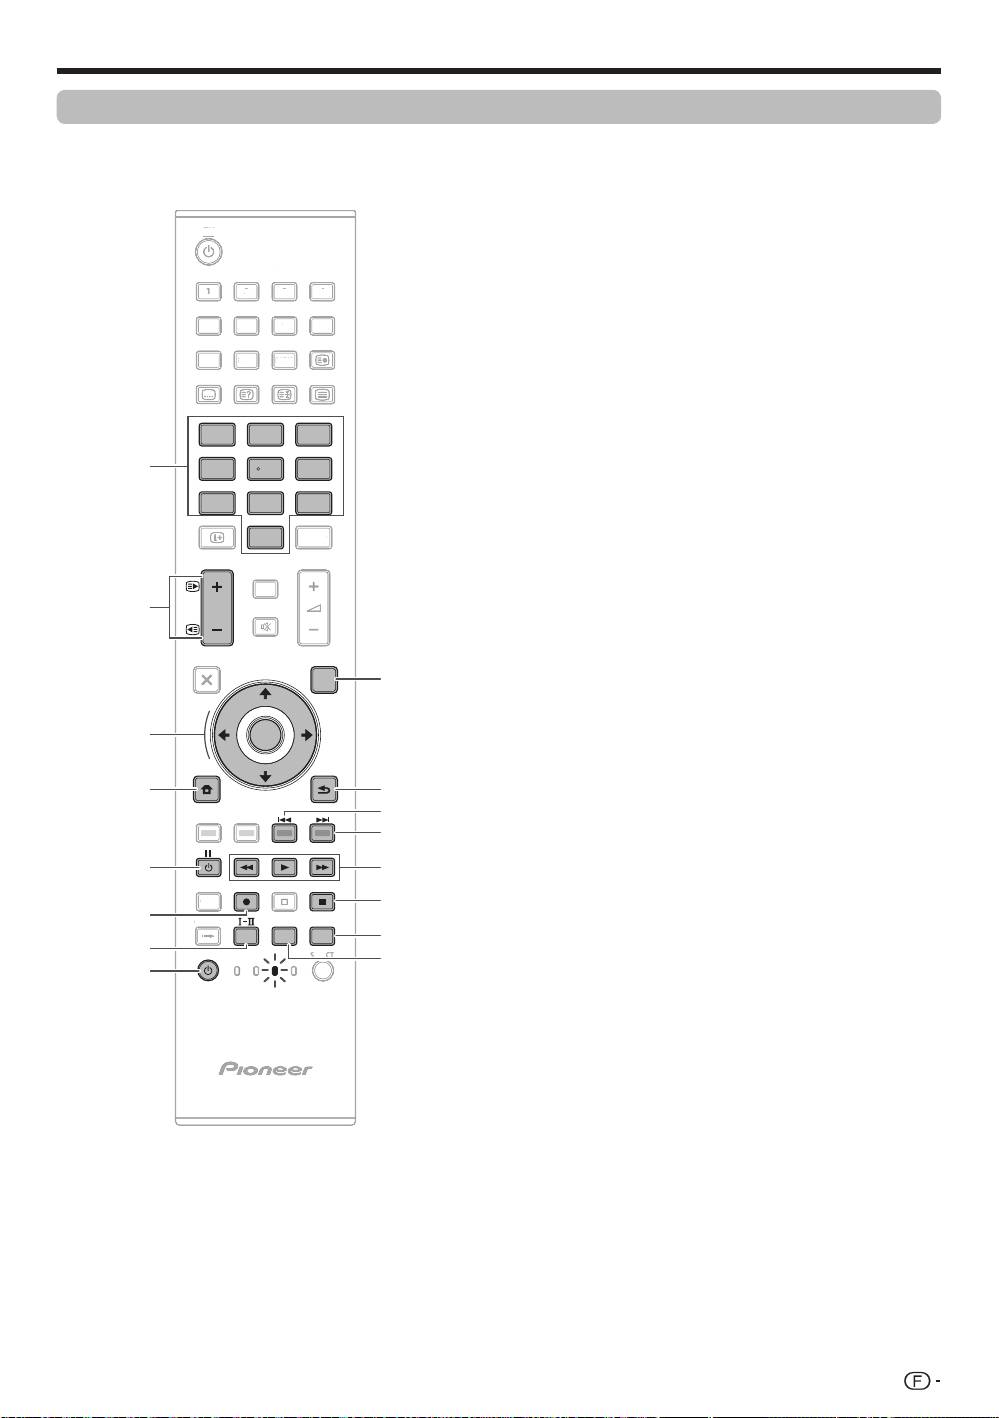
Utilisation de la télécommande avec un autre appareil (DVD/DVR)
E
Touches de commande du DVD/DVR
En mode DVD/DVR, les touches de la télécommande
fonctionnent comme suit.
1
0–9
Fonctionnent comme des touches numériques.
2
Pk/l (Enregistreur DVD/HDD (DVR) uniquement)
Appuyez sur cette touche pour modifier la chaîne du
tuner intégré dans l’enregistreur DVD/HDD (DVR).
3
ENTER
Appuyez sur cette touche pour activer la fonction sélectionnée.
a/b/c/d
Appuyez sur cette touche pour sélectionner des éléments
sur l’écran de menu du DVD.
4
MENU
Appuyez sur cette touche pour afficher le menu du DVD.
5
l (PAUSE/IMAGE FIXE)
Suspend la lecture et fige les images.
6
p (ENR) (Enregistreur DVD/HDD (DVR) uniquement)
Lance l’enregistrement.
7
TOOLS (Lecteur BD Pioneer uniquement)
Appuyez sur cette touche pour afficher le menu « TOOLS ».
8
SOURCE a
Met sous ou hors tension le lecteur DVD ou l’enregistreur
DVD/HDD (DVR).
9
DVD TOP MENU
Le menu supérieur du DVD apparaît lorsque vous
appuyez sur cette touche.
0
RETURN
Lorsque le menu du DVD est affiché, appuyez sur cette
touche pour rétablir l’écran immédiatement précédent.
Q
j (RECHERCHE DE CHAPITRE)
À chaque pression sur cette touche, vous reculez au
début du chapitre précédent.
W
k (RECHERCHE DE CHAPITRE)
À chaque pression sur cette touche, vous avancez au
début du chapitre suivant.
E
m (BALAYAGE)
Appuyez sur cette touche pour reculer.
n (LECTURE)
Lance la lecture.
o (BALAYAGE)
Appuyez sur cette touche pour effectuer une avance rapide.
R
r (ARRÊT)
Appuyez sur cette touche pour arrêter la lecture
ou l’enregistrement. Avec certains lecteurs DVD ou
enregistreurs DVD/HDD (DVR), si vous appuyez deux fois
sur cette touche, le plateau de disque peut s’ouvrir.
REC STOP (Enregistreur DVD/HDD (DVR)
uniquement)
Appuyez sur p et r simultanément pour arrêter
l’enregistrement. Cette opération n’est disponible que
pour les enregistreurs DVD/HDD (DVR) Pioneer et Sony.
T
HDD (Enregistreur DVD/HDD (DVR) uniquement)
Appuyez sur cette touche pour sélectionner le disque dur
(HDD) pour lecture ou enregistrement.
Y
DVD (Enregistreur DVD/HDD (DVR) uniquement)
Appuyez sur cette touche pour sélectionner le DVD pour
lecture ou enregistrement.
REMARQUE
•
Vous pouvez commander un lecteur BD en mode DVD/DVR.
•
Le lecteur DVD, l’enregistreur DVD/HDD (DVR) ou le lecteur
BD ne peuvent pas être sélectionnés simultanément.
TV
INPUT
1 2 3 4
5 6 7 8
TV DTV
RADIO
1 2 3
4 5 6
7 8 9
INFO
0
P.INFO
CH RETURN
P
DVD TOPMENU/
EXIT
GUIDE
EPG
ENTER
HOME
MENU
RETURN
MENU
HDMI REC STOP
CTRL
SCREEN
AV
CM SKIP
SIZE
SELECTION
TOOLS
DVD
HDD
SOURCE
SELECT
TV
DVD
STB DVR VCR
TV
DTV
R
ADI
O
1
2
3
4
5
6
7
8
TV
I
N
PU
T
P
.INF
O
INF
O
C
H RETUR
N
EXIT
C
TR
L
HD
M
I
R
E
C
S
T
OP
C
M SKIP
TV
ST
B
VCR
S
ELE
CT
1
2
9
3
4
10
11
12
5
13
14
6
15
7
16
8
Introduction
7
KRL46V_FR.indd 7 2008/07/09 14:03:34
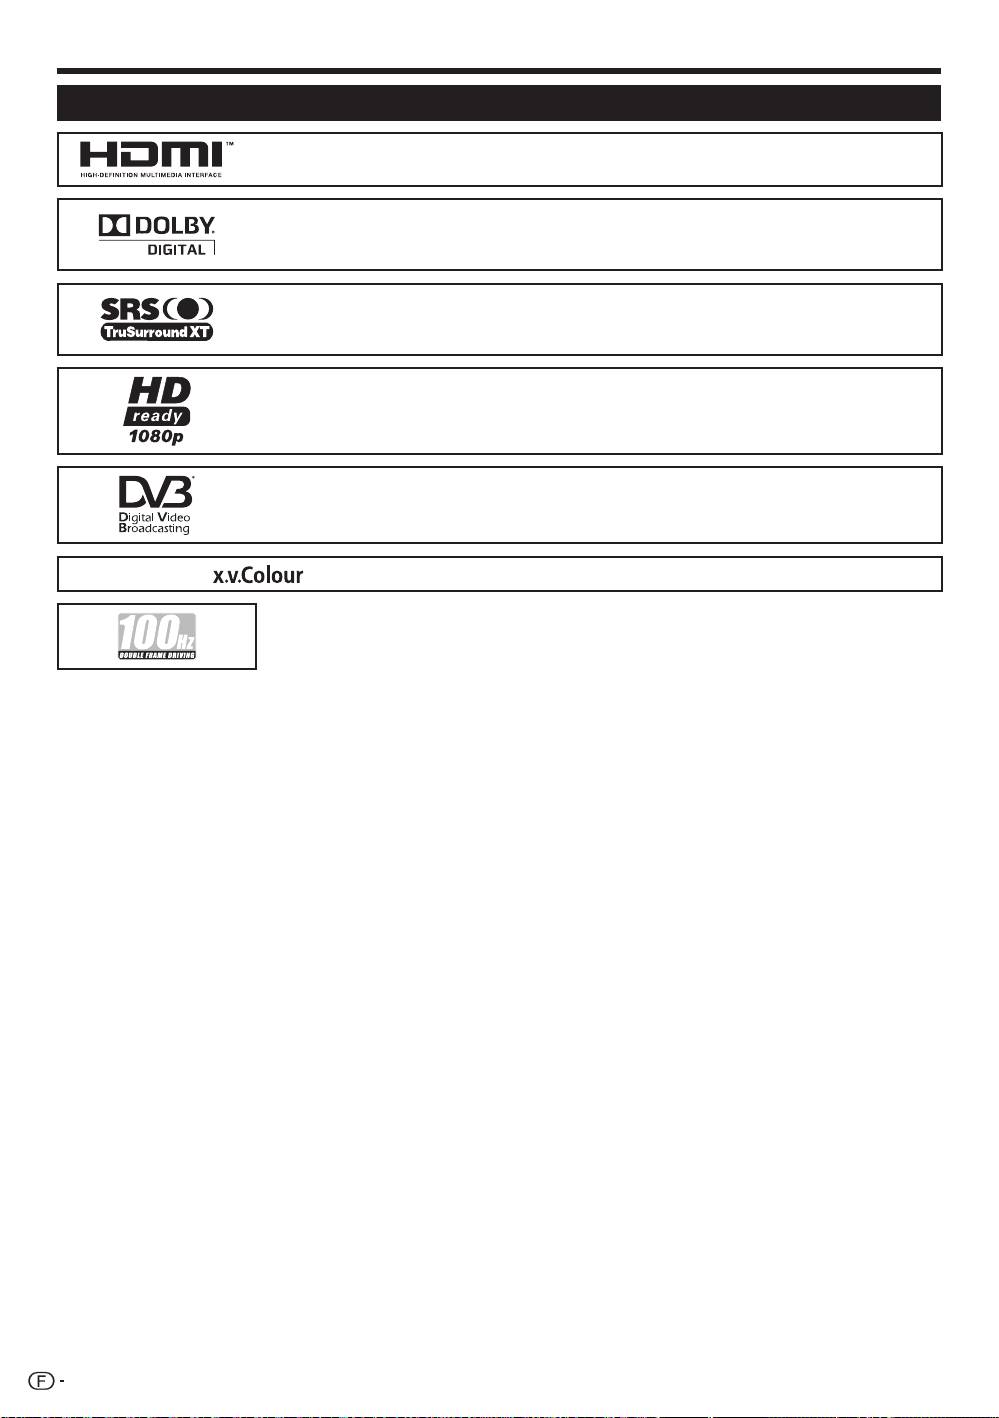
Introduction
Marques
•
« HDMI, le logo HDMI et High-Definition Multimedia Interface sont des marques de
commerce ou des marques déposées de HDMI Licensing LLC. »
•
Fabriqué sous licence de Dolby Laboratories.
•
« Dolby » et le sigle double-D sont des marques de commerce de Dolby
Laboratories.
•
TruSurround XT, SRS et le h symbole sont des marques déposées de SRS
Labs, Inc.
•
TruSurround XT technologie est incorporé sous licence de SRS Labs, Inc.
Le logo « HD ready 1080P » est une marque de commerce de EICTA.•
Le logo DVB est une marque déposée du projet DVB (Digital Video Broadcasting).•
« x.v.Colour » et sont des marques de Sony Corporation.•
8
KRL46V_FR.indd 8 2008/07/09 14:03:35
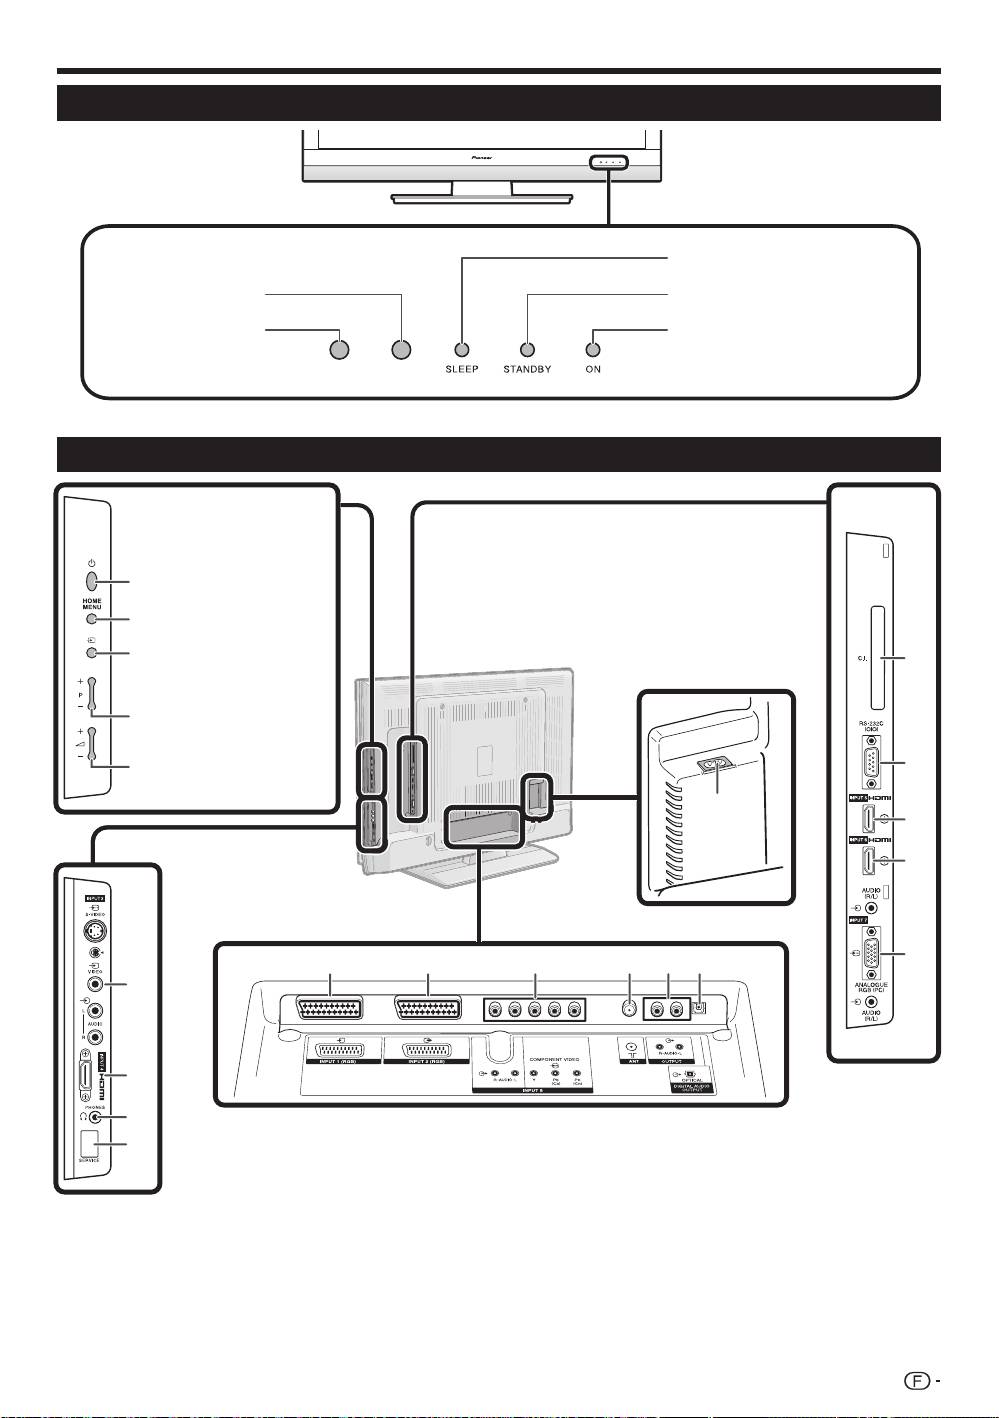
Introduction
Téléviseur (Vue de face)
RLS = Room Light Sensor (Capteur de lumière ambiante)*
Téléviseur (Vue de dos)
1�
Prise AC INPUT
7�
Prise INPUT2 (RGB)
12�
Fente COMMON INTERFACE
2�
Prises INPUT3
8�
Prise INPUT8 (COMPONENT/
13�
Prise RS-232C
3�
Prise INPUT4 (HDMI)
AUDIO)
14�
Prise INPUT5 (HDMI)
4�
PHONES (Casque)
9�
Prise ANT (antenne)
15�
Prises INPUT6 (HDMI/AUDIO)
5�
Connecteur SERVICE
10�
Prises OUTPUT (AUDIO)
16�
Prises INPUT7 (ANALOGUE RGB/
6�
Prise INPUT1 (RGB)
11�
Prise DIGITAL AUDIO OUTPUT
AUDIO)
12
13
1
14
15
16
6 7 8 9 10 11
2
3
4
5
Indicateur SLEEP
RLS*
Indicateur STANDBY
Capteur de
Indicateur ON
télécommande
Touche a (Alimentation)
Touche HOME MENU
b Touche
(Source d’entrée)
Pk/l Touches de
programme (canal)
ik/l Touches de
volume
AVERTISSEMENT :
Une pression sonore excessive en
provenance des écouteurs ou du casque
peut entraîner une perte auditive.
9
KRL46V_FR.indd 9 2008/07/09 14:03:36

Préparation
Accessoires fournis
Télécommande (g1) Cordon secteur (g2) Ensemble du socle (g1)Serre-câbles (g1)
Pages 3 et 11 Page 10Page 14Page 14
•
Mode d’emploi (ce document)
Pile alcaline format « AA » (g2) ... Page 11•
•
Feuillet de garantie
Pose de l’ensemble du socle
•
Avant de poser (ou déposer) l’ensemble du socle, débranchez le cordon secteur de la prise AC INPUT.
•
Avant de procéder aux opérations, étendez un rembourrage sur la surface de travail sur laquelle vous placerez le
téléviseur. Ceci lui évitera d’être endommagé.
ATTENTION
•
Fixez le socle dans le bon sens.
•
Veillez à bien suivre les instructions. Un montage incorrect du socle peut entraîner la chute du téléviseur.
1
Confirmez la présence des huit vis (quatre vis
3
1
Insérez le socle dans les ouvertures sous le
courtes et quatre vis longues) fournies avec
téléviseur. (Maintenez le socle afin qu’il ne
l’ensemble du socle.
tombe pas du bord de la surface de travail.)
2
Insérez et serrez les quatre vis courtes dans
les quatre trous de vis au dos du téléviseur.
2
Fixez le pied de soutien pour l’ensemble du
socle sur la base à l’aide de quatre vis longues
avec la clé hexagonale (fournie) comme illustré.
Coussin
moelleux
REMARQUE
•
Pour déposer le socle, procédez aux étapes ci-dessus
dans l’ordre inverse.
10
TV
1 2 3 4
INPUT
5 6 7 8
TV
DTV
RADIO
1 2 3
4 5 6
7 8 9
INFO
0
P.INFO
CH RETURN
P
EXIT
DVD TOPMENU/
GUIDE
EPG
HOME
ENTER
MENU
RETURN
MENU
HDMI REC STOP
CM SKIP
CTRL
SCREEN
SIZE
SELECTION
AV
SOURCE
TV
TOOLS
DVD
DVD
SELECT
HDD
STBDVR VCR
Clé
hexagonale
Vis courte
Clé hexagonale
Vis
longue
KRL46V_FR.indd 10 2008/07/09 14:03:37
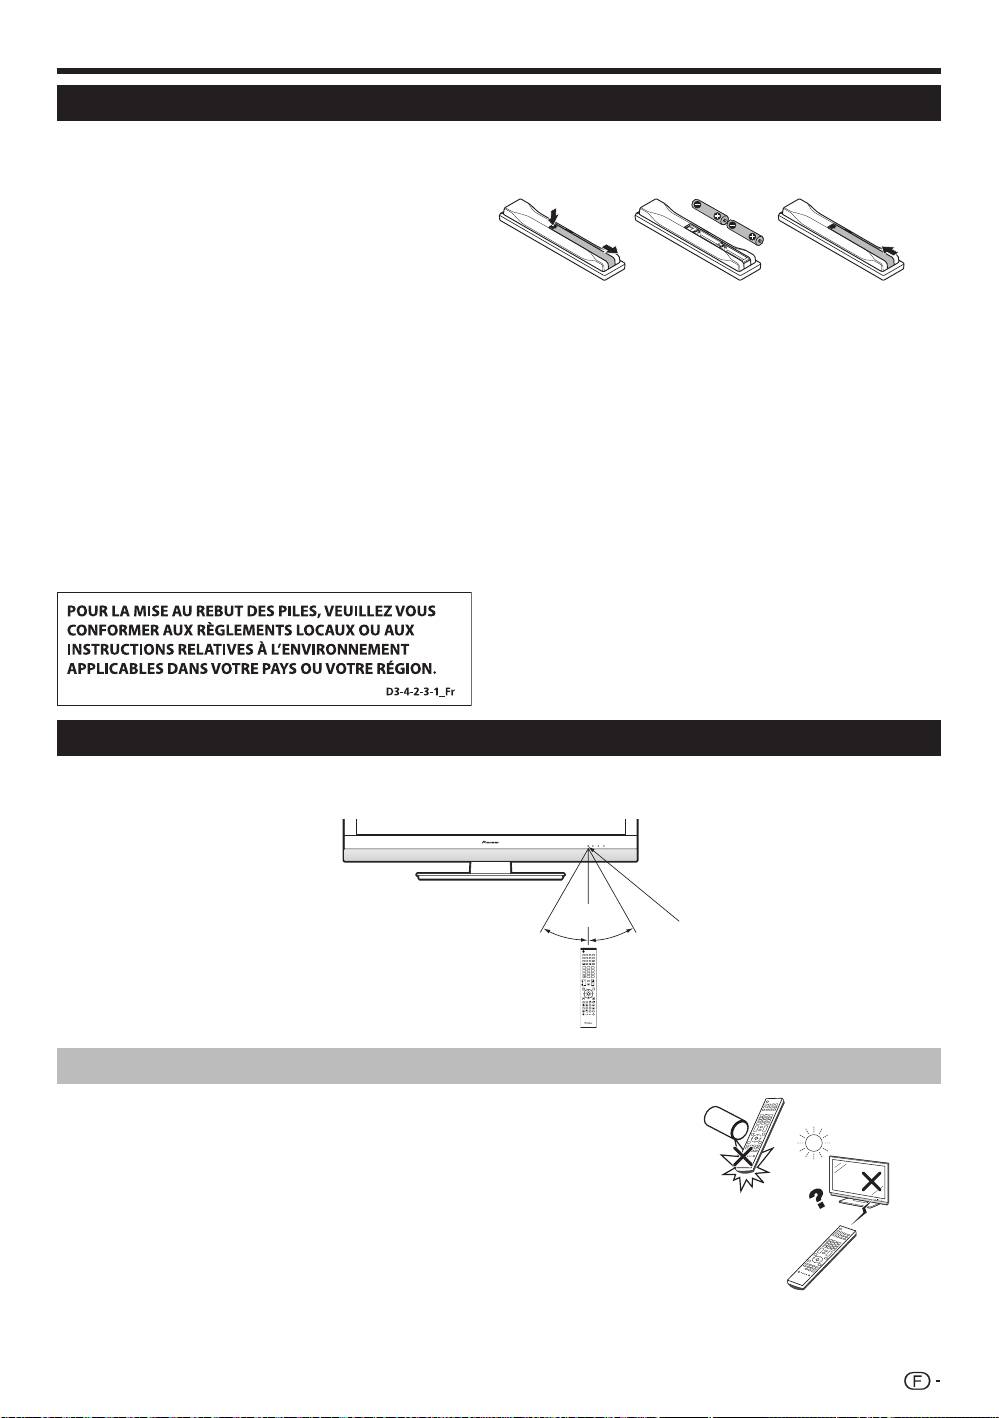
Préparation
Insertion des piles
Avant d’utiliser le téléviseur pour la première fois, insérez deux piles alcalines format « AA ». Lorsque les piles sont
épuisées et que la télécommande ne fonctionne plus, remplacez les piles par des piles format « AA » neuves.
1
Ouvrez le couvercle du compartiment des piles.
2
Insérez les deux piles alcalines format « AA »
fournies.
•
Placez les piles en faisant correspondre leurs bornes
avec les indications (e) et (f) dans le compartiment
des piles.
3
Refermez le couvercle.
ATTENTION
Une utilisation incorrecte des piles peut entraîner une fuite de produits chimiques ou même une explosion. Veillez à
bien suivre les instructions ci-dessous.
•
N’utilisez pas ensemble des piles de types différents. Les autres piles ont des caractéristiques différentes.
•
N’utilisez pas ensemble des piles usagées et neuves. Ceci peut raccourcir la durée de vie des piles neuves ou
provoquer des fuites des piles usagées.
•
Retirez les piles dès qu’elles sont usées. Les produits chimiques s’écoulant d’une pile peuvent provoquer une
allergie. En cas de fuite, essuyez soigneusement avec un chiffon.
•
Les piles fournies avec l’appareil peuvent avoir une durée de vie plus courte que prévue en raison des
conditions de stockage.
•
Si vous n’avez pas l’intention d’utiliser la télécommande pendant une période prolongée, retirez les piles.
•
Lorsque vous remplacez les piles, utilisez des piles alcalines plutôt que des piles au zinc-carbone.
Précautions sur la télécommande
•
N’exposez pas la télécommande à des chocs. Ne l’exposez pas non plus à des
liquides et ne la placez pas dans des endroits très humides.
•
N’installez pas, ni n’exposez la télécommande directement au soleil. La chaleur
risquerait de la déformer.
•
La télécommande risque de ne pas fonctionner correctement si le capteur
de télécommande du téléviseur est directement exposé au soleil ou à un
éclairage violent. Dans ce cas, modifiez l’angle de l’éclairage ou du téléviseur, ou
rapprochez la télécommande du capteur de télécommande.
TV
30° 30°
1 2 3 4
INPUT
TV
5 6 7 8
DTV
RADIO
INFO
4 5 6
1 2 3
7 8 9
0
P
CH RETURN
P.INFO
EXIT
DVD TOPMENU/
GUIDE
EPG
HOME
MENU
ENTER
MENU
RETURN
CTRL
HDMI REC STOP
SOURCE
CM SKIP
TV
TOOLS
DVD
DVD
SCREEN
SIZE
SELECTION
SELECT
HDD
AV
STBDVR VCR
Utilisation de la télécommande
Utilisez la télécommande en la dirigeant vers le capteur de télécommande. Des objets placés entre la
télécommande et le capteur peuvent gêner le bon fonctionnement de la télécommande.
5 m
Capteur de
télécommande
11
KRL46V_FR.indd 11 2008/07/09 14:03:38
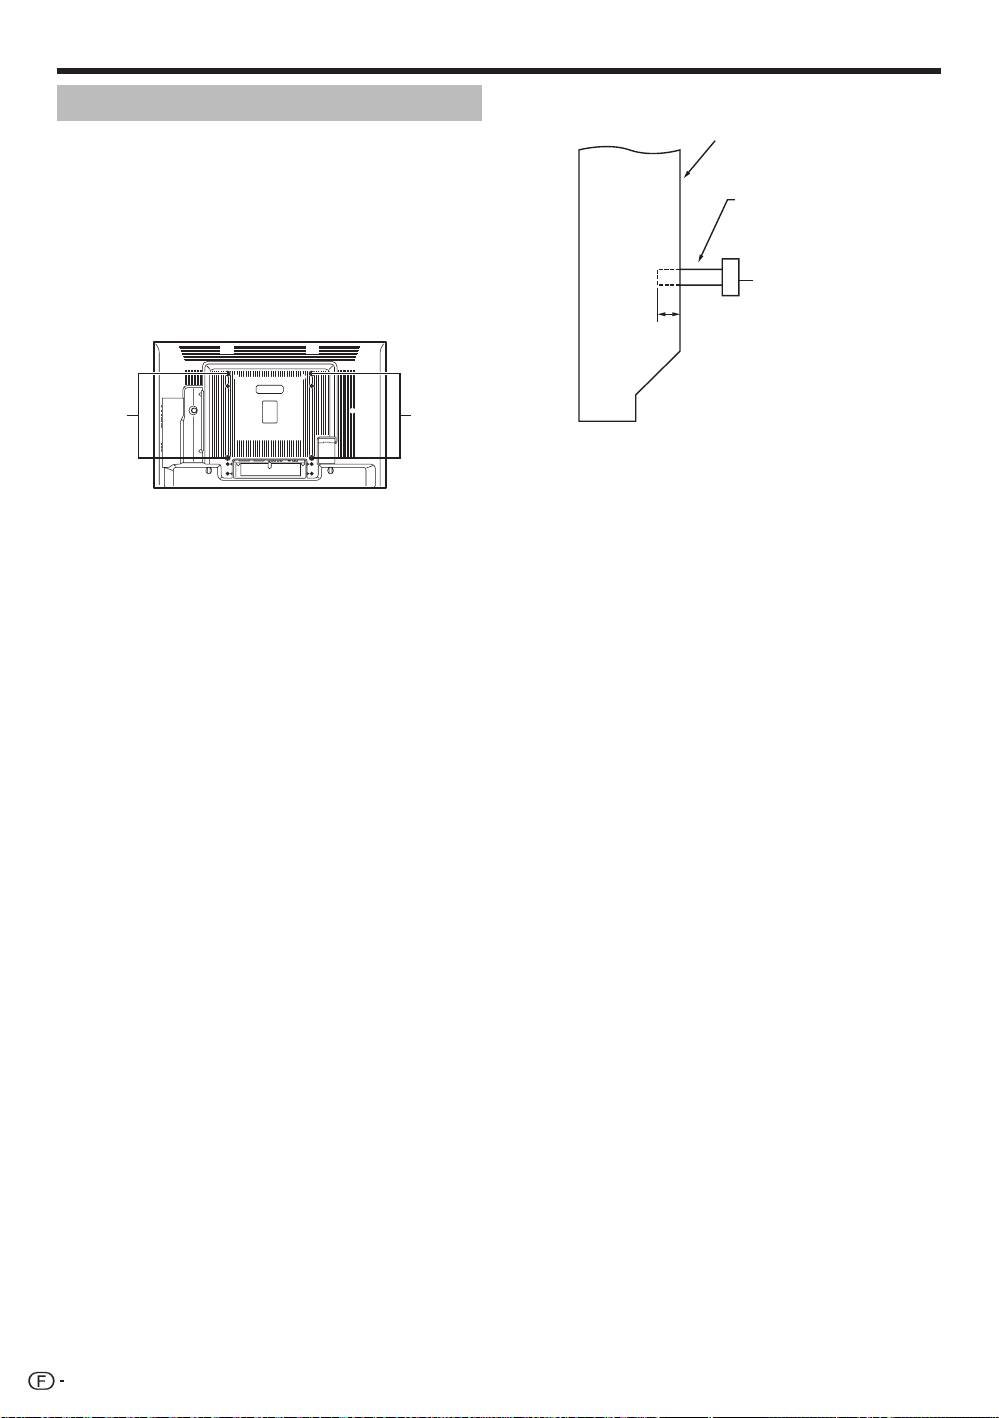
Préparation
Vue de profil
Précautions de montage
Surface de
Respectez les précautions suivantes lors du montage
montage
avec un accessoire comme le support en option.
Applique de montage
Lors de l’utilisation d’autres supports, appliques
Téléviseur
(ou accessoire
ou accessoires équivalents
à écran
équivalent)
•
Adressez-vous à votre revendeur.
plat
•
Les orifices de montage suivants peuvent être
utilisés pour le montage.
Vis M6
Vue arrière
12 mm à 15 mm
Orifices
Orifices
de
de
montage
montage
REMARQUE
•
Les orifices de montage peuvent être utilisés après
avoir retiré les cachets noirs et les vis.
ATTENTION
•
Utilisez des vis M6, pénétrant de 12 mm à 15 mm
depuis la surface de montage du téléviseur à écran
plat. Voir la vue de profil indiquée à droite.
•
Prenez garde de ne pas obstruer les ouvertures
d’aération à l’arrière du téléviseur à écran plat.
•
Assurez-vous d’installer le téléviseur à écran plat sur
une surface plane étant donné que le panneau LCD
de ce produit est en verre.
•
Les orifices des vis autres que ceux illustrés ci-
dessus ne sont destinés qu’aux produits spécifiés.
Ne les utilisez jamais pour installer des produits non
spécifiés.
REMARQUE
•
Pioneer ne saurait être responsable pour toute
blessure corporelle ou dommage infligé au produit
résultant de l’utilisation des accessoires de montage.
12
KRL46V_FR.indd 12 2008/07/09 14:03:39
