Pioneer CDJ-900: инструкция
Раздел: Музыкальное Оборудование
Тип: Dj-Проигрыватель
Характеристики, спецификации
Инструкция к Dj-Проигрывателю Pioneer CDJ-900
Оглавление
- Содержание
- До начала Свойства
- SOUND CARD HIGH SOUND QUALITY
- Перед началом работы Комплект поставки Диски/ файлы, воспроизводимые на CDJ-900 Воспроизводимые диски О воспроизведении CD
- Об устройствах USB О файлах ААС О файлах WAV О файлах AIFF О файлах МР3 О rekordbox
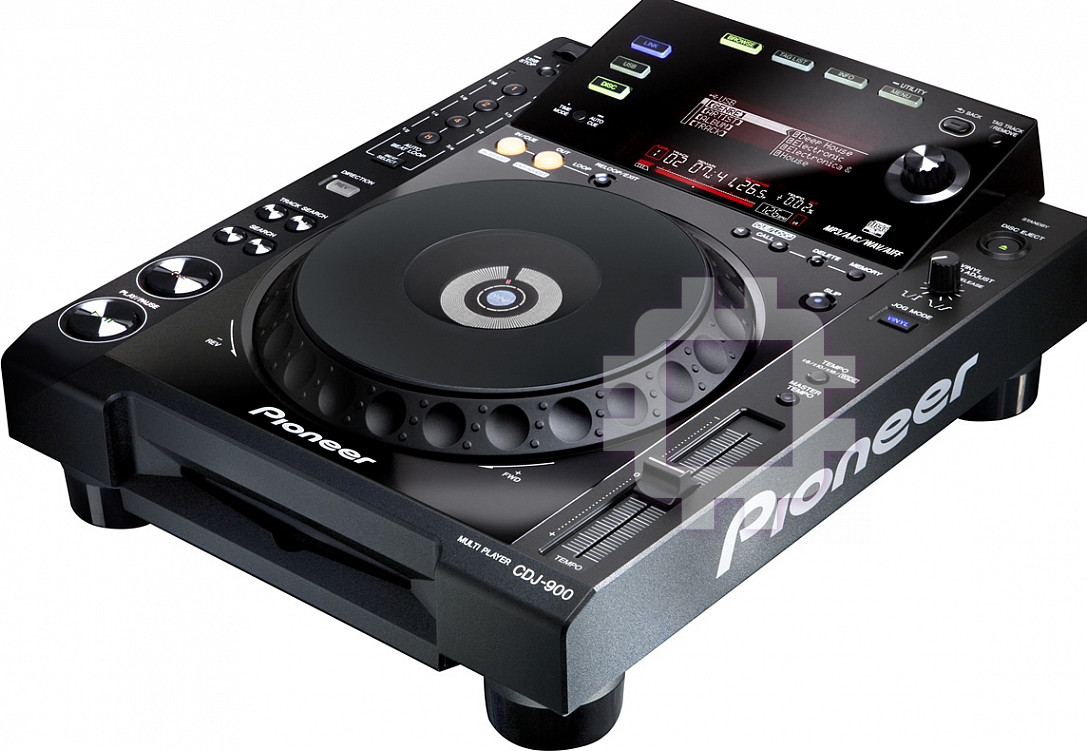
- Названия деталей и функции Панель управления Задняя панель Панель управления
- Фронтальная панель
- Дисплей основного блока Раздел дисплея поворотного переключателя
- Подключения Основной стиль Использование в комбинации с rekordbox
- Использование программного обеспечения DJ других марок Подключения для последовательного воспроизведения
- Воспроизведение Загрузка дисков Загрузка устройств USB Использование функции PRO DJ LINK
- Воспроизведение
- Настройка Метки Настройка Петли Точная регулировка точки входа в петлю (регулировка входа в петлю) Точная регулировка точки выхода из петли (регулировка выхода из петли)
- Отмена воспроизведения Петли (Выход из петли) Возврат на воспроизведение Петли (Возврат в петлю) Индивидуальное удаление метки или точек петли Срезание петлей (Срезание петли) Продление петлей Удаление всех меток и точек петли для диска Автоматический выбор петли на основе темпа дорожки (Auto Beat Loop) Удаление всей информации диска, записанной на устройстве USB Сохранение метки и точек петли Управление поворотным переключателем
- Поиск кадра [VINYL・CDJ] Сверхбыстрый поиск [VINYL・CDJ] Изменение высоты тона [VINYL・CDJ] Воспроизведение со скрэтчем [VINYL] Использование кнопки [SLIP]
- Управление CDJ-900 в комбинации с другими устройствами Запуск воспроизведения с помощью фейдера микшера DJ (Запуск с помощью фейдера) Последовательное воспроизведение на двух DJ проигрывателях Использование кнопки [BROWSE] Перегруппировка дорожек (Меню сортировки) Поиск дорожек (SEARCH) Использование функции перехода Просмотр истории воспроизведения (HISTORY)
- Использование кнопки [TAG LIST] Использование кнопки [INFO]
- Изменение настроек Использование кнопки [MENU/UTILITY] Параметр [HISTORY NAME] Изменение настроек Список настроек
- О программном обеспечении rekordbox Лицензионное Соглашение с конечным пользователем
- Предупреждения по авторским правам Меры предосторожности по установке
- Установка rekordbox Запуск rekordbox Использование сайта поддержки
- О программном драйвере Подключение CDJ-900 и компьютера Лицензионное Соглашение с конечным пользователем Меры предосторожности по установке Регулировка размера буфера (Windows) Установка програмного драйвера
- Проверка версии программного драйвера Список сообщений MIDI Проверка самой последней информации о программном драйвере Использование программного обеспечения DJ других марок Управление программным обеспечением DJ через интерфейс MIDI
- Дополнительная информация Возможные неисправности и способы их устранения Неисправность Проверьте Способ устранения
- Сообщения об ошибках Список иконок, отображаемых в разделе дисплей основного блока
- Предостережения по использованию Обращение с дисками
- Ограничение ответственности Технические характеристики
MULTI PLAYER
LECTEUR DE MULTI
MULTI-PLAYER
LETTORE MULTIPLO
CDJ-900
MULTI-SPELER
MULTIRREPRODUCTOR
МНОГОФУНКЦИОНАЛЬНЫЙ
ПРОИГРЫВАТЕЛЬ
http://www.prodjnet.com/support/
The Pioneer website listed above provides answers to frequently asked questions, information about
software, and other up-to-date data of assistance to our customers.
Le site Web de Pioneer ci-dessus fournit des réponses aux questions souvent posées, des informations
au sujet des logiciels et d’autres données mises à jour afin de venir en aide à notre clientèle.
Auf der oben angegebenen Pioneer-Website werden unseren Kunden Antworten auf häufig gestellte
Fragen, Informationen über Software und weitere Unterstützung mit neuesten Daten angeboten.
http://www.prodjnet.com/rekordbox/support/
For inquiries on rekordbox, please see the support site indicated above.
Pour toute demande d’informations au sujet de rekordbox, veuillez consulter le site d’assistance
indiqué ci-dessus.
Für Anfragen über rekordbox sehen Sie bitte die oben angegebene Support-Site.
Per domande riguardanti rekordbox, consultare il sito di supporto tecnico indicato qui sopra.
Voor hulp of nadere inlichtingen over rekordbox kunt u terecht op de bovengenoemde website.
Para obtener información acerca del rekordbox, vea el sitio de asistencia indicado más arriba.
Для справок по rekordbox, пожалуйста, смотрите сайт поддержки, обозначенный выше.
Operating Instructions
Mode d’emploi
Bedienungsanleitung
Istruzioni per l’uso
Handleiding
Manual de instrucciones
Инструкции по эксплуатации
DRB1484-A
1
2
En
DRB1484-A
2

English
Contents
How to read this manual
The names of displays, menus, and buttons in this manual are enclosed in brack-
ets. (e.g. [MASTER] channel, [ON/
OFF], [File] menu)
Before start
Features ...........................................................................................................................4
Before you start
What’s in the box .............................................................................................................6
Discs/
files playable on the CDJ-900 ..............................................................................6
Part Names and Functions
Control Panel ...................................................................................................................8
Rear Panel .......................................................................................................................9
Front Panel.......................................................................................................................9
Main unit display ...........................................................................................................10
Jog dial display section.................................................................................................10
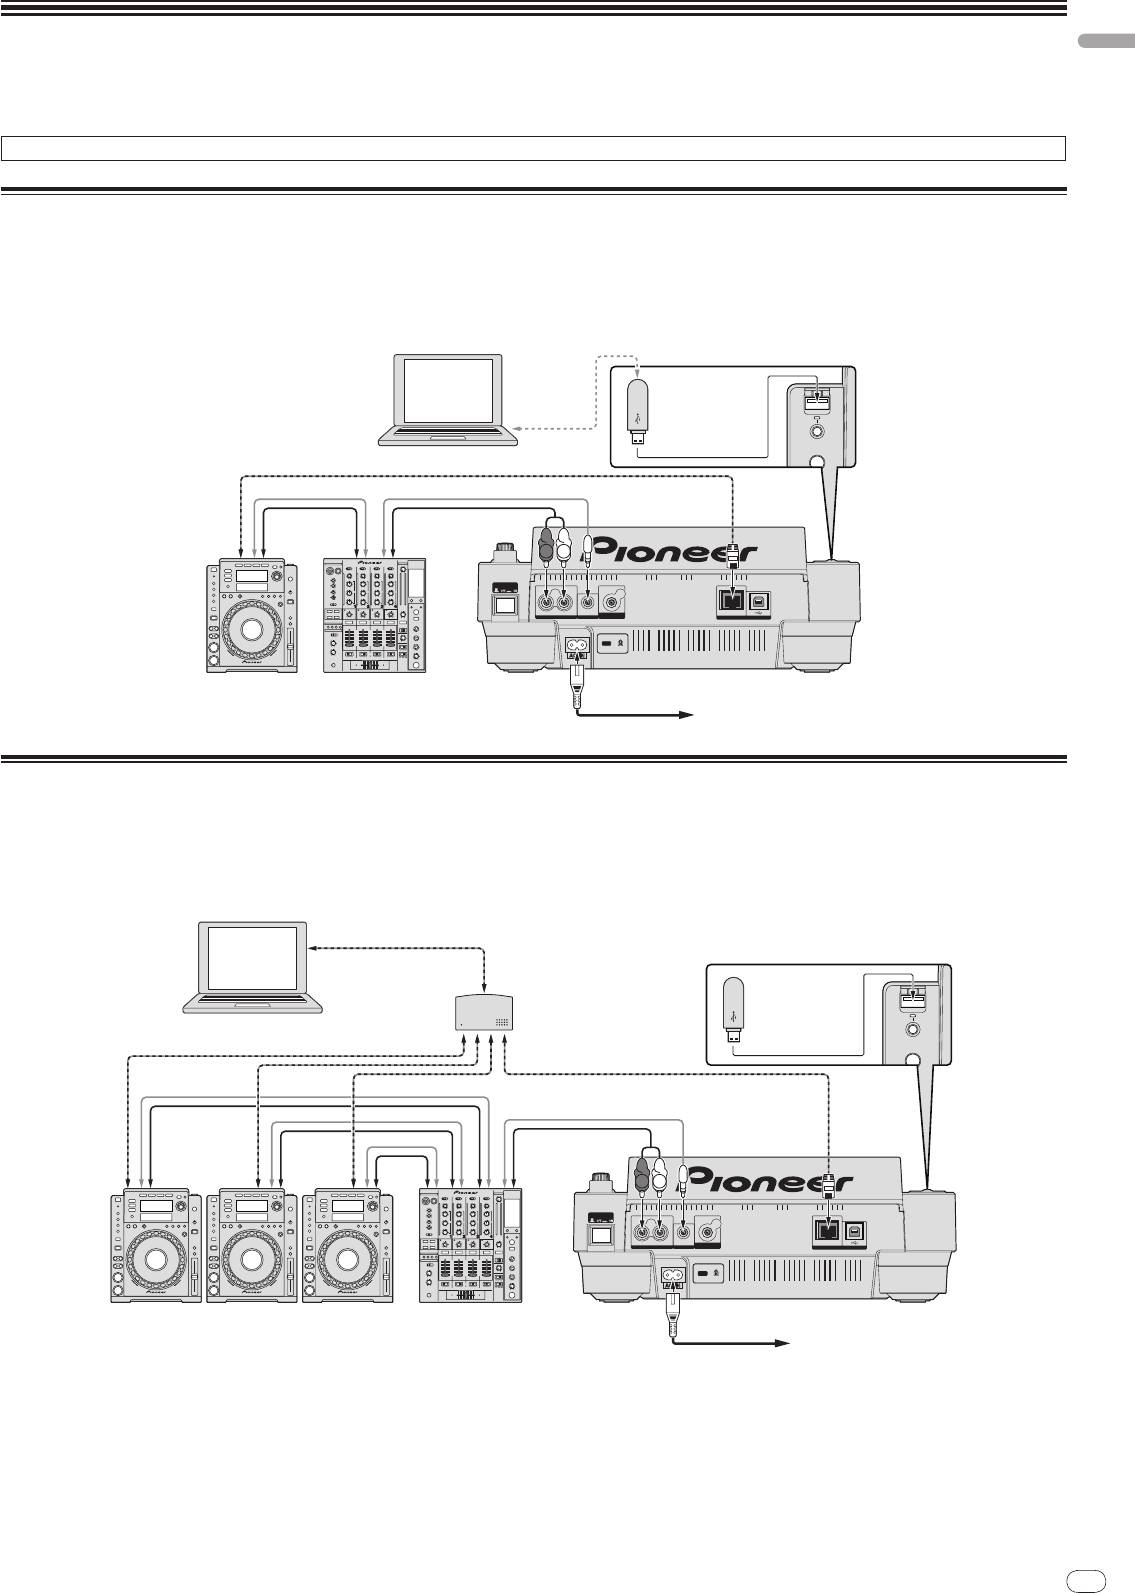
Connections
Basic style ......................................................................................................................11
Using in combination with rekordbox .........................................................................11
Using other brands of DJ software ..............................................................................12
Connections for relay play ............................................................................................12
Playback
Loading discs.................................................................................................................13
Loading USB devices ....................................................................................................13
Using the PRO DJ LINK function ................................................................................13
Playback .........................................................................................................................14
Setting Cue ....................................................................................................................15
Setting Loop ...................................................................................................................15
Setting the loop automatically based on the track’s tempo (Auto Beat Loop) ........16
Storing cue and loop points .........................................................................................16
Operating the jog dial ...................................................................................................16
Using the [SLIP] button ................................................................................................17
Operating the CDJ-900 in combination with other devices ......................................17
Using the [BROWSE] button .......................................................................................18
Using the [TAG LIST] button .........................................................................................18
Using the [INFO] button ...............................................................................................19
Changing the settings
Using the [MENU/UTILITY] button ...............................................................................20
About the rekordbox software ......................................................................................21
About the driver software .............................................................................................24
Using other brands of DJ software ..............................................................................25
Additional information
Troubleshooting ............................................................................................................26
Error messages .............................................................................................................27
List of icons displayed on the main unit display section ...........................................27
Cautions on use ............................................................................................................28
Handling discs ..............................................................................................................28
Disclaimer ......................................................................................................................29
Specifications ................................................................................................................29
En
3
DRB1484-A
3
4
En
DRB1484-A
Before start
Features
The CDJ-900 is a multi player for professional DJs, offering the variety of functions, durability and operability required for working in discos and nightclubs.
MULTI MEDIA, MULTI FORMAT
The CDJ-900 can play not only discs (CDs), but also music files recorded on USB devices (flash memory drives and hard disks). Supported music file formats include
not only music CD (CD-DA) and MP3 but also AAC, WAV and AIFF.
TM
rekordbox
The included rekordbox music management software can be used to prepare playlists, cues, loops, hot cues and other data required for DJ play unhurriedly at home
ahead of time. This allows you to devote all your attention to DJ play at the disco/
nightclub, with total assurance. From acquiring music files to DJ play, all steps in the
cycle of the DJ’s work can be accomplished smoothly.
rekordbox is an application for managing music files which are used for DJ play with a Pioneer DJ Player (i.e. CDJ-2000, CDJ-900).
Data that has been detected and measured, as well as any points which have been set and stored using rekordbox, can be used in combination with a Pioneer DJ Player
(i.e. CDJ-2000, CDJ-900) to achieve outstanding DJ performance.
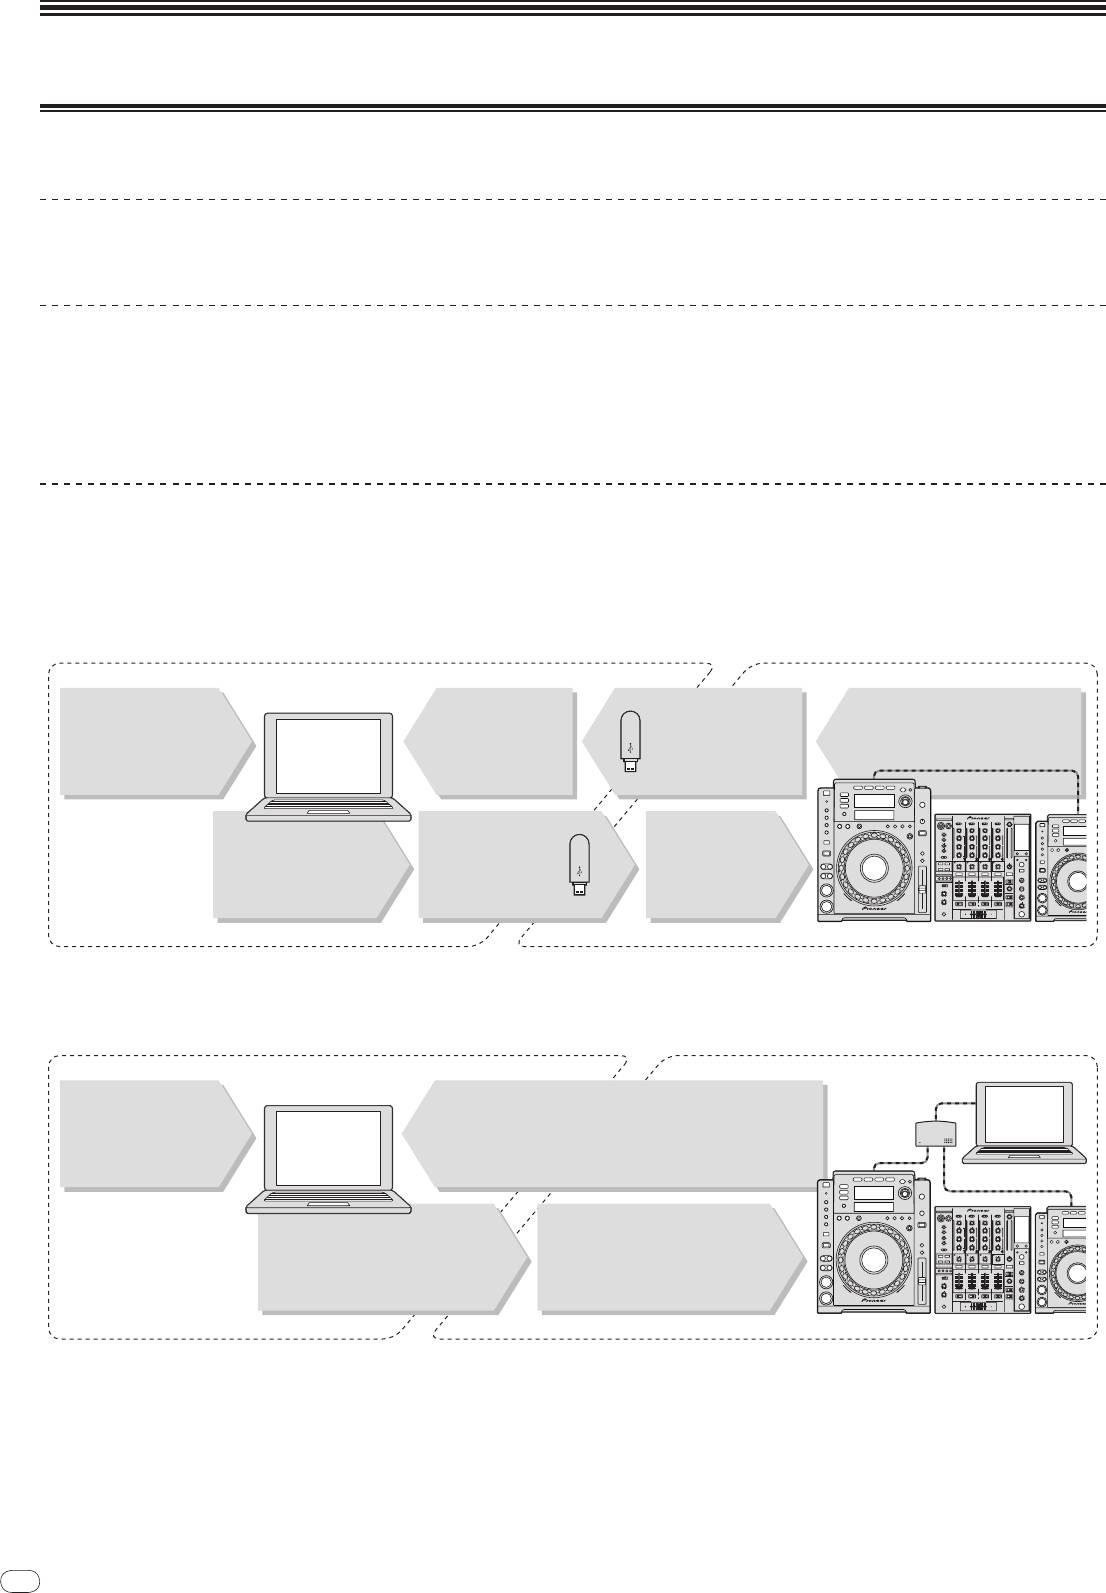
PRO DJ LINK
Functions include “USB Export” using USB devices (flash memory drives and hard discs) and “rekordbox LINK Export” using the computer on which rekordbox is
installed.
USB Export
This function can be used to transfer rekordbox music files and management data using USB devices. This eliminates the need to take your computer to the disco or
club.
4
At home/In a studio
At the disco/club
Computer
- Play using the rekordbox data.
Load music files onto
Check and manage
The playing history is
- Share rekordbox data using PRO
the computer from the
the playing history
stored on the USB
DJ LINK.
Internet or discs.
rekordbox
with rekordbox.
device.
- Add to and analyze the
Write the rekordbox
Load the USB device
collection.
data onto a USB
into the DJ player.
- Prepare with rekordbox.
device.
DJ player
rekordbox LINK Export
When the CDJ-900 and computer are connected by LAN cable, the rekordbox music files and management data can be transferred directly between them. This elimi-
nates the need to export data to USB devices.
At home/In a studio
At the disco/club
Computer
Switching
Load music files onto
rekordbox
- Play using the rekordbox data.
hub
the computer from the
- Share rekordbox data using PRO DJ LINK.
Internet or discs.
rekordbox
Computer
- Connect the computer and
- Add to and analyze the collection.
DJ player.
- Prepare with rekordbox.
- Load the rekordbox data into
the DJ player.
DJ player

SOUND CARD
English
The CDJ-900 is equipped with exclusive interface and MIDI interface for controlling the DJ software of other brands. There is also a built-in sound card, so other equip-
ment can be connected easily.
DISPLAY
The combination of a GUI displaying music file information in easily understandable fashion and a rotary selector with easy operation lets you select tracks with no
stress.
WAVE DISPLAY
This unit is equipped with a 100 x 7 dot WAVE display.
TAG LIST
In addition to playlists prepared using rekordbox, tracks to be played next can be temporarily collected inside the CDJ-900. The music files added to the tag list can be
displayed as a list. This function is extremely convenient for selecting tracks during live performances.
KEYWORD SEARCH
Keyword searching, letter jumping and other functions let you quickly and precisely search for the desired music file.
HISTORY MEMORY
The CDJ-900 is equipped with a history function storing the playing history of music files. Playlists can be created from this playing history using rekordbox.
0.5 FRAME STEP
The minimum frame has evolved from 1 (1/
75 seconds) to 0.5 frames. This makes it possible to set the cue and loop points with greater precision to achieve accurate,
advanced DJ play.
QUANTIZE
The CDJ-900 is equipped with a quantize function for putting a track on beat even when the button is pressed roughly, as long as the track has been analyzed with
rekordbox. When setting real time cues and auto beat loops, the beat is automatically set to the beat nearest the position at which the button was pressed.
HIGH SOUND QUALITY
The CDJ-900 is designed for thorough improvement of the sound quality, for both the digital and analog outputs.
For the digital circuitry, the CDJ-900 is equipped with a high performance Wolfson D/
A converter.
For the analog circuitry, a hybrid OP amplifier is used to reduce to the utmost limits that inaudible noise of 20 kHz and higher that can blur the original sound. Unwanted
digital noise is shut out to achieve clear, highly transparent sound faithful to the original.
En
5
DRB1484-A
54
6
En
DRB1484-A
Playback of discs created on a computer
Depending on the application’s settings and the computer’s environment set-
tings, it may not be possible to play discs created on a computer. Record discs in
Before you start
a format playable on the CDJ-900. For details, contact your application’s selling
agent.
It may not be possible to play discs created on a computer due to the disc’s prop-
erties, scratches or dirt, or poor recording quality (dirt on the recording lens, etc.).
What’s in the box
See Handling discs on page 28 for instructions on handling discs.
! Audio cable
! Power cable
Creating backup discs
! Control cord
! LAN cable
When CD-R/
-RW discs are paused or left in the pause mode at cue points for
! Disc force eject pin
long periods of time, it may become difficult to play the disc at that point, due
! CD-ROM (rekordbox)
to the properties of the disc. Also, when a specific point is looped repeatedly an
! License key
extremely large number of times, it may become difficult to play that point.
! Warranty card
When playing valuable discs, we recommend making backup discs.
! Operating instructions (this document)
Regarding copy protected CDs
This player is designed to conform to the specifications of the audio CD format.
Discs/
files playable on the CDJ-900
This player does not support the playback or function of discs that do not con-
form to these specifications.
Playable discs
About DualDisc
Discs including the following marks on the disc label, package or jacket can be
This player is designed to conform to the specifications of the audio CD format.
played.
This player does not support the playback or function of discs that do not con-
Types of discs that can be played and marks
form to these specifications.
About 8 cm single CDs
8 cm single CDs cannot be played on the CDJ-900. Do not mount 8 cm adapt-
ers on CDs and play them on the CDJ-900. The adapter could fall off as the disc
spins, damaging the disc or the player.
CD
CD-TEXT
About CD-Text
The CDJ-900 supports CD-Text. Titles, album names and artist names recorded in
CD-Text are displayed. When multiple text data is recorded, the first text data is
displayed. The supported character codes are shown below.
! ASCII
! ISO-8859
CD-R
CD-RW
! MS-JIS
! Mandarin Chinese character code
Discs playable on this player are as shown below.
! CD-R/
-RW discs recorded in music CD (CD-DA) format
! CD-R/
-RW disc containing music files (MP3/
AAC/
WAV/
AIFF)
About CD playback
Discs that cannot be played
Music files (MP3/
AAC/
WAV/
AIFF) recorded on CD-R/
-RW discs can be played.
Folder layers Max. 8 levels (files in folders beyond the 8th level cannot be played)
! DTS-CD
! Photo CDs
Max. number of
2 000 folders per disc (folders beyond the 2 000th folder cannot be
! Video CDs
folders
displayed)
! CD Graphics (CD-G) discs
! 999 files for each file format
Max. number of
! Unfinalized CDs
! 3 000 files per disc (files beyond the 3 000th folder cannot be dis-
files
! DVD-R/
-RW
played)
! DVD+R/
+RW
When there are many folders or files, some time may be required for loading.
! DVD-R DL (dual layer)
! DVD+R DL (dual layer)
! DVD-Video discs
! DVD-Audio discs
! DVD-RAM discs
6
About USB devices
About AAC files
English
Music files (MP3/
AAC/
WAV/
AIFF) recorded on USB devices can be played.
! AAC is the abbreviation of “Advanced Audio Coding”, a basic format of audio
Such data as disc identification information, cue points, loop points and hot cues
compression technology used for MPEG-2 and MPEG-4.
can be recorded on USB devices.
! The file format and extension of AAC data depends on the application used to
Folder layers Max. 8 levels (files in folders beyond the 8th level cannot be played)
create the data.
®
! In addition to AAC files encoded with iTunes
and with the extension “.m4a”,
Max. number of
Unlimited (folders beyond the 10 000th folder within a single folder
files with the extensions “.aac” and “.mp4” can also be played on the CDJ-
folders
cannot be displayed)
900. However, copyright protected AAC files purchased for example at the
Max. number of
Unlimited (files beyond the 10 000th file within a single folder cannot
iTunes Music Store cannot be played. Also, some files may not be playable,
files
be displayed)
depending on the iTunes version used to encode them.
Supported file
FAT, FAT32 and HFS+
! The CDJ-900 supports AAC files in the formats shown below.
systems
Sampling frequencies of 16 kHz, 22.05 kHz, 24 kHz,
! The CDJ-900 supports such USB mass storage class USB devices as external hard discs,
Compatible
MPEG-4 AAC LC
32 kHz, 44.1 kHz and 48 kHz, and bit rates of 16
portable flash memory drives and digital audio players. External DVD/
CD drives and
formats
kpbs – 320 kbps are supported.
other optical disc devices cannot be used.
! When there are many folders or files, some time may be required for loading.
ID3 tag versions 1.0, 1.1, 2.2, 2.3 and 2.4 are sup-
! If multiple partitions are set for the USB device, the device may not be recognized.
ported.
aac
Titles, album names, artist names, etc., are dis-
Track information
played here.
Cautions on using USB devices
Meta tags (embedded tags) are supported.
Extensions other
Titles, album names, artist names, etc., are dis-
than aac
! Some USB devices may not operate properly. Please note that Pioneer will
played here.
accept no responsibility whatsoever for loss of data recorded on USB devices.
File extension .m4a, .aac and .mp4
! USB hubs cannot be used.
! USB devices equipped with flash card readers may not operate.
! If a current above the allowable level is detected in the CDJ-900’s USB port,
it could happen that a warning message is displayed, the power to the USB
About WAV files
device is cut off and signal transfer is stopped. To restore normal operation,
The CDJ-900 supports WAV files in the formats shown below.
remove USB devices connected to the player, then press USB STOP. Avoid
reusing the USB device for which the excess current was detected. If normal
Compatible
The 16-/
24-bit non-compressed PCM format and sampling frequencies
operation is not restored after performing the above operation (if signals are
formats
of 44.1 kHz and 48 kHz are supported.
not transferred), try turning off the player’s power then turning it back on.
LST chunk
Track information
! Depending on the USB device you are using, the desired performance may
Titles, album names, artist names, etc., are displayed here.
not be achieved.
File extension .wav
About MP3 files
About AIFF files
MP3 files can have a constant bit rate (CBR) or a variable bit rate (VBR). Both
types of files can be played on the CDJ-900, but the search and super fast search
The CDJ-900 supports AIFF files in the formats shown below.
functions are slower with VBR files. If your priority is operability, we recommend
The 16-/
24-bit non-compressed PCM format and sampling frequencies
Compatible
recording MP3 files in CBR.
of 44.1 kHz and 48 kHz are supported.
formats
The CDJ-900 supports MP3 files in the formats shown below.
Titles, album names, artist names, etc., are displayed here.
File extension .aif, .aiff
Audio Layer-3 sampling frequencies of 32 kHz, 44.1
MPEG-1
kHz and 48 kHz, and bit rates of 32 kbps – 320 kbps
Compatible
are supported.
formats
Audio Layer-3 sampling frequencies of 16 kHz,
MPEG-2
22.05 kHz and 24 kHz, and bit rates of 16 kbps – 160
About rekordbox
kbps are supported.
! rekordbox is an application for managing music files which are used for DJ
ID3 tag versions 1.0, 1.1, 2.2, 2.3 and 2.4 are sup-
play with a Pioneer DJ Player (i.e. CDJ-2000, CDJ-900).
ported.
Track information
Data that has been detected and measured, as well as any points which
Titles, album names, artist names, etc., are dis-
have been set and stored using rekordbox, can be used in combination with
played here.
a Pioneer DJ Player (i.e. CDJ-2000, CDJ-900) to achieve outstanding DJ
File extension .mp3
performance.
! Install rekordbox from the included CD-ROM onto a computer. For instruc-
tions on using rekordbox, see Using in combination with rekordbox on page 11
and About the rekordbox software on page 21.
En
7
DRB1484-A
76
8
En
DRB1484-A
Part Names and Functions
8
Control Panel
Rear Panel
bcde fgh
i jk
UTILITY
BACK
TAG TRACK
BROWSE TAG LIST INFO MENU
/REMOVE
OFF
POWER
ON
POWER
LINK
STANDBY
a
l
USB
DISC EJECT
R
L
CONTROL
DIGITAL
STOP
USB
AUDIO OUT
OUT
9
DISC
m
1
/
16
1
1
/
4
TIME
AUTO
VINYL
MODE
CUE
SPEED ADJUST
1
/
8
2
1
/
3
TOUCH/
RELEASE
w
yz ABx
IN / CUE
OUTRELOOP/EXIT
CUE/LOOP
n
8
DELETE MEMORY
1
/
4
4
1
/
2
LOOP
CALL
o
JOG MODE
IN ADJUST
OUT ADJUST
1
/
2
8
3
/
4
SLIP
VINYL
p
AUTO
BEAT LOOP
q
BEAT
SELECT
7
6
DIRECTION
TEMPO
6
10 16
WIDE
5
REV
r
MASTER
TEMPO
s
TRACK SEARCH
CD
4
SEARCH
Front Panel
3
t
0
2
CUE
PLAY / PAUSE
REV
FWD
1
TEMPO
MULTI PLAY ER
CDJ-
900
uv
FE
c TIME MODE/
AUTO CUE (page 15)
Control Panel
d Main unit display (page 10)
1 PLAY/PAUSEf and PLAY/PAUSEf indicator (page 14)
e BROWSE (page 18)
This lights when playing tracks and flashes when in the pause mode.
f TAG LIST (page 18)
2 CUE and CUE indicator (page 15)
This lights when a cue point is set (except during track searching), and
g INFO (page 19)
flashes when a new cue point can be set in the pause mode.
h MENU/UTILITY (page 20)
3 SEARCHm/
n (page 14)
i BACK (page 18)
4 TRACK SEARCHo/
p (page 14)
j TAG TRACK/
REMOVE (page 18)
5 DIRECTION REV and REV indicator (page 14)
k Rotary selector
6 LOOP IN/
CUE (IN ADJUST) (page 15), LOOP OUT (OUT ADJUST)
When selecting tracks or setting items, the cursor moves when the rotary
selector is turned. Press the rotary selector to enter.
(page 15), RELOOP/EXIT (page 15)
l STANDBY indicator (page 20)
7 BEAT SELECT (page 16)
This lights when in the standby mode.
8 AUTO BEAT LOOP (1, 2, 4, 8) (page 16)
m DISC EJECTh and DISC EJECT indicator (page 13)
9 Beat select indicator (page 16)
n VINYL SPEED ADJUST (page 17)
The indicator for the row selected by pressing [BEAT SELECT] lights.
o CUE/LOOP CALLc/
d (page 16), DELETE (page 16), MEMORY
a USB device insertion slot, USB indicator and USB STOP (page 13)
(page 16)
b LINK, USB, DISC (page 14)

p JOG MODE, VINYL mode indicator and CDJ mode indicator
(page 17)
Front Panel
The mode switches between VINYL and CDJ each time this is pressed. The
English
indicator lights when the VINYL mode is selected.
E Disc insertion slot
q SLIP (page 17)
F Disc force eject pin insertion hole
r TEMPO ±6/±10/±16/WIDE (page 14)
s MASTER TEMPO (page 14)
About ejecting discs by force
t TEMPO (page 14)
! If the disc cannot be ejected by pressing [DISC EJECTh], the disc can be
ejected forcibly by inserting the disc force eject pin all the way into the disc
u Jog dial (– REV/
+ FWD) (page 16)
force eject pin insertion hole on the main unit’s front panel.
! When forcibly ejecting a disc, be sure to do so following the procedure below.
v Jog dial display section (page 10)
1 Press [POWER] and wait at least 1 minute after the set’s
power has turned off.
Rear Panel
Never forcibly eject a disc directly after turning off the set’s power. Doing so is
dangerous for the reasons described below.
w POWER wON vOFF
The disc will still be spinning when ejected and could hit your fingers, etc.,
Press to turn the power on and off.
causing injury.
Also, the disc clamp will rotate in an unstable way, and the disc could get
x AUDIO OUT L/
R (page 11)
scratched.
y AC IN (page 11)
2 Use the included disc force eject pin. (Do not use anything
z CONTROL (page 17)
else.)
The included disc force eject pin is mounted on the CDJ-900’s bottom panel.
A Kensington security slot
When the pin is inserted all the way into the insertion hole, the disc is ejected 5
mm to 10 mm out of the disc insertion slot. Grasp the disc with your fingers and
B DIGITAL OUT
pull it out.
C LINK (page 11)
D USB (page 11)
En
9
DRB1484-A
98
10
En
DRB1484-A
Main unit display
10
USB@PLAYER1
Track 002/0
Title01
1
Artist
Album
2
9
3
a
b
4
c
5
6
d
7
8
e
1 Information display section
9 Time display (minutes, seconds and frames)
Up to 63 characters can be displayed for each item. The characters that can
There are 75 frames to a second.
be displayed are letters A to Z, numbers 0 to 9 and certain symbols. Any other
characters are displayed as “?”.
a QUANTIZE
This lights red when [QUANTIZE] is turned on.
2 REMAIN
When [QUANTIZE] is turned on, the loop point is automatically set to the
This lights when the time display is set to the remaining time.
beat position nearest the position at which [LOOP IN/
CUE (IN ADJUST)],
[LOOP OUT (OUT ADJUST)] or [AUTO BEAT LOOP] (1, 2, 4, 8) was pressed.
3 TRACK
The Quantize function will not work (the indicator is off) under the following
This indicates the track number (01 – 99).
conditions:
! When playing tracks recorded on discs
4 PLAYER
! When playing music files that have not been analyzed with rekordbox
This indicates the player number (1 – 4) assigned to this CDJ-900.
! In the pause mode
5 A. CUE (page 15)
b MT
This lights when auto cue is set.
This lights when the master tempo is set (page 14).
6 MEMORY
c Playing speed display
Cue and loop points recorded on USB devices are displayed as marks.
The number changes according to the position of [TEMPO].
7 CUE
d Playing speed adjustment range display
The positions of currently set cue and loop points are displayed as marks.
This indicates the range in which the playing speed can be adjusted with
respect to the original playing speed recorded on the medium.
8 Playing address display
The track is displayed as a bar graph. When the remaining time is displayed,
e BPM
the display turns off from the left side. The entire graph flashes slowly when
Displays BPM (Beats Per Minute) of the track currently being played.
there are less than 30 seconds remaining in the track, then begins flashing
rapidly when less than 15 seconds remain.
Jog dial display section
1
2
3
4
5
1 Operation display
This indicates the playing position, with one revolution equal to 135 frames. It
turns during playback and stops in the pause mode.
2 Cue point display/
SLIP play display
3 Audio memory status display
This flashes when the audio memory is being written. It stops flashing,
remaining lit, when writing is completed.
The operations below may not be possible while the audio memory is being
written.
! Setting Cue Point during playback (Real Time Cue)
The display also flashes when there is not enough memory due to scratch
play.
4 Jog touch detection display
When the jog mode is set to VINYL, the top of the jog dial lights when
pressed.
5 VINYL
This lights when the jog mode is set to VINYL (page 16).
English
Connections
Be sure to turn off the power and unplug the power cord from the power outlet whenever making or changing connections.
Refer to the operating instructions for the component to be connected.
Connect the power cord after all the connections between devices have been completed.
Do not disconnect the LAN cable when music files and/
or information are being shared using PRO DJ LINK.
Basic style
! USB devices (flash memory drives and hard disks) can be used to transfer rekordbox music files and data to and from the CDJ-900 without taking a computer into
the DJ booth. This makes it possible to play using playlist, cue and loop information that has been set ahead of time using rekordbox.
! The contents of media loaded in DJ players (tracks, cue point memories, WAVE information, etc.) can be shared. For details, see Using the PRO DJ LINK function on
page 13.
! Up to four units can be connected. A switching hub (commercially available) is required to connect three or more units. Use a switching hub of 100 Mbps or greater.
Note that some switching hubs may not operate normally.
En
11
DRB1484-A
11
rekordbox
Computer
USB device on
which rekordbox
data is recorded
LAN cable
Control cord
Control cord
Audio cable
Audio cable
R
L
POWER
R
AUDIO OUT
L
CONTROL
DIGITAL
OUT
DJ player DJ mixer
Rear panel
Power cable
To an AC outlet
Using in combination with rekordbox
! When connected by LAN cable to a computer on which rekordbox is installed, tracks in rekordbox can be selected and played. For instructions on operating rekord-
box on the computer, see the rekordbox manual. Instructions on operating rekordbox can be found in the rekordbox [Help] menu.
! Up to two computers can be connected.
! The contents of media loaded in the different DJ players (tracks, cue point memories, WAVE information, etc.) can be displayed (page 13).
! Up to four units can be connected. A switching hub (commercially available) is required to connect three or more units. Use a switching hub of 100 Mbps or greater.
Note that some switching hubs may not operate normally.
LAN cable
rekordbox
Computer
USB device on
Switching hub
which rekordbox
data is recorded
LAN cable × 3
LAN cable
Control cord × 3
Control cord
Audio cable × 3
Audio cable
R
L
POWER
R
AUDIO OUT
L
CONTROL
DIGITAL
OUT
DJ player × 3DJ mixer
Rear panel
Power cable
To an AC outlet
12
En
DRB1484-A
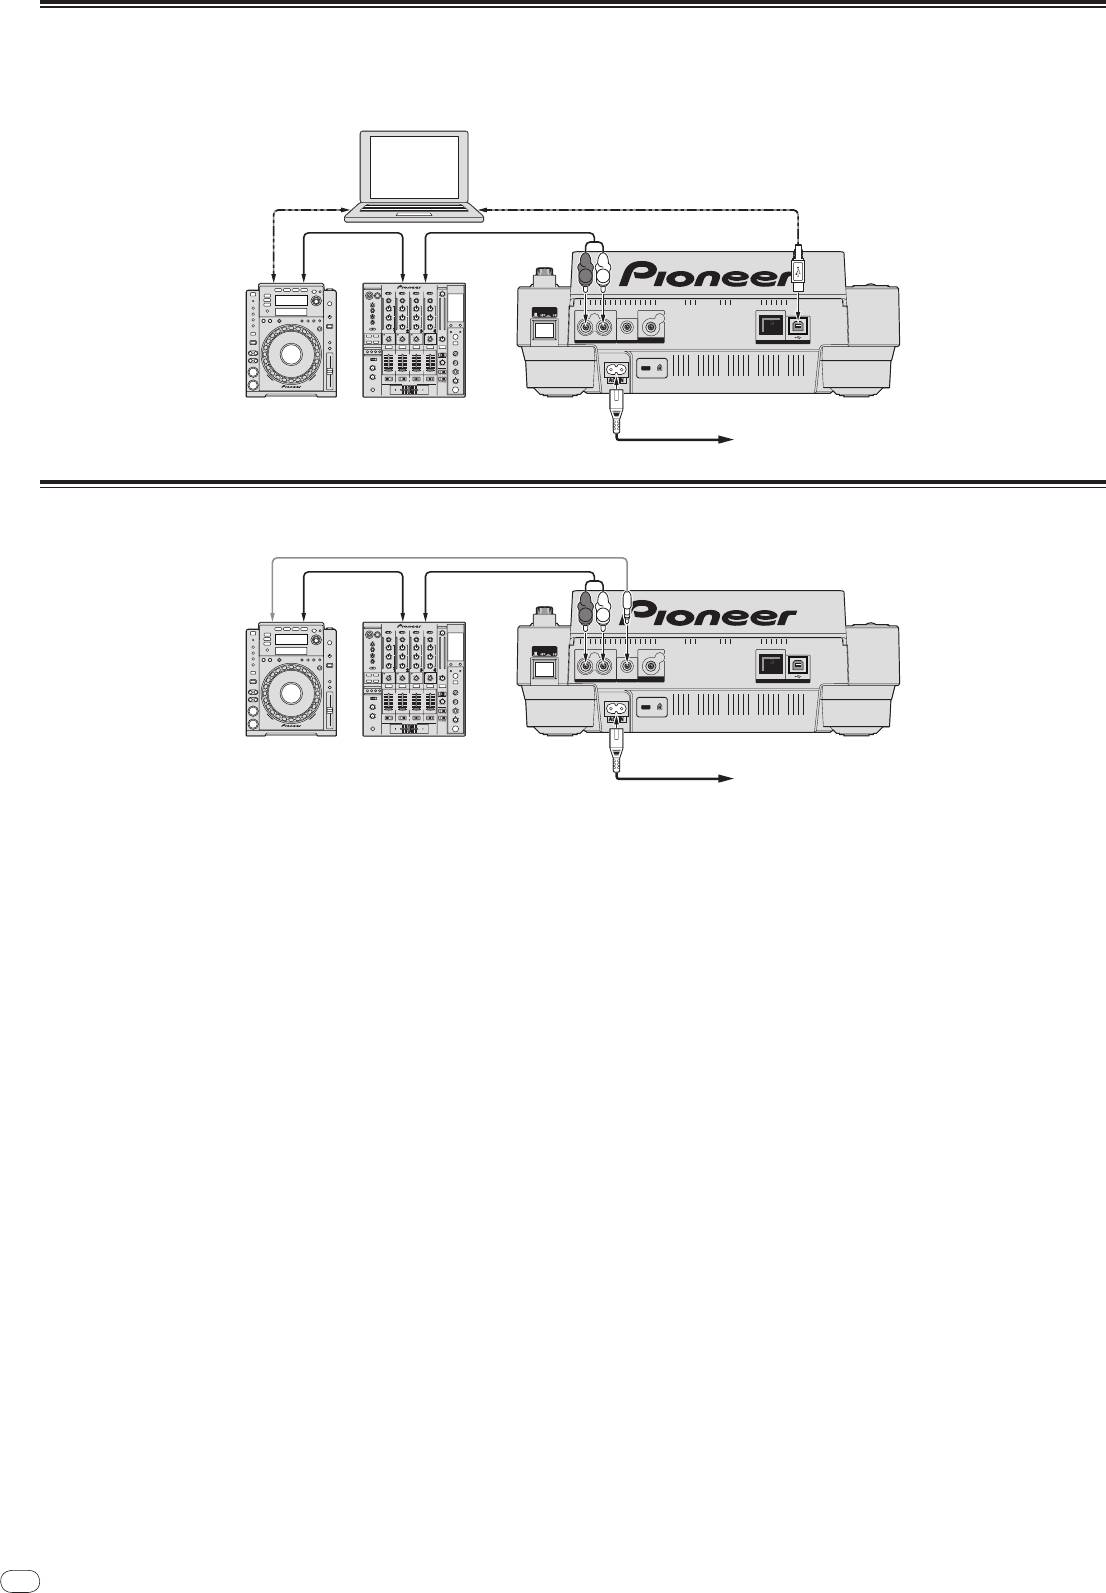
Using other brands of DJ software
With the CDJ-900, the operating information of the buttons, tempo adjustment dial, etc., can also be output in universal MIDI format. When connected by USB cable to a
computer on which MIDI-compatible DJ software is installed, the DJ software can be operated from the CDJ-900. The sound of music files being played on the computer
can also be output from the CDJ-900. For details, see About the driver software on page 24 and Using other brands of DJ software on page 25.
®
®
! Connect a computer on which Mac OS X (10.4.6 or later), Windows Vista
or Windows
XP is installed.
12
Other
Computer
brands of
DJ software
USB Cable
USB Cable
Audio cable
Audio cable
R
L
POWER
R
AUDIO OUT
L
CONTROL
DIGITAL
OUT
DJ player DJ mixer
Rear panel
Power cable
To an AC outlet
Connections for relay play
Relay play between two DJ players is possible by interconnecting the CDJ-900 and a Pioneer DJ player using the CONTROL jacks (page 17).
Control cord
Audio cable Audio cable
R
L
POWER
R
AUDIO OUT
L
CONTROL
DIGITAL
OUT
DJ player DJ mixer
Rear panel
Power cable
To an AC outlet
Sharing disc information
English
Playback
1 Connect the USB device to the DJ player connected by PRO DJ
LINK.
2 Load a disc in the CDJ-900.
Loading discs
When no USB device is connected to this unit, the player number of the DJ player
to which the USB device is connected and a check screen are displayed on this
! Set the disc with the printed side facing up.
unit’s display.
! Insert the disc into the disc insertion slot on the set’s front panel.
! Do not insert two or more discs at once.
3 Press [MEMORY] on this unit.
! Do not force discs into the set’s disc insertion slot when the set’s power is off.
The information of the disc loaded in this unit is registered on the USB device of
Doing so could damage the disc or the set.
the DJ player connected by PRO DJ LINK.
! When the disc is being drawn in or ejected, do not apply any force to the disc in
! When multiple DJ players are connected by PRO DJ LINK and USB devices
the direction opposite its movement. Doing so could damage the disc or the set.
are connected to two or more DJ players, discs are not registered in DJ play-
ers other than this one.
1 Press [POWER].
! If [DELETE] is pressed in step 3, the disc information is not registered on any
Turn on the power of this unit.
DJ player. Disc information is not registered in any DJ player until a USB
2 Insert the disc into the disc insertion slot.
device is connected to this unit (the DJ player in which the disc is loaded). To
Playback starts.
register the disc information, press [DISC], then press [MENU/UTILITY] and
! When auto cue is turned on, playback starts when [PLAY/PAUSEf] is
select the player in which the information is to be registered.
pressed. For details on the auto cue function, see Setting auto cue on page 15.
Browsing libraries and folders
Ejecting discs
The browsing display differs depending on whether or not library information is
recorded on the USB device.
Press [DISC EJECTh].
! With library information d Library browsing: The music files are displayed by
The disc is ejected from the disc insertion slot.
the categories set in rekordbox (album, artist, etc.).
! If [DISC EJECTh] is pressed by mistake, press [PLAY/PAUSEf] immedi-
! Without library information d Folder browsing: The folders/
tracks on the
ately. The set is restored to the status it was in just before [DISC EJECTh] was
medium are displayed with a tree structure.
pressed. (No sound is output during this time.)
The types of items on the category menu can be changed in rekordbox’s prefer-
ences (environmental settings).
Loading USB devices
Insert the USB device into the USB port.
The USB indicator lights.
! When a USB device that has previously been loaded in the CDJ-900 or a
Pioneer DJ player is loaded, the number of discs for which WAVE informa-
tion, etc., is recorded is displayed on the main unit display.
Removing USB devices from the set
! Be sure to follow the procedure below when removing USB devices from the
set. Removing a USB device without following this procedure could erase the
set’s management data and make it impossible to read the USB device.
! When turning the set’s power off, be sure to remove the USB device first.
1 Press [USB STOP] for over 2 second.
The USB indicator turns off.
2 Disconnect the USB device.
Using the PRO DJ LINK function
When two or more CDJ-900s are connected by LAN cable, tracks recorded on
USB devices connected to other players can be loaded onto this unit.
1 Connect this unit and other DJ players using LAN cables.
2 Press [LINK].
Media loaded in another DJ player is displayed on this unit’s display.
3 Select the medium and enter.
The medium’s contents are displayed.
4 Select the track and enter.
The track is loaded into this unit.
! The information below can be shared among DJ players connected by PRO
DJ LINK.
— Tracks (music files)
— TAG LIST (page 18)
— INFO (page 19)
— Disc cue points
— Disc WAVE displays
En
13
DRB1484-A
13
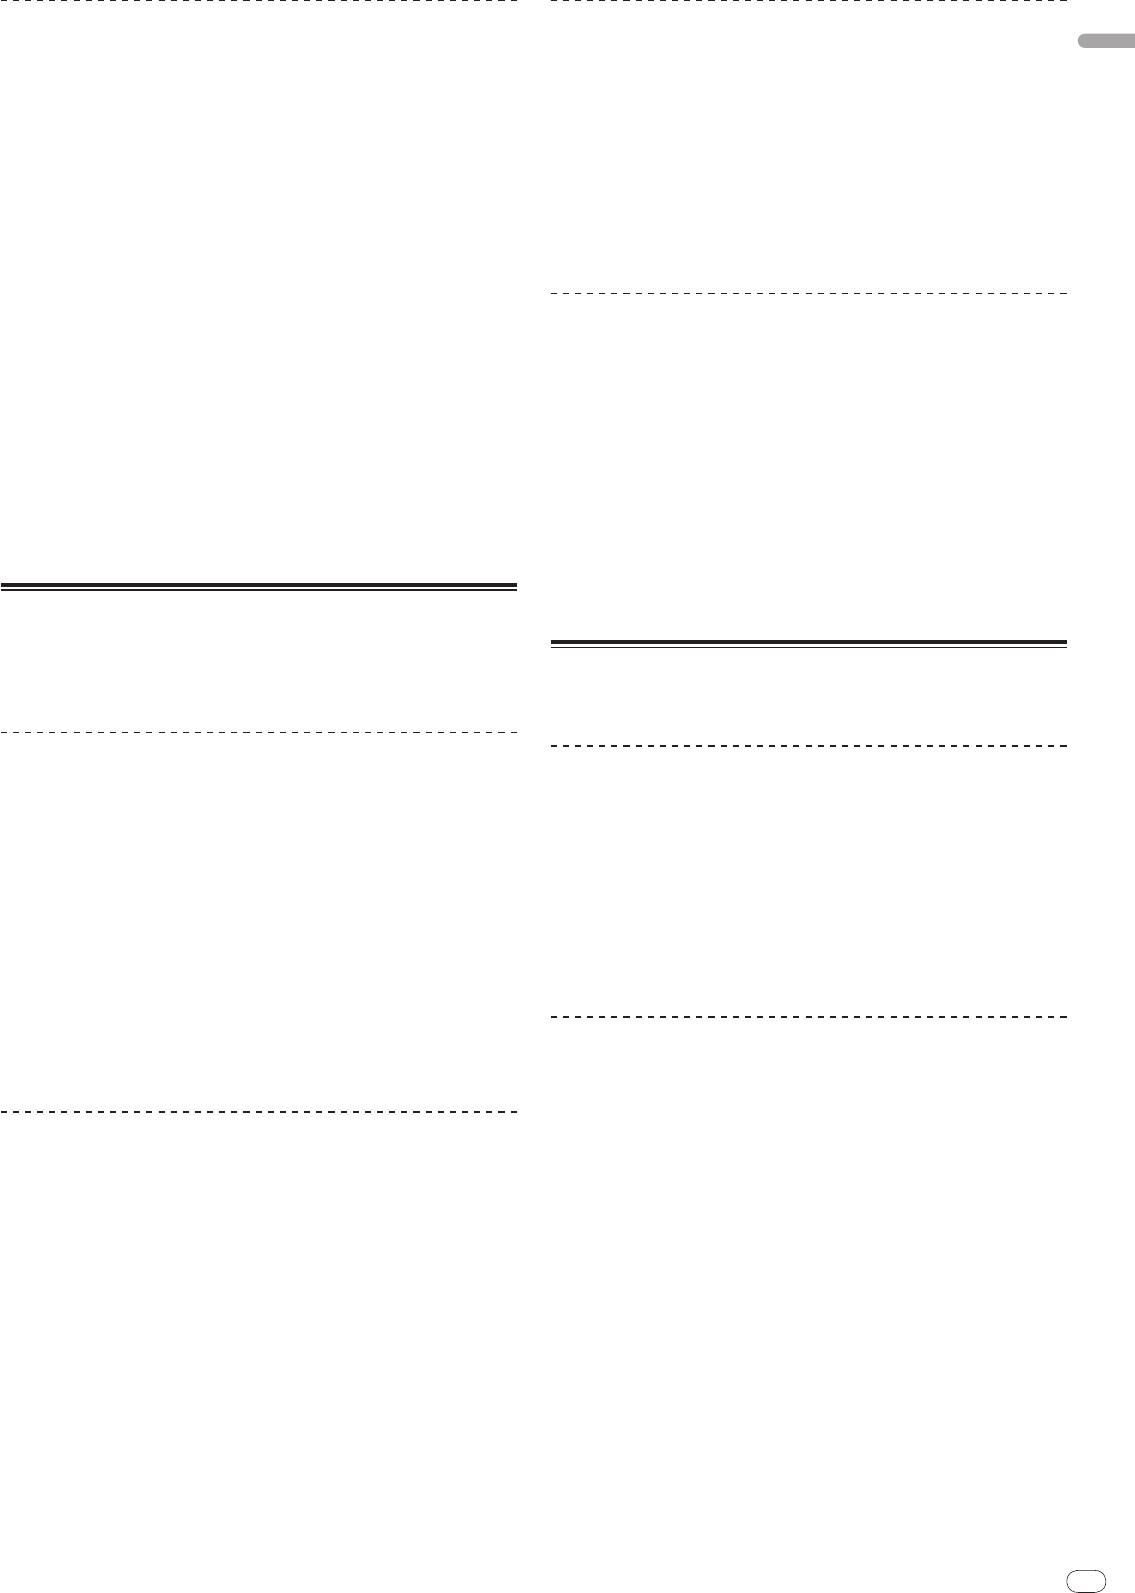
2 3 41
Folder
Folder 01
Title 01
Folder 02
Title 02
Folder 03
Title 03
Folder 04
Title 04
1List of contents
The contents of the selected medium are displayed.
2Uppermost level
Displays the name of the upper folder or media of the displayed item.
3Cursor
Turn the rotary selector to move the cursor up and down.
4Contents of
The contents of the line selected with the cursor are displayed.
selected item
14
En
DRB1484-A
! The tempo can be adjusted in units of 0.02 % when set to ±6 %, in steps of
0.05 % when set to ±10 %, in steps of 0.05 % when set to ±16 %, and in steps
Playback
of 0.5 % when set to WIDE.
! The adjustment range is ±100 % when set to WIDE. When set to –100 %,
1 Load the medium in this unit.
playback stops.
! The adjustment range is set to ±10 % when the power is turned on.
2 Press [DISC], [USB] or [LINK].
The contents of the selected medium are displayed.
3 Turn the rotary selector.
Adjusting the playing speed without changing
Select the track. The category/
folder/
track information is displayed.
the pitch (Master Tempo)
! Once the lowermost level in the folder is reached, press the rotary selector.
Press [BACK] to return to the uppermost level.
! Press [BACK] for over 1 second or press the media button of the medium you
Press [MASTER TEMPO].
are browsing to return to the uppermost level.
The MASTER TEMPO indicator and [MT] on the main unit display light. The pitch
does not change even when the playing speed is changed with the [TEMPO]
4 Press the rotary selector.
control.
The track is loaded and playback begins. is displayed to the left of the cur-
! The sound is digitally processed, so the sound quality decreases.
rently playing track.
! [TRACK SEARCHo/
p] can be used to select tracks within the currently
playing track’s category/
folder.
Playing in reverse
! When a disc containing music files recorded with a hierarchical structure is
loaded, playback starts from the tracks in the uppermost level.
Press [REV].
The REV indicator lights and the track plays in the reverse direction.
! When the music files are recorded in a folder structure, only tracks within the
Pausing
same category/
folder can be played in reverse. Also note that reverse play-
back may not start immediately.
During playback, press [PLAY/PAUSEf].
! The direction in which the playing speed is increased or decreased according
The PLAY/PAUSEf and CUE indicators flash. Press [PLAY/PAUSEf] again
to the direction in which the jog dial is turned is reversed.
to resume playback.
! When such operations as track searching and loop playback are performed
! If no operation is performed for 100 minutes while in the pause mode, the disc
during reverse playback, the audio memory status display on the jog dial
automatically stops spinning. When [PLAY/PAUSEf] is pressed at this
display section flashes and scratch play may not be possible.
time, playback resumes from the first track. When auto cue is turned on, the
set cues to the first track and pauses there.
Resuming playback from the position playing just before
the disc was ejected (Resume)
! After a disc is ejected, if that same disc is immediately reloaded in the CDJ-
900, playback resumes from the position playing just before the disc was
ejected.
! The resume function only works when the same disc is ejected then reloaded
before loading another disc.
! When [TRACK SEARCHo/
p] is pressed before starting playback, the set
searches for the beginning of the track and playback starts.
! The resume function does not work for USB devices.
Forward and reverse scanning
Press [SEARCHm/
n].
When [SEARCHm/
n] pressed and held in, the track is fast-forwarded or fast-
reversed.
! When the music files are recorded in a folder structure, only tracks within the
same category/
folder are fast-forwarded/
fast-reversed.
Finding the beginnings of tracks (Track Search)
Press [TRACK SEARCHo/
p].
Press the [p] to move to the beginning of the next track.
When [o] is pressed, the beginning of the currently playing track is searched.
When pressed twice consecutively, the set returns to the beginning of the previ-
ous track.
! When the music files are recorded in a folder structure, only tracks within the
same category/
folder are searched.
! When auto cue is turned on, the set searches for the beginning of the track
and pauses there (page 15).
Adjusting the playing speed (Tempo control)
Move [TEMPO] up or down.
The tempo increases when moved to the [+] side (down), decreases when
moved to the [–] side (up). The rate at which the playing speed is changed is
indicated on the playing speed display.
Selecting the range for adjusting the playing speed
Press [TEMPO ±6/±10/±16/WIDE].
The range of adjustment of the [TEMPO] control switches each time the button is
pressed. The adjustment range setting is indicated on the playing speed adjust-
ment range display.
14
3 Turn the rotary selector.
Setting Cue
The auto cue level setting changes.
English
1 During playback, press [PLAY/PAUSEf].
Changing procedure - [TIME MODE/
AUTO CUE]
Playback is paused.
1 Press [TIME MODE/
AUTO CUE] for at least 5 seconds.
2 Press [CUE].
The auto cue level setting changing mode is set.
The point at which the track is paused is set as the cue point. The CUE indicator
lights and the PLAY/PAUSEf indicators flashes. No sound is output at this
2 Press [CUE/
LOOP CALLc/
d].
time.
The auto cue level setting changes.
! When a new cue point is set, the previously set cue point is canceled.
! To cancel the changing mode, press [TIME MODE/
AUTO CUE] again.
! For instructions on saving cue points. see Storing cue and loop points on page 16.
Setting Loop
Adjusting the cue point position
1 During playback, press [LOOP IN/
CUE (IN ADJUST)] at the
1 Press [SEARCHm/
n] while pausing at the cue point.
position at which you want to start looping (the loop in point).
The CUE and PLAY/PAUSEf indicators flash.
Loop In Point is set.
2 Press [SEARCHm/
n].
! This operation is not necessary if you have already set a Cue Point as a Loop
The cue point can be fine-adjusted in steps of 0.5 frames.
In Point.
! The same operation is possible using the jog dial.
2 Press [LOOP OUT (OUT ADJUST)] at the position at which you
3 Press [CUE].
want to stop looping (the loop out point).
The point at which the button was pressed is set as the cue point.
The Loop Out Point is set, and Loop playback starts from the Loop In Point.
! When a new cue point is set, the previously set cue point is canceled.
! When playing music files, looping can only be set within the same track.
! When the medium containing the track is removed, the cue point is canceled. For
instructions on saving cue points. see Storing cue and loop points on page 16.
Fine-adjusting the loop in point (loop in adjust)
Returning to Cue Point (Back Cue)
1 During loop playback, press [LOOP IN/
CUE (IN ADJUST)].
[LOOP IN/
CUE (IN ADJUST)] switches to a fast flashing and [LOOP OUT
During playback, press [CUE].
(OUT ADJUST)] turns off.
The set immediately returns to the currently set cue point and pauses.
The loop in point’s time is displayed on the main unit display.
! When [PLAY/PAUSEf] is pressed, playback starts from the cue point.
2 Press [SEARCHm/
n].
The loop in point can be adjusted in units of 0.5 frames.
! The same operation is possible using the jog dial.
Checking Cue Point (Cue Point Sampler)
! The loop in point can be adjusted by ±30 frames and must be in front of the
loop out point.
Press and hold [CUE] after returning to the cue point.
Playback starts from the currently set cue point. Playback continues while [CUE]
3 Press [LOOP IN/
CUE (IN ADJUST)].
is pressed in.
! Normal loop playback resumes.
! When the music files are recorded in a folder structure, the cue point can only
! Normal loop playback also resumes if no operation is performed for over 10
be checked for tracks within the same category/
folder.
seconds.
! When playing music files, the loop in point can only be adjusted within the
same track.
Setting Cue Point during playback (Real Time
Cue)
Fine-adjusting the loop out point (loop out
adjust)
During playback, press [LOOP IN/
CUE (IN ADJUST)] at the position
at which you want to set the cue point.
1 During loop playback, press [LOOP OUT (OUT ADJUST)].
The point at which the button was pressed is set as the cue point.
[LOOP OUT (OUT ADJUST)] switches to a fast flashing and [LOOP IN/
CUE
(IN ADJUST)] turns off.
The loop out point’s time is displayed on the main unit display.
Setting auto cue
2 Press [SEARCHm/
n].
When a track is loaded or the track search operation is performed, the silent sec-
The loop out point can be adjusted in units of 0.5 frames.
tion at the beginning of the track is skipped and the cue point is automatically set
! The same operation is possible using the jog dial.
at the point immediately before the sound starts.
! The loop out point adjustment range is anywhere after the loop in point.
Press [TIME MODE/
AUTO CUE] for over 1 second.
3 Press [LOOP OUT (OUT ADJUST)].
Auto cue is turned on. [A. CUE] lights on the main unit display.
Normal loop playback resumes.
! The auto cue level setting remains in the memory, even when the power is
! Normal loop playback also resumes if no operation is performed for over 10
turned off.
seconds.
! When playing music files, the loop out point can only be adjusted within the
same track.
Changing the auto cue level
The sound pressure level for identifying a section as silent can be selected from
among the following eight steps:
Canceling Loop playback (Loop Exit)
–36 dB, –42 dB, –48 dB, –54 dB, –60 dB, –66 dB, –72 dB and –78 dB
! The auto cue level setting remains in the memory, even when the power is
During loop playback, press [RELOOP/EXIT].
turned off.
Playback continues after the Loop Out Point without returning to the Loop In
! There are two ways to change the auto cue level, as shown below.
Point.
Changing procedure - [MENU/UTILITY]
Returning to Loop playback (Reloop)
1 Press [MENU/UTILITY] for over 1 second.
The [UTILITY] screen is displayed.
After canceling loop playback, press [RELOOP/EXIT] during
playback.
2 Select [AUTO CUE LEVEL] and enter.
Playback returns to the previously set Loop In Point, and Loop playback resumes.
En
15
DRB1484-A
1514
16
En
DRB1484-A
! When multiple points are recorded, the point moves each time the button is
Cutting loops (Loop Cut)
pressed.
4 Press [DELETE].
During loop playback, press [SEARCHm] while pressing
[ DELETE] is displayed on the main unit display and the selected point infor-
[LOOP OUT (OUT ADJUST)].
mation is deleted.
The loop playing time is cut in half each time the button is pressed.
Deleting all cue and loop points for a disc
Extending loops
1 Load a USB device in the CDJ-900.
During loop playback, press [SEARCHn] while pressing
Cue and loop points are displayed as marks on the playing address display.
[LOOP OUT (OUT ADJUST)].
The loop playing time is doubled each time the button is pressed.
2 Press [DELETE] for at least 5 seconds.
! The same operation can be performed as described below.
[DISC CUE/
LOOP DATA-DELETE? PUSH MEMORY] appears on the main unit
— Turn the jog dial while pressing [LOOP OUT (OUT ADJUST)].
display.
3 Press [MEMORY].
All cue and loop points for the disc currently loaded in the CDJ-900 are deleted.
Setting the loop automatically based on
! The deletion mode is canceled when any button other than [MEMORY] is
pressed.
the track’s tempo (Auto Beat Loop)
1 Press [BEAT SELECT].
Deleting all disc information recorded on the
Set the number of beats for loop playback. This operation is not necessary when
selecting 1-beat, 2-beat, 4-beat or 8-beat loop playback.
USB device
! 1/
4-beat, 1/
3-beat, 1/
2-beat and 3/
4-beat: Press [BEAT SELECT] for over 1
second.
1 With no disc loaded in the CDJ-900, press [DELETE] for at least
! 1/
16-beat, 1/
8-beat, 1/
4-beat and 1/
2-beat: Press [BEAT SELECT] once.
5 seconds.
[DISC CUE/
LOOP DATA-DELETE ALL? PUSH MEMORY] appears on the main unit
2 In the play or pause mode, press one of the
display.
[AUTO BEAT LOOP] buttons (1, 2, 4 or 8) at the point at which you
want to set the loop.
2 Press [MEMORY].
The pressed button flashes, the loop out point is set automatically according to
All the disc information recorded on the USB device is deleted.
the track’s tempo (BPM) and the number of beats set in step 1, and loop playback
! The deletion mode is canceled when any button other than [MEMORY] is
begins.
pressed.
! When one of the [AUTO BEAT LOOP] buttons (1, 2, 4 or 8) is pressed again
during auto beat looping, the loop out point is automatically reset according
to the track’s tempo (BPM) and the number of beats of the button that was
Operating the jog dial
pressed, and loop playback begins.
The top of the jog dial has an embedded switch. Do not place objects on the jog
dial or subject it to strong forces. Also note that water or other liquids getting into
Storing cue and loop points
the set will lead to malfunction.
The jog dial has two modes.
! VINYL mode: When the top of the jog dial is pressed during playback, play-
1 Load a USB device in the CDJ-900.
back stops, and when the jog dial is spun at this time sound is produced
according to the direction in which the jog dial is spun.
2 Set Cue Point or Loop Point.
! CDJ mode: When the top of the jog dial is pressed, playback stops, and such
3 Press [MEMORY].
operations as scratch play are not possible.
[ MEMORY] appears on the main unit display. The stored cue point appears
on the playing address display. The point information is registered on the USB
device.
Frame search [VINYL・CDJ]
! To store loop points, press [MEMORY] during loop playback. The stored loop
points appear on the playing address display.
In the pause mode, spin the jog dial.
! The
icon is displayed to the left of tracks for which cue or loop points are
The position at which the track is pausing can be moved in units of 0.5 frames.
saved.
! The position is moved in the direction of playback when the jog dial is spun
clockwise, in the reverse direction when it is spun counterclockwise. The
position moves 135 for one revolution of the jog dial.
Calling out saved cue or loop points
1 Load a USB device in the CDJ-900.
Super fast search [VINYL・CDJ]
2 Load the track whose cue or loop points you want to call out.
Spin the jog dial while pressing in [SEARCHm/
n].
Cue and loop points are displayed as marks on the playing address display.
The track is fast-forwarded/
fast-reversed in the direction in which the jog dial is
spun.
3 Press [CUE/
LOOP CALLc/
d].
! When the [SEARCHm/
n] button is released, this function is canceled.
Playback is moved to the selected point and paused.
! When you stop the jog dial from spinning, normal playback resumes.
! When multiple points are recorded, the point moves each time the button is
! The fast-forward/
fast-reverse speed can be adjusted according to the speed at
pressed.
which the jog dial is spun.
4 Press [PLAY/PAUSEf].
Playback starts from the Cue or Loop point.
Super fast track search
When the jog dial is spun while pressing in [TRACK SEARCHo/
p], the track
advances at high speed in the direction in which the jog dial is spun.
Deleting cue or loop points individually
1 Load a USB device in the CDJ-900.
Pitch bend [VINYL・CDJ]
2 Load the track containing the cue point or loop points you
want to delete.
During playback, spin the outer section of the jog dial.
Cue and loop points are displayed as marks on the playing address display.
The playing speed increases when spun clockwise, decreases when spun coun-
terclockwise. When spinning is stopped, playback returns to the normal speed.
3 Press [CUE/
LOOP CALLc/
d].
! When the jog mode is set to the CDJ mode, the same operation can be per-
Playback is moved to the selected point and paused.
formed by spinning the top of the jog dial.
16
Scratch play [VINYL]
Auto beat slip looping
English
When the jog mode is set to the VINYL mode, tracks can be played according to
the direction and speed at which the jog dial is spun by spinning the top of the
1 Press [SLIP].
jog dial while pressing it.
The mode switches to the slip mode.
1 Press [JOG MODE VINYL].
2 Press one of the [AUTO BEAT LOOP] buttons (1, 2, 4 or 8).
Set the jog mode to VINYL.
The loop is set automatically and loop playback begins.
Normal playback continues in the background during looping. The SLIP indicator
2 During playback, press the top of the jog dial.
flashes in beat with the sound playing in the background. The position playing in
Playback slows then stops.
the background is shown on the jog dial’s SLIP play display.
3 Spin the jog dial in the desired direction and at the desired
3 Press [RELOOP/EXIT].
speed.
Normal playback of the sound that was playing in the background resumes.
The sound is played according to the direction and speed at which the jog dial is
! To cancel the slip mode, press [SLIP] again.
spun by spinning the top of the jog dial while pressing it.
4 Release your hand from the top of the jog dial.
Slip reverse
Normal playback resumes.
1 Press [SLIP].
Adjusting the speed at which playback slows then stops
The mode switches to the slip mode.
when the top of the jog dial is pressed and the speed at
which playback returns to normal when the top of the
2 During playback, press [REV].
The REV indicator lights and the track plays in the reverse direction.
jog dial is released.
Normal playback continues in the background during reverse playback. The SLIP
indicator flashes in beat with the sound playing in the background. The position
Turn [VINYL SPEED ADJUST TOUCH/BRAKE].
playing in the background is shown on the jog dial’s SLIP play display.
The speed increases when turned clockwise, decreases when turned
! Slip reverse play is automatically canceled after 8 beats have elapsed from
counterclockwise.
the position at which [REV] was pressed. Normal playback of the sound that
! When the jog mode set to the VINYL mode, the speed at which playback starts
was playing in the background resumes.
and stops when [PLAY/PAUSEf] is pressed changes simultaneously.
! If [REV] is pressed again before 8 beats have elapsed, slip reverse play is can-
celed and normal playback of the sound that was playing in the background
resumes.
Using the [SLIP] button
! To cancel the slip mode, press [SLIP] again.
When [SLIP] is set to on, normal playback with the original rhythm continues in
the background during scratch play, loop play and reverse play. When scratch
Operating the CDJ-900 in combination
play, loop play or reverse play is canceled, normal playback resumes from the
position playing in the background at that time.
with other devices
Slip scratch play [VINYL]
Starting playback using a DJ mixer’s fader
1 Press [JOG MODE VINYL].
(Fader Start)
Set the jog mode to VINYL.
1 Connect the CDJ-900 with a Pioneer DJ mixer using the
2 Press [SLIP].
included control cord.
The mode switches to the slip mode.
For instructions on connecting, see Basic style on page 11.
3 During playback, press the top of the jog dial.
2 Move the DJ mixer’s channel fader or cross fader.
The scratch play mode is set.
The DJ player’s pause mode is canceled and the track is played instantaneously.
Normal playback continues in the background during scratch play. The SLIP
Also refer to the operating instructions of the connected DJ mixer.
indicator flashes in beat with the sound playing in the background. The position
! When the channel fader or cross fader is set back to its original position, play-
playing in the background is shown on the jog dial’s SLIP play display.
back cues back to the set cue point and the pause mode is set (Back Cue).
! The slip loop and slip reverse operations cannot be performed during slip
scratch play.
4 Release your hand from the top of the jog dial.
Relay play on two DJ players
Normal playback of the sound that was playing in the background resumes.
! To cancel the slip mode, press [SLIP] again.
1 Connect the CDJ-900 and a DJ mixer.
For instructions on connecting, see Connections for relay play on page 12.
Slip looping
2 Set the DJ mixer’s cross fader to the center position.
3 Turn auto cue on for both DJ players.
1 Press [SLIP].
The DJ players’ auto cue indicators light.
The mode switches to the slip mode.
4 Start playback on this unit.
2 Press [LOOP IN/
CUE (IN ADJUST)], then press [LOOP OUT
The first track on this unit is played, and once it finished playback begins auto-
(OUT ADJUST)].
matically on the other DJ player. This unit cues to the beginning of the next track
Loop playback starts.
and pauses. This operation is repeated for relay play between the two DJ players.
Normal playback continues in the background during looping. The SLIP indicator
! The medium can be changed and the cue point set on the DJ player that is in
flashes in beat with the sound playing in the background. The position playing in
standby.
the background is shown on the jog dial’s SLIP play display.
! If the power of one DJ player is turned off during playback, playback may
! Loops of over 8 seconds cannot be set.
start on the other DJ player.
! The fader start function does not work during relay play.
3 Press [RELOOP/EXIT].
! Relay play may not be possible if the two DJ players are not connected to the
Looping is canceled, and normal playback of the sound that was playing in the
same DJ mixer.
background resumes.
! To cancel the slip mode, press [SLIP] again.
En
17
DRB1484-A
1716
18
En
DRB1484-A
Using the [BROWSE] button
Rearranging tracks (Sort menu)
When in the library browse mode, the tracks can be rearranged using the Sort
menu. (The Sort menu is not displayed when in the folder browse mode.)
1 Press [MENU/UTILITY] while the tracks are displayed.
The Sort menu is displayed to the right of the information display screen.
18
【
TRACK
】
SORT
Title 01
【
ARTIST
】
Title 02
【
ALBUM
】
Title 03
【
BPM
】
Title 04
【
RATING
】
2 Select and enter the setting item.
The tracks are sorted according to the selected item. The track information is
displayed.
! Sorting is canceled when [BACK] is pressed to return to the uppermost level.
! The types of sorting items on the Sort menu can be changed in the rekordbox
preferences (environmental settings).
Searching for tracks (SEARCH)
! The search function can be used to search for tracks recorded on the media
loaded in the set with [SEARCH].
! Tracks recorded on discs cannot be searched.
! Tracks recorded on media for which library browsing is not possible cannot
be searched.
1 Select [SEARCH] and enter the setting item.
The character input screen appears.
2 Using the rotary selector to input characters.
Tracks including the character you have input are displayed.
! When more characters are input at this point, tracks starting with the charac-
ter string you have input are displayed.
! When [BACK] is pressed, the category screen reappears.
Using the jump function
The jump function can be used to instantaneously move to the track, category or
folder you want to play.
The jump function includes the two modes below.
! Letter jumping: Use this when the tracks are arranged or sorted in alphabeti-
cal order.
! Page jumping: Use this when the tracks are not arranged or sorted in alpha-
betical order. Turn the rotary selector to jump by page.
In the letter jump mode
1 Press the rotary selector for at least 1 second.
The letter jump mode is set. The first letter of the selected track is displayed at
the top left.
[
T
]
Title 01
Title 02
Title 03
Title 04
2 Select the page to which you want to jump and enter.
The display moves to the selected page.
Checking the playing history (HISTORY)
! The track playing history is recorded and displayed at [HISTORY].
! Playlists can be created based on the playing history at [HISTORY] using
rekordbox. For details, see rekordbox’s operating instructions.
1 Load a USB device in the CDJ-900.
2 Playing tracks.
The currently playing track is recorded and displayed at [HISTORY].
! When a USB device, etc., is connected to the CDJ-900 for the first time or
reconnected, the new [HISTORY] is automatically created on the USB device.
! A warning message is displayed if there is not enough free space on the USB
device, etc., or if the device is write-protected.
! The name of [HISTORY] can be preset at [UTILITY] (page 20).
! When a track already recorded in [HISTORY] is played again after playing a
different track, it is newly recorded in [HISTORY].
! The maximum number of tracks that can be recorded in [HISTORY] is 999.
When a 1 000th track is recorded, the oldest item in the playing history is
deleted.
Deleting [HISTORY]
1 While [HISTORY] is selected, press [MENU/UTILITY].
The delete menu is displayed.
2 Select the range to be deleted and enter.
! [DELETE]: The [HISTORY] item selected with the cursor is deleted.
! [ALL DELETE]: The entire [HISTORY] is deleted.
! The [HISTORY] is deleted when [HISTORY] is converted into a playlist using
rekordbox.
Using the [TAG LIST] button
Up to 60 tracks to be played next or tracks selected for specific DJ scenes can be
preset in the tag list.
2 Select the character or symbol to which you want to jump and
enter.
The display moves to the category starting with the selected character or symbol.
! The characters that can be displayed are letters A – Z, numbers 0 – 9 and
symbols.
In the page jump mode
1 Press the rotary selector for at least 1 second.
The mode switches to the page jump mode.
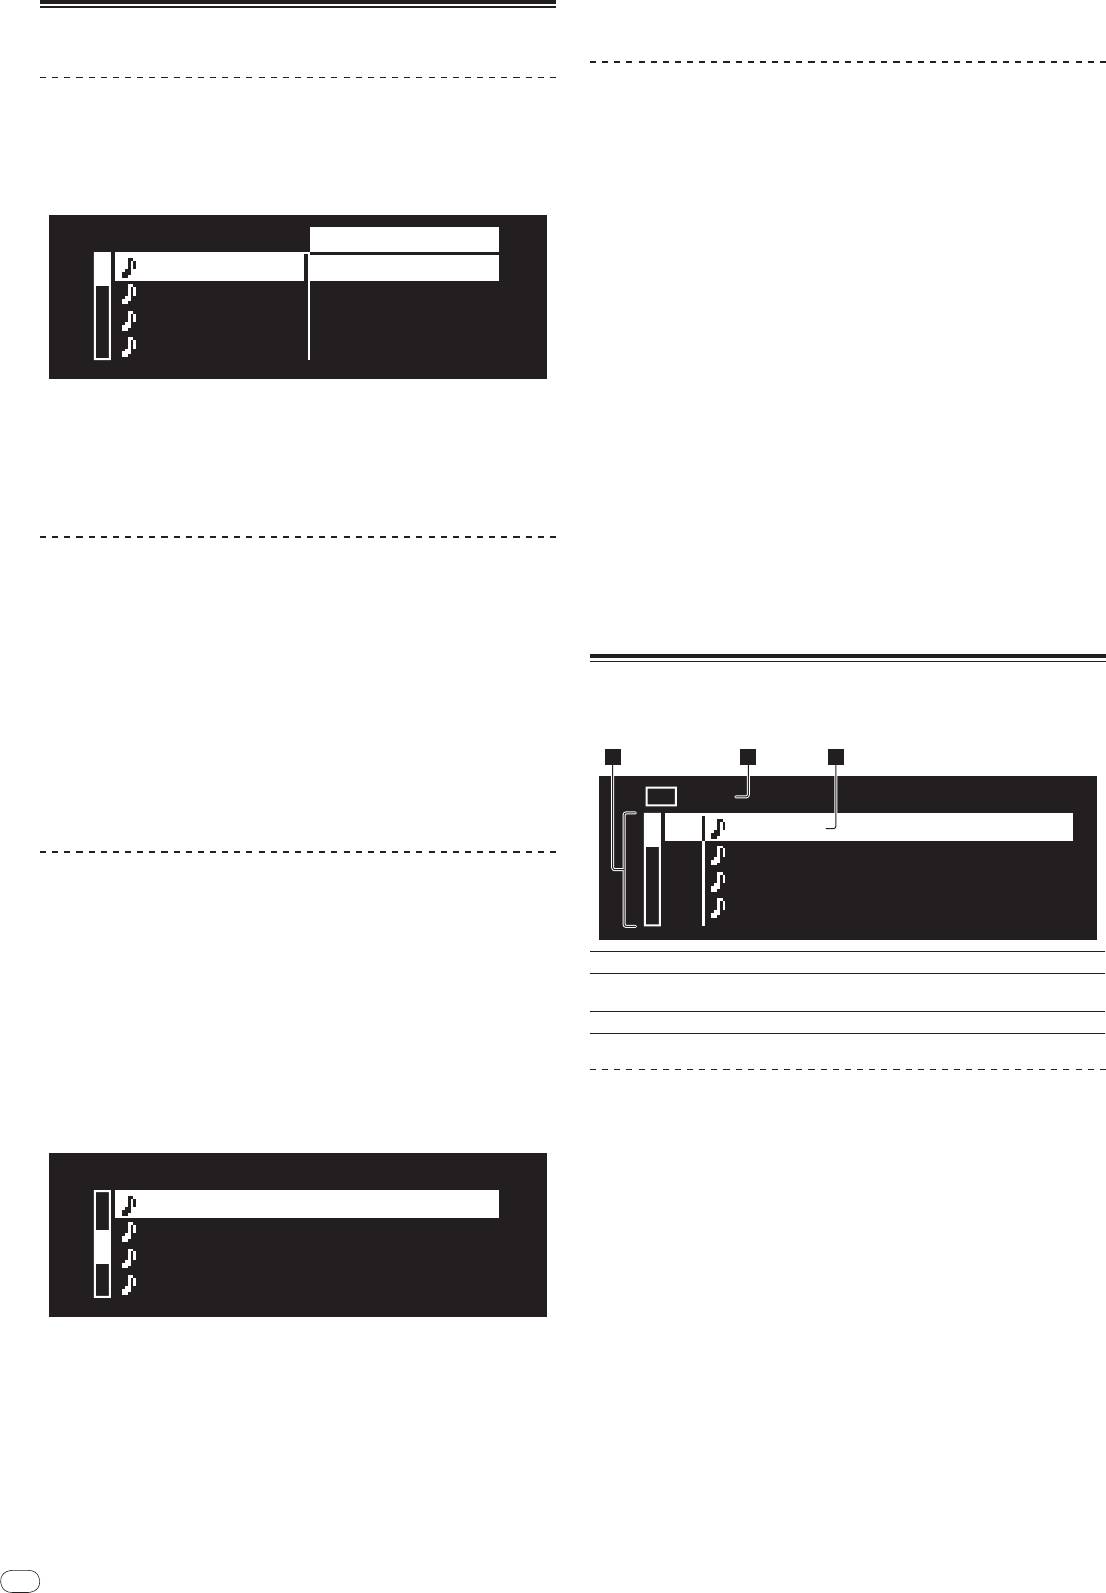
2 31
1
USB
Total Track 13
01
Title 01
02
Title 02
03
Title 03
04
Title 04
1List of contents
The contents of the tag list are displayed here.
The name of the medium on which the track is recorded is displayed
2Medium name
here.
3Cursor
Turn the rotary selector to move the cursor up and down.
Adding tracks to the tag list
Select the track, then press [TAG TRACK/
REMOVE].
1 is displayed to the left of the track.
! The number of tracks that can be added to the tag list is 60 tracks per
medium. If you attempt to add a 61st track, a warning message is displayed
and the track cannot be added. (There is no limit to the number of tracks
when a computer on which rekordbox is installed is connected.)
! Tracks can be recorded in the tag list ahead of time using rekordbox.
! When multiple DJ players are connected by PRO DJ LINK, the same tag list
contents are displayed on all DJ players.
! When [TAG TRACK/
REMOVE] is pressed while the information is displayed
after pressing [INFO], the tracks loaded in this unit are added to the tag list.
Adding categories or folders to the tag list
With the list of the tracks displayed on the right side of the
information display screen, press [TAG TRACK/
REMOVE].
The category name/
folder name flashes, and the tracks in that category/
folder
are added to the tag list.
! When a category/
folder including tracks already added to the tag list is
selected and [TAG TRACK/
REMOVE] is pressed, only the tracks not already
on the tag list are added.
! When a folder is added while in the folder browse mode, the track names are
registered as file names. The artist names are not registered.
Adding playlists to the tag list
With the list of the tracks displayed on the right side of the
English
information display screen, press [TAG TRACK/
REMOVE].
The playlist name flashes, and the tracks in that playlist are added to the tag list.
! When a playlist including tracks that have already been added to the tag list
is selected and [TAG TRACK/
REMOVE] is pressed, only the tracks that were
not previously added to the tag list are added.
Loading tracks from the tag list
1 Press [TAG LIST].
The tag list is displayed.
2 Select the track to be loaded and enter.
The track is loaded and playback starts.
Removing tracks from the tag list
1 Press [TAG LIST].
The tag list is displayed.
2 Select the track to be removed from the tag list, then press
[TAG TRACK/
REMOVE] for at least 1 second.
The track is removed from the tag list.
! If a track that has been added to the tag list is removed from the tag list while
it is playing, the track is played to the end, then the stop mode is set. The next
track is not played.
! When a medium is removed from the CDJ-900, all the tracks recorded on that
medium are removed from the tag list.
Using the [INFO] button
The details of the tracks loaded in the CDJ-900 can be checked by pressing
[INFO]. When DJ players are connected by PRO DJ LINK, the details of the tracks
loaded in the other DJ players can also be checked.
En
19
DRB1484-A
1918
2 31
USB@PLAYER1
Track 002/0
Title01
Artist
Album
1 Display the track details.
2 Select and enter the setting item.
The library browse mode for the selected item is set.
! It may not be possible to select some items.
! When a track is selected, it is moved to the category in which the track was
loaded.
! It is not possible to move items from the disc’s details to tracks loaded in a DJ
player connected by PRO DJ LINK.
! When an item for which only an icon is displayed is selected, that icon is
moved to the corresponding category.
The details of the tracks loaded in the DJ player are displayed
1Track details
here. Other details ([BPM], etc.) can be displayed by turning the
rotary selector.
2Medium/
player
The place where the track information is stored is displayed here.
number
3WAVE display
The WAVE display is shown here.
Checking the details of loaded tracks
While the track is playing, press [INFO].
The track’s details are displayed.
Displaying details of tracks loaded in other DJ
players
1 Connect this unit and the other DJ players by PRO DJ LINK.
2 Press [INFO], then press [MENU/UTILITY].
The [Link Info] screen appears.
3 Select the DJ player and enter.
The details of the tracks loaded in the selected DJ player are displayed.
! If no tracks are loaded in the selected DJ player, no details are displayed.
Using the information jump function
This function can be used to select items displayed in the details and move them
to the category, etc., in which a track is included.
20
En
DRB1484-A
Changing the
settings
Using the [MENU/UTILITY] button
Various settings on the CDJ-900 can be changed by pressing [MENU/UTILITY].
20
1 2
UTILITY
QUANTIZE
ON
SLIP FLASHING
OFF
AUTO CUE LEVEL
–60dB
MIDI CHANNEL
1
Setting the auto standby mode
1 Select [AUTO STANDBY] and enter the setting item.
2 Select [ON] or [OFF] and enter.
When [AUTO STANDBY] is set to [ON], the power management function is acti-
vated in the following cases and the standby mode is set.
! When no operation whatsoever is performed for over 4 hours with no disc
loaded or USB device connected, no PRO DJ LINK connection, and no
computer connected to the USB port (on the CDJ-900’s rear panel)
! When the CDJ-900 is operated, the standby mode is canceled.
! The CDJ-900 is shipped with the power management function turned on.
If you do not want to use the power management function, set [AUTO
STANDBY] to [OFF].
Setting [HISTORY NAME]
The name of the [HISTORY] recorded on the USB device can be preset.
1 Select [HISTORY NAME] and enter the setting item.
2 Using the rotary selector to input characters.
1Setting item
The CDJ-900’s settings items are displayed here.
3 Press the rotary selector to enter.
The [HISTORY NAME] setting is changed.
2Setting
The settings for the various items are displayed here.
! If [HISTORY NAME] is not set, numbers are added sequentially after
[HISTORY].
! The maximum number of characters that can be set for the [HISTORY] name
is 32, including both letters, numbers and symbols.
Changing the settings
1 Press [MENU/UTILITY] for over 1 second.
The [UTILITY] screen is displayed.
2 Select and enter the setting item.
The cursor moves to the setting.
3 Change the setting and enter.
The cursor returns to the setting.
! Press [BACK] before changing the setting to return to step 2.
4 Press [MENU/UTILITY].
Press [MENU/UTILITY] to return to the menu screen.
List of settings
The factory default settings are indicated in bold.
Options
Setting ranges Descriptions
settings
QUANTIZE
ON/
OFF For details, see QUANTIZE on page 10.
Sets whether or not the SLIP indicator
SLIP FLASHING
ON/
OFF
flashes during DJ play using the [SLIP]
button.
-36dB/
-42dB/
-48dB/
-54dB/
For details, see Changing the auto cue
AUTO CUE LEVEL
-60dB/
-66dB/
-72dB/
-78dB
level on page 15.
MIDI CHANNEL
1 – 16
-
Sets the browsing method for media on
LIBRARY CRE-
LIBRARY/
FOLDER
which Pioneer MEP-7000 libraries are
ATOR
recorded.
For details, refer to Setting [HISTORY
HISTORY NAME -
NAME] on the right.
This switches the number of bits of the
DIGITAL OUT
16 bit/
24 bit
audio signals output from the [DIGITAL
OUT] terminal.
Sets this unit’s player number. The
PLAYER No.
AUTO, 1 – 4
player number cannot be changed when
a medium is loaded in this unit.
When PRO DJ LINK connections are
LINK STATUS -
made, the connection status is dis-
played here.
For details, refer to Setting the auto
AUTO STANDBY
ON/
OFF
standby mode on the right.
VERSION No. -
Displays the CDJ-900’s software version.


