Pioneer HTP-071: инструкция
Раздел: Бытовая, кухонная техника, электроника и оборудование
Тип: Домашний кинотеатр
Инструкция к Домашнему кинотеатру Pioneer HTP-071
Оглавление
- BAЖHO Информация для пользователей по сбору и утилизации бывшего в эксплуатации оборудования и отработавших элементов питания Условия эксплуатации
- Установка элементов питания Установка ресивера
- Подключение громкоговорителей Порядок выполнения настроек на ресивере
- Подключение телевизора и компонентов воспроизведения Подключение ресивера к электророзетке
- Основные операции воспроизведения
HTP-071
HOME CINEMA PACKAGE
Quick Start Guide
PACK HOME CINEMA
Guide rapide
HOME CINEMA KIT
Guida di avvio rapido
HOME THEATRE-PAKKET
Snelstartgids
CONJUNTO HOME THEATER
Guía de inicio rápido
HEIMKINO-EINHEIT
Kurzanleitung
Thank you for buying this Pioneer product. This Quick Start Guide includes instructions for basic connections and operations to allow simple use of the
receiver. For detailed descriptions of the receiver, see the “Operating Instructions” provided on the included CD-ROM ( ).
Merci pour l’achat de ce produit Pioneer. Ce guide rapide contient les instructions relatives aux raccordements et opérations de base permettant une
utilisation simple de ce récepteur. Pour des descriptions plus détaillées du récepteur, référez-vous au “Mode d’emploi” sur le CD-ROM ( ) fourni.
Vi ringraziamo per avere acquistato questo prodotto Pioneer. Questa Guida di avvio rapido comprende istruzioni per i collegamenti fondamentali e per le
operazioni essenziali di questo ricevitore. Per una descrizione dettagliata del ricevitore, vedere le “Istruzioni per l’uso” contenute nel CD-ROM ( ) accluso.
Hartelijk dank voor de aanschaf van dit Pioneer product. In deze snelstartgids vindt u de instructies voor de basisaansluitingen en de basisbediening voor een
eenvoudig gebruik van de receiver. Voor meer gedetailleerde informatie wordt u verwezen naar de “Handleiding” die op de bijgeleverde CD-ROM ( ) staat.
Muchas gracias por haber adquirido este producto de Pioneer. Esta Guía de inicio rápido incluye instrucciones para hacer las conexiones y operaciones
básicas que le permitirán hacer un uso sencillo del receptor. Para conocer una descripción detallada del receptor, consulte el “Manual de instrucciones”
suministrado con el CD-ROM ( ) incluido.
Vielen Dank, dass Sie sich für dieses Pioneer-Produkt entschieden haben. Die Kurzanleitung enthält Anweisungen für grundlegende Verbindungen und
Bedienvorgänge, um eine einfache Bedienung des Receivers zu ermöglichen. Detaillierte Beschreibungen des Receivers finden Sie in der „Bedienungsanlei-
tung“ auf der mitgelieferten CD-ROM ( ).
Благодарим вас за приобретение данного изделия Pioneer. В данном Кратком руководстве пользователя содержатся инструкции по основным
подключениям и операциям для упрощенного использования ресивера. Подробное описание ресивера см. в «Инструкции по эксплуатации»,
содержащихся на поставляемом CD-ROM ( ).
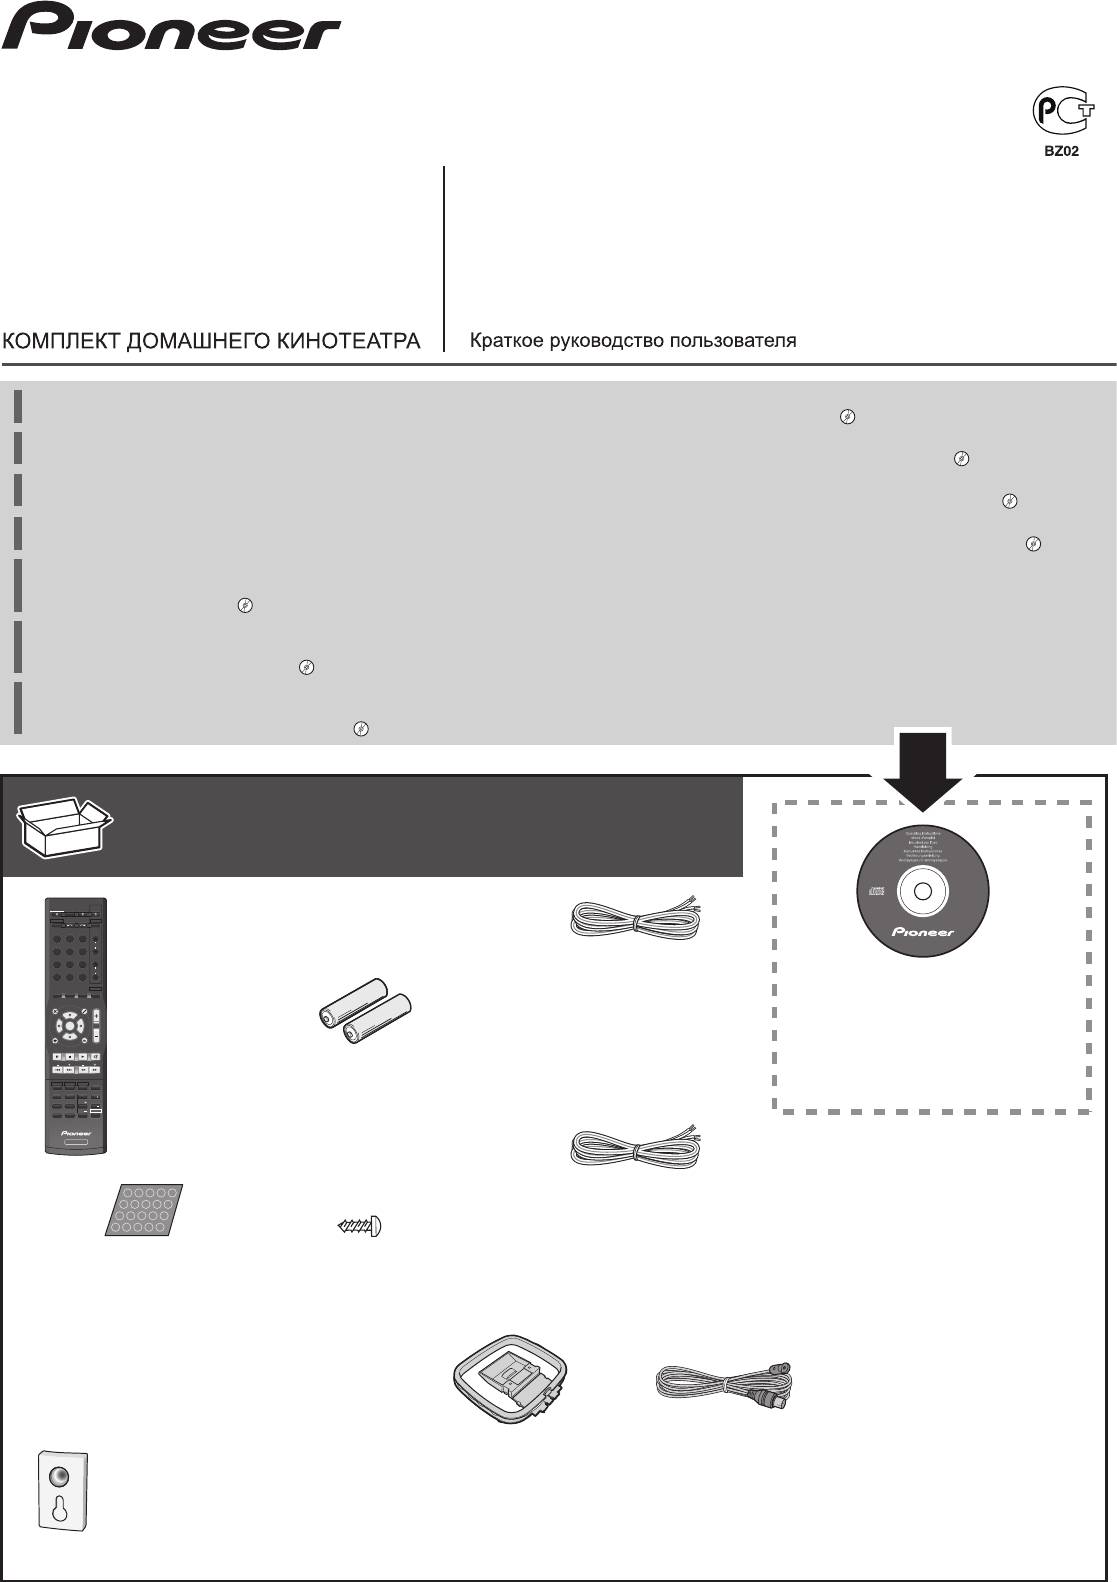
What’s in the box
Contenido de la caja
Contenu du carton d’emballage
Lieferumfang
Contenuto della confezione
Комплект поставки
Inhoud van de doos
HTP-071
RECEIVER
SOURCESLEEP
CONTROL
TV
Remote Control
RECEIVER DTV/TV
INPUT SELECT
INPUT
6517-00000-044-0S
Télécommande
BD DVD TV
CH
A
M
DVR/BDR
CD
CD-R
D
N
Telecomando
E
I
N
C
N
H
I
O
A
I
F
A
B
R
T
A
R
O
Q
I
É
U
E
N
C
H
I
N
E
ᴾ
ᴾ
©
2
0
1
1
P
I
O
E
N
R
E
C
O
R
P
ADAPTER
TUNER
PORTABLE
VOL
Afstandsbediening
Speaker cords (4 m) x 4
PHASE
SIGNAL SELS.RETRIEVER
Mando a distancia
Cordons d’enceinte (4 m) x 4
CD-ROM (Operating instructions)
AUTO/
DIRECT
STEREO
STANDARD
ALC/
BD MENU
ADV SURR
PARAMETER
AUDIO
TUNER EDIT
CD-ROM (Mode d’emploi)
TOP
T
U
N
E
TOOLS
MENU
MASTER
VOLUME
Fernbedienung
Cavi dei diffusori (4 m) x 4
MENU
T
E
P
R
CD-ROM (Istruzioni per l’uso)
P
S
E
R
ENTER
E
S
E
T
Пульт дистанционного
Luidsprekersnoeren (4 m) x 4
HOME
MENU
T
U
N
E
управления
Cables de altavoz (4 m) x 4
CD-ROM (Handleiding)
PTY SEARCH
SETUP
RETURN
BAND
MUTE
Lautsprecherkabel (4 m) x 4
CD-ROM (Manual de instrucciones)
BASS
TRE
AAA size IEC R03 dry cell batteries x2
CD-ROM (Bedienungsanleitung)
HDD
12
DVD
VCR
Колоночные кабели (4 м) x 4
TEST TONE
456
SB CH
CH SELECT
3
DISP
Piles à anode sèche AAA IEC R03 x 2
CH
CD-ROM (Инструкции по эксплуатации)
MIDNIGHT
789
SPEAKERS
LEV
DIMMER
CLR
LEV
SHIFT
CH
Pile a secco AAA IEC R03 x2
+
10
0
ENTER
AAA/IEC/R03 drogecelbatterijen x2
RECEIVER
Pilas secas AAA, IEC R03 x 2
These quick start guide
IEC R03 Trockenbatterien der Größe AAA x2
Le présent Guide de démarrage
Сухие батарейки размера AAA IEC R03, 2 шт.
Guida per l’avvio rapido
Speaker cords (10 m) x 2
Deze Quick Start-gids
Cordons d’enceinte (10 m) x 2
Esta guía de inicio rápido
Cavi dei diffusori (10 m) x 2
Diese Kurzanleitung
Luidsprekersnoeren (10 m) x 2
Non-Skid Pads x 20
Screw (M5) x 4
Это краткое руководство пользователя
Cables de altavoz (10 m) x 2
Coussinets antidérapants x 20
Vis (M5) x 4
Lautsprecherkabel (10 m) x 2
Power cord
Cuscinetti antiscivolamento x 20
Viti (M5) x 4
Колоночные кабели (10 м) x 2
Cordon d’alimentation
Antislipkussentjes x 20
Schroef (M5) x 4
Cavo di alimentazione
Pastillas antideslizantes x 20
Tornillo (M5) x 4
Netsnoer
Rutschfester Untersetzer x 20
Schraube (M5) x 4
Cable de alimentación
Предохранительные нескользкие
Винт (M5) x 4
Netzkabel
подкладки x 20
Кабель питания
Brackets for wall mounting x 4
AM loop antenna
FM wire antenna
Warranty card
Appliques pour montage mural x 4
Antenne cadre AM
Antenne filaire FM
Carte de garantie
Staffe per l’installazione su pareti x 4
Antenna AM a telaio
Antenna FM a filo
Documento di garanzia
Beugels voor wandbevestiging x 4
AM-raamantenne
FM-draadantenne
Garantiebewijs
Ménsula para montaje en la pared x 4
Antena de cuadro de AM
Antena de hilos de FM
Tarjeta de garantía
Halterung für Wandmontage x 4
MW-Rahmenantenne
UKW-Drahtantenne
Garantiekarte
Скобы для крепления на стене x 4
Рамочная антенна АМ
Проволочная антенна FM
Гарантийный сертификат
English
For detailed descriptions of the receiver, see the “Operating Instructions” provided on the included CD-ROM. The operating instructions can also be downloaded from the Pioneer website
(http:// www.pioneer.eu). See below for instructions on handling the CD-ROM.
0
Operating Environment
— This CD-ROM can be used with Microsoft® Windows® 95/98/Me/NT/2000/XP/Vista/7 and Apple Mac OS X 10.4. Adobe Reader (Version 4.0 or later) is required to
read this CD-ROM.
0
Precautions For Use
— This CD-ROM is for use with a personal computer. It cannot be used with a DVD player or music CD player. Attempting to play this CD-ROM with
a DVD player or music CD player can damage speakers or cause impaired hearing due to the large volume.
0
License
— Please agree to the “Terms of Use” indicated below before using this
CD-ROM. Do not use if you are unwilling to consent to the terms of its use.
0
Terms of Use
— Copyright to data provided on this CD-ROM belongs to PIONEER CORPORATION. Unauthorized
transfer, duplication, broadcast, public transmission, translation, sales, lending or other such matters that go beyond the scope of “personal use” or “citation” as defined by Copyright Law may
be subject to punitive actions. Permission to use this CD-ROM is granted under license by PIONEER CORPORATION.
0
General Disclaimer
— PIONEER CORPORATION does not guarantee
the operation of this CD-ROM with respect to personal computers using any of the applicable OS. In addition, PIONEER CORPORATION is not liable for any damages incurred as a result of use
of this CD-ROM and is not responsible for any compensation. The names of private corporations, products and other entities described herein are the registered trademarks or trademarks of
their respective firms.
* When Using a Mac OS:
Place this CD-ROM in a CD drive and then double-click on the CD-ROM icon to start up the application.
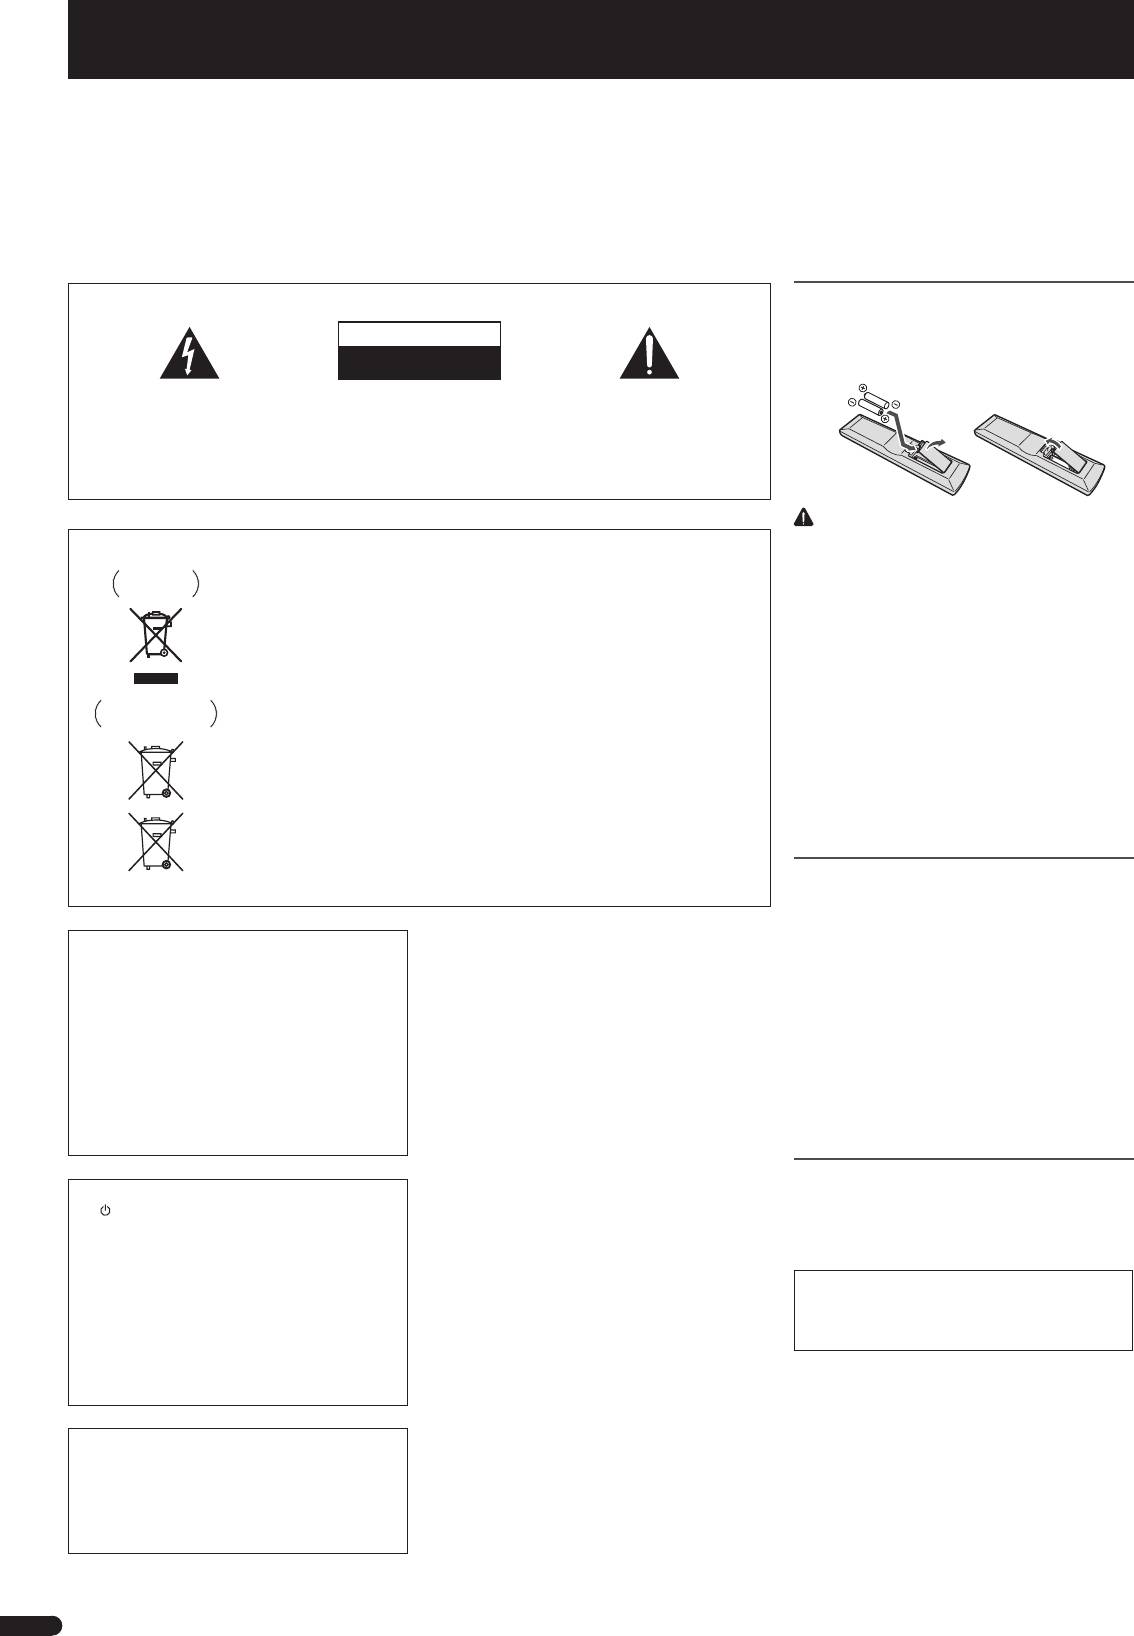
Loading the batteries
IMPORTANT
The batteries included with the unit are to check initial
CAUTION
operations; they may not last over a long period. We
RISK OF ELECTRIC SHOCK
recommend using alkaline batteries that have a longer
DO NOT OPEN
life.
The lightning flash with arrowhead symbol,
CAUTION:
The exclamation point within an equilateral
within an equilateral triangle, is intended to
TO PREVENT THE RISK OF ELECTRIC
triangle is intended to alert the user to the
alert the user to the presence of uninsulated
SHOCK, DO NOT REMOVE COVER (OR
presence of important operating and
“dangerous voltage” within the product’s
BACK). NO USER-SERVICEABLE PARTS
maintenance (servicing) instructions in the
enclosure that may be of sufficient
INSIDE. REFER SERVICING TO QUALIFIED
literature accompanying the appliance.
magnitude to constitute a risk of electric
SERVICE PERSONNEL.
shock to persons.
D3-4-2-1-1_A1_En
CAUTION
Information for users on collection and disposal of old equipment and used batteries
• Incorrect use of batteries may result in such hazards
as leakage and bursting. Observe the following
Symbol for
These symbols on the products, packaging, and/or accompanying documents mean
precautions:
equipment
that used electrical and electronic products and batteries should not be mixed with
– Never use new and old batteries together.
general household waste.
– Insert the plus and minus sides of the batteries
For proper treatment, recovery and recycling of old products and used batteries,
properly according to the marks in the battery
please take them to applicable collection points in accordance with your national
case.
legislation.
– Batteries with the same shape may have different
voltages. Do not use different batteries together.
By disposing of these products and batteries correctly, you will help to save valuable
– When disposing of used batteries, please comply
Symbol examples
resources and prevent any potential negative effects on human health and the
for batteries
environment which could otherwise arise from inappropriate waste handling.
with governmental regulations or environmental
public instruction’s rules that apply in your country
For more information about collection and recycling of old products and batteries,
or area.
please contact your local municipality, your waste disposal service or the point of sale
– Do not use or store batteries in direct sunlight or
where you purchased the items.
other excessively hot place, such as inside a car
These symbols are only valid in the European Union.
or near a heater. This can cause batteries to leak,
overheat, explode or catch fire. It can also reduce
For countries outside the European Union:
the life or performance of batteries.
If you wish to discard these items, please contact your local authorities or dealer and
ask for the correct method of disposal.
Installing the receiver
Pb
K058a_A1_En
• When installing this unit, make sure to put it on a
level and stable surface.
Don
’
t install it on the following places:
If the AC plug of this unit does not match the AC
– on a color TV (the screen may distort)
outlet you want to use, the plug must be removed
– near a cassette deck (or close to a device that
and appropriate one fitted. Replacement and
gives off a magnetic field). This may interfere with
mounting of an AC plug on the power supply cord of
the sound.
this unit should be performed only by qualified
– in direct sunlight
service personnel. If connected to an AC outlet, the
– in damp or wet areas
cut-off plug can cause severe electrical shock. Make
– in extremely hot or cold areas
sure it is properly disposed of after removal.
– in places where there is vibration or other
The equipment should be disconnected by removing
movement
the mains plug from the wall socket when left unused
– in places that are very dusty
for a long period of time (for example, when on
– in places that have hot fumes or oils (such as a
vacation).
kitchen)
D3-4-2-2-1a_A1_En
WARNING:
CAUTION
Do not climb or sit on this unit. Be especially careful
The STANDBY/ON switch on this unit will not
when children are around. The unit may be damaged,
completely shut off all power from the AC outlet.
or may fall over causing injury.
Since the power cord serves as the main disconnect
device for the unit, you will need to unplug it from the
AC outlet to shut down all power. Therefore, make
sure the unit has been installed so that the power
cord can be easily unplugged from the AC outlet in
case of an accident. To avoid fire hazard, the power
cord should also be unplugged from the AC outlet
when left unused for a long period of time (for
example, when on vacation).
D3-4-2-2-2a*_A1_En
2
En
WARNING
This equipment is not waterproof. To prevent a fire or
shock hazard, do not place any container filled with
liquid near this equipment (such as a vase or flower
pot) or expose it to dripping, splashing, rain or
moisture.
D3-4-2-1-3_A1_En
WARNING
Before plugging in for the first time, read the following
section carefully.
The voltage of the available power supply differs
according to country or region. Be sure that the
power supply voltage of the area where this unit
will be used meets the required voltage (e.g., 230 V
or 120 V) written on the rear panel.
D3-4-2-1-4*_A1_En
WARNING
To prevent a fire hazard, do not place any naked flame
sources (such as a lighted candle) on the equipment.
D3-4-2-1-7a_A1_En
Operating Environment
Pioneer is not responsible for any accidents or
damage that result from improper installation,
misuse or modication of the product, or natural
disasters.
Operating environment temperature and humidity:
+5 °C to +35 °C (+41 °F to +95 °F); less than 85 %RH
(cooling vents not blocked)
Do not install this unit in a poorly ventilated area, or in
locations exposed to high humidity or direct sunlight (or
This product is for general household purposes. Any
strong artificial light)
failure due to use for other than household purposes
D3-4-2-1-7c*_A1_En
(such as long-term use for business purposes in a
restaurant or use in a car or ship) and which requires
repair will be charged for even during the warranty
period.
K041_A1_En
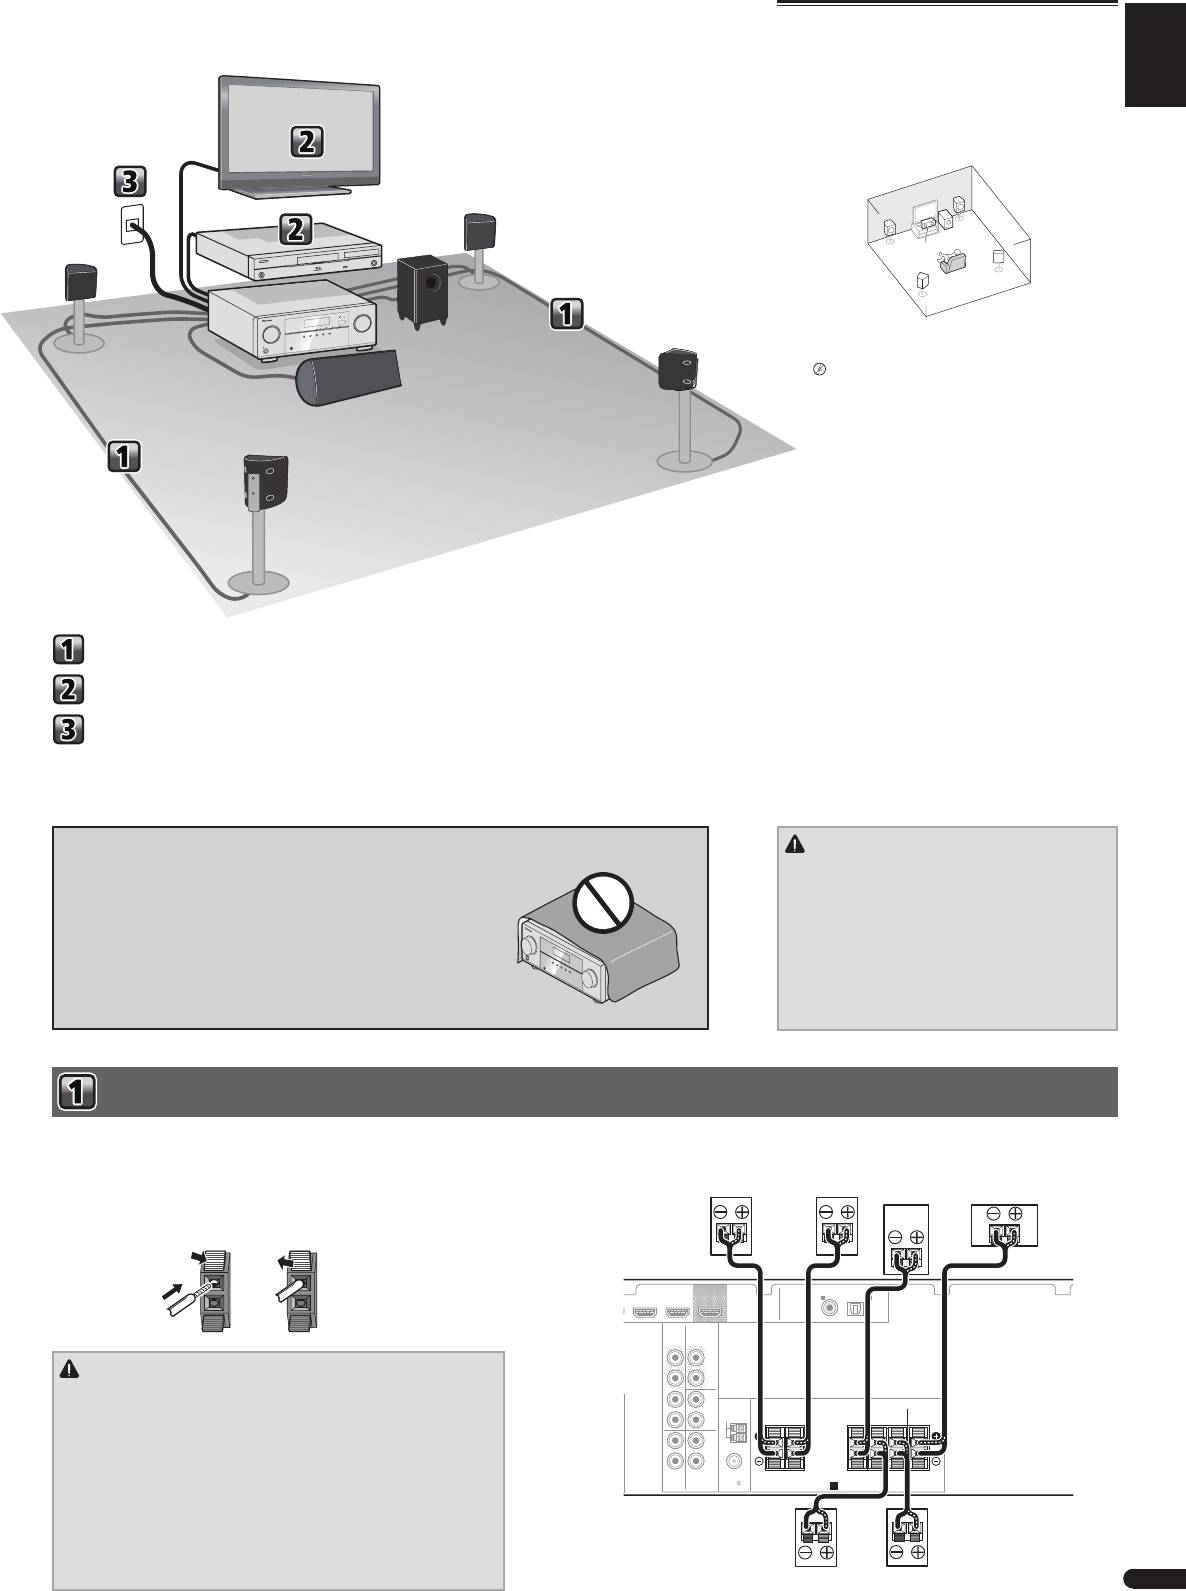
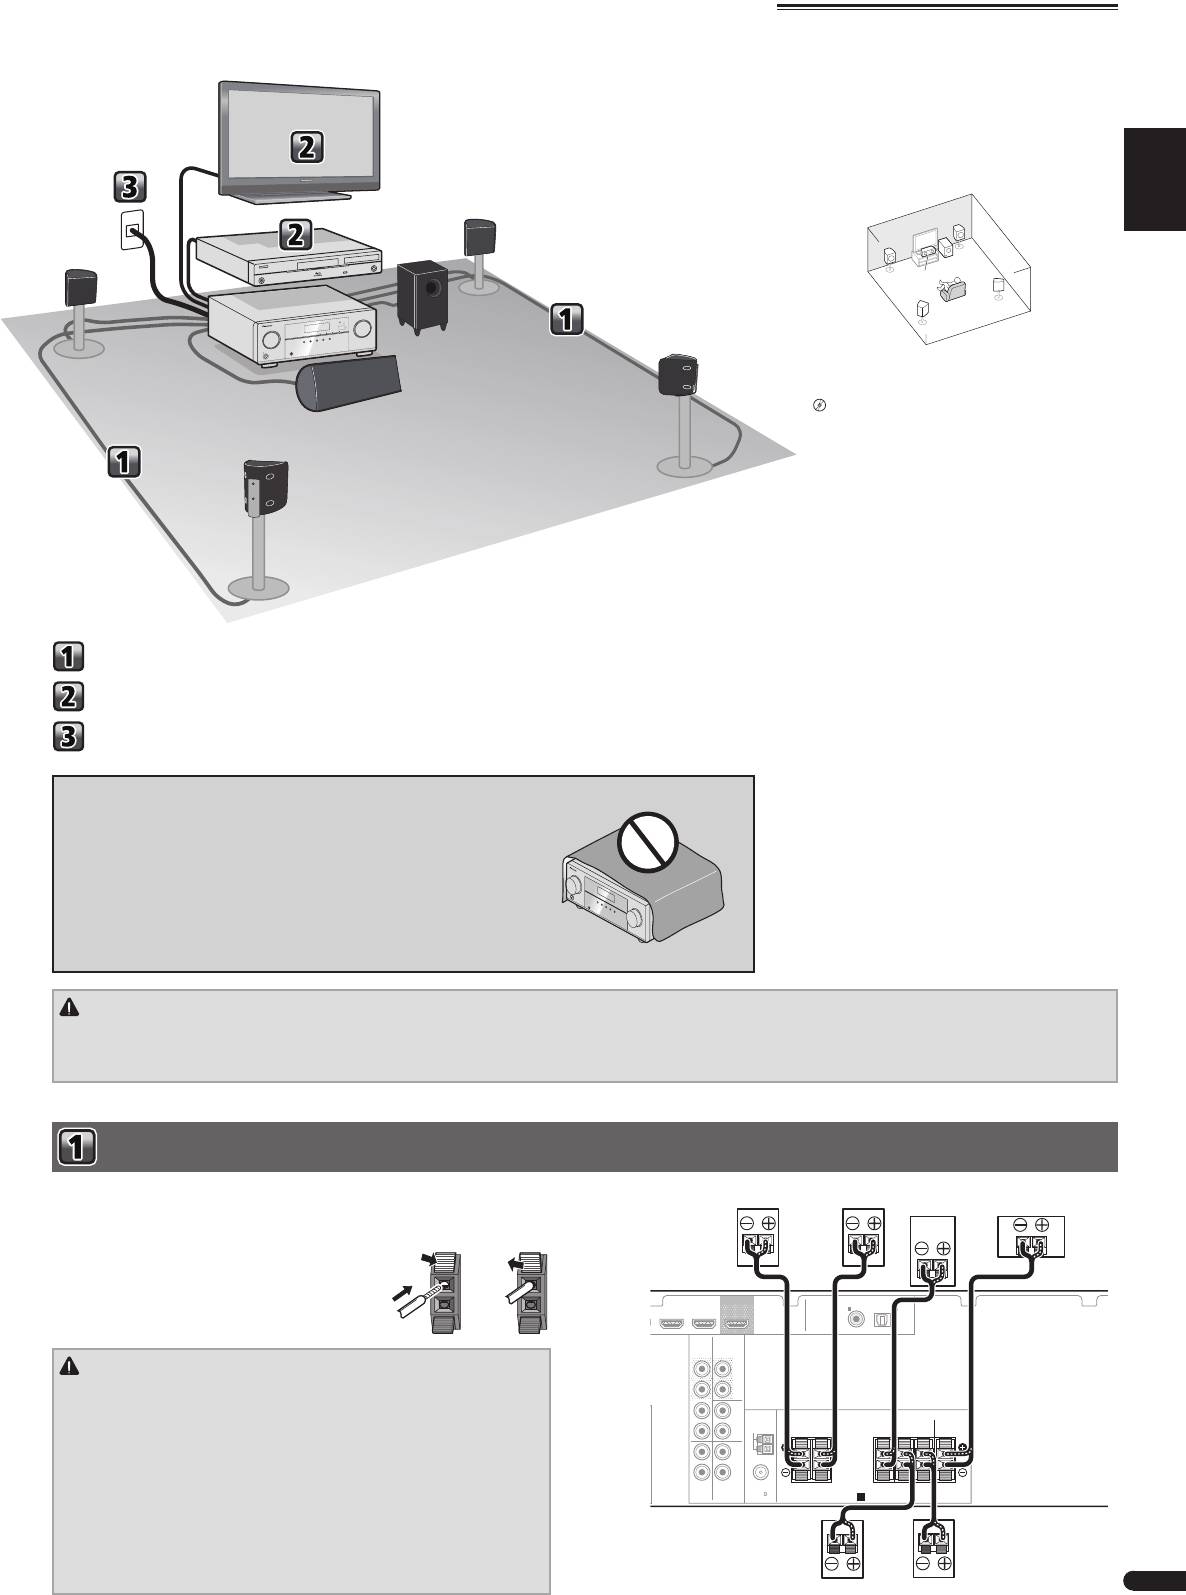
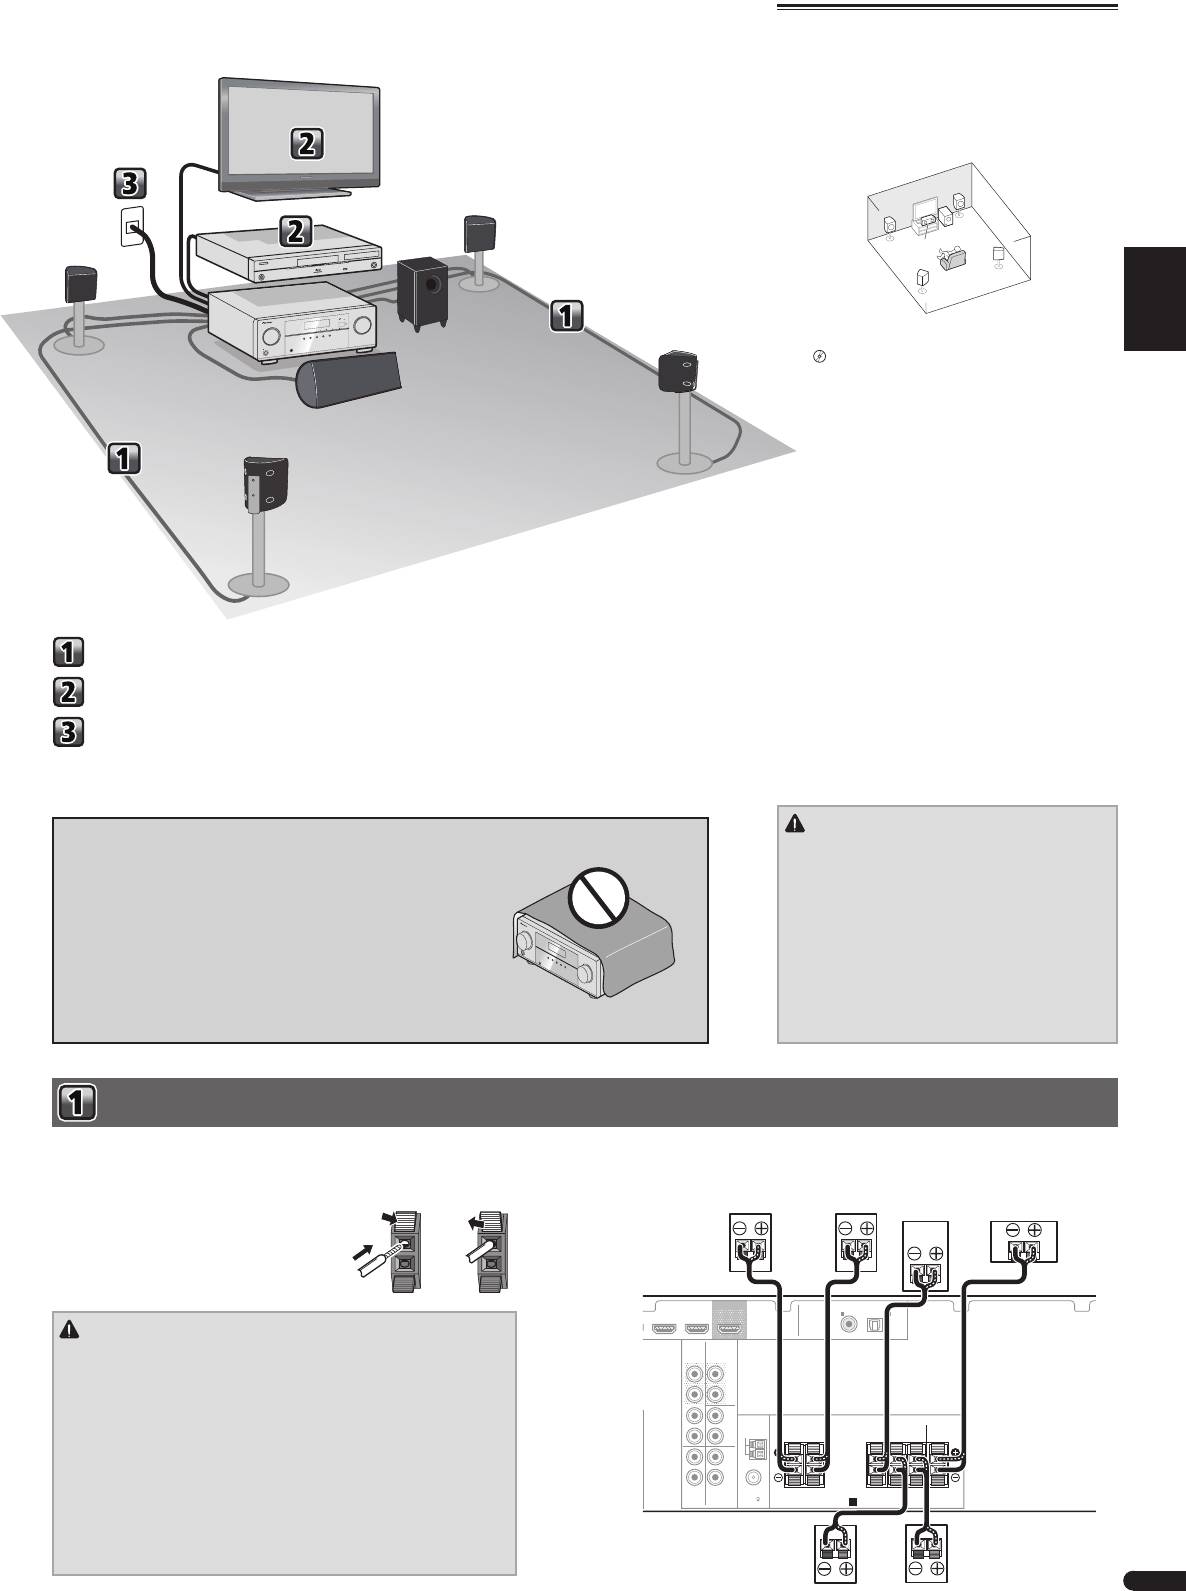
Placing the speakers
English
The receiver will work with just two stereo speakers (the
front speakers in the diagram) but using at least three
speakers is recommended, and a complete setup is
best for surround sound.
To achieve the best possible surround sound, install
your speakers as shown below.
Français
5.1 channel surorund system:
R
L
SW
C
Italiano
SR
SL
• In addition, surround back speakers can also be
connected.
l
“Connect the surround back speakers”
Nederlands
• The subwoofer and surround speakers are not
magnetically shielded and so should not be placed
near a TV or monitor, as the interaction of magnetic
materials can cause distortion of the colors on your
TV screen. Devices easily affected by magnetism
(magnetic media cards, wrist-watches, video tapes,
etc.) should not be placed near the subwoofer and
Español
surround speakers.
• The front speakers and center speaker furnished
in this system are designed for use close to a CRT-
based TV or color monitor. However, if color distortion
is caused due to the installation, try turning off the
power to the CRT-based TV or color monitor for 15
to 30 minutes, then turning on the power again. The
Deutsch
self-degaussing function built into the CRT-based TV
Connecting the speakers
or color monitor should help ameliorate the effect
of the speakers on the image. If color distortion
continues to be a problem, separate the speakers
Connecting a TV and playback component
farther away from the screen. If magnets or devices
emitting magnetic fields are installed nearby, the
Plugging the receiver
interactive effect with the speaker system may cause
color distortion in a CRT-based TV or color monitor.
• Do not attach center speaker and subwoofer to the
wall or ceiling, as they may cause injury in the event
of a fall.
Connecting the speakers
Make sure you connect the speaker on the right to the right (R) terminal and the speaker on the left to the left (L) terminal. Also make sure the positive and negative (+/–)
terminals on the receiver match those on the speakers.
Bare wire connections
1
Push open the tabs and insert exposed wire.
2
Release the tabs.
CAUTION
• These speaker terminals carry HAZARDOUS LIVE voltage. To prevent
the risk of electric shock when connecting or disconnecting the
speaker cables, disconnect the power cord before touching any
uninsulated parts.
• Make sure that all the bare speaker wire is twisted together and
inserted fully into the speaker terminal. If any of the bare speaker
wire touches the back panel it may cause the power to cut off as a
safety measure.
• Do not connect the supplied subwoofer to any amplifier other than
the one supplied with this system. Connection to any other amplifier
may result in malfunction or fire.
3
En
12
Flow of settings on the receiver
VENTILATION CAUTION
When installing this unit, make sure to leave space around the unit for
ventilation to improve heat radiation (at least 20 cm at top, 10 cm at rear,
and 10 cm at each side).
WARNING
Slots and openings in the cabinet are provided for ventilation to ensure
reliable operation of the product, and to protect it from overheating. To
prevent fire hazard, the openings should never be blocked or covered
with items (such as newspapers, table-cloths, curtains) or by operating
the equipment on thick carpet or a bed.
D3-4-2-1-7b*_A1_En
BD IN CD/SAT
OUT
ASSIGNABLE
COAXIAL
OPTICAL
IN
1
IN
1
(
CD-R / TAPE
)
(
TV
)
AUDIO
CD-R/TAPE
SURR BACK
OUT
PRE OUT
(
L
Single
)
R
L
IN CD/SAT
IN
ANTENNA
R
AM LOOP
FRONT CENTER
SURROUND SUBWOOFER
RLRL
L
IN
IN
R
TV
DVD
FM
UNBAL
75
SPEAKERS
A
AC I
N
The unit is a full-fledged AV receiver equipped with an
abundance of functions and terminals. It can be used
easily after following the procedure below to make the
connections and settings.
TV
L
Front left
(S-11-P)
Blu-ray Disc
R
player
Front right
(S-11-P)
SW
Subwoofer
(S-22W-P)
This receiver
(VSX-321-K-P)
C
Center
SR
(S-11-P)
Surround right
(S-11-P)
SL
Surround left
(S-11-P)
CAUTION
• Install the center speaker below the TV so that the
sound of the center channel is localized at the TV
screen.
• When installing the center speaker on top of
the TV, be sure to secure it with tape or some
other suitable means. Otherwise, the speaker
may fall from the TV due to external shocks such
as earthquakes, endangering those nearby or
damaging the speaker.
Front Right
Front Left
Center
Subwoofer
Surround
Surround
Be sure to complete
Right
Left
all connections before
connecting this unit to
the AC power source.

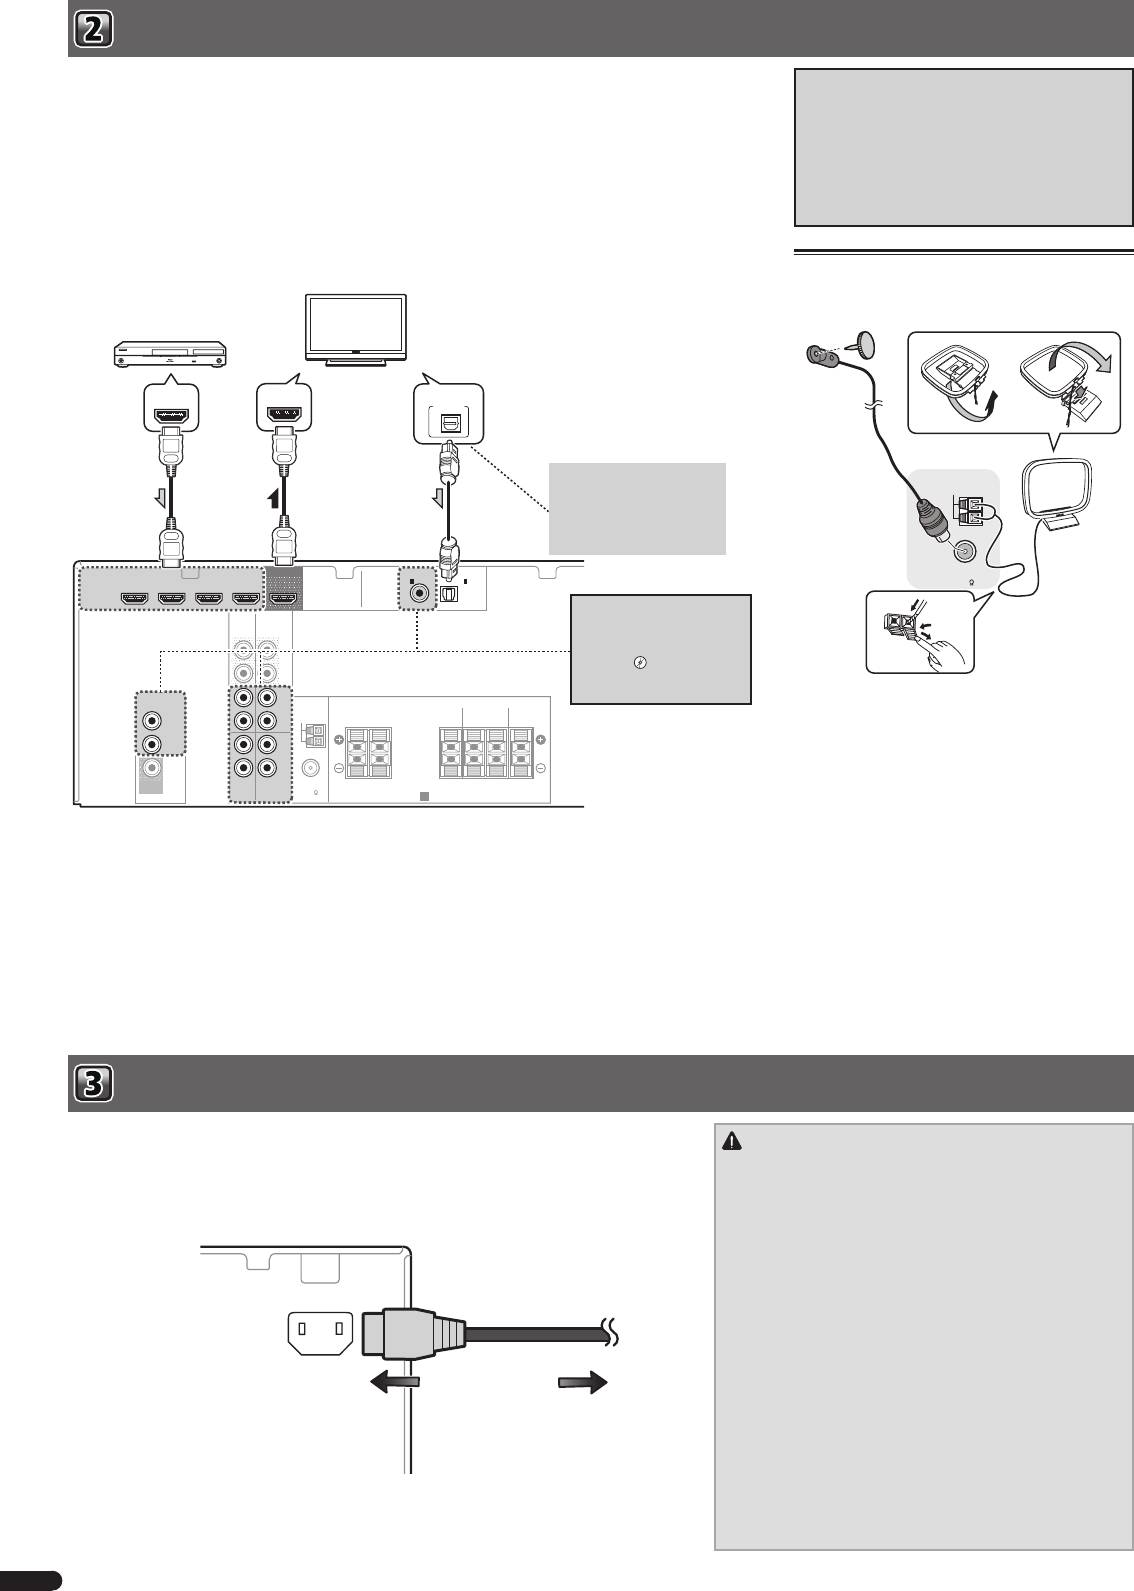
Connecting a TV and playback component
If you have an HDMI or DVI (with HDCP) equipped component (Blu-ray Disc player, etc.), you can connect it to this
About video outputs connection
receiver using a commercially available HDMI cable.
This receiver is not loaded with a video converter.
• The following connection/setting is required to listen to the sound of the TV over this receiver.
When you use HDMI cables for connecting to the
– If the TV does not support the HDMI Audio Return Channel function, connect the receiver and TV with audio
input device, the same cables should be used for
cables (as shown).
connecting to the TV.
– If the TV supports the HDMI Audio Return Channel function, the sound of the TV is input to the receiver via the
The signals input from the analog (composite) video
HDMI terminal, so there is no need to connect an audio cable. In this case, set ARC at HDMI Setup to ON.
input of this unit will not be output from the HDMI
– The ARC function may not operate even with the above connections. If this is the case, connect the receiver
OUT.
and the TV with an audio cable.
HDMI/DVI-compatible components
Connecting antennas
(Blu-ray Disc player, etc.)
Connect FM wire antenna and the the AM loop antenna
HDMI/DVI-compatible TV
as shown below.
HDMI INHDMI OUT DIGITAL AUDIO OUT
OPTICAL
If the TV does not support the
HDMI Audio Return Channel
function, this connection is
required to listen to the TV
ANTENNA
sound over the receiver.
AM LOOP
HDMI
DVR/BDR IN DVD IN BD IN CD/SAT
OUT
ASSIGNABLE
COAXIAL
OPTICAL
IN
1
IN
1
(
CD-R / TAPE
)
(
TV
)
If the device you wish to
AUDIO
connect does not have an
FM
UNBAL
CD-R/TAPE
SURR BACK
OUT
PRE OUT
HDMI output terminal, it
75
L
can be connected via these
(
Single
)
terminals.
l
“
Connecting
R
your component with no HDMI
terminal”
VIDEO
L
IN CD/SAT
IN
ANTENNA
FRONT CENTER
CD/SAT
R
AM LOOP
SURROUND SUBWOOFER
RLRL
DVD
L
IN
IN
R
MONITOR
FM
OUT
TV
DVD
UNBAL
75
SPEAKERS
A
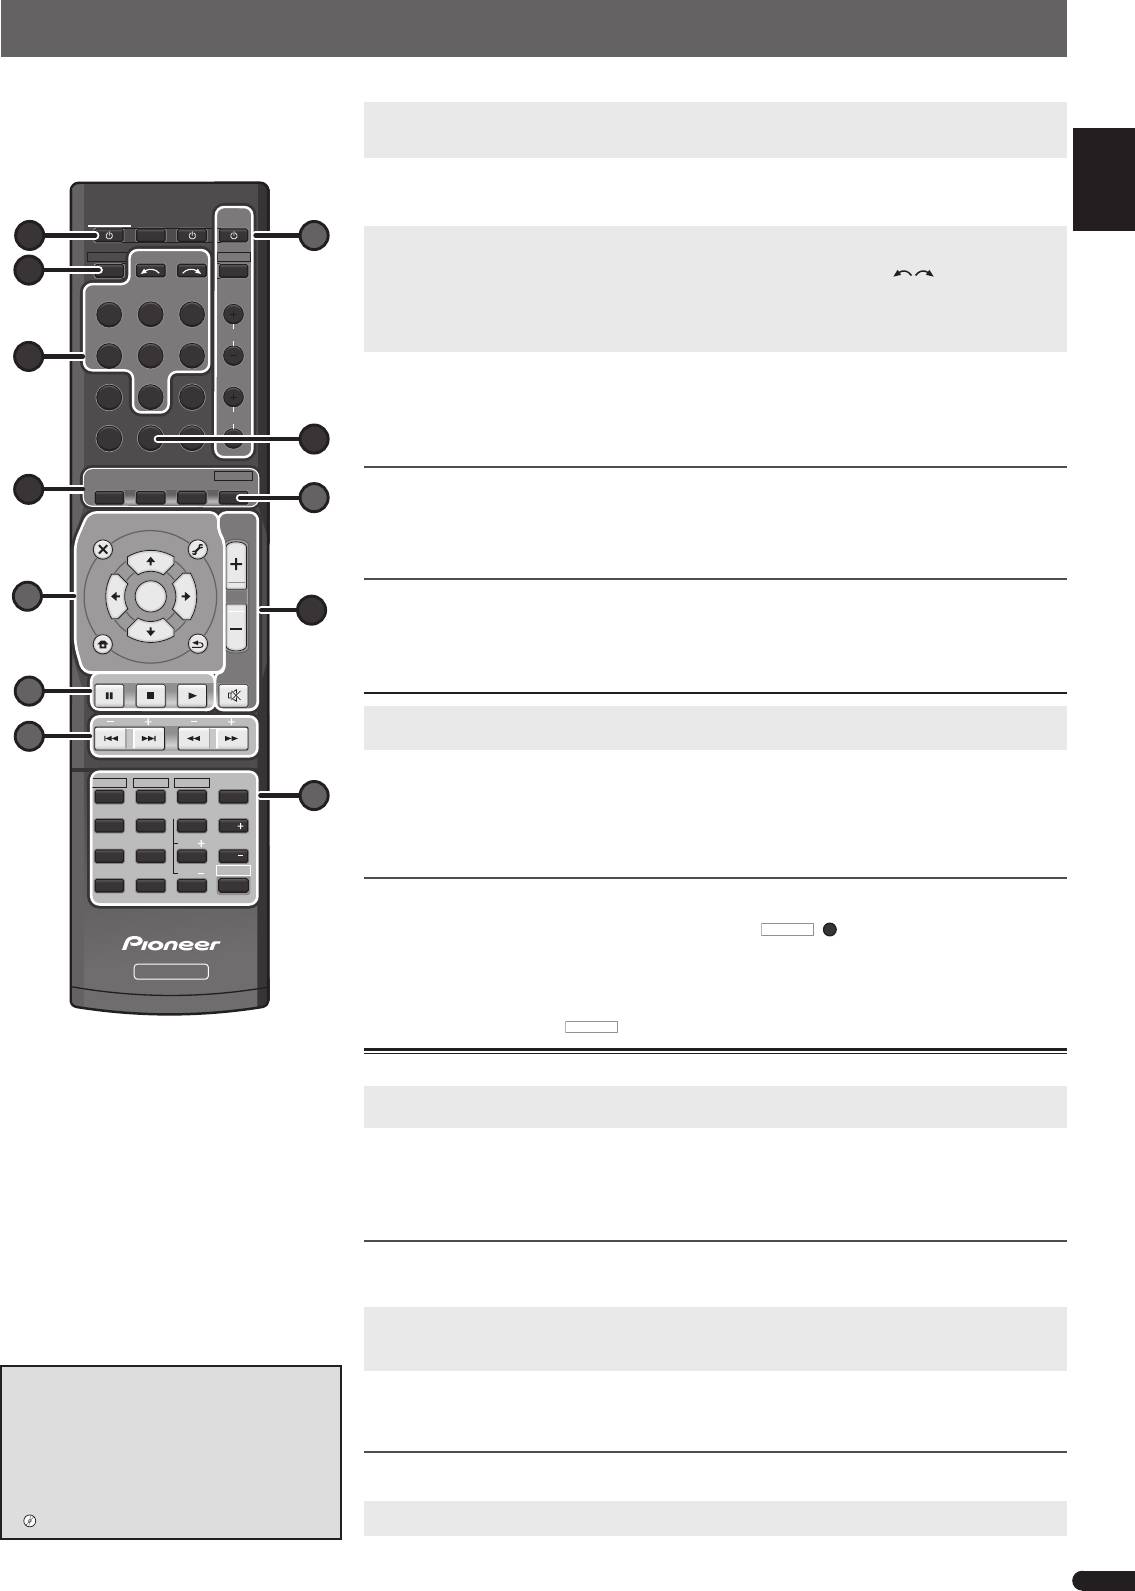
Plugging the receiver
Only plug in after you have connected all your components to this receiver, including the speakers.
CAUTION
1
Plug the supplied power cord into the AC IN socket on the back of the receiver.
• Handle the power cord by the plug part. Do not pull
2
Plug the other end into a power outlet.
out the plug by tugging the cord, and never touch the
power cord when your hands are wet, as this could
cause a short circuit or electric shock. Do not place
the unit, a piece of furniture, or other object on the
power cord or pinch the cord in any other way. Never
make a knot in the cord or tie it with other cables. The
power cords should be routed so that they are not
AC IN
likely to be stepped on. A damaged power cord can
cause a fire or give you an electric shock. Check the
power cord once in a while. If you find it damaged,
ask your nearest Pioneer authorized independent
service company for a replacement.
• Do not use any power cord other than the one
To power outlet
supplied with this unit.
• Do not use the supplied power cord for any purpose
other than that described below.
• The receiver should be disconnected by removing the
mains plug from the wall socket when not in regular
use, e.g., when on vacation.
4
En
English
0
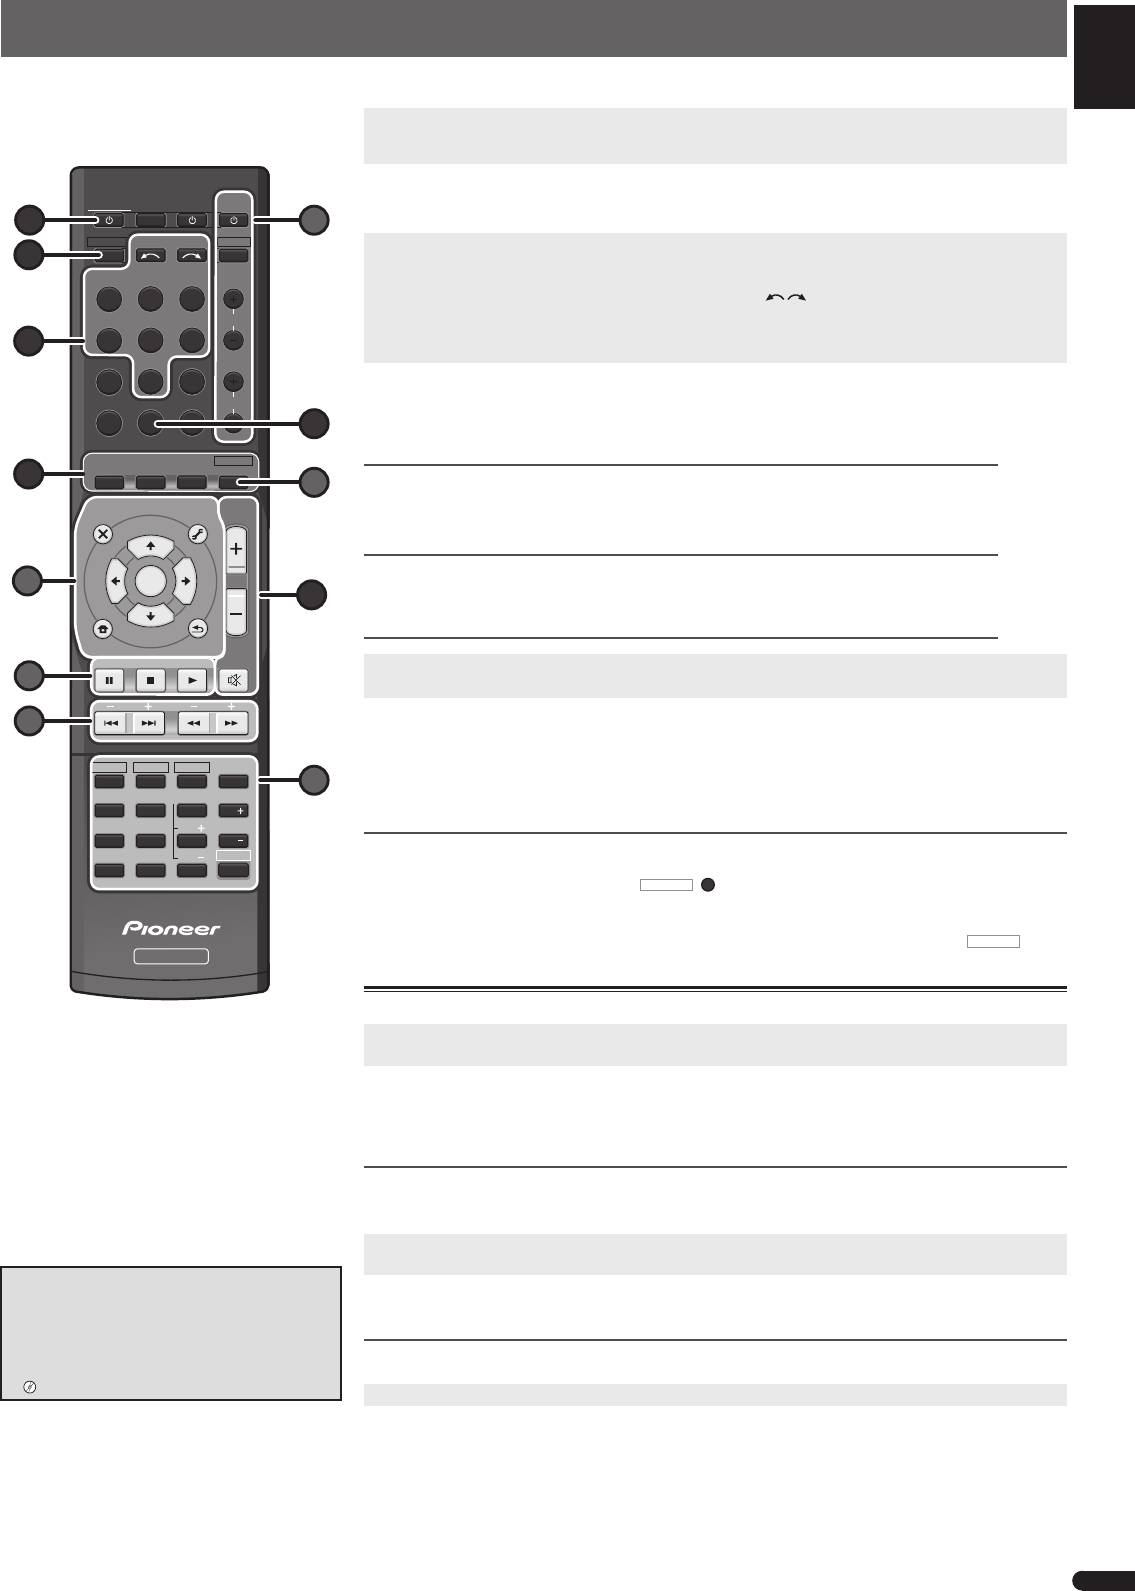
Basic playback
Here are the basic instructions for playing a source (such as a Blu-ray Disc) with your home theater system.
1
Switch on your system components and receiver.
Start by switching on the playback component (for example a Blu-ray Disc player), your TV, then the receiver (press
Français
u
RECEIVER
).
2
Switch the TV input to the input that connects this receiver.
RECEIVER
TV
For example, if you connected this receiver to the
VIDEO
jacks on your TV, make sure that the
VIDEO
input is now
SOURCESLEEP
CONTROL
selected.
1
B
RECEIVER DTV/TV
INPUT SELECT
3
Press input function buttons to select the input function you want to play.
7
INPUT
• The input of the receiver will switch over, and you will be able to operate other components using the remote
Italiano
BD DVD TV
control.
• The input source can also be selected by using
INPUT SELECT
buttons on the remote control, or by using
DVR/BDR
CD
CD-R
CH
the front panel INPUT SELECTOR dial. In this case, the remote control won’t switch operational modes.
• Press SIGNAL SEL to select the audio input signal corresponding to the source component (HDMI, digital or
3
analog).
ADAPTER
TUNER
PORTABLE
Nederlands
4
Press AUTO/DIRECT to select ’AUTO SURROUND’ and start playback of the source.
PHASE
SIGNAL SELS.RETRIEVER
VOL
If you’re playing a Dolby Digital or DTS surround sound Blu-ray/DVD disc, with a digital audio connection, you
should hear surround sound. If you’re playing a stereo source or if the connection is an analog audio connection,
6
you will only hear sound from the front left/right speakers in the default listening mode.
AUTO/
ALC/
BD MENU
DIRECT
STEREO
STANDARD
ADV SURR
4
Listening in Standard surround sound
A
This receiver provide basic surround sound for stereo and multichannel sources.
AUDIO
TUNER EDIT
MASTER
Español
PARAMETER
TOOLS
VOLUME
TOP
T
U
N
E
MENU
While listening to a source, press ALC/STANDARD repeatedly to select a listening mode.
MENU
E
T
R
P
E
Listening in Advanced surround sound
S
E
ENTER
E
S
A
R
P
T
The Advanced surround effects can be used for a variety of additional surround sound effects.
5
HOME
While listening to a source, press ADV SURR repeatedly to select a listening mode.
Deutsch
MENU
T
U
N
E
BAND
SETUP
RETURN
PTY SEARCH
MUTE
5
Use MASTER VOLUME +/– to adjust the volume level.
B
• Sound can be switched off by pressing MUTE button.
BASS
TRE
6
Enjoy a variety of sounds.
A
Press S.RETRIEVER to switch the Sound Retriever feature ON or OFF.
• When audio data is removed during the compression process, sound quality often suffers from an uneven
HDD
DVD
VCR
sound image. The Sound Retriever feature employs new DSP technology that helps bring CD quality sound
12
3
DISP
A
back to compressed 2-channel audio by restoring sound pressure and smoothing jagged artifacts left over after
TEST TONE
SB CH
CH SELECT
456
CH
compression.
MIDNIGHT
SPEAKERS
LEV
789
CH
Other remote control functions
DIMMER
LEV
SHIFT
A
CLR
0
ENTER
• The input of the receiver will switch over, and you will be able to operate other components using the remote
+
10
control. To operate the receiver, first press
RECEIVER
5
En
RECEIVER
• The following buttons are not used with this receiver:
– ADAPTER, PORTABLE
(
7
), then press the appropriate button to operate.
Use the "A" buttons to adjust the settings of this receiver and operate other devices.
Use the "B" buttons to operate TV. Operations are still possible even after pressing the
RECEIVER
button.
Listening to the radio
1
Press TUNER to select the tuner.
If necessary, press
BAND
to change the band (FM or AM).
2
Press
TUNE
to tune to a station.
• Press and hold
TUNE
for about a second. The receiver will start searching for the next station.
If you’re listening to an FM station but the reception is weak, press
BAND
to select
FM MONO
and set the receiver
to the mono reception mode.
Saving station presets
If you often listen to a particular radio station, it’s convenient to have the receiver store the frequency for easy recall
whenever you want to listen to that station.
1
Press TUNER EDIT while receiving a signal from the station you want to store.
The display shows
PRESET
, then a blinking
MEM
and station preset.
Canceling the Auto Power Down
When this receiver is not used over a period of
2
Press PRESET
l
(or number buttons) to select the station preset you want
,
then press ENTER.
several hours, it will power down automatically. The
The preset number stop blinking and the receiver stores the station.
automatic power-off timer is set to six hours under
factory settings, and the timing can be changed or
Listening to station presets
the power-off function switched off altogether.
You will need to have some presets stored to do this.
l
“The Auto Power Down menu”
Press PRESET
l
(or number buttons) to select the station preset you want.
© 2011 PIONEER CORPORATION.
All rights reserved.
Français
Pour des descriptions plus détaillées du récepteur, référez-vous au « Mode d’emploi » sur le CD-ROM fourni. Le mode d’emploi peut aussi être téléchargé du site Pioneer (http://www.
pioneer.eu). Voir ci-dessous pour l’emploi du CD-ROM.
0
Environnement d’utilisation
— Ce CD-ROM peut être utilisé avec Microsoft® Windows® 95/98/Me/NT/2000/XP/Vista/7 et Apple Mac OS X 10.4. Adobe Reader (Version 4.0 ou supérieur)
est requis pour lire ce CD-ROM.
0
Précautions d’utilisation
— Ce CD-ROM est conçu pour être utilisé avec un ordinateur personnel. Il ne peut pas être utilisé avec un lecteur de DVD ni
un lecteur de CD audio. Essayer de lire ce CD-ROM avec un lecteur de DVD ou un lecteur de CD audio peut endommager les enceintes ou causer une altération auditive à cause du volume
sonore élevé qui pourrait être produit.
0
Licence
— Veuillez accepter les “Conditions d’utilisation” indiquées ci-dessous avant d’utiliser ce CD-ROM. Ne l’utilisez pas si vous ne souhaitez
pas accepter les conditions d’utilisation.
0
Conditions d’utilisation
— Les droits d’auteur des données de ce CD-ROM appartiennent à PIONEER CORPORATION. Un transfert, une copie,
une diffusion, une transmission publique, une traduction, une vente, un prêt ou toute autre action non autorisée qui sort des limites de l’“utilisation personnelle” ou d’une “citation”, comme
défini par les lois sur les droits d’auteur, peut être soumise à des actions pénales. L’autorisation d’utiliser ce CD-ROM est donnée sous licence de PIONEER CORPORATION.
0
Exclusion
de responsabilité
— PIONEER CORPORATION ne garantit pas le fonctionnement de ce CD-ROM pour les ordinateurs personnels utilisant n’importe lequel des systèmes d’exploitation
applicables. De plus, PIONEER CORPORATION ne peut être tenu responsable pour tout dommages subis à la suite de l’utilisation de ce CD-ROM, n’est tenu à aucune compensation. Les
nom des sociétés privées, des produits ou d’autres entités citées ici sont des marques déposées ou des marque de commerce de leur entreprise respective.
* Lors de l’utilisation de Mac OS :
Placez ce CD-ROM dans un lecteur de CD et doublecliquez sur l’icône du CD-ROM pour démarrer l’application.
IMPORTANT
ATTENTION
DANGER D´ELECTROCUTION
NE PAS OUVRIR
Ce symbole de l’éclair, placé dans un
ATTENTION :
Ce point d’exclamation, placé dans un
triangle équilatéral, a pour but d’attirer
POUR ÉVITER TOUT RISQUE
triangle équilatéral, a pour but d’attirer
l’attention de l’utilisateur sur la présence, à
D’ÉLECTROCUTION, NE PAS ENLEVER LE
l’attention de l’utilisateur sur la présence,
l’intérieur du coffret de l’appareil, de
COUVERCLE (NI LE PANNEAU ARRIÈRE).
dans les documents qui accompagnent
“tensions dangereuses” non isolées d’une
AUCUNE PIÈCE RÉPARABLE PAR
l’appareil, d’explications importantes du
grandeur suffisante pour représenter un
L’UTILISATEUR NE SE TROUVE À
point de vue de l’exploitation ou de
risque d’électrocution pour les êtres
L’INTÉRIEUR. CONFIER TOUT ENTRETIEN À
l’entretien.
Chargement des piles
humains.
UN PERSONNEL QUALIFIÉ UNIQUEMENT.
Les piles de la télécommande fournies avec l’appareil
D3-4-2-1-1_A1_Fr
permettent d’effectuer les premières opérations ; il est
possible qu’elles ne durent pas très longtemps. Nous
recommandons l’usage de piles alcalines, dont la durée
Information à destination des utilisateurs sur la collecte et l’élimination des
de vie est supérieure.
équipements et batteries usagés
Marquage pour les
Ces symboles qui figurent sur les produits, les emballages et/ou les documents
équipements
d’accompagnement signifient que les équipements électriques et électroniques et
batteries usagés ne doivent pas être jetés avec les déchets ménagers et font l’objet
d’une collecte sélective.
Pour assurer l’enlèvement et le traitement appropriés des produits et batteries
usagés, merci de les retourner dans les points de collecte sélective habilités
conformément à la législation locale en vigueur.
ATTENTION
Exemples de marquage
En respectant les circuits de collecte sélective mis en place pour ces produits, vous
• Une mauvaise utilisation des piles peut provoquer
pour les batteries
contribuerez à économiser des ressources précieuses et à prévenir les impacts
des accidents tels que fuites ou explosions. Veuillez
négatifs éventuels sur la santé humaine et l’environnement qui pourraient résulter
observer les recommandations suivantes :
d’une mauvaise gestion des déchets.
– N’utilisez jamais des piles neuves et usagées dans
Pour plus d’information sur la collecte et le traitement des produits et batteries
le même appareil.
usagés, veuillez contacter votre municipalité, votre service de gestion des déchets
– Insérez les piles en respectant les indications de
ou le point de vente chez qui vous avez acheté ces produits.
polarité situées à l’intérieur du boîtier.
– Des piles de même forme peuvent avoir des
Ces symboles ne sont valables que dans les pays de l’Union Européenne.
voltages différents. N’utilisez jamais des piles de
Pour les pays n’appartenant pas à l’Union Européenne :
voltage différent dans le même appareil.
Pb
Si vous souhaitez jeter ces articles, veuillez contacter les autorités ou revendeurs
– Au moment d’éliminer les piles usagées, veuillez
locaux pour connaître les méthodes d’élimination appropriées.
respecter les réglementations gouvernementales
K058a_A1_Fr
ou les recommandations publiques relatives à la
protection de l’environnement en vigueur dans
votre pays ou région.
Si la fiche d’alimentation secteur de cet appareil ne
Ce produit est destiné à une utilisation domestique
– N’utilisez ni ne conservez les piles sous la lumière
convient pas à la prise secteur à utiliser, la fiche doit
générale. Toute panne due à une utilisation autre qu'à
directe du soleil ou dans un endroit excessivement
être remplacée par une appropriée. Ce
des fins privées (comme une utilisation à des fins
chaud, comme une voiture ou à proximité d’un
remplacement et la fixation d’une fiche secteur sur le
commerciales dans un restaurant, dans un autocar
appareil de chauffage. Les piles risqueraient de
cordon d’alimentation de cet appareil doivent être
ou sur un bateau) et qui nécessite une réparation
fuir, de surchauffer, d’exploser ou de s’enflammer.
effectués par un personnel de service qualifié. En cas
sera aux frais du client, même pendant la période de
Ceci pourrait aussi réduire la durée de vie et les
de branchement sur une prise secteur, la fiche de
garantie.
performances des piles.
coupure peut provoquer une sérieuse décharge
K041_A1_Fr
électrique. Assurez-vous qu’elle est éliminée
Installation du récepteur
correctement après sa dépose.
• Lors de l’installation de l’appareil, assurez-vous que
L’appareil doit être déconnecté en débranchant sa
ce dernier est posé sur une surface plane et stable.
fiche secteur au niveau de la prise murale si vous
N’installez pas l’appareil dans les endroits suivants :
prévoyez une période prolongée de non utilisation
(par exemple avant un départ en vacances).
– sur un téléviseur couleur (les images à l’écran
D3-4-2-2-1a_A1_Fr
pourraient être déformées)
– à proximité d’une platine à cassettes (ou d’un
appareil qui produit un champ magnétique). Le
ATTENTION
son pourrait s’en trouver affecté.
L’interrupteur STANDBY/ON de cet appareil ne
– à la lumière directe du soleil
coupe pas complètement celui-ci de sa prise secteur.
– à l’humidité
Comme le cordon d’alimentation fait office de
– à des températures extrêmes
dispositif de déconnexion du secteur, il devra être
– en présence de vibrations ou autres mouvements
débranché au niveau de la prise secteur pour que
– à la poussière
l’appareil soit complètement hors tension. Par
– à la fumée ou aux émanations graisseuses (cuisine
conséquent, veillez à installer l’appareil de telle
par ex.)
manière que son cordon d’alimentation puisse être
facilement débranché de la prise secteur en cas
d’accident. Pour éviter tout risque d’incendie, le
AVERTISSEMENT:
cordon d’alimentation sera débranché au niveau de
Ne montez pas et ne vous asseyez pas sur l’appareil.
la prise secteur si vous prévoyez une période
Soyez particulièrement vigilant lorsque des enfants
prolongée de non utilisation (par exemple avant un
se trouvent à proximité. L’appareil pourrait être
départ en vacances).
endommagé, ou tomber et provoquer des blessures.
D3-4-2-2-2a*_A1_Fr
2
Fr
AVERTISSEMENT
Cet appareil n’est pas étanche. Pour éviter les risques
d’incendie et de décharge électrique, ne placez près de
lui un récipient rempli d’eau, tel qu’un vase ou un pot
de fleurs, et ne l’exposez pas à des gouttes d’eau, des
éclaboussures, de la pluie ou de l’humidité.
D3-4-2-1-3_A1_Fr
AVERTISSEMENT
Milieu de fonctionnement
Température et humidité du milieu de fonctionnement :
De +5 °C à +35 °C (de +41 °F à +95 °F) ; Humidité
relative inférieure à 85 % (orifices de ventilation non
obstrués)
N’installez pas l’appareil dans un endroit mal ventilé ou
un lieu soumis à une forte humidité ou en plein soleil
(ou à une forte lumière artificielle).
D3-4-2-1-7c*_A1_Fr
Avant de brancher l’appareil pour la première, lisez
attentivement la section suivante.
La tension de l’alimentation électrique disponible
varie selon le pays ou la région. Assurez-vous que
la tension du secteur de la région où l’appareil sera
utilisé correspond à la tension requise (par ex. 230
V ou 120 V), indiquée sur le panneau arrière.
D3-4-2-1-4*_A1_Fr
AVERTISSEMENT
Pour éviter les risques d’incendie, ne placez aucune
flamme nue (telle qu’une bougie allumée) sur
l’appareil.
D3-4-2-1-7a_A1_Fr
Pioneer n’assume aucune responsabilité
en cas d’accidents ou de dégâts, résultant
d’une installation inappropriée, d’une erreur
d’utilisation, d’une altération du produit ou de
catastrophes naturelles.
English
Installation des enceintes
Le récepteur fonctionnera avec seulement deux
enceintes stéréo (les enceintes avant sur le schéma),
mais il est recommandé d’en utiliser au moins trois
; une configuration complète de huit enceintes est
cependant idéale pour la production du son surround.
Pour obtenir le meilleur son surround possible, installez
Français
vos enceintes conformément à l’illustration ci-dessous.
Système surround à 5.1 canaux :
R
L
Italiano
SW
C
SR
SL
• De plus, il est possible de connecter des enceintes
Nederlands
surround arrière.
l
« Raccordez les enceintes surround arrière »
• Le caisson de basse (subwoofer) et les enceintes
surround ne sont pas protégés contre les
interférences électromagnétiques. Pour cette raison,
ne les placez pas à proximité du téléviseur ou d’un
moniteur, car les interférences électromagnétiques
pourraient provoquer une distorsion des couleurs
Español
sur l’écran ou le moniteur. Les produits sensibles
aux champs magnétiques (cartes magnétiques,
montres, cassettes vidéo, etc.) ne doivent pas être
placés à proximité du caisson de basse ou des
enceintes surround.
• Les enceintes avant et l’enceinte centrale fournies
Deutsch
avec ce système sont conçues pour fonctionner à
proximité d’un téléviseur ou d’un moniteur couleur
Raccordement des enceintes
à tube cathodique. Cependant, si une distorsion des
couleurs est constatée par suite de cette installation,
Raccordement d’un téléviseur et de périphériques de lecture
coupez l’alimentation du téléviseur ou du moniteur
couleur à tube cathodique pendant 15 à 30 minutes,
puis remettez-le sous tension. Le dispositif de
Branchement du récepteur
démagnétisation incorporé au téléviseur ou au
moniteur couleur à tube cathodique devrait corriger
l’effet des enceintes sur l’image du téléviseur. Si la
distorsion des couleurs n’est pas corrigée, éloignez
les enceintes par rapport à l’écran. Si des aimants
ou des dispositifs produisant un champ magnétique
sont installés à proximité, une interaction avec
les enceintes peut provoquer une distorsion des
couleurs sur un téléviseur ou un moniteur couleur à
tube cathodique.
• N’attachez pas l’enceinte centrale et le caisson de
graves sur un mur ou au plafond car ils pourraient
occasionner des blessures en cas de chute.
Raccordement des enceintes
Vérifiez que l’enceinte droite est raccordée à la borne droite (R) et que l’enceinte gauche
est raccordée à la borne gauche (L). Assurez-vous également que les bornes positive et
négative (+/–) du récepteur sont reliées aux bornes positive et négative des enceintes.
Branchement des ls nus
1
Poussez sur les languettes pour les ouvrir et
insérez le l dénudé.
2
Relâchez les languettes.
ATTENTION
• Les bornes des haut-parleurs sont sous une tension DANGEREUSE.
Pour éviter tout risque de décharge électrique lors du branchement et
du débranchement des câbles de haut-parleur, débranchez le cordon
d’alimentation avant de toucher des parties non isolées.
• Assurez-vous que tous les brins de fil dénudés du câble d’enceinte sont
torsadés ensemble et insérés complètement dans la borne de l’enceinte. Si
une partie du fil d’enceinte exposé entre en contact avec le panneau arrière,
l’alimentation peut être coupée par mesure de sécurité.
• Ne raccordez pas le caisson de graves fourni à un amplificateur autre
que celui qui est fourni avec ce système. Le branchement à un autre
amplificateur pourrait entraîner un dysfonctionnement, voire un incendie.
voire un incendie.
3
Fr
12
Organigramme des réglages sur le récepteur
BD IN CD/SAT
OUT
ASSIGNABLE
COAXIAL
OPTICAL
IN
1
IN
1
(
CD-R / TAPE
)
(
TV
)
AUDIO
CD-R/TAPE
SURR BACK
OUT
PRE OUT
(
Single
L
)
R
L
IN CD/SAT
IN
ANTENNA
R
AM LOOP
FRONT CENTER
SURROUND SUBWOOFER
RLRL
L
IN
IN
R
TV
DVD
FM
UNBAL
75
SPEAKERS
A
AC I
N
Cet appareil est un récepteur AV à part entière
présentant un grand nombre de fonctions et de prises.
Il peut être utilisé facilement lorsque les raccordements
et les réglages mentionnés ci-dessous ont été effectués.
Téléviseur
L
Avant
gauche
Lecteur de
R
(S-11-P)
Blu-ray Disc
Avant droite
(S-11-P)
SW
Caisson de basses
(S-22W-P)
Ce récepteur
(VSX-321-K-P)
C
Centrale
SR
(S-11-P)
Surround droite
(S-11-P)
SL
Surround gauche
(S-11-P)
Avant droite
Avant gauche
Centrale
Caisson de basses
Assurez-vous que tous
Surround
Surround
les branchements ont été
droite
gauche
effectués correctement
avant de raccorder cet
appareil au secteur.
PR
É
CAUTION DE VENTILATION
Lors de l’installation de l’appareil, veillez à laisser un espace suffisant autour de
ses parois de manière à améliorer la dissipation de chaleur (au moins 20 cm sur le
dessus, 10 cm à l’arrière et 10 cm de chaque côté).
AVERTISSEMENT
Les fentes et ouvertures du coffret sont prévues pour la ventilation, pour assurer
un fonctionnement stable de l’appareil et pour éviter sa surchauffe. Pour éviter les
risques d’incendie, ne bouchez jamais les ouvertures et ne les recouvrez pas
d’objets, tels que journaux, nappes ou rideaux, et n’utilisez pas l’appareil posé sur
un tapis épais ou un lit.
D3-4-2-1-7b*_A1_Fr
ATTENTION
• Installez l’enceinte centrale en dessous du téléviseur, de sorte que le son du canal central semble provenir de l’écran du téléviseur.
• Si vous installez l‘enceinte centrale sur le téléviseur, veillez à l’immobiliser avec un cordon ou par un moyen approprié. Sinon, l’enceinte risquerait de tomber du fait de
chocs extérieurs à l’appareil, comme lors d’un séisme ; vous pourriez mettre en danger les personnes à proximité ou l’enceinte pourrait être endommagée.
Raccordement d’un téléviseur et de périphériques de lecture
Si vous avez un composant équipé d’une prise HDMI ou DVI (avec HDCP) (Lecteur Blu-ray Disc, etc.), vous pouvez
À propos du raccordement des sorties vidéo
le raccorder à ce récepteur à l’aide d’un câble HDMI disponible dans le commerce.
Ce récepteur ne comporte pas de convertisseur vidéo.
• La connexion et/ou le réglage suivant est nécessaire pour écouter le son du téléviseur par l’intermédiaire du
Si vous utilisez des câbles HDMI pour raccorder un
récepteur.
équipement en entrée, le même type de câble doit
– Si le téléviseur ne prend pas en charge la fonction HDMI Audio Return Channel, connectez le récepteur et le
être utilisé pour le raccordement du téléviseur.
téléviseur à l’aide de câbles audio (comme indiqué).
Les signaux de l’entrée vidéo analogique (composite)
– Si le téléviseur prend en charge la fonction HDMI Audio Return Channel, le son du téléviseur est envoyé vers
de cet appareil ne seront pas envoyés vers la sortie
le récepteur via la prise HDMI et il n’est alors pas nécessaire de connecter un câble audio. Dans ce cas, réglez
HDMI OUT.
l’option ARC sur ON dans le menu de configuration.
– Dans le cas où la fonction ARC ne peut pas être utilisée, même avec les connexions ci-dessus. Raccordez cet
appareil au téléviseur à l’aide d’un câble audio.
Raccordement des antennes
Raccordez l’antenne filaire FM et l’antenne cadre AM
Équipements compatibles HDMI/DVI
comme indiqué ci-dessous.
(Lecteur de Blu-ray Disc, etc.)
Téléviseur compatible HDMI/DVI
HDMI INHDMI OUT DIGITAL AUDIO OUT
OPTICAL
Si le téléviseur ne prend pas
ANTENNA
en charge la fonction HDMI
AM LOOP
Audio Return Channel, cette
connexion est nécessaire pour
écouter le son du téléviseur par
l’intermédiaire du récepteur.
OUT
ASSIGNABLE
FM
HDMI
DVR/BDR IN DVD IN BD IN CD/SAT
COAXIAL
OPTICAL
IN
1
IN
1
UNBAL
75
(
CD-R / TAPE
)
(
TV
)
Si l’ équipement que vous
AUDIO
CD-R/TAPE
SURR BACK
souhaitez connecter ne possède
OUT
PRE OUT
pas de prise de sortie HDMI,
(
L
Single
)
il peut être connecté via ces
bornes.
l
« Raccordement
R
d’un équipement dépourvu de
VIDEO
borne HDMI »
L
IN CD/SAT
IN
ANTENNA
FRONT CENTER
SURROUND SUBWOOFER
CD/SAT
R
AM LOOP
RLRL
DVD
L
IN
IN
R
MONITOR
FM
OUT
TV
DVD
UNBAL
75
SPEAKERS
A
Branchement du récepteur
Ne raccordez le récepteur au secteur qu’après y avoir connecté tous les composants, y compris
ATTENTION
les haut-parleurs.
• Tenez le cordon d’alimentation par sa prise lorsque vous
1
Enchez le cordon d’alimentation fourni dans la prise AC IN à l’arrière du récepteur.
le manipulez. Ne débranchez pas l’appareil en tirant sur le
2
Enchez l’autre extrémité dans une prise électrique.
cordon et ne touchez jamais le cordon d’alimentation avec
les mains mouillées ; vous pourriez provoquer un court-circuit
ou prendre un choc électrique. Ne placez pas l’appareil, un
meuble ou tout autre objet sur le cordon d’alimentation, et
évitez de le pincer de toute autre manière. Ne faites jamais
de nœud dans le cordon et ne le liez jamais avec d’autres
AC IN
câbles. Les cordons d’alimentation doivent être acheminés de
façon à ce qu’on ne puisse pas marcher dessus. Un cordon
d’alimentation endommagé peut provoquer un incendie ou
un choc électrique. Vérifiez l’état du cordon de temps à autre.
Si le cordon est endommagé, demandez-en le remplacement
auprès du service après-vente agréé Pioneer le plus proche.
Vers la prise secteur
• N’utilisez aucun autre cordon d’alimentation que celui fourni
avec cet appareil.
• N’utilisez pas le cordon d’alimentation fourni à d’autres fins
que celles décrites ci-après.
• Lorsque le récepteur n’est pas utilisé durant une longue
période (par ex. pendant les vacances), il est recommandé de
le débrancher, en retirant le connecteur d’alimentation de la
prise murale.
4
Fr
English
0
Lecture de base
Voici les instructions de base pour lire une source (telle qu’un Blu-ray Disc) avec votre système home cinéma.
1
Allumez les composants de votre système et votre récepteur.
Commencez par sélectionner l’équipement de lecture (par exemple un lecteur de disque Blu-ray), puis le téléviseur,
Français
puis le récepteur (appuyez sur
u
RECEIVER
).
2
Commutez l’entrée TV sur l’entrée qui est connectée à ce récepteur.
Par exemple, si vous connectez ce récepteur aux prise
VIDEO
de votre téléviseur, veillez à ce que l’entrée
RECEIVER
TV
sélectionnée soit
VIDEO
.
SOURCESLEEP
CONTROL
1
B
3
Utilisez les touches de fonctions d’entrée pour sélectionner la fonction d’entrée souhaitée.
RECEIVER DTV/TV
INPUT SELECT
• L’entrée du récepteur commute et vous pourrez alors utiliser d’autres composants via la télécommande.
Italiano
7
INPUT
• La source d’entrée peut aussi être sélectionnée à l’aide des touches
INPUT SELECT
de la télécommande,
BD DVD TV
ou du bouton rotatif INPUT SELECTOR. Dans ce cas, la télécommande ne permutera pas les modes de
fonctionnement.
• Appuyez sur SIGNAL SEL pour sélectionner le signal d’entrée correspondant au composant source (HDMI,
DVR/BDR
CD
CD-R
CH
numérique ou analogique).
3
4
Appuyez sur AUTO/DIRECT pour sélectionner “AUTO SURROUND”, puis lancez la lecture de la source.
Nederlands
ADAPTER
TUNER
PORTABLE
Si vous lisez un disque Blu-ray/DVD enregistré en Dolby Digital ou DTS surround, l’utilisation d’une connexion
audionumérique doit vous permettre de profiter du son surround. Si vous lisez à partir d’une source stéréo ou si la
PHASE
SIGNAL SELS.RETRIEVER
VOL
connexion audio est une connexion analogique, le son ne sera émis que par les enceintes avant gauche et droite
6
en mode d’écoute par défaut.
AUTO/
ALC/
BD MENU
DIRECT
STEREO
STANDARD
ADV SURR
Écoute en mode surround standard
4
A
Ce récepteur permet d’obtenir, sans réglage particulier, un son surround de base pour les sources stéréo et
Español
AUDIO
TUNER EDIT
MASTER
multicanaux.
PARAMETER
TOOLS
VOLUME
TOP
T
U
N
E
MENU
Lorsque vous écoutez une source, appuyez de manière répétée sur la touche ALC/STANDARD pour
MENU
sélectionner un mode d’écoute.
T
P
E
R
S
E
ENTER
E
S
A
E
Écoute en mode surround avancé
P
R
T
5
Les effets Advanced surround peuvent être utilisés pour une large gamme d’effets sonores surround
Deutsch
HOME
supplémentaires.
MENU
T
U
N
E
BAND
Lorsque vous écoutez une source, appuyez de manière répétée sur la touche ADV SURR pour
SETUP
RETURN
PTY SEARCH
sélectionner un mode d’écoute.
MUTE
B
Utilisez le bouton rotatif MASTER VOLUME +/– pour régler le volume sonore.
BASS
TRE
5
• Pour couper le son, appuyez sur la touche MUTE.
A
6
Protez de toute une variété de sons.
HDD
DVD
VCR
12
3
DISP
Appuyez sur la touche S.RETRIEVER pour activer ou désactiver la fonction Sound Retriever.
A
TEST TONE
SB CH
CH SELECT
• Lorsque des données audio sont supprimées lors de la compression, la qualité du son est souvent amoindrie
456
CH
du fait de l’inégalité de l’image sonore. La fonction Sound Retriever a recours à une nouvelle technologie DSP
MIDNIGHT
SPEAKERS
LEV
pour restaurer un son de qualité CD vers des sources audio compressées à 2 canaux en rétablissant la pression
789
CH
sonore et en lissant les artéfacts dentelés restants après la compression.
DIMMER
LEV
SHIFT
A
CLR
0
ENTER
+
10
Autres fonctions de la télécommande
• L’entrée du récepteur commute et vous pourrez alors utiliser d’autres composants via la télécommande. Pour
faire commander ce récepteur, appuyez d’abord sur la touche
RECEIVER
(
7
)
de la télécommande, puis appuyez
sur la touche souhaitée.
RECEIVER
Utilisez les touches “A” pour ajuster les réglages de ce récepteur et pour commander d’autres
équipements.
Utilisez les touches “B” pour commander le téléviseur. Les commandes restent utilisables même après
avoir appuyé sur la touche
5
Fr
RECEIVER
• Les touches suivantes ne sont pas utilisées avec ce
récepteur :
– ADAPTER, PORTABLE
.
Ecoute de la radio
1
Appuyez sur TUNER pour sélectionner le syntoniseur.
Appuyez sur la touche
BAND
pour changer de bande de fréquences (FM ou AM), si nécessaire.
2
Pour rechercher une station de radio, utilisez les touches
TUNE
.
• Appuyez sur une des touches
TUNE
sans la relâcher pendant environ une seconde. Le récepteur lance la
recherche de la station suivante dans la direction correspondant à la touche.
Si la réception du signal radio FM est faible, appuyez sur la touche
BAND
pour sélectionner
FM MONO
, et réglez le
récepteur en mode de réception mono.
Mémorisation de stations préréglées
Si vous écoutez souvent une station de radio, il peut être pratique d’enregistrer sa fréquence dans le récepteur afin
de pouvoir y accéder facilement lorsque vous le souhaitez.
1
Pour mémoriser une station de radio que vous êtes en train d’écouter, appuyez d’abord sur la touche
TUNER EDIT.
L’écran affiche
PRESET
, puis un
MEM
clignotant et une station préréglée.
Annulation de la fonction d’arrêt
automatique Auto Power Down
2
Utilisez les touches PRESET
l
(ou les touches numérotées) pour sélectionner le numéro de station
préréglée que vous souhaitez attribuer à cette station, puis appuyez sur ENTER.
Lorsque ce récepteur n’est pas utilisé pendant
une période de plusieurs heures, il se met
Le numéro préréglé cesse de clignoter et le récepteur mémorise la station.
automatiquement hors tension. La minuterie d’arrêt
automatique est réglée en usine sur une durée six
Écoute des stations préréglées
heures. Cette durée peut être modifiée et la fonction
Vous devez mémoriser des stations préréglées pour avoir accès à cette fonction.
d’arrêt automatique peut aussi être désactivée.
Utilisez les touches PRESET
l
(ou les touches numérotées) pour sélectionner la station préréglée
l
« Le menu Auto Power Down »
que vous voulez écouter.
© 2011 PIONEER CORPORATION.
Tous droits de reproduction et de traduction réservés.
Italiano
Per una descrizione dettagliata del ricevitore, vedere le “Istruzioni per l’uso” contenute nel CD-ROM accluso. Le istruzioni per l’uso possono venire scaricate anche dal sito di Pioneer (http://
www.pioneer.eu). Per quanto riguarda le modalità di uso del CD-ROM, vedere le istruzioni che seguono.
0
Ambiente operativo
— Questo CD-ROM è compatibile con i sistemi operativi Microsoft® Windows® 95/98/Me/NT/2000/XP/Vista/7 e Apple Mac OS X 10.4. Per leggere il CD-ROM è
necessario disporre di Adobe Reader (versione 4.0 o successiva).
0
Precauzioni d'uso
— Questo CD-ROM deve essere usato esclusivamente con i personal computer. Esso non può quindi
essere usato nei lettori DVD né in quelli CD musicali. Qualsiasi tentativo di riprodurlo con un lettore DVD o CD musicale può causare il danneggiamento dei diffusori o dell’apparato uditivo
a causa dell’alto livello di volume.
0
Licenza
— Prima di usare il CD-ROM si devono accettare i “Termini d’uso” qui oltre riportati. Esso non deve pertanto essere usato qualora non s’intenda
accettare tali termini.
0
Termini d’uso
— I diritti d’autore dei dati contenuti in questo CD-ROM appartengono a PIONEER CORPORATION. Il trasferimento, la duplicazione, la diffusione,
la trasmissione pubblica, la traduzione, la vendita, la cessione in prestito o qualsiasi altro tipo di attività analoga che vada oltre l’ambito del semplice “uso personale” o della “citazione”
secondo quando stabilito nella Legge sui diritti d’autore senza disporre della necessaria autorizzazione possono essere puniti. Il permesso di usare questo CD-ROM è concesso in licenza
da PIONEER CORPORATION.
0
Condizioni d'uso
— PIONEER CORPORATION non fornisce alcuna garanzia di funzionamento di questo CD-ROM con i personal computer in cui sia
installato uno dei sistemi operativi compatibili. PIONEER CORPORATION non accetta inoltre alcuna responsabilità per gli eventuali danni causati dall’uso del CD-ROM, né accetta di fornire
qualsivoglia tipo di compensazione. Il nome delle società private, dei prodotti e delle altre entità qui citate sono marchi di fabbrica o marchi di fabbrica depositati appartenenti alle rispettive
società.
* In ambiente Mac OS:
Per avviare l’applicazione è necessario inserire il CD-ROM nell’unità CD e fare quindi doppio clic sull’icona del CD-ROM.
IMPORTANTE
CAUTION
RISK OF ELECTRIC SHOCK
DO NOT OPEN
Il simbolo del lampo con terminale a forma
ATTENZIONE:
Il punto esclamativo in un triangolo
di freccia situato all’interno di un triangolo
PER EVITARE IL RISCHIO DI SCOSSE
equilatero serve ad avvisare l’utilizzatore
equilatero serve ad avvisare l’utilizzatore
ELETTRICHE, NON RIMUOVERE IL
della presenza di importanti istruzioni di
della presenza di una “tensione pericolosa”
COPERCHIO (O IL RETRO). NON CI SONO
funzionamento e manutenzione riportate nel
non isolata nella struttura del prodotto che
PARTI INTERNE LA CUI MANUTENZIONE
libretto allegato al prodotto.
potrebbe essere di un’intensità tale da
POSSA ESSERE EFFETTUATA
provocare scosse elettriche all’utilizzatore.
DALL’UTENTE. IN CASO DI NECESSITÀ,
RIVOLGERSI ESCLUSIVAMENTE A
PERSONALE DI SERVIZIO QUALIFICATO.
D3-4-2-1-1_A1_It
Informazioni per gli utilizzatori finali sulla raccolta e lo smaltimento di vecchi
Installazione delle batterie
dispositivi e batterie esauste
Le pile sono comprese nell’unità per controllare le
operazioni iniziali; non durano a lungo. Si consiglia di
Simbolo per
Questi simboli sui prodotti, confezioni, e/o documenti allegati significano che vecchi
usare pile alcaline poiché hanno una durata maggiore.
il prodotto
prodotti elettrici ed elettronici e batterie esauste non devono essere mischiati ai rifiuti
urbani indifferenziati.
Per l’appropriato trattamento, recupero e riciclaggio di vecchi prodotti e batterie
esauste, fate riferimento ai punti di raccolta autorizzati in conformità alla vostra
legislazione nazionale.
Con il corretto smaltimento di questi prodotti e delle batterie, aiuterai a salvaguardare
Esempi di simboli
preziose risorse e prevenire i potenziali effetti negativi sull’ambiente e sulla salute
per le batterie
umana che altrimenti potrebbero sorgere da una inappropriata gestione dei rifiuti.
ATTENZIONE
Per maggiori informazioni sulla raccolta e il riciclaggio di vecchi prodotti e batterie
• L’utilizzo errato delle pile può causare rischi quali
esauste, contattate il vostro Comune, il Servizio di raccolta o il punto vendita dove
perdite o scoppi. Osservare sempre le seguenti
avete acquistato l’articolo.
precauzioni:
– Non usare mai pile nuove e vecchie allo stesso
Questi simboli sono validi solo nell’Unione Europea.
tempo.
Per i paesi al di fuori dell’unione Europea:
– Inserire le polarità positiva e negativa delle pile in
Se volete liberarvi questi oggetti, contattate le vostre autorità locali o il punto vendita
conformità con le marcature nel vano pile.
per il corretto metodo di smaltimento.
– Pile con la stessa forma possono avere un
Pb
voltaggio diverso. Non usare diversi tipi di pile
contemporaneamente.
K058a_A1_It
– Assicurarsi di rispettare le norme nazionali o la
legislazione per la tutela dell’ambiente in vigore
Se la spina del cavo di alimentazione di questo
nella nazione in cui verrà usato l’apparecchio.
Questo prodotto è destinato esclusivamente all'uso
apparecchio non si adatta alla presa di corrente
domestico. Eventuali disfunzioni dovute ad usi diversi
– Non usare né conservare le pile alla luce diretta
alternata di rete nella quale si intende inserire la
(quali uso prolungato a scopi commerciali, in
del sole o in luoghi eccessivamente caldi, come
spina stessa, questa deve essere sostituita con una
all’interno di un’automobile o in prossimità di
ristoranti, o uso in auto o su navi) e che richiedano
adatta allo scopo. La sostituzione della spina del cavo
un calorifero. Le pile potrebbero perdere liquido,
particolari riparazioni, saranno a carico dell'utente,
di alimentazione deve essere effettuata solamente da
surriscaldarsi, esplodere o prendere fuoco. Anche
anche se nel corso del periodo di garanzia.
personale di servizio qualificato. Dopo la sostituzione,
la durata o le prestazioni delle pile potrebbero
K041_A1_It
la vecchia spina, tagliata dal cavo di alimentazione,
risultare ridotta.
deve essere adeguatamente eliminata per evitare
possibili scosse o folgorazioni dovute all’accidentale
Installazione del ricevitore
inserimento della spina stessa in una presa di
• All’installazione di quest’unità, assicurarsi di
corrente sotto tensione.
posizionarla su una superficie piana e stabile.
Se si pensa di non utilizzare l’apparecchio per un
Evitare di installare l’apparecchio nei seguenti luoghi:
relativamente lungo periodo di tempo (ad esempio,
durante una vacanza), staccare la spina del cavo di
– sopra un televisore (possibile distorsione dello
schermo)
alimentazione dalla presa di corrente alternata di
rete.
– vicino ad una piastra a cassette (o vicino ad un
D3-4-2-2-1a_A1_It
dispositivo che genera campi magnetici). Questo
può interferire con il suono.
AVVERTENZA
– alla luce diretta del sole
L’interruttore principale ( STANDBY/ON )
– in luoghi umidi o bagnati
dell’apparecchio non stacca completamente il flusso
– in luoghi estremamente caldi o freddi
di corrente elettrica dalla presa di corrente alternata
– in luoghi esposti a vibrazioni o altri movimenti
di rete. Dal momento che il cavo di alimentazione
– in luoghi molto polverosi
costituisce l’unico dispositivo di distacco
– in luoghi esposti a fumi o oli (ad esempio la
dell’apparecchio dalla sorgente di alimentazione, il
cucina)
cavo stesso deve essere staccato dalla presa di
corrente alternata di rete per sospendere
completamente qualsiasi flusso di corrente.
AVVERTENZA:
Verificare quindi che l’apparecchio sia stato installato
Non saltare né sedersi su questa unità. Si consiglia
in modo da poter procedere con facilità al distacco
particolare prudenza in presenza dei bambini. L’unità
del cavo di alimentazione dalla presa di corrente, in
potrebbe subire danni o cadere causando incidenti.
caso di necessità. Per prevenire pericoli di incendi,
inoltre, il cavo di alimentazione deve essere staccato
dalla presa di corrente alternata di rete se si pensa di
non utilizzare l’apparecchio per periodi di tempo
relativamente lunghi (ad esempio, durante una
vacanza).
2
D3-4-2-2-2a*_A1_It
It
ATTENZIONE
Questo apparecchio non è impermeabile. Per prevenire
pericoli di incendi o folgorazioni, non posizionare nelle
vicinanze di questo apparecchio contenitori pieni di
liquidi (quali vasi da fiori, o simili), e non esporre
l’apparecchio a sgocciolii, schizzi, pioggia o umidità.
D3-4-2-1-3_A1_It
ATTENZIONE
Prima di collegare per la prima volta l’apparecchio alla
sorgente di alimentazione leggere attentamente la
sezione che segue.
La tensione della sorgente di elettricità differisce
da Paese a Paese e da regione a regione. Verificare
che la tensione di rete della zona in cui si intende
utilizzare l’apparecchio sia quella corretta, come
indicato sul pannello posteriore dell’apparecchio
stesso (ad es.: 230 V o 120 V).
D3-4-2-1-4*_A1_It
ATTENZIONE
Condizioni ambientali di funzionamento
Gamma ideale della temperatura ed umidità
dell’ambiente di funzionamento:
da +5 °C a +35 °C, umidità relativa inferiore all‘85 %
(fessure di ventilazione non bloccate)
Non installare l’apparecchio in luoghi poco ventilati, o
in luoghi esposti ad alte umidità o alla diretta luce del
sole (o a sorgenti di luce artificiale molto forti).
D3-4-2-1-7c*_A1_It
Questo prodotto è conforme al DM 28/8/1995, Nº548,
ottemperando alle prescrizioni di cui al DM 25/6/1985
(par.3, all. A) e DM 27/8/1987 (All. I).
D44-9-4-1a_A1_It
Per evitare il pericolo di incendi, non posizionare
sull’apparecchio dispositivi con fiamme vive (ad
esempio una candela accesa, o simili).
D3-4-2-1-7a_A1_It
Pioneer non è responsabile di incidenti e danni
dovuti ad un’installazione scorretta, all’uso
scorretto o alla modica del prodotto, o a
disastri naturali.
English
Posizionamento degli altoparlanti
Il ricevitore funziona anche con due soli altoparlanti
stereo (gli altoparlanti anteriori dello schema); si
consiglia tuttavia di utilizzare almeno tre altoparlanti.
Una configurazione completa risulta ottimale per il
suono surround.
Per ottenere il miglior suono surround possibile,
installare gli altoparlanti come segue.
Français
Sistema surround a 5.1 canali:
R
L
SW
C
Italiano
SR
SL
• Inoltre, si possono connettere anche gli altoparlanti
surround posteriori.
l
“Connettere gli altoparlanti surround posteriori”
• Il subwoofer e gli altoparlanti surround non sono
Nederlands
protetti magneticamente, perciò non devono
essere collocati vicino alla TV o a uno schermo,
poiché l’interazione dei materiali magnetici
potrebbe causare la distorsione dei colori sullo
schermo TV. Gli apparecchi che vengono facilmente
influenzati dalle onde magnetiche (le schede media
magnetiche, gli orologi da polso, i registratori, ecc.)
non dovrebbero essere collocati vicino al subwofer o
agli altoparlanti surround.
Español
• I diffusori anteriori e quello centrale del sistema
sono progettati per l’uso anche vicini a televisori
o monitor dotati di tubo a raggi catodici. Tuttavia,
se l’installazione causa distorsioni cromatiche,
provare a spegnere il televisore o monitor a colori
dotato di tubo a raggi catodici per circa da 15
a 30 minuti, quindi riaccenderlo. La funzione di
auto smagnetizzazione incorporata nel televisore
o monitor a colori dotato di tubo a raggi catodici
Deutsch
dovrebbe aiutare a rimediare gli effetti dei diffusori
Collegamento degli altoparlanti
sull’immagine. Se la distorsione continua ad essere
un problema, allontanare i diffusori dallo schermo.
Se dei magneti o dei dispositivi che generano campi
Connettere una TV e componenti playback
magnetici sono installati nelle vicinanze, l’interazione
con i diffusori può causare aberrazioni cromatiche
su di un televisore o monitor a colori dotato di tubo
Collegamento del ricevitore
a raggi catodici.
• Non applicare il diffusore centrale ed il subwoofer
ad un muro o al soffitto, dato che possono causare
ferimenti in caso cadessero.
Collegamento degli altoparlanti
Assicuratevi di connettere l’altoparlante a destra al terminale destro (R) e quello a sinistra al terminale sinistro (L). Inoltre, assicurarsi che i terminali positivo e negativo (+/–)
del ricevitore corrispondano a quelli degli altoparlanti.
Collegamenti a fili nudi
1
Premere le linguette per aprirle e
inserire la parte scoperta del cavo.
2
Rilasciare le linguette.
ATTENZIONE
• I terminali degli altoparlanti sono sotto tensione, la stessa
PERICOLOSA tensione della corrente di rete. Per prevenire rischi di
folgorazioni nel corso delle operazioni di collegamento o di distacco
dei cavi degli altoparlanti, staccare il cavo di alimentazione principale
prima di toccare qualsiasi parte non isolata.
• Assicurarsi che il filo nudo dell’altoparlante sia attorcigliato e inserito
completamente nel terminale dell’altoparlante. Se la parte scoperta
di un cavo dovesse entrare in contatto con il pannello posteriore, può
prodursi un’interruzione di corrente per l’attivazione dell’interruttore
differenziale.
• Non collegare il subwoofer in dotazione ad amplificatori diversi da
quello in dotazione al sistema. Il collegamento ad altri amplificatori
può causare guasti o incendi.
3
It
12
Flusso delle impostazioni del ricevitore
BD IN CD/SAT
OUT
ASSIGNABLE
COAXIAL
OPTICAL
IN
1
IN
1
(
CD-R / TAPE
)
(
TV
)
AUDIO
CD-R/TAPE
SURR BACK
OUT
PRE OUT
(
Single
L
)
R
L
IN CD/SAT
IN
ANTENNA
R
AM LOOP
FRONT CENTER
SURROUND SUBWOOFER
RLRL
L
IN
IN
R
TV
DVD
FM
UNBAL
75
SPEAKERS
A
AC I
N
Questa unità è un potente ricevitore AV dotato di molte
funzioni e molti terminali. Può venire usato senza
difficoltà dopo aver eseguito la procedura seguente per
fare i collegamenti e le impostazioni.
TV
L
Sinistro
anteriore
Lettore Blu-ray
R
(S-11-P)
Disc
Destro
anteriore
(S-11-P)
SW
Subwoofer
(S-22W-P)
Questo ricevitore
(VSX-321-K-P)
C
Centro
SR
(S-11-P)
Destro surround
(S-11-P)
SL
Sinistro surround
(S-11-P)
Destro
Sinistro
anteriore
anteriore
Centro
Subwoofer
Completate tutti i
Destro
Sinistro
collegamenti prima di
surround
surround
collegare quest’unità alla
presa d’alimentazione CA.
AVVERTENZA PER LA VENTILAZIONE
ATTENZIONE
• Installare il diffusore centrale sotto il televisore,
Installare l’apparecchio avendo cura di lasciare un certo spazio all’intorno
in modo che il suono del canale centrale risulti
dello stesso per consentire una adeguata circolazione dell’aria e migliorare
la dispersione del calore (almeno 20 cm sulla parte superiore, 10 cm sul
provenire dallo schermo.
retro, e 10 cm su ciascuno dei lati).
• In caso di installazione del diffusore centrale
sopra il televisore, fissarlo al televisore con del
ATTENZIONE
nastro adesivo o con un qualche altro mezzo
L’apparecchio è dotato di un certo numero di fessure e di aperture per la
idoneo. Se non adeguatamente bloccato, il
ventilazione, allo scopo di garantirne un funzionamento affidabile, e per
diffusore potrebbe cadere dal televisore a seguito
proteggerlo dal surriscaldamento. Per prevenire possibili pericoli di incendi
di urti, vibrazioni, terremoti, o per altre cause, con
le aperture non devono mai venire bloccate o coperte con oggetti vari (quali
conseguenti possibili lesioni fisiche alle persone
giornali, tovaglie, tende o tendaggi, ecc.), e l’apparecchio non deve essere
utilizzato appoggiandolo su tappeti spessi o sul letto.
eventualmente presenti nelle vicinanze, o danni al
D3-4-2-1-7b*_A1_It
diffusore stesso.
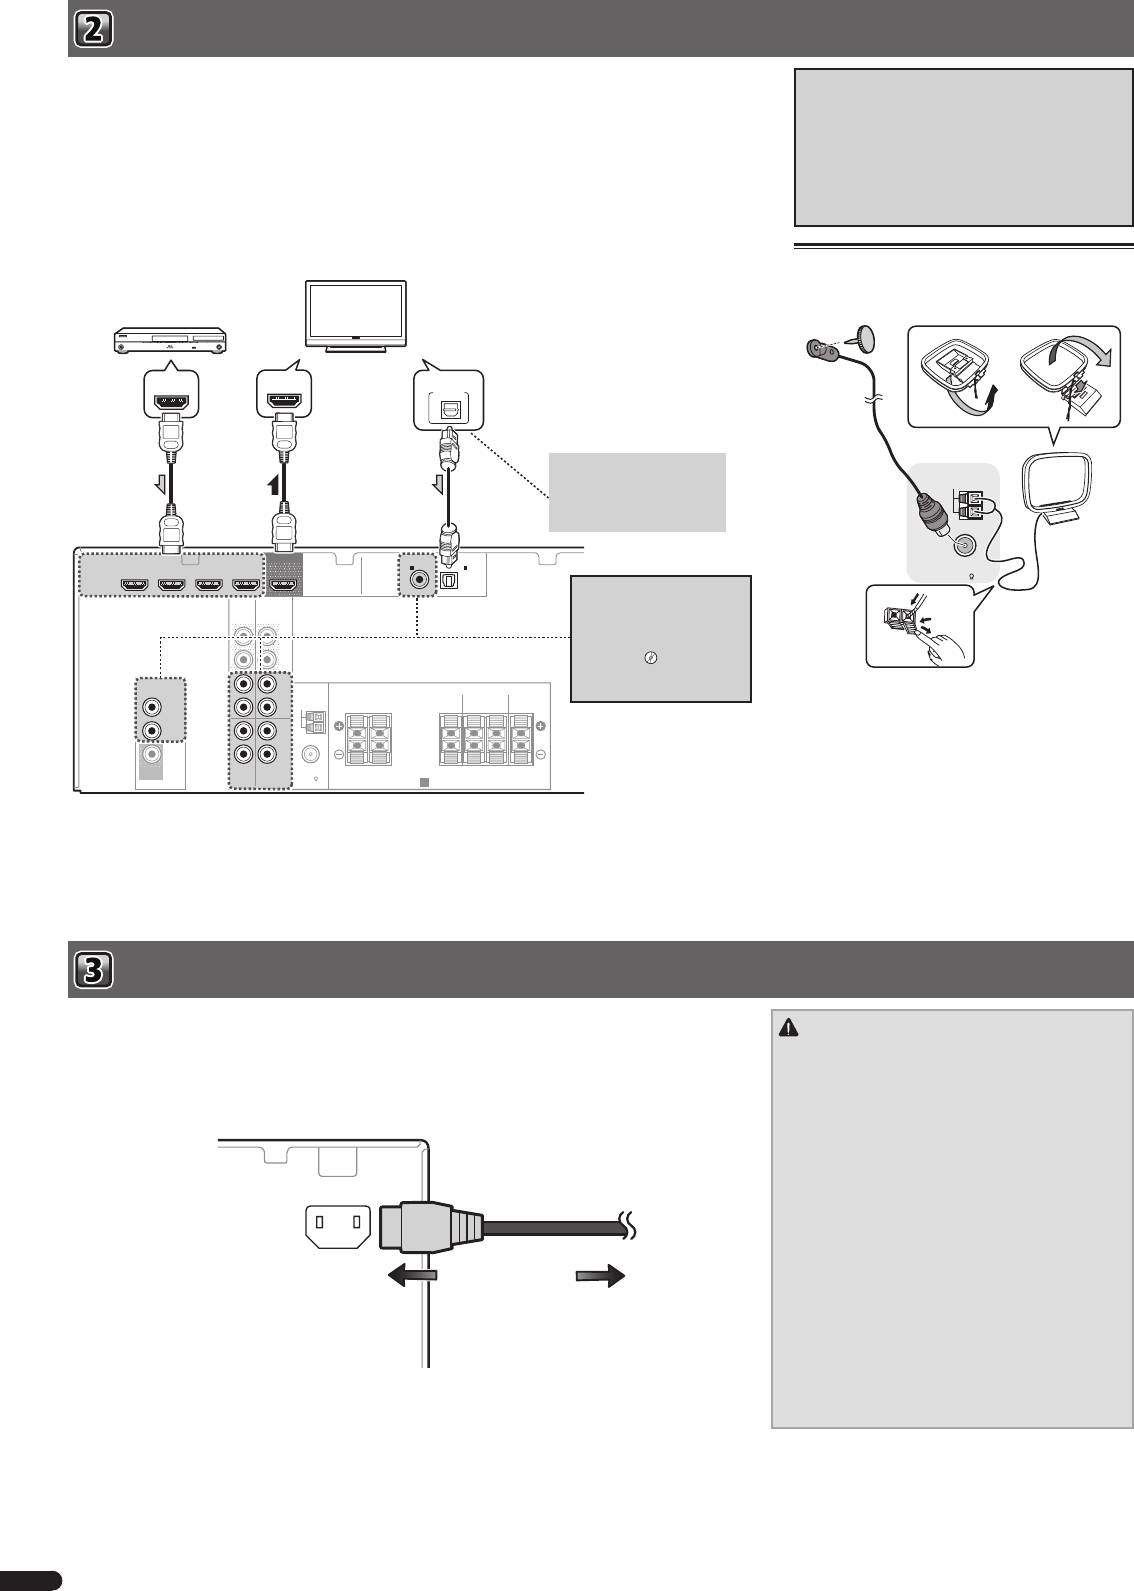
Connettere una TV e componenti playback
Se si dispone di un componente dotato di funzionalità HDMI o DVI (con HDCP) (lettore di Blu-ray Disc o altro), sarà
Le connessioni di emissione video
possibile collegarlo a questo ricevitore utilizzando un cavo HDMI reperibile in commercio.
Questo ricevitore non dispone di convertitore
• La seguente connessione/impostazione è richiesta per ascoltare il suono della TV da questo ricevitore.
video. Se si usano cavi HDMI per connettersi
– Se la TV non supporta la funzione HDMI Audio Return Channel, connettete il ricevitore e la TV ai cavi audio
all’apparecchio di entrata, gli stessi cavi dovrebbero
(come mostrato).
essere usati per connettersi alla TV.
– Se la TV supporta la funzione HDMI Audio Return Channel, il suono della TV viene immesso al ricevitore
I segnali di entrata dal video analogico (composito)
attraverso il terminale HDMI, in modo che non sia necessario connettersi a un cavo audio. In questo caso,
di questa unità non saranno emessi dal terminale
impostate ARC nel HDMI Setup su ON.
HDMI OUT.
– La funzione ARC non può essere attivata nemmeno con le connessioni di cui sopra. In tal caso, connettere il
ricevitore e la TV tramite un cavo audio.
Collegamento delle antenne
Connettete un’antenna FM a cavo e la loop antenna AM
Componenti compatibili HDMI/DVI
come mostrato qui sotto.
(Bluray Disc, ecc.)
TV compatibile HDMI/DVI
HDMI INHDMI OUT DIGITAL AUDIO OUT
OPTICAL
Se la TV non supporta la
ANTENNA
funzione HDMI Audio Return
AM LOOP
Channel, questa connessione è
indispensabile per ascoltare il
suono della TV dal ricevitore.
HDMI
DVR/BDR IN DVD IN BD IN CD/SAT
OUT
ASSIGNABLE
COAXIAL
OPTICAL
IN
1
IN
1
FM
UNBAL
75
(
CD-R / TAPE
)
(
TV
)
Se l’apparecchio che desiderate
AUDIO
collegare non possiede un
CD-R/TAPE
SURR BACK
OUT
PRE OUT
terminale di uscita HDMI,
L
la connessione può essere
(
Single
)
eseguita attraverso questi
R
terminali.
l
“Connettere il
vostro componente senza un
VIDEO
L
terminale HDMI”
IN CD/SAT
IN
ANTENNA
FRONT CENTER
SURROUND SUBWOOFER
CD/SAT
R
AM LOOP
RLRL
DVD
L
IN
IN
R
MONITOR
FM
OUT
TV
DVD
UNBAL
75
SPEAKERS
A
Collegamento del ricevitore
Procedere al collegamento solo dopo aver connesso al ricevitore tutti i componenti, ivi compresi gli
ATTENZIONE
altoparlanti.
• Maneggiare il cavo di alimentazione dal lato della
1
Collegare il cavo di alimentazione fornito alla presa AC IN sul retro del ricevitore.
spina. Non estrarre la spina tirando il cavo e non
2
Inserire l’altra estremità in una presa di corrente.
toccare mai il cavo d’alimentazione con le mani
bagnate, altrimenti si può verificare un corto circuito
o scosse elettriche. Non appoggiare l’apparecchio,
mobili o altri oggetti sul cavo di alimentazione, né
comprimerlo in alcun modo. Non fare mai nodi
al cavo, né legarlo ad altri cavi. Far passare i cavi
AC IN
d’alimentazione in modo tale che non sia possibile
calpestarli. Un cavo d’alimentazione danneggiato
può causare un incendio o folgorazione. Controllare il
cavo d’alimentazione ogni tanto. Se si dovesse trovare
il cavo danneggiato, rivolgersi al più vicino centro
di assistenza autorizzato Pioneer per richiederne la
sostituzione.
All’uscita di corrente
• Utilizzare solo ed esclusivamente il cavo di
alimentazione fornito con questo apparecchio.
• Utilizzare il cavo di alimentazione fornito solo ed
esclusivamente al fine descritto qui di seguito.
• Quando si prevede di non utilizzare il ricevitore per un
certo tempo, ad esempio se si va in vacanza, staccare
la spina dalla presa a muro.
4
It
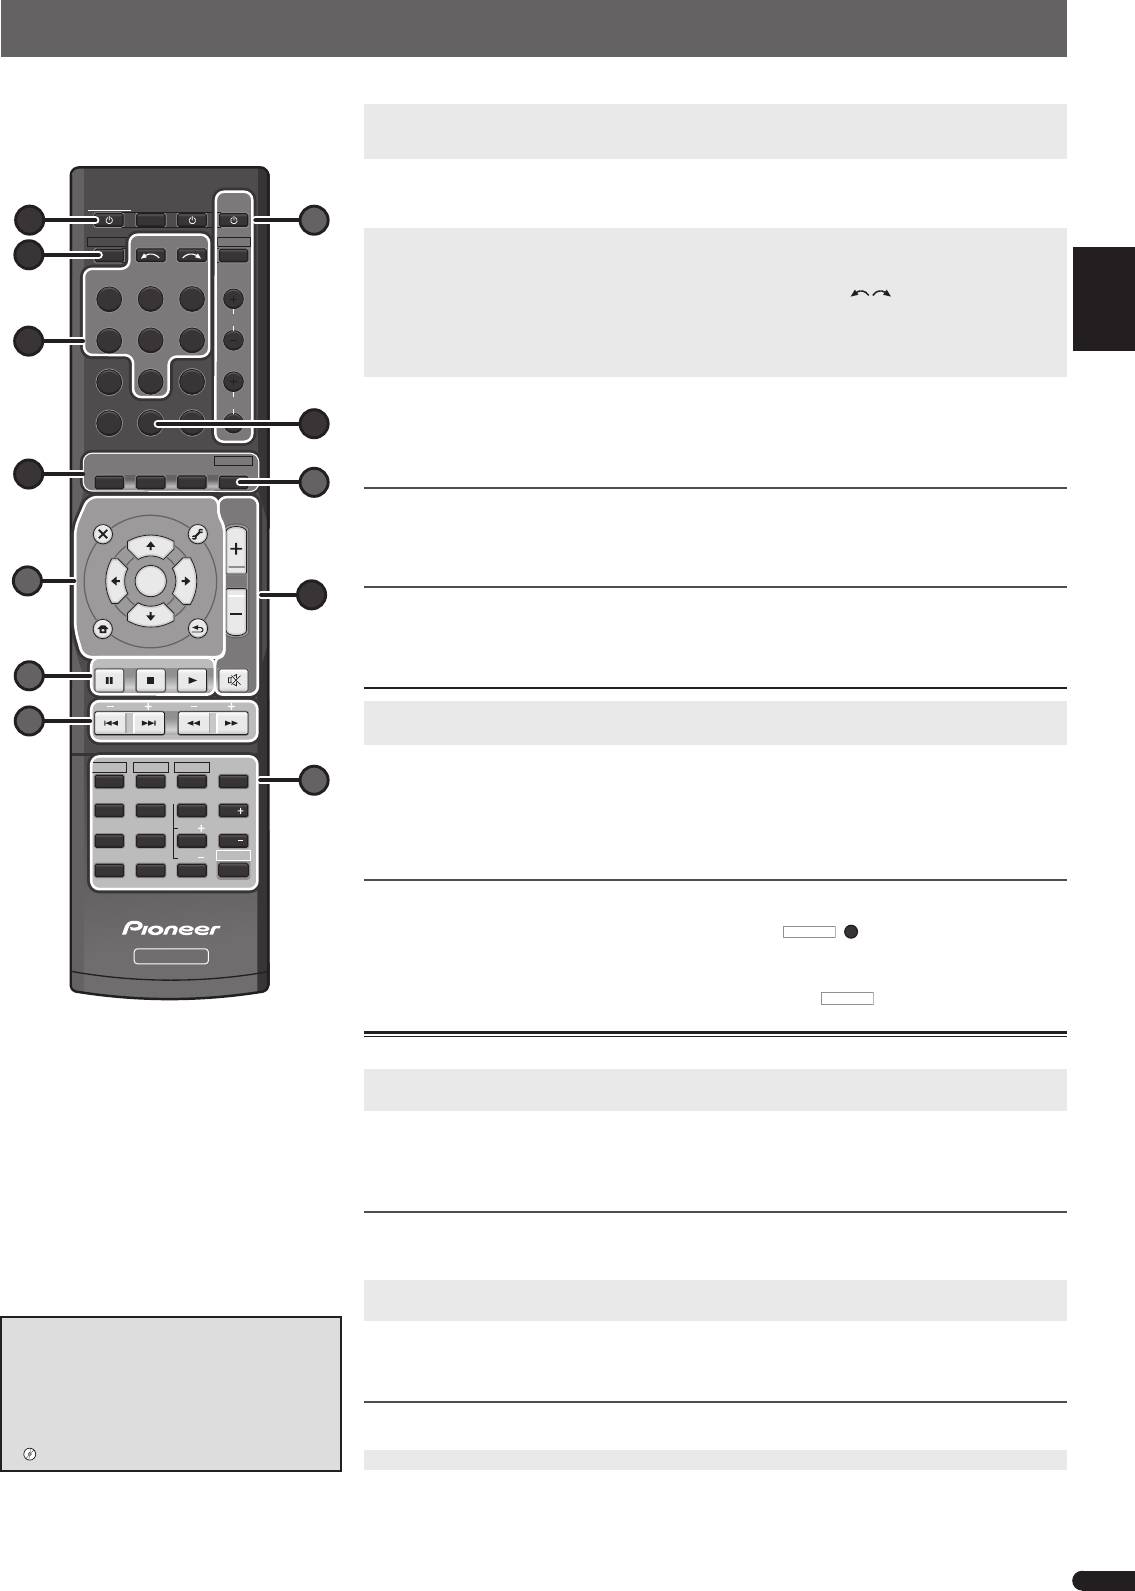
English
0
Riproduzione di base
Di seguito sono riportate le istruzioni di base per riprodurre una sorgente (ad esempio un Blu-ray Disc) con il sistema home theater.
• I seguenti tasti non sono usati con questo ricevitore:
1
Accendere i componenti del sistema e il ricevitore.
– ADAPTER, PORTABLE
Iniziare commutando sulla componente di playback (per esempio un lettore Blue-ray Disc) la vostra TV, e poi il
Français
ricevitore (premere
u
RECEIVER
).
2
Commutate l’entrata della TV su quella che connette questo ricevitore.
TV
Per esempio, se avete connesso questo ricevitore alle prese jack
VIDEO
sulla vostra TV, assicuratevi che l’entrata
RECEIVER
SOURCESLEEP
CONTROL
VIDEO
sia stata selezionata.
1
B
RECEIVER DTV/TV
INPUT SELECT
3
Premete i tasti di entrata funzione per selezionare la funzione d’entrata che volete attivare.
7
INPUT
• L’entrata del ricevitore si attiverà e sarete in grado di mettere in funzione altre componenti attraverso il
Italiano
telecomando.
BD DVD TV
• Si può selezionare la sorgente di entrata anche tramite i tasti
INPUT SELECT
sul telecomando o usando
la tastiera INPUT SELECTOR sul pannello frontale. In tal caso, il telecomando non commuterà sulle modalità
DVR/BDR
CD
CD-R
CH
operative.
3
• Premete SIGNAL SEL per selezionare il segnale di entrata audio corrispondente alla componente sorgente (HDMI,
ADAPTER
TUNER
PORTABLE
digitale o analogico).
Nederlands
PHASE
SIGNAL SELS.RETRIEVER
VOL
4
Premere AUTO/DIRECT per scegliere ‘AUTO SURROUND’ e riprendere la riproduzione della sorgente.
Se state riproducendo un suono surround Dolby Digital o DTS di un disco Blu-ray/DVD, con una connessione audio-
6
digitale, dovreste ascoltare un suono surround. Se state riproducendo da una sorgente stereo o se la connessione
è audio-analogica, ascolterete solo suono proveniente dagli altoparlanti anteriori, sinistro e destro in modalità di
AUTO/
ALC/
BD MENU
DIRECT
STEREO
STANDARD
ADV SURR
ascolto default.
4
A
AUDIO
TUNER EDIT
MASTER
Ascoltare in suono surround standard
Español
PARAMETER
TOOLS
VOLUME
TOP
T
U
N
E
MENU
Questo ricevitore fornisce suono surround base per sorgenti stereo e multicanale.
MENU
Se state ascoltando una sorgente, premete ALC/STANDARD ripetutamente per selezionare la modalità
T
P
E
R
di ascolto.
S
E
A
E
ENTER
S
R
T
E
P
5
Ascoltare in suono surround avanzato
HOME
Gli effetti surround avanzati possono essere utilizzati per numerosi effetti surround aggiuntivi.
Deutsch
MENU
T
U
N
E
BAND
SETUP
RETURN
PTY SEARCH
Se state ascoltando una sorgente, premete ADV SURR ripetutamente per selezionare la modalità di
MUTE
ascolto.
B
BASS
TRE
5
Usate MASTER VOLUME +/– per regolare il livello del volume.
A
• Il suono può essere disattivato premendo il tasto MUTE.
HDD
DVD
VCR
6
Gustate il piacere di una varietà di suoni.
12
3
DISP
A
Premete S.RETRIEVER per commutare l’impostazione del Sound Retriever su ON o su OFF.
TEST TONE
SB CH
CH SELECT
CH
• Quando si rimuovono dati audio durante il processo di compressione, la qualità del suono spesso si riduce a
456
causa della mancanza di uniformità di immagine dei suoni. La funzione Sound Retriever impiega l’innovativa
MIDNIGHT
SPEAKERS
LEV
789
CH
tecnologia DSP, che consente di ripristinare un suono di qualità CD per il suono a 2 canali compresso,
DIMMER
LEV
SHIFT
ripristinando la pressione sonora e livellando i picchi causati dalla compressione.
A
CLR
0
ENTER
+
10
Altre funzioni del telecomando
• L’entrata del ricevitore si attiverà e sarete in grado di mettere in funzione altre componenti attraverso il
telecomando. Per mettere in funzione il ricevitore, prima premete
RECEIVER
(
7
)
, poi premete il tasto adatto per
operare.
RECEIVER
Usate i tasti “A” per regolare le impostazioni di questo ricevitore e operare su altri apparecchi.
Usare i tasti “B” per operare sulla TV. Dopo aver premuto il tasto
RECEIVER
è ancora possibile operare.
Ascolto della radio
1
Per scegliere il sintonizzatore, premere TUNER.
Se necessario, premete
BAND
per cambiare banda (FM o AM).
2
Premete
TUNE
per sintonizzarvi su una stazione.
• Premete e tenete premuto
TUNE
per circa un secondo. Il ricevitore inizierà a cercare la prossima stazione.
Se si sta ascoltando una stazione FM, ma la ricezione è debole, premere
BAND
per selezionare
FM MONO
e
impostare il ricevitore in modalità di ricezione mono.
Come salvare le stazioni di preselezione
Se si ascolta spesso una particolare stazione radio, è comodo memorizzare la frequenza della stessa per un facile
richiamo ogni qualvolta si desidera ascoltare la stazione in questione.
1
Premete TUNER EDIT mentre state ricevendo il segnale di una stazione che intendete memorizzare.
Sul display appare l’indicazione
PRESET
, poi l’indicazione
MEM
lampeggiante e la stazione preselezionata.
Annullare lo Spegnimento Automatico
2
Premere PRESET
l
(o i tasti numerici) per selezionare la stazione preimpostata che si desidera, poi
Se il ricevitore non viene usato per diverse ore, si
premere ENTER.
spegnerà automaticamente. Il timer di spegnimento
Il numero pre-impostato cessa di lampeggiare e il ricevitore memorizza la stazione.
automatico è fissato su sei ore secondo le
impostazioni di fabbrica e il periodo può essere
cambiato oppure la funzione di spegnimento può
Ascolto delle stazioni memorizzate
essere eliminata completamente.
È necessario aver memorizzato delle stazioni per poterle ascoltare.
l
“Il menù Spegnimento Automatico”
Premere PRESET
l
(o i tasti numerici) per selezionare la stazione preimpostata che si desidera.
© 2011 PIONEER CORPORATION.
Tutti i diritti riservati.
5
It
Nederlands
Voor meer gedetailleerde informatie wordt u verwezen naar de “Handleiding” die op de bijgeleverde CD-ROM staat. De Handleiding kan ook worden gedownload vanaf de Pioneer website
(http://www.pioneer.eu). Zie hieronder voor verdere informatie over het gebruik van de CD-ROM.
0
Omgeving bediening
— Deze CD-ROM kan worden gebruikt met Microsoft® Windows® 95/98/Me/NT/2000/XP/Vista/7 en Apple Mac OS X 10.4. Adobe Reader (Version 4.0 of later)
is vereist om bepaalde documenten op deze CD-ROM te kunnen lezen.
0
Voorzorgsmaatregelen voor gebruik
— Deze CD-ROM is bedoeld voor gebruik met een PC. Deze schijf kan
niet worden gebruikt met een DVD-speler of CD-speler voor muziek. Als er wordt geprobeerd deze CD-ROM af te spelen met een DVD-speler of muziek CDspeler, kunnen de luidsprekers
beschadigd raken of kan uw gehoor zelfs beschadigd raken vanwege het hoge volume.
0
Licentie
— U dient akkoord te gaan met de “Gebruiksvoorwaarden” hieronder voor u deze CD-ROM
gaat gebruiken. Gebruik de CD-ROM niet als u niet akkoord wilt gaan met de voorwaarden voor gebruik ervan.
0
Gebruiksvoorwaarden
— De auteursrechten op de gegevens op deze
CD-ROM behoren toe aan PIONEER CORPORATION. Overdracht, duplicatie, uitzending, openbare overdracht, vertaling, verkoop, uitleen of andere dergelijke handelingen die verder gaan
dan wat gemeenlijk kan worden verstaan onder “persoonlijk gebruik” of “citeren” zoals gedefinieerd in de op het auteursrecht betrekking hebbende regelgeving zonder toestemming kan
onderwerp vormen van gerechtelijke actie. Toestemming tot gebruik van deze CD-ROM wordt onder licentie verleend door PIONEER CORPORATION.
0
Algemene disclaimer
— PIONEER
CORPORATION geeft geen garantie betreffende de werking van deze CD-ROM op persoonlijke computers met één van de genoemde besturingssystemen. Daarbij aanvaardt PIONEER
CORPORATION geen aansprakelijkheid voor enige schade als gevolg van gebruik van deze CD-ROM en is niet verantwoordelijk voor enige compensatie. De namen van bedrijven, producten
en andere dingen die hierin beschreven worden zijn gedeponeerde handelsmerken of handelsmerken van hun respectievelijke eigenaren.
* Wanneer u Mac OS gebruikt:
Plaats deze CD-ROM in een CD-station en dubbelklik op het pictogram voor de CD-ROM om de applicatie op te starten.
De batterijen plaatsen
BELANGRIJK
De bij het systeem meegeleverde batterijen zijn
CAUTION
bestemd voor het eerste gebruik en niet voor langdurig
RISK OF ELECTRIC SHOCK
gebruik. Wij adviseren het gebruik van duurzame
DO NOT OPEN
alkalische batterijen.
De lichtflash met pijlpuntsymbool in een
WAARSCHUWING:
Het uitroepteken in een gelijkzijdige
gelijkzijdige driehoek is bedoeld om de
OM HET GEVAAR VOOR EEN ELEKTRISCHE
driehoek is bedoeld om de aandacht van de
aandacht van de gebruikers te trekken op
SHOCK TE VOORKOMEN, DEKSEL (OF
gebruiker te trekken op de aanwezigheid van
een niet geïsoleerde “gevaarlijke spanning”
RUG) NIET VERWIJDEREN. AAN DE
belangrijke bedienings- en
in het toestel, welke voldoende kan zijn om
BINNENZIJDE BEVINDEN ZICH GEEN
onderhoudsinstructies in de handleiding bij
bij aanraking een elektrische shock te
ELEMENTEN DIE DOOR DE GEBRUIKER
dit toestel.
veroorzaken.
KUNNEN BEDIEND WORDEN. ENKEL
DOOR GEKWALIFICEERD PERSONEEL TE
BEDIENEN.
D3-4-2-1-1_A1_Nl
WAARSCHUWING
• Verkeerd gebruik van de batterijen kan lekkage of het
Gebruikersinformatie voor het verzamelen en verwijderen van oude producten en
barsten van de batterijen tot gevolg hebben. Neem
batterijen
de volgende voorzorgsmaatregelen in acht:
– Gebruik nooit oude en nieuwe batterijen door
Symbool voor
De symbolen op producten, verpakkingen en bijbehorende documenten geven aan
elkaar.
toestellen
dat de gebruikte elektronische producten en batterijen niet met het gewone
huishoudelijk afval kunnen worden samengevoegd.
– Plaats de batterijen zodanig dat de plus- en
Er bestaat een speciaal wettelijk voorgeschreven verzamelsysteem voor de juiste
minpolen overeenkomen met de merktekens in het
behandling, het opnieuw bruikbaar maken en de recyclage van gebruikte producten
batterijvak.
en batterijen.
– Batterijen met dezelfde vorm kunnen een
verschillende spanning hebben. Gebruik
Door een correcte verzamelhandeling zorgt u ervoor dat het verwijderde product en/of
verschillende soorten batterijen niet samen.
Symbolen
batterij op de juiste wijze wordt behandeld, opnieuw bruikbaar wordt gemaakt, wordt
– Wanneer u gebruikte batterijen weggooit, dient u
voor batterijen
gerecycleerd en het niet schadelijk is voor de gezondheid en het milieu.
zich te houden aan de wettelijke voorschriften of
Voor verdere informatie betreffende de juiste behandling, het opnieuw bruikbaar
de milieuwetgeving die in uw land of gebied van
maken en de recyclage van gebruikte producten en batterijen kunt u contact opnemen
toepassing zijn.
met de plaatselijke overheid of een verkooppunt.
– Gebruik of bewaar batterijen niet in direct zonlicht
Deze symbolen zijn enkel geldig in de landen van de europese unie.
of op een hete plaats, zoals in de auto of bij een
kachel. Batterijen kunnen hierdoor gaan lekken,
oververhitten, exploderen of in brand vliegen.
Indien u zich in een ander dan bovengenoemde landen bevindt kunt u contact
Dit kan tevens de levensduur van de batterijen
opnemen met de plaatselijke overheid voor meer informatie over de juiste verwijdering
verkorten.
Pb
van het product.
K058a_A1_Nl
De receiver installeren
• Installeer dit toestel op een vlak en stabiel oppervlak.
Als de netstekker van dit apparaat niet geschikt is
WAARSCHUWING
Installeer het niet op de volgende plaatsen:
voor het stopcontact dat u wilt gebruiken, moet u de
Dit apparaat is niet waterdicht. Om brand of een
– op een kleuren-TV (kan beeldvervorming
stekker verwijderen en een geschikte stekker
elektrische schok te voorkomen, mag u geen voorwerp
veroorzaken)
aanbrengen. Laat het vervangen en aanbrengen van
dat vloeistof bevat in de buurt van het apparaat zetten
(bijvoorbeeld een bloemenvaas) of het apparaat op
– dicht bij een cassettedeck (of een ander apparaat
een nieuwe netstekker over aan vakkundig
dat een magnetisch veld opwekt). Dit kan
onderhoudspersoneel. Als de verwijderde stekker per
andere wijze blootstellen aan waterdruppels,
opspattend water, regen of vocht.
storingen in het geluid veroorzaken.
ongeluk in een stopcontact zou worden gestoken,
D3-4-2-1-3_A1_Nl
kan dit resulteren in een ernstige elektrische schok.
– in rechtstreeks zonlicht
Zorg er daarom voor dat de oude stekker na het
– in een vochtige of natte ruimte
verwijderen op de juiste wijze wordt weggegooid.
– in een zeer warme of koude ruimte
Haal de stekker van het netsnoer uit het stopcontact
– op plaatsen die onderhevig zijn aan trillingen of
wanneer u het apparaat geruime tijd niet denkt te
andere bewegingen
gebruiken (bijv. wanneer u op vakantie gaat).
– op zeer stoffige plaatsen
D3-4-2-2-1a_A1_Nl
– op plaatsen waar hete dampen of olie aanwezig
zijn (bv. in de keuken)
LET OP
De STANDBY/ON schakelaar van dit apparaat
koppelt het apparaat niet volledig los van het lichtnet.
WAARSCHUWING:
Aangezien er na het uitschakelen van het apparaat
Dit apparaat mag niet als speelgoed worden gebruikt.
nog een kleine hoeveelheid stroom blijft lopen, moet
Let daar goed op als er kinderen in de buurt zijn. Het
u de stekker uit het stopcontact halen om het
apparaat kan worden beschadigd of omvallen, wat kan
apparaat volledig van het lichtnet los te koppelen.
leiden tot lichamelijk letsel.
Plaats het apparaat zodanig dat de stekker in een
noodgeval gemakkelijk uit het stopcontact kan
worden gehaald. Om brand te voorkomen, moet u de
stekker uit het stopcontact halen wanneer u het
apparaat langere tijd niet denkt te gebruiken (bijv.
wanneer u op vakantie gaat).
D3-4-2-2-2a*_A1_Nl
Dit apparaat is bestemd voor normaal huishoudelijk
gebruik. Indien het apparaat voor andere doeleinden
of op andere plaatsen wordt gebruikt (bijvoorbeeld
langdurig gebruik in een restaurant voor zakelijke
doeleinden, of gebruik in een auto of boot) en als
gevolg hiervan defect zou raken, zullen de reparaties
in rekening gebracht worden, ook als het apparaat
nog in de garantieperiode is.
2
K041_A1_Nl
Nl
W
AARSCHUWING
L
ees zorgvuldig de volgende informatie voordat u de
stekk
er de eerste maal in het stopcontact steekt.
De bedrijfsspanning van het apparaat verschilt
afhank
elijk van het land waar het apparaat wordt
verk
ocht. Zorg dat de netspanning in het land waar
het apparaat wor
dt gebruikt overeenkomt met de
bedrijfsspanning (bij
v. 230 V of 120 V) aangegeven
op de achterkant van het apparaat
.
D3-4-2-1-4*_A1_Nl
WAARSCHUWING
Om brand te voorkomen, mag u geen open vuur (zoals
een brandende kaars) op de apparatuur zetten.
D3-4-2-1-7a_A1_Nl
Gebruiksomgeving
Pioneer kan niet aansprakelijk worden gesteld
Temperatuur en vochtigheidsgraad op de plaats van
voor ongevallen of schade die het gevolg zijn
gebruik:
van onjuiste montage, verkeerd gebruik of
+5 °C tot +35 °C, minder dan 85 % RH
wijziging van het product, of als gevolg van
(ventilatieopeningen niet afgedekt)
natuurrampen.
Zet het apparaat niet op een slecht geventileerde plaats
en stel het apparaat ook niet bloot aan hoge
vochtigheid of direct zonlicht (of sterke kunstmatige
verlichting).
D3-4-2-1-7c*_A1_Nl
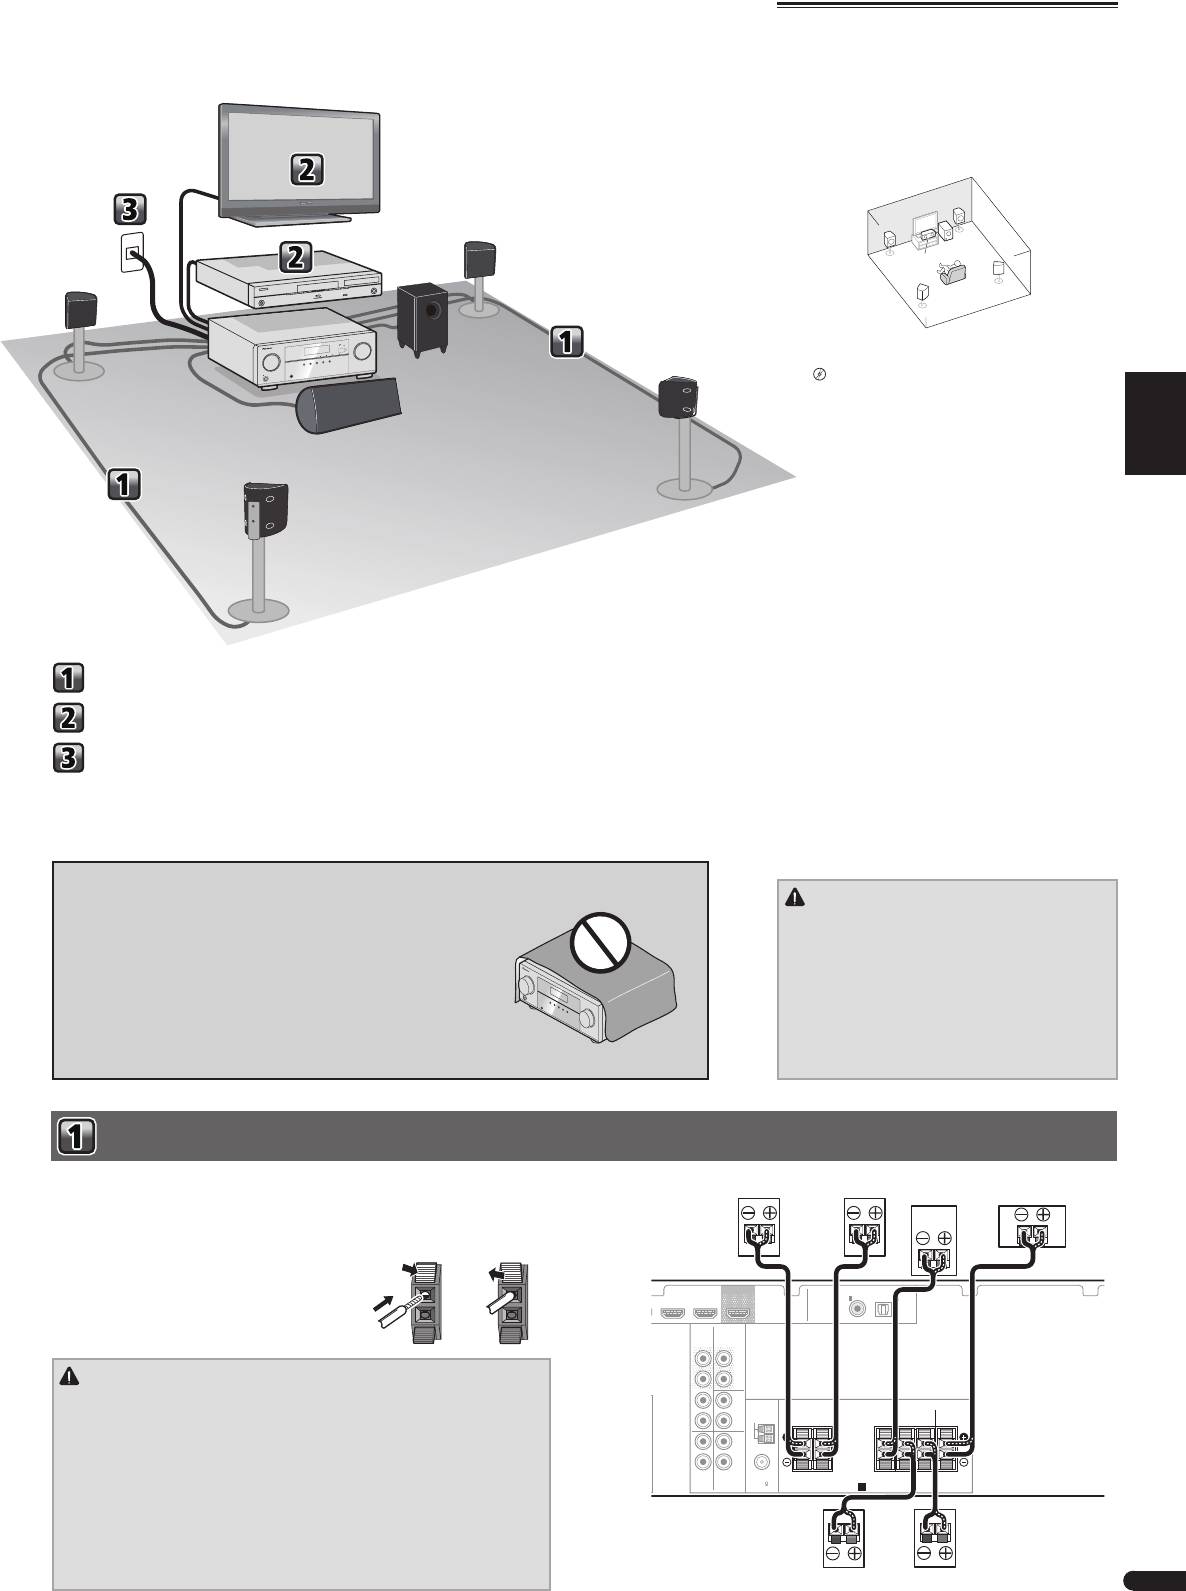
English
Français
Italiano
Nederlands
Español
Deutsch
De luidsprekers aansluiten
Aansluiting van uw TV en weergave-apparatuur
De receiver aansluiten op het stopcontact
De luidsprekers aansluiten
BD IN CD/SAT
OUT
ASSIGNABLE
COAXIAL
OPTICAL
IN
1
IN
1
(
CD-R / TAPE
)
(
TV
)
AUDIO
CD-R/TAPE
SURR BACK
OUT
PRE OUT
Single
(
L
)
WAARSCHUWING
R
• Op deze luidsprekeraansluitingen staat een GEVAARLIJKE spanning. Om
L
IN CD/SAT
IN
ANTENNA
een elektrische schok te voorkomen bij het aansluiten en losmaken van de
R
AM LOOP
FRONT CENTER
SURROUND SUBWOOFER
RLRL
luidsprekerkabels, moet u de stekker uit het stopcontact halen voordat u
L
niet geïsoleerde onderdelen aanraakt.
IN
IN
R
• Zorg dat de ontblote draaduiteinden van de luidsprekerkabel stevig in elkaar
TV
DVD
FM
UNBAL
zijn gedraaid en volledig in de luidsprekeraansluiting steken. Wanneer kale
75
SPEAKERS
A
luidsprekerdraad contact maakt met het achterpaneel, kan hierdoor het
apparaat worden uitgeschakeld als veiligheidsmaatregel.
• Sluit de bijgeleverde subwoofer niet op een andere versterker aan dan die
bij dit systeem wordt geleverd. Aansluiting op een andere versterker kan
resulteren in een defect of brand.
3
Nl
AC I
N
De luidsprekers opstellen
De receiver werkt al met twee stereoluidsprekers
(de voorluidsprekers in de afbeelding). Het verdient
echter aanbeveling ten minste drie luidsprekers te
gebruiken en een complete opstelling is het beste voor
surroundgeluid.
Stel uw luidsprekers op zoals hieronder getoond om
een optimaal surroundgeluid te verkrijgen.
5.1-kanaals surroundsysteem:
R
L
SW
C
SR
SL
• Daarnaast kunnen tevens surroundspeakers worden
aangesloten.
l
“Sluit de surround-achterluidsprekers aan”
• De subwoofer en de surroundspeakers zijn niet
magnetisch beschermd en mogen daarom niet in
de buurt van een TV of monitor worden geplaatst,
omdat door de wisselwerking tussen magnetisch
materiaal de kleuren op uw TV-scherm kunnen
vervormen. Apparatuur die gemakkelijk door
magnetisch materiaal wordt aangetast (magnetische
mediakaarten, polshorloges, videotapes, enz.)
mag niet in de buurt van de subwoofer en
surroundspeakers worden geplaatst.
• De voorluidsprekers en de middenluidspreker in
dit systeem zijn ontworpen voor gebruik dichtbij
een beeldbuistelevisie of kleurenmonitor. Als er
echter kleurvervorming optreedt als gevolg van
de opstelling, schakel dan de beeldbuistelevisie
of kleurenmonitor 15 tot 30 minuten uit en
schakel de apparatuur daarna weer in. De zelf-
degaussing functie die in de beeldbuistelevisie of
kleurenmonitor is ingebouwd, zou een eventueel
effect van de luidsprekers op het beeld moeten
verminderen. Als kleurvervorming een probleem
blijft vormen, moet u de luidsprekers verder van
het scherm vandaan plaatsen. Als magneten of
apparaten die een magnetisch veld opwekken
in de buurt staan, kan interactie met het
luidsprekersysteem kleurvervorming veroorzaken in
een beeldbuistelevisie of kleurenmonitor.
• Bevestig de middenluidspreker en de subwoofer niet
aan de muur of het plafond, want deze luidsprekers
kunnen letsel veroorzaken als ze vallen.
Zorg ervoor dat de luidspreker aan de rechterzijde op het rechteraansluitpunt (R), en de
Voor-rechts
Voor-links
Midden
Subwoofer
luidspreker aan de linkerzijde op het linkeraansluitpunt (L) wordt aangesloten. Ook moeten
de positieve en negatieve (+/–) aansluitingen op de receiver overeenkomen met die op de
luidsprekers.
Basisbedradingsaansluitingen
1
Duw de klemaansluiting open en steek
de ontblote draad naar binnen.
2
Laat de klemaansluiting los.
Surround-
Surround-
rechts
links
12
Stroomschema voor de instellingen op de
receiver
Dit apparaat is een multifunctionele AV-receiver die is
uitgerust met talloze voorzieningen en aansluitingen.
Het apparaat kan gemakkelijk worden gebruikt door de
onderstaande aanwijzingen te volgen voor het maken
TV
van de aansluitingen en instellingen.
L
Voor-links
(S-11-P)
Blu-ray Disc-
R
apparaat
Voor-rechts
(S-11-P)
SW
Subwoofer
(S-22W-P)
Deze receiver
(VSX-321-K-P)
C
Midden
SR
(S-11-P)
Surround-rechts
(S-11-P)
SL
Surround-links
(S-11-P)
BELANGRIJKE INFORMATIE BETREFFENDE DE VENTILATIE
Let er bij het installeren van het apparaat op dat er voldoende vrije ruimte
WAARSCHUWING
rondom het apparaat is om een goede doorstroming van lucht te
• Plaats de middenluidspreker onder het
waarborgen (tenminste 20 cm boven, 10 cm achter en 10 cm aan de
zijkanten van het apparaat).
televisietoestel, zodat de klank van het middenkanaal
zich rond het televisiescherm bevindt.
WAARSCHUWING
• Plaatst u de middenluidspreker bovenop het
De gleuven en openingen in de behuizing van het apparaat zijn aangebracht
televisietoestel, bevestig hem dan met plakband
voor de ventilatie, zodat een betrouwbare werking van het apparaat wordt
of een ander geschikt middel. Zo niet, kan de
verkregen en oververhitting wordt voorkomen. Om brand te voorkomen, moet
luidspreker van het televisietoestel af vallen door
u ervoor zorgen dat deze openingen nooit geblokkeerd worden of dat ze
externe schokken, zoals aardschokken, en kunnen
afgedekt worden door voorwerpen (kranten, tafelkleed, gordijn e.d.) of door
de omstanders in gevaar worden gebracht of kan
gebruik van het apparaat op een dik tapijt of een bed.
D3-4-2-1-7b*_A1_Nl
de luidspreker beschadigd raken.
Zorg ervoor dat alle
aansluitingen tot stand
zijn gebracht voordat u de
stekker van dit toestel in
het stopcontact steekt.
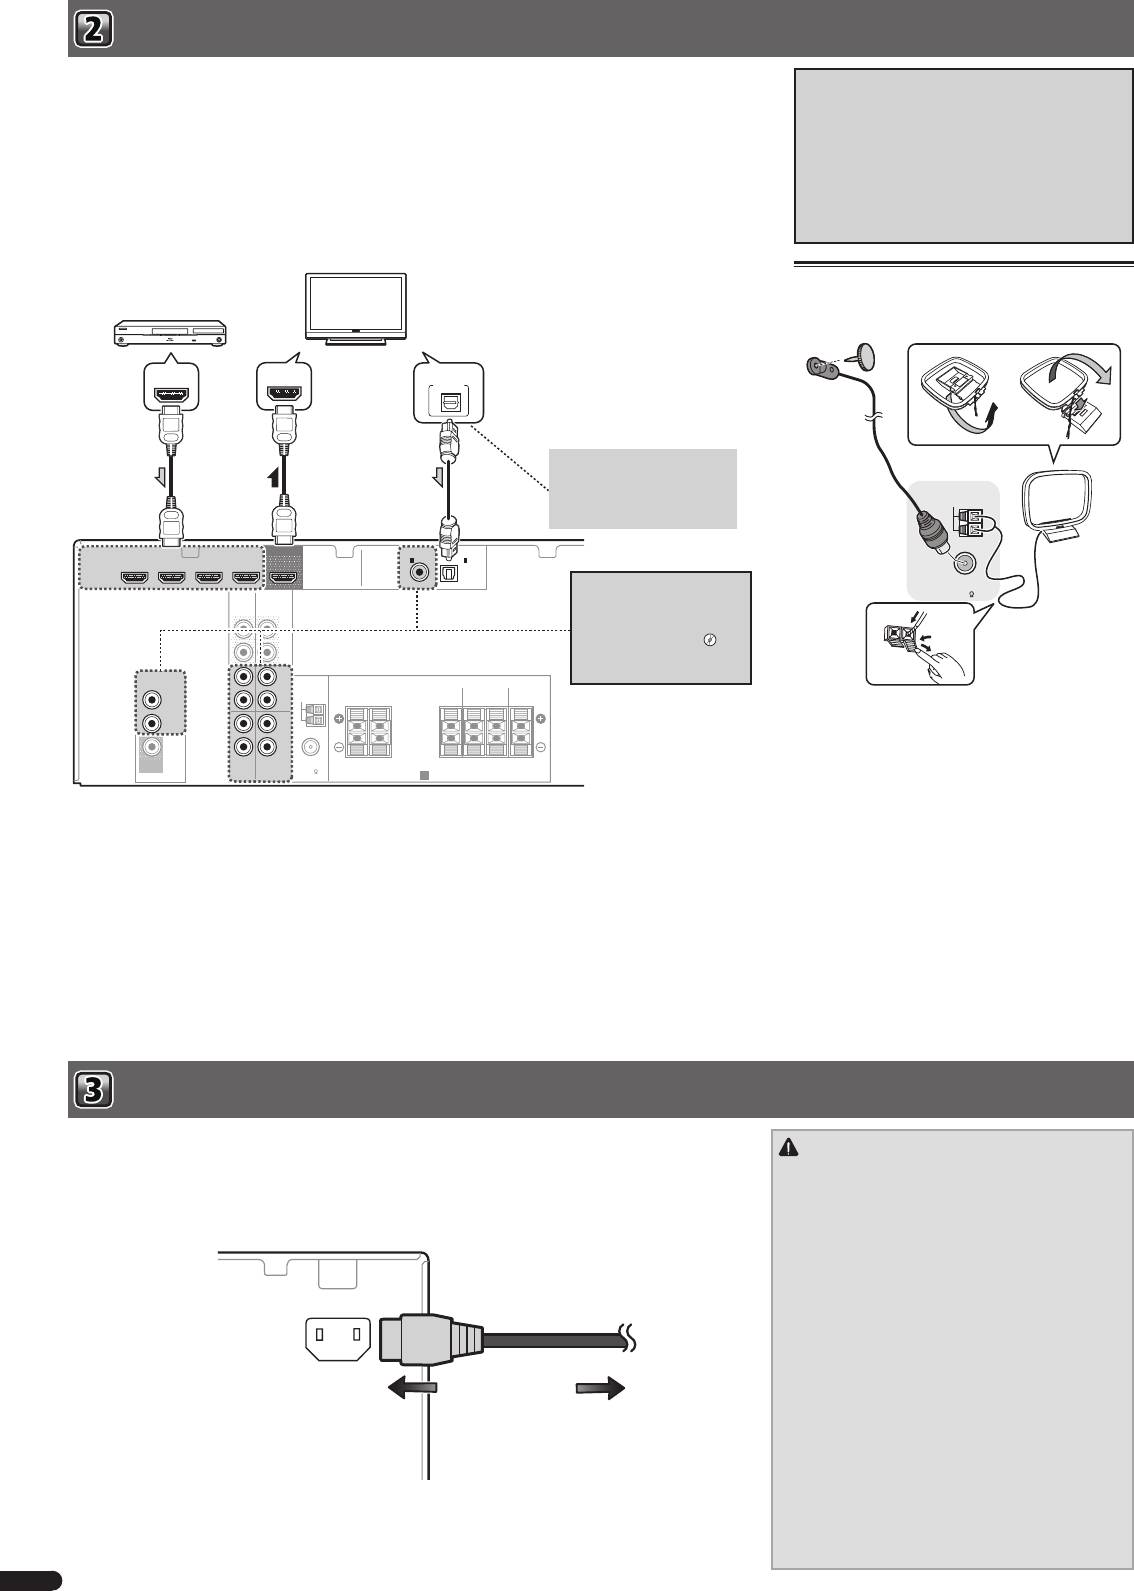
Aansluiting van uw TV en weergave-apparatuur
Als u een apparaat hebt dat is uitgerust met HDMI of DVI (met HDCP) (zoals een Blu-ray Disc-speler enz.), kunt u
Informatie over aansluitingen voor de
dit aansluiten op de receiver met een algemeen verkrijgbare HDMI-kabel.
video-uitgangen
• De volgende aansluiting/instelling is vereist om naar geluid van de TV via deze receiver te luisteren.
Deze receiver is niet voorzien van een videoconverter.
– Als de TV de HDMI Audio Return Channel-functie niet ondersteunt, sluit dan de receiver en de TV met
Als u HDMI-kabels gebruikt voor aansluiting op het
audiokabels aan (zoals getoond).
ingangsapparaat, dienen dezelfde kabels te worden
– Als de TV de HDMI Audio Return Channel-functie ondersteunt, dan wordt het geluid van de TV via het HDMI-
gebruikt voor aansluiting op de TV.
aansluitpunt op de receiver weergegeven, zodat aansluiting van een audiokabel niet nodig is. Zet in dat geval
De signaalinvoer van de analoge (composiet) video-
ARC bij HDMI Setup op ON.
ingang van dit apparaat wordt niet via de HDMI OUT
– De ARC-functie werkt mogelijk ook niet met de hierboven aangegeven aansluitingen. Sluit de receiver en de TV
uitgevoerd.
in dat geval aan via een audiokabel.
Antennes aansluiten
HDMI/DVI-compatible componenten
(Blu-ray Disc-apparaat,enz.)
Sluit de FM-draadantenne en de AM-lusantenne aan
HDMI/DVI-compatible TV
zoals hieronder aangegeven.
HDMI INHDMI OUT DIGITAL AUDIO OUT
OPTICAL
Als de TV de HDMI Audio Return
Channel-functie niet ondersteunt,
dan moet deze aansluiting
ANTENNA
worden uitgevoerd om naar TV-
AM LOOP
geluid via de receiver te luisteren.
HDMI
DVR/BDR IN DVD IN BD IN CD/SAT
OUT
ASSIGNABLE
COAXIAL
OPTICAL
IN
1
IN
1
(
CD-R / TAPE
)
(
TV
)
Als het apparaat dat u wilt
FM
UNBAL
AUDIO
aansluiten geen HDMI-
75
CD-R/TAPE
SURR BACK
OUT
PRE OUT
uitgangaansluitpunt heeft, kan
(
L
Single
)
het via deze aansluitpunten
worden aangesloten.
l
“Een
R
apparaat zonder HDMI-ingang
aansluiten”
VIDEO
L
IN CD/SAT
IN
ANTENNA
FRONT CENTER
SURROUND SUBWOOFER
CD/SAT
R
AM LOOP
RLRL
DVD
L
IN
IN
R
MONITOR
FM
OUT
TV
DVD
UNBAL
75
SPEAKERS
A
De receiver aansluiten op het stopcontact
Sluit de receiver pas aan, nadat u al uw componenten op deze receiver hebt aangesloten, waaronder
WAARSCHUWING
de luidsprekers.
• Pak het netsnoer alleen bij het stekkerdeel beet. Trek
1
Steek het meegeleverde netsnoer in de AC IN-aansluiting aan de achterzijde van de
de stekker niet uit door aan het snoer te rukken en
receiver.
raak het netsnoer nooit met natte handen aan; dit
2
Steek de stekker van het netsnoer in het stopcontact.
kan een kortsluiting of elektrische schok tot gevolg
hebben. Plaats het apparaat, een meubelstuk of
enig ander voorwerp niet op het netsnoer en knel
het netsnoer op geen enkele manier af. Maak nooit
een knoop in het netsnoer of knoop deze samen met
AC IN
andere kabels. Leid de netsnoeren zodanig dat de
kans klein is dat er iemand op trapt. Een beschadigd
netsnoer kan brand of een elektrische schok
veroorzaken. Controleer regelmatig de staat van het
netsnoer. Wanneer u beschadigingen aantreft, vraagt
u uw dichtstbijzijnde Pioneer-erkende, onafhankelijke
servicecentrum om het netsnoer te vervangen.
Naar het stopcontact
• Gebruik uitsluitend het netsnoer dat bij dit apparaat is
meegeleverd.
• Gebruik het netsnoer uitsluitend voor het doel dat
hieronder staat beschreven.
• Wanneer de receiver niet geregeld wordt gebruikt,
bijv. tijdens vakanties, moet hij losgekoppeld zijn door
de stekker van het netsnoer uit het stopcontact te
trekken.
4
Nl

English
Basisbediening voor afspelen
Dit zijn algemene instructies voor het afspelen van een bron, zoals een Blu-ray Disc, met het thuistheatersysteem.
• De volgende toetsen worden niet bij deze receiver
1
Zet de apparatuur van het systeem en de receiver aan.
gebruikt:
Begin met het inschakelen van het weergavecomponent (bijvoorbeeld een Blu-ray Disc-speler, uw TV), en daarna de
Français
– ADAPTER, PORTABLE
receiver (druk op
u
RECEIVER
).
2
Zet de TV-ingang op de ingang waarop deze receiver is aangesloten.
Als u de receiver bijvoorbeeld op het
VIDEO
-contactpunt van uw TV heeft aangesloten, zorg er dan voor dat u thans
RECEIVER
TV
SOURCESLEEP
CONTROL
het
VIDEO
-contactpunt selecteert.
1
B
3
Druk op de ingangsfunctietoetsen om de ingangsfunctie die u wilt afspelen te selecteren.
RECEIVER DTV/TV
INPUT SELECT
• De ingang van de receiver schakelt over en vervolgens kunt u andere componenten via de afstandsbediening
Italiano
7
INPUT
bedienen.
BD DVD TV
• De ingangsbron kan tevens worden geselecteerd door de toetsen
INPUT SELECT
op de afstandsbediening
te gebruiken, of de INPUT SELECTOR-schijf op het voorpaneel. In dat geval schakelt de afstandsbediening niet
DVR/BDR
CD
CD-R
CH
over op de bedieningsmodes.
• Druk op SIGNAL SEL om het audio-ingangssignaal dat met de broncomponent overeenkomt te selecteren (HDMI,
3
digitaal of analoog).
ADAPTER
TUNER
PORTABLE
Nederlands
4
Druk op AUTO/DIRECT om ‘AUTO SURROUND’ te selecteren en te beginnen met het afspelen van de
PHASE
SIGNAL SELS.RETRIEVER
VOL
bron.
6
Als u via een digitale audio-aansluiting een Blu-ray/DVD-disc met Dolby Digital of DTS surroundgeluid afspeelt,
moet u surroundgeluid kunnen horen. Als u een stereobron afspeelt, of als de aansluiting een analoge audio-
AUTO/
ALC/
BD MENU
aansluiting betreft, hoort u alleen geluid uit de voorluidsprekers links/rechts in de standaardluisterfunctie.
DIRECT
STEREO
STANDARD
ADV SURR
4
A
Luisteren in Standard Surround Sound
Español
AUDIO
TUNER EDIT
MASTER
Deze receiver levert standaard surroundgeluid voor stereo- en multikanaalsbronnen.
PARAMETER
TOOLS
VOLUME
U
MENU
TOP
T
N
E
MENU
Wanneer u een bron beluistert, druk dan herhaald op ALC/STANDARD om een luistermodus te kiezen.
P
R
S
E
T
E
Luisteren in Advanced Surround Sound
E
ENTER
E
S
A
R
P
T
Met de geavanceerde surround-effecten kunnen diverse extra surround-geluidseffecten worden verkregen.
5
Deutsch
HOME
Wanneer u een bron beluistert, druk dan herhaald op ADV SURR om een luistermodus te kiezen.
MENU
T
U
N
E
BAND
SETUP
RETURN
PTY SEARCH
MUTE
5
Gebruik MASTER VOLUME +/– om het geluidsniveau in te stellen.
B
• Het geluid kan worden uitgeschakeld door op de MUTE-toets te drukken.
BASS
TRE
6
Verschillende geluidsmogelijkheden zijn beschikbaar.
A
Druk op S.RETRIEVER om de Sound Retriever-functie in of uit te schakelen (ON/OFF).
• Wanneer audiogegevens worden verwijderd tijdens het compressieproces, lijdt de geluidskwaliteit vaak aan
HDD
DVD
VCR
een ongelijk geluidsbeeld. De Sound Retriever-functie maakt gebruik van nieuwe DSP-technologie waarmee
12
3
DISP
A
het geluid van cd-kwaliteit kan worden hersteld voor gecomprimeerde 2-kanaals-audio door de geluidsdruk te
TEST TONE
SB CH
CH SELECT
456
CH
herstellen en hakerige storingen glad te strijken die achterblijven na compressie.
MIDNIGHT
SPEAKERS
LEV
789
CH
Overige functies van de afstandsbediening
DIMMER
LEV
SHIFT
A
CLR
0
ENTER
• De ingang van de receiver schakelt over en vervolgens kunt u andere componenten via de afstandsbediening
+
10
bedienen. Druk eerst op
RECEIVER
(
7
)
en vervolgens op de daarvoor bestemde toets om de receiver te bedienen.
Gebruik de toetsen in “A” om de instellingen van deze receiver aan te passen en andere apparaten te
bedienen.
Gebruik toetsen “B” om de TV te bedienen. Bediening is ook nog mogelijk nadat u op de toets
RECEIVER
RECEIVER
heeft gedrukt.
Naar de radio luisteren
1
Kies de tuner door op TUNER te drukken.
Druk indien nodig op
BAND
om de frequentie (FM of AM) te wijzigen.
2
Druk op TUNE
om op een station af te stemmen.
• Houd
TUNE
ongeveer één seconde lang ingedrukt. De receiver begint te zoeken naar het volgende station.
Als u luistert naar een FM-station maar de ontvangst is slecht, druk op
BAND
om
FM MONO
te selecteren en zet
de receiver op mono-ontvangst.
Voorkeurzenders opslaan
Als u vaak naar een bepaalde zender luistert, is het handig dat u de frequentie opslaat in het geheugen van de
receiver om hem later makkelijk te kunnen oproepen.
1
Druk op TUNER EDIT terwijl u een signaal ontvangt uit het station dat u wenst op te slaan.
In het scherm wordt
PRESET
weergegeven en vervolgens een knipperende
MEM
en de geheugenpositie.
Uitschakelen van de Auto Power Down
2
Druk op PRESET
l
(of de cijfertoetsen) om het gewenste presetstation te kiezen en druk dan op
Als deze receiver enkele uren lang niet wordt gebruikt,
ENTER.
schakelt hij automatisch uit. De automatische
Het voorkeuzenummer stopt met knipperen en de receiver slaat het station op.
Power Off-timer is ingesteld op zes uren volgens
de fabrieksinstellingen, en deze timing kan worden
gewijzigd of de Power Off-functie kan helemaal
Voorkeursstations kiezen
worden uitgeschakeld.
Dit kan alleen als voorkeurzenders zijn opgeslagen.
l
“Het Auto Power Down-menu”
Druk op PRESET
l
(of de cijfertoetsen) om het gewenste presetstation te kiezen.
© 2011 PIONEER CORPORATION.
Alle rechten voorbehouden.
5
Nl
Español
Para conocer una descripción detallada del receptor, consulte el “Manual de instrucciones” suministrado con el CD-ROM incluido. El manual de instrucciones también se puede descargar
del sitio Web de Pioneer (http://www.pioneer.eu). Consulte más abajo para conocer las instrucciones de manejo del CD-ROM.
0
Entorno de funcionamiento
— Este CD-ROM puede utilizarse con Microsoft® Windows® 95/98/Me/NT/2000/XP/Vista/7 y Apple Mac OS X 10.4. Se requiere Adobe Reader (Versión 4.0 ó
posterior) para leer este CD-ROM.
0
Precauciones de uso
— Este CD-ROM es para utilizarse con un PC. No se puede utilizarlo con un reproductor de DVD o reproductor de CD de música.
Intentar reproducir este CD-ROM con un reproductor de DVD o reproductor de CD de música puede dañar los altavoces o perjudiciar la audición debido al volumen muy alto.
0
Licencia
—
Asegúrese de aceptar los “Términos de Uso” que se indican a continuación antes de utilizar este CD-ROM. No utilice si no está de acuerdo con los términos de uso.
0
Términos de uso
—
Los derechos de autor de los datos que se proveen en este CD-ROM pertenecen a PIONEER CORPORATION. La transferencia, duplicación, transmisión, divulgación pública, traducción,
venta, préstamo u otros asuntos relacionados no autorizados que estén fuera del contexto del “uso personal” o “citación” como se define en la Ley de los Derechos de Autor pueden estar
sujetos a acciones punitivas. Se otorga el permiso para utilizar este CD-ROM bajo licencia de PIONEER CORPORATION.
0
Descargo de responsabilidad
— PIONEER CORPORATION no
garantiza el funcionamiento de este CD-ROM con respecto a cualquier PC con los sistemas operativos aplicables. Además, PIONEER CORPORATION no será responsable de cualesquiera
daños ocasionados por el uso de este CD-ROM, ni tampoco será responsable de ninguna indemnización. Los nombres de compañías privadas, productos y otras entidades que se
describen aquí son las marcas registradas o marcas comerciales de sus respectivos propietarios.
* Cuando se utiliza un sistema operativo Mac:
Coloque este CD-ROM en la unidad de CD y, a continuación, haga doble clic en el icono de CD-ROM para iniciar la aplicación.
Entorno de funcionamiento
IMPORTANTE
Temperatura y humedad del entorno de funcionamiento
+5 °C a +35 °C; menos del 85 % de humedad relativa
CAUTION
(rejillas de refrigeración no obstruidas)
RISK OF ELECTRIC SHOCK
No instale este aparato en un lugar mal ventilado, ni en
DO NOT OPEN
lugares expuestos a alta humedad o a la luz directa del
La luz intermitente con el símbolo de punta
ATENCIÓN:
El punto exclamativo dentro un triángulo
sol (o de otra luz artificial potente).
de flecha dentro un triángulo equilátero.
PARA PREVENIR EL PELIGRO DE CHOQUE
equilátero convenido para avisar el usuário
D3-4-2-1-7c*_A1_Es
Está convenido para avisar el usuario de la
ELÉCTRICO NO REMOVER LA TAPA NI LAS
de la presencia de importantes
presencia de “voltaje peligrosa” no aislada
PARTES DENTRO NO UTILIZADAS,
instrucciones sobre el funcionamiento y la
dentro el producto que podría constituir un
LLAMAR UNA PERSONA CUALIFICADA.
manutención en la libreta que acompaña el
Instalación de las pilas
peligro de choque eléctrico para las
aparato.
Las pilas suministradas con este equipo le permitirán
personas.
comprobar las operaciones iniciales, pero no durarán
D3-4-2-1-1_A1_Es
mucho tiempo. Se recomienda utilizar pilas alcalinas
de larga duración.
Información para los usuarios en la recogida y tratamiento de los equipos al final de
su vida y de las pilas y baterías usadas.
Estos símbolos en los productos, embalaje, y/o en los documentos que los
Símbolo para
acompañan significa que los productos eléctricos y electrónicos al final de su vida, las
equipos
pilas y baterías no deben mezclarse con los residuos generales de su hogar.
Para el tratamiento adecuado, recuperación y reciclado de los productos viejos y las
pilas usadas, por favor deposítelos en los puntos de recogida de acuerdo con su
legislación nacional.
PRECAUCIÓN
• El uso incorrecto de las pilas puede provocar
Mediante el tratamiento correctamente de estos productos y pilas, ayudará a preservar
situaciones peligrosas tales como fugas y
Símbolo para
los recursos y prevenir cualquier efecto negativo en la salud humana y el medio-
explosiones. Tenga en cuenta las siguientes
pilas y baterías
ambiente que podría surgir por una inadecuada manipulación de los desperdicios.
precauciones:
Para más información sobre recogida y reciclado de los productos viejos, pilas y
– Nunca utilice pilas nuevas y usadas al mismo
baterías, por favor contacte con su municipio, sobre localización de los puntos limpios
tiempo.
o diríjase al punto de venta donde compró los productos.
– Instale las pilas correctamente, haciendo coincidir
los polos positivo y negativo de las mismas
Estos símbolos sólo son válidos en la Unión Europea.
con las marcas de polaridad impresas en el
Para países fuera de la Unión europea:
compartimiento de las pilas.
Si desea eliminar estos artículos, por favor contactar con las autoridades locales o el
– Aunque distintas pilas tengan la misma forma,
distribuidor y pida por el método correcto de tratamiento.
pueden tener tensiones diferentes. No mezcle
Pb
pilas de distinto tipo.
– Cuando se deshaga de las pilas usadas, asegúrese
K058a_A1_Es
de respetar las disposiciones gubernamentales o
las normas de las instituciones medioambientales
públicas que rigen en su país o región.
Si la clavija del cable de alimentación de CA de este
Este producto es para tareas domésticas generales.
aparato no se adapta a la toma de corriente de CA
Cualquiera avería debida a otra utilización que tareas
– No use ni guarde pilas en lugares expuestos a
que usted desea utilizar, deberá cambiar la clavija por
domésticas (tales como el uso a largo plazo para
la luz solar directa o en lugares con un calor
excesivo, como el interior de un coche o cerca
otra que se adapte apropiadamente. El reemplazo y
motivos de negocios en un restaurante o el uso en un
de un calefactor. Esto puede provocar fugas en
montaje de una clavija del cable de alimentación de
coche o un barco) y que necesita una reparación
las pilas, sobrecalentamiento, explosiones o
CA sólo deberá realizarlos personal de servicio
hará que cobrarla incluso durante el período de
incendios. También puede reducir la vida o el
técnico cualificado. Si se enchufa la clavija cortada a
garantía.
rendimiento de las mismas.
una toma de corriente de CA, puede causar fuertes
K041_A1_Es
descargas eléctricas. Asegúrese de que se tira de la
forma apropiada después de haberla extraído.
Instalación del receptor
ADVERTENCIA
El aparato deberá desconectarse desenchufando la
Este aparato no es impermeable. Para evitar el riesgo
• Cuando instale el equipo, asegúrese de colocarlo
clavija de la alimentación de la toma de corriente
de incendio y de descargas eléctricas, no ponga ningún
sobre una superficie nivelada y estable.
cuando no se proponga utilizarlo durante mucho
recipiente lleno de líquido (como pueda ser un vaso o
No lo instale en los lugares siguientes:
tiempo (por ejemplo, antes de irse de vacaciones).
un florero) cerca del aparato ni lo exponga a goteo,
– sobre un televisor en color (la imagen podría
D3-4-2-2-1a_A1_Es
salpicaduras, lluvia o humedad.
distorsionarse en la pantalla)
D3-4-2-1-3_A1_Es
– cerca de una platina de casete (o cerca de
PRECAUCIÓN
dispositivos que generen campos magnéticos).
ADVERTENCIA
El interruptor de la alimentación STANDBY/ON de
Esto podría interferir con el sonido.
Antes de enchufar el aparato a la corriente, lea la sección
este aparato no corta por completo toda la
– bajo la luz directa del sol
siguiente con mucha atención.
alimentación de la toma de corriente de CA. Puesto
– en lugares húmedos o mojados
La tensión de la red eléctrica es distinta según el
que el cable de alimentación hace las funciones de
– en lugares extremadamente calurosos o fríos
país o región. Asegúrese de que la tensión de la
dispositivo de desconexión de la corriente para el
alimentación de la localidad donde se proponga
– en lugares que sean objeto de vibraciones u otros
aparato, para desconectar toda la alimentación del
utilizar este aparato corresponda a la tensión
movimientos
aparato deberá desenchufar el cable de la toma de
necesaria (es decir, 230 V ó 120 V) indicada en el
– en lugares donde haya mucho polvo
corriente de CA. Por lo tanto, asegúrese de instalar
panel posterior.
– en lugares donde haya vapores o aceites calientes
el aparato de modo que el cable de alimentación
D3-4-2-1-4*_A1_Es
(p. ej., en una cocina)
pueda desenchufarse con facilidad de la toma de
corriente de CA en caso de un accidente. Para evitar
ADVERTENCIA
correr el peligro de incendio, el cable de
ADVERTENCIA:
Para evitar el peligro de incendio, no ponga nada con
alimentación también deberá desenchufarse de la
No se suba a esta unidad ni se siente en ella. Extreme
fuego encendido (como pueda ser una vela) encima del
toma de corriente de CA cuando no se tenga la
las precauciones cuando haya niños cerca. La unidad
aparato.
intención de utilizarlo durante mucho tiempo seguido
podría dañarse o caerse, con el consiguiente peligro de
D3-4-2-1-7a_A1_Es
(por ejemplo, antes de irse de vacaciones).
herir a alguien.
D3-4-2-2-2a*_A1_Es
Pioneer no se hace responsable de accidentes
o daños como consecuencia de una instalación
incorrecta, manipulación indebida o por las
modicaciones del producto, así como tampoco
debido a desastres naturales.
2
Es
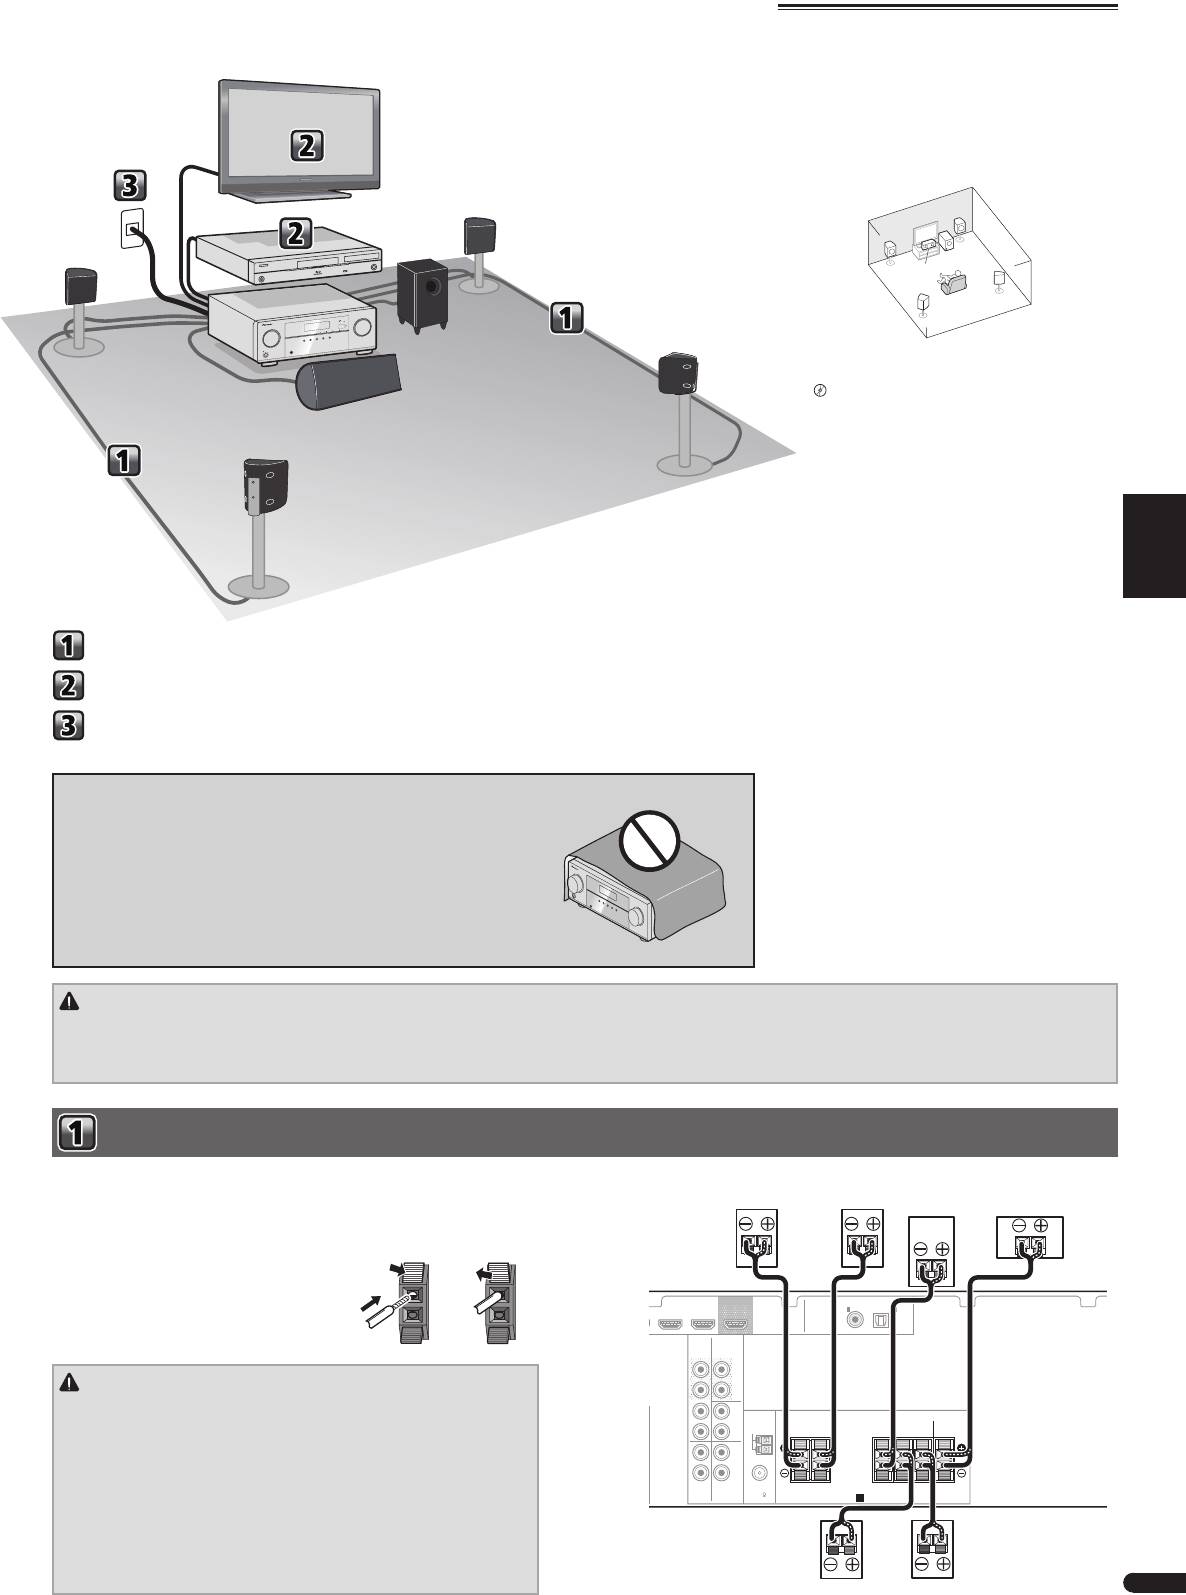
English
Français
Italiano
Nederlands
Español
Deutsch
Conexión de los altavoces
Conexión de componentes de reproducción y de un TV
Conexión del receptor
Conexión de los altavoces
BD IN CD/SAT
OUT
ASSIGNABLE
COAXIAL
OPTICAL
IN
1
IN
1
(
CD-R / TAPE
)
(
TV
)
AUDIO
CD-R/TAPE
SURR BACK
OUT
PRE OUT
Single
(
L
)
PRECAUCIÓN
R
• Estos terminales de los altavoces llevan VOLTAJE VIVO PELIGROSO. Para
L
evitar el peligro de descargas eléctricas al conectar o desconectar los
IN CD/SAT
IN
ANTENNA
R
AM LOOP
FRONT CENTER
SURROUND SUBWOOFER
RLRL
cables de altavoz, desenchufe el cable de alimentación antes de tocar las
partes de los cables que no están aisladas.
L
IN
IN
• Asegúrese de que no haya hilos expuestos del cable del altavoz en
R
TV
DVD
FM
contacto con el panel trasero mientras el equipo está encendido. Si
75
UNBAL
SPEAKERS
A
alguno de los cables desprotegidos del altavoz tocara el panel trasero,
podría provocar un corte de corriente como medida de seguridad.
• No conecte el altavoz de subgraves suministrado a ningún amplificador
que no sea el que se suministra con este sistema. La conexión a cualquier
otro amplificador puede ocasionar mal funcionamiento o un incendio.
3
Es
AC I
N
Disposición de los altavoces
El receptor puede funcionar con sólo dos altavoces
estéreo (los altavoces frontales en el diagrama), pero
se recomienda utilizar al menos tres altavoces, o una
configuración completa para obtener el mejor sonido
envolvente.
Para obtener el mejor sonido envolvente posible, instale
los altavoces como se indica a continuación.
Sistema de sonido envolvente de 5.1 canales:
R
L
SW
C
SR
SL
• Además, también puede conectar altavoces
surround posteriores.
l
“Conecte los altavoces traseros de sonido
envolvente”
• El subwoofer y los altavoces de sonido envolvente
no están protegidos magnéticamente, por lo que
no se deberán colocar cerca de un televisor ni
monitor, dado que la interacción de los materiales
magnéticos podría provocar una distorsión de los
colores en la pantalla del televisor. Los dispositivos
fácilmente afectados por el magnetismo (tarjetas
magnéticas, relojes de pulsera, cintas de vídeo, etc.)
no deberán colocarse cerca del subwoofer ni de los
altavoces de sonido envolvente.
• Los altavoces delanteros y el altavoz central de
este sistema están diseñados para poder utilizarse
cerca de un televisor o monitor en color de TRC. No
obstante, si su instalación causa distorsión del color,
intente arreglarlo desconectando la alimentación
del televisor o monitor en color de TRC durante 15
a 30 minutos y volviéndola a conectar otra vez tras
este período. La función de autodesmagnetización
incorporada en los televisores y monitores en color
de TRC ayudará a mejorar el efecto que causan los
altavoces en la imagen. Si persiste el problema de
la distorsión del color, incremente la distancia entre
los altavoces y la pantalla. Si se instalan imanes o
dispositivos que emiten campos magnéticos en las
cercanías, el efecto interactivo con los altavoces
puede provocar distorsión del color en un televisor o
monitor en color de TRC.
• No fije el altavoz central ni el altavoz de subgraves
a una pared ni al techo, ya que podrían caerse y
ocasionar lesiones.
Asegúrese de conectar el altavoz de la derecha al terminal derecho (R) y el altavoz de la
Frontal
Frontal
izquierda al terminal izquierdo (L). Asegúrese también de que los terminales positivo y
derecho
izquierdo
Central
Subwoofer
negativo (+/–) del receptor coincidan con los terminales de los altavoces.
Conexiones de cables desnudos
1
Empuje para abrir las pestañas e
introduzca los hilos expuestos del
cable.
2
Suelte las pestañas.
Sonido
Sonido
envolvente
envolvente
derecho
izquierdo
12
Organigrama de ajustes del receptor
Este equipo es un receptor AV completo equipado con
numerosas funciones y terminales. Se puede usar
fácilmente tras seguir el procedimiento indicado a
continuación para la realización de las conexiones y
Televisor
ajustes.
L
Frontal
Reproductor de
izquierdo
Blu-ray Disc
R
(S-11-P)
Frontal
derecho
(S-11-P)
SW
Subwoofer
(S-22W-P)
Este receptor
(VSX-321-K-P)
C
Central
SR
(S-11-P)
Sonido envolvente
derecho
(S-11-P)
SL
Sonido envolvente
izquierdo
(S-11-P)
Asegúrese de completar
todas las conexiones
antes de conectar este
equipo a la fuente de
alimentación de CA.
PRECAUCIÓN PARA LA VENTILACIÓN
Cuando instale este aparato, asegúrese de dejar espacio en torno al mismo para la
ventilación con el fin de mejorar la disipación de calor (por lo menos 20 cm encima,
10 cm detrás, y 10 cm en cada lado).
ADVERTENCIA
Las ranuras y aberturas de la caja del aparato sirven para su ventilación para poder
asegurar un funcionamiento fiable del aparato y para protegerlo contra
sobrecalentamiento. Para evitar el peligro de incendio, las aberturas nunca deberán
taparse ni cubrirse con nada (como por ejemplo, periódicos, manteles, cortinas) ni
ponerse en funcionamiento el aparato sobre una alfombra gruesas o una cama.
D3-4-2-1-7b*_A1_Es
PRECAUCIÓN
• Instale el altavoz central debajo del televisor, de forma que el sonido del canal central quede ubicado a la altura de la pantalla.
• Al instalar el altavoz central sobre el televisor, procure asegurarlo con algún medio que evite su posible caída. De lo contrario, el altavoz podría caerse del televisor debido
a impactos, como terremotos, y poner en peligro a quienes se encontrasen cerca, o dañar el propio altavoz.
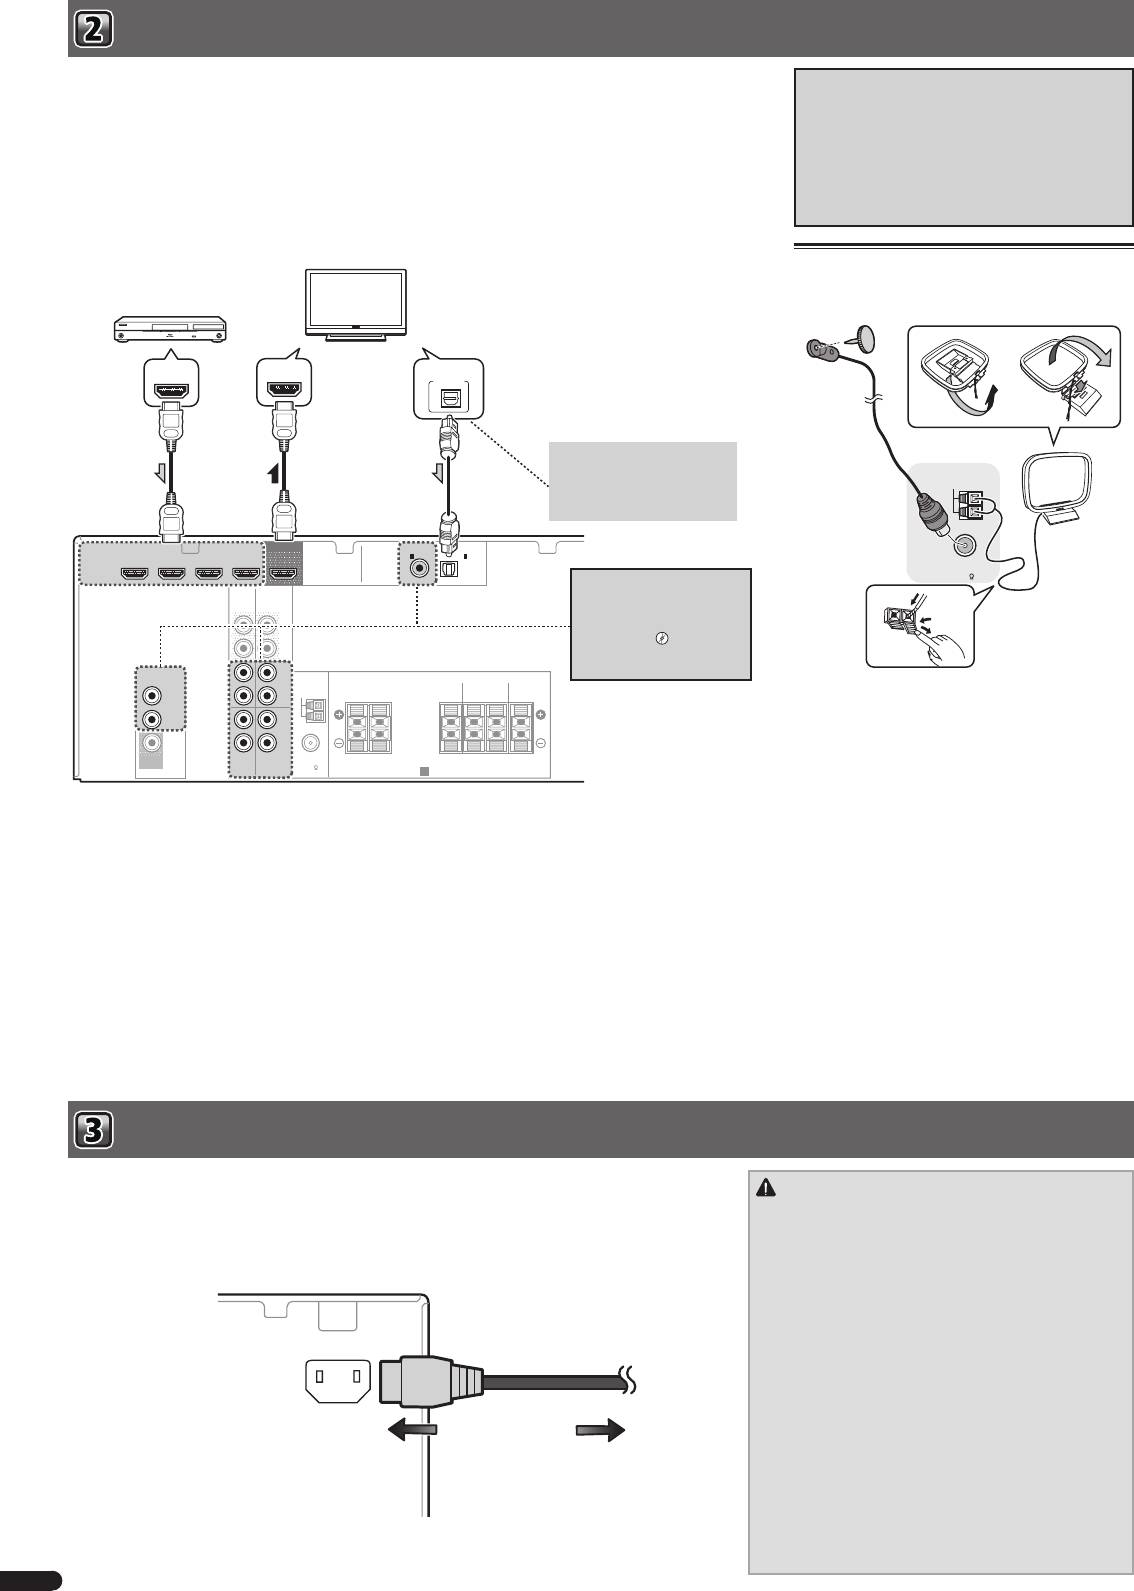
Conexión de componentes de reproducción y de un TV
Si dispone de un componente (reproductor de Blu-ray Disc, etc.) equipado con HDMI o DVI (con HDCP), puede
Acerca de la conexión de salidas de vídeo
conectarlo a este receptor con un cable HDMI disponible en el mercado.
Este receptor no incorpora un conversor de vídeo.
• Se precisa el ajuste/conexión siguiente para escuchar el sonido del televisor en este receptor.
Cuando utilice cables HDMI para conectar el
– Si el televisor no soporta la función HDMI Audio Return Channel, conecte el receptor y el televisor con cables
dispositivo de entrada, es preciso usar el mismo tipo
de audio (tal como se ilustra).
de cables para la conexión con el televisor.
– Si el televisor soporta la función HDMI Audio Return Channel, el sonido del televisor se transmite al receptor a
Las señales de entrada procedentes de la entrada de
través del terminal HDMI, de modo que no hay necesidad de conectar un cable de audio. En este caso, ajuste
vídeo analógico (compuesto) de esta unidad no se
ARC en HDMI Setup a ON.
generarán desde HDMI OUT.
– Aunque se cumplan las anteriores condiciones, es posible que la función ARC no funcione. En tal caso,
conecte el receptor y el televisor mediante un cable de audio.
Conexión de antenas
Componentes compatibles con HDMI/DVI
Conecte la antena de hilo de FM y la antena de cuadro
(Reproductor de Blu-ray Disc, etc.)
de AM tal como se indica a continuación.
Televisor compatible con HDMI/DVI
HDMI INHDMI OUT DIGITAL AUDIO OUT
OPTICAL
Si el televisor no soporta la
función HDMI Audio Return
ANTENNA
Channel, esta conexión es
AM LOOP
necesaria para escuchar el
sonido del televisor en el receptor.
HDMI
DVR/BDR IN DVD IN BD IN CD/SAT
OUT
ASSIGNABLE
COAXIAL
OPTICAL
IN
1
IN
1
FM
UNBAL
(
CD-R / TAPE
)
(
TV
)
Si el dispositivo que desea
75
AUDIO
CD-R/TAPE
SURR BACK
conectar no consta de un
OUT
PRE OUT
terminal de salida HDMI, puede
(
L
Single
)
conectarse a través de estos
terminales.
l
“
Conexión
R
de un componente sin terminal
VIDEO
HDMI
L
”
IN CD/SAT
IN
ANTENNA
FRONT CENTER
SURROUND SUBWOOFER
CD/SAT
R
AM LOOP
RLRL
DVD
L
IN
IN
R
MONITOR
FM
OUT
TV
DVD
UNBAL
75
SPEAKERS
A
Conexión del receptor
Enchufe el receptor a la red sólo después de haber conectado al mismo todos los componentes,
PRECAUCIÓN
incluidos los altavoces.
• Sujete el cable de alimentación por la parte del enchufe.
1
Enchufe el cable de alimentación a la toma AC IN de la parte posterior del receptor.
No desconecte la clavija tirando del cable; nunca toque
2
Enchufe el otro extremo a la toma de corriente.
el cable de alimentación con las manos mojadas, ya
que esto puede causar cortocircuitos o descargas
eléctricas. No coloque el equipo, un mueble ni ningún
objeto encima del cable de alimentación. No dañe el
cable de alimentación. No anude el cable ni lo ate a otros
cables. Los cables de alimentación deben ser tendidos
AC IN
de manera tal que la probabilidad de que alguien los pise
sea mínima. Un cable de alimentación dañado puede
causar incendios y descargas eléctricas. Revise el cable
de alimentación cada cierto tiempo. Si encuentra que
está dañado, pida un cable de recambio al representante
autorizado de Pioneer más cercano.
A la salida de alimentación
• No utilice ningún cable de alimentación que no sea el
suministrado con esta unidad.
• No utilice el cable de alimentación suministrado para
ninguna finalidad distinta a la descrita a continuación.
• Cuando no utilice el receptor de forma continuada (por
ejemplo, durante las vacaciones), desenchúfelo de la
toma de corriente.
4
Es
- 1
- 2
