Pioneer F-F3MK2-K: инструкция
Раздел: Бытовая, кухонная техника, электроника и оборудование
Тип: Музыкальный Центр
Инструкция к Музыкальному Центру Pioneer F-F3MK2-K
Оглавление
-
- Информация для пользователей по сбору и утилизации бывшего в эксплуатации оборудования и отработавших элементов питания
- Содержание
- Глава 1: Прежде чем вы приступите к использованию Особенности Комплект поставки
- Прежде чем вы приступите к использованию Установка батареек Установка тюнера
- Глава 2: Соединения Подключение кабелей
- Соединения
- Подключение в качестве аналогового источника звука Подключение к электросети
- Глава 3: Органы управления и дисплеи Передняя панель
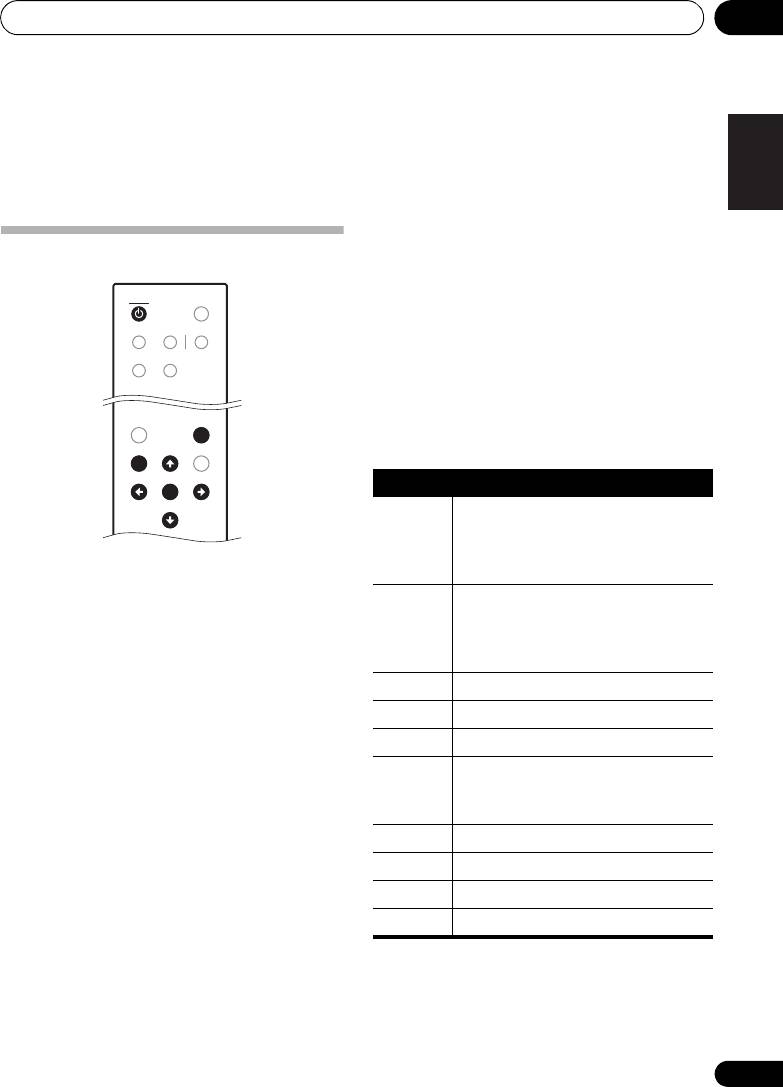
- Пульт дистанционного управления
- Органы управления и дисплеи
- Глава 4: Прослушивание радиопередач FM/AM Автоматическое заполнение памяти ЗНАЧЕНИЯ ПО УМОЛЧАНИЮ
- Ручная настройка Режим поиска Автоматическая настройка
- Прослушивание радиопередач FM/AM Вызов предустановленных станций
- Предустановленные станции
- Введение в систему Поиск RDS/Поиск PTY/Поиск TP радиоданных RDS
- Прослушивание радиопередач FM/AM Назначение имен предустановкам станций
- Память последнего Инициализация включения (перезагрузка) микропроцессора
- Глава 5: Подсоединение других устройств Подсоединение наружных Управление тюнером через антенн датчик дистанционного управления усилителем Pioneer
- Глава 6: Дополнительная информация Устранение неполадок Неполадка Устранение
- Дополнительная информация Неполадка Устранение
- Дополнительная информация Технические характеристики Тюнер FM Принадлежности Чистка корпуса устройства Тюнер AM Аудиотракт Разное

F-F3MK2-
K
F3
FM/AM Tuner
Tuner AM/FM
UKW/MW-Tuner
FM/AM-tuner
Sintonizzatore FM/AM
Sintonizador FM/AM
BZ02
Discover the benefits of registering your product online at
http://www.pioneer.co.uk
(or http://www.pioneer.eu).
Découvrez les nombreux avantages offerts en enregistrant votre produit en ligne
maintenant sur
http://www.pioneer.fr
(ou http://www.pioneer.eu).
Bitte nutzen Sie die Möglichkeit zur Registrierung Ihres Produktes
unter
http://www.pioneer.de
(oder http://www.pioneer.eu)
Ontdek nu de voordelen van online registratie! Registreer uw Pioneer product via
http://www.pioneer.nl - http://www.pioneer.be
(of http://www.pioneer.eu).
Registra il tuo prodotto su
http://www.pioneer.it
(o http://www.pioneer.eu) e
scopri subito quali vantaggi puoi ottenere!
Registre su producto en
http://www.pioneer.es
(o en http://www.pioneer.eu) Descubra los beneficios de registrarse on-line:
Operating Instructions | Mode d’emploi | Bedienungsanleitung |
Handleiding | Istruzioni per I’uso | Manual de instrucciones
01_F-F3MK2_en.book 1 ページ 2009年4月3日 金曜日 午後1時45分
IMPORTANT
CAUTION
RISK OF ELECTRIC SHOCK
DO NOT OPEN
The lightning flash with arrowhead symbol,
CAUTION:
The exclamation point within an equilateral
within an equilateral triangle, is intended to
TO PREVENT THE RISK OF ELECTRIC
triangle is intended to alert the user to the
alert the user to the presence of uninsulated
SHOCK, DO NOT REMOVE COVER (OR
presence of important operating and
“dangerous voltage” within the product’s
BACK). NO USER-SERVICEABLE PARTS
maintenance (servicing) instructions in the
enclosure that may be of sufficient
INSIDE. REFER SERVICING TO QUALIFIED
literature accompanying the appliance.
magnitude to constitute a risk of electric
SERVICE PERSONNEL.
D3-4-2-1-1_A1_En
shock to persons.
VENTILATION CAUTION
&$(# !'&!"'*'%#%"""#%)!'%
When installing this unit, make sure to leave space
"%&"-%"!"'#!,"!'!%
around the unit for ventilation to improve heat
*'$(!%'&$(# !'&(&)&"%
radiation (at least 10 cm at top, 10 cm at rear, and
"*%#"'"%+#"&''"%##!&#&!%!
10 cm at each side).
"% "&'(%
!
WARNING
Slots and openings in the cabinet are provided for
ventilation to ensure reliable operation of the
product, and to protect it from overheating. To
"#%)!'%+%"!"'#!*!
prevent fire hazard, the openings should never be
&"(%&&(&'!"!'
blocked or covered with items (such as newspapers,
$(# !'
!
table-cloths, curtains) or by operating the
equipment on thick carpet or a bed.
D3-4-2-1-7b_A_En
Operating Environment
Operating environment temperature and humidity:
+5 °C to +35 °C (+41 °F to +95 °F); less than 85 %RH
(cooling vents not blocked)
Do not install this unit in a poorly ventilated area, or in
locations exposed to high humidity or direct sunlight (or
strong artificial light)
D3-4-2-1-7c*_A1_En
+$!)$)+ !!%$,'(*%%!- '(
$' #)$$*#)'-$'' $#(*')))
If the AC plug of this unit does not match the AC
%$,'(*%%!-+$!)$)',') (*# )
outlet you want to use, the plug must be removed
, !!*(")()'&* '+$!)
and appropriate one fitted. Replacement and
$',' ))#$#)''%#!
#
mounting of an AC plug on the power supply cord of
this unit should be performed only by qualified
service personnel. If connected to an AC outlet, the
cut-off plug can cause severe electrical shock. Make
sure it is properly disposed of after removal.
The equipment should be disconnected by removing
the mains plug from the wall socket when left unused
for a long period of time (for example, when on
vacation).
D3-4-2-2-1a_A1_En
POWER
STANDBY
OFF
ON
SECONDARY
RDS
TUNED
BAND
STEREO
MENU
TUNING/PRESET
DISPLAY
F3
AUTO TUNE
01_F-F3MK2_en.book 2 ページ 2009年4月3日 金曜日 午後1時45分
01_F-F3MK2_en.book 3 ページ 2009年4月3日 金曜日 午後1時45分
CAUTION
POWER-CORD CAUTION
The POWER switch on this unit will not completely
Handle the power cord by the plug. Do not pull out the
shut off all power from the AC outlet. Since the
plug by tugging the cord and never touch the power
power cord serves as the main disconnect device for
cord when your hands are wet as this could cause a
the unit, you will need to unplug it from the AC outlet
short circuit or electric shock. Do not place the unit, a
to shut down all power. Therefore, make sure the
piece of furniture, etc., on the power cord, or pinch the
unit has been installed so that the power cord can
cord. Never make a knot in the cord or tie it with other
be easily unplugged from the AC outlet in case of an
cords. The power cords should be routed such that they
accident. To avoid fire hazard, the power cord should
are not likely to be stepped on. A damaged power cord
also be unplugged from the AC outlet when left
can cause a fire or give you an electrical shock. Check
unused for a long period of time (for example, when
the power cord once in a while. When you find it
on vacation).
D3-4-2-2-2a_A_En
damaged, ask your nearest PIONEER authorized
service center or your dealer for a replacement.
S002*_En
Information for users on collection and disposal of old equipment and used batteries
Symbol for
These symbols on the products, packaging, and/or accompanying documents mean
equipment
that used electrical and electronic products and batteries should not be mixed with
general household waste.
For proper treatment, recovery and recycling of old products and used batteries,
please take them to applicable collection points in accordance with your national
legislation.
By disposing of these products and batteries correctly, you will help to save valuable
Symbol examples
resources and prevent any potential negative effects on human health and the
for batteries
environment which could otherwise arise from inappropriate waste handling.
For more information about collection and recycling of old products and batteries,
please contact your local municipality, your waste disposal service or the point of sale
where you purchased the items.
These symbols are only valid in the European Union.
For countries outside the European Union:
If you wish to discard these items, please contact your local authorities or dealer and
ask for the correct method of disposal.
Pb
K058a_A1_En
Replacement and mounting of an AC plug on the power supply cord of this unit should be performed only by qualified
service personnel.
IMPORTANT: THE MOULDED PLUG
This appliance is supplied with a moulded three pin mains plug for your safety and convenience. A 10 amp fuse is fitted in this plug. Should
the
fuse need to be replaced, please ensure that the replacement fuse has a rating of 10 amps and that it is approved by ASTA or BSI to BS1362.
Check for the ASTA mark or the BSI mark on the body of the fuse.
If the plug contains a removable fuse cover, you must ensure that it is refitted when the fuse is replaced. If you lose the fuse cover the plug
must not be used until a replacement cover is obtained. A replacement fuse cover can be obtained from your local dealer.
If the fitted moulded plug is unsuitable for your socket outlet, then the fuse shall be removed and the plug cut off and disposed of
safely. There is a danger of severe electrical shock if the cut off plug is inserted into any 13 amp socket.
If a new plug is to be fitted, please observe the wiring code as shown below. If in any doubt, please consult a qualified electrician.
IMPORTANT: The wires in this mains lead are coloured in accordance with the following code:
Blue : Neutral Brown : Live
As the colours of the wires in the mains lead of this appliance may not correspond with the coloured markings identifying the terminals in
your plug, proceed as follows ;
The wire which is coloured BLUE must be connected to the terminal which is marked with the
letter N or coloured BLACK.
The wire which is coloured BROWN must be connected to the terminal which is marked with the
letter L or coloured RED.
How to replace the fuse: Open the fuse compartment with a screwdriver and replace the fuse.
D3-4-2-1-2-2_B_En

01_F-F3MK2_en.book 4 ページ 2009年4月3日 金曜日 午後1時45分
Thank you for buying this Pioneer product.
Please read through these operating instructions so that you will know how to operate your model
properly. After you have finished reading the instructions, put them in a safe place for future
reference.
Contents
01 Before you start
04 Listening to FM/AM
Features . . . . . . . . . . . . . . . . . . . . . . . . . . . . . 5
Auto preset memory . . . . . . . . . . . . . . . . . . . 13
What’s in the box . . . . . . . . . . . . . . . . . . . . . . 5
Search Mode. . . . . . . . . . . . . . . . . . . . . . . . . 14
Inserting the battery . . . . . . . . . . . . . . . . . . . . 6
Preset stations . . . . . . . . . . . . . . . . . . . . . . . 16
Installing the tuner . . . . . . . . . . . . . . . . . . . . . 6
An introduction to RDS . . . . . . . . . . . . . . . . . 17
RDS Search/PTY Search/TP Search. . . . . . . . 17
02 Connections
Naming station presets . . . . . . . . . . . . . . . . . 18
Last function memory . . . . . . . . . . . . . . . . . . 19
Making cable connections . . . . . . . . . . . . . . . 7
Initialization of the microprocessor . . . . . . . . 19
Connecting analog audio sources . . . . . . . . . 9
Plugging in . . . . . . . . . . . . . . . . . . . . . . . . . . . 9
05 Other connections
03 Controls and displays
Connecting external antennas. . . . . . . . . . . . 20
Operating this tuner with the remote
Front panel . . . . . . . . . . . . . . . . . . . . . . . . . . 10
sensor of your Pioneer amplifier . . . . . . . . . . 20
Remote control unit . . . . . . . . . . . . . . . . . . . 11
06 Additional information
Troubleshooting . . . . . . . . . . . . . . . . . . . . . . 21
Specifications . . . . . . . . . . . . . . . . . . . . . . . . 23
4
En

01_F-F3MK2_en.book 5 ページ 2009年4月3日 金曜日 午後1時45分
Before you start 01
Chapter 1:
English
Before you start
Features
What’s in the box
High Quality Audio Parts
Please confirm that the following accessories
are in the box when you open it.
• Schottky Barrier Diode
• Remote control unit
• Gold Plated Terminal
• AAA/IEC R03 dry cell batteries x2
FrançaisDeutsch
100 Stations, Groupe Presets
(FM/AM 100)
•Power cord
RDS (Radio Data System) with Radio Text
• RCA/phono stereo audio cable
MPX mode
•SR control cable
•AM loop antenna
Italiano Español
•FM antenna
• Warranty card
• Operating instructions (This document)
Nederlands
5
En
01_before_you_start.fm 6 ページ 2009年4月6日 月曜日 午後2時35分
Before you start01
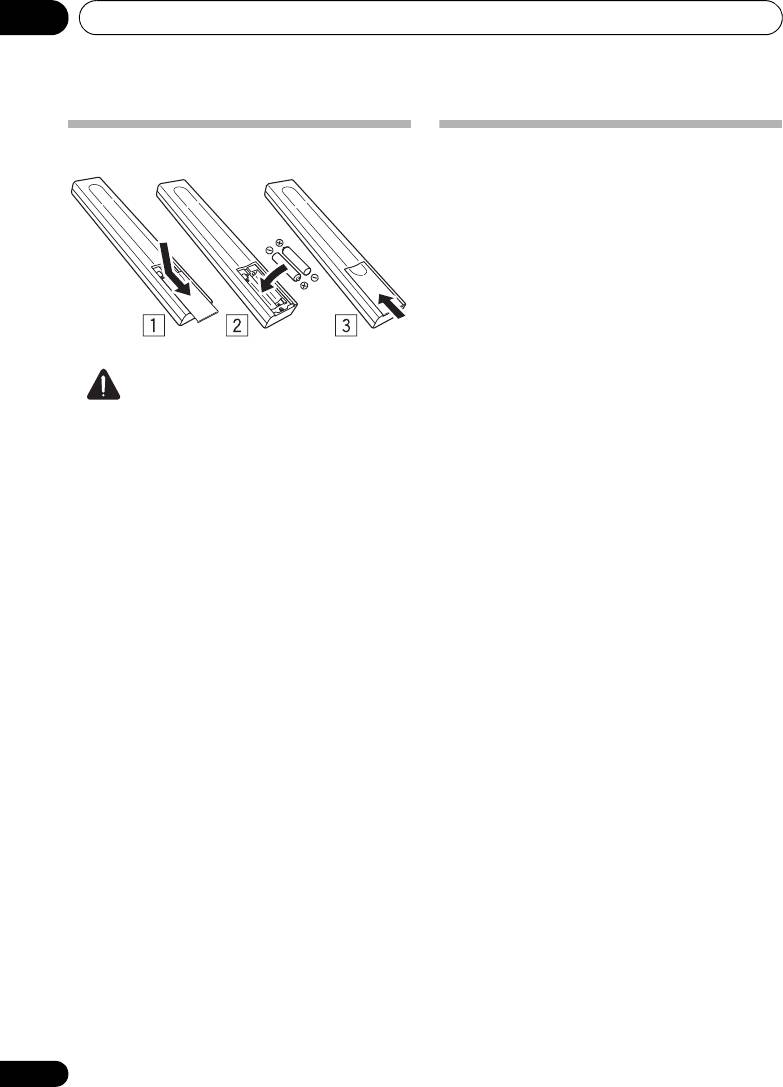
Inserting the battery
Installing the tuner
• When installing this unit, make sure to put
it on a level and stable surface.
Don’t install it on the following places:
– on a color TV (the screen may distort)
– near a cassette deck (or close to a device
that gives off a magnetic field). This may
interfere with the sound.
– in direct sunlight
–in damp or wet areas
– in extremely hot or cold areas
Caution
– in places where there is vibration or
Incorrect use of batteries may result in such
other movement
hazards as leakage and bursting. Observe the
following precautions:
– in places that are very dusty
• Never use new and old batteries together.
– in places that have hot fumes or oils
(such as a kitchen)
• Insert the plus and minus sides of the
batteries properly according to the marks
in the battery case.
• Batteries with the same shape may have
different voltages. Do not use different
batteries together.
• When disposing of used batteries, please
comply with governmental regulations or
environmental public institution’s rules
that apply in your country or area.
• WARNING
Do not use or store batteries in direct
sunlight or other excessively hot place,
such as inside a car or near a heater. This
can cause batteries to leak, overheat,
explode or catch fire. It can also reduce the
life or performance of batteries.
6
En
Connections 02
Chapter 2:
English
Connections
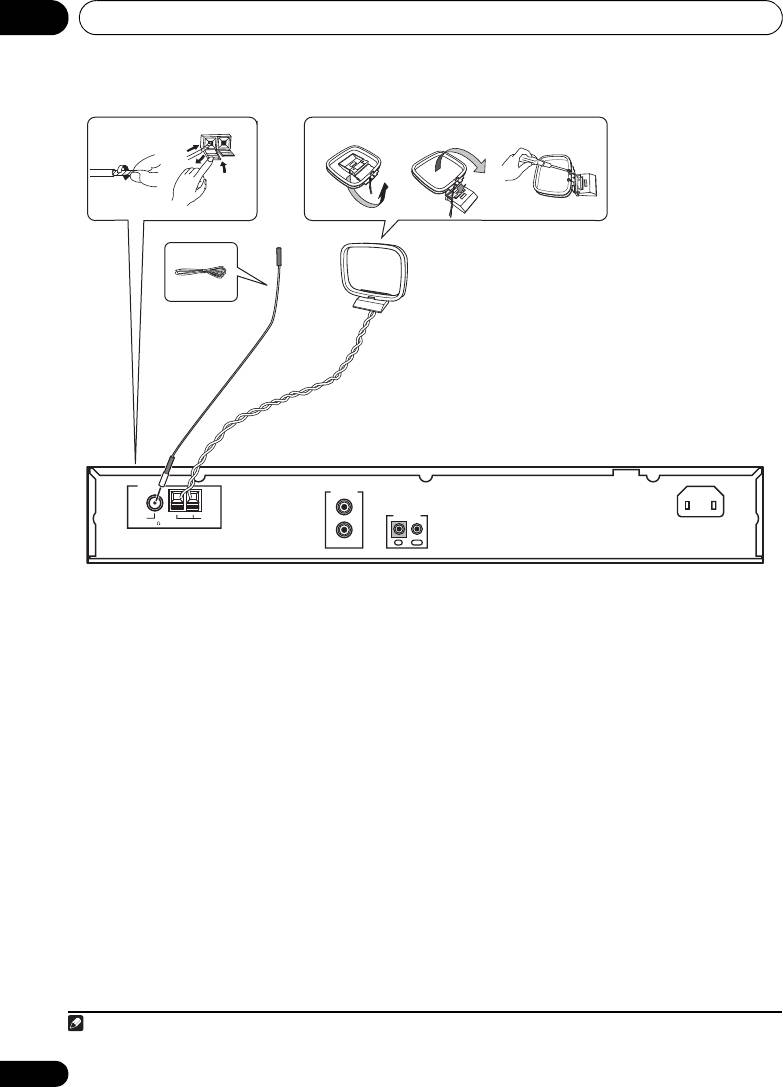
Connecting antennas
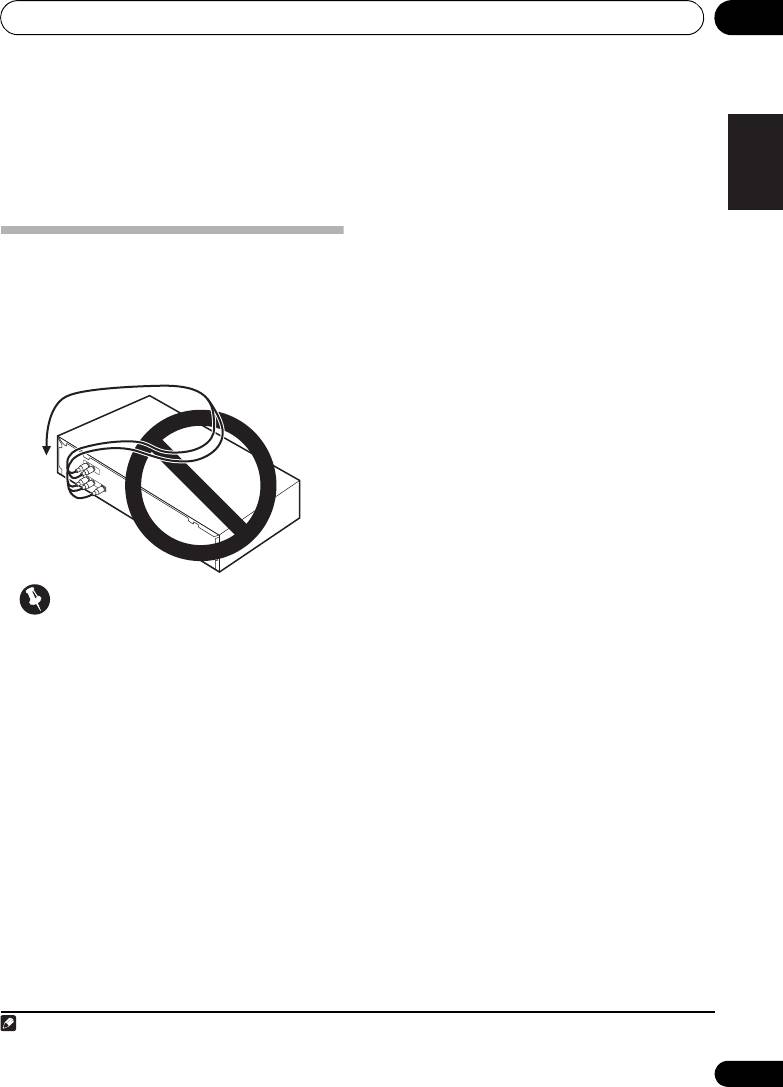
Making cable connections
Connect the AM loop antenna and FM antenna
as shown in the illustration (page 8). To
Make sure not to bend the cables over the top
improve reception and sound quality, connect
of this unit (as shown in the illustration), since
1
the magnetic field produced by the unit’s
external antennas
(See Connecting external
transformers may cause a humming noise in
antennas on page 20).
FrançaisDeutsch
the speakers.
Italiano Español
Nederlands
Important
• Before making or changing any
connections, switch off the power and
disconnect the power cord from the AC
outlet.
7
En
Note
01_F-F3MK2_en.book 7 ページ 2009年4月3日 金曜日 午後1時45分
1 Do not disconnect the AM loop antenna even if an external AM antenna is used.
Connections02
g. A
g. B
g. C
1
2
3
5
4
AM loop antenna
FM antenna
ANTENNA
AC IN
LINEOUT
L
FM
AM
CONTROL
UNBAL 75
LOOP
R
OUTIN
1 Pull off the protective shields of both AM
4 Place the AM loop antenna on a flat
antenna wires.
surface, pointing in the direction that
produces best reception.
2 Push open the tabs, then insert one wire
Don’t let it come into contact with metal
fully into each terminal, then release the tabs
objects and avoid placing near computers,
to secure the AM antenna wires.
television sets or other electrical appliances.
3 Fix the AM loop antenna to the attached
1
5 Connect the FM antenna
in the same
stand.
way as the AM loop antenna.
To fix the stand to the antenna, bend in the
For best results, extend the FM antenna fully
direction indicated by the arrow (fig. A) then
and fix to a wall or door frame. Don’t drape
clip the loop onto the stand (fig. B).
loosely or leave coiled up.
• If you plan to mount the AM antenna to a
wall or other surface, secure the stand with
screws (fig. C) before clipping the loop to
the stand. Make sure the reception is clear.
8
En
Note
01_F-F3MK2_en.book 8 ページ 2009年4月3日 金曜日 午後1時45分
1 Do not connect two FM antennas simultaneously.
01_F-F3MK2_en.book 9 ページ 2009年4月3日 金曜日 午後1時45分
Connections 02
English
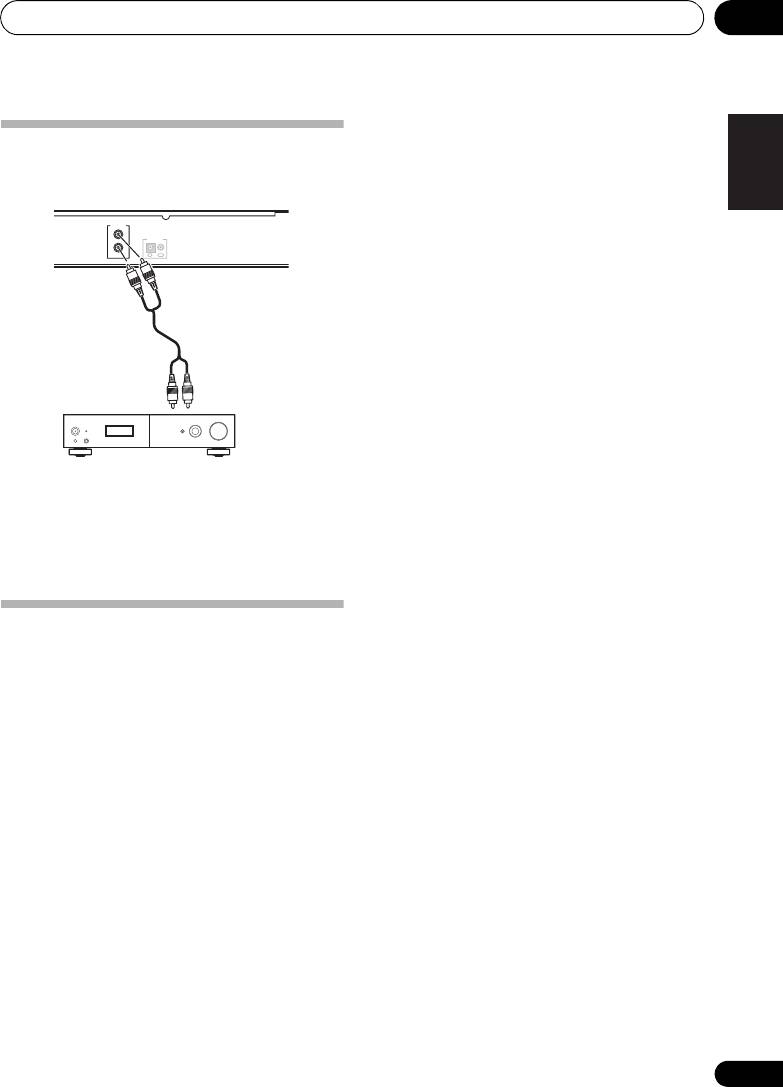
Connecting analog audio
sources
LINEOUT
L
CONTROL
R
OUTIN
FrançaisDeutsch
To analog input
Italiano Español
Amplifier
• Use the RCA/phono jack audio cable to
connect this unit’s LINE OUT connectors
to the analog input connectors of an
amplifier.
Nederlands
Plugging in
Make sure to complete all connections before
connecting to an AC outlet.
• Connect the power cord to the AC inlet
(AC IN) on the rear panel of the tuner, then
plug into a AC outlet.
9
En
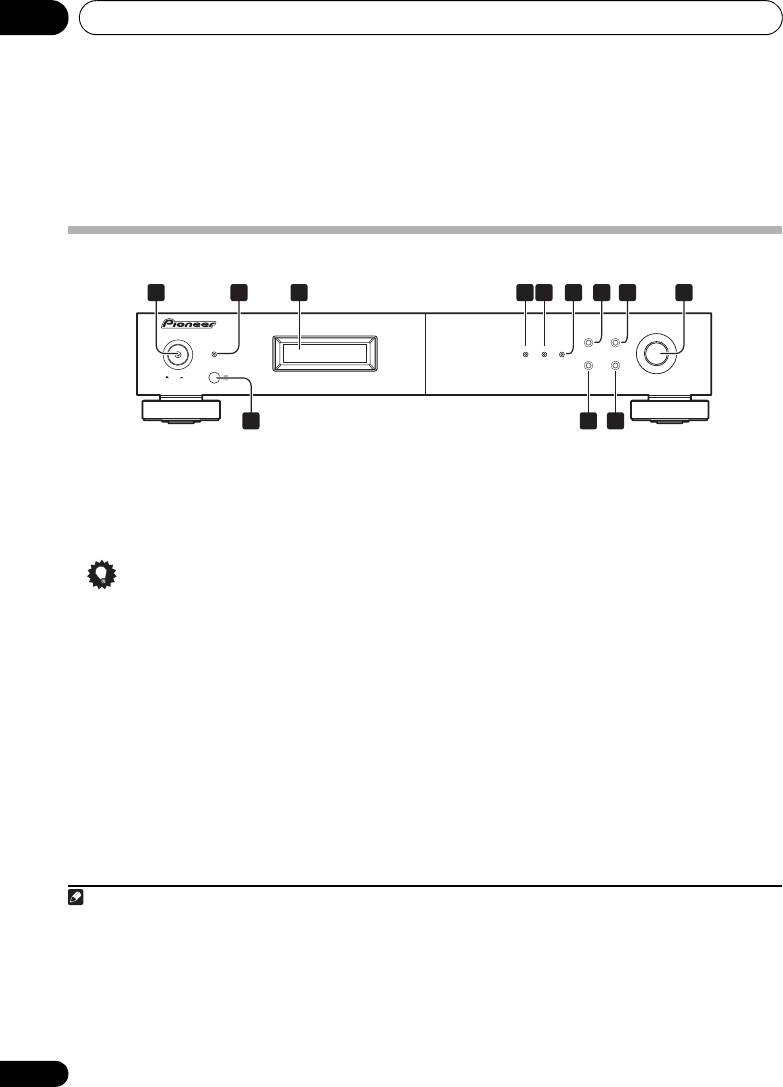
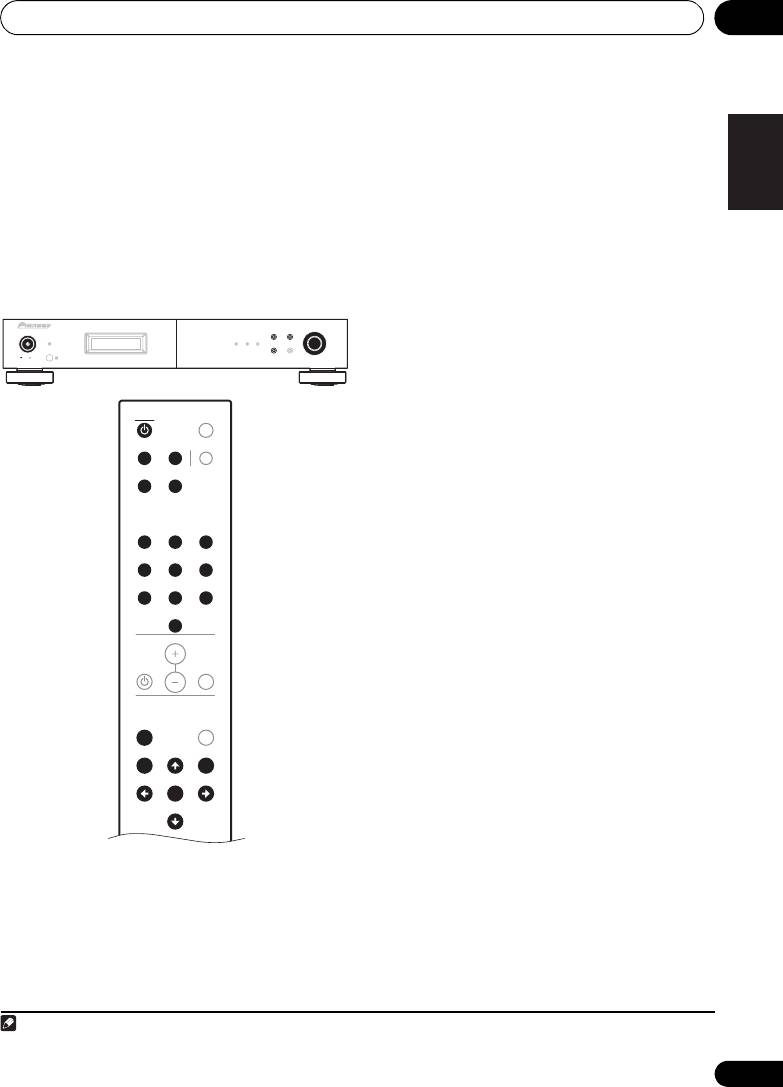
Controls and displays03
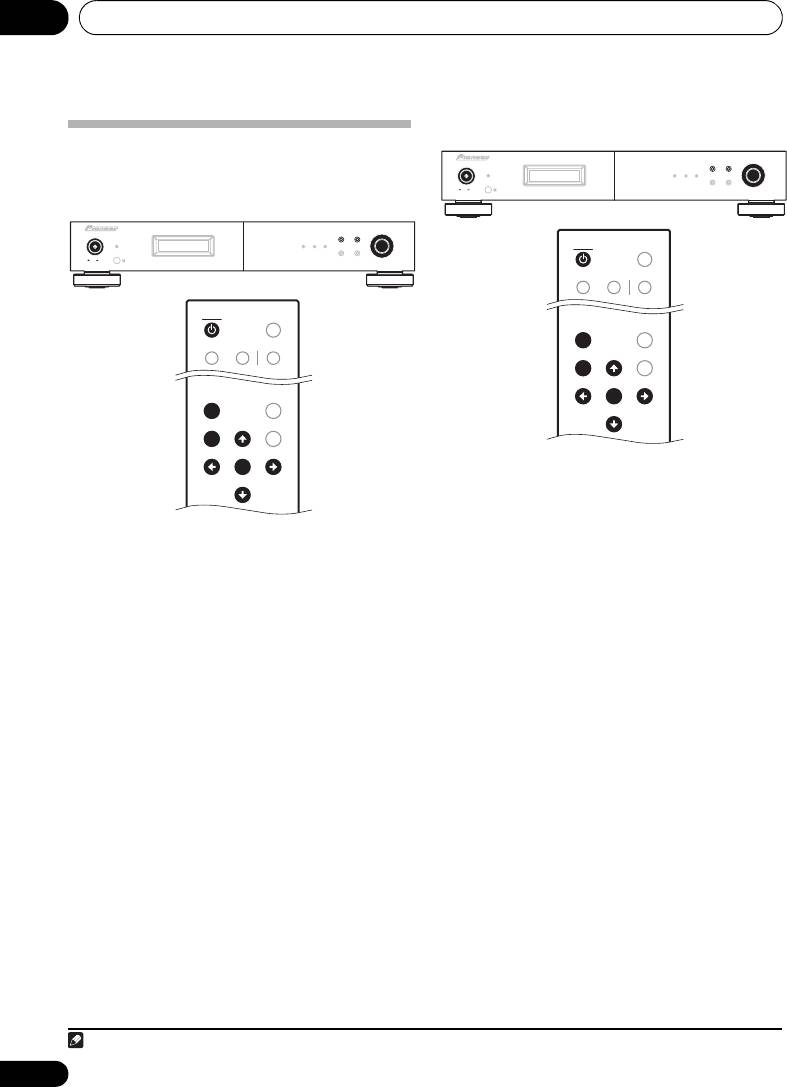
Chapter 3:
Controls and displays
Front panel
1
2 6 7 8 9
3 54
TUNING/PRESET
F3
POWER
BAND
MENU
STANDBY
RDS TUNED STEREO
DISPLAY AUTO PRESET
ONOFF
10
1211
1
4
RDS
indicator
1
POWER
OFF
ON
Lights when an RDS broadcast is received, and
2
STANDBY
indicator
flashes during RDS search.
3Display
5
TUNED
indicator
Lights when a station is properly tuned in.
Tip
6
STEREO
indicator
Lights red when a stereo broadcast is received.
• Liquid Crystal Display
Goes off when a monaural broadcast is
The LCD used in this unit has a tendency to
received. Lights blue when the MPX mono
change color in response to the
mode is selected.
surrounding temperature. The display’s
color tone may turn gray or its ability to
switch between displayed information may
slow down when the room is not at
optimum temperature, or when the unit
has been operating for a long period of
time. However, these are only temporary
symptoms and regular functionality will be
restored once the unit returns to optimum
temperature.
10
En
Note
01_F-F3MK2_en.book 10 ページ 2009年4月3日 金曜日 午後1時45分
1 • Remember that even when the unit is in the standby mode, it remains connected to the AC line voltage. Be sure to unplug
the power cord whenever leaving your home for vacations or when otherwise not using the unit for extended periods of time.
• When the unit is in the standby mode, if the power is turned off by pressing the main unit’s POWER button, the power will
not turn on if the button is prersed again.
To turn on the power in this c`se, press either the remote control unit’s TUNER button or a different button (other than the
POWER button) on the main unit.
• When the unit is in the standby mode, if the power is turned off by unplugging the power cord, the power will not turn merely
by reconnecting the power cord.
To turn on the power in this case, reconnect the power cord and then press either the remote control unit’s TUNER button
or a different button (other than the POWER button) on the main unit.

Controls and displays 03
7
BAND
English
1
Selects FM or AM.
Remote control unit
8
MENU
Use to enter/exit menu mode.
Using the remote control
The unit times out if no operation is performed
Keep in mind the following when using the
for about five seconds after the menu mode is
remote control:
set.
• Make sure that there are no obstacles
between the remote and the remote sensor
9
TUNING/PRESET
dial
on the unit.
Press this dial to select an option or execute a
command.
• The remote has a range of about 7 m at an
angle of about 30º from the remote sensor.
FrançaisDeutsch
Turn this dial to select menu options, radio
presets or stations.
• Remote operation may become unreliable
if strong sunlight or fluorescent light is
In the tuning mode, the reception frequency
shining on the unit’s remote sensor.
can be tuned in an increasing or decreasing
direction. Turn the dial clockwise to change the
• Remote controllers for different devices
reception toward higher frequencies. Turn the
can interfere with each other. Avoid using
Italiano Español
dial counterclockwise to tune the reception
remotes for other components located
toward lower frequencies.
close to this unit.
In the preset mode, turning this dial moves the
• Replace the battery when you notice a
2
selected preset channel
up or down. The auto
decrease in the operating range of the
tuning operation cannot be used when in this
remote.
Nederlands
mode.
When inputting station names, use this dial to
select desired characters (page 18).
10 Remote sensor
11
DISPLAY
Use to select the display mode (page 18).
12
AUTO PRESET
When pressed during FM or AM mode,
receivable stations are automatically stored in
the preset memory in order starting from
preset channel A1.
11
En
Note
01_F-F3MK2_en.book 11 ページ 2009年4月3日 金曜日 午後1時45分
1 Noise may be generated when receiving AM or FM if a near-by television set is turned on. The tuner should be used as far away
from a television as possible.
2 Effective period of memory back-up is about a month under normal temperature.
03_Part_names.fm 12 ページ 2009年4月7日 火曜日 午前9時48分
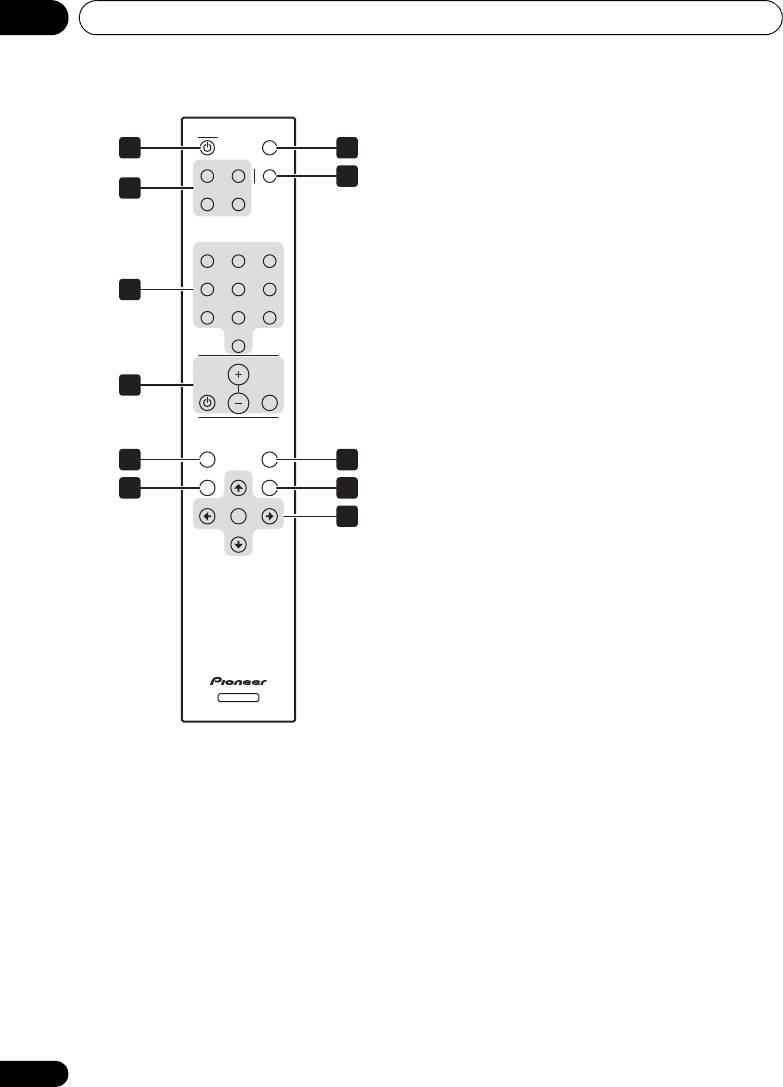
Controls and displays03
5
MENU
TUNER
DIMMER
Use to enter/exit menu mode.
1 7
A/B/C D/E/F MPX
6
BAND
8
2
G/H I/ J
Selects FM or AM.
7
DIMMER
Dims or brightens the display (or switches the
123
backlight off).
456
3
8
MPX
78
9
Use to switch between stereo and mono
10
reception during FM broadcasts. If the signal is
VOLUME
weak, switching to mono may improve the
sound quality (page 15).
4
MUTEAMP
9
A.PRESET/A.TUNE
When pressed during FM or AM mode,
A.PRESET
MENU
A.TUNE
receivable stations are automatically stored in
5
9
the preset memory in order starting from
BAND TUNE
MEMORY
6
10
preset channel A1.
PRESET
ENTER
PRESET
11
10
MEMORY
TUNE
Use to preset stations. This button is also used
for manual station-name character selection
for FM and AM broadcasts, and for Program
Type search.
11 Tuning buttons
ENTER
Selects an option or executes a command.
TUNER
TUNE
Use to change reception frequency.
1
TUNER
PRESET
Switches the unit between standby and on.
Selects station preset when listening to the
radio.
2 Preset channel range buttons
(
A/B/C
,
D/E/F
,
G/H
,
I/J
)
Use to tune in preset broadcast stations.
3 Station call buttons (
1
to
10
)
Use these buttons to preset stations, and to
recall previously preset stations.
4 AMP controls
Use to control Pioneer amplifier.
AMP
VOLUME
MUTE
12
En
Listening to FM/AM 04
Chapter 4:
English
Listening to FM/AM
• If a station cannot be preset automatically
due to poor reception, use the “Manual
Auto preset memory
tuning” operation to tune in the station,
then preset it using the manual “Preset
stations” operation.
• To interrupt this function, press the
FrançaisDeutsch
TUNER button.
• Perform this operation from the remote
control unit.
DEFAULT VALUE
Italiano Español
Nederlands
1 Make sure that the unit is in standby
mode, and then press the
TUNER
button to
turn on the power.
2 Watching the display, press the
BAND
button to select the desired band (AM or FM).
3 Press the
A.PRESET/A.TUNE
button.
4 Press the
ENTER
button.
The unit automatically begins searching for the
broadcast stations.
• When the first broadcast station is found,
that station is stored in the preset memory
at channel A1.
Subsequent stations are automatically
stored in order at preset channels A1 to
A10, B1 to B10, C1 to C10, D1 to D10,
E1 to E10, F1 to F10, G1 to G10, H1 to H10,
I1 to I10 and J1 to J10 for a maximum of 100
stations.
• Channel A1 is tuned in after the auto preset
memory operation is completed.
13
En
TUNER
TUNER
DIMMER
A/B/C D/E/F MPX
G/H I/ J
A.PRESET
A.PRESET
MENU
A.TUNE
A.TUNE
BAND TUNE
BAND TUNE
MEMORY
PRESET
PRESET
ENTER
ENTER
PRESET
PRESET
TUNE
TUNE
01_F-F3MK2_en.book 13 ページ 2009年4月3日 金曜日 午後1時45分
Auto tuner presets
A1 to A10 87.5MHz/88.0MHz/90.0MHz/
92.0 MHz/94.0 MHz/96.0 MHz/
98.0 MHz/100.0 MHz/102.0 MHz/
104.0 MHz
B1 to B10 106.0 MHz/108.0 MHz/98.0 MHz/
98.0 MHz/98.0 MHz/98.0 MHz/
98.0 MHz/98.0 MHz/98.0 MHz/
98.0 MHz
C1 to C10 98.0 MHz
D1 to D10 98.0 MHz
E1 to E10 98.0 MHz
F1 to F10 531 kHz/531 kHz/603 kHz/801 kHz/
999 kHz/1197 kHz/1395 kHz/
1602 kHz/1602 kHz/999 kHz
G1 to G10 999 kHz
H1 to H10 999 kHz
I1 to I10 999 kHz
J1 to J10 999 kHz
Listening to FM/AM04
Manual tuning
Search Mode
Auto tuning
BAND
MENU
TUNING/PRESET
F3
POWER
STANDBY
RDS TUNED STEREO
DISPLAY AUTO PRESET
ONOFF
TUNER
TUNER
DIMMER
A/B/C D/E/F MPX
I/J
A.PRESET
MENU
MENU
A.TUNE
BAND TUNE
BAND TUNE
MEMORY
PRESET
PRESET
ENTER
ENTER
PRESET
PRESET
TUNE
TUNE
1 Press the
POWER
or
TUNER
button to
turn on the power.
2 Watching the display, press the
BAND
1 Press the
POWER
or
TUNER
button to
button to select the desired band (AM or FM).
turn on the power.
3 Press the
MENU
button to select menu.
2 Watching the display, press the
BAND
4 Either turn the
TUNING/PRESET
dial or
button to select the desired band (AM or FM).
press the
/
button to select the search
3 Press the
MENU
button to select menu.
1
mode.
4 Either turn the
TUNING/PRESET
dial or
5 Press the
TUNING/PRESET
dial or
ENTER
press the
/
button to select the search
button to set the manual tuning mode.
mode.
6 Either turn the
TUNING/PRESET
dial or
5 Press the
TUNING/PRESET
dial or
ENTER
press the
/
button to tune in the desired
button to set the auto tuning mode.
station.
The frequency changes continuously when the
6 Either turn the
TUNING/PRESET
dial or
/ button on the remote control unit is held
press the
/
button.
in.
Automatic searching will begin, and then stop
when a station is received.
• When the MPX mono mode has been
selected, FM stereo broadcasts will be
• When the unit is in the MPX stereo mode
received in monaural, and the STEREO
and FM band auto tuning is selected, the
indicator will light blue.
front-panel STEREO indicator will light red
when a stereo broadcast is received. At
open frequencies (no station is received),
the sound will be muted and the TUNED
and STEREO indicators will turn off.
14
En
Note
01_F-F3MK2_en.book 14 ページ 2009年4月3日 金曜日 午後1時45分
F3
POWER
BAND
MENU
TUNING/PRESET
STANDBY
RDS TUNED STEREO
DISPLAY AUTO PRESET
ONOFF
TUNER
TUNER
DIMMER
A/B/C D/E/F MPX
I/J
A.PRESET
MENU
MENU
A.TUNE
BAND TUNE
BAND TUNE
MEMORY
PRESET
PRESET
ENTER
ENTER
PRESET
PRESET
TUNE
TUNE
1Hold the / button depressed for 0.5 seconds or more to perform rapid tuning.
Listening to FM/AM 04
Improving FM stereo sound
1 Connect the antenna and confirm that
English
reception is possible.
If the TUNED or STEREO indicator fails to light
when tuning into an FM station due to a weak
2 Press the
POWER
or
TUNER
button to
reception signal, press the MPX button to
turn on the power.
1
switch the tuner into mono reception mode.
3 Press the
MENU
button to select menu.
This should improve the sound quality and
allow you to enjoy the broadcast.
4 Either turn the
TUNING/PRESET
dial or
press the
/
button to select the search
Recalling preset stations
mode.
5 Either turn the
TUNING/PRESET
dial or
press the
/
button to select “
Preset
”.
FrançaisDeutsch
6 Press the
TUNING/PRESET
dial or
ENTER
button to set the preset mode.
7 Watching the display, either turn the
TUNING/PRESET
dial, or press the
/
Italiano Español
button to select the desired preset channel.
7-1 Press one of the preset channel range (
A
to
J
) buttons to select the desired memory
block (A to J).
Nederlands
7-2 Press one of the station call (
1
to
10
)
buttons to select the desired preset channel
(1 to 10).
• Steps 1 to 5 can be skipped when using the
/, preset channel range (A to J) and
station call (1 to 10) buttons.
The preset mode is set when any of these
buttons is pressed, regardless of the menu
setting at that time.
For instructions on presetting stations, see the
section “Preset stations” (page 16).
15
En
Note
1The STEREO indicator will light blue when the MPX button is pressed.
F3
BAND
MENU
TUNING/PRESET
POWER
STANDBY
RDS TUNED STEREO
DISPLAY AUTO PRESET
ONOFF
TUNER
DIMMER
A/B/C D/E/F MPX
G/H I/J
123
456
78
9
10
VOLUME
MUTEAMP
A.PRESET
MENU
A.TUNE
BAND TUNE
MEMORY
PRESET
ENTER
PRESET
TUNE
01_F-F3MK2_en.book 15 ページ 2009年4月3日 金曜日 午後1時45分
Listening to FM/AM04
1 Use the “Auto tuning” or “Manual
tuning” operation to tune in the station to be
Preset stations
preset in the memory.
BAND
MENU
TUNING/PRESET
F3
POWER
STANDBY
RDS TUNED STEREO
2 Press the
MENU
button to select menu.
DISPLAY AUTO PRESET
ONOFF
3 Either turn the
TUNING/PRESET
dial or
press the
/
button to select “
Memory
”.
TUNER
DIMMER
4 Press the
TUNING/PRESET
dial or
ENTER
button to set the preset mode and make the
A/B/C D/E/F MPX
preset channel number flash.
G/H I/J
• Steps 1 to 4 can be skipped when using the
MEMORY button.
When this button is pressed, the preset
123
memory standby mode is set, regardless of
456
the menu setting at that time.
78
9
5 While the preset channel number is
10
flashing, press one of the preset channel
VOLUME
range (
A
to
J
) buttons to select the desired
memory block (A to J).
MUTEAMP
6 While the preset channel number is
flashing, either turn the
TUNING/PRESET
A.PRESET
MENU
A.TUNE
dial, press the
/
or Station call (
1
to
10
)
button to select the desired preset channel (1
BAND TUNE
MEMORY
1
to 10).
PRESET
ENTER
PRESET
7 While the preset channel number is
TUNE
flashing, either press the
TUNING/PRESET
dial or the
MEMORY
button to store the
station in the preset memory.
• To preset other channels, repeat steps 2 to
6.
• A total of 100 broadcast stations can be
preset — 10 stations (channels 1 to 10) in
2
each of blocks A to J.
16
En
Note
01_F-F3MK2_en.book 16 ページ 2009年4月3日 金曜日 午後1時45分
1 When the preset channel is A1, pressing the button or rotating the TUNING/PRESET dial to the left will cause the preset
channel to move to J10.
2 When a broadcast station is stored in memory, the MPX setting is simultaneously stored.

Listening to FM/AM 04
English
An introduction to RDS
RDS Search/PTY Search/TP Search
Radio Data System (RDS) is a system used by
most FM radio stations to provide listeners with
Searching for RDS programs
various kinds of information, such as the name
One of the most useful features of RDS is the
of the station and the kind of show being
ability to search for a particular kind of radio
broadcast.
program. You can search for any of the
One feature of RDS is that you can search by
program types listed above.
type of program. For example, you can search
1 Press the
BAND
button to select the FM
for a station that’s broadcasting a show with
2
band.
the program type, JAZZ.
FrançaisDeutsch
1
2 Press the
MENU
button to select menu.
You can search the following program types:
NEWS – News
FINANCE – Stock market
3 Select “RDS” by either rotating the
AFFAIRS – Current Affairs
reports, commerce,
TUNING/PRESET
dial or pressing the
/
INFO
– General Information
trading, etc.
button, then press either the
TUNING/
SPORT – Sport
CHILDREN – Programs for
PRESET
dial or
ENTER
button.
EDUCATE – Educational
children
Italiano Español
DRAMA – Radio plays, etc.
SOCIAL – Social affairs
4 Either turn the
TUNING/PRESET
dial or
CULTURE – National or
RELIGION – Programs
press
/
button to select the desired
regional culture, theater,
concerning religion
etc.
PHONE IN – Public
search mode (RDS search, PTY search or TP
SCIENCE – Science and
expressing their views by
search).
technology
phone
Nederlands
VARIED – Usually talk-
TRAVEL – Holiday-type
5 Press the
TUNING/PRESET
dial or
ENTER
based material, such as
travel information as
button to search for the RDS program you
quiz shows or interviews.
opposed to traffic
want to hear.
POP M – Pop music
announcements.
The system starts searching through the
ROCK M – Rock music
LEISURE – Leisure interests
station presets for a match. When it finds one,
EASY M – Easy listening
and hobbies
LIGHT M – ‘Light’ classical
JAZZ – Jazz
the search stops and the station plays for five
music
COUNTRY
– Country music
seconds.
CLASSICS – ‘Serious’
NATION M – Popular
classical music
music in a language other
6 If you want to continue listening to the
OTHER M – Music not
than English
station, press the
TUNING/PRESET
dial or
fitting above categories
OLDIES – Popular music
ENTER
button within five seconds.
WEATHER – Weather
from the ’50s and ’60s
If you don’t press the TUNING/PRESET knob or
reports
FOLK M – Folk music
ENTER button, searching resumes.
DOCUMENT
– Documentary
If the program type cannot be found, the unit
will automatically begin the frequency search
3
mode.
17
En
Note
01_F-F3MK2_en.book 17 ページ 2009年4月3日 金曜日 午後1時45分
1 In addition, ALARM may be displayed. ALARM is used for emergency broadcast announcements. You cannot search for this
type of announcement, but the tuner will switch automatically to this RDS signal in the event of a broadcast.
2 RDS is only possible in the FM band.
3 PTY searches station presets only. If no stations have been preset, or if the PTY search could not be found among the station
presets NO PTY DATA is displayed.

Listening to FM/AM04
Displaying RDS information
4 Input the name you want.
Use the DISPLAY button to display the
Choose from the following characters for a
1
name up to eight characters long.
different types of RDS information available.
ABCDEFGHIJKLMNOPQRSTUVWXYZ
• Press the
DISPLAY
button for RDS
information.
abcdefghijklmnopqrstuvwxyz
Each press changes the display as follows:
0123456789
• Radio Text (RT) – Messages sent by the
radio station. For example, a talk radio
!"#$%&'()*+,-./[ \ ]^_:;<=>? [space]
station may provide a phone number as RT.
•Use the TUNING/PRESET dial or /
• Program Service Name (PS) – The name of
buttons to select characters.
the radio station.
• Press the TUNING/PRESET dial or ENTER
•Program Type (PTY) – This indicates the
button to confirm a character. If no
kind of program currently being broadcast.
character is input, a space is input.
• Clock Time (CT)
• The name is stored when the TUNING/
PRESET dial or MEMORY button is
pressed after choosing the fourth
Naming station presets
character.
For easier identification, you can name your
5 Either turn the
TUNING/PRESET
dial,
station presets.
press the preset channel range (
A
to
J
) or
1 Choose the station preset you want to
station call (
1
to
10
) button.
name.
The display shows Station Name, then a
For how to do this, see “Recalling preset
blinking cursor at the first character position.
stations” (page 15).
Tip
2 Press the
MENU
button to select menu.
3 Select Station Name by either rotating the
• To delete a station name, repeat steps 4
TUNING/PRESET
dial or pressing the
/
and 5, and input all blank spaces in place
button, then press either the
TUNING/
of the name.
PRESET
dial or
ENTER
button.
18
En
Note
04_Listen_FM-AM.fm 18 ページ 2009年4月14日 火曜日 午前10時10分
1 • If any noise is picked up while displaying the RT scroll, some characters may be displayed incorrectly.
• NO ** DATA will appear when the required data cannot be found.

Listening to FM/AM 04
English
Last function memory
Initialization of the
• This unit is equipped with a last function
microprocessor
memory which stores the input and output
• When the indication of the display is not
setting conditions as they were
normal or when the operation of the unit
immediately before the power is switched
does not shows the reasonable result, the
off.
initializaton of the microprocessor is
This function eliminates the need to
required by the following procedure.
perform complicated resettings when the
1 Press the unit’s
POWER
button to turn
power is switch on.
the power off.
• The unit is also equipped with a back-up
FrançaisDeutsch
memory.
2 Press the unit’s
POWER
button to turn
the power on while holding down the
MENU
This function provides approximately two
button.
week of memory storage when the main
unit’s POWER button is off and with the
3“
Memory Clear?
” will be displayed in the
power cord disconnected.
display. Using the unit’s
TUNING/PRESET
Italiano Español
dial, select either “
Yes
” or “
No
” and press the
TUNING/PRESET
dial.
4If “
Yes
” is selected, the memory will be
cleared and the unit will then be set to
standby mode. If “
No
” is selected, the unit
Nederlands
1
will be set to standby mode.
19
En
Note
01_F-F3MK2_en.book 19 ページ 2009年4月3日 金曜日 午後1時45分
1 • If step 4 does not work, start over from step 1.
• If the microprocessor has been reset, all the button settings are reset to the default values (the values set upon shipment
from the factory).

01_F-F3MK2_en.book 20 ページ 2009年4月3日 金曜日 午後1時45分
Other connections05
Chapter 5:
Other connections
Caution
• Make sure the power is switched off before making or changing the connections.
Connecting external antennas
Operating this tuner with the
remote sensor of your Pioneer
external
FM antenna external AM antenna
amplifier
Outdoor antenna
Many Pioneer components have SR CONTROL
Indoor antenna
jacks which can be used to link components
(vinyl-coated Wire)
together so that you can use just the remote
(5 m to 6 m)
sensor of one component. When you use a
remote control, the control signal is passed
Loop antenna
along the chain to the appropriate component.
ANTENNA
Note that if you use this feature, make sure that
ANTENNA
you also have at least one set of analog audio
FM
AM
UNBAL 75
LOOP
FM
AM
UNBAL
75
LOOP
jacks connected to another component for
grounding purposes.
PAL connector
1 Connect the CONTROL IN jack of this
tuner to the CONTROL OUT jack of your
• For an external AM antenna, use 5 m to 6 m
Pioneer amplifier.
of vinyl-insulated wire and set up either
Use a cable with a mono mini-plug on each
indoors or outdoors. Leave the loop
end for the connection.
antenna connected. Only use the included
AM loop antenna.
Amplifier
This tuner CD player, etc.
• For an external FM antenna, use a PAL
Pioneer
component
connector to hook up an external FM
CONTROL
remote
To control
To control
antenna.
control
output
OUTIN
input
2 This process can be used to form a daisy-
chain linkage with other Pioneer components
as well.
20
En
