Pioneer VSX-S510-K: инструкция
Раздел: Видео Аудио Фото Оборудование
Тип: Hi-Fi Компонент


Характеристики, спецификации
Инструкция к Hi-Fi Компоненту Pioneer VSX-S510-K
Quick Start Guide
Guide rapide
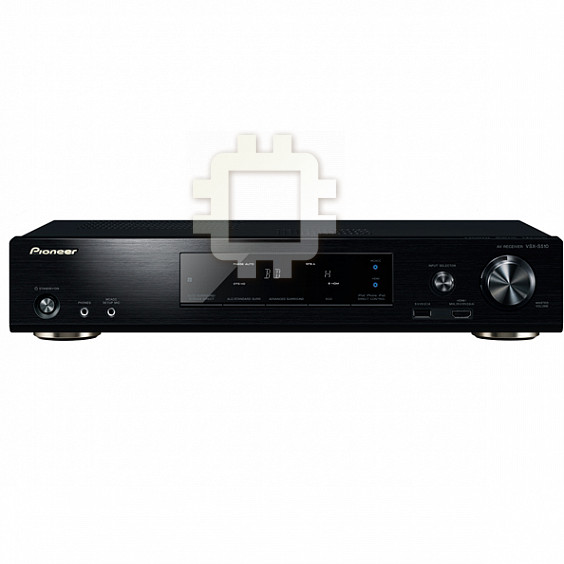
AV Receiver
Kurzanleitung
Amplificateur AV
AV Receiver
Guida di avvio rapido
VSX-S510-K/-S/-W
Только VSX-S510-K/-S, VSX-S310-K/-S
Sintoamplificatore AV
Snelstartgids
VSX-S310-K/-S
AV Receiver
Guía de inicio rápido
Receptor AV
AV-ресивер
Краткое руководство пользователя
Thank you for buying this Pioneer product. This Quick Start
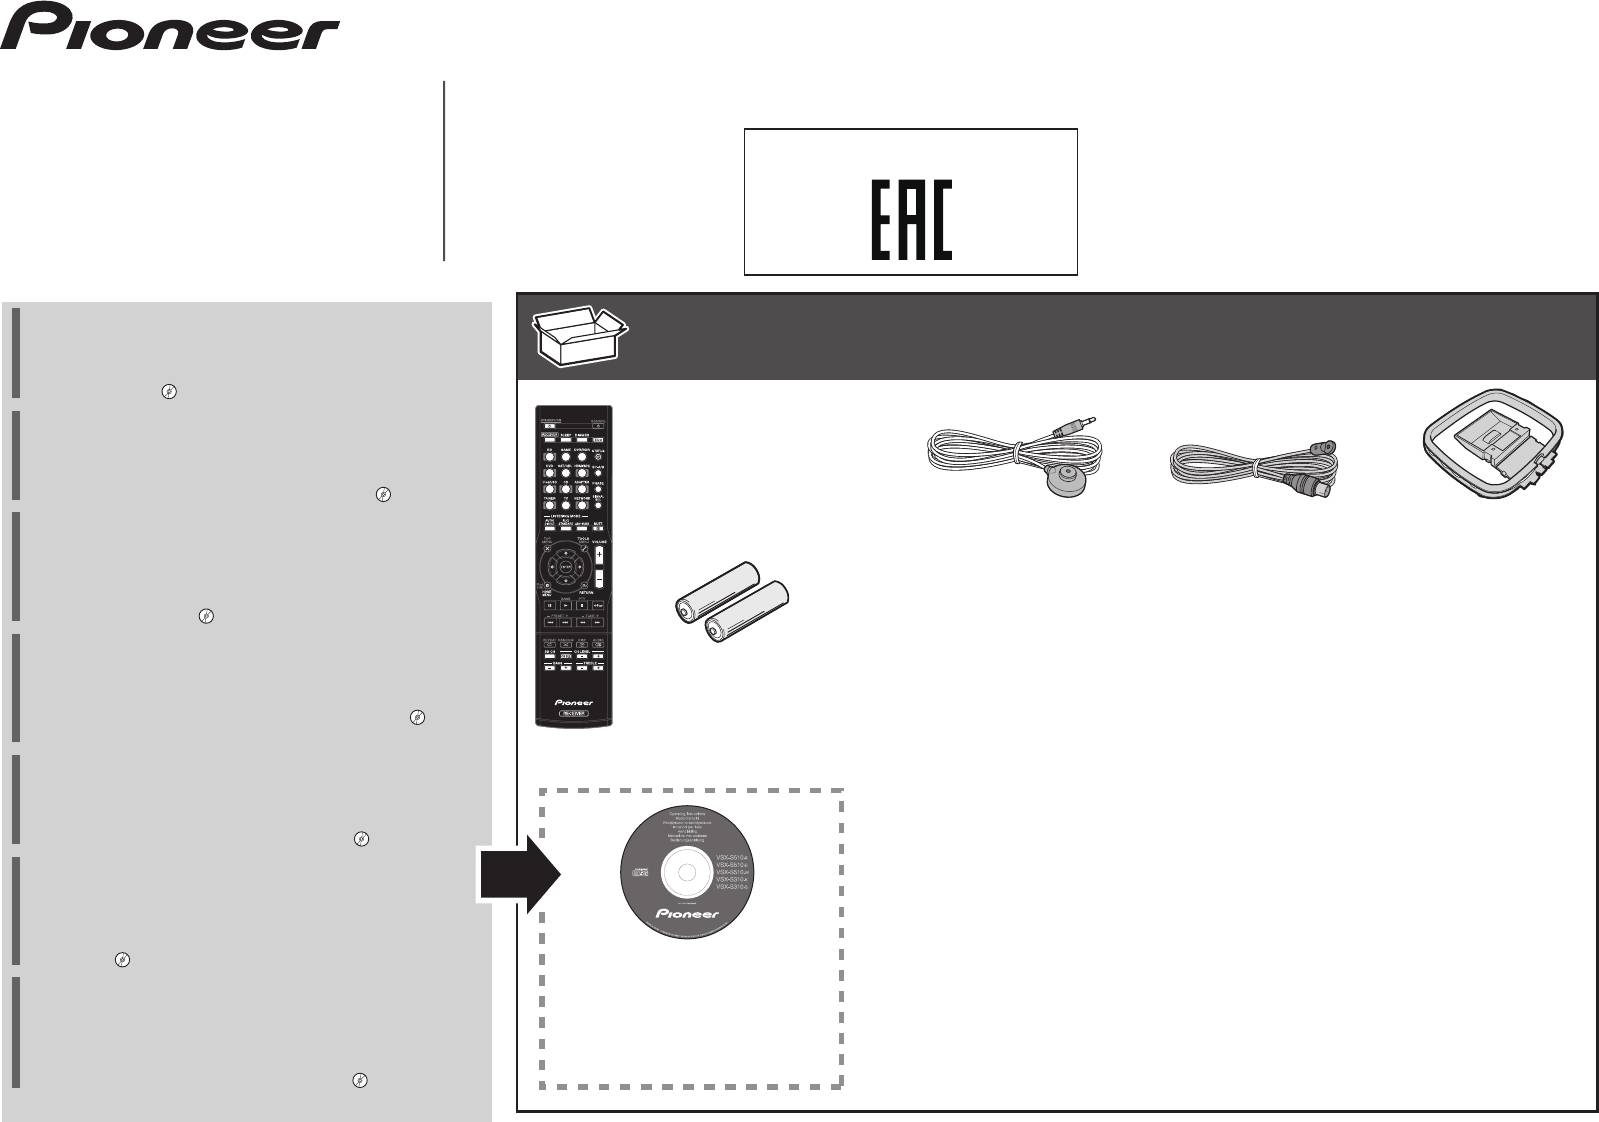
What’s in the box
Contenuto della confezione
Contenido de la caja
Guide includes instructions for basic connections and operations
Contenu du carton d’emballage
Inhoud van de doos
Комплект поставки
to allow simple use of the receiver. For detailed descriptions of
Lieferumfang
the receiver, see the “Operating Instructions” provided on the
included CD-ROM ( ).
Merci pour l’achat de ce produit Pioneer. Ce guide rapide
Remote Control
contient les instructions relatives aux raccordements et
Télécommande
opérations de base permettant une utilisation simple de ce
Fernbedienung
récepteur. Pour des descriptions plus détaillées du récepteur,
Telecomando
référez-vous au “Mode d’emploi” sur le CD-ROM ( ) fourni.
Afstandsbediening
Mando a distancia
Vielen Dank, dass Sie sich für dieses Pioneer-Produkt entschieden
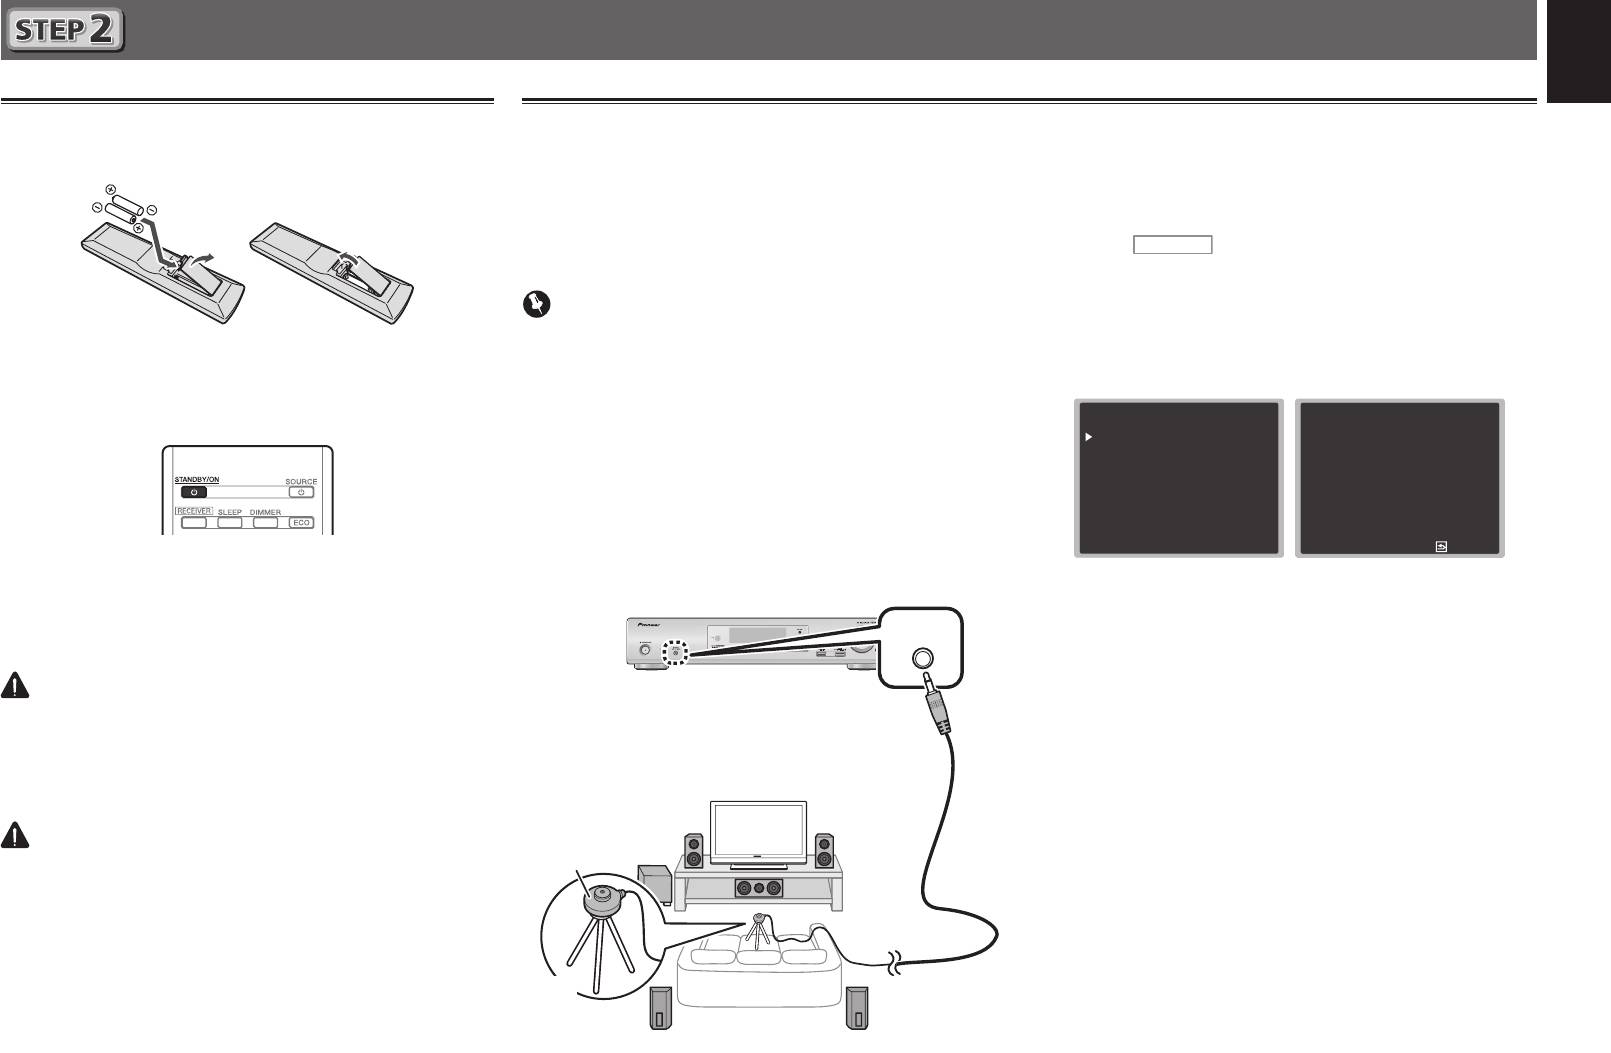
Setup microphone
FM wire antenna
AM loop antenna
Пульт дистанционного
haben. Die Kurzanleitung enthält Anweisungen für grundlegende
управления
Microphone de configuration
Antenne filaire FM
Antenne cadre AM
Verbindungen und Bedienvorgänge, um eine einfache Bedienung
Mikrofon für die Einstellung
UKW-Drahtantenne
MW-Rahmenantenne
des Receivers zu ermöglichen. Detaillierte Beschreibungen des
Impostazione microfono
Antenna FM a filo
Antenna AM a telaio
Receivers finden Sie in der „Bedienungsanleitung“ auf der
Microfoon voor instellen
FM-draadantenne
AM-raamantenne
mitgelieferten CD-ROM ( ).
Micrófono de configuración
Antena de hilos de FM
Antena de cuadro de AM
Установочный микрофон
Проволочная антенна FM
Рамочная антенна АМ
Vi ringraziamo per avere acquistato questo prodotto Pioneer.
Questa Guida di avvio rapido comprende istruzioni per i
AAA size IEC R03 dry cell batteries x2
collegamenti fondamentali e per le operazioni essenziali di
Piles à anode sèche AAA IEC R03 x 2
questo ricevitore. Per una descrizione dettagliata del ricevitore,
AAA/IEC/R03 Trockenbatterien x2
Power cord
These quick start guide
Warranty card
vedere le “Istruzioni per l’uso” contenute nel CD-ROM ( )
Pile a secco AAA IEC R03 x2
Cordon d’alimentation
Le présent Guide de démarrage
Carte de garantie
accluso.
AAA/IEC/R03 drogecelbatterijen x2
Pilas secas AAA, IEC R03 x 2
Netzkabel
Diese Kurzanleitung
Garantiekarte
Hartelijk dank voor de aanschaf van dit Pioneer product. In deze
Сухие батарейки размера AAA IEC R03, 2 шт.
Cavo di alimentazione
Guida per l’avvio rapido
Tarjeta de garantía
snelstartgids vindt u de instructies voor de basisaansluitingen en
Netsnoer
Deze Quick Start-gids
Documento di garanzia
de basisbediening voor een eenvoudig gebruik van de receiver.
Cable de alimentación
Esta guía de inicio rápido
Garantiebewijs
Voor meer gedetailleerde informatie wordt u verwezen naar de
Кабель питания
Это краткое руководство пользователя
Гарантийный сертификат
“Handleiding” die op de bijgeleverde CD-ROM ( ) staat.
Muchas gracias por haber adquirido este producto de Pioneer.
Esta Guía de inicio rápido incluye instrucciones para hacer las
SPEAKER CAUTION Sheet (English only)
conexiones y operaciones básicas que le permitirán hacer un uso
Note d’avertissement relative aux enceintes (en anglais uniquement)
sencillo del receptor. Para conocer una descripción detallada del
Lautsprecher-Sicherheitshinweise (nur Englisch)
receptor, consulte el “Manual de instrucciones” suministrado con
Scheda PRECAUZIONI ALTOPARLANTI (solo inglese)
el CD-ROM ( ) incluido.
CD-ROM (Operating instructions)
Informatieblad over SPEAKER CAUTION (alleen Engels)
CD-ROM (Mode d’emploi)
Благодарим вас за приобретение данного изделия Pioneer.
Hoja de PRECAUCIONES ACERCA DE LOS ALTAVOCES (solo en inglés)
CD-ROM (Bedienungsanleitung)
В данном Кратком руководстве пользователя содержатся
Лист SPEAKER CAUTION (МЕРЫ ПРЕДОСТОРОЖНОСТИ ДЛЯ
CD-ROM (Istruzioni per l’uso)
инструкции по основным подключениям и операциям для
ГРОМКОГОВОРИТЕЛЕЙ) (только на английском языке)
CD-ROM (Handleiding)
упрощенного использования ресивера. Подробное
CD-ROM (Manual de instrucciones)
описание ресивера см. в «Инструкции по эксплуатации»,
CD-ROM (Инструкции по эксплуатации)
содержащихся на поставляемом CD-ROM ( ).
Safety Brochure
For detailed descriptions of the receiver, see the “Operating Instructions” provided on the included CD-ROM. The operating instructions can also be downloaded from the Pioneer website (http:// www.pioneer.eu). See below
for instructions on handling the CD-ROM.
0
Operating Environment
— In regard to viewing the user’s manual PDF included on the CD-ROM, operation has been confirmed on the following operating environments. Microsoft® Windows® XP / Windows Vista® /
Windows® 7 / Windows® 8 and Apple Mac OS X 10.7 or later, Adobe Reader (Version 10, 11).
0
Precautions For Use
— This CD-ROM is for use with a personal computer. It cannot be used with a DVD player or music CD
player. Attempting to play this CD-ROM with a DVD player or music CD player can damage speakers or cause impaired hearing due to the large volume.
0
License
— Please agree to the “Terms of Use” indicated below
before using this CD-ROM. Do not use if you are unwilling to consent to the terms of its use.
0
Terms of Use
— Copyright to data provided on this CD-ROM belongs to PIONEER CORPORATION. Unauthorized transfer,
duplication, broadcast, public transmission, translation, sales, lending or other such matters that go beyond the scope of “personal use” or “citation” as defined by Copyright Law may be subject to punitive actions.
Permission to use this CD-ROM is granted under license by PIONEER CORPORATION.
0
General Disclaimer
— PIONEER CORPORATION does not guarantee the operation of this CDROM with respect to personal
computers using any of the applicable OS. In addition, PIONEER CORPORATION is not liable for any damages incurred as a result of use of this CD-ROM and is not responsible for any compensation. The names of private
corporations, products and other entities described herein are the registered trademarks or trademarks of their respective firms.
*
When Using a Mac OS
: Place the CD-ROM in the CD drive, click the CD drive from Finder, and double click the Index.html (table of contents) for operation instructions.
CAUTION
WARNING
CAUTION
TO PREVENT THE RISK OF ELECTRIC SHOCK, DO NOT REMOVE
To prevent a fire hazard, do not place any naked flame sources (such
The
u
STANDBY/ON
switch on this unit will not completely shut
COVER (OR BACK). NO USER-SERVICEABLE PARTS INSIDE. REFER
as a lighted candle) on the equipment.
off all power from the AC outlet. Since the power cord serves as the
SERVICING TO QUALIFIED SERVICE PERSONNEL.
D3-4-2-1-7a_A1_En
main disconnect device for the unit, you will need to unplug it from
D3-4-2-1-1_B1_En
the AC outlet to shut down all power. Therefore, make sure the unit
This product is for general household purposes. Any failure due
Operating Environment
has been installed so that the power cord can be easily unplugged
to use for other than household purposes (such as long-term use
Operating environment temperature and humidity:
from the AC outlet in case of an accident. To avoid fire hazard, the
for business purposes in a restaurant or use in a car or ship) and
power cord should also be unplugged from the AC outlet when left
+5 °C to +35 °C (+41 °F to +95 °F); less than 85 %RH (cooling vents
which requires repair will be charged for even during the warranty
not blocked)
unused for a long period of time (for example, when on vacation).
period.
D3-4-2-2-2a*_A1_En
Do not install this unit in a poorly ventilated area, or in locations
K041_A1_En
exposed to high humidity or direct sunlight (or strong artificial light).
WARNING
D3-4-2-1-7c*_A2_En
WARNING
Store small parts out of the reach of children and infants. If
This equipment is not waterproof. To prevent a fire or shock hazard, do
VENTILATION CAUTION
English
not place any container filled with liquid near this equipment (such
accidentally swallowed, contact a doctor immediately.
When installing this unit, make sure to leave space around the unit
as a vase or flower pot) or expose it to dripping, splashing, rain or
D41-6-4_A1_En
for ventilation to improve heat radiation (at least 10 cm at top, 5 cm at
moisture.
rear, and 5 cm at each side).
D3-4-2-1-3_A1_En
WARNING
Slots and openings in the cabinet are provided for ventilation to ensure
Information for users on collection and disposal of old equipment and used batteries
reliable operation of the product, and to protect it from overheating. To
Symbol for
These symbols on the products, packaging, and/or accompanying documents mean that used electrical and
prevent fire hazard, the openings should never be blocked or covered
equipment
electronic products and batteries should not be mixed with general household waste.
with items (such as newspapers, table-cloths, curtains) or by operating
For proper treatment, recovery and recycling of old products and used batteries, please take them to applicable
the equipment on thick carpet or a bed.
collection points in accordance with your national legislation.
D3-4-2-1-7b*_A1_En
By disposing of these products and batteries correctly, you will help to save valuable resources and prevent any
potential negative effects on human health and the environment which could otherwise arise from inappropriate
Symbol examples
waste handling.
for batteries
For more information about collection and recycling of old products and batteries, please contact your local
municipality, your waste disposal service or the point of sale where you purchased the items.
These symbols are only valid in the European Union.
For countries outside the European Union:
If you wish to discard these items, please contact your local authorities or dealer and ask for the correct method of
disposal.
K058a_A1_En
2
Pb
English
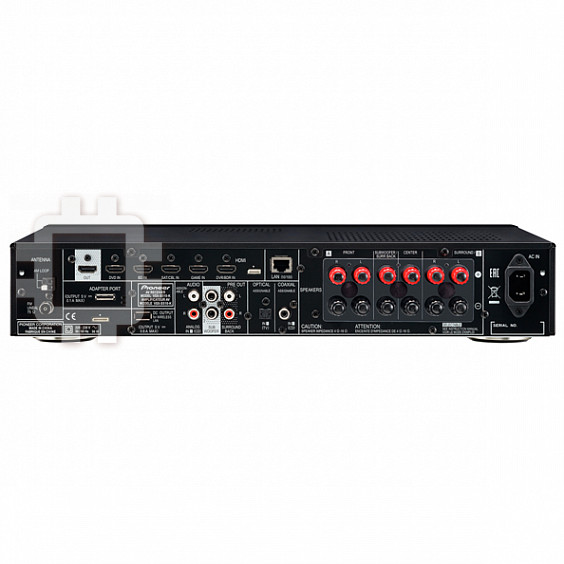
Connecting up
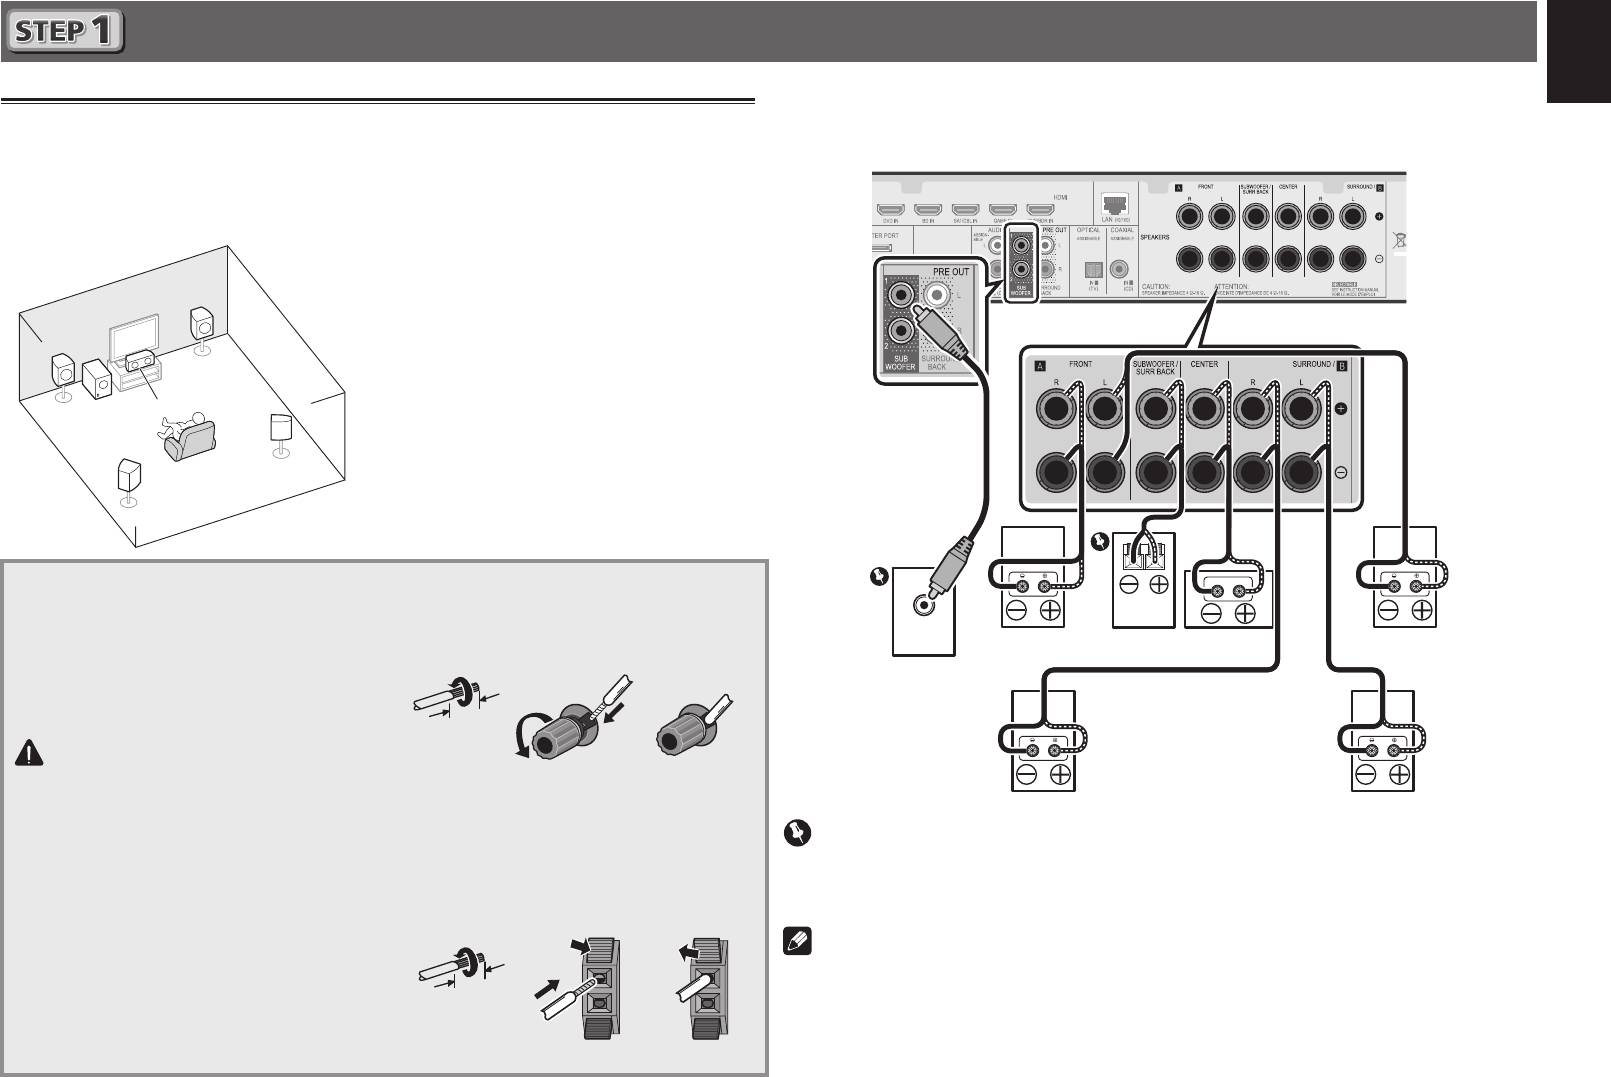
After installing the speakers, connect them as shown below.
Connecting the speakers
Français
VSX-S510 connection diagram
The receiver will work with just two stereo speakers (the front speakers in the diagram) but using
at least three speakers is recommended, and a complete setup is best for surround sound.
To achieve the best possible surround sound, install your speakers as shown below.
5.1 channel surorund system:
L
– Front Left
Deutsch
C
– Center
R
– Front Right
SL
– Surround Left
SR
– Surround Right
SW
– Subwoofer
Italiano
• In addition, surround back speakers or
Speaker B (VSX-S510 only) can also be
connected.
• For details, see page 11 of the Operating
Nederlands
Instructions (CD-ROM).
Connecting the speaker cables
1
Twist exposed wire strands together.
Make sure you connect the speaker on
2
Loosen terminal and insert exposed wire.
Español
LINE LEVEL
the right to the right (
R
) terminal and the
INPUT
3
Tighten terminal.
speaker on the left to the left (
L
) terminal.
Also make sure the positive and negative
(
+/–
) terminals on the receiver match those
on the speakers.
CAUTION
• Before making or changing
connections, switch off the power and
disconnect the power cord from the AC
outlet.
• These speaker terminals carry
HAZARDOUS LIVE
voltage. To prevent
the risk of electric shock when
connecting or disconnecting the
speaker cables, disconnect the power
cord before touching any uninsulated
parts.
3
12 3
10 mm
The wires should be connected as follows to the
VSX-S310’s CENTER or SURROUND terminals.
1
Twist exposed wire strands together.
2
Push open the tabs and insert exposed
wire.
3
Release the tabs.
12 3
R
L
SW
C
SR
SL
Front Right (
R
)
Passive
Center (
C
)
Front Left (
L
)
Subwoofer
Powered
Subwoofer (
SW
)
Surround Right
Surround Left
(
SR
)
(
SL
)
Important
• Connect passive subwoofers such as Pioneer S-SLW500 to the SPEAKERS SUBWOOFER
terminals.
• Please connect either the passive subwoofers or the powered subwoofers, not both.
Note
• This unit supports speakers with a nominal impedance of 4
W
to 16
W
.
10 mm
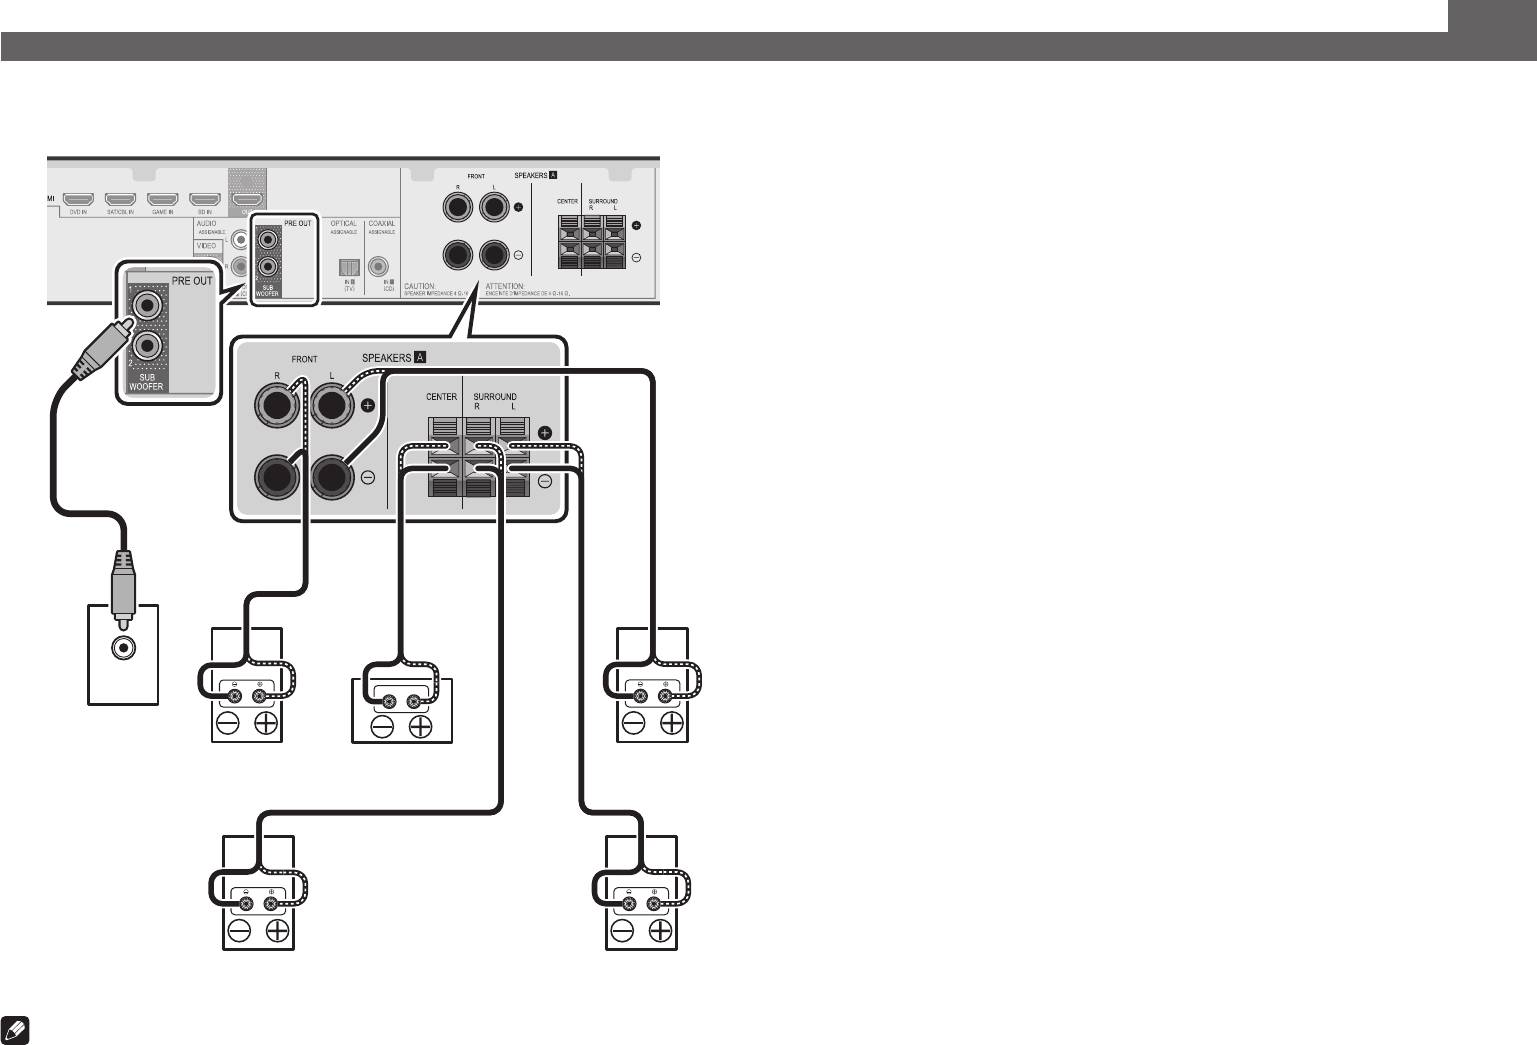
Connecting up (continued)
VSX-S310 connection diagram
LINE LEVEL
INPUT
Powered
Subwoofer (
SW
)
Front Right (
R
) Front Left (
C
)
L
)Center (
Surround Right
Surround Left
(
SR
)
(
SL
)
Note
• This unit supports speakers with a nominal impedance of 4
W
to 16
W
.
4
English
Connecting up (continued)
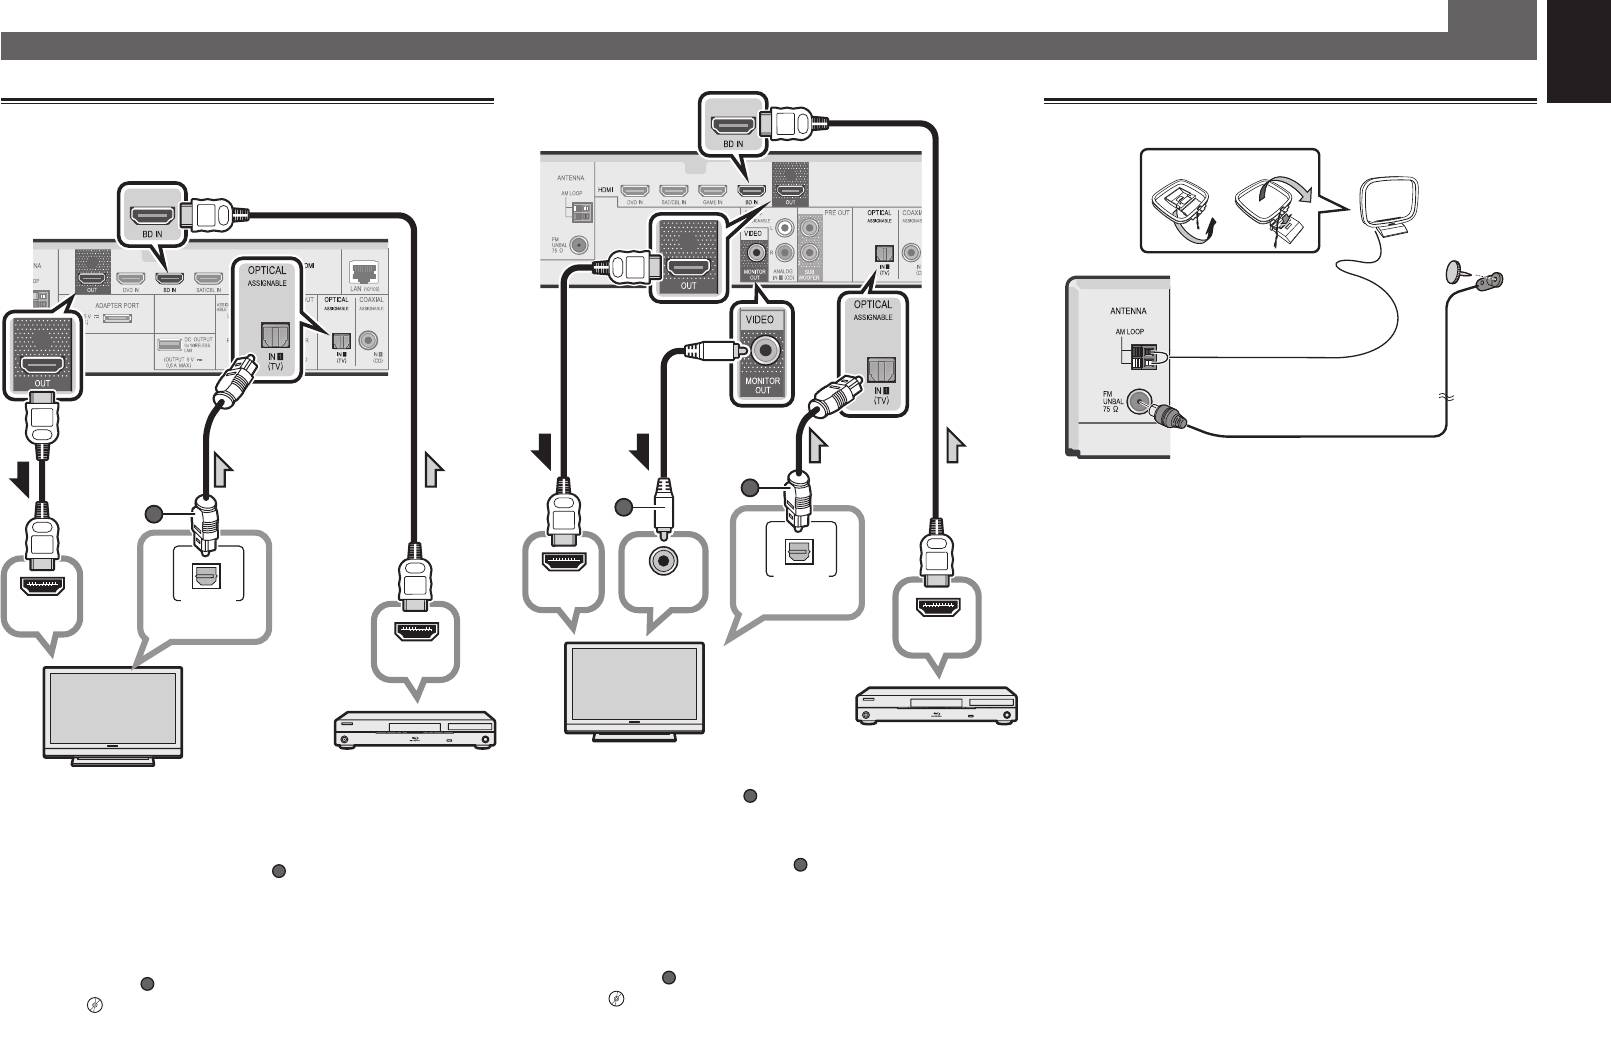
Connecting a TV and playback
Connecting antennas
Français
components
21
AM loop antenna
VSX-S510
Deutsch
Italiano
FM wire antenna
Nederlands
Español
HDMI/DVI-compatible
HDMI/DVI-compatible TV
Blu-ray Disc player, etc.
• The OSD will only be output from the HDMI OUT terminal.
• If the TV does not support the HDMI Audio Return Channel
function, optical digital cable (
5
A
) connection is required to
listen to the TV sound over the receiver.
• If the TV supports the HDMI Audio Return Channel
function, the sound of the TV is input to the receiver via the
HDMI terminal, so there is no need to connect an optical
digital cable (
A
• Composite video cable (
). In this case, set
ARC
at
HDMI Setup
to
ON
l
“HDMI Setup” on page 56.
• Please refer to the TV’s operation manual for directions on
connections and setup for the TV.
A
) connection is necessary in
order to see the OSD of the unit on the TV.
• If the TV does not support the HDMI Audio Return Channel
function, optical digital cable (
B
) connection is required to
listen to the TV sound over the receiver.
• If the TV supports the HDMI Audio Return Channel
function, the sound of the TV is input to the receiver via the
HDMI terminal, so there is no need to connect an optical
digital cable (
B
VSX-S310
B
A
A
OPTICAL
HDMI IN
VIDEO IN
OPTICAL
DIGITAL AUDIO OUT
HDMI IN
DIGITAL AUDIO OUT
HDMI OUT
HDMI OUT
HDMI/DVI-compatible
HDMI/DVI-compatible TV
Blu-ray Disc player, etc.
). In this case, set
ARC
at
HDMI Setup
to
ON
l
“HDMI Setup” on page 56.
• Please refer to the TV’s operation manual for directions on
connections and setup for the TV.
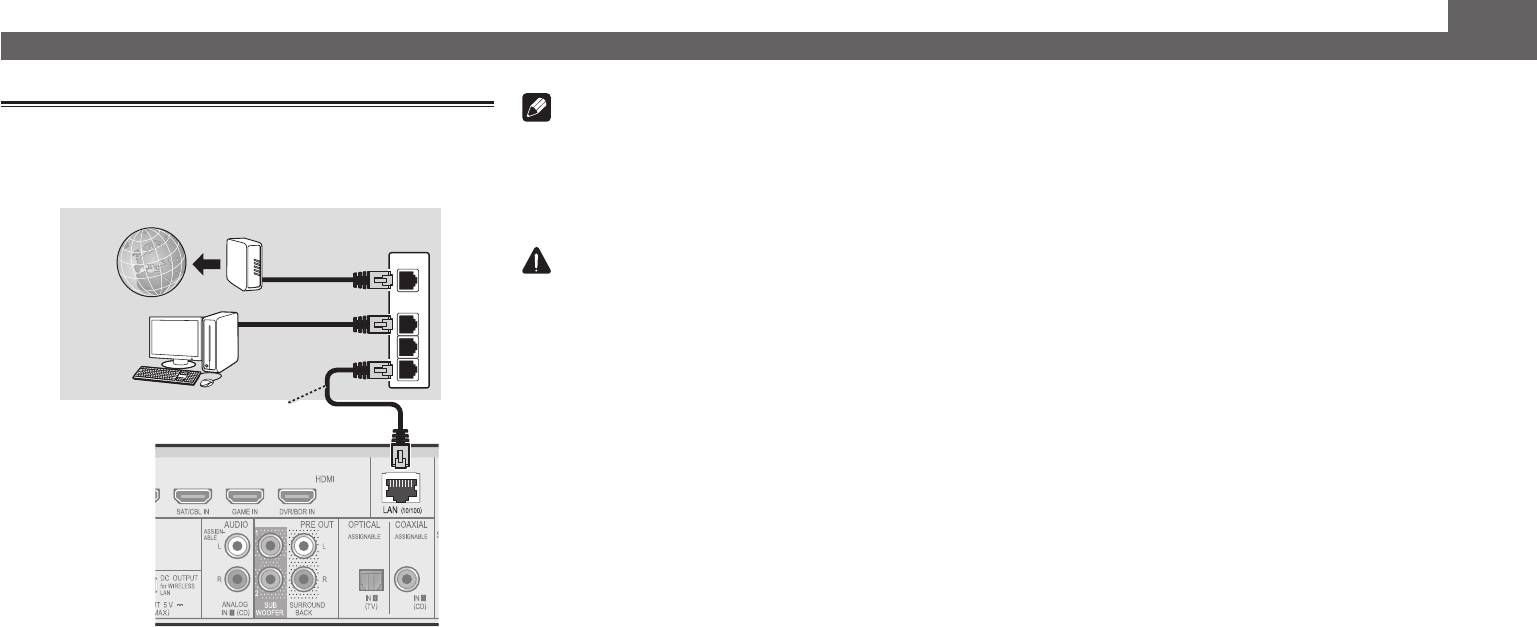
Connecting up (continued)
Note
Connecting to the network through
• Refer to the operating instructions in the included CD-
LAN interface
ROM if you wish to connect a TV or playback component
in a method other than an HDMI connection.
VSX-S510 only
• Refer to the operating instructions in the included CD-
Internet
Modem
ROM for other device connections.
Router
WAN
CAUTION
• Handle the power cord by the plug part. Do not pull out
LAN
the plug by tugging the cord, and never touch the power
1
Computer
cord when your hands are wet, as this could cause a short
2
circuit or electric shock. Do not place the unit, a piece of
3
furniture, or other object on the power cord or pinch the
cord in any other way. Never make a knot in the cord or tie
LAN cable (sold separately)
it with other cables. The power cords should be routed so
that they are not likely to be stepped on. A damaged power
cord can cause a fire or give you an electric shock. Check
the power cord once in a while. If you find it damaged,
ask your nearest Pioneer authorized independent service
company for a replacement.
VSX-S510
6
English
Initial Setup
Before you start
Automatically setting up for surround sound (MCACC)
Français
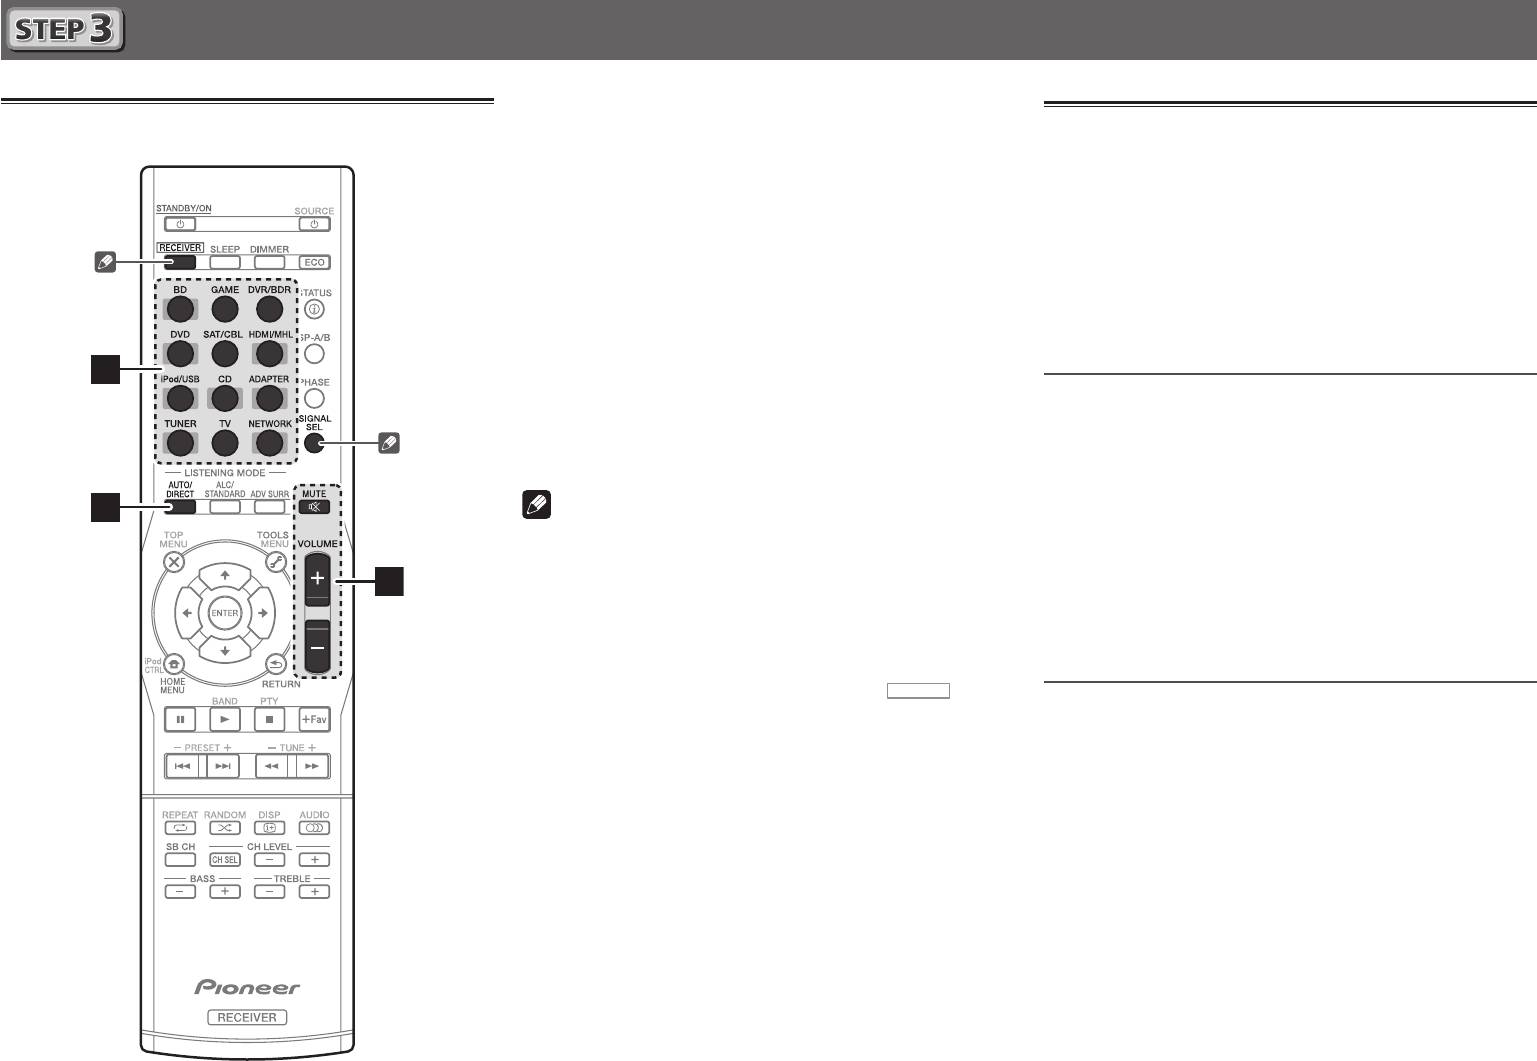
1
Put the batteries in the remote control.
The Auto Multi-Channel ACoustic Calibration (MCACC) setup
2
Press BD button on the remote control to
uses the supplied setup microphone to measure and analyze
switch to BD entry.
the test tone that is outputted by the speakers. This setup
enables automatic high precision measuring and settings;
3
Press
Deutsch
utilizing it will create an optimum user listening environment.
Important
• Measure in a quiet environment.
The batteries included with the unit are to check initial
• If you have a tripod, use it to place the microphone so
operations; they may not last over a long period. We
that it’s about ear level at your normal listening position.
Italiano
recommend using alkaline batteries that have a longer life.
Otherwise, place the microphone at ear level using a table
2
Switch on the receiver and your TV.
or a chair.
• Accurate measurements may not be possible if there are
obstacles between the speakers and the listening position
(microphone).
Nederlands
• When measuring, step away from the listening position,
and operate using the remote control from the external
side of all the speakers.
3
Switch the TV input so that it connects to the
1
Connect the supplied setup microphone.
receiver.
Español
4
Turn the powered subwoofer on and turn up
MCACC
SETUP
MIC
the volume.
WARNING
• Do not use or store batteries in direct sunlight or other
excessively hot place, such as inside a car or near a
heater. This can cause batteries to leak, overheat, explode
or catch fire. It can also reduce the life or performance of
batteries.
CAUTION
• When inserting the batteries, make sure not to damage
the springs on the battery’s (–) terminals. This can cause
batteries to leak or overheat.
• When disposing of used batteries, please comply with
governmental regulations or environmental public
institution’s rules that apply in your country/area.
7
RECEIVER
on the remote control, then
press the HOME MENU button.
The Home Menu appears on your TV.
4
Select ’Auto MCACC’ from the Home Menu,
then press ENTER.
Automatic measuring will start.
Home Menu
1
. Auto MCACC
1
. Auto MCACC
Now Analyzing
2
. Manual SP Setup
3
. Input Assign
Environment Check
4. Auto Power Down
Ambient Noise
5. HDMI Setup
Speaker YES/NO
6. Network Standby
7. MHL Setup
8. Speaker System
9. OSD Setup
Return
VSX-S510
• Measuring will take about 3 to 12 minutes.
5
Follow the instructions on-screen.
• Automatic setting is complete when the Home Menu
screen appears.
6
Make sure the setup microphone is
disconnected.
Microphone
Tripod
Basic playback
1
Switch on the playback component.
Multichannel playback
E.g. Turn the Blu-ray Disc player connected to the
HDMI BD IN
terminal on.
2
Switch the input of the receiver.
E.g. Press
BD
to select the
BD
input.
3
Press AUTO/DIRECT to select
’AUTO SURROUND’.
For multi-channel playback with a 2-channel audio input
(TV, music, etc.), press the
ALC/STANDARD
or
ADV SURR
button to select your preferred listening mode.
2
4
Start the playback component’s playback.
E.g. Start playback of the Blu-ray Disc player.
5
Use VOLUME +/– to adjust the volume level.
Sound can be switched off by pressing
MUTE
button.
3
Note
• In order to listen to the audio from the source component
that is connected to this receiver using a coaxial or an
C1
O1
5
optical cable, choose the
(coaxial) or
(optical) input.
Please press
SIGNAL SEL
in accordance with either CD or
TV input.
• The input of the receiver will switch over, and you will
be able to operate other components using the remote
control. To operate the receiver, first press
8
RECEIVER
Listening to the radio
1
Press TUNER to select the tuner.
If necessary, press
BAND
to change the band (FM or AM).
2
Press
TUNE
+/– to tune to a station.
• Press and hold
TUNE
+/–
for about a second. The receiver
will start searching for the next station.
• If you’re listening to an FM station but the reception
is weak, press
BAND
to select FM MONO and set the
receiver to the mono reception mode.
Saving station presets
If you often listen to a particular radio station, it’s convenient to
have the receiver store the frequency for easy recall whenever
you want to listen to that station.
1
Press TOOLS while receiving a signal from the
station you want to store.
The preset number is blinking.
2
Press PRESET+/– to select the station preset
you want, then press ENTER.
The preset number stop blinking and the receiver stores
the station.
on
Listening to station presets
the remote control, then press the appropriate button to
operate.
You will need to have some presets stored to do this.
Press PRESET+/– to select the station preset
you want.
English
Basic playback (continued)
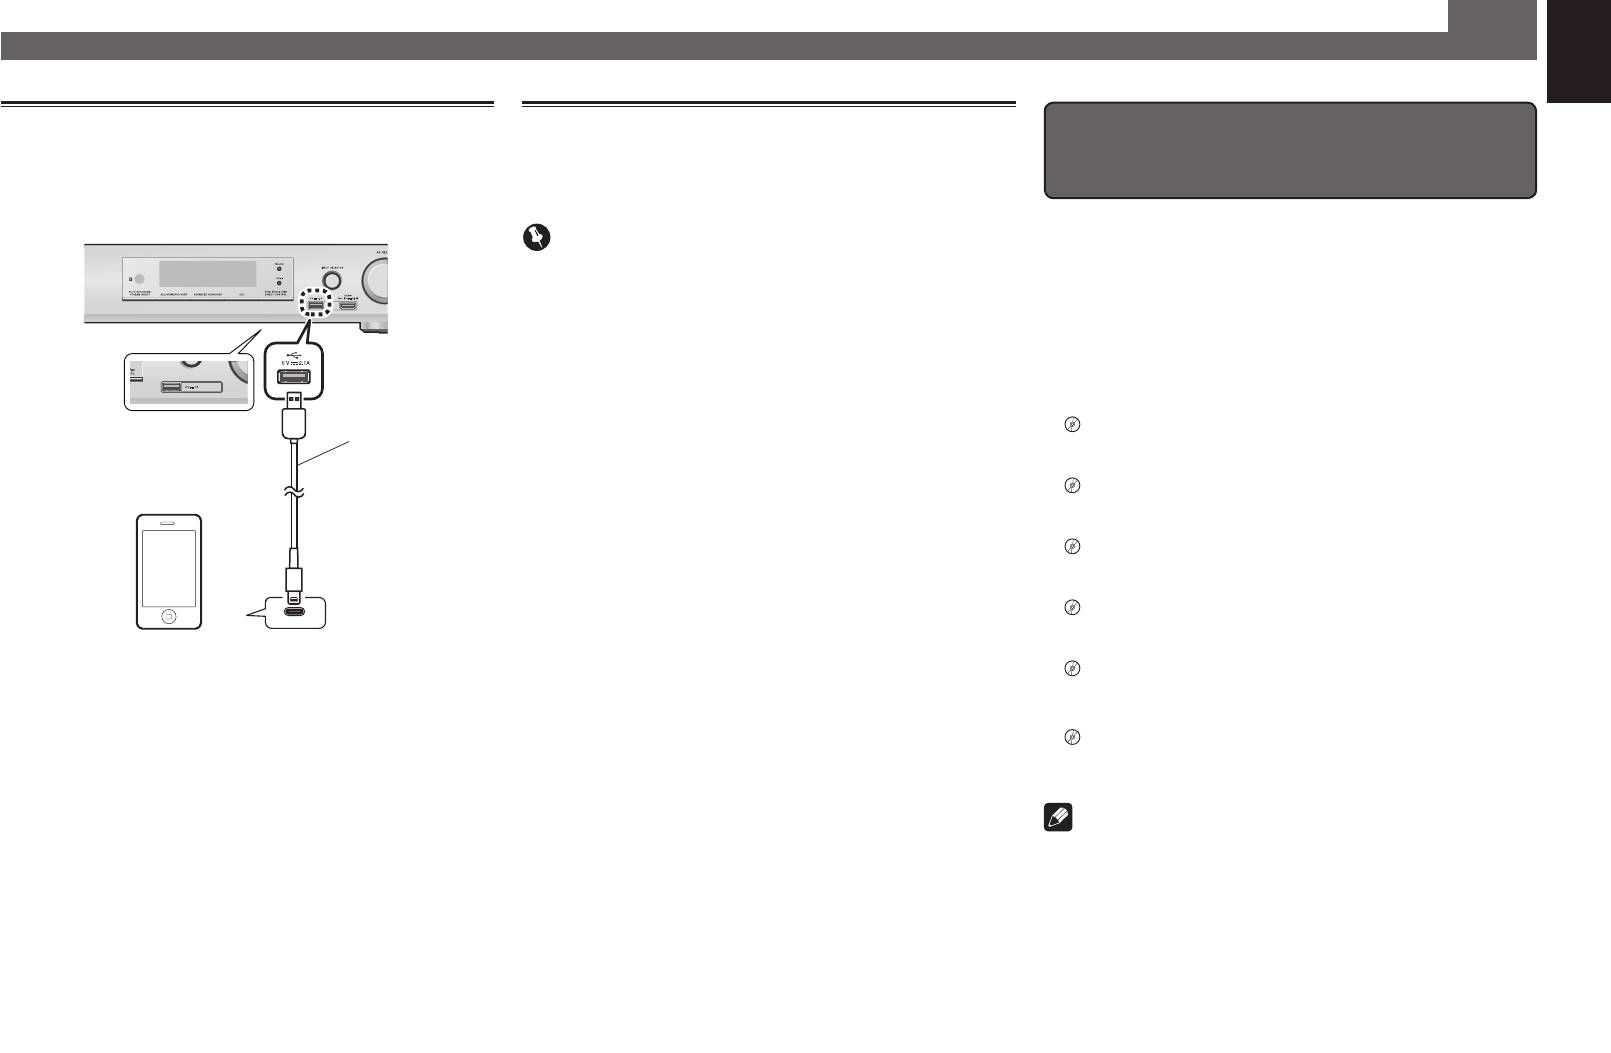
Playing an iPod
Listening to Internet radio stations
To enjoy the many functions of the
Français
• About one minute is required between turning the power
VSX-S510 only
unit to the fullest extent
on and completion of startup.
• About one minute is required between turning the power
on and completion of startup.
1
Connect your iPod.
VSX-S510
Load the CD-ROM into your computer and download the
Important
PDF manual from the menu screen to read.
Deutsch
• When using a broadband Internet connection, a contract
with an Internet service provider is required. For more
details, contact your nearest Internet service provider.
• To listen to Internet radio stations, you must have high-
speed broadband Internet access. With a 56 K or ISDN
Functions
Italiano
modem, you may not enjoy the full benefits of Internet
radio.
■
Playing a USB device
USB cable that
VSX-S310
comes with the iPod
• Access to content provided by third parties requires a
l
page 29
high speed internet connection and may also require
■
Bluetooth ADAPTER for Wireless Enjoyment of Music
account registration and a paid subscription. Third
iPod/iPhone or iPad
l
Nederlands
(VSX-S510 only)
party content services may be changed, suspended,
page 32 (VSX-S510 only)
interrupted, or discontinued at any time without notice,
■
Playback with NETWORK features
and Pioneer disclaims any liability in connection with such
l
page 42 (VSX-S510 only)
occurrences. Pioneer does not represent or warrant that
content services will continue to be provided or available
■
Setting the Audio options
for a particular period of time, and any such warranty,
l
page 40
Español
express or implied, is disclaimed.
■
Using the Home Menu
2
Press iPod/USB to select the iPod/USB input.
1
Press NETWORK repeatedly to select the
l
page 51
When the display shows the names of folders and files,
NETRADIO input.
you’re ready to play music from the iPod.
It may take several seconds for this receiver to access the
Troubleshooting
3
Use
/
to select a category, then press
network.
l
page 58
ENTER to browse that category.
2
Use
/
to select the Internet radio station to
• To return to the previous level any time, press
RETURN
.
play back, and then press ENTER.
VSX-S510only
4
Use
/
to browse the selected category (e.g.,
Note
albums).
• This unit supports AirPlay. For details, see page 42 of the
• Use
/l
to move to previous/next levels.
operating instructions and the Apple website (http://www.
apple.com).
5
Continue browsing until you arrive at what
• This unit’s software can be updated (page 46 of the
you want to play, then press
to start
operating instructions). With Mac OS, it can be updated
playback.
using Safari (page 47 of the operating instructions).
© 2013 PIONEER CORPORATION.
All rights reserved.
9


