Pioneer CP-LX70: инструкция
Раздел: Бытовая, кухонная техника, электроника и оборудование
Тип: Домашний кинотеатр
Инструкция к Домашнему кинотеатру Pioneer CP-LX70
Оглавление

01_CP-LX70_EU.book 1 ページ 2007年9月5日 水曜日 午前10時51分
Speaker Stand
Socle d’enceinte
Lautsprecherständer
Base per diffusori
Luidsprekerstandaard
Soportes de altavoz
Suporte para colunas
CP-LX
Högtalarstativ
Højttalerstativ
Høyttalerstativ
Kaiutinjalusta
Стойка под динамик
CP-LX TS

Thank you for buying this Pioneer product. The speaker stands
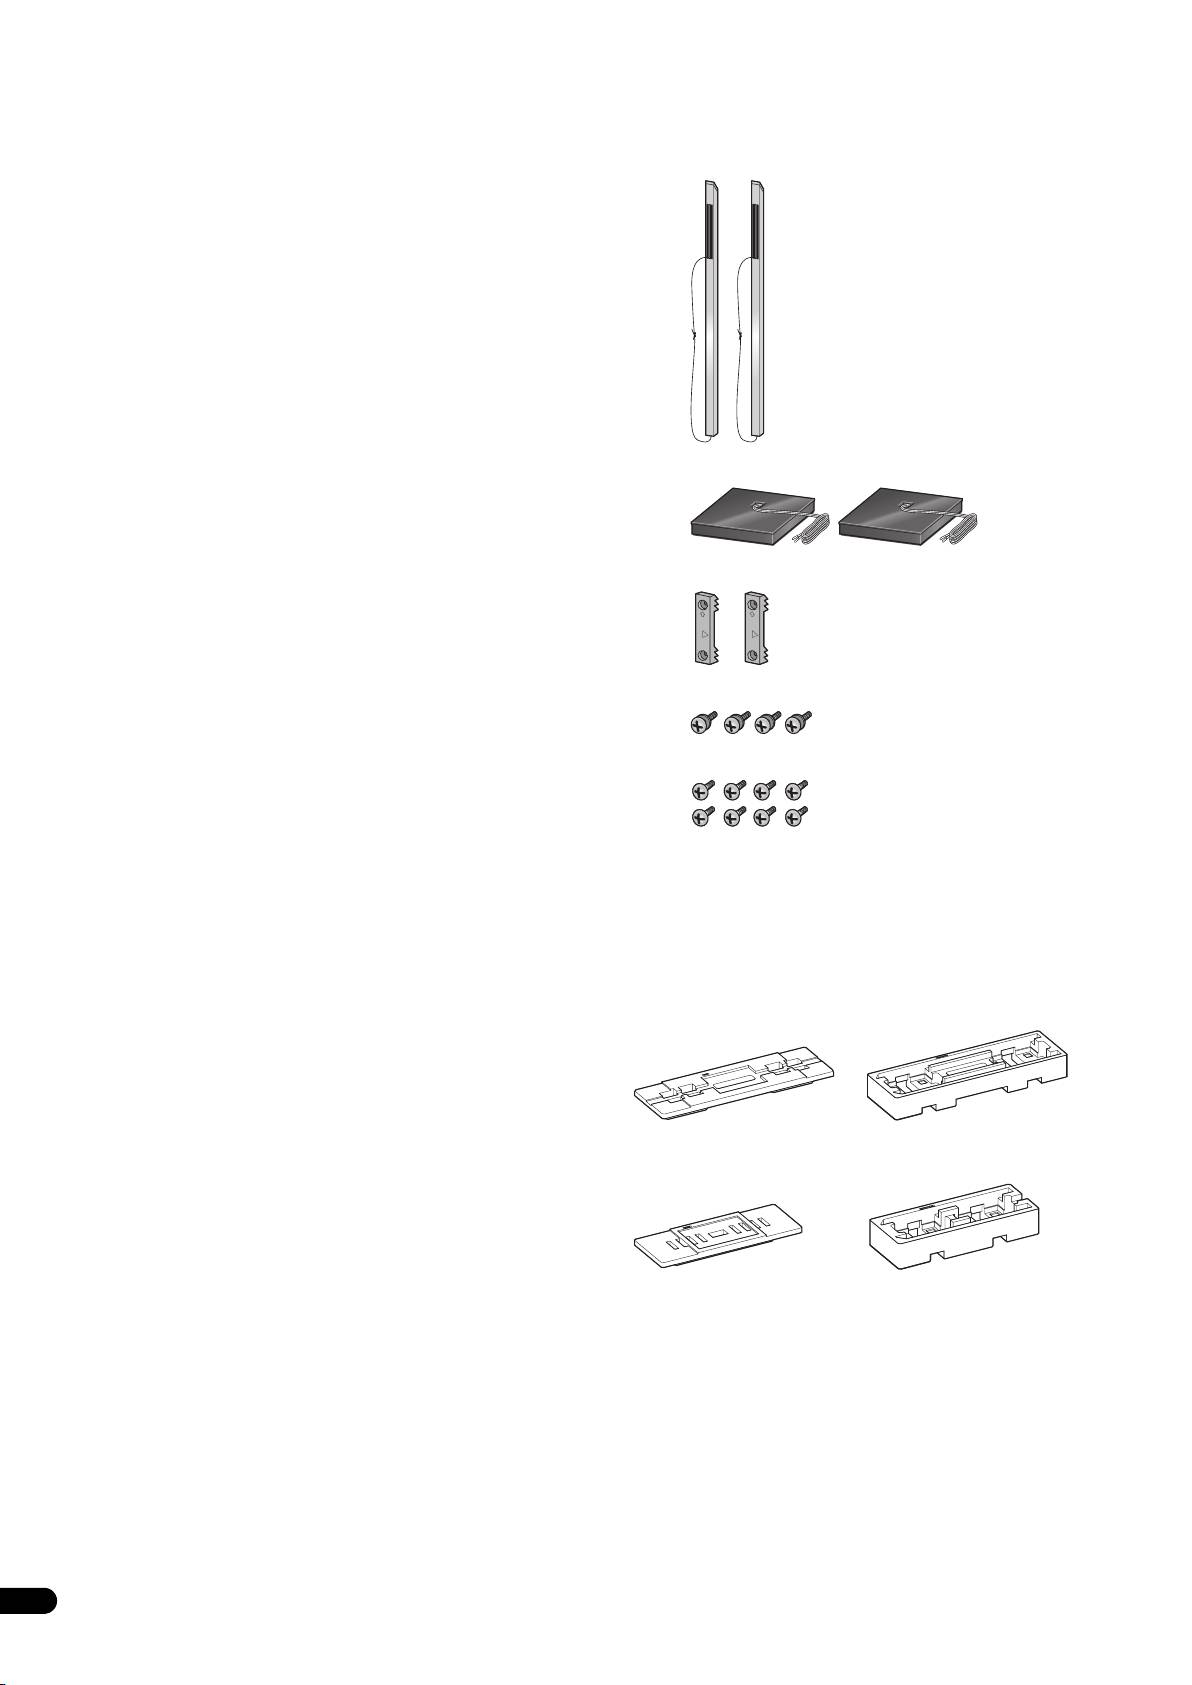
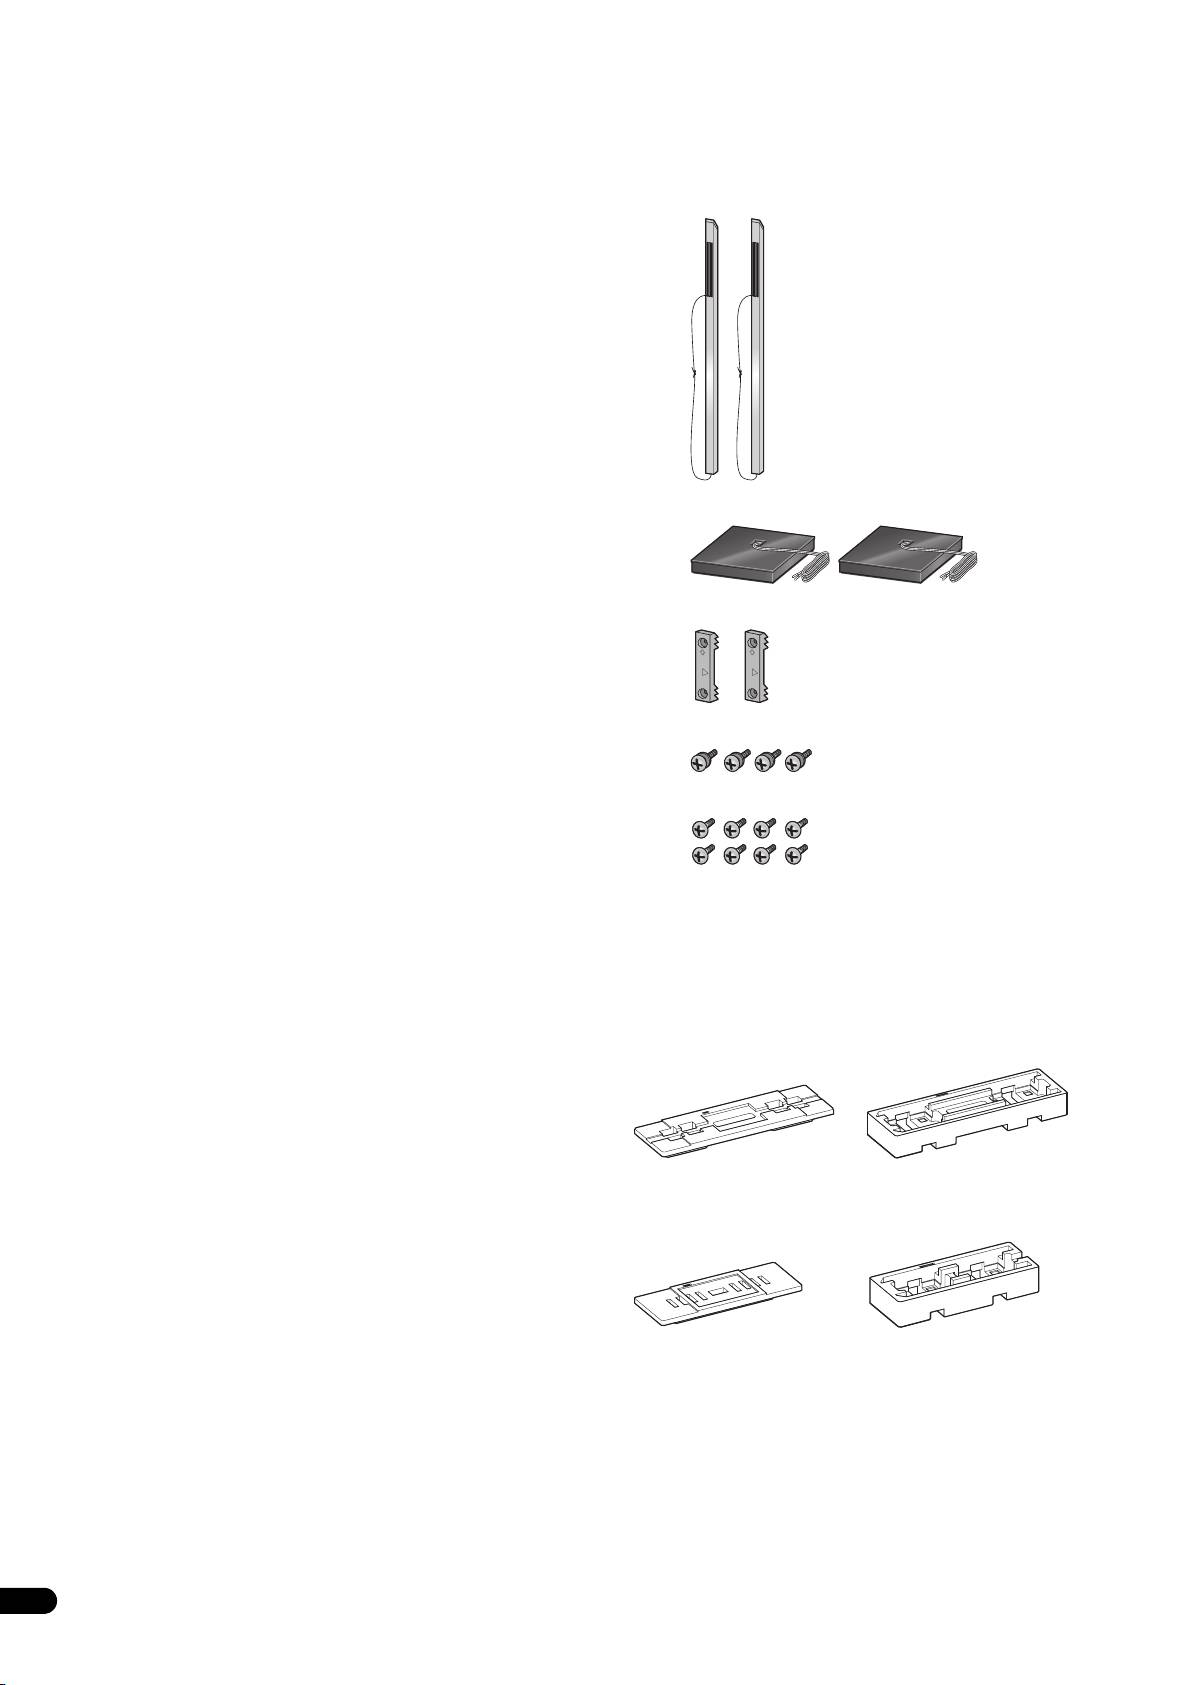
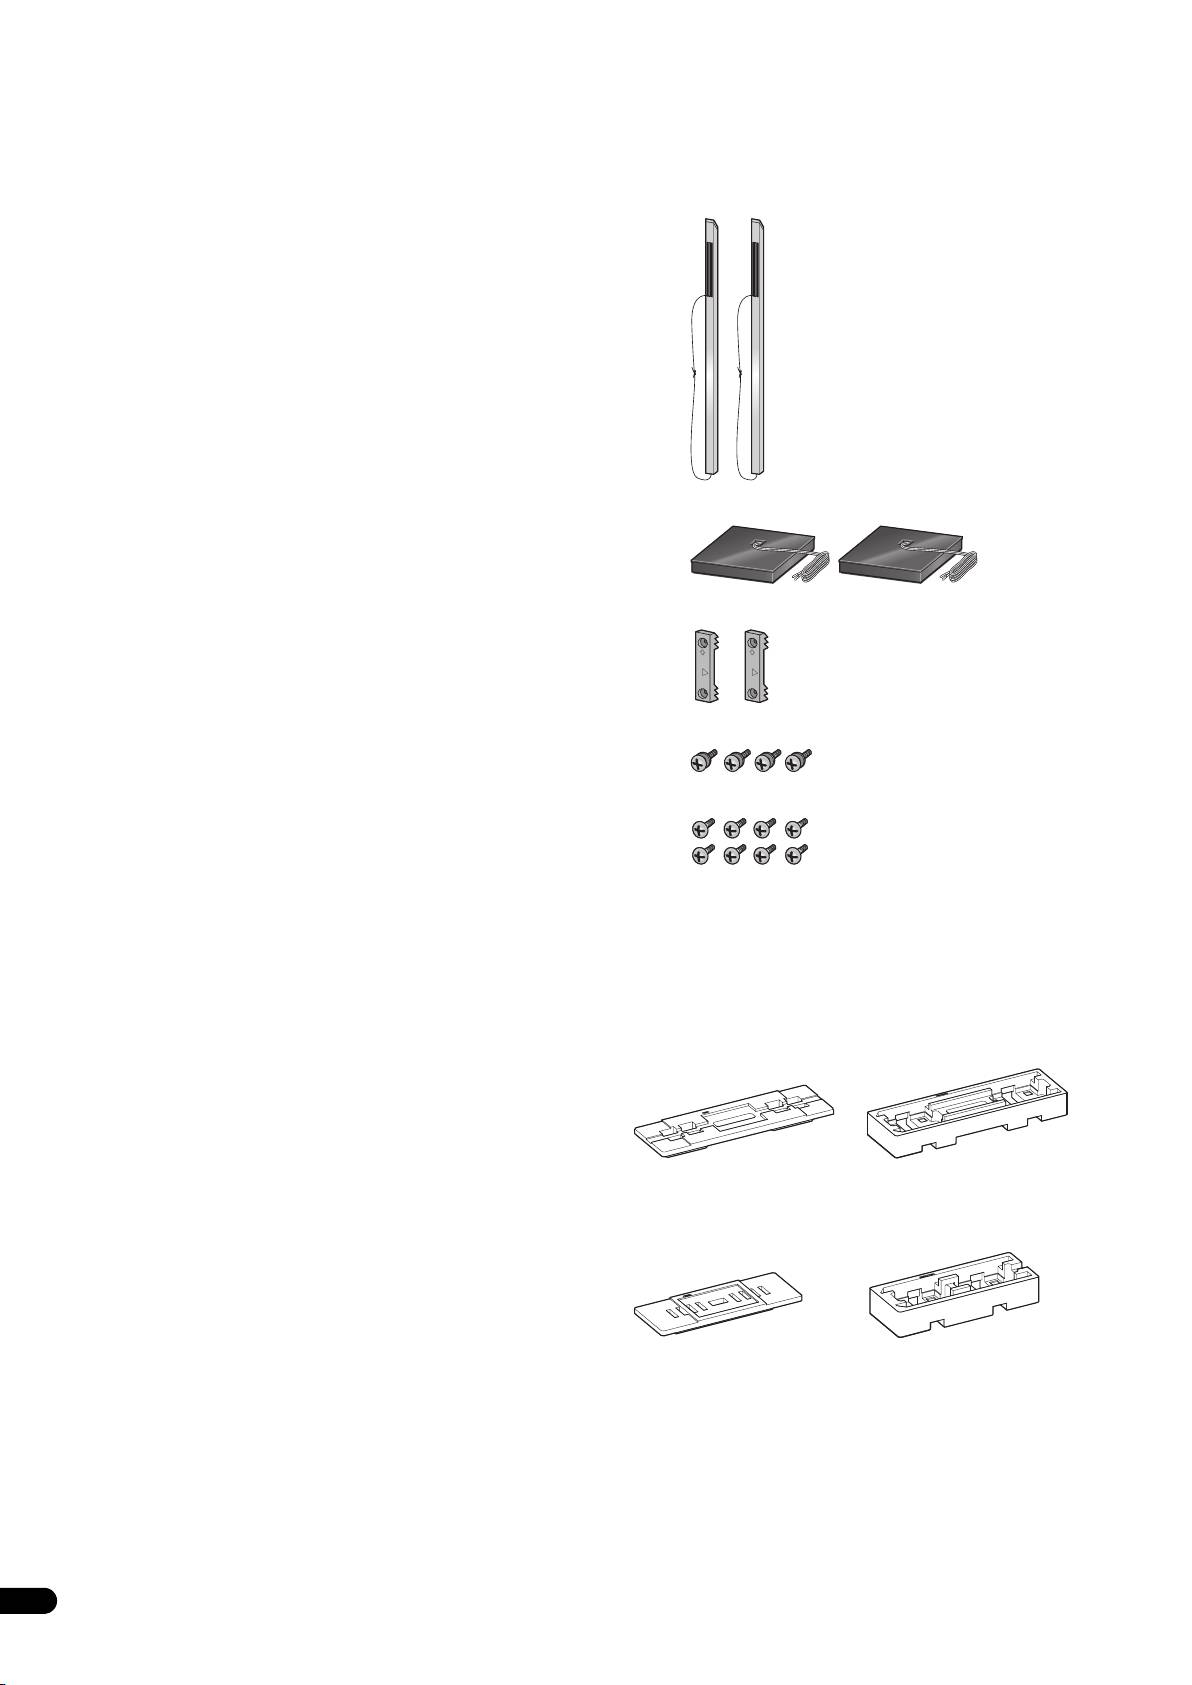
Confirm your Accessories
CP-LX70 and CP-LX70TS should only be used with the S-LX70-LR
Pioneer speaker system. Please read through these operating
• Pillar x 2
instructions for proper assembly and use. After you have finished
reading the instructions, put them away in a safe place for future
reference.
Caution
• Pioneer is not responsible for any accidents or damage that
result from improper installation, misuse or modification of the
product, or natural disasters.
• Only use the screws supplied when fixing the speaker to the
speaker stand. Speakers may fall and incur damages if not fixed
in place properly.
• Only use Pioneer S-LX70-LR Speakers with this stand. Other
speakers may not balance properly, causing them to fall and
potentially injure persons nearby.
•Stand base x 2
• Be careful when assembling and moving the speaker stand, as
it may cause damage or injury in the event of a fall.
• Do not place the stand on an unstable and/or sloping surface.
The stand and speaker may fall and cause injury.
• Speaker security plate x 2
Care of the speaker stands
• With normal use, wiping with a soft cloth should be sufficient
to keep the stand clean. If necessary, clean with a cloth dipped
in a neutral cleanser diluted five or six times with water, and
wrung out well. Do not use furniture wax or cleansers. Never
•Screw (Large) x 4
use alcohol, thinners, benzine, insecticide sprays or other
chemicals on or near this unit since these will corrode the
surfaces. When using chemically-treated cloths, be sure to
• Screw (Small) x 8
carefully read their accompanying instruction manual.
Cleaning the speaker stand bases
• When cleaning the surface of the speaker stand bases, gently
wipe with the cleaning cloth supplied with the speaker system
• Operating instructions
S-LX70-LR.
Illustrations of pillars and bases depict those for the CP-LX70.
• Wiping with a dusty or hard cloth, or applying too much force
Those for the CP-LX70TS are similar, but of slightly different sizes.
when wiping may result in scratching of the surface of the
The Styrofoam cushioning material shown is used during
speaker stand base.
assembly.
•CP-LX70
CAUTION
•CP-LX70TS
2
En
T
hese speaker terminals carry HAZARDOUS LIVE voltage. To
prevent the risk of electric shock when connecting or
disconnecting the speaker cables, disconnect the power cord
before touching any uninsulated parts.
TOP
TOP
TOP
01_CP-LX70_EU.book 2 ページ 2007年9月5日 水曜日 午前10時51分
TOP
Cushioning
Cushioning
material (Top)
material (Bottom)
Cushioning
Cushioning
material (Top)
material (Bottom)
01_CP-LX70_EU.book 3 ページ 2007年9月5日 水曜日 午前10時51分
English Français Deutsch
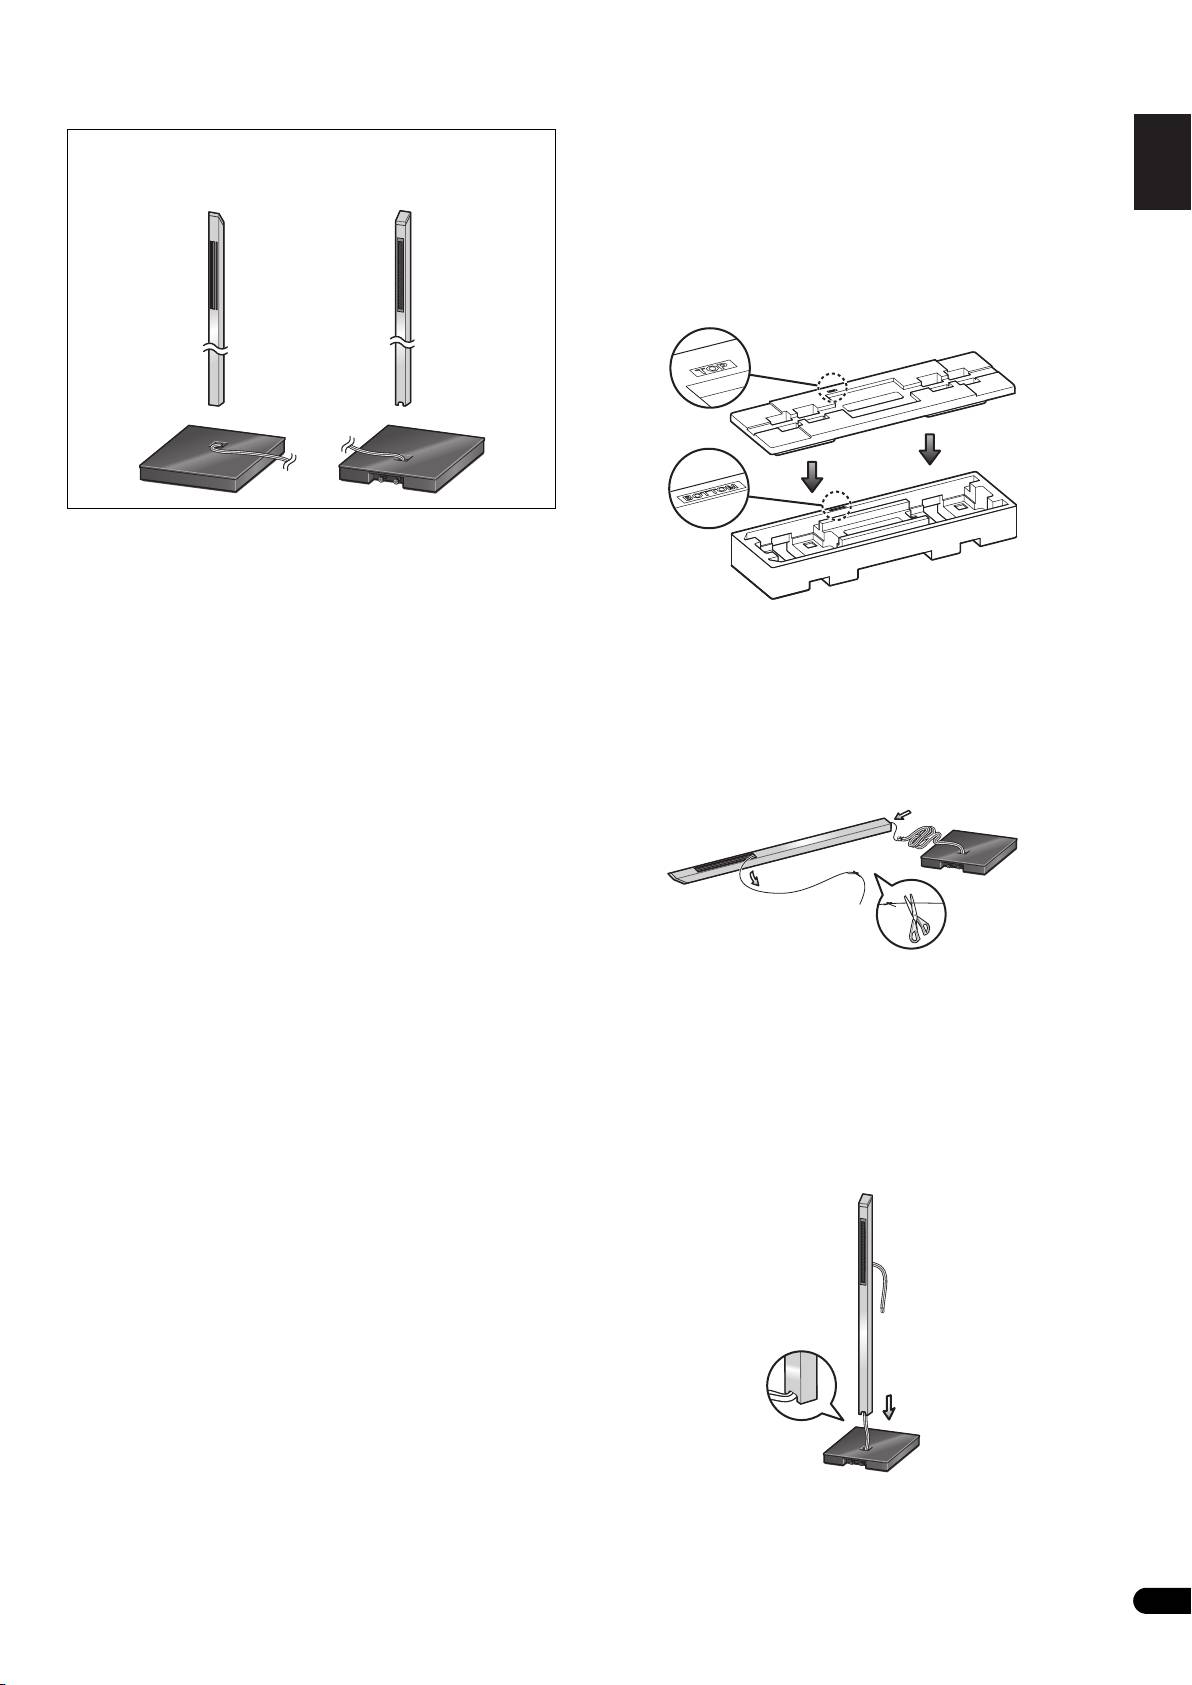
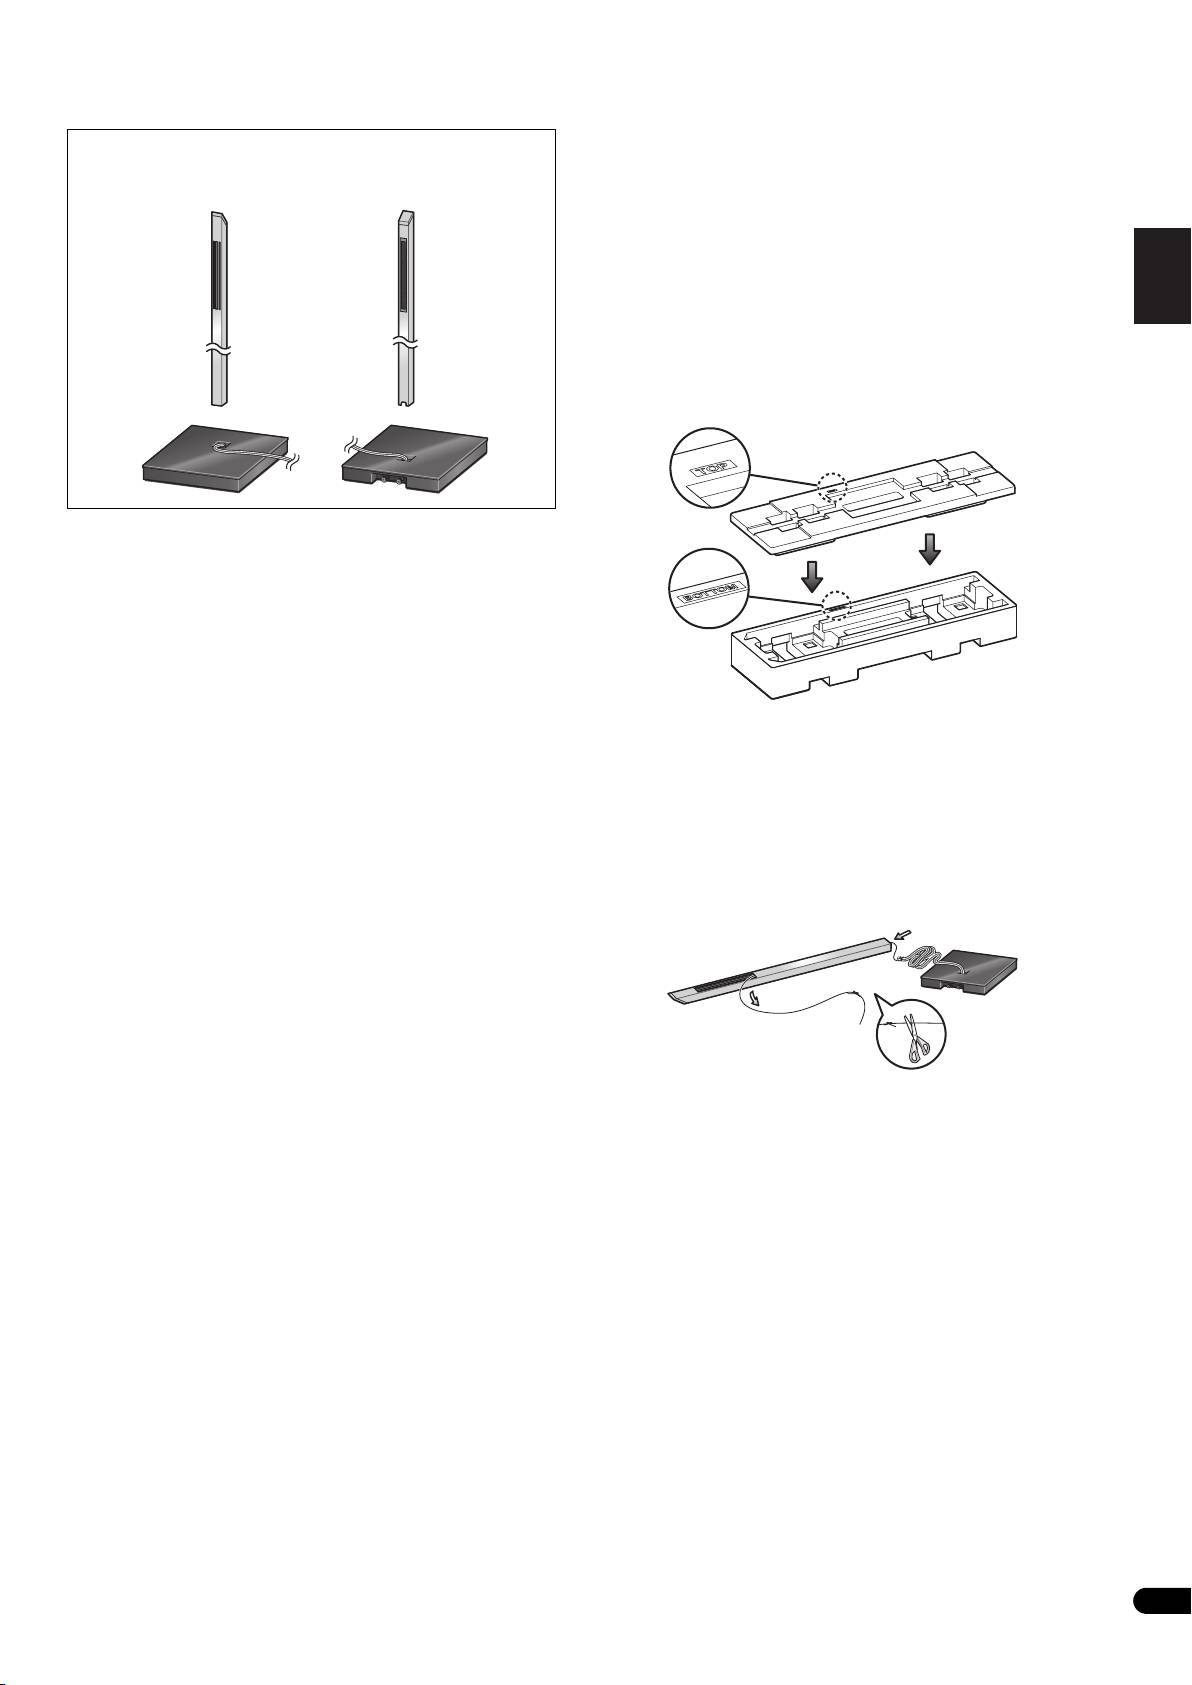
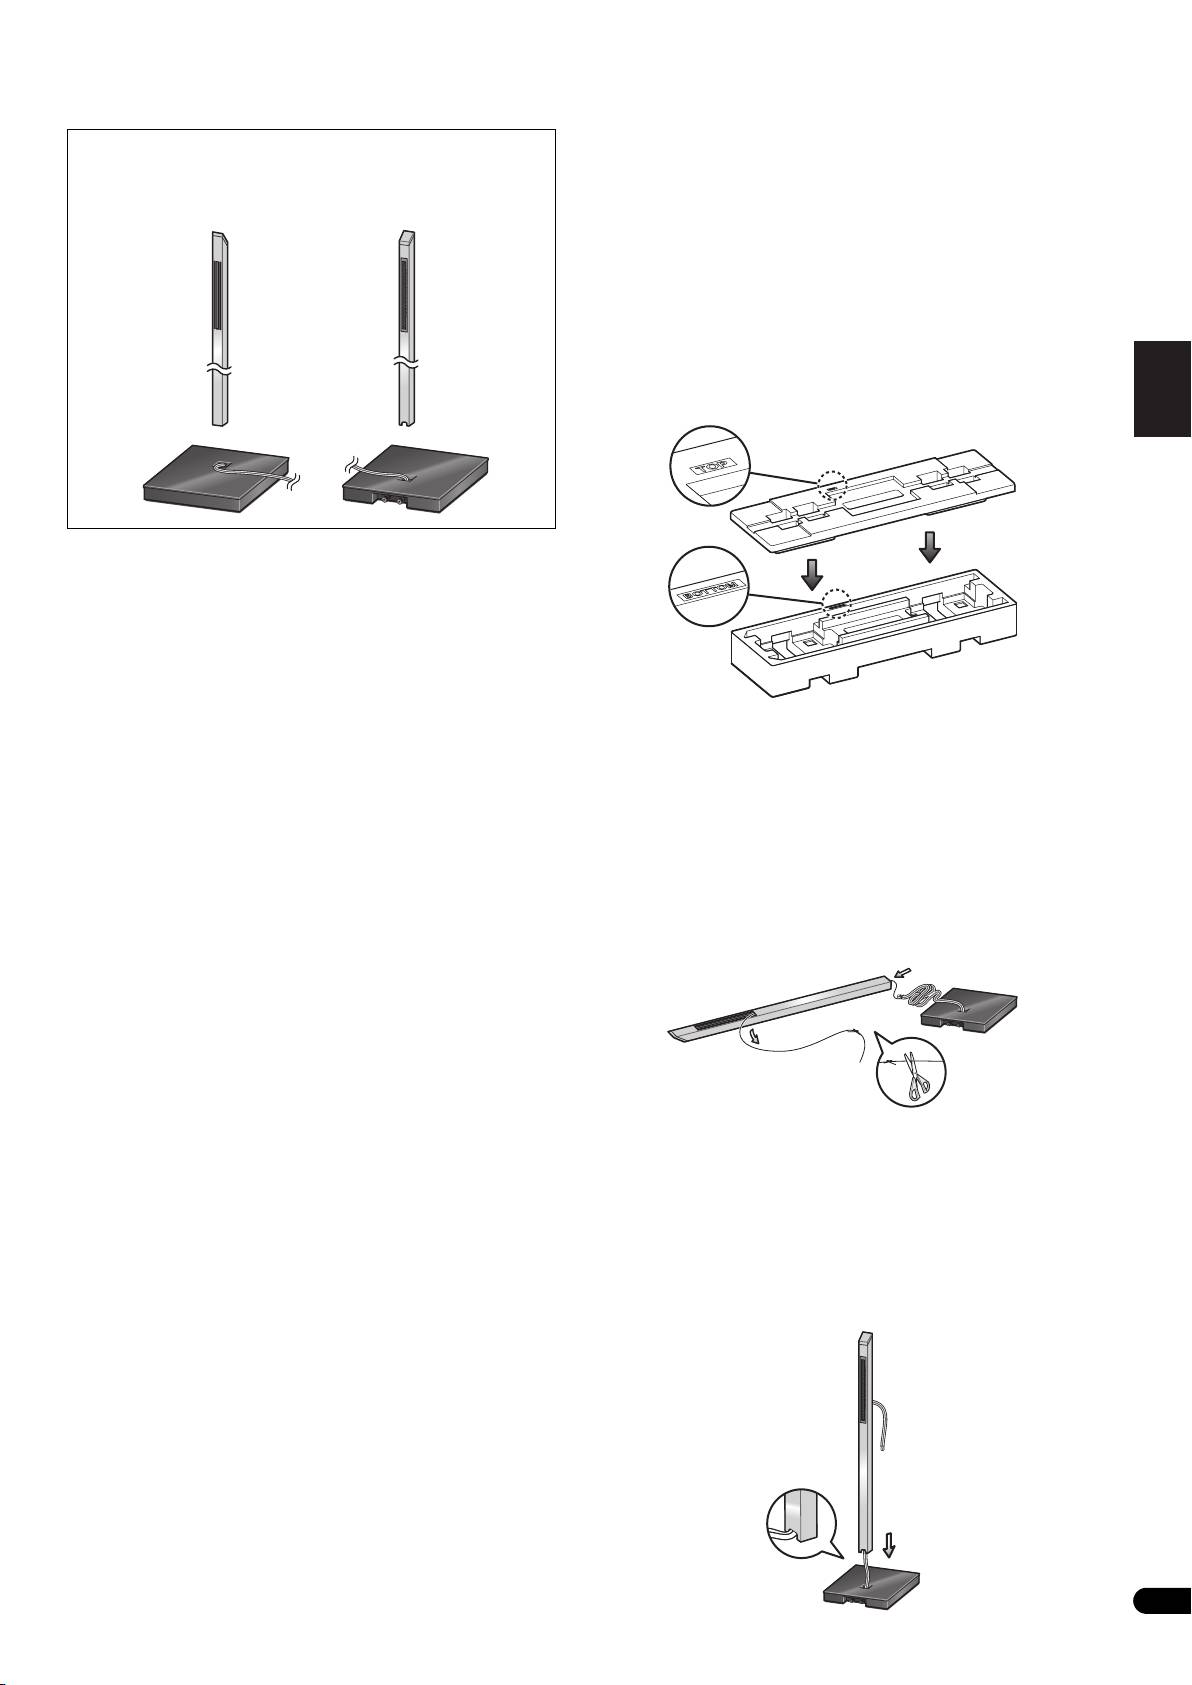
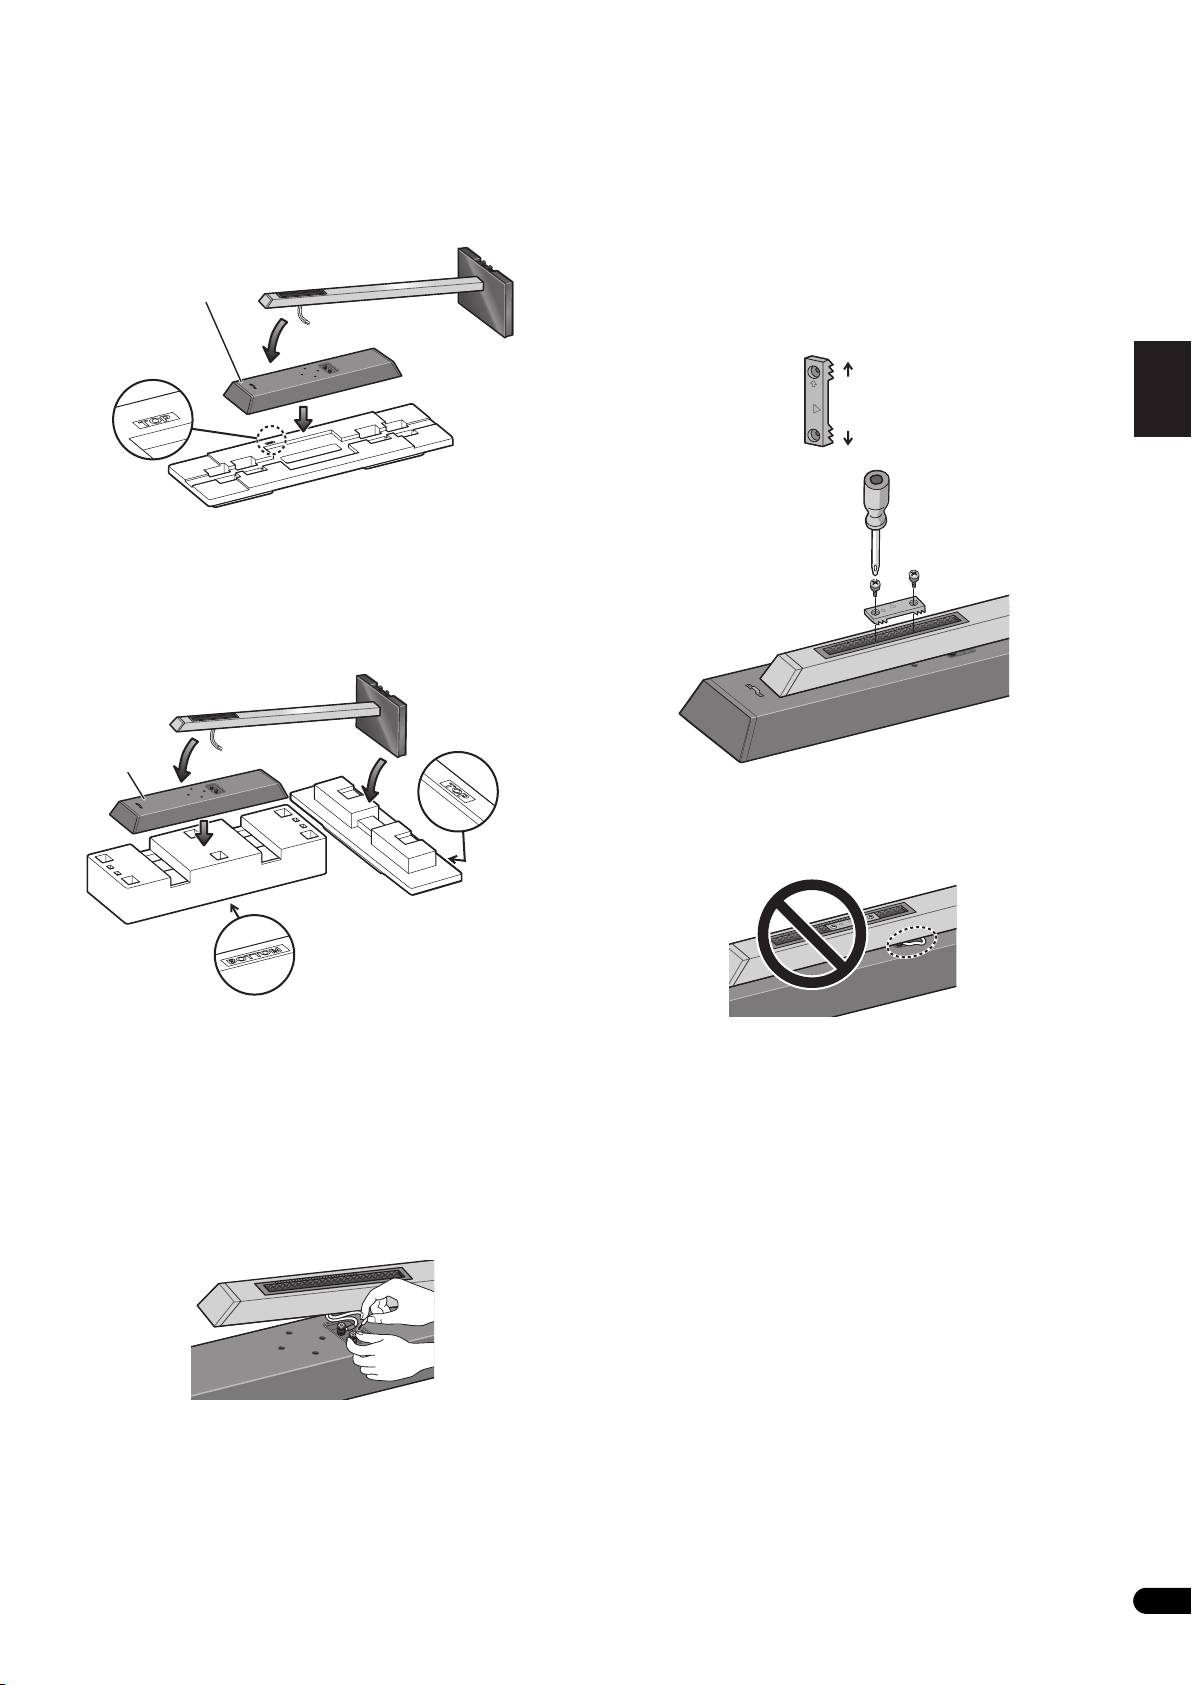
Assembling the speaker stands
The pillars and speaker stand bases are designed with specific
Make sure you assemble the stand on a flat surface that is relatively
directional orientation for assembly. During assembly, make sure
they are attached in the correct directions.
soft (such as a carpet).
A medium-sized Phillips screwdriver is required for assembly.
• The Styrofoam cushions are used during assembly.
Front side Rear side
CP-LX70 only: Confirm that the surfaces with printing are
facing upwards and oriented as shown, then align the top
cushion on the bottom cushion as illustrated.
Cushioning
material (Top)
Italiano Español Português Dansk Norsk SuomiSvenska
Installing the speaker stands
• Place the stand on a stable, level surface; placing the stand on
Nederlands
Cushioning
an unstable surface can be dangerous.
material (Bottom)
When placing the speaker, keep in mind that the tone is affected by
the position of the speaker.
1 Run the speaker cable through the pillar and place the pillar
If the bass is insufficient, move the speaker closer to the wall. The
onto the stand base.
richest bass sound is obtained when the speaker is right against
Place the pillar on a flat surface and cut the string that is strung
the wall. If the bass is too powerful, producing a muffled tone, move
through the pillar. Tie the speaker cable coming out of the stand
the speaker away from the wall. Placing the speaker against a thick
base to the end string at the bottom of the pillar. Pull the end of the
curtain may also be effective.
string emerging from the top front side of the pillar to pull the
Adjust the position as necessary to obtain optimal sound from your
speaker cable up through the pillar.
system.
• Remove the string once the speaker cable is through the pillar.
Next, stand the pillar upright and fit the bottom of the pillar into the
stand base, making sure that the pillar is aligned with the hole in
the stand base.
• When fitting the pillar into the stand base, make sure that the
speaker cable comes through the groove on the bottom of the
pillar and does not get pinched between the pillar and the stand
base.
• Make sure not to scratch the surface of the stand base with the
pillar, as the decorative laminate of the stand base may scar
easily.
3
En
01_CP-LX70_EU.book 4 ページ 2007年9月5日 水曜日 午前10時51分
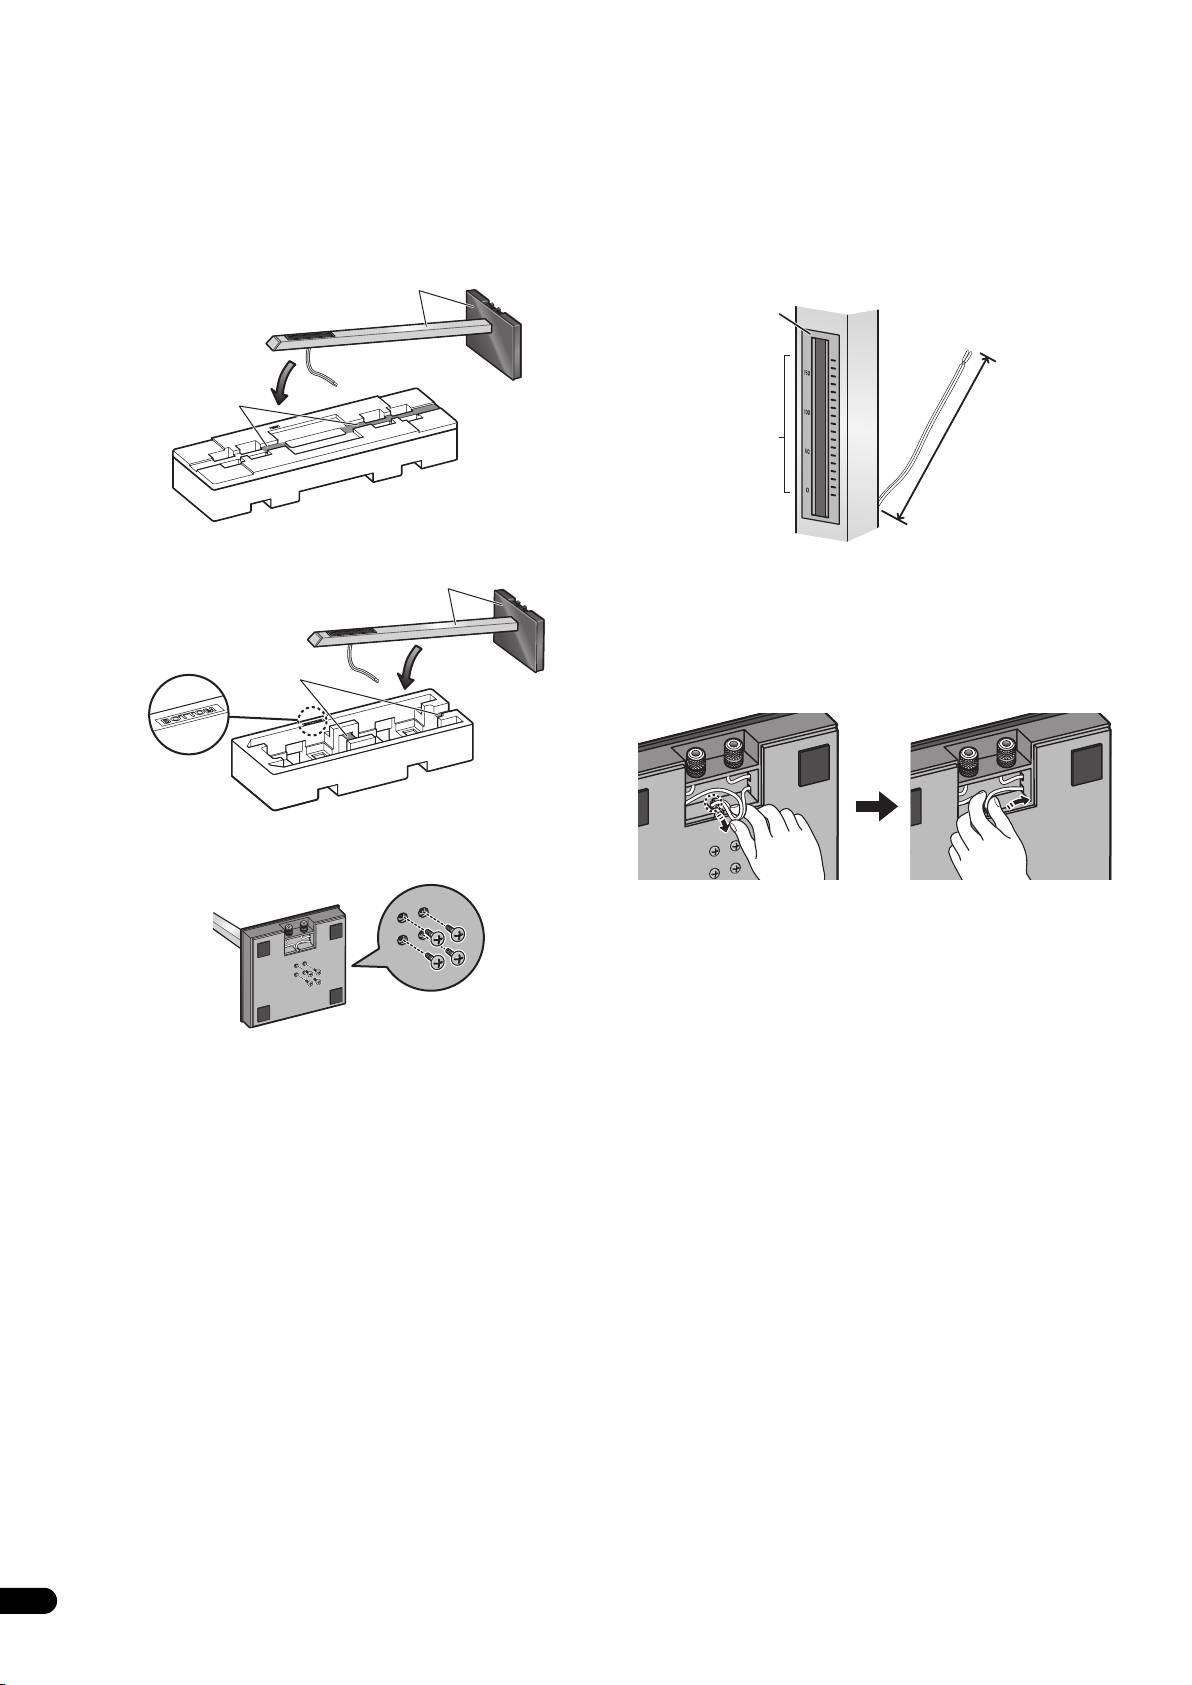
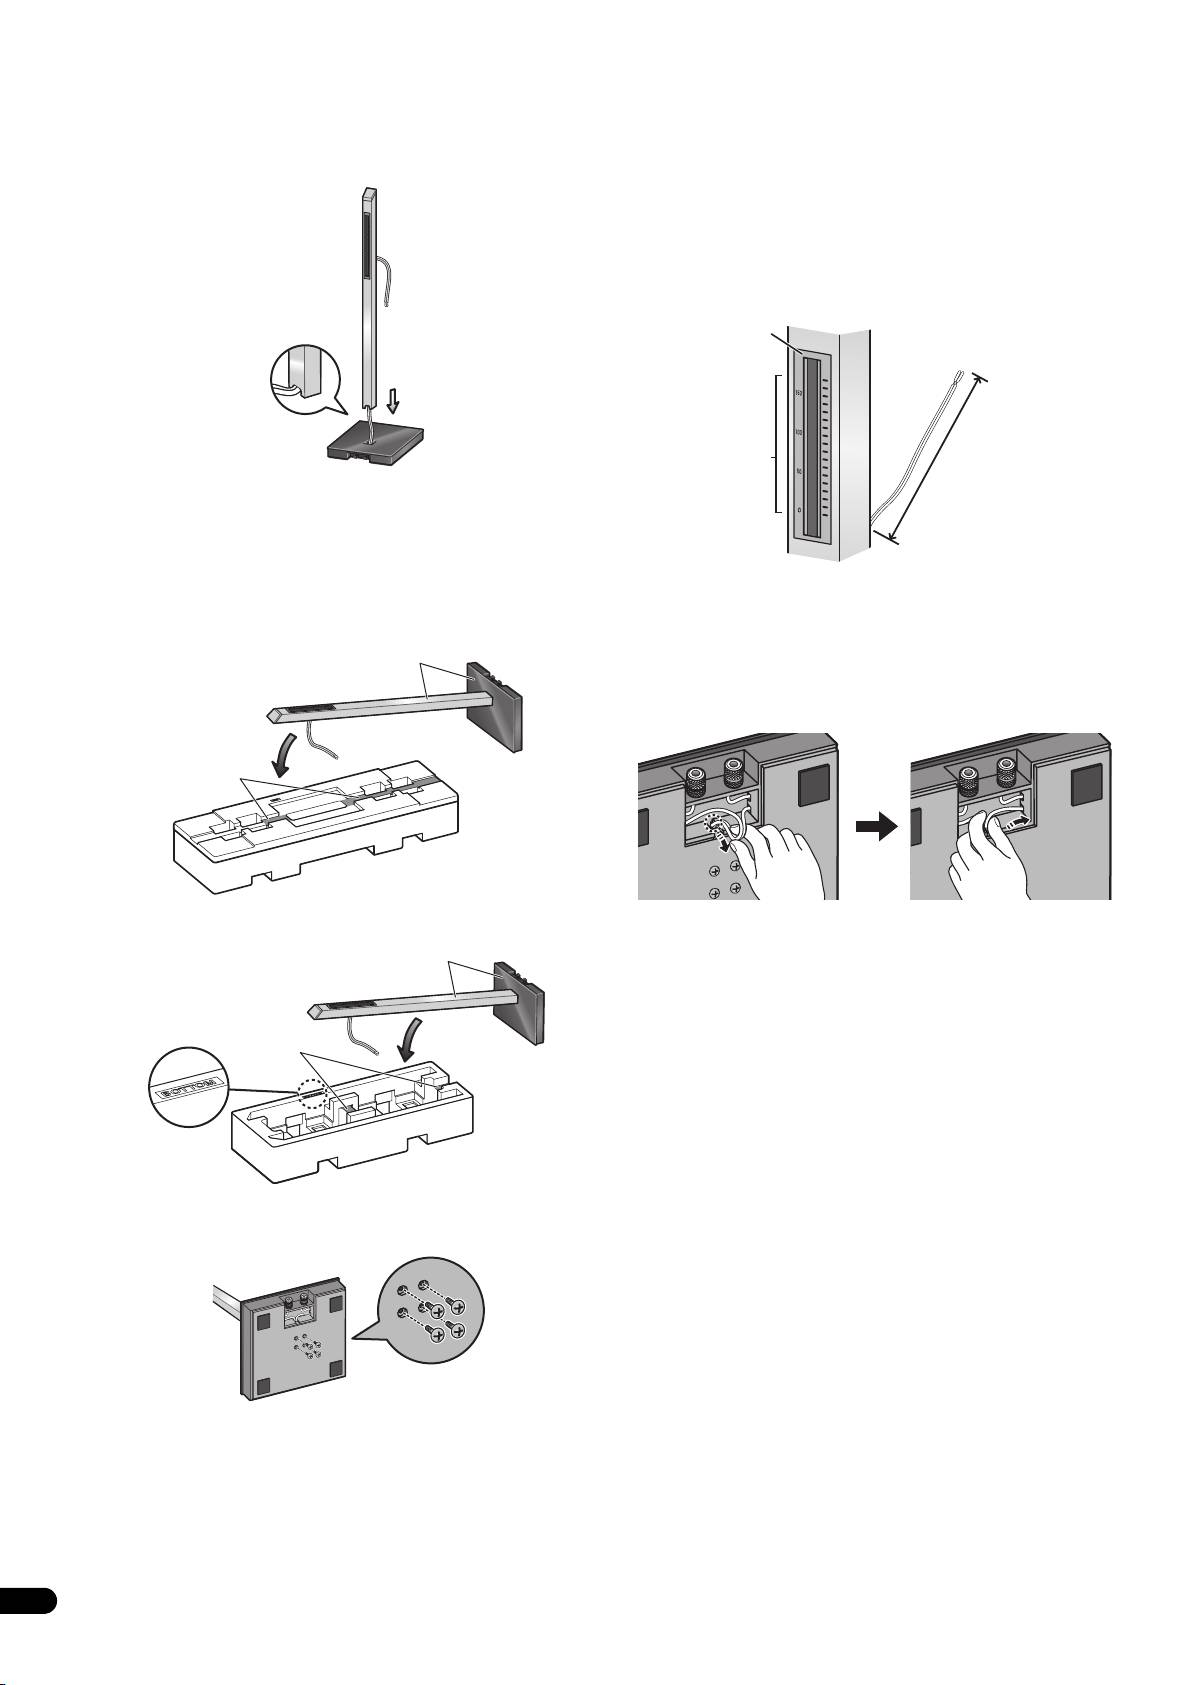
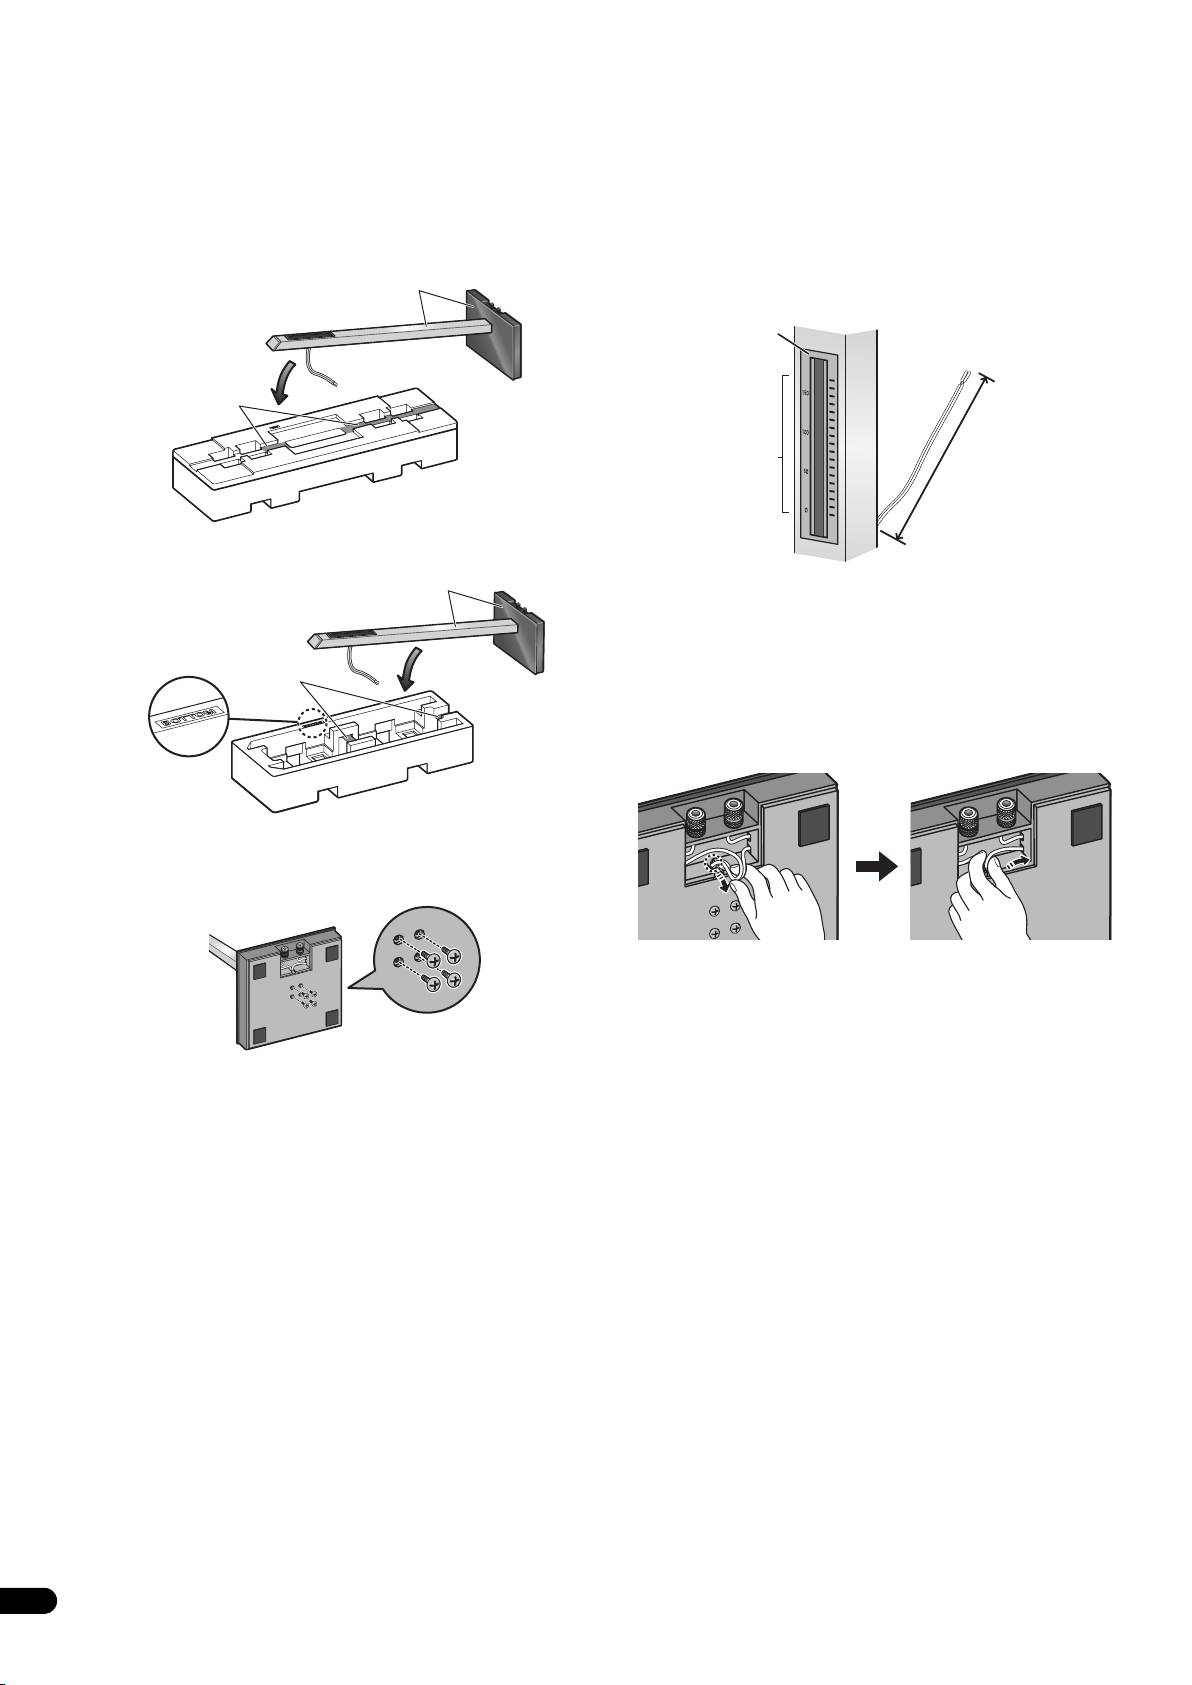
2 Securing the pillar onto the stand base.
3 Adjust the length of the speaker cable.
While the pillar is fitted into the stand base, slowly place the stand
Adjust the length of the speaker cable to suit the height at which
onto the groove of the cushioning material (places indicated in the
the speaker is going to be installed. Viewing the height scale on the
accompanying illustration) so that the rear side of the stand faces
backside of the pillar, adjust the length of the exposed speaker
upwards (securely hold both the pillar and the stand base when
cable using the following numbers as reference:
doing this).
Scale: 0 Approx. 11 cm (4.3 in.)
• Pillar and base for CP-LX70
Scale: 100 Approx. 15 cm (5.9 in.)
Hold both pillar and stand base
Scale: 170 Approx. 22 cm (8.7 in.)
Backside
of pillar
Rest pillar here
Height scale
Exposed speaker
cable length
• Pillar and base for CP-LX70TS
• To shorten the speaker cable, adjust the length by pulling the
Hold both pillar and stand base
additional cable in the pillar from the hole in the bottom of the
stand base, and then push that extra cable into the hole where
the right or left cable passes, as shown in the illustration. If all
of the extra cable cannot be pressed into the hole, store the
Rest pillar here
remainder of the cable in the open space on the bottom of the
stand base.
Cushioning
material (Bottom)
From the bottom side of the stand base, secure the pillar to the
stand base by screwing in 4 supplied screws (small).
(When making the cord shorter)
Screws (small)
4
En
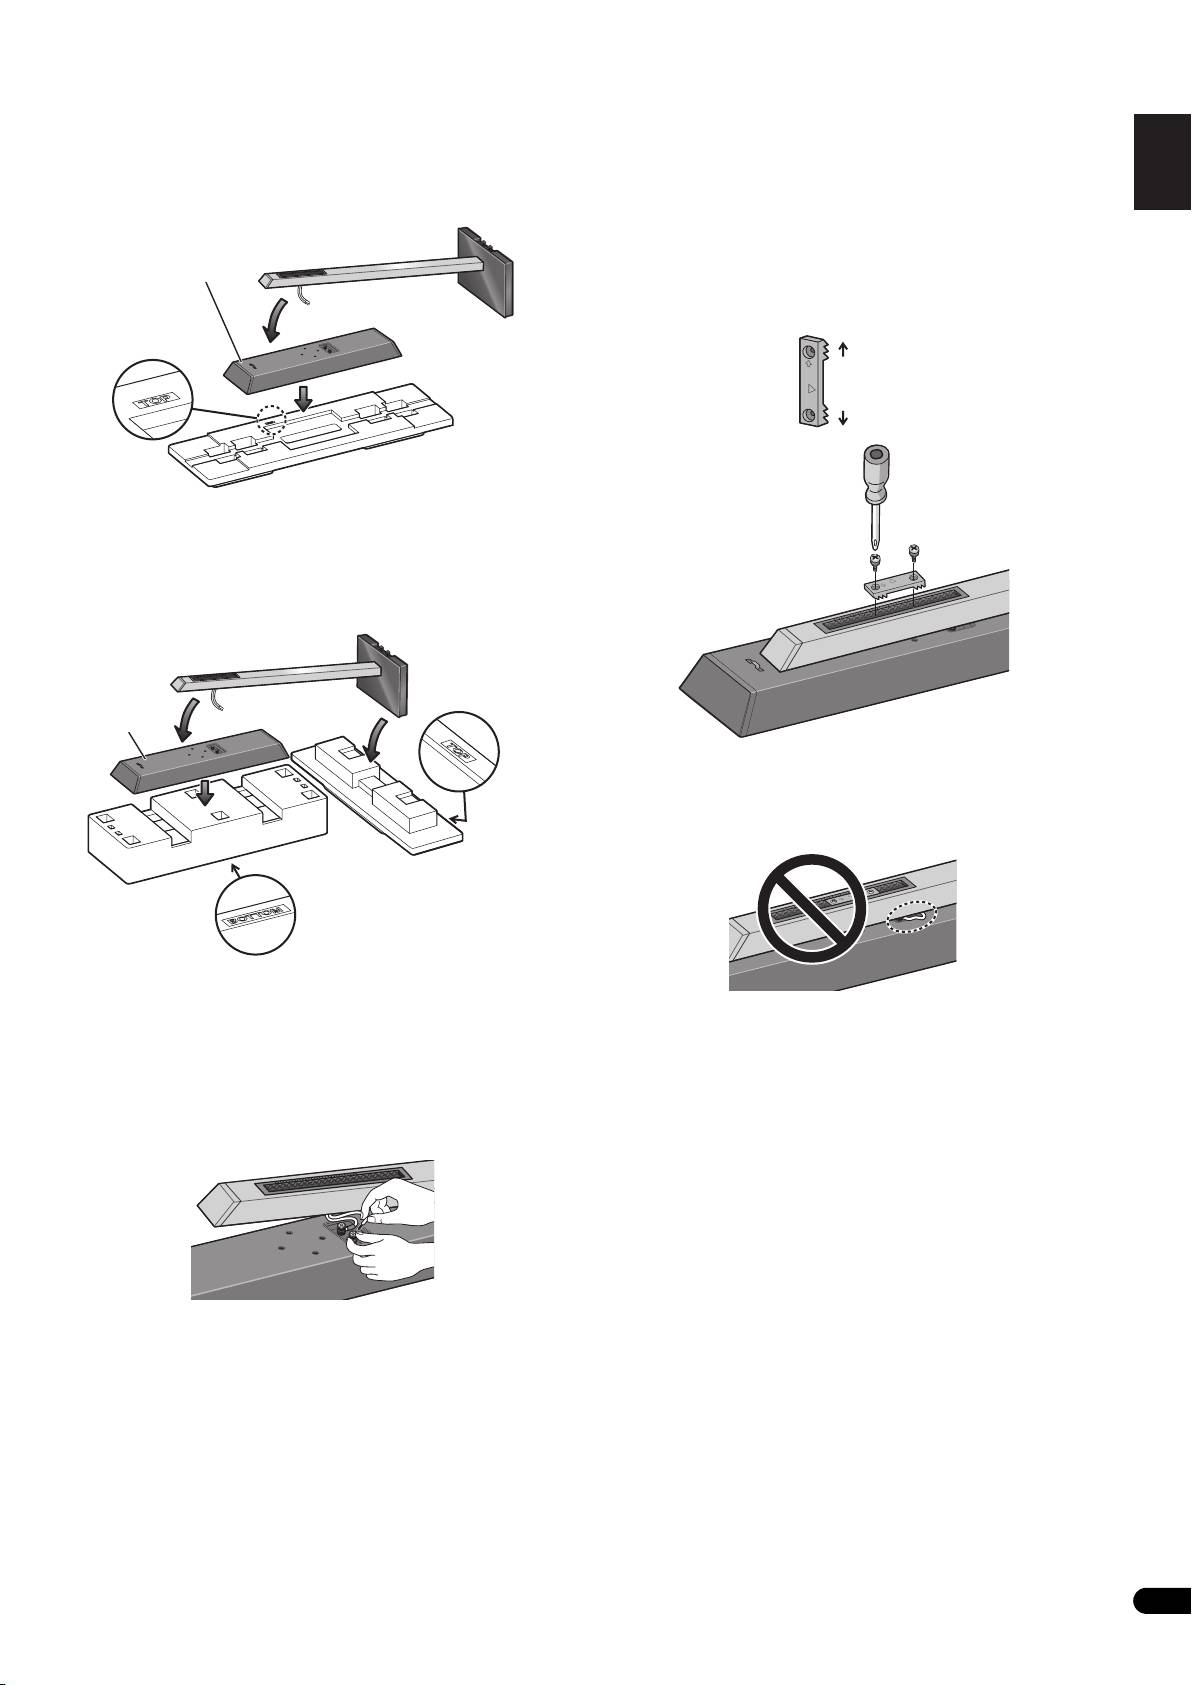
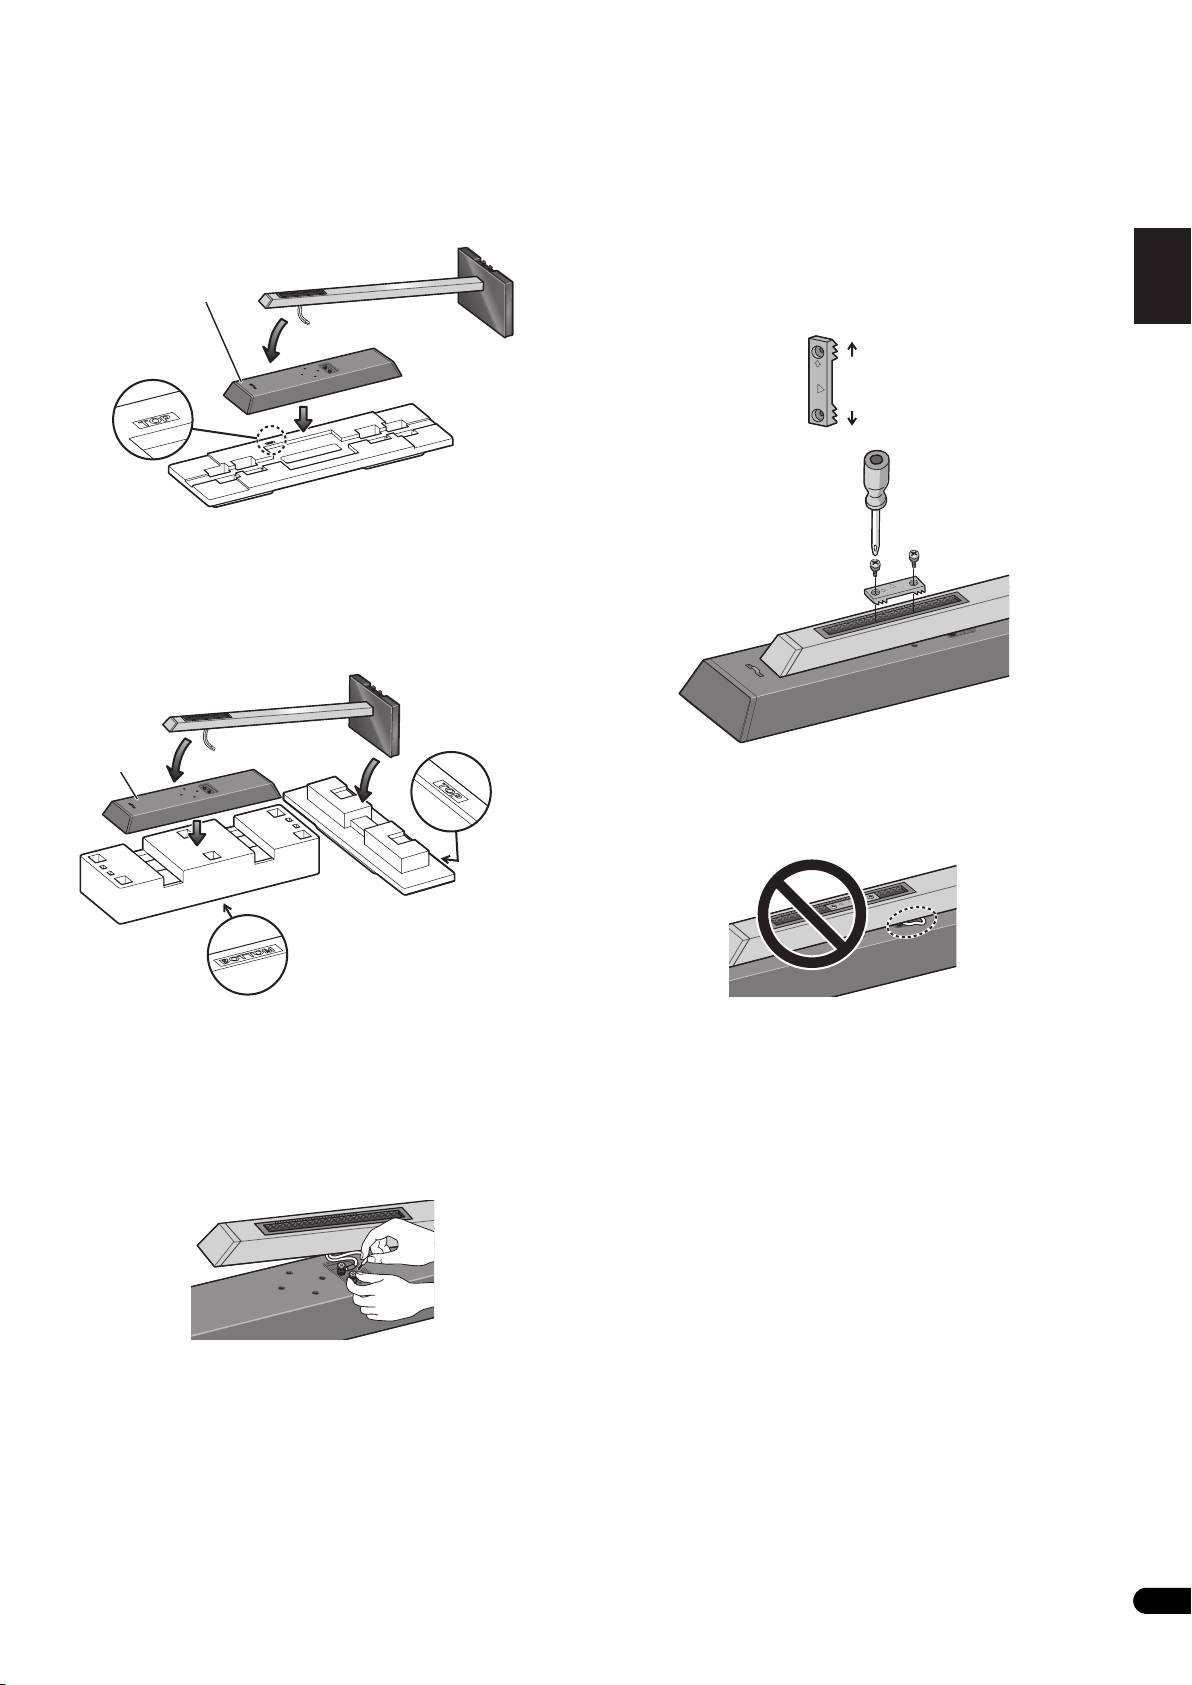
4 Preparing to attach the speaker.
6 Secure the speaker.
English Français Deutsch
CP-LX70: Temporarily place the speaker stand upright, and detach
Once the speaker is placed in the installation position, pull the
the bottom cushion material, leaving only the top cushion on the
slack of the speaker cord and store in the bottom side of the stand
floor. Place the speaker on the top cushion and place the speaker
base as shown in step 3.
stand on top of the speaker.
Next, place the speaker security plate on the pillar, and secure to
the speaker using the supplied screws (large).
• The speaker security plates are designed with a directional
Speaker
orientation in which they are to be installed. Attach them so
that the side printed with “TOP” is oriented toward the top of the
speaker and pillar.
Italiano Español Português Dansk Norsk SuomiSvenska
Cushioning
material (Top)
CP-LX70TS: Temporarily stand the speaker stand upright, then turn
the bottom cushion material over and place the speaker on it. As
shown in the illustration, turn the top cushion material sideways
Nederlands
and orient it sideways to the stand, then rest the speaker stand
assembled in step 2 on it.
Speaker
Caution
Confirm that the speaker cable does not become pinched between
(Rear side)
the pillar and the speaker.
Cushioning
material (Top)
Cushioning
material (Bottom)
(Rear side)
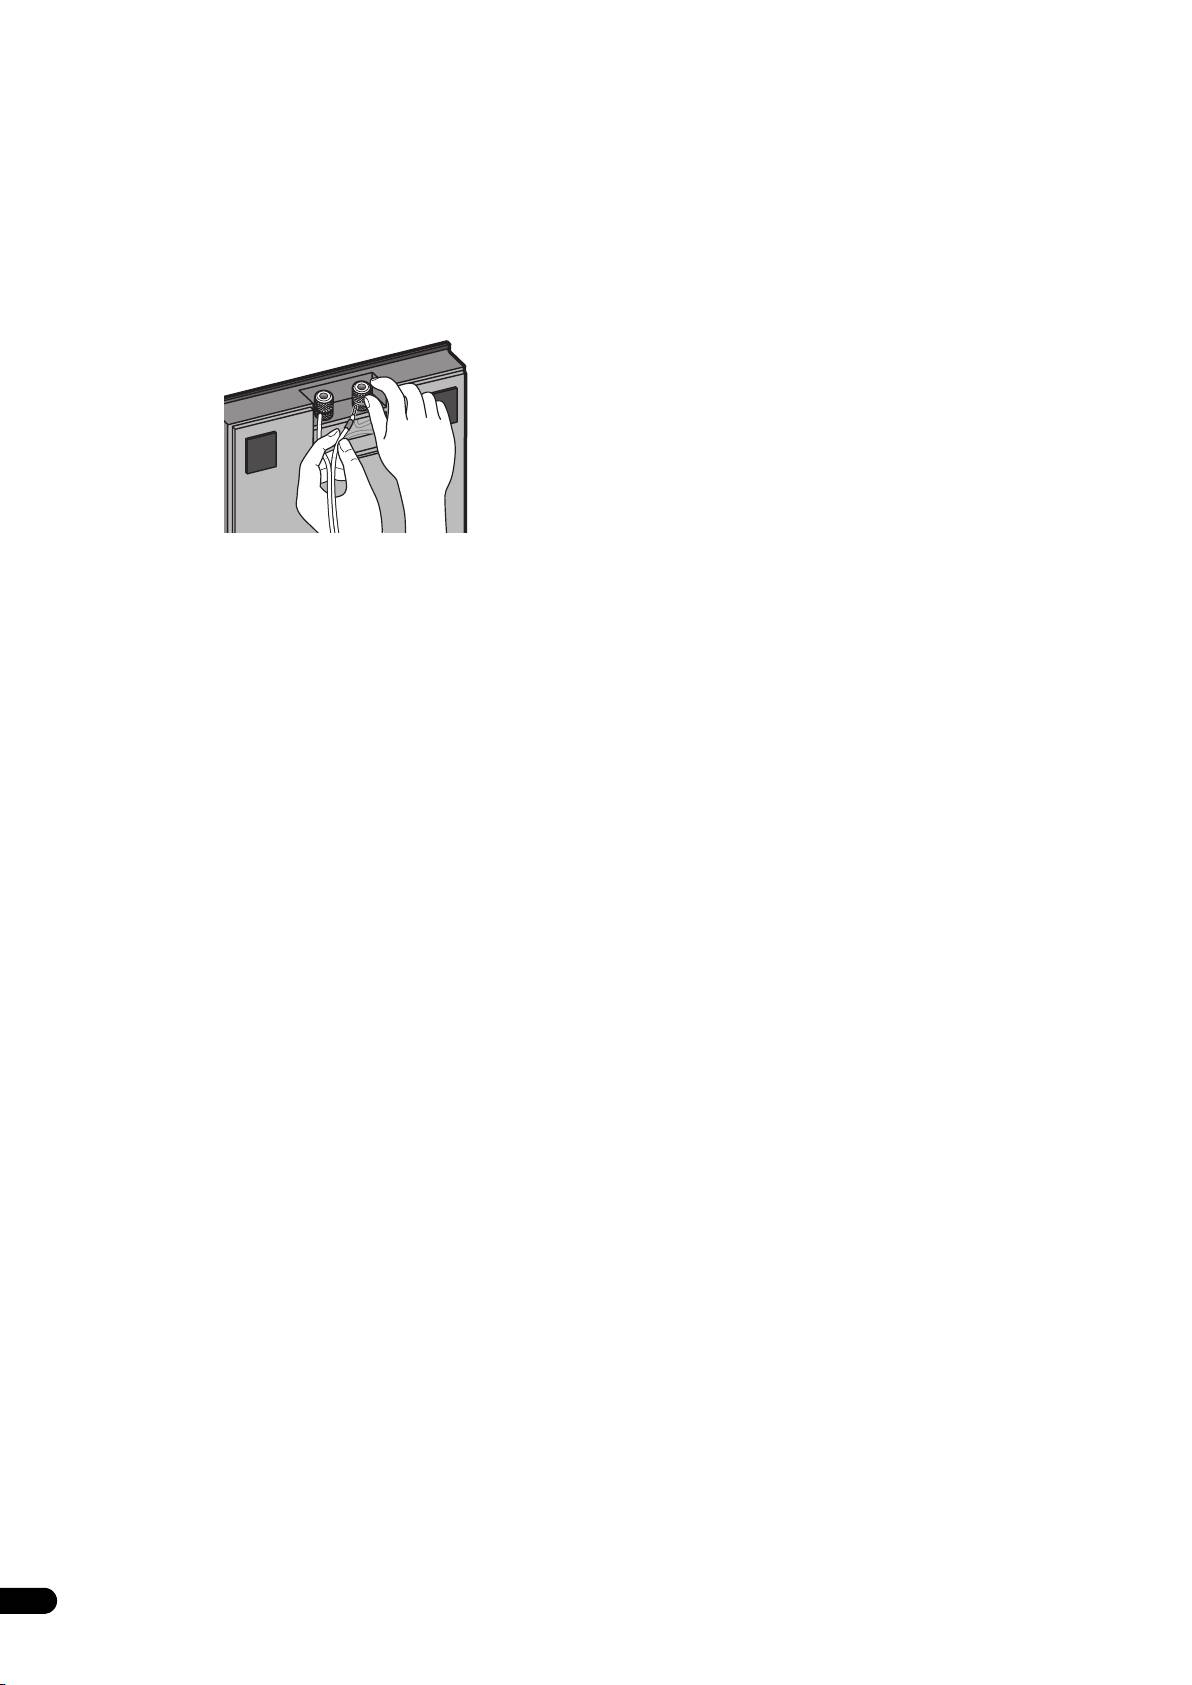
5 Connect the speaker cable to the speaker.
Pull the speaker cable through the front side of the pillar (the
bottom side during assembly) and connect to the terminals located
on the backside of the speaker.
• Connect the speaker cable with the marking to the (+) terminal,
and the cable without the marking to the (–) terminal.
• If connecting the cords proves to be difficult, slightly move the
position of the pillar and speaker.
5
En
TOP
TOP
Top
Bottom
OP
T
TOP
TOP
01_CP-LX70_EU.book 5 ページ 2007年9月5日 水曜日 午前10時51分
TOP

01_CP-LX70_EU.book 6 ページ 2007年9月5日 水曜日 午前10時51分
Connect the speaker cable to the amplifier
Placement
Connect the speaker cable to the terminals located on the rear side
Finish the installation of the speaker systems in your room by
of the stand base.
standing them and their attached stands upright. Refer to the
section “When Installing the Speaker Stands” on page 3.
1 Switch off the power to your amplifier.
• The bottom and top cushioning materials should not be
2 Connect the speaker cables to the input terminals on the rear
discarded after assembly, but stored in a safe place.
side of the stand base. For input terminal polarity, red is positive
(+) and black is negative (–).
Changing the Speaker Height
When changing the height of the speakers, reassemble the stand
while referring to step 3 through 6 of “Assembling the Speaker
Stand.”
• Do not attempt to adjust the speaker height while the stand is
upright. This could cause the speaker to fall, resulting in
damage or personal injury.
3 Connect the other ends of the cables to the amp's speaker
output terminals (for more details, refer to your amp owner's
manual).
• Grasp the cap knobs on the lower input terminals and rotate
them to the left (counter-clockwise), insert the speaker cable
wires into the holes in the terminal posts, then tighten the
knobs to secure the wires.
• You can also connect the stand base’s terminals with a banana
plug. When using a banana plug, be sure to remove the cap at
the tip of the input terminal.
• If the cables’ wires happen to be pushed out of the terminals,
allowing the wires to come into contact with each other, it
places an excessive additional load on the amp. This may cause
the amp to stop functioning, and may even damage the amp.
• After connecting the plugs, pull lightly on the cables to make
sure that the ends of the cables are securely connected to the
terminals. Poor connections can create noise and interruptions
in the sound.
• When using a set of speakers connected to an amplifier, you
won't be able to obtain the normal stereo effect if the polarity
(+ , –) of one of the speakers (left or right) is reversed.
6
En
01_CP-LX70_EU.book 7 ページ 2007年9月5日 水曜日 午前10時51分
English Français Deutsch
Specifications
If you want to dispose this product, do not mix it with general
household waste. There is a separate collection system for used
• CP-LX70 (floor stand)
electronic products in accordance with legislation that requires
External dimensions............271 mm (W) x 1067 mm (H) x 271 mm (D)
proper treatment, recovery and recycling.
Weight............................................................................................... 8.9 kg
Private households in the member states of the EU, in Switzerland and Norway
may return their used electronic products free of charge to designated
Supplied accessories
collection facilities or to a retailer (if you purchase a similar new one).
Pillars ........................................................................................................ 2
For countries not mentioned above, please contact your local authorities for
Stand bases.............................................................................................. 2
the correct method of disposal.
By doing so you will ensure that your disposed product undergoes the
Speaker security plates [SNN1069] ....................................................... 2
necessary treatment, recovery and recycling and thus prevent potential
Screws (Large) [BMH50P350FBN]......................................................... 4
negative effects on the environment and human health.
Screws (Small) [BMZ40P200FTB]........................................................... 8
These operating instructions [SRD6095]............................................... 1
Replacement part numbers
Non-skid pads [SEB1324]
Input terminal (red) [SKX1105]
Italiano Español Português Dansk Norsk SuomiSvenska
Inputer terminal (black) [SKX1106]
Top cushioning material [SHA2596]
Bottom cushioning material [SHA2597]
Rubber gasket material [SEC2155]
External packaging box [SHG6326]
Nederlands
Protective sheet (for stand base) [SHC1841]
Polyethylene bag (for screws and speaker security plates)
[SHL1460]
Polyethylene bag (for connection cables) [SHL1296]
Polyethylene bag (for Operating Instructions) [SHL1295]
Polyethylene bag (for pillars) [SHL1426]
The product numbers are listed above in square brackets.
• CP-LX70TS (tabletop stand)
External dimensions..............225 mm (W) x 681 mm (H) x 225 mm (D)
Weight............................................................................................... 5.9 kg
Supplied accessories
Pillars ........................................................................................................ 2
Stand bases.............................................................................................. 2
Speaker security plates [SNN1069]........................................................ 2
Screws (Large) [BMH50P350FBN]......................................................... 4
Screws (Small) [BMZ40P200FTB]........................................................... 8
These operating instructions [SRD6095]............................................... 1
Replacement part numbers
Non-skid pads [SEB1324]
Input terminal (red) [SKX1105]
Inputer terminal (black) [SKX1106]
Top cushioning material [SHA2599]
Bottom cushioning material [SHA2600]
Rubber gasket material [SEC2155]
External packaging box [SHG6327]
Protective sheet (for stand base) [SHC1841]
Polyethylene bag (for screws and speaker security plates)
[SHL1460]
Polyethylene bag (for connection cables) [SHL1349]
Polyethylene bag (for Operating Instructions) [SHL1295]
Polyethylene bag (for pillars) [SHL1347]
The product numbers are listed above in square brackets.
• Specifications and design subject to possible modification
without notice, due to improvements.
Published by Pioneer Corporation.
Copyright © 2007 Pioneer Corporation.
All rights reserved.
7
En
Nous vous remercions pour l’achat de ce produit Pioneer. Les
Vérifiez vous accessoires
socles d’enceinte CP-LX70 et CP-LX70TS doivent uniquement être
utilisés avec le système d’enceintes Pioneer S-LX70-LR. Veuillez lire
• Pilier x 2
attentivement ce mode d’emploi pour assembler et utiliser
correctement ce produit. Après avoir lu ces instructions, rangez-les
dans un endroit sûr pour pouvoir vous y référer à l’avenir.
Attention
• Pioneer ne peut être tenu responsable pour tout accident ou
dommage résultant d’une installation incorrecte, d’une
mauvaise utilisation, de modifications apportées au produit ou
de désastres naturels.
• Lors de la fixation de l’enceinte sur le socle d’enceinte, utilisez
uniquement les vis fournies. Les enceintes risquent de tomber
et de causer des dommages si elles ne sont pas fixés
correctement.
• Utilisez uniquement les enceintes Pioneer S-LX70-LR avec ce
• Base de socle x 2
socle. D’autres enceintes risquent de ne pas être suffisamment
équilibrées, et pourraient tomber blessant des personnes se
trouvant à proximité.
• Faites attention lors de l’assemblage et du déplacement des
• Plaque de sécurité d’enceinte x 2
enceintes car en cas de chute elles peuvent causer des
dommages ou des blessures.
• Ne placez pas le socle sur une surface instable et/ou glissante.
Le socle et l’enceinte risquerait de tomber et de causer des
blessures.
•Vis (grande) x 4
Entretient des socles d’enceinte
• Lors d’une utilisation normale, frotter avec un chiffon doux
devrait être suffisant pour garder le socle propre. Si nécessaire,
• Vis (petite) x 8
nettoyez avec un chiffon imprégné d’un nettoyant neutre dilué
dans cinq ou six fois son volume d’eau et essorez-le bien.
N’utilisez jamais de produits de nettoyage ou de la cire pour
meubles. N’utilisez jamais d’alcool, de diluant, benzine, bombe
insecticide ou autres produits chimiques à proximité de cet
• Mode d’emploi
appareil car ces produits détérioreraient le fini de surface. Lors
Les illustrations des piliers et des bases représentent ceux du CP-
de l’utilisation d’un chiffon traité chimiquement, faites bien
LX70. Ceux pour le CP-LX70TS sont similaires mais leur taille est
attention de lire le manuel d’instructions qui l’accompagne.
légèrement différente.
Nettoyage des bases des socles d’enceinte
Le matériau de bourrage en mousse de polystirène montré est
utilisé pendant l’assemblage.
• Lors du nettoyage de la surface des bases des socles
d’enceinte, frottez doucement avec le chiffon de nettoyage
•CP-LX70
fourni avec le système d’enceintes S-LX70-LR.
• Frotter avec un chiffon poussiéreux ou dur ou appliquer une
force trop importante en frottant peut causer des rayures à la
surface des bases des socles d’enceinte.
ATTENTION
Les bornes des haut-parleurs sont sous une tension ACTIVE
DANGEREUSE. Pour éviter tout risque de décharge électrique
•CP-LX70TS
lors du branchement et du débranchement des câbles de haut-
parleur, débranchez le cordon d’alimentation avant de toucher
des parties non isolées.
2
Fr
TOP
TOP
TOP
TOP
Matériau de
bourra
g
Matériau de
e (haut)
bourra
g
e (bas)
Matériau de
bourra
g
Matériau de
e (haut)
bourra
g
02_CP-LX70_FR.book 2 ページ 2007年9月5日 水曜日 午前10時54分
e (bas)
02_CP-LX70_FR.book 3 ページ 2007年9月5日 水曜日 午前10時54分
English Français Deutsch
Assemblage des socles
Les piliers et les bases des socles d’enceinte sont conçus avec un
orientation spécifique pour l’assemblage. Pendant l’assemblage,
d’enceinte
assurez-vous qu’ils sont attachés dans la direction correcte.
Assurez-vous d’assembler le socle sur une surface plage
relativement douce (comme sur un tapis).
Face avant Face arrière
Un tournevis cruciforme de taille moyenne est nécessaire pour
l’assemblage.
• Les matériaux de bourrage en mousse de polystyrène sont
utilisés pendant l’assemblage.
CP-LX70 uniquement: Vérifiez que la surface avec
l’impression est dirigée vers le haut et orientée comme montré,
puis alignez le matériau de bourrage du haut sur le matériau de
bourrage du bas, comme montré sur l’illustration.
Matériau de
bourrage (haut)
Italiano Español Português Dansk Norsk SuomiSvenska
Installation des socles d’enceinte
• Placez le socle sur une surface stable et plate. Le placer sur une
Nederlands
surface instable peut être dangereux.
Lors de l’installation de l’enceinte, gardez à l’esprit que la tonalité
est affectée par la position de l’enceinte.
S’il n’y a pas suffisamment de grave, approchez l’enceinte du mur.
Le son le plus riche en graves est obtenu quand l’enceinte est juste
Matériau de
contre le mur. Si il y a trop de graves et que la tonalité est étouffée,
bourrage (bas)
éloignez l’enceinte du mur. Placez l’enceinte contre un rideau
épais peut aussi être efficace.
1 Faites passer le câble dans le pilier et placez le pilier sur la
Ajustez la position si nécessaire pour obtenir un son optimal pour
base du socle.
votre système.
Placez le pilier sur une surface plate et coupez la ficelle qui passe
dans le pilier. Attachez le câble d’enceinte qui sort de la base du
socle à l’extrémité de la ficelle en bas du pilier. Tirez l’extrémité de
la ficelle qui sort de côté avant supérieur du pilier pour tirez aussi
le câble d’enceinte vers le haut.
• Retirez la ficelle une fois que le câble d’enceinte est passé dans
le pilier.
Ensuite, mettez le pilier debout et placez le bas du piler sur la base
du socle en vous assurant que le pilier est aligné avec les trous
dans la base du socle.
• Lors du placement du pilier sur la base du socle, assurez-vous
que le câble d’enceinte passe à travers la fente du bas du pilier
et ne se retrouve pas coincé entre le pilier et la base du socle.
3
Fr
02_CP-LX70_FR.book 4 ページ 2007年9月5日 水曜日 午前10時54分
• Assurez-vous de ne pas rayer la surface de la base du socle
3 Ajustez la longueur du câble d’enceinte.
avec le pilier car le panneau stratifié de la base du socle peut
Ajutez la longueur du câble d’enceinte en fonction de la hauteur à
s’érafler facilement.
laquelle vous allez installer l’enceinte. En vous référant à l’échelle
des hauteurs située à l’arrière du pilier, ajuster la longueur de la
partie du câble d’enceinte exposée en utilisant les chiffres suivant
comme référence:
Échelle: 0 Environ 11 cm
Échelle: 100 Environ 15 cm
Échelle: 170 Environ 22 cm
Face arrière
du pilier
Échelle des
hauteurs
Longueur exposée
2 Fixation du pilier sur la base du socle.
du câble d'enceinte
Pendant que le pilier est placé sur la base du socle, insérez
doucement le socle dans a fente du matériau de bourrage (les
emplacements sont indiqués sur l’illustration ci-contre) de façon
que la face arrière du socle soit dirigée vers le haut (tenez
• Pour raccourcir le câble d’enceinte, ajustez la longueur en
solidement le pilier et la base du socle pendant l’opération).
tirant un supplément de câble dans le pilier à partir du trou
• Pilier et base pour le CP-LX70
dessous la base du socle, puis poussez le câble en trop dans le
Tenez à la fois le pilier et la base du socle
trou où les câble droit et gauche passe, comme le montre
l’illustration ci-contre. Si tout le câble en trop ne peut pas être
inséré dans le trou, mettez le câble restant dans l’espace ouvert
en bas de la base du socle.
Posez le pilier ici
(Pour rendre le cordon plus court)
• Pilier et base pour le CP-LX70TS
Tenez à la fois le pilier et la base du socle
Posez le pilier ici
Matériau de
bourrage (bas)
À partir du dessous de la base du socle, fixez le pilier sur la base du
socle en vissant les 4 vis (petites) fournies.
Vis (petites)
4
Fr
4 Préparation pour la fixation de l’enceinte.
6 Fixez l’enceinte.
English Français Deutsch
CP-LX70: Placez temporairement le socle d’enceinte debout, et
Une fois que l’enceinte est placée dans sa position d’installation,
détachez le matériau de bourrage du bas, en laissant uniquement
tirez le câble d’enceinte en trop et placez-le dessous la base du
le matériau de bourrage du haut sur le sol. Placez l’enceinte sur le
socle comme montré à l’étape 3.
matériau de bourrage du haut et placez le socle de l’enceinte par
Ensuite, placez la plaque de sécurité de l’enceinte sur le pilier et
dessus l’enceinte.
fixez-la au pilier en utilisant les vis (grandes) fournies.
• Les plaques de sécurité des enceintes sont conçues avec une
orientation particulière dans laquelle elles doivent être
installées. Fixez-les de façon que le côté sur lequel “TOP” est
imprimé soit orienté vers le haut de l’enceinte et du pilier.
Italiano Español Português Dansk Norsk SuomiSvenska
Matériau de
bourra
CP-LX70TS: Mettez le socle d’enceinte temporairement debout,
puis retournez le matériau de bourrage du bas et placez l’enceinte
Nederlands
dessus. Comme montré sur l’illustration, tournez le matériau de
bourrage du haut latéralement et orientez le latéralement sur le
socle, puis posez le socle d’enceinte assemblé à l’étape 2 par
dessus.
Attention
Vérifiez que le câble d’enceinte ne soit pas coincé entre le pilier et
l’enceinte.
5 Connectez le câble d’enceinte à l’enceinte.
Tirez le câble d’enceinte par le côté avant du pilier (le côté inférieur
pendant l’assemblage) et connectez-le aux prises situées à l’arrière
de l’enceinte.
• Connectez le câble d’enceinte marqué à la prise (+), et le câble
d’enceinte sans marque à la prise (–).
• Si la connexion des câble est difficile à réaliser, bougez
légèrement la position du pilier et de l’enceinte.
5
Fr
g
Enceinte
e (haut)
Enceinte
(Face arrière)
Matériau de
bourrage (haut)
Matériau de
bourrage (bas)
(Face arrière)
TOP
TO
P
Haut
Bas
OP
T
TOP
TOP
02_CP-LX70_FR.book 5 ページ 2007年9月5日 水曜日 午前10時54分
TOP

02_CP-LX70_FR.book 6 ページ 2007年9月5日 水曜日 午前10時54分
Connectez le câble d’enceinte à l’amplificateur
Placement
Connectez le câble d’enceinte aux prises situées sur le côté arrière
Finissez l’installation du système d’enceintes dans votre pièce en
de la base du socle.
les mettant debout avec leur socle attaché. Reportez-vous à la
section “Installation des socles d’enceinte” à la page 3.
1 Mettez votre amplificateur hors tension.
• Les matériaux de bourrage de bas et du haut ne doivent pas
2 Connectez le câble d’enceinte aux prises d’entrée situées sur
être jetés après l’assemblage, mais conservés dans un endroit
le côté arrière de la base du socle. Pour la polarité des prises
sûr.
d’entrées, le rouge est positif (+) et le noir négatif (–).
Changement de la hauteur de l’enceinte
Pour changer la hauteur des enceintes, réassemblez les socle en
vous référant aux étapes 3 à 6 de “Assemblage des socles
d’enceinte.”
• N’essayez pas d’ajuster la hauteur de l’enceinte alors que le
socle est debout. L’enceinte risquerait de tomber et cela
pourrait entraîner des dommages ou des blessures.
3 Connectez les autres extrémités des câble aux prises de sortie
d’enceinte de l’amplificateur (pour en savoir plus, reportez-vous
au mode d’emploi de votre amplificateur).
• Tenez fermement les boutons rotatifs des prises d’entrée
inférieure et tournez-les vers la gauche (sens contraire des
aiguilles d’une montre), insérez le fil de chaque câble
d’enceinte dans le trou de la prise, puis serrez le bouton pour
fixer les fils.
• Vous pouvez aussi connecter les prises de la base du socle avec
des fiches banane. Lors de l’utilisation d’une fiche banane,
assurez-vous de retirez le capuchon qui se trouve sur la prise
d’entrée.
• S’il arrive que les files des câbles soit sortis des prises et qu’ils
entrent en contact les uns avec les autres, cela ajoutera une
charge supplémentaire excessive à l’amplificateur. Et cela peut
entraîner un arrêt du fonctionnement de l’amplificateur et peut
même l’endommager.
• Après avoir connecter les fiches, tirez légèrement sur les câble
pour vous assurer que les extrémités des câble sont
connectées solidement aux prises. Une mauvaise connexion
peut créer du bruit des interruptions du son.
• Lors de l’utilisation d’un jeu d’enceintes connectées à un
amplificateur, vous n’obtiendrez pas l’effet stéréo normal si la
polarité (+ , –) d’une des enceintes (gauche ou droite) est
inversée.
6
Fr
02_CP-LX70_FR.book 7 ページ 2007年9月5日 水曜日 午前10時54分
English Français Deutsch
Spécifications
Si vous souhaitez vous débarrasser de cet appareil, ne le mettez pas
à la poubelle avec vos ordures ménagères. Il existe un système de
• CP-LX70 (socle de sol)
collecte séparé pour les appareils électroniques usagés, qui doivent
Dimensions extérieure ..........271 mm (L) x 1067 mm (H) x 271 mm (P)
être récupérés, traités et recyclés conformément à la législation.
Poids ................................................................................................. 8,9 kg
Les habitants des états membres de l’UE, de Suisse et de Norvège peuvent
retourner gratuitement leurs appareils électroniques usagés aux centres de
Accessoires fournis
collecte agréés ou à un détaillant (si vous rachetez un appareil similaire neuf).
Piliers ........................................................................................................ 2
Dans les pays qui ne sont pas mentionnés ci-dessus, veuillez contacter les
Bases du socle ........................................................................................ 2
autorités locales pour savoir comment vous pouvez vous débarrasser de vos
Plaques de sécurité des enceintes [SNN1069]..................................... 2
appareils.
Vis (grande) [BMH50P350FBN].............................................................. 4
Vis (petite) [BMZ40P200FTB] .................................................................. 8
Vous garantirez ainsi que les appareils dont vous vous débarrassez sont
correctement récupérés, traités et recyclés et préviendrez de cette façon les
Ce mode d’emploi [SRD6095]................................................................. 1
impacts néfastes possibles sur l’environnement et la santé humaine.
Numéros des pièces de rechange
Patins antidérapants [SEB1324]
Prise d’entrée (rouge) [SKX1105]
Italiano Español Português Dansk Norsk SuomiSvenska
Prise d’entrée (noire) [SKX1106]
Matériaux de bourrage du haut [SHA2596]
Matériaux de bourrage du bas [SHA2597]
Joint en caoutchouc [SEC2155]
Carton d’emballage extérieur [SHG6326]
Nederlands
Feuille de protection (pour la base du socle) [SHC1841]
Sachet en polyéthylène (pour les vis et les plaques de sécurité
des enceintes) [SHL1460]
Sachet en polyéthylène (pour les câbles de connexion)
[SHL1296]
Sachet en polyéthylène (pour le mode d’emploi) [SHL1295]
Sachet en polyéthylène (pour les piliers) [SHL1426]
Les numéros de produit sont indiqués ci-dessus entre crochets.
• CP-LX70TS (socle de bureau)
Dimensions extérieure ............225 mm (L) x 681 mm (H) x 225 mm (P)
Poids ................................................................................................. 5,9 kg
Accessoires fournis
Piliers ........................................................................................................ 2
Bases du socle ........................................................................................ 2
Plaques de sécurité des enceintes [SNN1069]..................................... 2
Vis (grande) [BMH50P350FBN].............................................................. 4
Vis (petite) [BMZ40P200FTB] .................................................................. 8
Ce mode d’emploi [SRD6095]................................................................. 1
Numéros des pièces de rechange
Patins antidérapants [SEB1324]
Prise d’entrée (rouge) [SKX1105]
Prise d’entrée (noire) [SKX1106]
Matériaux de bourrage du haut [SHA2599]
Matériaux de bourrage du bas [SHA2600]
Joint en caoutchouc [SEC2155]
Carton d’emballage extérieur [SHG6327]
Feuille de protection (pour la base du socle) [SHC1841]
Sachet en polyéthylène (pour les vis et les plaques de sécurité
des enceintes) [SHL1460]
Sachet en polyéthylène (pour les câbles de connexion)
[SHL1349]
Sachet en polyéthylène (pour le mode d’emploi) [SHL1295]
Sachet en polyéthylène (pour les piliers) [SHL1347]
Les numéros de produit sont indiqués ci-dessus entre crochets.
• Les caractéristiques techniques et le design peuvent être
modifiés sans aucun avis pour y apporter des améliorations.
Publication de Pioneer Corporation.
© 2007 Pioneer Corporation.
Tous droits de reproduction et de traduction réservés.
7
Fr
Wir danken Ihnen dafür, dass Sie sich für dieses Produkt von
Überprüfen des mitgelieferten
Pioneer entschieden haben. Die Lautsprecherständer CP-LX70 und
CP-LX70TS sind ausschließlich für den Gebrauch mit dem Pioneer-
Zubehörs
Lautsprechersystem S-LX70-LR vorgesehen. Bitte lesen Sie diese
Bedienungsanleitung vor dem Gebrauch aufmerksam durch,
• Pfeiler x 2
damit ein fehlerfreier Zusammenbau und Betrieb gewährleistet
sind. Bitte bewahren Sie diese Anleitung anschließend für spätere
Bezugnahme griffbereit auf.
Achtung
• Pioneer lehnt jegliche Haftung für Unfälle oder Schäden ab, die
durch Fehler bei Zusammenbau oder Aufstellung,
zweckentfremdeten Gebrauch oder höhere Gewalt entstehen.
• Verwenden Sie ausschließlich die mitgelieferten Schrauben zur
Befestigung des Lautsprechers an diesem
Lautsprecherständer. Wenn die Lautsprecher nicht sicher an
den Ständern befestigt werden, besteht die Gefahr, dass sie
herunterfallen und beschädigt werden.
• Grundplatte x 2
• Befestigen Sie ausschließlich Pioneer-Lautsprecher S-LX70-LR
an diesen Ständern. Bei Befestigung anderer Lautsprecher
sind diese möglicherweise nicht einwandfrei an den Ständern
balanciert, so dass die Gefahr besteht, dass sie herunterfallen
und Verletzungen verursachen.
• Lautsprecher-Sicherheitsplatte x 2
• Bitte gehen Sie bei Zusammenbau und Transport des
Lautsprecherständers sorgsam vor, um ein Stolpern zu
vermeiden, dass Schäden und Verletzungen zur Folge haben
könnte.
• Stellen Sie den Ständer auf keinen Fall auf einer unstabilen
und/oder schrägen Unterlage auf. Anderenfalls besteht die
• Schraube (groß) x 4
Gefahr, dass Ständer und Lautsprecher umkippen und
Verletzungen verursachen.
• Schraube (klein) x 8
Reinigung der Lautsprecherständer
• Schmutzflecken und Staub, die beim normalen Gebrauch
auftreten, können durch Abreiben mit einem weichen Tuch
entfernt werden. Bei starker Verschmutzung tauchen Sie ein
Tuch in eine Lösung aus 5–6 Teilen eines neutralen
• Bedienungsanleitung
Haushaltsreinigers und 1 Teil Wasser, wringen Sie es gründlich
Die Abbildungen zeigen grundsätzlich die Pfeiler und Grundplatten
aus, und wischen Sie die Schmutzflecken damit ab. Benutzen
des Modells CP-LX70. Die entsprechenden Teile des Modells CP-
Sie keine Möbelpolituren oder -reinigungsmittel. Verwenden
LX70TS unterscheiden sich lediglich durch eine andere Größe.
Sie auf keinen Fall Alkohol, Farbverdünner, Benzin,
Insektensprays oder andere Chemikalien auf oder in der Nähe
Die nachstehend abgebildeten Styroporpolster werden beim
des Ständers, da derartige Substanzen das Oberflächenfinish
Zusammenbau der Ständer verwendet.
anlösen. Bitte lesen Sie vor der Verwendung eines chemisch
•CP-LX70
behandelten Reinigungstuchs die dem Tuch beiliegende
Gebrauchsanweisung des Herstellers.
Reinigen der Grundplatten der Lautsprecherständer
• Reiben Sie die Grundplatten mit dem Reinigungstuch im
Lieferumfang des Lautsprechersystems S-LX70-LR sacht ab.
• Durch Abreiben mit einem staubigen oder harten Tuch oder
übermäßige Kraftanwendung kann die Oberfläche der
•CP-LX70TS
Grundplatte zerkratzt werden.
ACHTUNG
An den Lautsprecherklemmen dieses Gerätes liegt eine potentiell
GEFÄHRLICHE Spannung an. Zur Vermeidung von
Stromschlaggefahr ist unbedingt darauf zu achten, den
Netzstecker beim Anschließen und Abtrennen der
Lautsprecherkabel von der Netzsteckdose zu trennen, bevor
irgendwelche nicht isolierten Teile berührt werden.
2
Ge
TOP
TOP
TOP
03_CP-LX70_GE.book 2 ページ 2007年9月5日 水曜日 午前10時55分
TOP
Schaumstoffteil
Schaumstoffteil
(oben)
(unten)
Schaumstoffteil
Schaumstoffteil
(oben)
(unten)
03_CP-LX70_GE.book 3 ページ 2007年9月5日 水曜日 午前10時55分
English Français Deutsch
Zusammenbau der
Die Pfeiler und Grundplatten müssen mit einer bestimmten
Ausrichtung zusammengebaut werden. Bitte achten Sie beim
Lautsprecherständer
Zusammenbau darauf, diese Teile mit der korrekten Ausrichtung
Nehmen Sie den Zusammenbau des Ständers auf einer ebenen,
zu befestigen.
relativ weichen Unterlage (z.B. einem Teppich) vor.
Ein Kreuzschlitzschraubendreher mittlerer Größe wird für den
Vorderseite Rückseite
Zusammenbau benötigt.
• Die Styroporpolster werden beim Zusammenbau verwendet.
Nur CP-LX70: Vergewissern Sie sich, dass die beschrifteten
Oberflächen nach oben weisen und wie nachstehenden
abgebildet ausgerichtet sind, und legen Sie das obere
Styroporpolster dann wie durch die Pfeile der Abbildung
gezeigt auf das untere.
Schaumstoffteil
(oben)
Italiano Español Português Dansk Norsk SuomiSvenska
Aufstellung der
Nederlands
Lautsprecherständer
• Stellen Sie den Ständer auf einer stabilen, ebenen Unterlage
auf; die Aufstellung auf einer unstabilen Unterlage ist potentiell
gefährlich.
Schaumstoffteil
Bitte beachten Sie bei der Wahl des Aufstellungsorts, dass der
(unten)
Klang von der Position des Lautsprechers beeinflusst wird.
Wenn die Bässe zu leise sind, platzieren Sie den Lautsprecher
1 Verlegen Sie das Lautsprecherkabel durch den Pfeiler, und
näher an einer Wand. Die sattesten Bässe werden erhalten, wenn
stellen Sie den Pfeiler dann auf die Grundplatte.
die Rückwand des Lautsprechers die Wand berührt. Wenn die
Legen Sie den Pfeiler auf eine ebene Unterlage, und
Bässe zu laut sind, so dass ein dumpfer Klang erzeugt wird, sorgen
durchschneiden Sie die durch den Pfeiler führende Schnur.
Sie für einen größeren Abstand des Lautsprechers von der Wand.
Binden Sie das aus der Grundplatte herausführende
Dieses Problem lässt sich möglicherweise auch durch eine
Lautsprecherkabel an das Schnurende an der Unterseite des
Aufstellung des Lautsprechers vor einem dicken Vorhang
Pfeilers. Ziehen Sie an dem aus der Vorderseite oben am Pfeiler
beseitigen.
herausführende Schnurende, um das Lautsprecherkabel durch
Justieren Sie die Position des Lautsprechers nach Erfordernis, bis
den Pfeiler zu führen.
Sie den Aufstellungsort ermittelt haben, an dem die optimale
• Nachdem Sie das Lautsprecherkabel durch den Pfeiler verlegt
Klangabstrahlung erhalten wird.
haben, entfernen Sie die Schnur.
Stellen Sie den Pfeiler senkrecht, richten Sie seine Unterkante auf
das Loch in der Grundplatte aus, und setzen Sie den Pfeiler ein.
• Achten Sie beim Einpassen des Pfeilers in die Grundplatte
darauf, ein Einklemmen des Lautsprecherkabels, das aus der
Nut an der Unterkante des Pfeilers herausführt, zwischen den
beiden Teilen zu vermeiden.
• Gehen Sie beim Einsetzen sorgsam vor, da das Zierlaminat auf
der Oberfläche der Grundplatte leicht durch den Pfeiler
zerkratzt werden kann.
3
Ge
03_CP-LX70_GE.book 4 ページ 2007年9月5日 水曜日 午前10時55分
2 Befestigen Sie den Pfeiler an der Grundplatte.
3 Justieren Sie die Länge des Lautsprecherkabels.
Legen Sie den in die Grundplatte eingesetzten Pfeiler vorsichtig so
Passen Sie die Länge des Lautsprecherkabels der vorgesehenen
in die dafür vorgesehene Vertiefung im Styroporpolster (in der
Montagehöhe des Lautsprechers am Pfeiler an. Justieren Sie die
Abbildung gezeigt), dass die Rückseite des Pfeilers nach oben
freie Länge des Lautsprecherkabels anhand der Höhenskala an der
weist (halten Sie dabei sowohl den Pfeiler als auch die
Rückseite des Pfeilers unter Bezugnahme auf die folgenden
Grundplatte).
Angaben:
• Pfeiler und Grundplatte des Modells CP-LX70
Skalenteilung: 0 ca. 11 cm
Skalenteilung: 100 ca. 15 cm
Sowohl Pfeiler und Grundplatte ergreifen
Skalenteilung: 170 ca. 22 cm
Rückseite des
Pfeilers
Den Pfeiler
hier ablegen
Höhenskala
Freie Länge des
Lautsprecherkabels
• Pfeiler und Grundplatte des Modells CP-LX70TS
Sowohl Pfeiler und Grundplatte ergreifen
• Um die freie Länge des Lautsprecherkabels zu verringern,
ziehen Sie das innerhalb des Pfeilers verlegte
Lautsprecherkabel um die überschüssige Länge aus dem Loch
an der Unterseite der Grundplatte, und drücken Sie diesen
Den Pfeiler
Kabelabschnitt dann wie in der Abbildung gezeigt in das Loch,
hier ablegen
wo das rechte oder Kabel verlegt ist. Falls die überschüssige
Kabellänge nicht vollständig in das Loch passt, bringen Sie den
Rest des Kabels in der Aussparung an der Unterseite der
Grundplatte unter.
Schaumstoffteil
(unten)
Schrauben Sie 4 der mitgelieferten Schrauben (klein) von der
Unterseite der Grundplatte her ein, um den Pfeiler an der
Grundplatte zu befestigen.
(Kürzen des Kabels)
Schrauben (klein)
4
Ge
4 Bereiten Sie den Lautsprecher zur Befestigung vor.
6 Befestigen Sie den Lautsprecher.
English Français Deutsch
CP-LX70: Stellen Sie den Lautsprecherständer vorübergehend
Wenn sich der Lautsprecher in der vorgesehenen Montageposition
aufrecht, und entfernen Sie das untere Styroporpolster, so dass nur
befindet, straffen Sie das Lautsprecherkabel, und bringen Sie die
das obere Polster auf dem Boden zurückbleibt. Legen Sie den
überschüssige Länge dann wie in Schritt 3 gezeigt in der
Lautsprecher auf das obere Styroporpolster, und platzieren Sie den
Aussparung an der Unterseite der Grundplatte unter.
Ständer auf dem Lautsprecher.
Bringen Sie dann die Lautsprecher-Sicherheitsplatte am Pfeiler an,
und befestigen Sie sie mit den mitgelieferten Schrauben (groß).
• Die Lautsprecher-Sicherheitsplatten müssen mit einer
Lautsprecher
bestimmten Ausrichtung befestigt werden. Bringen Sie sie so
an, dass die Seite mit der Beschriftung „TOP“ auf die Oberkante
von Lautsprecher und Pfeiler weist.
Italiano Español Português Dansk Norsk SuomiSvenska
Schaumstoffteil
(oben)
CP-LX70TS: Stellen Sie den Lautsprecherständer vorübergehend
aufrecht, drehen Sie das untere Styroporpolster um, und legen Sie
Nederlands
den Lautsprecher darauf. Drehen Sie das obere Styroporpolster wie
in der Abbildung gezeigt in seitlicher Richtung so, dass im rechten
Winkel zum Ständer ausgerichtet ist, und legen Sie den in Schritt 2
zusammengebauten Lautsprecherständer darauf.
Lautsprecher
Achtung
Vergewissern Sie sich, dass das Lautsprecherkabel nicht zwischen
dem Pfeiler und dem Lautsprecher eingeklemmt ist.
(Rückseite)
Schaumstoffteil
(oben)
Schaumstoffteil
(unten)
(Rückseite)
5 Schließen Sie das Lautsprecherkabel an den Lautsprecher an.
Ziehen Sie das Lautsprecherkabel durch die Vorderseite des
Pfeilers (d.h. seine Unterseite während des Zusammenbaus), und
schließen Sie es an die Klemmen an der Rückseite des
Lautsprechers an.
• Schließen Sie den mit einer Markierung versehenen Draht des
Lautsprecherkabels an die positiv (+) Klemme, und den Draht
ohne Markierung an die negativ (–) Klemme an.
• Falls sich die Drähte nur schwer an die Klemmen anschließen
lassen, verschieben Sie den Pfeiler geringfügig gegenüber dem
Lautsprecher.
5
Ge
TOP
TO
P
Oben
Unten
OP
T
TOP
TOP
03_CP-LX70_GE.book 5 ページ 2007年9月5日 水曜日 午前10時55分
P
TO
03_CP-LX70_GE.book 6 ページ 2007年9月5日 水曜日 午前10時55分
Schließen Sie das Lautsprecherkabel an den
Aufstellung
Verstärker an
Beenden Sie die Aufstellung der Lautsprecher und der daran
Schließen Sie das Lautsprecherkabel an die Klemmen an der
befestigten Ständer, indem Sie sie am vorgesehenen Platz im
Rückseite der Grundplatte des Lautsprecherständers an.
Hörraum aufrecht stellen. Bitte schlagen Sie hierzu im Abschnitt
„Aufstellung der Lautsprecherständer“ auf Seite 3 nach.
1 Schalten Sie den Verstärker aus.
• Bewahren Sie die Styroporpolster nach dem Zusammenbau für
2 Schließen Sie die Lautsprecherkabel an die Eingangsklemmen
spätere Verwendung an einem sicheren Ort auf.
an der Rückseite der Grundplatte jedes Lautsprecherständers an.
Die roten Eingangsklemmen sind positiv (+), die schwarzen
Ändern der Standhöhe der Lautsprecher
Eingangsklemmen negativ (–) gepolt.
Wenn eine Änderung der Standhöhe der Lautsprecher gewünscht
wird, führen Sie den Zusammenbau des Ständers erneut unter
Bezugnahme auf Schritt 3 bis 6 des Abschnitts „Zusammenbau der
Lautsprecherständer“ aus.
• Versuchen Sie auf keinen Fall, die Standhöhe eines
Lautsprechers bei aufrecht stehendem Ständer zu verändern.
Anderenfalls besteht die Gefahr, dass der Lautsprecher
herunterfällt, wodurch Schäden und Verletzungen verursacht
werden können.
3 Schließen Sie das andere Ende jedes Lautsprecherkabels an
die Lautsprecher-Ausgangsklemmen des Verstärkers an
(Einzelheiten hierzu finden Sie in der Bedienungsanleitung des
Verstärkers).
• Drehen Sie die Kappenknöpfe der unteren Eingangsklemmen
nach links (im Gegenuhrzeigersinn), führen Sie die blanken
Drähte jedes Lautsprecherkabels in die Löcher in den
Polbolzen ein, und ziehen Sie die Knöpfe dann wieder an, um
die Drähte in den Klemmen zu sichern.
• Bananenstecker können ebenfalls für den Anschluss an den
Klemmen der Ständergrundplatten verwendet werden. In
einem solchen Fall müssen die Kappenknöpfe vorher von den
Polbolzen entfernt werden.
• Falls die blanken Leiter der Drähte des Lautsprecherkabels so
weit aus den Klemmen herausstehen, so dass sie sich
gegenseitig berühren, kann dies eine Überlastung des
Verstärkers verursachen. In einem solchen Fall stellt der
Verstärker möglicherweise den Betrieb ein, und es kann sogar
zu einer Beschädigung des Verstärkers kommen.
• Ziehen Sie nach dem Herstellen der Anschlüsse sacht an
jedem Lautsprecherkabel, um sicherzustellen, dass die Drähte
fest in den Klemmen sitzen. Lose Anschlüsse können
Rauschen und Tonaussetzer verursachen.
• Falls ein Lautsprecher (entweder der linke oder der rechte)
versehentlich mit vertauschter Polarität (+ , –) an einen
Verstärker angeschlossen wird, kann der normale Stereoeffekt
nicht erzielt werden.
6
Ge
03_CP-LX70_GE.book 7 ページ 2007年9月5日 水曜日 午前10時55分
English Français Deutsch
Technische Daten
Mischen Sie dieses Produkt, wenn Sie es entsorgen wollen, nicht mit
gewöhnlichen Haushaltsabfällen. Es gibt ein getrenntes
• CP-LX70 (Bodenständer)
Sammelsystem für gebrauchte elektronische Produkte, über das die
Außenabmessungen .............271 mm (B) x 1067 mm (H) x 271 mm (T)
richtige Behandlung, Rückgewinnung und Wiederverwertung gemäß
der bestehenden Gesetzgebung gewährleistet wird.
Masse................................................................................................ 8,9 kg
Privathaushalte in den Mitgliedsstaaten der EU, in der Schweiz und in
Mitgeliefertes Zubehör
Norwegen können ihre gebrauchten elektronischen Produkte an vorgesehenen
Sammeleinrichtungen kostenfrei zurückgeben oder aber an einen Händler
Pfeiler...............................................................................................2 Stck.
zurückgeben (wenn sie ein ähnliches neues Produkt kaufen).
Ständergrundplatten ......................................................................2 Stck.
Lautsprecher-Sicherheitsplatten [SNN1069]................................2 Stck.
Bitte wenden Sie sich in den Ländern, die oben nicht aufgeführt sind,
Schrauben (groß) [BMH50P350FBN]............................................4 Stck.
hinsichtlich der korrekten Verfahrensweise der Entsorgung an die örtliche
Schrauben (klein) [BMZ40P200FTB].............................................8 Stck.
Kommunalverwaltung.
Vorliegende Bedienungsanleitung [SRD6095].............................1 Stck.
Auf diese Weise stellen Sie sicher, dass das zu entsorgende Produkt der
notwendigen Behandlung, Rückgewinnung und Wiederverwertung unterzogen
wird, und so mögliche negative Einflüsse auf die Umwelt und die menschliche
Ersatzteilnummern
Gesundheit vermieden werden.
Rutschfreie Untersetzer [SEB1324]
Eingangsklemme (rot) [SKX1105]
Italiano Español Português Dansk Norsk SuomiSvenska
Eingangsklemme (schwarz) [SKX1106]
Oberes Styroporpolster [SHA2596]
Unteres Styroporpolster [SHA2597]
Gummidichtmaterial [SEC2155]
Verpackungskarton [SHG6326]
Nederlands
Schutzfolie (für Ständergrundplatte) [SHC1841]
Polyethylenbeutel (für Schrauben und Lautsprecher-
Sicherheitsplatten) [SHL1460]
Polyethylenbeutel (für Anschlusskabel) [SHL1296]
Polyethylenbeutel (für Bedienungsanleitung) [SHL1295]
Polyethylenbeutel (für Pfeiler) [SHL1426]
Die Teilenummern sind oben jeweils in eckige Klammern gesetzt.
• CP-LX70TS (Tischständer)
Außenabmessungen ...............225 mm (B) x 681 mm (H) x 225 mm (T)
Masse................................................................................................ 5,9 kg
Mitgeliefertes Zubehör
Pfeiler...............................................................................................2 Stck.
Ständergrundplatten ......................................................................2 Stck.
Lautsprecher-Sicherheitsplatten [SNN1069]................................2 Stck.
Schrauben (groß) [BMH50P350FBN]............................................4 Stck.
Schrauben (klein) [BMZ40P200FTB].............................................8 Stck.
Vorliegende Bedienungsanleitung [SRD6095].............................1 Stck.
Ersatzteilnummern
Rutschfreie Untersetzer [SEB1324]
Eingangsklemme (rot) [SKX1105]
Eingangsklemme (schwarz) [SKX1106]
Oberes Styroporpolster [SHA2599]
Unteres Styroporpolster [SHA2600]
Gummidichtmaterial [SEC2155]
Verpackungskarton [SHG6327]
Schutzfolie (für Ständergrundplatte) [SHC1841]
Polyethylenbeutel (für Schrauben und Lautsprecher-
Sicherheitsplatten) [SHL1460]
Polyethylenbeutel (für Anschlusskabel) [SHL1349]
Polyethylenbeutel (für Bedienungsanleitung) [SHL1295]
Polyethylenbeutel (für Pfeiler) [SHL1347]
Die Teilenummern sind oben jeweils in eckige Klammern gesetzt.
• Änderungen der technischen Daten und äußeren Aufmachung
bleiben im Sinne der ständigen Produktverbesserung jederzeit
vorbehalten.
Veröffentlicht von Pioneer Corporation.
Urheberrechtlich geschützt © 2007 Pioneer Corporation.
Alle Rechte vorbehalten.
7
Ge
Vi ringraziamo per avere acquistato questo prodotto Pioneer. Le
Confermare la presenza degli
basi per diffusori CP-LX70 e CP-LX70TS devono essere utilizzate
solo col sistema di diffusori Pioneer S-LX70-LR. Si prega di leggere
accessori
attentamente queste istruzioni per l’uso per ottenere un montaggio
ed un utilizzo appropriati. Dopo avere terminato la lettura delle
•Gambo x 2
istruzioni, conservarle in un luogo sicuro per eventuali riferimenti in
futuro.
Attenzione
• Pioneer non è responsabile per incidenti o danni risultanti da
un’installazione inappropriata, da un utilizzo scorretto o da
modifiche del prodotto oppure da disastri naturali.
• Utilizzare solo le viti fornite in dotazione quando si fissa il
diffusore alla sua base. I diffusori potrebbero cadere e subire
dei danni se non vengono fissati in posizione in modo
appropriato.
• Utilizzare solo diffusori Pioneer S-LX70-LR con questa base.
Diffusori diversi potrebbero non essere correttamente
• Basamento della base x 2
equilibrati causando così cadute e possibili lesioni a persone
vicine.
• Fare attenzione quando si monta e si sposta la base dei
diffusori dato che essi potrebbero causare danni o lesioni nel
caso di cadute.
• Piastra di sicurezza diffusore x 2
• Non posizionare la base su una superficie instabile o inclinata.
La base ed il diffusore potrebbero cadere e causare delle
lesioni.
Manutenzione delle basi dei diffusori
• Con un normale utilizzo, la pulizia eseguita con un panno
• Vite (Grande) x 4
morbido dovrebbe essere sufficiente a mantenere la base
pulita. Se necessario, pulire con un panno imbevuto di
detergente neutro diluito cinque o sei volte con acqua e quindi
• Vite (Piccola) x 8
ben strizzato. Non utilizzare cera per mobili o altri prodotti per
pulizia. Non usare mai alcol, solventi, benzina, insetticidi sotto
forma di spray o altri prodotti chimici sull’apparecchio o nelle
vicinanze dello stesso dato che questi prodotti possono
corrodere le superfici. Quando si utilizzano dei panni trattati
• Istruzioni per l'uso
chimicamente, accertarsi di leggere con attenzione il manuale
Le illustrazioni dei gambi e delle basi rappresentano quelli del CP-
di istruzioni allegato.
LX70. Quelli per il CP-LX70TS simili ma di dimensioni leggermente
diverse.
Pulizia dei basamenti delle basi dei diffusori
Il materiale in schiuma dell'imballaggio mostrato viene
• Quando si pulisce la superficie dei basamenti delle basi dei
utilizzato durante il montaggio.
diffusori, strofinare con gentilezza usando il panno pulente
fornito in dotazione al sistema di diffusori S-LX70-LR.
•CP-LX70
• La pulizia con un panno polveroso o rigido oppure
l’applicazione di una forza eccessiva possono causare graffi
della superficie del basamento della base del diffusore.
AVVERTENZA
I terminali degli altoparlanti sono sotto tensione, alla stessa
PERICOLOSA tensione della corrente di rete. Per prevenire
rischi di folgorazioni nel corso delle operazioni di collegamento o
•CP-LX70TS
di distacco dei cavi degli altoparlanti, staccare il cavo di
alimentazione principale prima di toccare qualsiasi parte non
isolata.
2
It
TOP
TOP
TOP
04_CP-LX70_IT.book 2 ページ 2007年9月5日 水曜日 午前10時58分
TOP
Materiale
Materiale
ammortizzante (Sopra)
ammortizzante (Sotto)
Materiale
Materiale
ammortizzante (Sopra)
ammortizzante (Sotto)
