Pioneer S-LX70W: инструкция
Раздел: Бытовая, кухонная техника, электроника и оборудование
Тип: Микрофон
Инструкция к Микрофону Pioneer S-LX70W
01_S_LX70W_En.book 1 ページ 2008年7月18日 金曜日 午後5時4分
Operating Instructions | Mode d’emploi | Bedienungsanleitung
Istruzioni per I’uso | Handleiding | Manual de instrucciones
Manual de instruções | Bruksanvisning | Brugsanvisning
Bruksanvisning | Käyttöohjeet |
POWERED SUBWOOFER
ENCEINTE ACTIVE D’EXTREMES GRAVES
AKTIVER SUBWOOFER
SUBWOOFER, ALTOPARLANTE PER TONI BASSI, ALIMENTATO
SUBWOOFER MET SPANNINGSCIRCUIT
ALTAVOCES DE GRAVES SECUNDARIOS ENERGIZADOS
SUBWOOFER DE POTÊNCIA
STRÖMFÖRSÖRJD SUBWOOFER
AKTIV SUBWOOFER
STRØMFORSYNT SUBWOOFER
TEHOLLINEN APUBASSO
01_S_LX70W_En.book 2 ページ 2008年7月18日 金曜日 午後5時4分
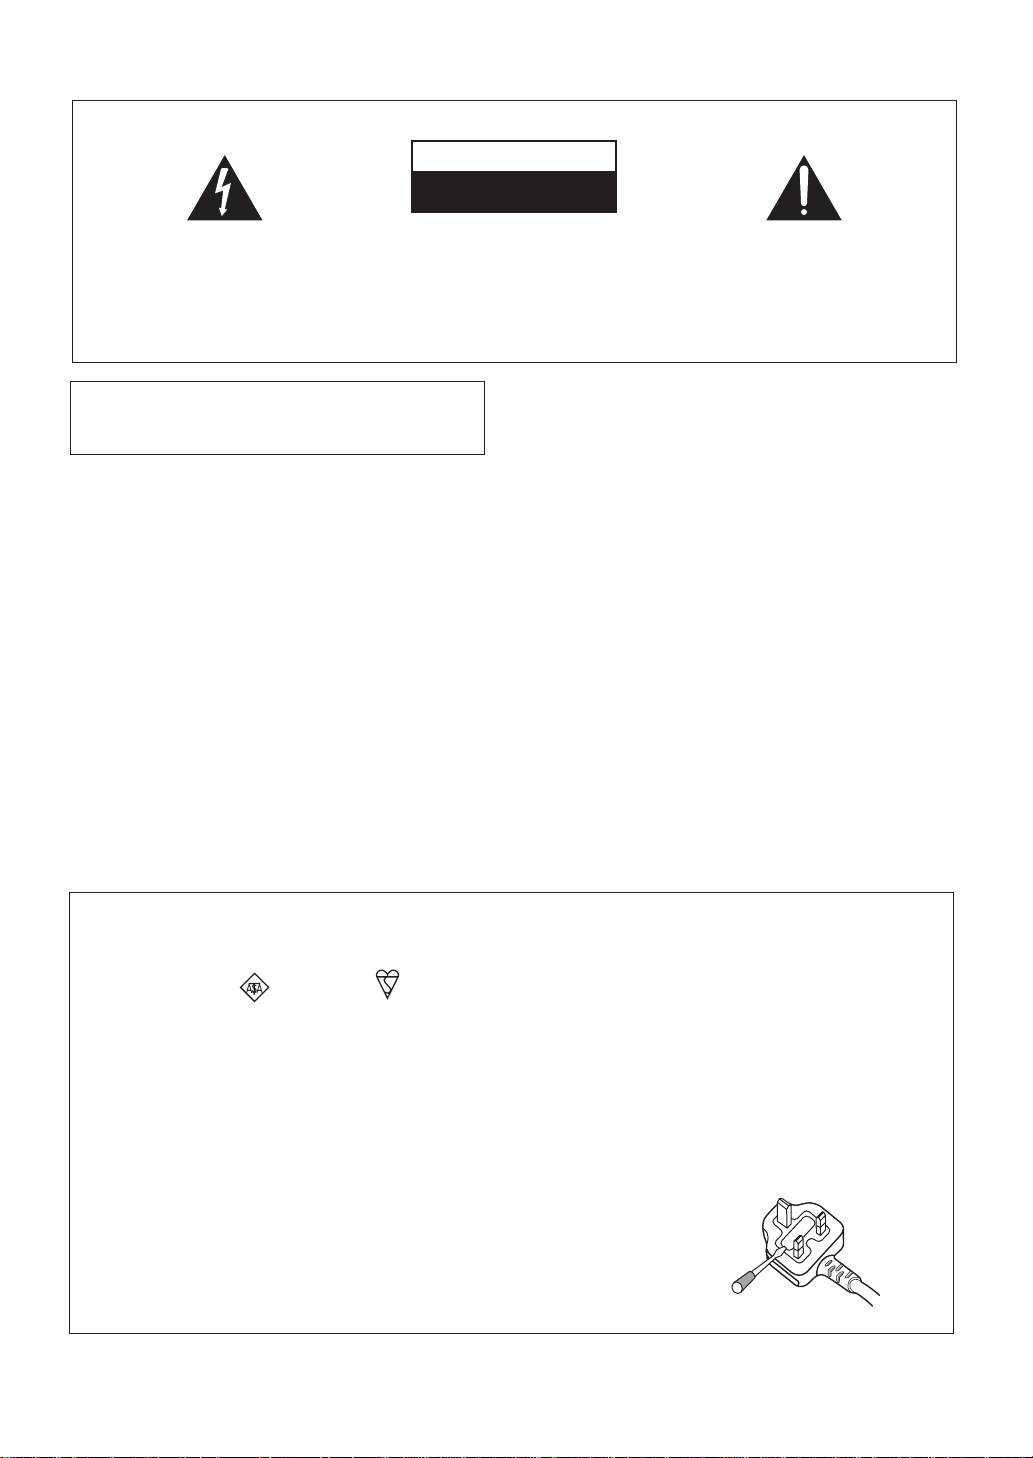
IMPORTANT
CAUTION
RISK OF ELECTRIC SHOCK
DO NOT OPEN
The lightning flash with arrowhead symbol,
CAUTION:
The exclamation point within an equilateral
within an equilateral triangle, is intended to
TO PREVENT THE RISK OF ELECTRIC
triangle is intended to alert the user to the
alert the user to the presence of uninsulated
SHOCK, DO NOT REMOVE COVER (OR
presence of important operating and
"dangerous voltage" within the product's
BACK). NO USER-SERVICEABLE PARTS
maintenance (servicing) instructions in the
enclosure that may be of sufficient
INSIDE. REFER SERVICING TO QUALIFIED
literature accompanying the appliance.
magnitude to constitute a risk of electric
SERVICE PERSONNEL.
shock to persons.
D3-4-2-1-1_En-A
This product complies with the Low Voltage Directive
WARNING
2006/95/EC and EMC Directive 2004/108/EC.
To prevent a fire hazard, do not place any naked
D3-4-2-1-9a_A_En
flame sources (such as a lighted candle) on the
equipment.
D3-4-2-1-7a_A_En
Thank you for buying this PIONEER product. Please read
VENTILATION CAUTION
through these operating instructions so you will know
When installing this unit, make sure to leave space
how to operate your model properly. After you have
around the unit for ventilation to improve heat
finished reading the instructions, put them away in a safe
radiation (at least 25 cm at top, 15 cm at rear, and
place for future reference.
10 cm at each side).
In some countries or regions, the shape of the power
WARNING
plug and power outlet may sometimes differ from that
Slots and openings in the cabinet are provided for
shown in the explanatory drawings. However, the
ventilation to ensure reliable operation of the
method of connecting and operating the unit is the same.
product, and to protect it from overheating. To
prevent fire hazard, the openings should never be
WARNING
blocked or covered with items (such as newspapers,
This equipment is not waterproof. To prevent a fire
table-cloths, curtains) or by operating the
or shock hazard, do not place any container filled
equipment on thick carpet or a bed.
D3-4-2-1-7b_A_En
with liquid near this equipment (such as a vase or
flower pot) or expose it to dripping, splashing, rain
or moisture.
D3-4-2-1-3_A_En
[For U.K. model]
Replacement and mounting of an AC plug on the power supply cord of this unit should be performed only by qualified
service personnel.
IMPORTANT: THE MOULDED PLUG
This appliance is supplied with a moulded three pin mains plug for your safety and convenience. A 10 amp fuse is fitted in this plug. Should
the fuse need to be replaced, please ensure that the replacement fuse has a rating of 10 amps and that it is approved by ASTA or BSI to
BS1362.
Check for the ASTA mark or the BSI mark on the body of the fuse.
If the plug contains a removable fuse cover, you must ensure that it is refitted when the fuse is replaced. If you lose the fuse cover the plug
must not be used until a replacement cover is obtained. A replacement fuse cover can be obtained from your local dealer.
If the fitted moulded plug is unsuitable for your socket outlet, then the fuse shall be removed and the plug cut off and disposed of
safely. There is a danger of severe electrical shock if the cut off plug is inserted into any 13 amp socket.
If a new plug is to be fitted, please observe the wiring code as shown below. If in any doubt, please consult a qualified electrician.
IMPORTANT: The wires in this mains lead are coloured in accordance with the following code:
Blue : Neutral Brown : Live
As the colours of the wires in the mains lead of this appliance may not correspond with the coloured markings identifying the terminals in
your plug, proceed as follows ;
The wire which is coloured BLUE must be connected to the terminal which is marked with the
letter N or coloured BLACK.
The wire which is coloured BROWN must be connected to the terminal which is marked with the
letter L or coloured RED.
How to replace the fuse: Open the fuse compartment with a screwdriver and replace the fuse.
D3-4-2-1-2-2_B_En
01_S_LX70W_En.book 3 ページ 2008年7月18日 金曜日 午後5時4分
If you want to dispose this product, do not mix it with general household waste. There is a separate collection system for used
electronic products in accordance with legislation that requires proper treatment, recovery and recycling.
Private households in the member states of the EU, in Switzerland and Norway may return their used electronic products free of charge to
designated collection facilities or to a retailer (if you purchase a similar new one).
For countries not mentioned above, please contact your local authorities for the correct method of disposal.
By doing so you will ensure that your disposed product undergoes the necessary treatment, recovery and recycling and thus prevent potential
negative effects on the environment and human health.
K058_A_En
WARNING
If the AC plug of this unit does not match the AC
Before plugging in for the first time, read the following
outlet you want to use, the plug must be removed
section carefully.
and appropriate one fitted. Replacement and
The voltage of the available power supply differs
mounting of an AC plug on the power supply cord of
according to country or region. Be sure that the
this unit should be performed only by qualified
power supply voltage of the area where this unit
service personnel. If connected to an AC outlet, the
will be used meets the required voltage (e.g., 230 V
cut-off plug can cause severe electrical shock. Make
or 120 V) written on the rear panel.
D3-4-2-1-4_A_En
sure it is properly disposed of after removal.
The equipment should be disconnected by removing
the mains plug from the wall socket when left
WARNING:
unused for a long period of time (for example, when
Do not climb or sit on this unit. Be especially
on vacation).
D3-4-2-2-1a_A_En
careful when children are around. The unit may be
damaged, or may fall over causing injury.
CAUTION
The POWER switch on this unit will not completely
Operating Environment
shut off all power from the AC outlet. Since the
Operating environment temperature and humidity:
power cord serves as the main disconnect device for
+5 ºC to +35 ºC (+41 ºF to +95 ºF); less than 85 %RH
the unit, you will need to unplug it from the AC outlet
(cooling vents not blocked)
to shut down all power. Therefore, make sure the
Do not install this unit in a poorly ventilated area, or in
unit has been installed so that the power cord can
locations exposed to high humidity or direct sunlight (or
be easily unplugged from the AC outlet in case of an
strong artificial light).
D3-4-2-1-7c_A_En
accident. To avoid fire hazard, the power cord should
also be unplugged from the AC outlet when left
unused for a long period of time (for example, when
POWER-CORD CAUTION
on vacation).
D3-4-2-2-2a_A_En
Handle the power cord by the plug. Do not pull out the
plug by tugging the cord and never touch the power
cord when your hands are wet as this could cause a
short circuit or electric shock. Do not place the unit, a
piece of furniture, etc., on the power cord, or pinch the
cord. Never make a knot in the cord or tie it with other
cords. The power cords should be routed such that they
are not likely to be stepped on. A damaged power cord
can cause a fire or give you an electrical shock. Check
the power cord once in a while. When you find it
damaged, ask your nearest PIONEER authorized
service center or your dealer for a replacement.
S002_En
01_S_LX70W_En.book 4 ページ 2008年7月18日 金曜日 午後5時4分
CONTENTS
FEATURES
■
300 W (RMS) power with D class amplifier that serves
ACCESSORY ITEMS...........................4
audio and video software playback such as Dolby*
FEATURES .........................................4
Digital with a wide dynamic range.
IN COMBINATION WITH
■
Equipped with 30 cm driver
■
Crossover frequency can be set to 50 Hz, 60 Hz, 70 Hz,
SPEAKERS .........................................4
80 Hz, 100 Hz, 120 Hz, 160 Hz, 200 Hz.
INSTALLATION.................................. 5
■
Equipped with Bass Mode selector (Music/Cinema
mode).
Speaker Installation...........................5
Installation Precautions ....................5
* Maunfactured under license from Dolby Laboratories.
PANEL FACILITIES.............................6
“Dolby” and the double-D symbol are trademarks of Dolby
Laboratories.
FRONT PANEL....................................6
REAR PANEL......................................6
IN COMBINATION WITH
CONNECTIONS.................................. 7
SPEAKERS
LINE LEVEL CONNECTION................ 7
OPERATION ......................................7
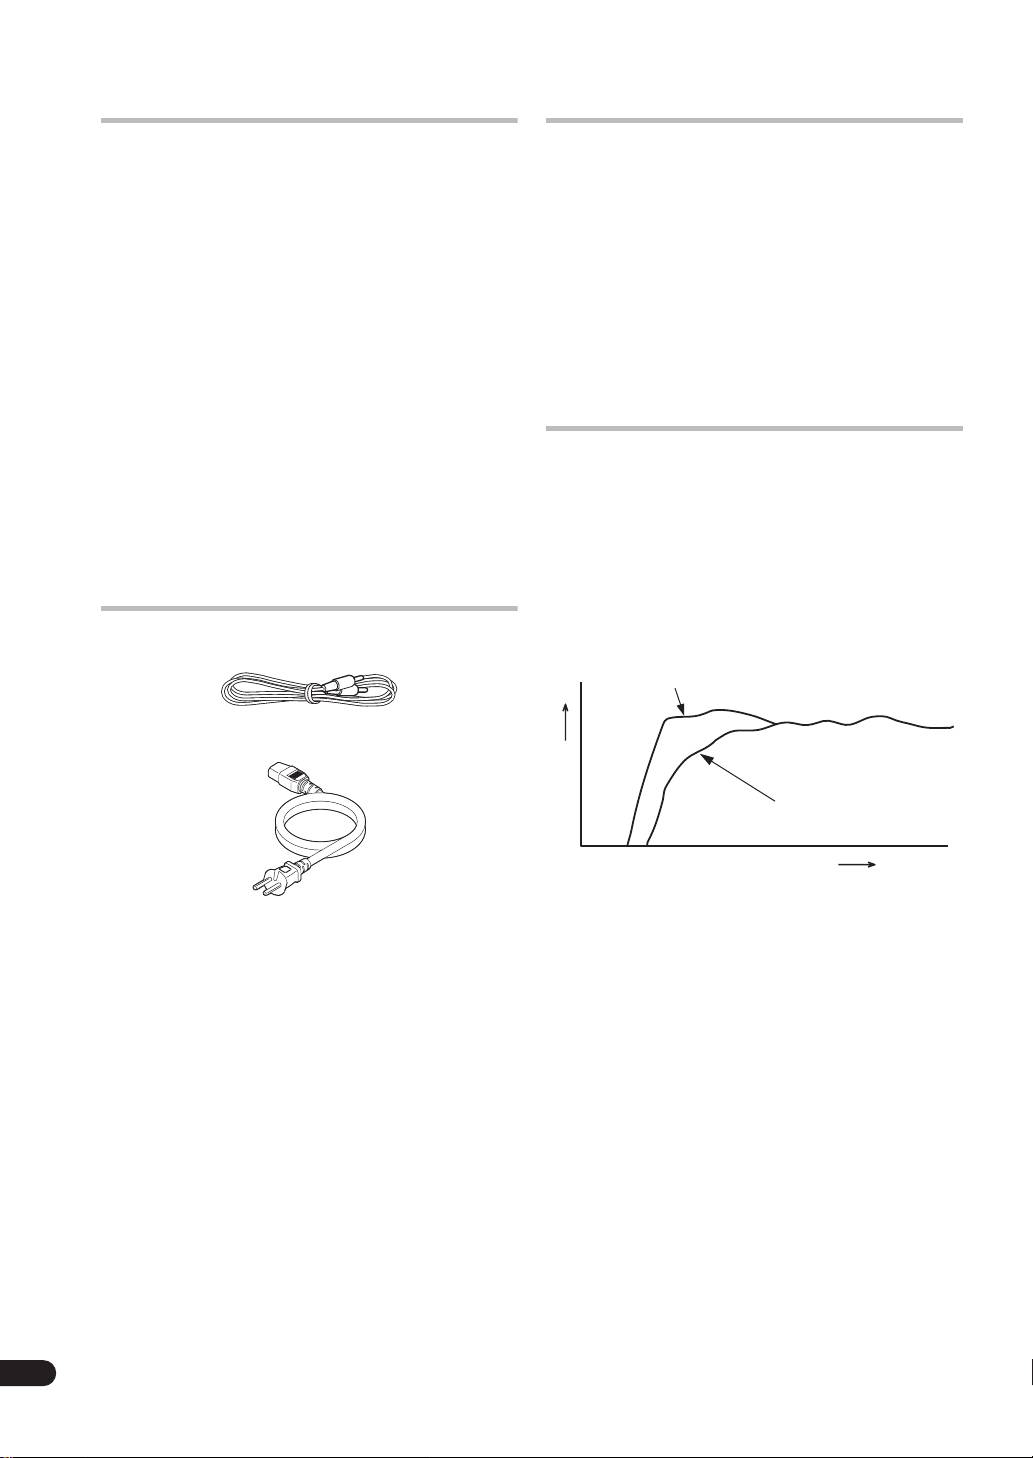
The frequency characteristics of the S-LX70W/S-81W-MK
combined with small-size speakers are shown below. As
TROUBLESHOOTING ........................ 8
shown in these figures, the low frequency range is
SPECIFICATIONS ............................... 8
improved.
• These special characteristics are obtained in an
echoless chamber. The effect of an additional S-LX70W/
ACCESSORY ITEMS
S-81W-MK in an ordinary listening room is better than
the chart indicates when positioned adequately.
Small-size speakers + S-LX70W/S-81W-MK
RCA plug cord x 1
Small-size speaker
RESPONCE (dB)
FREQUENCY (Hz)
• With playback of Dolby* Digital, establishment of a
special channel for the subwoofer is recommended;
Power cable x 1
and with playback of LFE (Low Frequency Effect: sound
effect like the rumbling of the earth, whose purpose is
Polishing cloth x 1
to intensify the force of the video), the S-LX70W/
S-81W-MK is especially effective.
Warranty card x 1
Dolby* Digital
Operating instructions
Dolby Digital is the name of the Dolby Surround multi-
channel digital system that was developed from Dolby
Surround, as a continuation of Dolby Pro Logic Surround.
Dolby Digital is also referred to as a 5.1 channel system.
This is because it has 5 channels in the 20 Hz to 20 kHz
frequency range (front left and right, center, and rear left
and right) and an independent channel for the
subwoofer. The subwoofer channel is also referred to as
LFE (Low Frequency Effect).
The LFE channel is used according to individual tastes to
enhance the bass effect.
4
En
01_S_LX70W_En.book 5 ページ 2008年7月18日 金曜日 午後5時4分
NOTES:
English Français Deutsch
INSTALLATION
• To avoid interference with the picture on a nearby TV
set, use magnetically shielded speaker systems. This
is particularly important for the center speaker since it
Speaker Installation
is usually located closest to the TV.
• Position the left and right channel speakers at equal
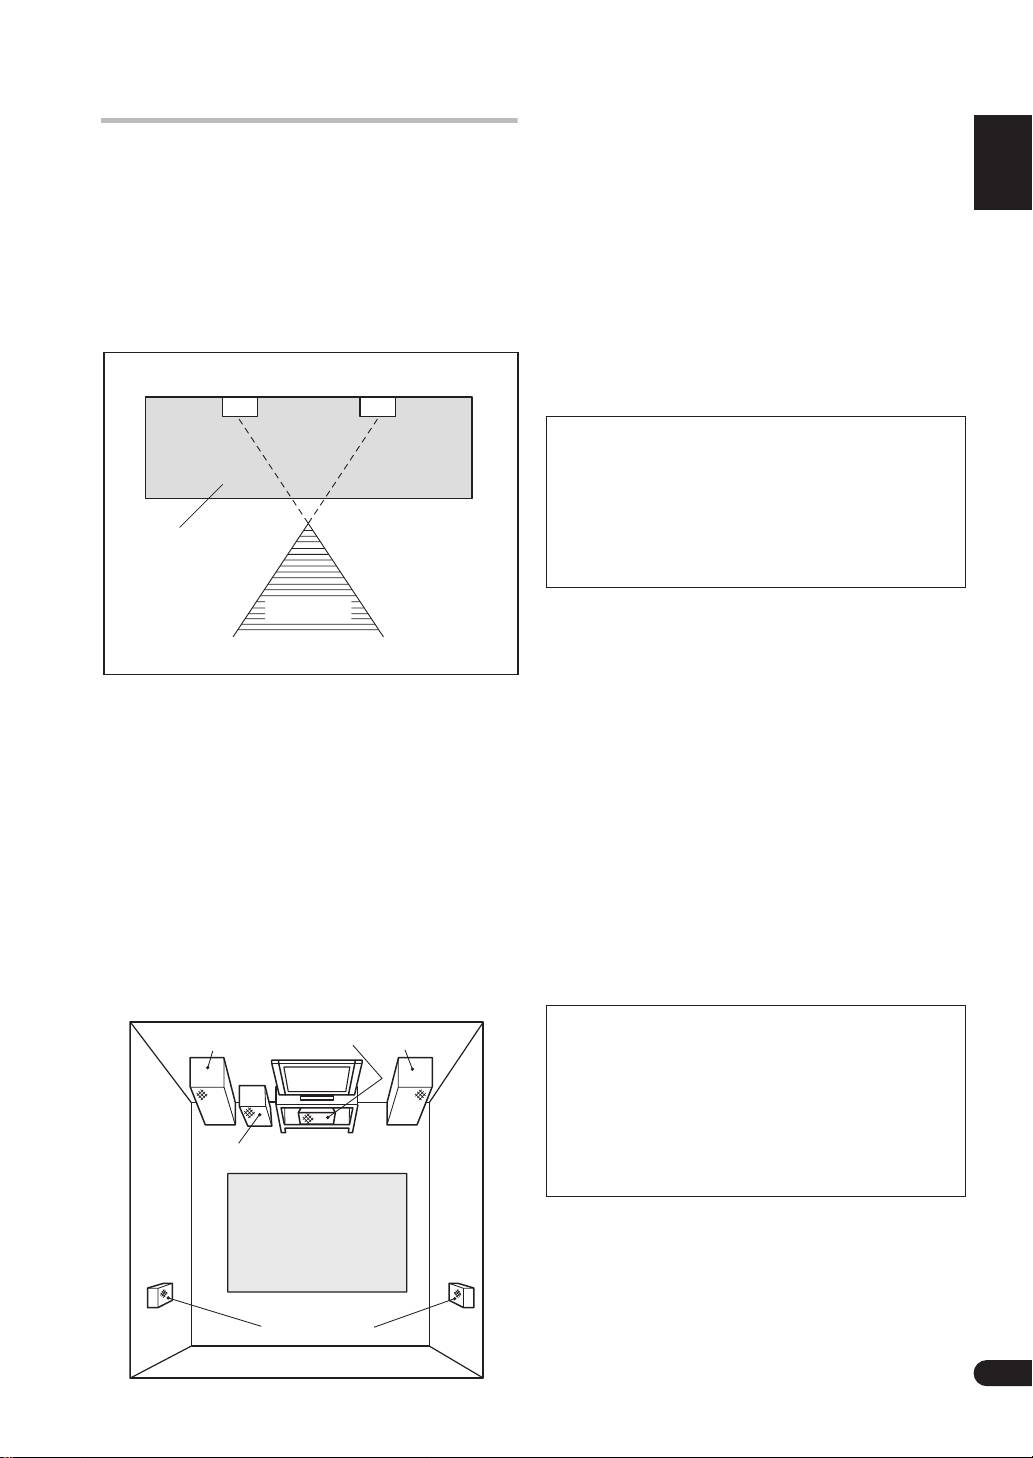
• Subwoofer Installation Criteria
distances from the TV set and approximately 1.8 meters
1 Left speaker
from each other.
2 Right speaker
• Install the center speaker above or below the TV so
3 Recommended installation range for the
that the sound of the center channel is localized at the
subwoofer
TV screen.
4 Listening position
• The rear (surround) speakers are most effective when
installed in parallel locations directly to the side, or
12
slightly behind, the listener, at a level about 1 meter
above the listener’s ears.
CAUTION:
When installing the center speaker on top of the TV,
be sure to secure it with tape or some other suitable
Italiano Español
means.
Otherwise, the speaker may fall from the TV due to
external shocks such as earthquakes, and it may lead
3
to endangering those nearby or damaging the
speaker.
Nederlands
4
Installation Precautions
• Install the unit in a well-ventilated location where it will
not be exposed to high temperatures and high
humidity.
The subwoofer plays back the bass in monaural, making
• Do not place the unit near stoves or other heating
use of the fact that the human ear is not very sensitive to
equipment or at locations exposed to direct sunlight,
the direction of low-pitched sound. Because of this, the
as these can have an adverse effect on the cabinet and
subwoofer can be installed almost anywhere. If it is
internal components. Also, do not install the unit
installed too far away, however, the sound from the other
where there is too much dust or high humidity, as
speakers may become unnatural.
these can cause malfunctioning or breakdowns.
(Avoid cooking tables and other locations where the
• An example of speaker positioning
unit would be exposed to heat, steam and soot.)
1 Front left speaker
• Do not place heavy or large objects on top of the
speaker. Doing so could provoke the speaker to fall,
2 Center speaker
causing damages or bodily injury. If speakers fall from
3 Front right speaker
their installation locations, they may suffer irreparable
4 Subwoofer
cracks in their finish.
5 Listening area
• Keep the unit away from devices such as cassette
6 Rear left speaker
decks which are sensitive to magnetic fields.
7 Rear right speaker
This speaker system is magnetically shielded.
1
2
3
However, depending on the installation location,
color distortion may occur if the speaker system is
installed extremely close to the screen of a television
set.
If this happens, turn off the power switch of the
television set, and turn it on after 15 to 30 minutes.
4
If the problem persists, place the speaker system
away from the television set.
• Do not place the speaker on an unstable surface, as
5
doing so may cause the speaker to fall and cause
damage or bodily injury.
• Do not place cups, glasses, or other containers with
fluids on top of the units, since the units may be
damaged if the liquid spills.
67
5
En
01_S_LX70W_En.book 6 ページ 2008年7月18日 金曜日 午後5時4分
• The installation location selected should have a sturdy
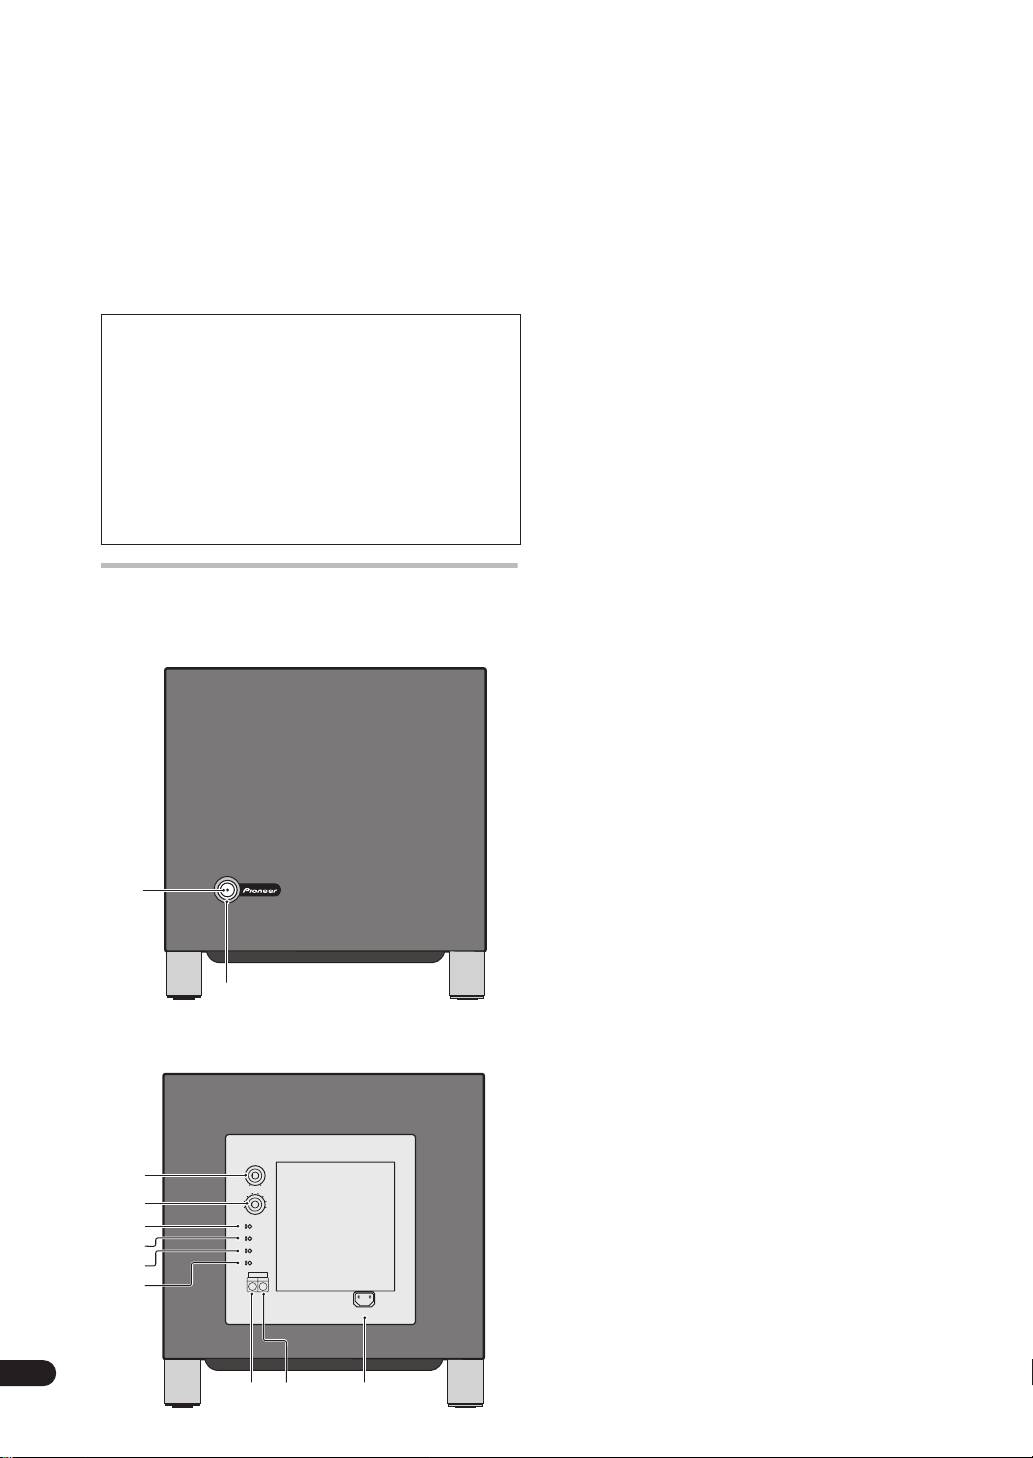
1 Power Indicator (STANDBY/ON)
floor surface. Mounting the speaker on a long-pile
Lights blue when the power has been switched ON.
carpet should be avoided, since the carpet may touch
When AUTO STANDBY switch is set to ON, lights blue
the driver’s diaphram, causing distorted sound.
whenever the speaker receive an audio signal. If the
• Please install this unit away from the antenna cable of
power is switched OFF only briefly, the indicator lights
the tuner, as noise can be caused with installation
blue when power is restored. If no signal is present for
close to the antenna cable. In such a case, use this
more than 12 minutes, the subwoofer automatically
unit at a position away from the antenna and the
reverts to standby mode and the power indicator lights
antenna cable, or when playback of extra bass is not
red. If, subsequently, a signal is received, power
required, switch off the power for this unit.
automatically comes back on and the power indicator
lights blue.
MAINTENANCE OF EXTERNAL SURFACES
NOTE:
• Clean the surface by wiping with the provided
• If you are planning on switching the unit OFF for a long
polishing cloth, or with another soft, dry cloth.
period of time, make sure to check that the indicator
• When the surfaces are very dirty, wipe with a soft
light has gone out after switching OFF.
cloth dipped in some neutral cleanser diluted five
or six times with water, and wrung out well, and
2 Power switch (POWER)
then wipe again with a dry cloth. Do not use
When pressed, power is turned ON; when pressed
furniture wax or cleaners.
again, power is turned OFF.
• Never use thinners, benzine, insecticide sprays
and other chemicals on or near this unit, since
these will corrode the surfaces.
3 Volume knob (VOLUME)
Sets the subwoofer volume.
• Turn the knob slowly from the MIN position.
• With this unit, the bass level can be independently
PANEL FACILITIES
set, so do not turn up the bass on the AV amplifier.
FRONT PANEL
4 Crossover knob (CROSSOVER)
When using the subwoofer, set the upper frequency
limit for the subwoofer (
50 Hz, 60 Hz, 70 Hz, 80 Hz,
100 Hz, 120 Hz, 160 Hz, 200 Hz
) so that it
complemets the output from your other speakers.
When using the bass managment features of an AV
receiver, set to
BYPASS ON
in order to use the low-
pass filter of the AV receiver for high quality sound.
5 Bypass switch (BYPASS)
When set to
ON
, the audio signal is routed directly to
POWER
STANDBY/ON
the woofer unit, bypassing the amplifier’s filter.
1
6 Bass mode switch (BASS MODE)
MUSIC
: The characteristic frequencies become flat.
Recommended for music sources.
CINEMA
: Low frequencies are emphasized.
Recommended for sources that require strong bass.
2
7 Phase switch (PHASE 0º /180º)
REAR PANEL
When set to
180º
, the output phase becomes the
reverse of the input signal, and when set to
0º
, it is in
the same phase as the input signal.
• Normally, the switch is set to
0º
.
But when the sound connection between the
subwoofer and the left and right speakers sounds
unnatural, try switching to
180º
and set the switch
3
MIN
VOLUME
MAX
in the position where the sound is natural.
70Hz
100Hz80Hz
120Hz
60Hz
160Hz
4
50Hz
200Hz
• When using two or more subwoofers together,
CROSSOVER
5
OFF
ON
BYPASS
make sure that the phase switch of all of them are
CINEMA
MUSIC
BASS MODE
6
180∞
0∞
set to the same position.
PHASE
AUTO STANDBY
OFF
ON
7
LINE LEVEL
OUTPUT
INPUT
8
AC IN
6
En
9 11
10
01_S_LX70W_En.book 7 ページ 2008年7月18日 金曜日 午後5時4分
8 Auto Standby switch (AUTO STANDBY)
10 Line Level Input terminal (LINE LEVEL INPUT)
English Français Deutsch
Switches the Auto Standby feature on/off.
Connect to the SUBWOOFER PREOUT terminal of an
When switched
ON
(the default setting is
OFF
), the
amplifier or receiver, with the specially provided RCA
Auto Standby feature becomes active. In this mode, if
plug cord.
there is no input signal for 12 minutes the system
automatically switches to standby. The power is
11 AC INLET
automatically switched on again if an input signal is
• Connect the power cord to the powered subwoofer
detected.
unit’s AC INLET.
NOTE:
• Connect the power cord to a AC socket.
• There may be cases where a connected component
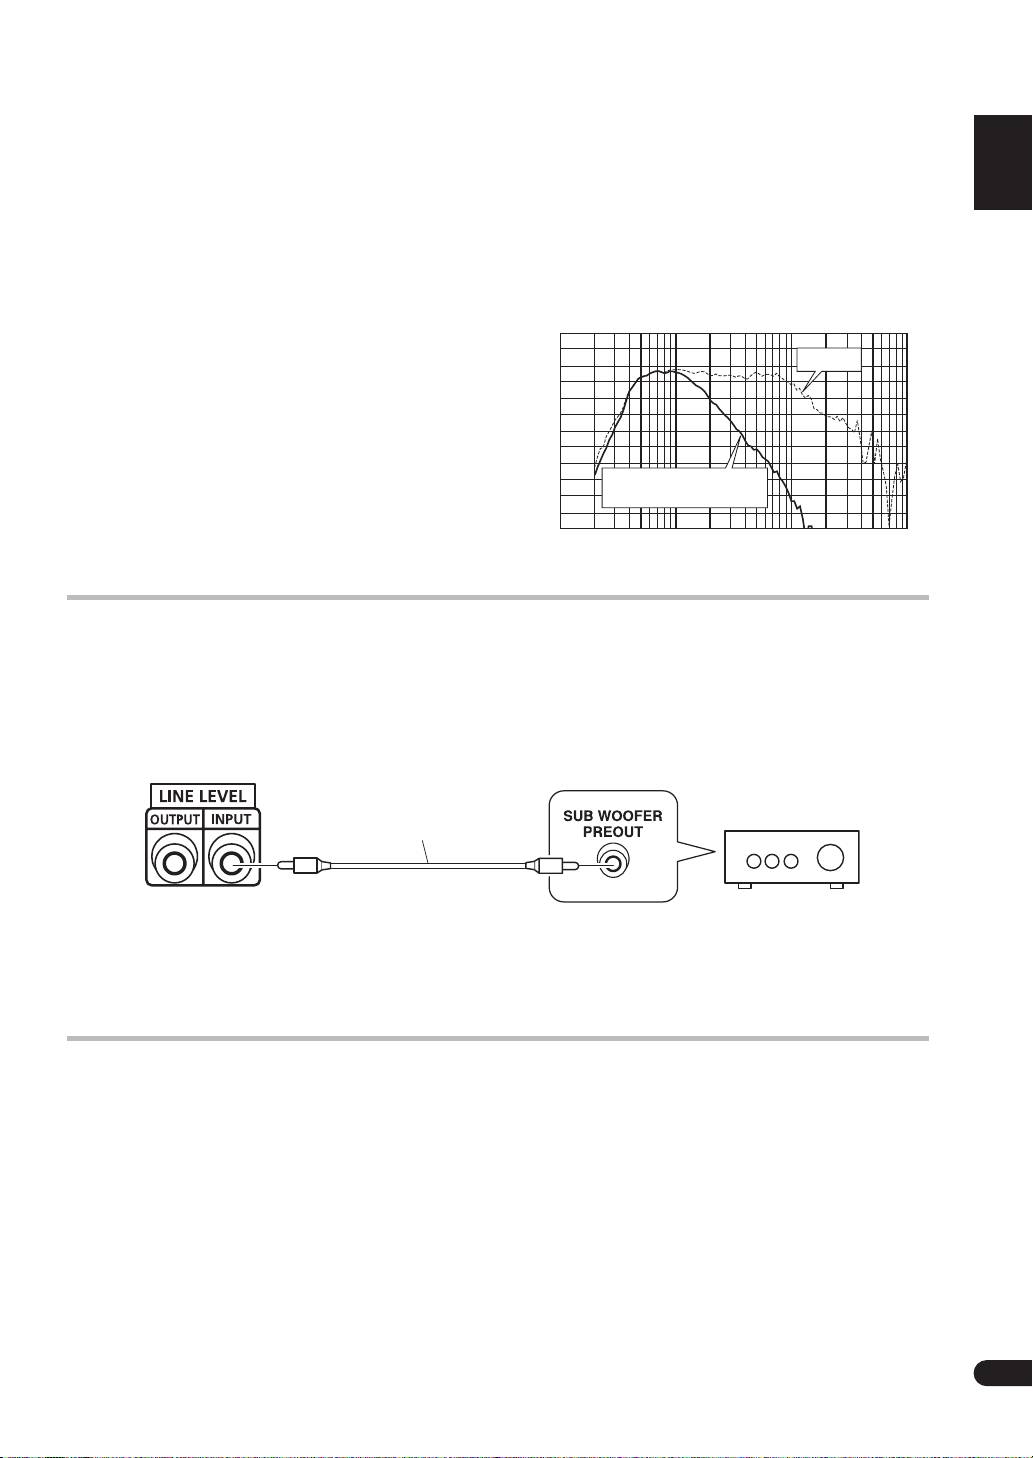
S-LX70W/S-81W-MK
Music mode Frequency response
outputs noise or some other non-audio signal which
100
causes this system to automatically power on when in
Auto Standby mode. If this happens, switch off the
Bypass
90
Auto Standby mode and switch the system on/off
manually.
80
70
9 Line Level Output terminal (LINE LEVEL OUTPUT)
Used for connecting other equipment through the
60
Italiano Español
amplifier. The signal output from this jack is not
Non-bypass
50
(Crossover 200 Hz)
affected in any way by the settings of the various
Sound pressure level (dB)
controls on the unit.
40
10
100
1000
10000
Frequency (Hz)
Nederlands
CONNECTIONS
Before making or changing any connections, switch off the power and disconnect both this unit and the
amplifier/receiver from the AC outlet.
LINE LEVEL CONNECTION
S-LX70W/S-81W-MK
(Rear Panel)
Supplied RCA plug cord
This connection is for an amplifier or receiver equipped
NOTE:
with a
SUBWOOFER PREOUT
terminal. Connect to the
• When connected to the
PREOUT
terminal for
LINE LEVEL INPUT
terminal on this unit, using the
surround center channel on the amplifier or receiver,
specially provided RCA plug cord.
the bass is heard only on the center channel, so it will
be insufficient.
OPERATION
For details regarding operating part functions, refer to
2. Operate the amplifier or receiver and adjust the
page 6.
volume of the other speakers.
1. Turn the POWER switch (2) ON.
3. Adjust the volume of the bass with the VOLUME
• If the unit’s power cord is connected to a switched AC
knob (3).
outlet on the amplifier or receiver and the switch is left
• When necessary, operate the
CROSSOVER
knob (
4
)
ON, the unit can be turned ON/OFF together with the
and
PHASE
switch (
7
), and then adjust with the
amplifier or receiver.
VOLUME
knob (
3
). Set the
BASS MODE
switch (
6
) to
• If the unit cannot be connected to the amplifier or
either
MUSIC
or
CINEMA
.
receiver, turn the power to the amplifier or receiver ON
4. Turn the POWER switch (2) OFF.
before turning the power to the unit ON. When turning
• The power indicator disappears.
the power OFF, turn the power to the unit OFF before
turning the power to the amplifier or receiver OFF.
7
En
01_S_LX70W_En.book 8 ページ 2008年7月18日 金曜日 午後5時4分
TROUBLESHOOTING
Incorrect operations are often mistaken for trouble and malfunctions. If you think that there is something wrong with
this component, check the points below. Sometimes the trouble may lie in another component. Investigate the other
components and electrical appliances being used. If the trouble cannot be rectified even after exercising the checks
listed below, ask your nearest PIONEER authorized service center or your dealer to carry out repair work.
SYMPTOM
CAUSE REMEDY
1 No power is being supplied
• Power supply plug is not
• Insert plug securely.
(Indicator does not light up
correctly inserted.
when power switch is turned
on.)
2 No sound
• Connection of accessory RCA
• Check again and connect correctly.
(Indicator is lit.)
plug cord is wrong or
disconnected.
•
VOLUME
knob is set to
MIN
.
• Turn clockwise slowly.
3 Sound is distorted.
• Level is too high.
• Turn the
VOLUME
knob counter-
clockwise to lower the level.
• Input level is too high.
• Turn the amplifier’s output level (volume,
bass control, bass boost) counter-
clockwise to lower the level.
4 Howling noise occurs.
• No power supplied to the
• Connect an amplifier and supply power.
amplifier.
• Subwoofer level is set too high.
• Place the subwoofer a good distance
from speakers. Turn the
VOLUME
knob
counter-clockwise to lower the volume.
5 Much noise when listening to
• The AM loop antenna or the FM
• Increase the distance between the AM or
AM or FM broadcasts.
indoor antenna is close to this
FM antenna (for indoor use) and this unit.
unit.
SPECIFICATIONS
Cabinet ....................... Floor type with CLOSED BOX system
(magnetically shielded)
Speaker........................................................... 30 cm cone type
Frequency response
Published by Pioneer Corporation.
.....................................25 Hz to 4000 Hz (set to BYPASS ON)
Copyright © 2007 Pioneer Corporation.
Power Amplifier Continuous Power Output (RMS)
All rights reserved.
................................................................... 300 W/4
Ω
(100 Hz)
Input (sensitivity at 100 Hz/impedance)
LINE LEVEL (RCA jack)................................... 160 mV/33 k
Ω
Output (Level at 100 Hz/impedance)
is a trademark placed on a product with
LINE LEVEL (RCA jack)...................................... 160 mV/1 k
Ω
Pioneer’s Phase Control Technology.
Selectable CROSSOVER Frequencies
The Technology enables high-grade 5.1ch with no delay
.......................................................50 Hz, 60 Hz, 70 Hz, 80 Hz,
in the bass area.
100 Hz, 120 Hz, 160 Hz, 200 Hz
Outline Dimension
........................... 362 mm (W) x 365 mm (H) x 362 mm (D)
Weight (without package).............................................18.2 kg
Power Requirements................220 V to 230 V~, 50
Hz/60
Hz
Power Consumption......................................................... 90 W
Power Consumption in standby..................................... 1.0 W
Accessories............................................... RCA plug cord x 1
Power cable x 1
Polishing cloth x 1
Warranty card x 1
Operating instructions
Specifications and design subject to possible
modification without notice, due to improvements.
8
En

01_S_LX70W_En.book 9 ページ 2008年7月18日 金曜日 午後5時4分
English Français Deutsch
Italiano Español
Nederlands
9
En
