Pioneer S-DJ80X: инструкция
Раздел: Музыкальное Оборудование
Тип: Активная Колонка

Характеристики, спецификации
Инструкция к Активной Колонке Pioneer S-DJ80X

ACTIVE REFERENCE MONITOR
S-DJ50X
MONITEUR DE RÉFÉRENCE ACTIF
AKTIVER REFERENZMONITOR
S-DJ50X-W
REFERENCE MONITOR ATTIVO
ACTIEVE REFERENTIEMONITOR
MONITOR ACTIVO DE REFERENCIA
S-DJ60X
MONITOR ATIVO DE REFERÊNCIA
АКТИВНЫЙ СТУДИЙНЫЙ МОНИТОР
S-DJ80X
http://pioneerdj.com/support/
Operating Instructions
Mode d’emploi
Bedienungsanleitung
Istruzioni per l’uso
Handleiding
Manual de instrucciones
Manual de instruções
Инструкции по эксплуатации
T
English
Français Deutsch Italiano
Nederlands Español
he Pioneer DJ support site shown above offers FAQs, information on software and various other types of
information and services to allow you to use your product in greater comfort.
Le site de support DJ de Pioneer indiqué ci-dessus propose une FAQ, des informations sur le logiciel et divers
types d’informations et de services qui permettent une utilisation plus confortable de ce produit.
Die oben gezeigte Pioneer DJ-Support-Website enthält häufig gestellte Fragen, Informationen über Software
und andere wichtige Informationen und Dienste, die Ihnen helfen, Ihr Produkt optimal zu verwenden.
Il sito di supporto DJ Pioneer indicato qui sopra offre una sezione FAQ, informazioni sul software ed
informazioni e servizi di vario tipo, per permettere un uso più confortevole dei nostri prodotti.
De bovengenoemde Pioneer DJ ondersteuningswebsite biedt een overzicht van de vaak gestelde vragen,
Português Русский
informatie over software en allerlei andere soorten informatie en diensten die u in staat stellen dit product met
meer gemak te gebruiken.
El sitio de asistencia Pioneer DJ mostrado arriba ofrece las preguntas frecuentes, información del software y
varios otros tipos de información y servicios que le permitirán usar su producto con mayor confort.
O site de suporte da Pioneer DJ mostrado acima oferece FAQs, informações sobre o software e outros tipos
de informações e serviços para permitir utilizar o produto com um maior conforto.
На указанном выше сайте поддержки Pioneer DJ содержатся раздел часто задаваемых вопросов,
информация по программному обеспечению, а также различные другие типы информации и услуг,
позволяющие использовать ваше изделие более лучшим образом.

Thank you for buying this Pioneer product.
Please read through these operating instructions so you will know how to operate your model properly. After you have finished reading the
instructions, put them away in a safe place for future reference.
CAUTION
This product is for general household purposes. Any
TO PREVENT THE RISK OF ELECTRIC SHOCK, DO NOT
failure due to use for other than household purposes
REMOVE COVER (OR BACK). NO USER-SERVICEABLE
(such as long-term use for business purposes in a
PARTS INSIDE. REFER SERVICING TO QUALIFIED
restaurant or use in a car or ship) and which requires
SERVICE PERSONNEL.
D3-4-2-1-1_B1_En
repair will be charged for even during the warranty
period.
K041_A1_En
WARNING
This equipment is not waterproof. To prevent a fire or
shock hazard, do not place any container filled with
POWER-CORD CAUTION
liquid near this equipment (such as a vase or flower
Handle the power cord by the plug. Do not pull out the
pot) or expose it to dripping, splashing, rain or
plug by tugging the cord and never touch the power
moisture.
cord when your hands are wet as this could cause a
D3-4-2-1-3_A1_En
short circuit or electric shock. Do not place the unit, a
piece of furniture, etc., on the power cord, or pinch the
WARNING
cord. Never make a knot in the cord or tie it with other
To prevent a fire hazard, do not place any naked flame
cords. The power cords should be routed such that they
sources (such as a lighted candle) on the equipment.
are not likely to be stepped on. A damaged power cord
D3-4-2-1-7a_A1_En
can cause a fire or give you an electrical shock. Check
the power cord once in a while. When you find it
damaged, ask your nearest PIONEER authorized
Operating Environment
service center or your dealer for a replacement.
Operating environment temperature and humidity:
S002*_A1_En
+5 °C to +35 °C (+41 °F to +95 °F); less than 85 %RH
(cooling vents not blocked)
WARNING
Do not install this unit in a poorly ventilated area, or in
This product equipped with a three-wire grounding
locations exposed to high humidity or direct sunlight (or
(earthed) plug - a plug that has a third (grounding) pin.
strong artificial light)
This plug only fits a grounding-type power outlet. If you
D3-4-2-1-7c*_A1_En
are unable to insert the plug into an outlet, contact a
licensed electrician to replace the outlet with a properly
CAUTION
grounded one. Do not defeat the safety purpose of the
The
POWER
switch on this unit will not completely
grounding plug.
D3-4-2-1-6_A1_En
shut off all power from the AC outlet. Since the power
cord serves as the main disconnect device for the
unit, you will need to unplug it from the AC outlet to
VENTILATION CAUTION
shut down all power. Therefore, make sure the unit
When installing this unit, make sure to leave space
has been installed so that the power cord can be
around the unit for ventilation to improve heat radiation
easily unplugged from the AC outlet in case of an
(at least 30 cm at top, 30 cm at rear, and 30 cm at each
accident. To avoid fire hazard, the power cord should
side).
also be unplugged from the AC outlet when left
unused for a long period of time (for example, when
WARNING
on vacation).
Slots and openings in the cabinet are provided for
D3-4-2-2-2a*_A1_En
ventilation to ensure reliable operation of the product,
and to protect it from overheating. To prevent fire
hazard, the openings should never be blocked or
For Finland customers
covered with items (such as newspapers, table-cloths,
Laite on liitettävä suojamaadoituskoskettimilla
curtains) or by operating the equipment on thick carpet
varustettuun pistorasiaan
or a bed.
D3-4-2-1-7b*_A1_En
For Norway customers
Apparatet må tilkoples jordet stikkontakt
For Sweden customers
Apparaten skall anslutas till jordat uttag
D3-4-2-1-6b_A1_En
Do not attach these speakers to the wall or ceiling, as
they may cause injury in the event of a fall.
SGK007*_A1_En
2
En
English
If you want to dispose this product, do not mix it with general household waste. There is a separate collection system for used
electronic products in accordance with legislation that requires proper treatment, recovery and recycling.
Introduction
Main Features
Diffuser on the waveguide improves sound directivity and
Grooves on the bass-reflex duct improve the airflow and provide
provides spacious sound.
loss-less bass performance.
Aramid fiber woofer cone is light and extremely rigid, which
provides the best bass response.
Confirm All Accessories
Power cord (1)
Warranty card
Operating Instructions (this document)
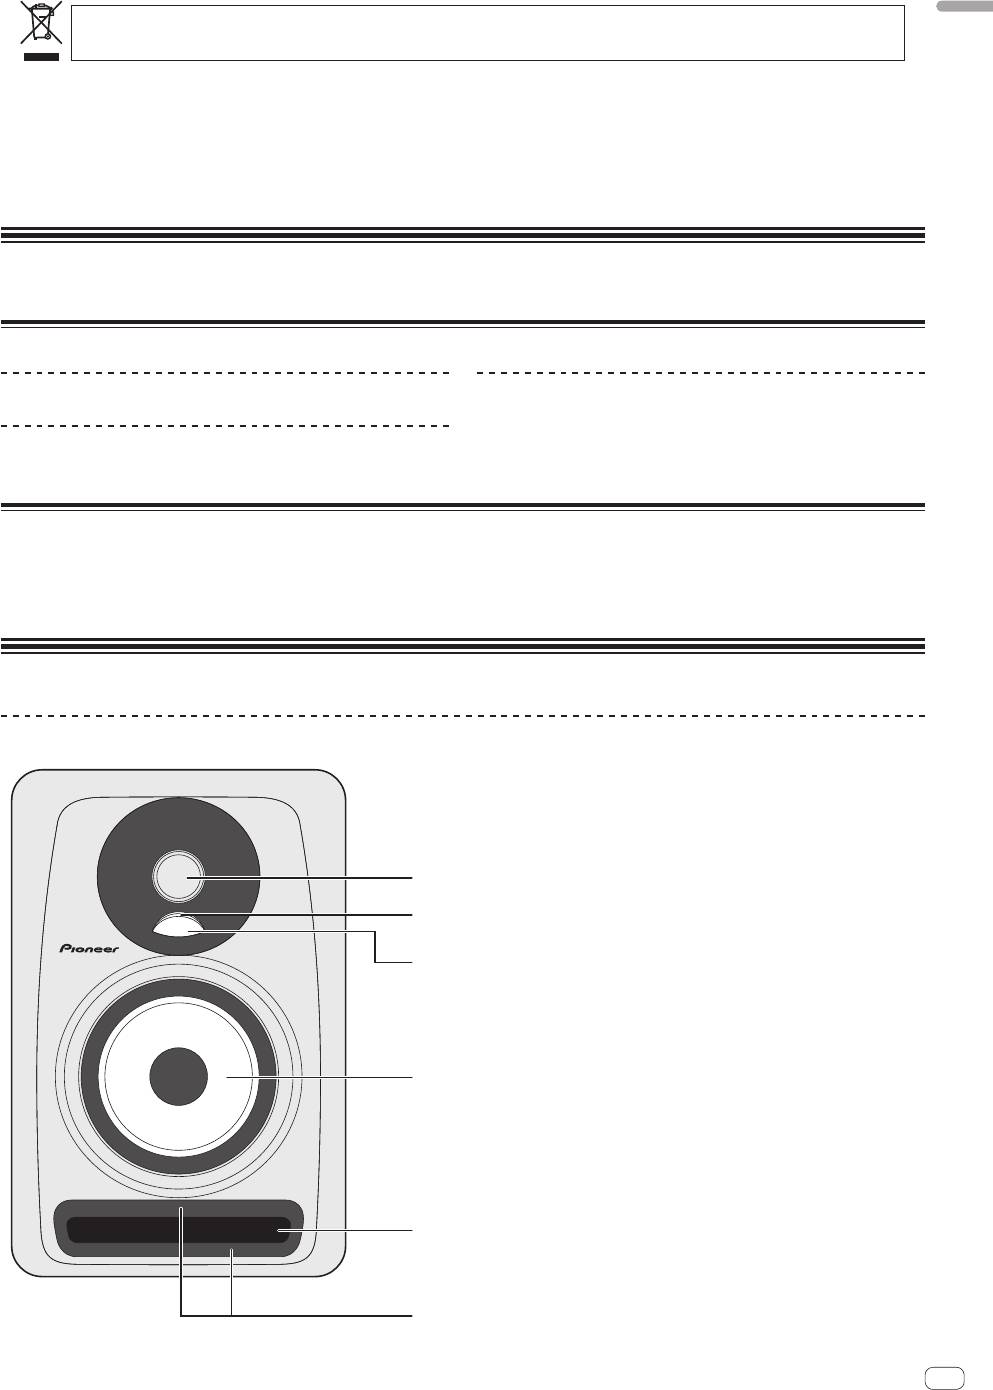
Names and Functions of Parts
Front Panel Facilities
1
1-inch high-resolution soft dome tweeter
2
Illumination (POWER indicator)
Lights up according to whether the power is on or off. The
indicator does not light up when the speakers are in standby
mode.
1
3
Diffuser
2
Improves the directionality and diffusion of high-frequency
sounds.
3
4
Aramid fiber woofer
Light and extremely rigid cones provides the best bass
response.
5
Bass-reflex duct
6
Groove
4
Regulates the flow of air in the bass-reflex duct to enable
powerful low-frequency sounds with little loss in sound.
5
6
En
3
DRC1402-A
3
P
rivate households in the member states of the EU, in Switzerland and Norway may return their used electronic products free of charge to
designated collection facilities or to a retailer (if you purchase a similar new one).
Fo
r countries not mentioned above, please contact your local authorities for the correct method of disposal.
By doing so you will ensure that your disposed product undergoes the necessar
y treatment, recovery and recycling and thus prevent potential
negative effects on the environment and human health
.
K058b_A1_En

Rear Panel Facilities
1
LEVEL dial
Use to adjust the sound level (volume).
2
HF LEVEL ADJ dial
Use to adjust high-frequency sounds.
You can select from –2 dB, –1 dB, 0 dB, and 1 dB.
1
3
AUTO STANDBY switch
Use to turn the auto standby function on or off.
2
When the auto standby function is turned on, the speakers
automatically enter standby mode if no input signal is
received for a certain period of time (approximately 25
3
minutes) and power consumption can be reduced. When
an input signal is received while the speakers are in standby
4
mode, the speakers will automatically resume from standby
5
mode.
•The illumination (POWER indicator) on the front panel turns
6
off when the speakers enter standby mode.
•When the input signal is weaker than a certain level, the
7
speakers may not automatically resume from standby
mode. In such cases, turn off the [
AUTO STANDBY
] switch
8
to use the speakers.
•To force the speakers to resume from standby mode, turn off
9
the [
POWER
] switch on the rear panel once, and turn it back
on after a few seconds.
a
4
XLR INPUT connector
XLR type balanced input connector. The connector’s pin array
is as follows: No. 1 Ground, No. 2 Hot, and No. 3 Cold.
5
TRS INPUT jack
* The S-DJ50X is shown in the illustration.
Balanced-input phone jack.
CAUTION
Do not connect to both the XLR INPUT connector and the TRS
INPUT jack at the same time.
6
RCA INPUT jack
RCA pin-type unbalanced input jacks.
7
POWER switch
Use to turn the power on and off.
CAUTION
Before turning on the power, make sure to check that the
[
VOLTAGE SELECTOR
] switch is set to the appropriate voltage
for the country or region where the speakers will be used. If
the [
VOLTAGE SELECTOR
] switch is not correctly set, contact
a Pioneer service center and request that the set voltage be
changed and the fuse be replaced. At the time of shipment, a
fuse with the appropriate voltage setting is set in the product.
When it becomes necessary to change the voltage setting, the
fuse must be replaced.
8
VOLTAGE SELECTOR switch
This switch is used to select the appropriate voltage settings
for the country/region of use. It is not to be used by the
customer directly.
9
AC IN
Connect the accessory power cord here and to an AC
power outlet. Do not plug in the power cord until all other
connections have been completed. Use only the furnished
accessory power cord.
a
Fuse holder
4
En
DRC1402-A
4
English
Installation and Connections
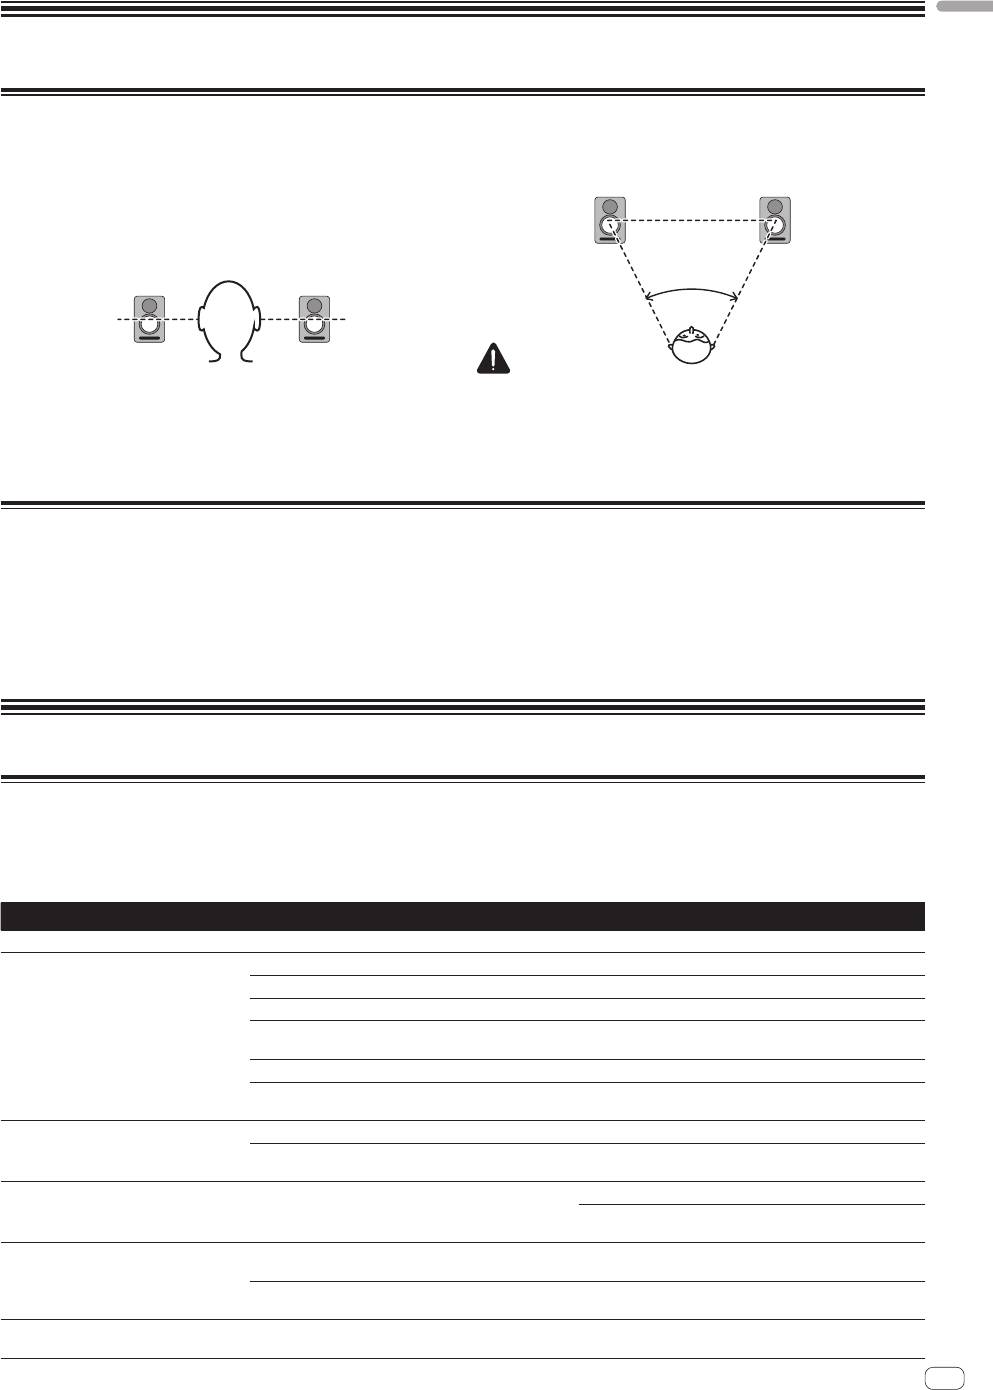
How to Install
A speaker’s playback sound is delicately influenced by
Speakers should ideally be located at 30 ° angles from the
conditions in the listening room. To produce optimum listening
listening position (together forming a total 60 ° angle), and
conditions, take due consideration of the conditions of your
rotated inward to face the listening position.
installation location before beginning actual installation.
Place the speakers at ear level.
50 °~ 60 °
CAUTION
To promote proper cooling, please assure that sufficient space
For a natural stereo effect, the right and left speakers should
is preserved between the speakers and nearby walls or other
be installed in symmetrical and equidistant positions from the
components (minimum 30 cm or more above, behind, and to
listening position.
right and left sides of each speaker). Leaving insufficient space
between the speaker and walls or other components may lead to
rising interior temperatures, leading to malfunction or damage.
Connections
When making or changing connections, always turn off the
• DonotconnecttoboththeXLRINPUTconnectorandtheTRS
power and disconnect the power cord from its outlet.
INPUT jack at the same time.
Also, be sure to read the operating instructions for the other
• Makesuretosetthesoundlevelatanappropriatelevelas
components to which you are connecting these speakers.
the input signals to the XLR INPUT connector (or TRS INPUT
Do not plug in the power cord until all other connections have
jack) and RCA INPUT jack will be mixed together, affecting the
been completed.
sound level.
Use only the furnished accessory power cord.
Additional Information
Troubleshooting
If you think you are experiencing a malfunction with this unit, check the following items.
Also check other devices connected to the
unit. If the problem persists, consult your dealer for service.
On occasion, the unit may fail to operate properly due to static electricity or other external conditions. In this event, disconnect the
power cord and wait for five minutes or more, then reconnect the power cord and check for proper operation.
Symptom Items to Check Remedy
No power Is power cord connected properly? Connect power cord to outlet.
No sound from connected audio
Has connected audio device been set properly? Set device’s external input and sound volume properly.
devices, or sound is very small.
Is connection cable connected properly? Connect cables properly.
Are connectors or plugs dirty? Clean connectors and plugs before connecting.
Is the sound volume set properly? Turn the [
LEVEL
] dial on the rear panel clockwise and
turn up the volume.
Is the power turned on? Turn on the [
POWER
] switch on the rear panel.
Is the auto standby function on? Turn off the [
POWER
] switch on the rear panel once,
wait a few seconds, and then turn it back on.
Illumination (POWER indicator)
Is the power turned on? Turn on the [
POWER
] switch on the rear panel.
remains turned off.
Is the auto standby function on? Turn off the [
POWER
] switch on the rear panel once,
wait a few seconds, and then turn it back on.
Speakers do not resume (turn on) from
Is the level of the input signal low? Increase the level of the input signal.
standby mode.
Turn off the [
AUTO STANDBY
] switch to turn off the
auto standby function.
Sound is distorted. Is the sound level set properly? Slowly turn the [
LEVEL
] dial on the rear panel
counterclockwise and turn down the volume.
Is the output level of the connected audio device set
Adjust the output level of the connected audio device
properly?
properly.
Feedback (continuous howling sound) Is the sound volume set properly? Slowly turn the [
LEVEL
] dial on the rear panel
counterclockwise and turn down the volume.
En
5
4 5
DRC1402-A

Trademarks
Pioneer is a registered trademark of PIONEER CORPORATION.
Other listed company names and a product name are the registered trademark of the companies or trademarks.
Specifications
S-DJ50X/S-DJ50X-W S-DJ60X S-DJ80X
Type Bi-amp 2-way active speaker
Amplifier
LF amp 30 W 50 W 70 W
HF amp 15 W 20 W 20 W
Input connectors (balanced input) XLR × 1, TRS (1/4 inch Phone) × 1
Input connectors (unbalanced input) RCA × 1
Impedance 10kΩ
Speaker
Enclosure Bass reflex
Enclosure material MDF
Woofer (LF driver) 13 cm cone 15 cm cone 20 cm cone
Tweeter (HF driver) 2.5 cm soft dome
Playback response 50 Hz to 20 kHz 45 Hz to 20 kHz 40 Hz to 20 kHz
Power unit/other
Supported voltages 100 V to 120 V (50 Hz to 60 Hz) / 220 V to 240 V (50 Hz to 60 Hz) conversion
Power consumption 100 W 140 W 160 W
Power consumption during standby
0.5 W or less
mode
External dimensions W × H × D 197 mm × 301 mm × 262 mm 228 mm × 342 mm × 295 mm 276 mm × 401 mm × 315 mm
Weight 6.5 kg 8.5 kg 11.8 kg
Specifications and design subject to possible modification without notice, due to improvements.
© 2013 PIONEER CORPORATION. All rights reserved.
6
En
DRC1402-A
6
6 7
DRC1402-A

Nous vous remercions d’avoir acheté ce produit Pioneer.
Veuillez lire attentivement ce mode d’emploi de manière à pouvoir utiliser votre modèle correctement. Après avoir lu ces
explications,conservez-les en lieu sûr pour éventuellement les consulter plus tard.
ATTENTION
ATTENTION
POUR ÉVITER TOUT RISQUE D’ÉLECTROCUTION, NE
L’interrupteur
POWER
de cet appareil ne coupe pas
PAS ENLEVER LE COUVERCLE (NI LE PANNEAU
complètement celui-ci de sa prise secteur. Comme le
ARRIÈRE). AUCUNE PIÈCE RÉPARABLE PAR
cordon d’alimentation fait office de dispositif de
L’UTILISATEUR NE SE TROUVE À L’INTÉRIEUR.
déconnexion du secteur, il devra être débranché au
CONFIER TOUT ENTRETIEN À UN PERSONNEL
niveau de la prise secteur pour que l’appareil soit
QUALIFIÉ UNIQUEMENT.
D3-4-2-1-1_B1_Fr
complètement hors tension. Par conséquent, veillez à
installer l’appareil de telle manière que son cordon
AVERTISSEMENT
d’alimentation puisse être facilement débranché de
Cet appareil n’est pas étanche. Pour éviter les risques
la prise secteur en cas d’accident. Pour éviter tout
d’incendie et de décharge électrique, ne placez près de
risque d’incendie, le cordon d’alimentation sera
lui un récipient rempli d’eau, tel qu’un vase ou un pot
débranché au niveau de la prise secteur si vous
de fleurs, et ne l’exposez pas à des gouttes d’eau, des
prévoyez une période prolongée de non utilisation
éclaboussures, de la pluie ou de l’humidité.
(par exemple avant un départ en vacances).
D3-4-2-1-3_A1_Fr
D3-4-2-2-2a*_A1_Fr
AVERTISSEMENT
Ce produit est destiné à une utilisation domestique
Pour éviter les risques d’incendie, ne placez aucune
générale. Toute panne due à une utilisation autre qu'à
flamme nue (telle qu’une bougie allumée) sur
des fins privées (comme une utilisation à des fins
l’appareil.
D3-4-2-1-7a_A1_Fr
commerciales dans un restaurant, dans un autocar
ou sur un bateau) et qui nécessite une réparation
PRÉCAUTION DE VENTILATION
sera aux frais du client, même pendant la période de
Lors de l’installation de l’appareil, veillez à laisser un
garantie.
K041_A1_Fr
espace suffisant autour de ses parois de manière à
améliorer la dissipation de chaleur (au moins 30 cm sur
le dessus, 30 cm à l’arrière et 30 cm de chaque côté).
Ne fixez pas ces enceintes sur une paroi ou au
plafond car leur chute pourrait causer des blessures.
AVERTISSEMENT
SGK007*_A1_Fr
Les fentes et ouvertures du coffret sont prévues pour la
ventilation, pour assurer un fonctionnement stable de
NOTE IMPORTANTE SUR LE CABLE
l’appareil et pour éviter sa surchauffe. Pour éviter les
risques d’incendie, ne bouchez jamais les ouvertures et
D’ALIMENTATION
ne les recouvrez pas d’objets, tels que journaux, nappes
Tenir le câble d’alimentation par la fiche. Ne pas
ou rideaux, et n’utilisez pas l’appareil posé sur un tapis
débrancher la prise en tirant sur le câble et ne pas
épais ou un lit.
toucher le câble avec les mains mouillées. Cela risque
D3-4-2-1-7b*_A1_Fr
de provoquer un court-circuit ou un choc électrique. Ne
pas poser l’appareil ou un meuble sur le câble. Ne pas
Milieu de fonctionnement
pincer le câble. Ne pas faire de noeud avec le câble ou
Température et humidité du milieu de fonctionnement :
l’attacher à d’autres câbles. Les câbles d’alimentation
De +5 °C à +35 °C (de +41 °F à +95 °F) ; Humidité
doivent être posés de façon à ne pas être écrasés. Un
relative inférieure à 85 % (orifices de ventilation non
câble abîmé peut provoquer un risque d’incendie ou un
obstrués)
choc électrique. Vérifier le câble d’alimentation de
N’installez pas l’appareil dans un endroit mal ventilé ou
temps en temps. Contacter le service après-vente
un lieu soumis à une forte humidité ou en plein soleil
PIONEER le plus proche ou le revendeur pour un
(ou à une forte lumière artificielle).
remplacement.
D3-4-2-1-7c*_A1_Fr
S002*_A1_Fr
AVERTISSEMENT
Cet appareil est muni d’une fiche de mise à la terre
(masse) à trois fils. Comme la fiche présente une
troisième broche (de terre), elle ne peut se brancher
que sur une prise de courant, prévue pour une mise à
la terre. Si vous n’arrivez pas à insérer la fiche dans la
prise de courant, contactez un électricien qualifié pour
faire remplacer la prise par une qui soit mise à la terre.
N’annulez pas la fonction de sécurité que procure cette
fiche de mise à la terre.
D3-4-2-1-6_A1_Fr
2
Fr


