Pioneer S-LX70W: instruction
Class: Household, kitchen appliances, electronics and equipment
Type: Microphone
Manual for Pioneer S-LX70W
Table of contents
- IMPORTANT
- Operating Environment POWER-CORD CAUTION
- CONTENTS FEATURES IN COMBINATION WITH SPEAKERS ACCESSORY ITEMS
- INSTALLATION Speaker Installation Installation Precautions
- PANEL FACILITIES FRONT PANEL REAR PANEL
- CONNECTIONS LINE LEVEL CONNECTION OPERATION
- TROUBLESHOOTING SYMPTOM CAUSE REMEDY SPECIFICATIONS

01_S_LX70W_En.book 1 ページ 2008年7月18日 金曜日 午後5時4分
Operating Instructions | Mode d’emploi | Bedienungsanleitung
Istruzioni per I’uso | Handleiding | Manual de instrucciones
Manual de instruções | Bruksanvisning | Brugsanvisning
Bruksanvisning | Käyttöohjeet |
POWERED SUBWOOFER
ENCEINTE ACTIVE D’EXTREMES GRAVES
AKTIVER SUBWOOFER
SUBWOOFER, ALTOPARLANTE PER TONI BASSI, ALIMENTATO
SUBWOOFER MET SPANNINGSCIRCUIT
ALTAVOCES DE GRAVES SECUNDARIOS ENERGIZADOS
SUBWOOFER DE POTÊNCIA
STRÖMFÖRSÖRJD SUBWOOFER
AKTIV SUBWOOFER
STRØMFORSYNT SUBWOOFER
TEHOLLINEN APUBASSO
01_S_LX70W_En.book 2 ページ 2008年7月18日 金曜日 午後5時4分
IMPORTANT
CAUTION
RISK OF ELECTRIC SHOCK
DO NOT OPEN
The lightning flash with arrowhead symbol,
CAUTION:
The exclamation point within an equilateral
within an equilateral triangle, is intended to
TO PREVENT THE RISK OF ELECTRIC
triangle is intended to alert the user to the
alert the user to the presence of uninsulated
SHOCK, DO NOT REMOVE COVER (OR
presence of important operating and
"dangerous voltage" within the product's
BACK). NO USER-SERVICEABLE PARTS
maintenance (servicing) instructions in the
enclosure that may be of sufficient
INSIDE. REFER SERVICING TO QUALIFIED
literature accompanying the appliance.
magnitude to constitute a risk of electric
SERVICE PERSONNEL.
shock to persons.
D3-4-2-1-1_En-A
This product complies with the Low Voltage Directive
WARNING
2006/95/EC and EMC Directive 2004/108/EC.
To prevent a fire hazard, do not place any naked
D3-4-2-1-9a_A_En
flame sources (such as a lighted candle) on the
equipment.
D3-4-2-1-7a_A_En
Thank you for buying this PIONEER product. Please read
VENTILATION CAUTION
through these operating instructions so you will know
When installing this unit, make sure to leave space
how to operate your model properly. After you have
around the unit for ventilation to improve heat
finished reading the instructions, put them away in a safe
radiation (at least 25 cm at top, 15 cm at rear, and
place for future reference.
10 cm at each side).
In some countries or regions, the shape of the power
WARNING
plug and power outlet may sometimes differ from that
Slots and openings in the cabinet are provided for
shown in the explanatory drawings. However, the
ventilation to ensure reliable operation of the
method of connecting and operating the unit is the same.
product, and to protect it from overheating. To
prevent fire hazard, the openings should never be
WARNING
blocked or covered with items (such as newspapers,
This equipment is not waterproof. To prevent a fire
table-cloths, curtains) or by operating the
or shock hazard, do not place any container filled
equipment on thick carpet or a bed.
D3-4-2-1-7b_A_En
with liquid near this equipment (such as a vase or
flower pot) or expose it to dripping, splashing, rain
or moisture.
D3-4-2-1-3_A_En
[For U.K. model]
Replacement and mounting of an AC plug on the power supply cord of this unit should be performed only by qualified
service personnel.
IMPORTANT: THE MOULDED PLUG
This appliance is supplied with a moulded three pin mains plug for your safety and convenience. A 10 amp fuse is fitted in this plug. Should
the fuse need to be replaced, please ensure that the replacement fuse has a rating of 10 amps and that it is approved by ASTA or BSI to
BS1362.
Check for the ASTA mark or the BSI mark on the body of the fuse.
If the plug contains a removable fuse cover, you must ensure that it is refitted when the fuse is replaced. If you lose the fuse cover the plug
must not be used until a replacement cover is obtained. A replacement fuse cover can be obtained from your local dealer.
If the fitted moulded plug is unsuitable for your socket outlet, then the fuse shall be removed and the plug cut off and disposed of
safely. There is a danger of severe electrical shock if the cut off plug is inserted into any 13 amp socket.
If a new plug is to be fitted, please observe the wiring code as shown below. If in any doubt, please consult a qualified electrician.
IMPORTANT: The wires in this mains lead are coloured in accordance with the following code:
Blue : Neutral Brown : Live
As the colours of the wires in the mains lead of this appliance may not correspond with the coloured markings identifying the terminals in
your plug, proceed as follows ;
The wire which is coloured BLUE must be connected to the terminal which is marked with the
letter N or coloured BLACK.
The wire which is coloured BROWN must be connected to the terminal which is marked with the
letter L or coloured RED.
How to replace the fuse: Open the fuse compartment with a screwdriver and replace the fuse.
D3-4-2-1-2-2_B_En
01_S_LX70W_En.book 3 ページ 2008年7月18日 金曜日 午後5時4分
If you want to dispose this product, do not mix it with general household waste. There is a separate collection system for used
electronic products in accordance with legislation that requires proper treatment, recovery and recycling.
Private households in the member states of the EU, in Switzerland and Norway may return their used electronic products free of charge to
designated collection facilities or to a retailer (if you purchase a similar new one).
For countries not mentioned above, please contact your local authorities for the correct method of disposal.
By doing so you will ensure that your disposed product undergoes the necessary treatment, recovery and recycling and thus prevent potential
negative effects on the environment and human health.
K058_A_En
WARNING
If the AC plug of this unit does not match the AC
Before plugging in for the first time, read the following
outlet you want to use, the plug must be removed
section carefully.
and appropriate one fitted. Replacement and
The voltage of the available power supply differs
mounting of an AC plug on the power supply cord of
according to country or region. Be sure that the
this unit should be performed only by qualified
power supply voltage of the area where this unit
service personnel. If connected to an AC outlet, the
will be used meets the required voltage (e.g., 230 V
cut-off plug can cause severe electrical shock. Make
or 120 V) written on the rear panel.
D3-4-2-1-4_A_En
sure it is properly disposed of after removal.
The equipment should be disconnected by removing
the mains plug from the wall socket when left
WARNING:
unused for a long period of time (for example, when
Do not climb or sit on this unit. Be especially
on vacation).
D3-4-2-2-1a_A_En
careful when children are around. The unit may be
damaged, or may fall over causing injury.
CAUTION
The POWER switch on this unit will not completely
Operating Environment
shut off all power from the AC outlet. Since the
Operating environment temperature and humidity:
power cord serves as the main disconnect device for
+5 ºC to +35 ºC (+41 ºF to +95 ºF); less than 85 %RH
the unit, you will need to unplug it from the AC outlet
(cooling vents not blocked)
to shut down all power. Therefore, make sure the
Do not install this unit in a poorly ventilated area, or in
unit has been installed so that the power cord can
locations exposed to high humidity or direct sunlight (or
be easily unplugged from the AC outlet in case of an
strong artificial light).
D3-4-2-1-7c_A_En
accident. To avoid fire hazard, the power cord should
also be unplugged from the AC outlet when left
unused for a long period of time (for example, when
POWER-CORD CAUTION
on vacation).
D3-4-2-2-2a_A_En
Handle the power cord by the plug. Do not pull out the
plug by tugging the cord and never touch the power
cord when your hands are wet as this could cause a
short circuit or electric shock. Do not place the unit, a
piece of furniture, etc., on the power cord, or pinch the
cord. Never make a knot in the cord or tie it with other
cords. The power cords should be routed such that they
are not likely to be stepped on. A damaged power cord
can cause a fire or give you an electrical shock. Check
the power cord once in a while. When you find it
damaged, ask your nearest PIONEER authorized
service center or your dealer for a replacement.
S002_En
01_S_LX70W_En.book 4 ページ 2008年7月18日 金曜日 午後5時4分
CONTENTS
FEATURES
■
300 W (RMS) power with D class amplifier that serves
ACCESSORY ITEMS...........................4
audio and video software playback such as Dolby*
FEATURES .........................................4
Digital with a wide dynamic range.
IN COMBINATION WITH
■
Equipped with 30 cm driver
■
Crossover frequency can be set to 50 Hz, 60 Hz, 70 Hz,
SPEAKERS .........................................4
80 Hz, 100 Hz, 120 Hz, 160 Hz, 200 Hz.
INSTALLATION.................................. 5
■
Equipped with Bass Mode selector (Music/Cinema
mode).
Speaker Installation...........................5
Installation Precautions ....................5
* Maunfactured under license from Dolby Laboratories.
PANEL FACILITIES.............................6
“Dolby” and the double-D symbol are trademarks of Dolby
Laboratories.
FRONT PANEL....................................6
REAR PANEL......................................6
IN COMBINATION WITH
CONNECTIONS.................................. 7
SPEAKERS
LINE LEVEL CONNECTION................ 7
OPERATION ......................................7
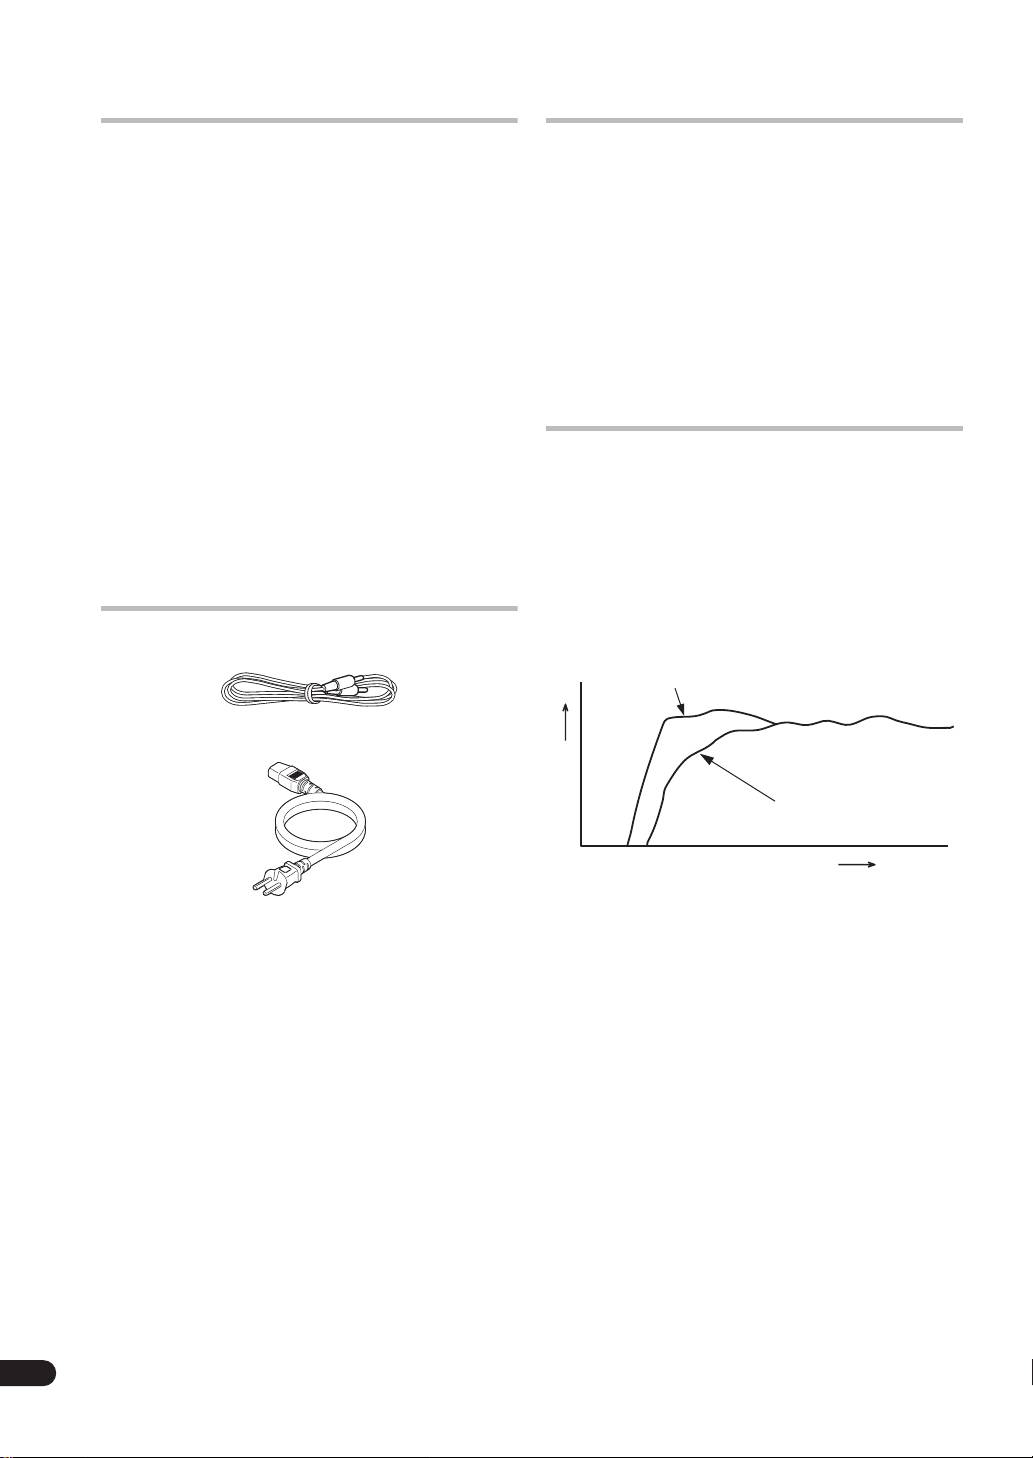
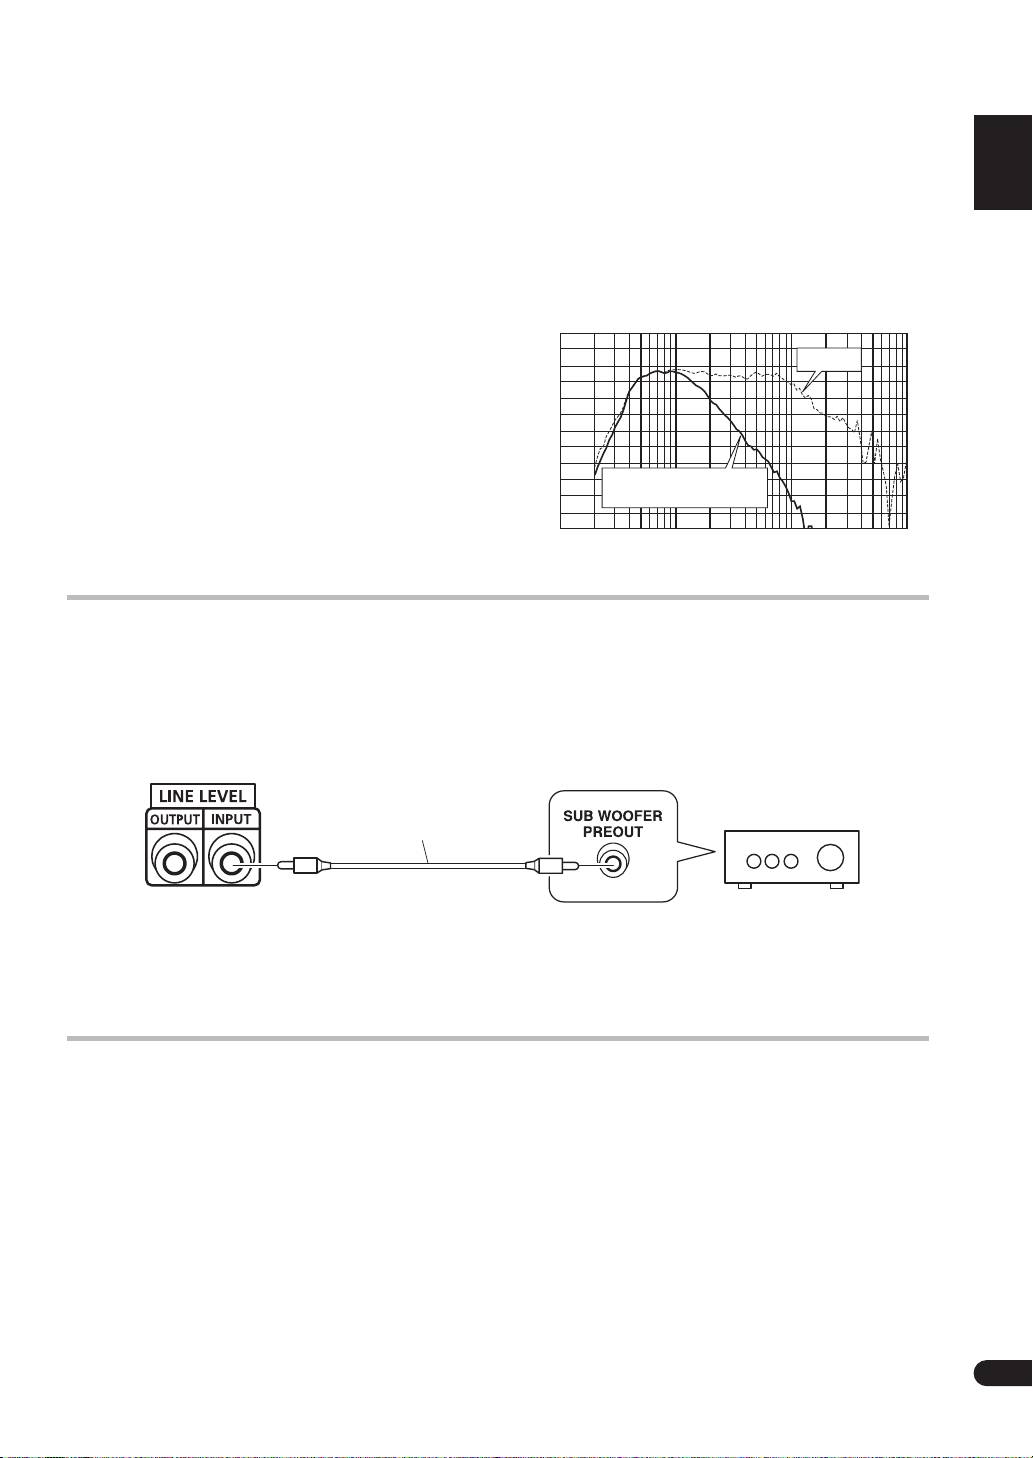
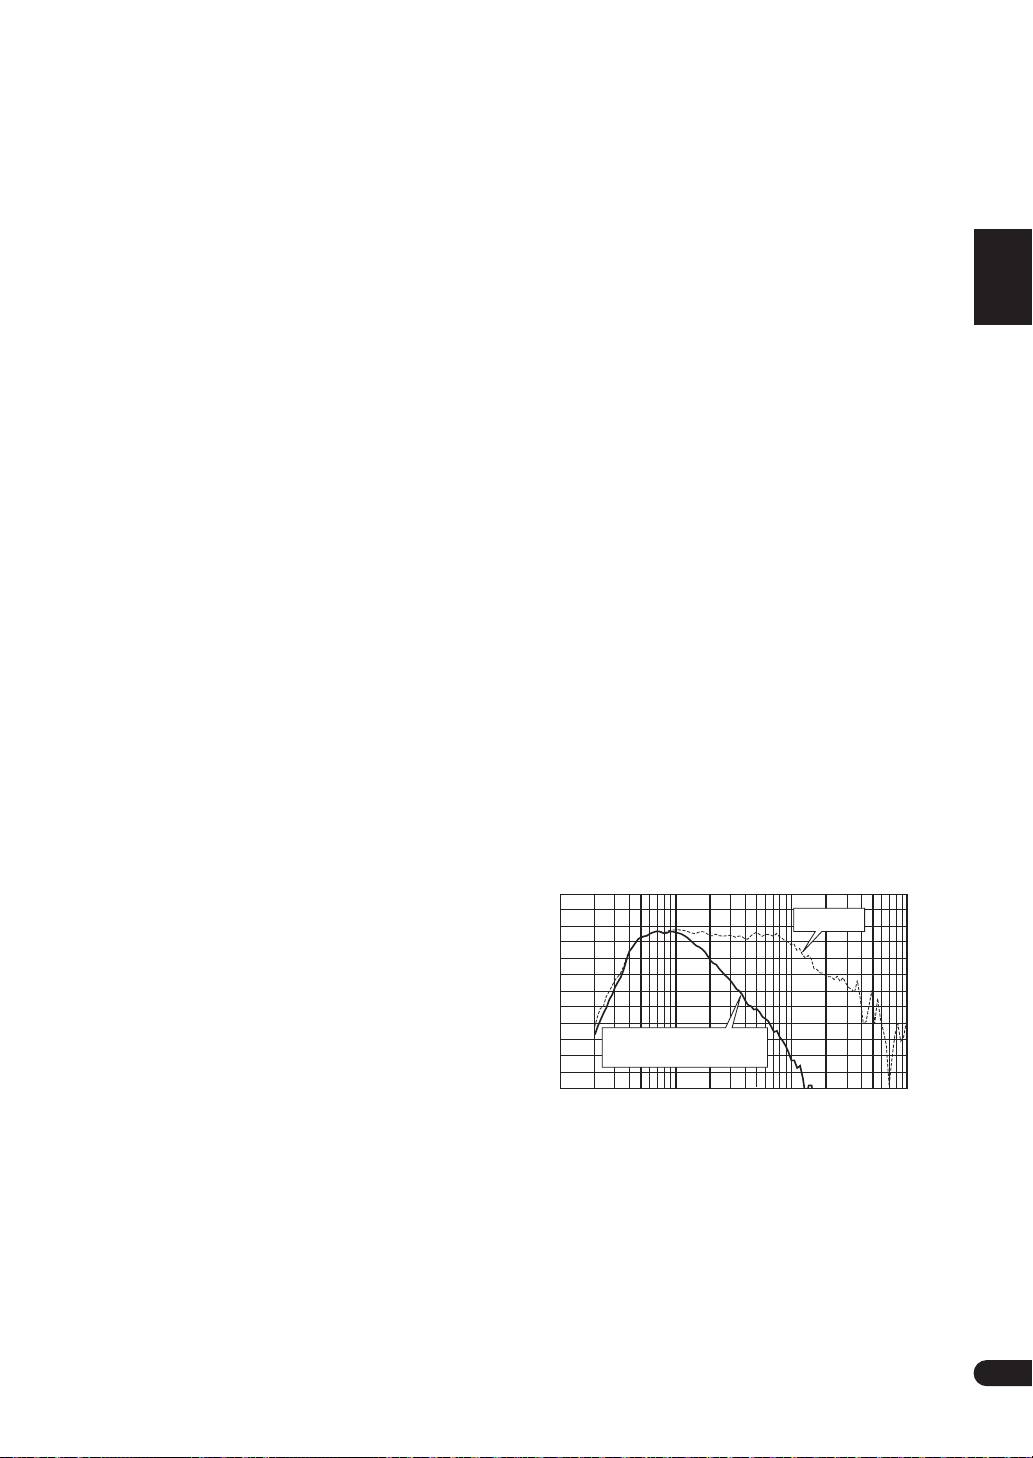
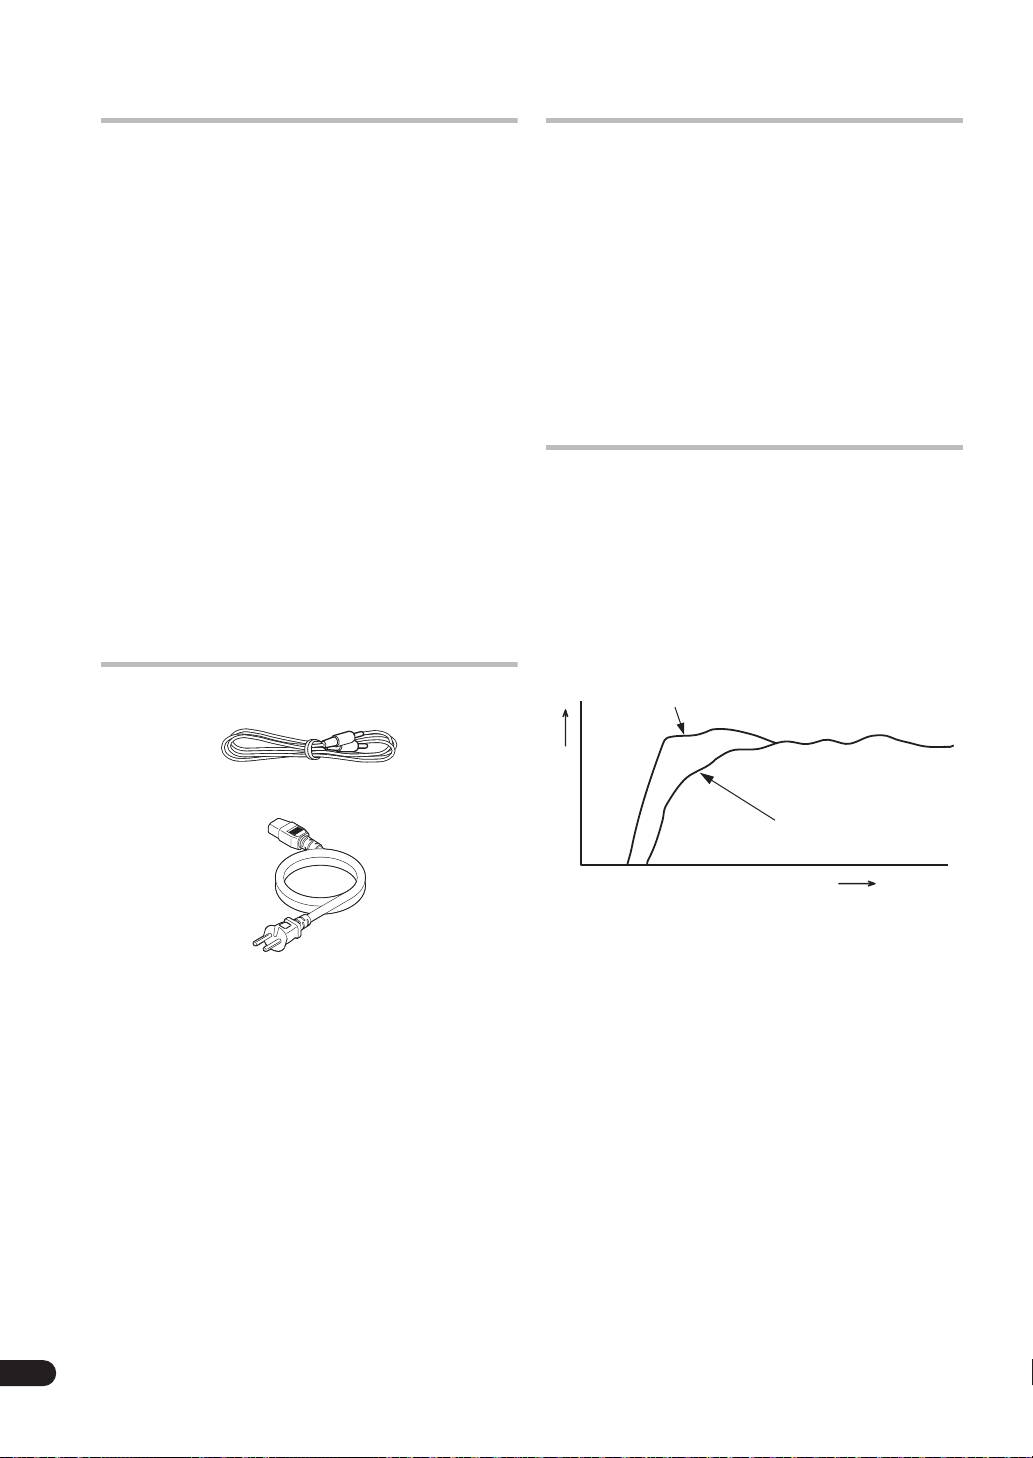
The frequency characteristics of the S-LX70W/S-81W-MK
combined with small-size speakers are shown below. As
TROUBLESHOOTING ........................ 8
shown in these figures, the low frequency range is
SPECIFICATIONS ............................... 8
improved.
• These special characteristics are obtained in an
echoless chamber. The effect of an additional S-LX70W/
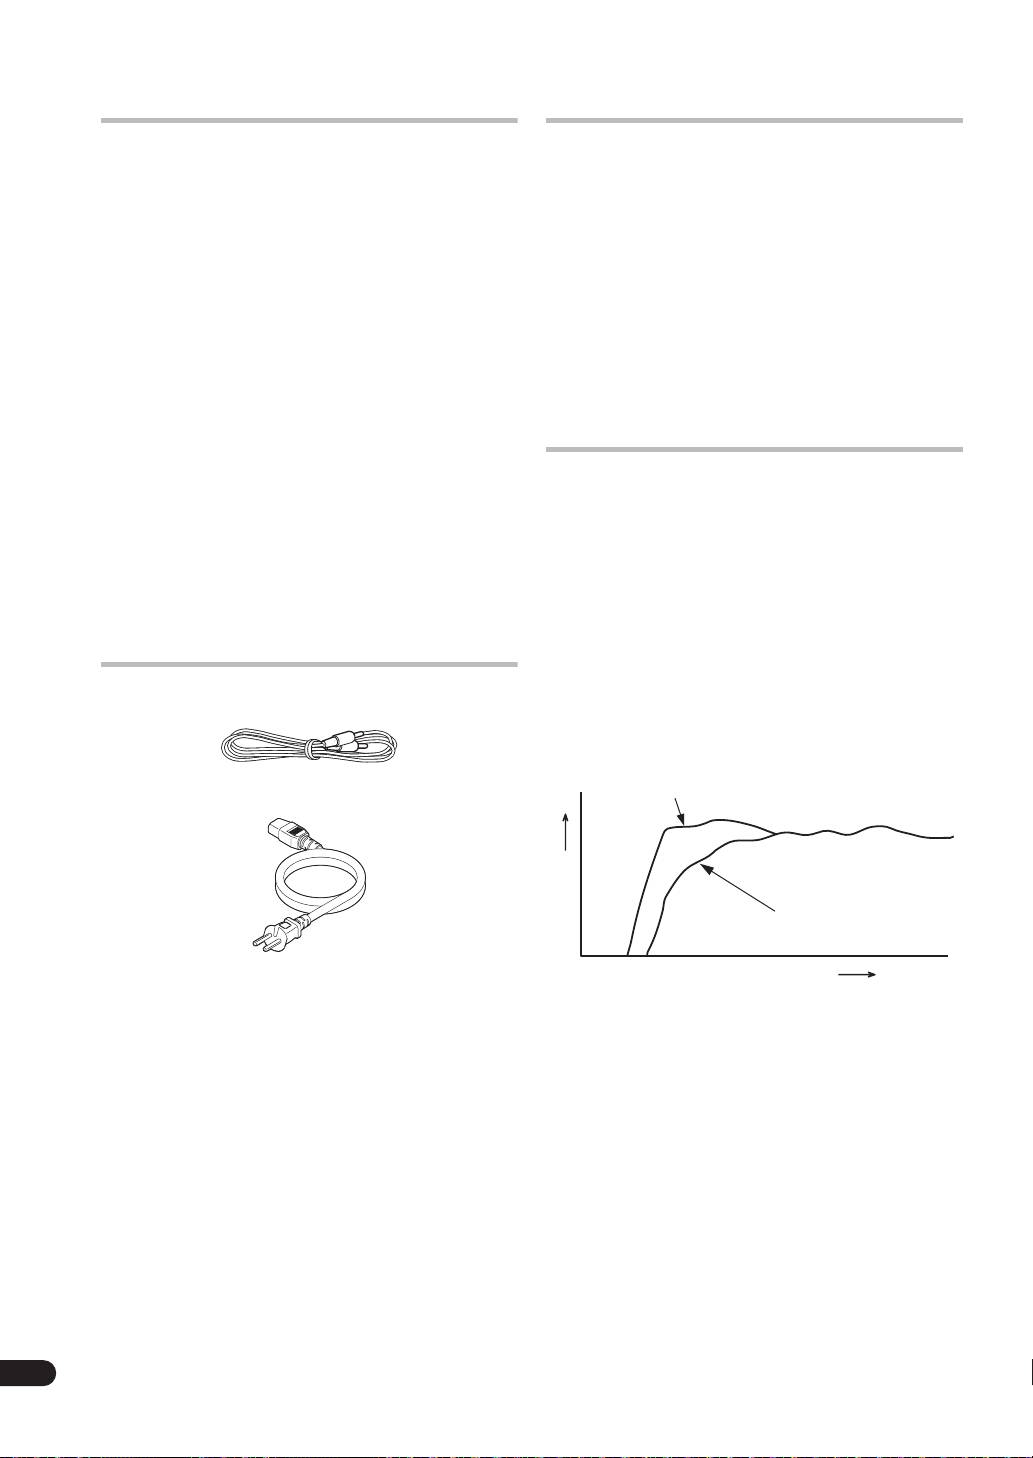
ACCESSORY ITEMS
S-81W-MK in an ordinary listening room is better than
the chart indicates when positioned adequately.
Small-size speakers + S-LX70W/S-81W-MK
RCA plug cord x 1
Small-size speaker
RESPONCE (dB)
FREQUENCY (Hz)
• With playback of Dolby* Digital, establishment of a
special channel for the subwoofer is recommended;
Power cable x 1
and with playback of LFE (Low Frequency Effect: sound
effect like the rumbling of the earth, whose purpose is
Polishing cloth x 1
to intensify the force of the video), the S-LX70W/
S-81W-MK is especially effective.
Warranty card x 1
Dolby* Digital
Operating instructions
Dolby Digital is the name of the Dolby Surround multi-
channel digital system that was developed from Dolby
Surround, as a continuation of Dolby Pro Logic Surround.
Dolby Digital is also referred to as a 5.1 channel system.
This is because it has 5 channels in the 20 Hz to 20 kHz
frequency range (front left and right, center, and rear left
and right) and an independent channel for the
subwoofer. The subwoofer channel is also referred to as
LFE (Low Frequency Effect).
The LFE channel is used according to individual tastes to
enhance the bass effect.
4
En
01_S_LX70W_En.book 5 ページ 2008年7月18日 金曜日 午後5時4分
NOTES:
English Français Deutsch
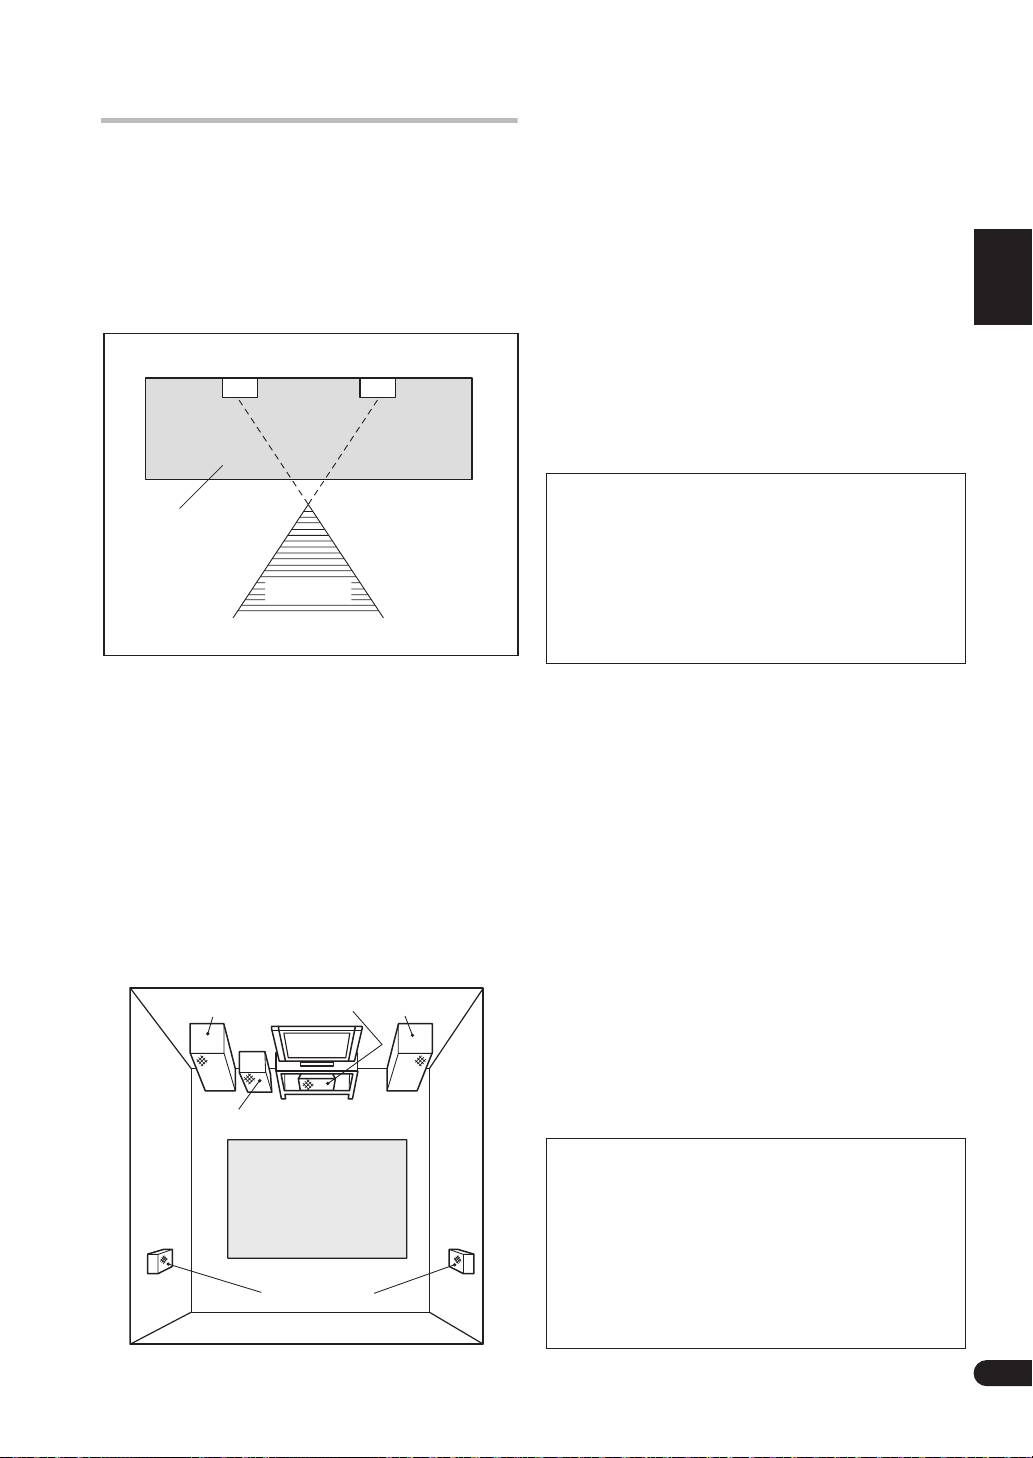
INSTALLATION
• To avoid interference with the picture on a nearby TV
set, use magnetically shielded speaker systems. This
is particularly important for the center speaker since it
Speaker Installation
is usually located closest to the TV.
• Position the left and right channel speakers at equal
• Subwoofer Installation Criteria
distances from the TV set and approximately 1.8 meters
1 Left speaker
from each other.
2 Right speaker
• Install the center speaker above or below the TV so
3 Recommended installation range for the
that the sound of the center channel is localized at the
subwoofer
TV screen.
4 Listening position
• The rear (surround) speakers are most effective when
installed in parallel locations directly to the side, or
12
slightly behind, the listener, at a level about 1 meter
above the listener’s ears.
CAUTION:
When installing the center speaker on top of the TV,
be sure to secure it with tape or some other suitable
Italiano Español
means.
Otherwise, the speaker may fall from the TV due to
external shocks such as earthquakes, and it may lead
3
to endangering those nearby or damaging the
speaker.
Nederlands
4
Installation Precautions
• Install the unit in a well-ventilated location where it will
not be exposed to high temperatures and high
humidity.
The subwoofer plays back the bass in monaural, making
• Do not place the unit near stoves or other heating
use of the fact that the human ear is not very sensitive to
equipment or at locations exposed to direct sunlight,
the direction of low-pitched sound. Because of this, the
as these can have an adverse effect on the cabinet and
subwoofer can be installed almost anywhere. If it is
internal components. Also, do not install the unit
installed too far away, however, the sound from the other
where there is too much dust or high humidity, as
speakers may become unnatural.
these can cause malfunctioning or breakdowns.
(Avoid cooking tables and other locations where the
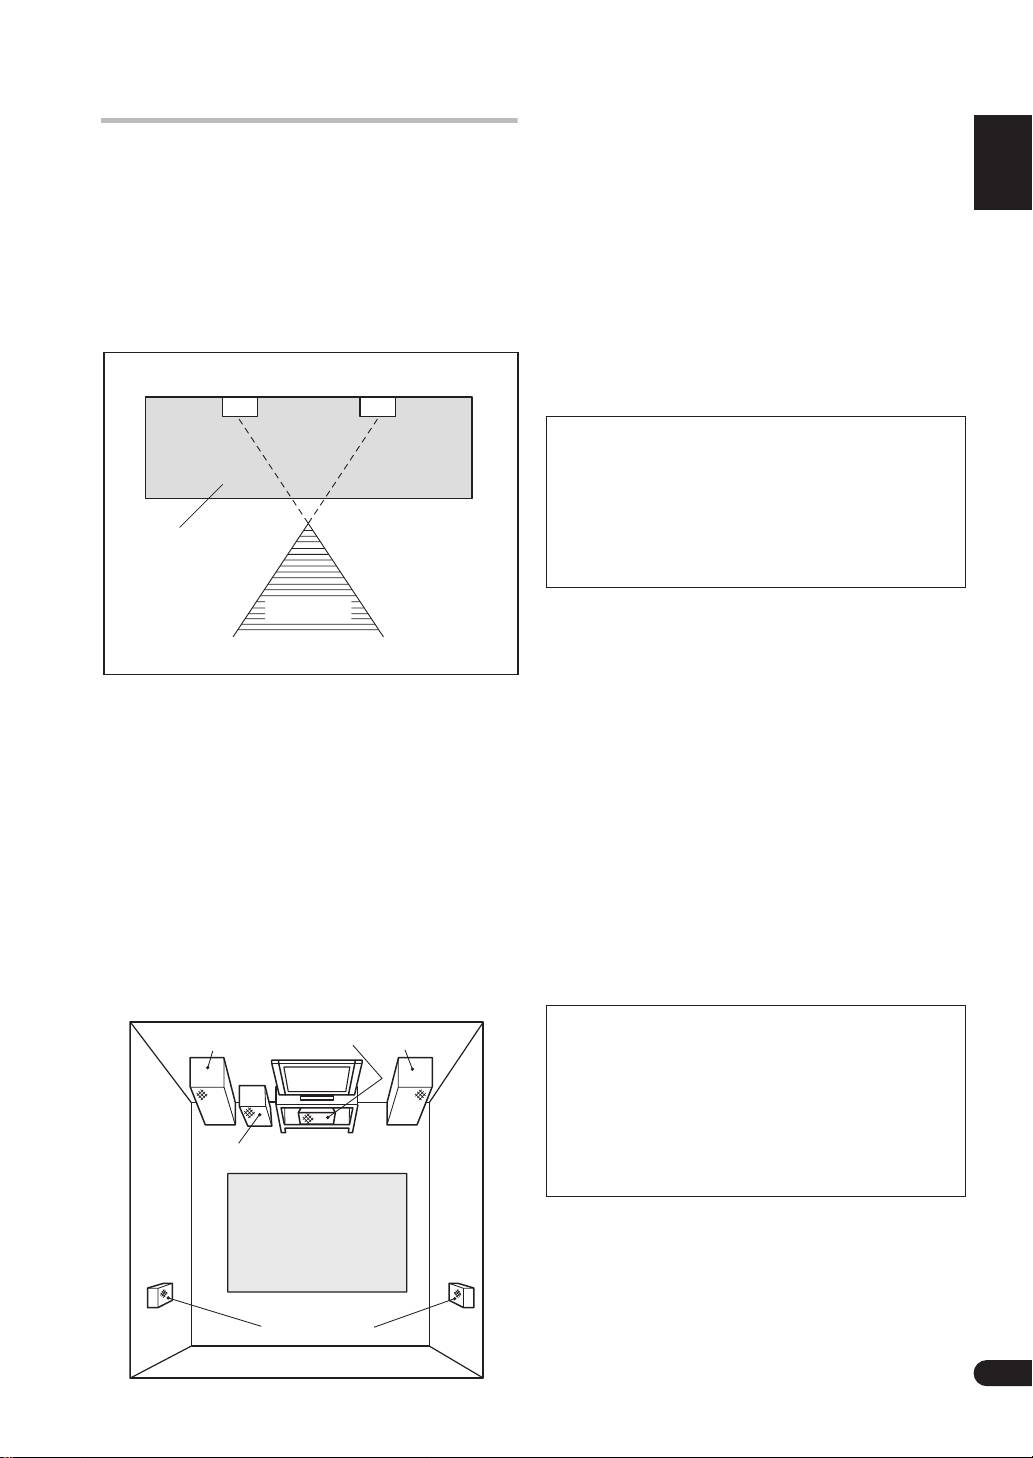
• An example of speaker positioning
unit would be exposed to heat, steam and soot.)
1 Front left speaker
• Do not place heavy or large objects on top of the
speaker. Doing so could provoke the speaker to fall,
2 Center speaker
causing damages or bodily injury. If speakers fall from
3 Front right speaker
their installation locations, they may suffer irreparable
4 Subwoofer
cracks in their finish.
5 Listening area
• Keep the unit away from devices such as cassette
6 Rear left speaker
decks which are sensitive to magnetic fields.
7 Rear right speaker
This speaker system is magnetically shielded.
1
2
3
However, depending on the installation location,
color distortion may occur if the speaker system is
installed extremely close to the screen of a television
set.
If this happens, turn off the power switch of the
television set, and turn it on after 15 to 30 minutes.
4
If the problem persists, place the speaker system
away from the television set.
• Do not place the speaker on an unstable surface, as
5
doing so may cause the speaker to fall and cause
damage or bodily injury.
• Do not place cups, glasses, or other containers with
fluids on top of the units, since the units may be
damaged if the liquid spills.
67
5
En
01_S_LX70W_En.book 6 ページ 2008年7月18日 金曜日 午後5時4分
• The installation location selected should have a sturdy
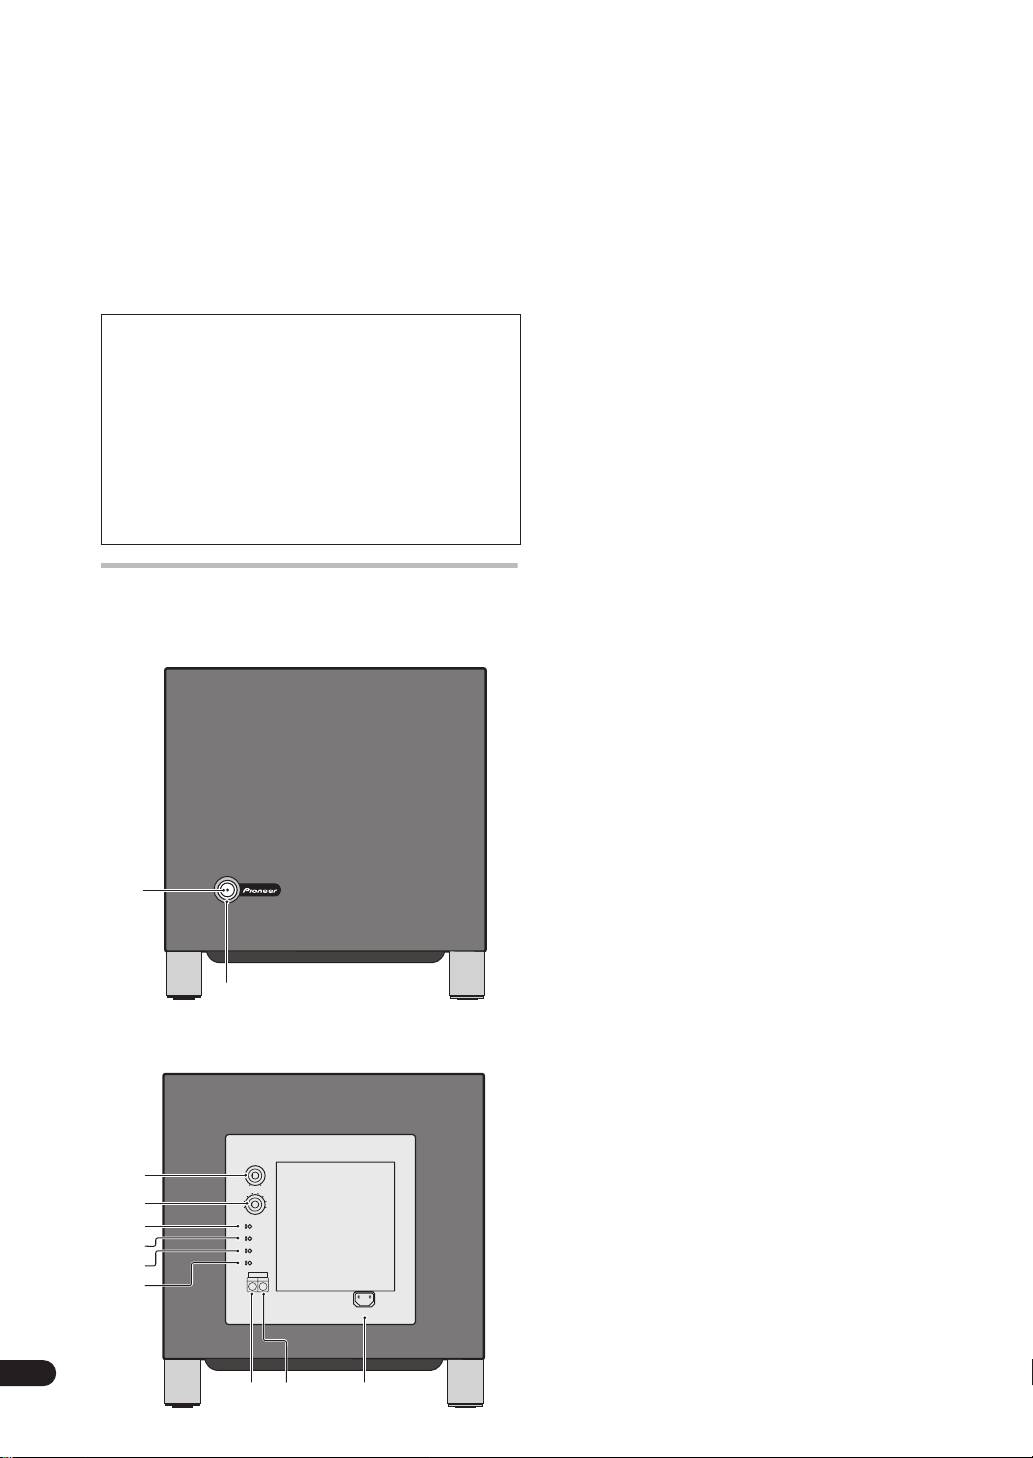
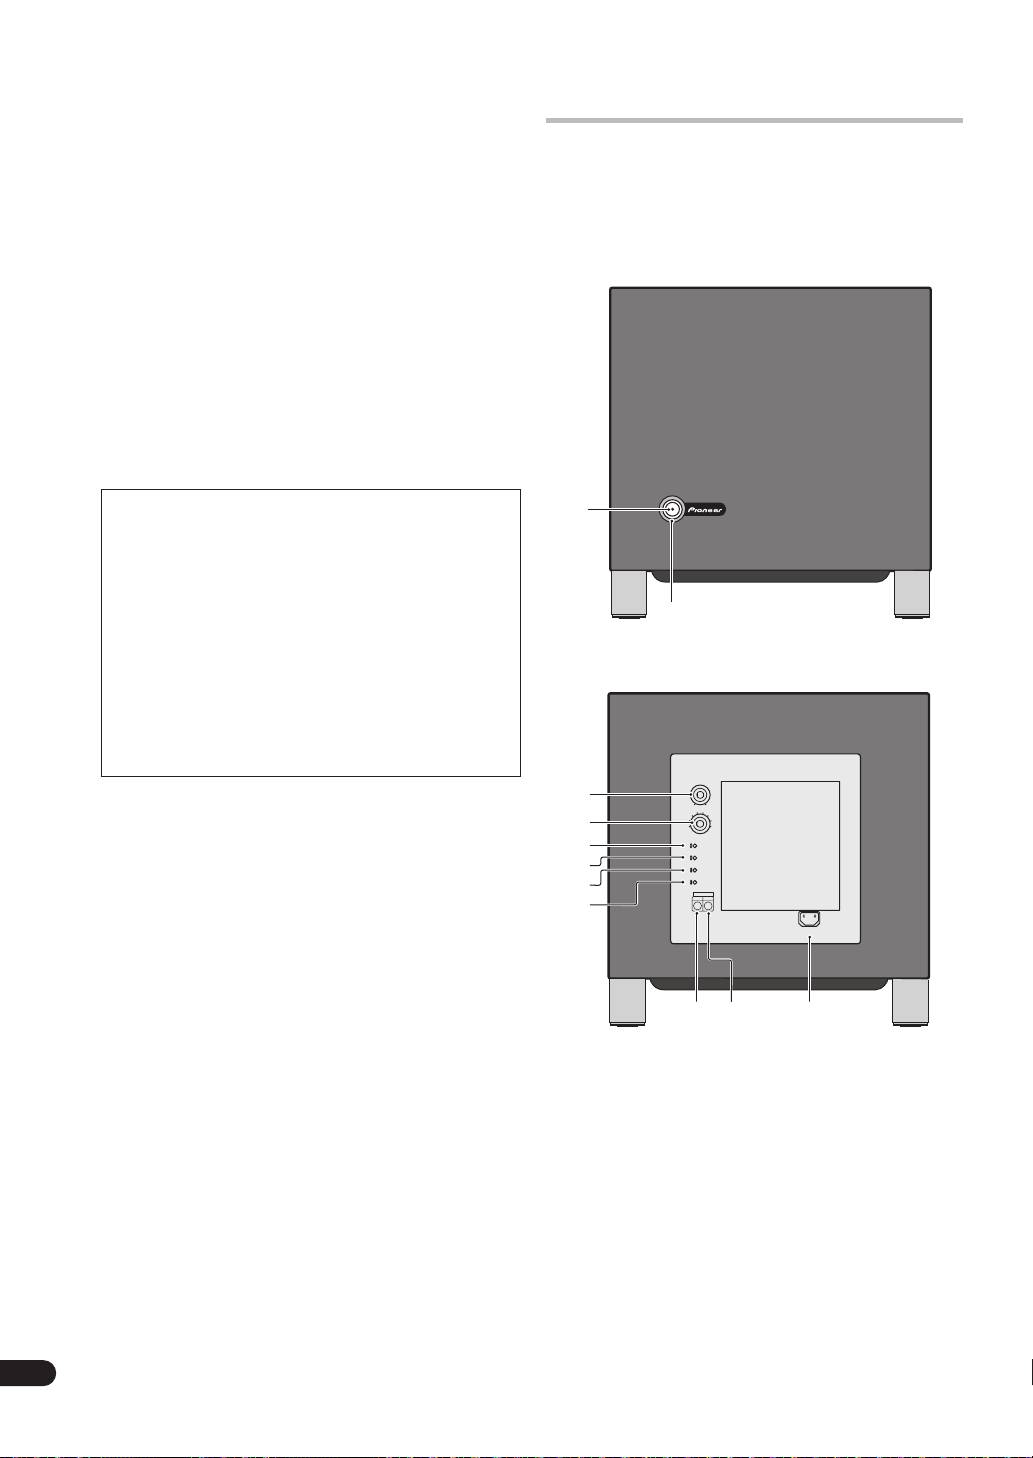
1 Power Indicator (STANDBY/ON)
floor surface. Mounting the speaker on a long-pile
Lights blue when the power has been switched ON.
carpet should be avoided, since the carpet may touch
When AUTO STANDBY switch is set to ON, lights blue
the driver’s diaphram, causing distorted sound.
whenever the speaker receive an audio signal. If the
• Please install this unit away from the antenna cable of
power is switched OFF only briefly, the indicator lights
the tuner, as noise can be caused with installation
blue when power is restored. If no signal is present for
close to the antenna cable. In such a case, use this
more than 12 minutes, the subwoofer automatically
unit at a position away from the antenna and the
reverts to standby mode and the power indicator lights
antenna cable, or when playback of extra bass is not
red. If, subsequently, a signal is received, power
required, switch off the power for this unit.
automatically comes back on and the power indicator
lights blue.
MAINTENANCE OF EXTERNAL SURFACES
NOTE:
• Clean the surface by wiping with the provided
• If you are planning on switching the unit OFF for a long
polishing cloth, or with another soft, dry cloth.
period of time, make sure to check that the indicator
• When the surfaces are very dirty, wipe with a soft
light has gone out after switching OFF.
cloth dipped in some neutral cleanser diluted five
or six times with water, and wrung out well, and
2 Power switch (POWER)
then wipe again with a dry cloth. Do not use
When pressed, power is turned ON; when pressed
furniture wax or cleaners.
again, power is turned OFF.
• Never use thinners, benzine, insecticide sprays
and other chemicals on or near this unit, since
these will corrode the surfaces.
3 Volume knob (VOLUME)
Sets the subwoofer volume.
• Turn the knob slowly from the MIN position.
• With this unit, the bass level can be independently
PANEL FACILITIES
set, so do not turn up the bass on the AV amplifier.
FRONT PANEL
4 Crossover knob (CROSSOVER)
When using the subwoofer, set the upper frequency
limit for the subwoofer (
50 Hz, 60 Hz, 70 Hz, 80 Hz,
100 Hz, 120 Hz, 160 Hz, 200 Hz
) so that it
complemets the output from your other speakers.
When using the bass managment features of an AV
receiver, set to
BYPASS ON
in order to use the low-
pass filter of the AV receiver for high quality sound.
5 Bypass switch (BYPASS)
When set to
ON
, the audio signal is routed directly to
POWER
STANDBY/ON
the woofer unit, bypassing the amplifier’s filter.
1
6 Bass mode switch (BASS MODE)
MUSIC
: The characteristic frequencies become flat.
Recommended for music sources.
CINEMA
: Low frequencies are emphasized.
Recommended for sources that require strong bass.
2
7 Phase switch (PHASE 0º /180º)
REAR PANEL
When set to
180º
, the output phase becomes the
reverse of the input signal, and when set to
0º
, it is in
the same phase as the input signal.
• Normally, the switch is set to
0º
.
But when the sound connection between the
subwoofer and the left and right speakers sounds
unnatural, try switching to
180º
and set the switch
3
MIN
VOLUME
MAX
in the position where the sound is natural.
70Hz
100Hz80Hz
120Hz
60Hz
160Hz
4
50Hz
200Hz
• When using two or more subwoofers together,
CROSSOVER
5
OFF
ON
BYPASS
make sure that the phase switch of all of them are
CINEMA
MUSIC
BASS MODE
6
180∞
0∞
set to the same position.
PHASE
AUTO STANDBY
OFF
ON
7
LINE LEVEL
OUTPUT
INPUT
8
AC IN
6
En
9 11
10
01_S_LX70W_En.book 7 ページ 2008年7月18日 金曜日 午後5時4分
8 Auto Standby switch (AUTO STANDBY)
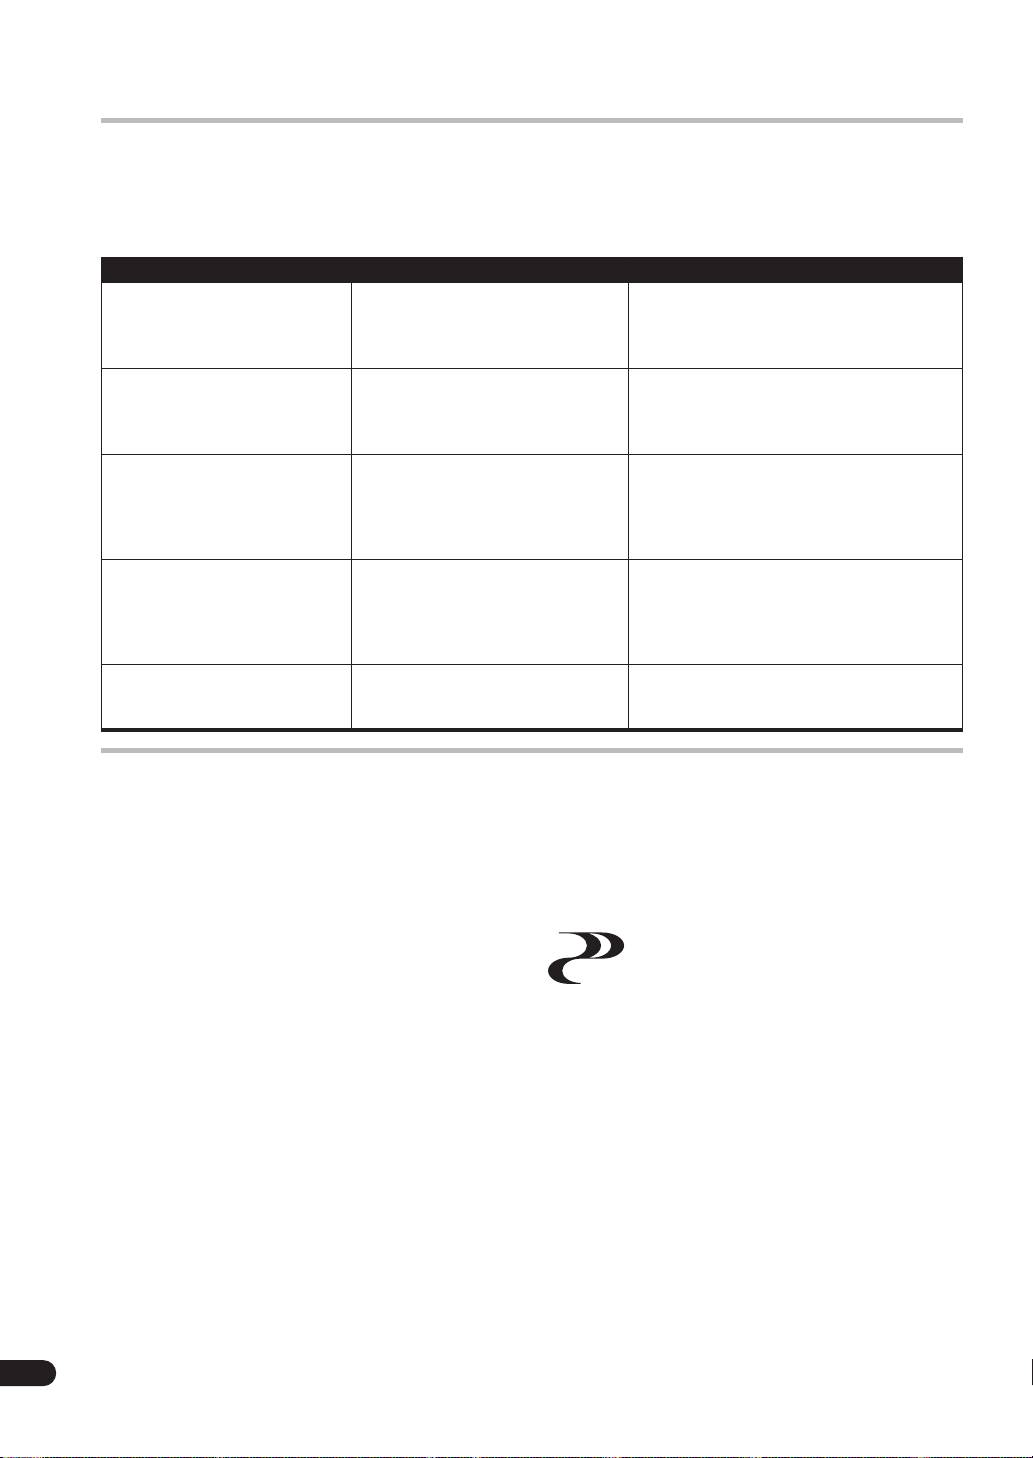
10 Line Level Input terminal (LINE LEVEL INPUT)
English Français Deutsch
Switches the Auto Standby feature on/off.
Connect to the SUBWOOFER PREOUT terminal of an
When switched
ON
(the default setting is
OFF
), the
amplifier or receiver, with the specially provided RCA
Auto Standby feature becomes active. In this mode, if
plug cord.
there is no input signal for 12 minutes the system
automatically switches to standby. The power is
11 AC INLET
automatically switched on again if an input signal is
• Connect the power cord to the powered subwoofer
detected.
unit’s AC INLET.
NOTE:
• Connect the power cord to a AC socket.
• There may be cases where a connected component
S-LX70W/S-81W-MK
Music mode Frequency response
outputs noise or some other non-audio signal which
100
causes this system to automatically power on when in
Auto Standby mode. If this happens, switch off the
Bypass
90
Auto Standby mode and switch the system on/off
manually.
80
70
9 Line Level Output terminal (LINE LEVEL OUTPUT)
Used for connecting other equipment through the
60
Italiano Español
amplifier. The signal output from this jack is not
Non-bypass
50
(Crossover 200 Hz)
affected in any way by the settings of the various
Sound pressure level (dB)
controls on the unit.
40
10
100
1000
10000
Frequency (Hz)
Nederlands
CONNECTIONS
Before making or changing any connections, switch off the power and disconnect both this unit and the
amplifier/receiver from the AC outlet.
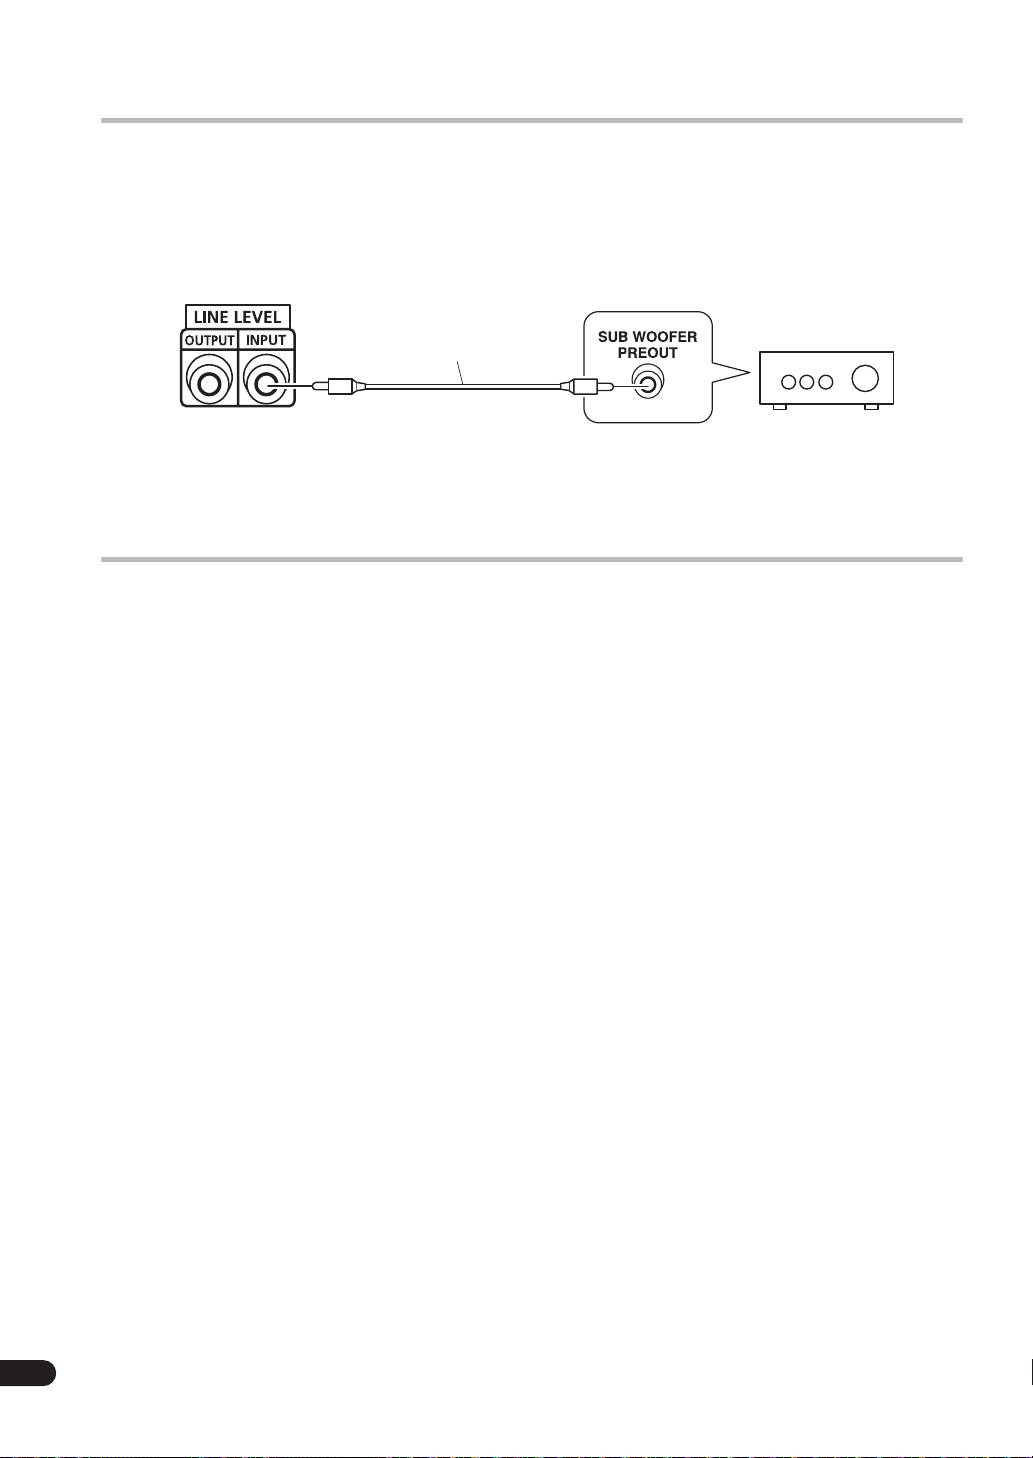
LINE LEVEL CONNECTION
S-LX70W/S-81W-MK
(Rear Panel)
Supplied RCA plug cord
This connection is for an amplifier or receiver equipped
NOTE:
with a
SUBWOOFER PREOUT
terminal. Connect to the
• When connected to the
PREOUT
terminal for
LINE LEVEL INPUT
terminal on this unit, using the
surround center channel on the amplifier or receiver,
specially provided RCA plug cord.
the bass is heard only on the center channel, so it will
be insufficient.
OPERATION
For details regarding operating part functions, refer to
2. Operate the amplifier or receiver and adjust the
page 6.
volume of the other speakers.
1. Turn the POWER switch (2) ON.
3. Adjust the volume of the bass with the VOLUME
• If the unit’s power cord is connected to a switched AC
knob (3).
outlet on the amplifier or receiver and the switch is left
• When necessary, operate the
CROSSOVER
knob (
4
)
ON, the unit can be turned ON/OFF together with the
and
PHASE
switch (
7
), and then adjust with the
amplifier or receiver.
VOLUME
knob (
3
). Set the
BASS MODE
switch (
6
) to
• If the unit cannot be connected to the amplifier or
either
MUSIC
or
CINEMA
.
receiver, turn the power to the amplifier or receiver ON
4. Turn the POWER switch (2) OFF.
before turning the power to the unit ON. When turning
• The power indicator disappears.
the power OFF, turn the power to the unit OFF before
turning the power to the amplifier or receiver OFF.
7
En
01_S_LX70W_En.book 8 ページ 2008年7月18日 金曜日 午後5時4分
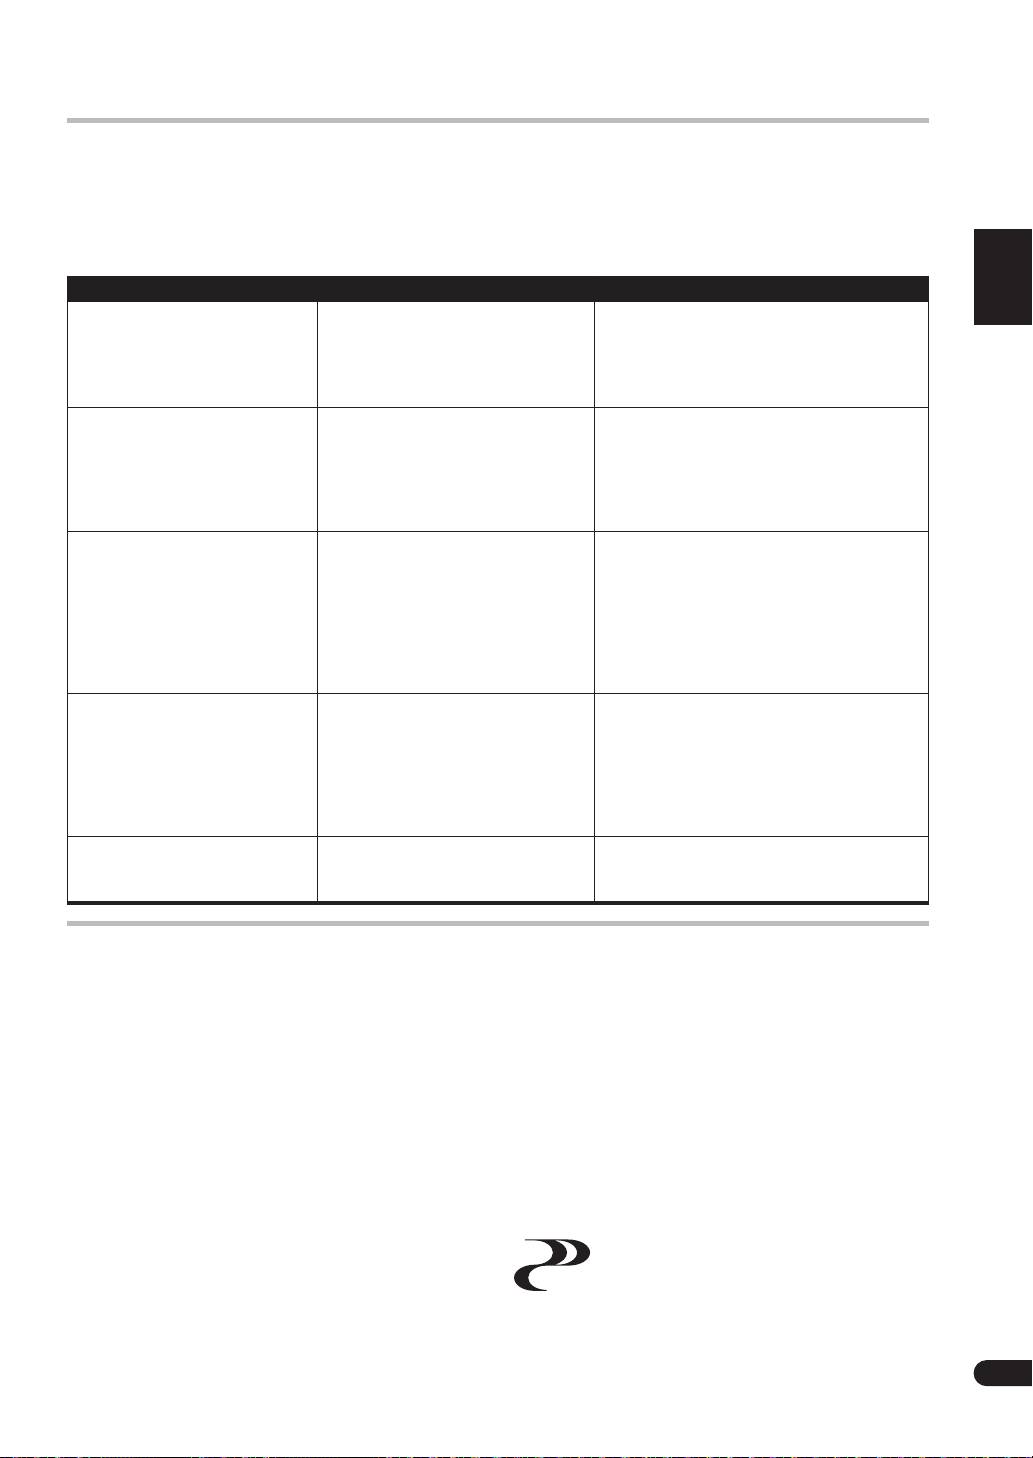
TROUBLESHOOTING
Incorrect operations are often mistaken for trouble and malfunctions. If you think that there is something wrong with
this component, check the points below. Sometimes the trouble may lie in another component. Investigate the other
components and electrical appliances being used. If the trouble cannot be rectified even after exercising the checks
listed below, ask your nearest PIONEER authorized service center or your dealer to carry out repair work.
SYMPTOM
CAUSE REMEDY
1 No power is being supplied
• Power supply plug is not
• Insert plug securely.
(Indicator does not light up
correctly inserted.
when power switch is turned
on.)
2 No sound
• Connection of accessory RCA
• Check again and connect correctly.
(Indicator is lit.)
plug cord is wrong or
disconnected.
•
VOLUME
knob is set to
MIN
.
• Turn clockwise slowly.
3 Sound is distorted.
• Level is too high.
• Turn the
VOLUME
knob counter-
clockwise to lower the level.
• Input level is too high.
• Turn the amplifier’s output level (volume,
bass control, bass boost) counter-
clockwise to lower the level.
4 Howling noise occurs.
• No power supplied to the
• Connect an amplifier and supply power.
amplifier.
• Subwoofer level is set too high.
• Place the subwoofer a good distance
from speakers. Turn the
VOLUME
knob
counter-clockwise to lower the volume.
5 Much noise when listening to
• The AM loop antenna or the FM
• Increase the distance between the AM or
AM or FM broadcasts.
indoor antenna is close to this
FM antenna (for indoor use) and this unit.
unit.
SPECIFICATIONS
Cabinet ....................... Floor type with CLOSED BOX system
(magnetically shielded)
Speaker........................................................... 30 cm cone type
Frequency response
Published by Pioneer Corporation.
.....................................25 Hz to 4000 Hz (set to BYPASS ON)
Copyright © 2007 Pioneer Corporation.
Power Amplifier Continuous Power Output (RMS)
All rights reserved.
................................................................... 300 W/4
Ω
(100 Hz)
Input (sensitivity at 100 Hz/impedance)
LINE LEVEL (RCA jack)................................... 160 mV/33 k
Ω
Output (Level at 100 Hz/impedance)
is a trademark placed on a product with
LINE LEVEL (RCA jack)...................................... 160 mV/1 k
Ω
Pioneer’s Phase Control Technology.
Selectable CROSSOVER Frequencies
The Technology enables high-grade 5.1ch with no delay
.......................................................50 Hz, 60 Hz, 70 Hz, 80 Hz,
in the bass area.
100 Hz, 120 Hz, 160 Hz, 200 Hz
Outline Dimension
........................... 362 mm (W) x 365 mm (H) x 362 mm (D)
Weight (without package).............................................18.2 kg
Power Requirements................220 V to 230 V~, 50
Hz/60
Hz
Power Consumption......................................................... 90 W
Power Consumption in standby..................................... 1.0 W
Accessories............................................... RCA plug cord x 1
Power cable x 1
Polishing cloth x 1
Warranty card x 1
Operating instructions
Specifications and design subject to possible
modification without notice, due to improvements.
8
En

01_S_LX70W_En.book 9 ページ 2008年7月18日 金曜日 午後5時4分
English Français Deutsch
Italiano Español
Nederlands
9
En
02_S_LX70W_FR.book 2 ページ 2008年7月18日 金曜日 午後5時8分
IMPORTANT
ATTENTION
DANGER D´ELECTROCUTION
NE PAS OUVRIR
Ce symbole de l’éclair, placé dans un
ATTENTION:
Ce point d’exclamation, placé dans un
triangle équilatéral, a pour but d’attirer
POUR ÉVITER TOUT RISQUE
triangle équilatéral, a pour but d’attirer
l’attention de l’utilisateur sur la présence, à
D’ÉLECTROCUTION, NE PAS ENLEVER LE
l’attention de l’utilisateur sur la présence,
l’intérieur du coffret de l’appareil, de
COUVERCLE (NI LE PANNEAU ARRIÈRE).
dans les documents qui accompagnent
“tensions dangereuses” non isolées d’une
AUCUNE PIÈCE RÉPARABLE PAR
l’appareil, d’explications importantes du
grandeur suffisante pour représenter un
L’UTILISATEUR NE SE TROUVE À
point de vue de l’exploitation ou de
risque d’électrocution pour les êtres
L’INTÉRIEUR. CONFIER TOUT ENTRETIEN À
l’entretien.
humains.
UN PERSONNEL QUALIFIÉ UNIQUEMENT.
D3-4-2-1-1_Fr
AVERTISSEMENT
Ce produit est conforme à la directive relative à la
Pour éviter les risques d’incendie, ne placez aucune
basse tension 2006/95/CE et à la directive relative à
flamme nue (telle qu’une bougie allumée) sur
la compatibilité électromagnétique 2004/108/CE.
l’appareil.
D3-4-2-1-7a_A_Fr
D3-4-2-1-9a_A_Fr
PRÉCAUTION DE VENTILATION
Nous vous remercions pour cet achat d’un produit
Lors de l’installation de l’appareil, veillez à laisser
PIONEER.
un espace suffisant autour de ses parois de manière
Nous vous demandons de lire soigneusement ce
à améliorer la dissipation de chaleur (au moins
mode d’emploi; vous serez ainsi à même de faire
25 cm sur le dessus, 15 cm à l’arrière et 10 cm de
correctement fonctionner l’appareil. Après avoir bien lu
chaque côté).
le mode d’emploi, le ranger dans un endroit sûr pour
AVERTISSEMENT
pouvoir s’y référer ultérieurement.
Les fentes et ouvertures du coffret sont prévues
Dans certains pays ou certaines régions, la forme de la
pour la ventilation, pour assurer un fonctionnement
fiche d’alimentation et de la prise d’alimentation peut
stable de l’appareil et pour éviter sa surchauffe.
différer de celle qui figure sur les schémas, mais les
Pour éviter les risques d’incendie, ne bouchez
branchements et le fonctionnement de l’appareil
jamais les ouvertures et ne les recouvrez pas
restent les mêmes.
d’objets, tels que journaux, nappes ou rideaux, et
n’utilisez pas l’appareil posé sur un tapis épais ou
AVERTISSEMENT
un lit.
D3-4-2-1-7b_A_Fr
Cet appareil n’est pas étanche. Pour éviter les
risques d’incendie et de décharge électrique, ne
AVERTISSEMENT
placez près de lui un récipient rempli d’eau, tel
Avant de brancher l’appareil pour la première, lisez
qu’un vase ou un pot de fleurs, et ne l’exposez pas
attentivement la section suivante.
à des gouttes d’eau, des éclaboussures, de la pluie
La tension de l’alimentation électrique disponible
ou de l’humidité.
D3-4-2-1-3_A_Fr
varie selon le pays ou la région. Assurez-vous que
Milieu de fonctionnement
la tension du secteur de la région où l’appareil sera
T
empérature et humidité du milieu de fonctionnement :
utilisé correspond à la tension requise (par ex.
De +5 ºC à +35 ºC (de +41 ºF à +95 ºF); Humidité
230 V ou 120 V), indiquée sur le panneau arrière.
D3-4-2-1-4_A_Fr
relative inférieure à 85 % (orifices de ventilation non
obstrués) N’installez pas l’appareil dans un endroit mal
ATTENTION: Ne montez pas et ne vous asseyez pas
ventilé ou un lieu soumis à une forte humidité ou en plein
sur l’appareil. Soyez spécialement prudent si des
soleil (ou à une forte lumière artificielle).
D3-4-2-1-
7c_A_Fr
enfants sont à proximité, car l’appareil pourrait
être endommagé et causer des blessures en
Si la fiche d’alimentation secteur de cet appareil ne
tombant.
convient pas à la prise secteur à utiliser, la fiche doit
être remplacée par une appropriée.
Ce remplacement et la fixation d’une fiche secteur
sur le cordon d’alimentation de cet appareil doivent
être effectués par un personnel de service qualifié.
En cas de branchement sur une prise secteur, la
fiche de coupure peut provoquer une sérieuse
décharge électrique. Assurez-vous qu’elle est
éliminée correctement après sa dépose.
L’appareil doit être déconnecté en débranchant sa
fiche secteur au niveau de la prise murale si vous
prévoyez une période prolongée de non utilisation
(par exemple avant un départ en vacances).
D3-4-2-2-1a_A_Fr
NOTE IMPORTANTE SUR LE CABLE
D’ALIMENTATION
T
02_S_LX70W_FR.book 3 ページ 2008年7月18日 金曜日 午後5時8分
Si vous souhaitez vous débarrasser de cet appareil, ne le mettez pas à la poubelle avec vos ordures ménagères. Il existe un système de
collecte séparé pour les appareils électroniques usagés, qui doivent être récupérés, traités et recyclés conformément à la législation.
Les habitants des états membres de l’UE, de Suisse et de Norvège peuvent retourner gratuitement leurs appareils électroniques usagés aux
centres de collecte agréés ou à un détaillant (si vous rachetez un appareil similaire neuf).
Dans les pays qui ne sont pas mentionnés ci-dessus, veuillez contacter les autorités locales pour savoir comment vous pouvez vous débarrasser
de vos appareils.
Vous garantirez ainsi que les appareils dont vous vous débarrassez sont correctement récupérés, traités et recyclés et préviendrez de cette façon
les impacts néfastes possibles sur l’environnement et la santé humaine.
K058_A_Fr
ATTENTION
L’interrupteur POWER de cet appareil ne coupe pas
enir le câble d’alimentation par la fiche. Ne pas
complètement celui-ci de sa prise secteur. Comme
débrancher la prise en tirant sur le câble et ne pas
le cordon d’alimentation fait office de dispositif de
toucher le câble avec les mains mouillées. Cela risque
déconnexion du secteur, il devra être débranché au
de provoquer un court-circuit ou un choc électrique. Ne
niveau de la prise secteur pour que l’appareil soit
pas poser l’appareil ou un meuble sur le câble. Ne pas
complètement hors tension. Par conséquent, veillez
pincer le câble. Ne pas faire de noeud avec le câble ou
à installer l’appareil de telle manière que son cordon
l’attacher à d’autres câbles. Les câbles d’alimentation
d’alimentation puisse être facilement débranché de
doivent être posés de façon à ne pas être écrasés. Un
la prise secteur en cas d’accident. Pour éviter tout
câble abîmé peut provoquer un risque d’incendie ou un
risque d’incendie, le cordon d’alimentation sera
choc électrique. Vérifier le câble d’alimentation de
débranché au niveau de la prise secteur si vous
temps en temps. Contacter le service après-vente
prévoyez une période prolongée de non utilisation
PIONEER le plus proche ou le revendeur pour un
(par exemple avant un départ en vacances).
remplacement.
S002_Fr
D3-4-2-2-2a_A_Fr
02_S_LX70W_FR.book 4 ページ 2008年7月18日 金曜日 午後5時8分
SOMMAIRE
CARACTERISTIQUES
■
Puissance de 300 W (RMS) avec amplificateur de
ACCESSOIRES FOURNIS.................... 4
classe D, pour la lecture de programmes audio et
CARACTERISTIQUES .........................4
vidéo tels que Dolby* Digital avec une large plage
UTILISATION COMBINEE AVEC DES
dynamique.
■
Equipé d’un haut-parleur de 30 cm
ENCEINTES ACOUSTIQUES............... 4
■
La fréquence de recouvrement peut être réglée à
INSTALLATION.................................. 5
50 Hz, 60 Hz, 70 Hz, 80 Hz, 100 Hz, 120 Hz, 160 Hz ou
200 Hz.
Installation des enceintes .................5
■
Équipé d’un sélecteur Bass Mode (mode Music/
Précautions d’installation .................5
Cinema).
DESCRIPTION DE LA FACE AVANT
* Fabriqué sous licence de Dolby Laboratories.
Le terme «Dolby» et le sigle double D sont des marques de
ET DE LA FACE ARRIERE .................. 6
commerce de Dolby Laboratories.
FACE AVANT ......................................6
FACE ARRIERE................................... 6
UTILISATION COMBINEE
RACCORDEMENTS............................ 8
AVEC DES ENCEINTES
RACCORDEMENT DE NIVEAU
ACOUSTIQUES
LIGNE ..................................................8
FONCTIONNEMENT.......................... 8
Les caractéristiques de fréquence du S-LX70W/S-81W-
MK lorsqu’il est utilisé en combinaison avec des
DEPANNAGE..................................... 9
enceintes acoustiques de petite taille sont indiquées ci-
FICHE TECHNIQUE............................ 9
dessous. Comme on peut le voir sur ce graphique, la
gamme des basses fréquences est sensiblement
améliorée.
ACCESSOIRES FOURNIS
• Ces caractéristiques spéciales sont obtenues dans une
chambre sans écho. L’effet produit par l’ajout d’un S-
LX70W/S-81W-MK dans une salle d’écoute ordinaire
est supérieur à l’effet indiqué sur le graphique, à
condition que le subwoofer soit correctement placé.
Câble à prise RCA x 1
Enceinte de petite taille + S-LX70W/S-81W-MK
Enceinte de petite taille
REPONSE (dB)
Cordon d’alimentation x 1
FREQUENCE (Hz)
• Il est recommandé de réserver un canal spécial pour
Chiffon de nettoyage x 1
le subwoofer en cas de reproduction d’un programme
Dolby* Digital. Le S-LX70W/S-81W-MK est
Fiche de garantie x 1
particulièrement efficace en cas de reproduction d’un
LFE (effet de basse fréquence : destiné à donner plus
d’intensité à la vidéo).
Mode d’emploi
Dolby* Digital
Dolby Digital est une expression désignant un système
sonore numérique Dolby à voies multiples qui a été
développé à partir du système sonore Dolby pour succéder
au système sonore Dolby Pro Logic.
Le système Dolby Digital est un système parfois dit à 5.1
voies parce qu’il offre 5 voies dans la gamme de
fréquence 20 Hz à 20 kHz (avant gauche et droite, centre,
arrière gauche et droite) et une voie indépendante pour
le subwoofer. La voie du subwoofer est également
appelée voie LFE (effet de basse fréquence).
La voie LFE peut être utilisée selon les goûts personnels
de chacun pour renforcer les sons graves.
4
Fr
02_S_LX70W_FR.book 5 ページ 2008年7月18日 金曜日 午後5時8分
REMARQUES :
English Français Deutsch
INSTALLATION
• Pour éviter toute perturbation des images du
récepteur de télévision, utiliser des enceintes à écran
magnétique. Ceci est plus particulièrement important
Installation des enceintes
dans le cas de l’enceinte centrale du fait qu’elle est
toujours la plus proche du récepteur de télévision.
• Critères d’installation du subwoofer
• Placer l’enceinte droite et l’enceinte gauche à égale
1 Enceinte gauche
distance du récepteur de télévision et à environ
2 Enceinte droite
1,8 mètre l’une de l’autre.
3 Position préconisée pour le subwoofer
• Installez l’enceinte centrale au-dessus ou en dessous
4 Position d’écoute
du téléviseur, de façon à ce que le son du canal central
provienne de l’écran du téléviseur.
12
• Les enceintes arrière (ambiophoniques) donnent les
meilleurs résultats lorsqu’elles sont placées de
manière symétrique par rapport à la position d’écoute,
au même niveau ou légèrement derrière, et à environ
1 mètre au-dessus du niveau des oreilles d’une
personne assise.
Italiano Español
ATTENTION:
Si vous installez l‘enceinte centrale sur le téléviseur,
3
assurez-vous de le fixer avec du ruban adhésif ou par
un autre moyen.
Sinon, l‘enceinte risque de tomber à cause de chocs
Nederlands
extérieurs à l‘appareil, comme des tremblements de
4
terre, et vous pourriez mettre en danger les
personnes à proximité ou l‘enceinte pourrait être
endommagée.
Le subwoofer restitue les graves en monophonie, en
profitant du fait que l’oreille humaine n’est pas capable
Précautions d’installation
de localiser les sons graves. Pour cette raison, ce
subwoofer peut être installé pratiquement n’importe où.
• Installer le subwoofer dans un endroit bien ventilé où
Toutefois, s’il est installé trop loin, le son des autres haut-
il ne sera pas soumis à une humidité ou à des
parleurs risque de ne plus être naturel.
températures excessives.
• Ne pas placer le subwoofer à proximité d’un radiateur,
• Emplacements types des enceintes
ou autre appareil de chauffage, et ne pas l’exposer aux
rayons directs du soleil car cela risquerait
1 Enceinte avant gauche
d’endommager le coffret ou les composants internes.
2 Enceinte centrale
Ne pas le placer non plus dans un endroit
3 Enceinte avant droite
excessivement poussiéreux ou humide car ceci
4 Subwoofer
pourrait provoquer des anomalies de fonctionnement
5 Zone d’écoute
ou une panne. (Eviter de le placer sur une table de
cuisine ou autres emplacements où il serait soumis à
6 Enceinte arrière gauche
la chaleur, à la vapeur ou à la suie.)
7 Enceinte arrière droite
• Ne pas poser d’objets lourds ou volumineux sur le
dessus de l’enceinte, car ceci pourrait provoquer sa
1
2
3
chute et entraîner des dégâts ou des blessures. Si les
enceintes devaient tomber, leur finition pourrait subir
des fissures irréparables.
• Ne pas placer le subwoofer à proximité d’un appareil,
comme par exemple un magnétophone, susceptible
d’être affecté par les champs magnétiques.
4
Cette enceinte acoustique est une enceinte à écran
magnétique.
Elle risque, cependant, de provoquer des altérations
5
de la couleur des images si elle est placée à proximité
de l’écran d’un récepteur de télévision.
Si ce phénomène se produit, mettre le récepteur de
télévision hors tension et attendre 15 à 30 minutes
avant de le remettre sous tension.
67
Si le problème persiste, éloigner l’enceinte
acoustique du récepteur de télévision.
5
Fr
02_S_LX70W_FR.book 6 ページ 2008年7月18日 金曜日 午後5時8分
• Ne pas placer l’enceinte sur une surface instable, car
elle pourrait tomber et provoquer des dégâts ou des
DESCRIPTION DE LA FACE
blessures.
• Ne pas poser de tasses, verres ou autres récipients
AVANT ET DE LA FACE
contenant un liquide sur le dessus des appareils car
ARRIERE
ils pourraient être endommagés si du liquide devait y
pénétrer.
• L’emplacement d’installation choisi doit être la
FACE AVANT
surface d’un plancher solide. Eviter de poser
l’enceinte sur un tapis à longs poils, car ils pourraient
toucher le diaphragme et provoquer une distorsion
des sons.
• Prière d’installer cette unité à distance du câble
d’antenne du tuner, car des parasites peuvent être
provoqués par une installation proche du câble
d’antenne. Dans ce cas, utiliser cette unité à une
position écartée de l’antenne et du câble d’antenne,
ou si la reproduction de basses supplémentaires n’est
pas nécessaire, couper l’alimentation de cette unité.
POWER
STANDBY/ON
ENTRETIEN DES SURFACES EXTERNES
1
• Frotter la surface extérieure au moyen du chiffon
de nettoyage fourni ou d’un linge doux et sec.
• Lorsque les surfaces sont extrêmement sales,
utiliser un chiffon doux et un produit détergeant
neutre dilué dans cinq ou six volumes d’eau. Bien
2
tordre le chiffon avant de nettoyer les surfaces. Les
essuyer ensuite avec un chiffon sec. Ne jamais
utiliser de produits de nettoyage ou de la cire pour
FACE ARRIERE
meubles.
• Ne jamais utiliser de diluant, benzine, bombe
insecticide et autres produits chimiques à
proximité de cette enceinte car ces produits
détérioreraient le fini de surface.
3
MIN
VOLUME
MAX
70Hz
100Hz80Hz
120Hz
60Hz
160Hz
4
50Hz
200Hz
CROSSOVER
ON
5
OFF
BYPASS
MUSIC
CINEMA
BASS MODE
6
180∞
0∞
PHASE
ON
7
AUTO STANDBY
OFF
LINE LEVEL
OUTPUT
INPUT
8
AC IN
9 11
10
1 Témoin d’alimentation (STANDBY/ON)
S’allume en bleu quand l’appareil est mis sous
tension (ON). Quand l’interrupteur AUTO STANDBY
est activé (ON), il s’allume en bleu chaque fois que
l’enceinte reçoit des signaux audio. Si l’alimentation
n’est coupée (OFF) que brièvement, le témoin s’allume
en bleu lorsque l’alimentation est rétablie. Si aucun
signal n’est présent pendant plus de 12 minutes, le
subwoofer repasse automatiquement au mode
d’attente et le témoin d’alimentation s’allume en
rouge. Si, par la suite, un signal est capté,
l’alimentation est automatiquement rétablie et le
témoin d’alimentation s’allume en bleu.
REMARQUE :
• Si vous prévoyez de laisser l’appareil hors tension
pendant une durée prolongée, vérifiez que le témoin
d’alimentation s’est bien éteint après avoir mis
6
l’appareil hors tension.
Fr
02_S_LX70W_FR.book 7 ページ 2008年7月18日 金曜日 午後5時8分
2 Interrupteur d’alimentation (POWER)
8 Interrupteur d’attente automatique (AUTO
English Français Deutsch
Appuyer une première fois sur ce bouton pour mettre
STANDBY)
sous tension et une deuxième fois pour mettre hors
Il active et désactive la fonction de mise en attente
tension.
automatique.
Lorsque la fonction est en service (
ON
) (ce réglage est
3 Bouton de volume (VOLUME)
désactivé (
OFF
) par défaut), la mise en attente
Permet de régler le volume du subwoofer.
automatique agit. Dans ce cas, si aucun signal n’est
entré pendant 12 minutes, le système passe
• Tourner lentement le bouton à partir de la position
automatiquement en mode d’attente. L’alimentation
MIN.
est rétablie automatiquement dès qu’un signal
• Avec cet appareil, le niveau des basses peut être
d’entrée est détecté.
réglé indépendamment et il n’est donc pas
nécessaire d’élever le niveau des basses sur
REMARQUE :
l’amplificateur AV.
• Des cas peuvent se présenter où un composant
raccordé émet des parasites ou d’autres signaux non-
4 Bouton de réglage de recouvrement
audio qui provoquent une remise sous tension du
(CROSSOVER)
système alors qu’il est en mode d’attente
Réglez la limite de fréquence supérieure pour le
automatique. Dans ce cas, désactivez (OFF) le mode
subwoofer (
50 Hz, 60 Hz, 70 Hz, 80 Hz, 100 Hz,
d’attente automatique et mettez le système
Italiano Español
120 Hz, 160 Hz, 200 Hz
) de manière qu’elle complète
manuellement en service ou hors service.
la sortie des autres haut-parleurs.
Dans le cas d’une utilisation des fonctions de gestion
9 Borne de sortie niveau ligne (LINE LEVEL OUTPUT)
des graves d’un récepteur AV, régler sur
BYPASS ON
Pour raccorder d’autres appareils via l’amplificateur.
pour utiliser le filtre passe-bas du récepteur AV et
Le signal fournit par cette prise n’est nullement affecté
améliorer la qualité du son.
Nederlands
par les réglages des diverses commandes de cet
appareil.
5 Interrupteur de dérivation (BYPASS)
Lors d’un réglage sur
ON
, le signal audio passe
10 Borne d’entrée du niveau de ligne (LINE LEVEL
directement au woofer, évitant ainsi le filtre de
INPUT)
l’amplificateur.
Pour raccorder à la borne SUBWOOFWER PREOUT
d’un amplificateur ou d’un récepteur au moyen du
6 Sélecteur de mode de graves (BASS MODE)
cordon à fiche RCA spécialement fourni.
MUSIC
: La réponse en fréquence est plate. Réglage
recommandé pour les sources musicales.
11 Prise secteur (AC IN)
CINEMA
: Les basses fréquences sont accentuées.
• Brancher le cordon d’alimentation sur la prise AC
Réglage recommandé pour les sources exigeant des
IN du subwoofer sous tension.
graves puissants.
• Brancher le cordon d’alimentation sur une prise du
secteur.
7 Sélecteur de phase (PHASE 0˚/ 180˚)
S-LX70W/S-81W-MK
Lors d’un réglage sur
180º
, la phase de sortie devient
Réponse en fréquence en mode Musique
l’inverse du signal d’entrée; lors d’un réglage sur
0º
,
100
elle est la même que le signal d’entrée.
Dérivation
90
• Ce sélecteur doit être normalement réglé sur
0º
,
mais lorsque l’équilibre du son entre l’enceinte
80
droite, l’enceinte gauche et le subwoofer ne semble
pas naturel, essayer
180º
et laisser le sélecteur à la
70
positon donnant le résultat le plus naturel.
60
•A l’emploi de deux ou plusieurs subwoofers, veiller
Non dérivation
à ce que le sélecteur de phase de chacun d’eux soit
50
(Recouvrement 200 Hz)
réglé à la même position.
Niveau de pression sonore (dB)
40
10
100
1000
10000
Fréquence (Hz)
7
Fr
02_S_LX70W_FR.book 8 ページ 2008年7月18日 金曜日 午後5時8分
RACCORDEMENTS
Avant d’effectuer ou de changer les raccordements, mettre hors tension et débrancher cet appareil et
l’amplificateur ou le récepteur au niveau de la prise secteur.
RACCORDEMENT DE NIVEAU LIGNE
S-LX70W/S-81W-MK
(face arrière)
Câble à prise RCA fourni
Cette connexion est destinée à un amplificateur ou un
REMARQUE :
récepteur muni d’une borne
SUBWOOFER PREOUT
.
• En cas d’une connexion sur la borne
PREOUT
pour la
Relier cette borne à la borne d’entrée
LINE LEVEL INPUT
voie centrale surround sur l’amplificateur ou le
du subwoofer à l’aide du câble à prise RCA fourni.
récepteur, les graves ne seront perçus que sur la voie
centrale, ce qui laissera à désirer.
FONCTIONNEMENT
Se reporter à la page 6 pour plus de renseignements sur
2. Faire fonctionner l’amplificateur ou le récepteur
les fonctions des diverses bornes et commandes.
et ajuster le volume des autres haut-parleurs.
1. Allumer (ON) l’interrupteur d’alimentation
3. Ajuster le volume des graves par le bouton
POWER (2).
VOLUME (3).
• Si le cordon d’alimentation est branché sur une prise
• Lorsque nécessaire, utiliser le bouton de réglage
secteur commutée de l’amplificateur ou du récepteur
CROSSOVER
(
4
) et le sélecteur
PHASE
(
7
) et régler
et que l’interrupteur est laissé activé (ON), cet appareil
ensuite le volume avec le bouton
VOLUME
(
3
). Régler
pourra être mis sous/hors tension en même temps
le sélecteur
BASS MODE
(
6
) sur
MUSIC
ou sur
que l’amplificateur ou le récepteur.
CINEMA
.
• Si cet appareil ne peut pas être connecté à
4. Enteindre (OFF) l’interrupteur d’alimentation
l’amplificateur ou au récepteur, mettre l’amplificateur
POWER (2).
ou le récepteur sous tension (ON) avant de mettre cet
• Le témoin d’alimentation disparaît.
appareil sous tension. Lors de la mise hors tension,
mettre cet appareil hors tension (OFF) avant de couper
l’alimentation de l’amplificateur ou du récepteur.
8
Fr
02_S_LX70W_FR.book 9 ページ 2008年7月18日 金曜日 午後5時8分
English Français Deutsch
DEPANNAGE
Il arrive souvent que des anomalies de fonctionnement ou des problèmes apparents soient dus à de simples erreurs
de manipulation. Si cette enceinte semble ne pas fonctionner correctement, contrôler les points suivants. Parfois un
autre élément de la chaîne est à l’origine du problème. Contrôler tous les éléments et accessoires électriques utilisés.
Si l’origine du problème n’a pas pu être trouvée après avoir effectué les contrôles suivants, s’adresser au service après-
vente PIONEER le plus proche ou à un distributeur.
SYMPTÔME
CAUSE REMÈDE
1L’enceinte ne se met pas sous
• Le cordon d’alimentation n’est
• Brancher correctement le cordon
tension (le témoin
pas branché correctement.
d’alimentation.
d’alimentation ne s’allume pas
lorsque l’interrupteur POWER
est enfoncé).
2Pas de son
• La connexion du cordon à fiche
• Vérifier les raccordements et connecter
(Le témoin d’alimentation
RCA fourni comme accessoire
correctement.
s’allume.)
est erronée ou le cordon est
Italiano Español
débranché.
• Le bouton de réglage du volume
• Tourner lentement ce bouton dans le
VOLUME
est réglé sur
MIN
.
sens des aiguilles d’une montre.
3 Le son est déformé.
• Le niveau est trop élevé.
• Tourner le bouton de réglage du volume
VOLUME
dans le sens contraire des
Nederlands
aiguilles d’une montre pour baisser le
niveau.
• Le niveau d’entrée est trop élevé.
• Utiliser les commandes de réglage du
niveau de sortie (volume, réglage grave,
renforcement des basses) de
l’amplificateur pour baisser le niveau.
4 Un bruit de cornemuse se
• L’amplificateur n’est pas sous
• Connecter un amplificateur et le mettre
produit.
tension.
sous tension.
• Le niveau du subwoofer est trop
• Placer le subwoofer à une bonne
élevé.
distance des autres enceintes. Tourner le
bouton de réglage du volume
VOLUME
dans le sens contraire des aiguilles d’une
montre pour baisser le niveau.
5 Nombreux parasites lors
• L’antenne-cadre AM ou l’antenne
• Augmenter la distance entre l’antenne
d’écoute d’émission AM ou
intérieure FM est proche de cette
AM ou FM (pour usage intérieur) et cette
FM.
unité.
unité.
FICHE TECHNIQUE
Coffret ................ Type plancher avec système CLOSED BOX
Accessoires fournis.............................. Câble à prise RCA x 1
(écran magnétique)
Cordon d’alimentation x 1
Haut-parleur .............................................Type conique 30 cm
Chiffon de nettoyage x 1
Réponse en fréquences
Fiche de garantie x 1
........................... De 25 Hz à 4000 Hz (réglé sur BYPASS ON)
Mode d’emploi
Puissance de sortie continue (RMS) ......300 W/4
Ω
(100 Hz)
Entrée (sensibilité à 100 Hz/impédance)
Les caractéristiques techniques et le design peuvent être
LINE LEVEL (prise RCA)..................................160 mV/33 k
Ω
modifiés sans aucun avis pour y apporter des
Sortie (Niveau à 100 Hz/impédance)
améliorations.
LINE LEVEL (prise RCA) ....................................160 mV/1 k
Ω
Sélection des fréquences de recouvrement (CROSSOVER)
Publication de Pioneer Corporation.
........................................................50 Hz, 60 Hz, 70 Hz, 80 Hz,
© 2007 Pioneer Corporation.
100 Hz, 120 Hz, 160 Hz, 200 Hz
Tous droits de reproduction et de traduction réservés.
Dimensions externes
..................................362 mm (L) x 365 mm (H) x 362 mm (P)
Poids (sans emballage).................................................18,2 kg
Alimentation électrique...... 220 V à 230 V~ CA, 50
Hz/60
Hz
est une marque de frabrique placée sur un
Consommation d’énergie.................................................90 W
produit utilisant la “Phase Control Technology” de
Consommation en mode Attente................................... 1,0 W
Pioneer.
Cette technologie permet une reproduction 5.1 voies de
haute qualité sans retard dans les graves.
9
Fr
03_S_LX70W_GE.book 2 ページ 2008年7月18日 金曜日 午後5時54分
WICHTIG
CAUTION
RISK OF ELECTRIC SHOCK
DO NOT OPEN
Das Blitzsymbol in einem Dreieck weist den
ACHTUNG:
Ein Ausrufezeichen in einem Dreieck weist
Benutzer darauf hin, dass eine
UM SICH NICHT DER GEFAHR EINES
den Benutzer auf wichtige Bedienungs- und
Berührungsgefahr mit nicht isolierten Teilen
ELEKTRISCHEN SCHLAGES AUSZUSETZEN,
Wartungsanweisungen in den Dokumenten
im Geräteinneren, die eine gefährliche
DÜRFEN SIE NICHT DEN DECKEL (ODER
hin, die dem Gerät beiliegen.
Spannung führen, besteht. Die Spannung
DIE RÜCKSEITE) ENTFERNEN. IM
kann so hoch sein, dass sie die Gefahr eines
GERÄTEINNEREN BEFINDEN SICH KEINE
elektrischen Schlages birgt.
VOM BENUTZER REPARIERBAREN TEILE.
ÜBERLASSEN SIE REPARATUREN DEM
QUALIFIZIERTEN KUNDENDIENST.
D3-4-2-1-1_Ge
Dieses Produkt erfüllt die Niederspannungsrichtilie
WARNUNG
2006/95/EC und die EMV-Richtinie 2004/108/EC.
Dieses Gerät ist nicht wasserdicht. Zur Vermeidung
der Gefahr von Brand und Stromschlag keine
D3-4-2-1-9a_A_Ge
Behälter mit Flüssigkeiten (z.B. Blumenvasen und
-töpfe) in die Nähe des Gerätes bringen und dieses
Wir danken Ihnen für den Kauf dieses Pioneer-Produkts.
vor Tropfwasser, Spritzwasser, Regen und Nässe
Lesen Sie sich bitte diese Bedienungsanleitung durch.
schützen.
D3-4-2-1-3_A_Ge
Dann wissen Sie, wie Sie Ihr Gerät richtig bedienen.
WARNUNG
Bewahren Sie sie an einem sicheren Platz auf, um auch
Keine Quellen offener Flammen (z.B. eine
zukünftig nachschlagen zu können.
brennende Kerze) auf dieses Gerät stellen.
In manchen Ländern oder Verkaufsgebieten weichen die
D3-4-2-1-7a_A_Ge
Ausführungen von Netzstecker oder Netzsteckdosen
u.U. von den in den Abbildungen gezeigten ab; die
VORSICHTSHINWEIS ZUR BELÜFTUNG
Anschluss- und Bedienungsverfahren des Gerätes sind
Bei der Aufstellung dieses Gerätes muss für einen
jedoch gleich.
ausreichenden Freiraum gesorgt werden, um eine
einwandfreie Wärmeabfuhr zu gewährleisten
WARNUNG
(mindestens 25 cm oberhalb des Gerätes, 15 cm
Vor dem erstmaligen Anschluss des Gerätes an das
hinter dem Gerät und jeweils 10 cm an der Seite
Stromnetz bitte den folgenden Hinweis sorgfältig
des Gerätes).
beachten.
WARNUNG
Die Netzspannung ist je nach Land verschieden. Vor
Im Gerätegehäuse sind Ventilationsschlitze und
der Inbetriebnahme des Gerätes sicherstellen, dass
andere Öffnungen vorgesehen, die dazu dienen,
die örtliche Netzspannung mit der auf dem
eine Überhitzung des Gerätes zu verhindern und
Typenschild an der Rückwand des Gerätes
einen zuverlässigen Betrieb zu gewährleisten. Um
angegebenen Nennspannung (z.B. 230 V oder
Brandgefahr auszuschließen, dürfen diese
120 V) übereinstimmt.
D3-4-2-1-4_A_Ge
Öffnungen auf keinen Fall blockiert oder mit
Gegenständen (z.B. Zeitungen, Tischdecken und
WARNUNG: Bitte klettern Sie nicht auf dieses
Gardinen) abgedeckt werden, und das Gerät darf
Gerät, und setzen Sie sich nicht darauf. Gehen Sie
beim Betrieb nicht auf einem dicken Teppich oder
besonders sorgsam vor, wenn sich Kinder in der
Bett aufgestellt sein.
D3-4-2-1-7b_A_Ge
Nähe aufhalten. Das Gerät könnte beschädigt
werden oder umfallen, so dass Verletzungsgefahr
besteht.
ACHTUNG
Der POWER-Schalter dieses Gerätes trennt das
Betriebsumgebung
Gerät nicht vollständig vom Stromnetz. Um das
Betriebstemperatur und Betriebsluftfeuchtigkeit:
Gerät vollständig vom Netz zu trennen, muss der
5 ºC bis 35 ºC, 85 % rel. Feuchte max.
Netzstecker aus der Netzsteckdose gezogen werden.
(Ventilationsschlitze nicht blockiert)
Daher sollte das Gerät so aufgestellt werden, dass
Eine Aufstellung dieses Gerät an einem unzureichend
stets ein unbehinderter Zugang zur Netzsteckdose
belüfteten, sehr feuchten oder heißen Ort ist zu
gewährleistet ist, damit der Netzstecker in einer
vermeiden, und das Gerät darf weder direkter
Notsituation sofort abgezogen werden kann. Um
Sonneneinstrahlung noch starken Kunstlichtquellen
Brandgefahr auszuschließen, sollte der Netzstecker
ausgesetzt werden.
D3-4-2-1-7c_A_Ge
vor einem längeren Nichtgebrauch des Gerätes,
beispielsweise während des Urlaubs, grundsätzlich
von der Netzsteckdose getrennt werden.
D3-4-2-2-2a_A_Ge
03_S_LX70W_GE.book 3 ページ 2008年7月18日 金曜日 午後5時54分
Mischen Sie dieses Produkt, wenn Sie es entsorgen wollen, nicht mit gewöhnlichen Haushaltsabfällen. Es gibt ein getrenntes
Sammelsystem für gebrauchte elektronische Produkte, über das die richtige Behandlung, Rückgewinnung und Wiederverwertung
gemäß der bestehenden Gesetzgebung gewährleistet wird.
Privathaushalte in den Mitgliedsstaaten der EU, in der Schweiz und in Norwegen können ihre gebrauchten elektronischen Produkte an
vorgesehenen Sammeleinrichtungen kostenfrei zurückgeben oder aber an einen Händler zurückgeben (wenn sie ein ähnliches neues Produkt
kaufen).
Bitte wenden Sie sich in den Ländern, die oben nicht aufgeführt sind, hinsichtlich der korrekten Verfahrensweise der Entsorgung an die örtliche
Kommunalverwaltung.
Auf diese Weise stellen Sie sicher, dass das zu entsorgende Produkt der notwendigen Behandlung, Rückgewinnung und Wiederverwertung
unterzogen wird, und so mögliche negative Einflüsse auf die Umwelt und die menschliche Gesundheit vermieden werden.
K058_A_Ge
VORSICHT MIT DEM NETZKABEL
Falls der Netzstecker des Netzkabels dieses Gerätes
Fassen Sie das Netzkabel immer am Stecker. Ziehen Sie
nicht in die Zusatzsteckdose einer anderen
nicht am Kabel selbst, und fassen Sie das Netzkabel
Komponente passt, muss er gegen einen
niemals mit nassen Händen an, da dies einen
Netzstecker der geeigneten Ausführung
Kurzschluss oder elektrischen Schlag verursachen
ausgewechselt werden. Ein derartiger Austausch des
kann. Stellen Sie nicht das Gerät, Möbelstücke o.ä. auf
Netzsteckers muss vom Kundendienstpersonal
das Netzkabel; sehen Sie auch zu, dass es nicht
vorgenommen werden. Wenn der vom Netzkabel
eingeklemmt wird. Machen Sie niemals einen Knoten
abgeschnittene ursprüngliche Netzstecker in eine
in das Netzkabel, und binden Sie es nicht mit anderen
Netzsteckdose eingesteckt wird, besteht akute
Kabeln. Das Netzkabel sollte so gelegt werden, dass
Stromschlaggefahr! Daher ist unbedingt dafür zu
niemand darauf tritt. Ein beschädigtes Netzkabel kann
sorgen, dass der abgeschnittene Netzstecker sofort
einen Brand oder elektrischen Schlag verursachen.
vorschriftsmäßig entsorgt wird.
Prüfen Sie das Netzkabel von Zeit zu Zeit. Sollte es
Vor einem längeren Nichtgebrauch des Gerätes,
beschädigt sein, wenden Sie sich an Ihre nächste
beispielsweise während des Urlaubs, sollte der
autorisierte PIONEER-Kundendienststelle oder Ihren
Netzstecker aus der Netzsteckdose gezogen werden,
Händler, um es zu ersetzen.
S002_Ge
um das Gerät vollständig vom Netz zu trennen.
D3-4-2-2-1a_A_Ge
03_S_LX70W_GE.book 4 ページ 2008年7月18日 金曜日 午後5時54分
INHALTSVERZEICHNIS
MERKMALE
■
300 W (eff.) mit Verstärker der Klasse D für
ZUBEHÖR.......................................... 4
Wiedergabe von Audio- und Videomaterial wie Dolby*
MERKMALE ...................................... 4
Digital mit breitem Dynamikbereich.
IN KOMBINATION MIT
■
Ausgestattet mit 30 cm-System.
■
Die folgenden Einstellungen der Übernahmefrequenz
LAUTSPRECHERN.............................. 4
stehen zur Auswahl: 50 Hz, 60 Hz, 70 Hz, 80 Hz,
AUFSTELLUNG..................................5
100 Hz, 120 Hz, 160 Hz und 200 Hz.
■
Ein Bass-Modus-Wahlschalter (MUSIC/CINEMA) ist
Aufstellen der Lautsprecher..............5
vorgesehen.
Zur Beachtung bei der
Aufstellung ......................................... 5
* Hergestellt unter Lizenz von Dolby Laboratories.
„Dolby“ und das Doppel-D-Symbol sind Warenzeichen von
BEDIENELEMENTE, ANZEIGEN UND
Dolby Laboratories.
ANSCHLÜSSE .................................... 6
GERÄTEVORDERSEITE......................6
IN KOMBINATION MIT
GERÄTERÜCKSEITE ..........................6
LAUTSPRECHERN
ANSCHLÜSSE .................................... 8
Nachstehend sind die Frequenzeigenschaften des
HOCHPEGEL-ANSCHLUSS............... 8
S-LX70W/S-81W-MK in Kombination mit kleinen
BEDIENUNG......................................8
Lautsprechern dargestellt. Wie aus der Abbildung
hervorgeht, wird der tiefe Frequenzbereich verbessert.
FEHLERSUCHE................................... 8
• Diese Eigenschaften wurden in einem echofreien
TECHNISCHE DATEN ........................ 9
Raum erhalten. Die Wirkung eines zusätzlichen
S-LX70W/S-81W-MK in einem normalen Hörraum ist
bei richtiger Anordnung größer als in der Darstellung.
ZUBEHÖR
kleiner Lautsprecher + S-LX70W/S-81W-MK
Cinchsteckerkabel x 1
kleiner Lautsprecher
ANSPRECHEN (dB)
FREQUENZ (Hz)
• Für die Wiedergabe von Dolby* Digital wird
empfohlen, einen besonderen Kanal für den
Subwoofer vorzusehen. Der S-LX70W/S-81W-MK ist
besonders effektiv für die Wiedergabe von LFE (Low
Netzkabel x 1
Frequency Effect: Klangeffekte wie Rumpeln der Erde,
die den Bildeindruck verstärken sollen).
Poliertuch x 1
Dolby* Digital
Garantiekarte x 1
Dolby Digital ist die Bezeichnung des Dolby Surround
Mehrkanal-Digitalsystems, das als Weiterführung des
Bedienungsanleitung
Dolby Pro-Logic Surround von Dolby Surround entwickelt
wurde.
Dolby Digital wird auch als 5.1-Kanal-System bezeichnet,
weil es über 5 Kanäle im Frequenzbereich von 20 Hz bis
20 kHz (vorne links und rechts, Mitte und hinten links
und rechts) und einen unabhängigen Kanal für den
Subwoofer verfügt. Der Subwooferkanal wird auch LFE-
Kanal (Low Frequency Effect) genannt.
Der LFE-Kanal wird nach individuellem Geschmack zur
Verstärkung der Basswirkung eingesetzt.
4
Ge
