Pioneer KURO PDK-TS36B: instruction
Class: Televisions and Digital TV
Type:
Manual for Pioneer KURO PDK-TS36B
Table of contents
- Cautions Contents
- Checking the Enclosed Parts
- Attaching the Pioneer Television
- Forward/Backward Angle of Inclination Adjustment Mechanism
- Installing the Product on a TV table etc.
- Preparing the Cables
- Preventing Equipment from Falling Over
- Fixing the rotation to the front Detaching the Pioneer Television from the Stand Specifications
- Dimensions Diagram

PDK-TS36B_AZR1279B.indb 1 2008/07/07 9:32:30
Thank you for buying Pioneer’s product.
Please read through the Operating Instructions to learn how
Cautions
to operate your model safely and properly.
Please be advised to keep the Operating Instructions in
This product is a table top stand exclusively designed
your place for future reference.
for Pioneer televisions (PDP-5020FD / PDP-111FD / PDP-
LX5090H / PDP-LX5090 / PDP-LX509A / PDP-C509A).
Installation
Use with other model is capable of resulting in instability
• Consult your dealer if you encounter any difficulties
causing possible injury. For further information, please
with this installation.
contact the store where you purchased your display.
• Pi
oneer is not liable for any damage resulting from
improper installation, improper use, modification, or
Do not install or modify the product other than specified. Do
natural disasters.
not use this stand for a Pioneer television other than those
designated and do not modify it or use it for other purposes.
Improper installation is extremely dangerous because it may
result in it falling over or other accident.
Installation Location
•
Se
lect a location that is strong enough to support the
weight of the stand and the displays.
• Ma
ke sure to place it in a level and stable location.
• Do not install it outdoors or in a wet place such as at a
hot spring or near a beach.
• Do n
ot install the stand where it may be subjected to
Contents
vibration or shock.
Assembling and Installation
Cautions ................................................................... 2
• As
semble the stand in accordance with the assembly
Checking the Enclosed Parts ................................... 3
instructions and securely attach all screws at the
Assembling the Stand ............................................. 4
designated locations.
The
re have been cases where unforeseen accidents
Attaching the Pioneer Television ........................... 5
such as the equipment breaking or falling over
Forward/Backward Angle of Inclination
occurred after the installation of the display because
the stand was not installed as instructed.
Adjustment Mechanism .......................................... 6
•
Th
e display must always be installed by two or more
Installing the Product on a TV table etc. ............... 7
people to assure it is installed safely.
Preparing the Cables ............................................... 8
• Be
fore installation, turn off the power for the display
and peripheral devices then remove the power cord
Preventing Equipment from Falling Over .............. 9
plug from the power outlet.
Fixing the rotation to the front ............................ 10
Detaching the Pioneer Television from
This product rotates 10° to the left and right and inclines
approximately 2° forward and backward.
the Stand ................................................................ 10
Do not place objects within the range of rotation of this
Specifications ......................................................... 10
product and the Pioneer television. Install this product so
that during routine use or when it is rotated, it does not
Dimensions Diagram ............................................. 11
protrude from the TV table or other location it has been
installed. Failure to do so could cause unforeseen accidents
such as the equipment breaking or falling over (see page 7).
While adjusting its angle forward and backward, be
extremely careful to keep your hands out of the space
between the bottom of the Pioneer television and the stand
(see page 6).
Prevent accidents caused by the product falling over, by
taking reliable measures to prevent it from falling over (see
page 9).
2
En
PDK-TS36B_AZR1279B.indb 2 2008/07/07 9:32:31
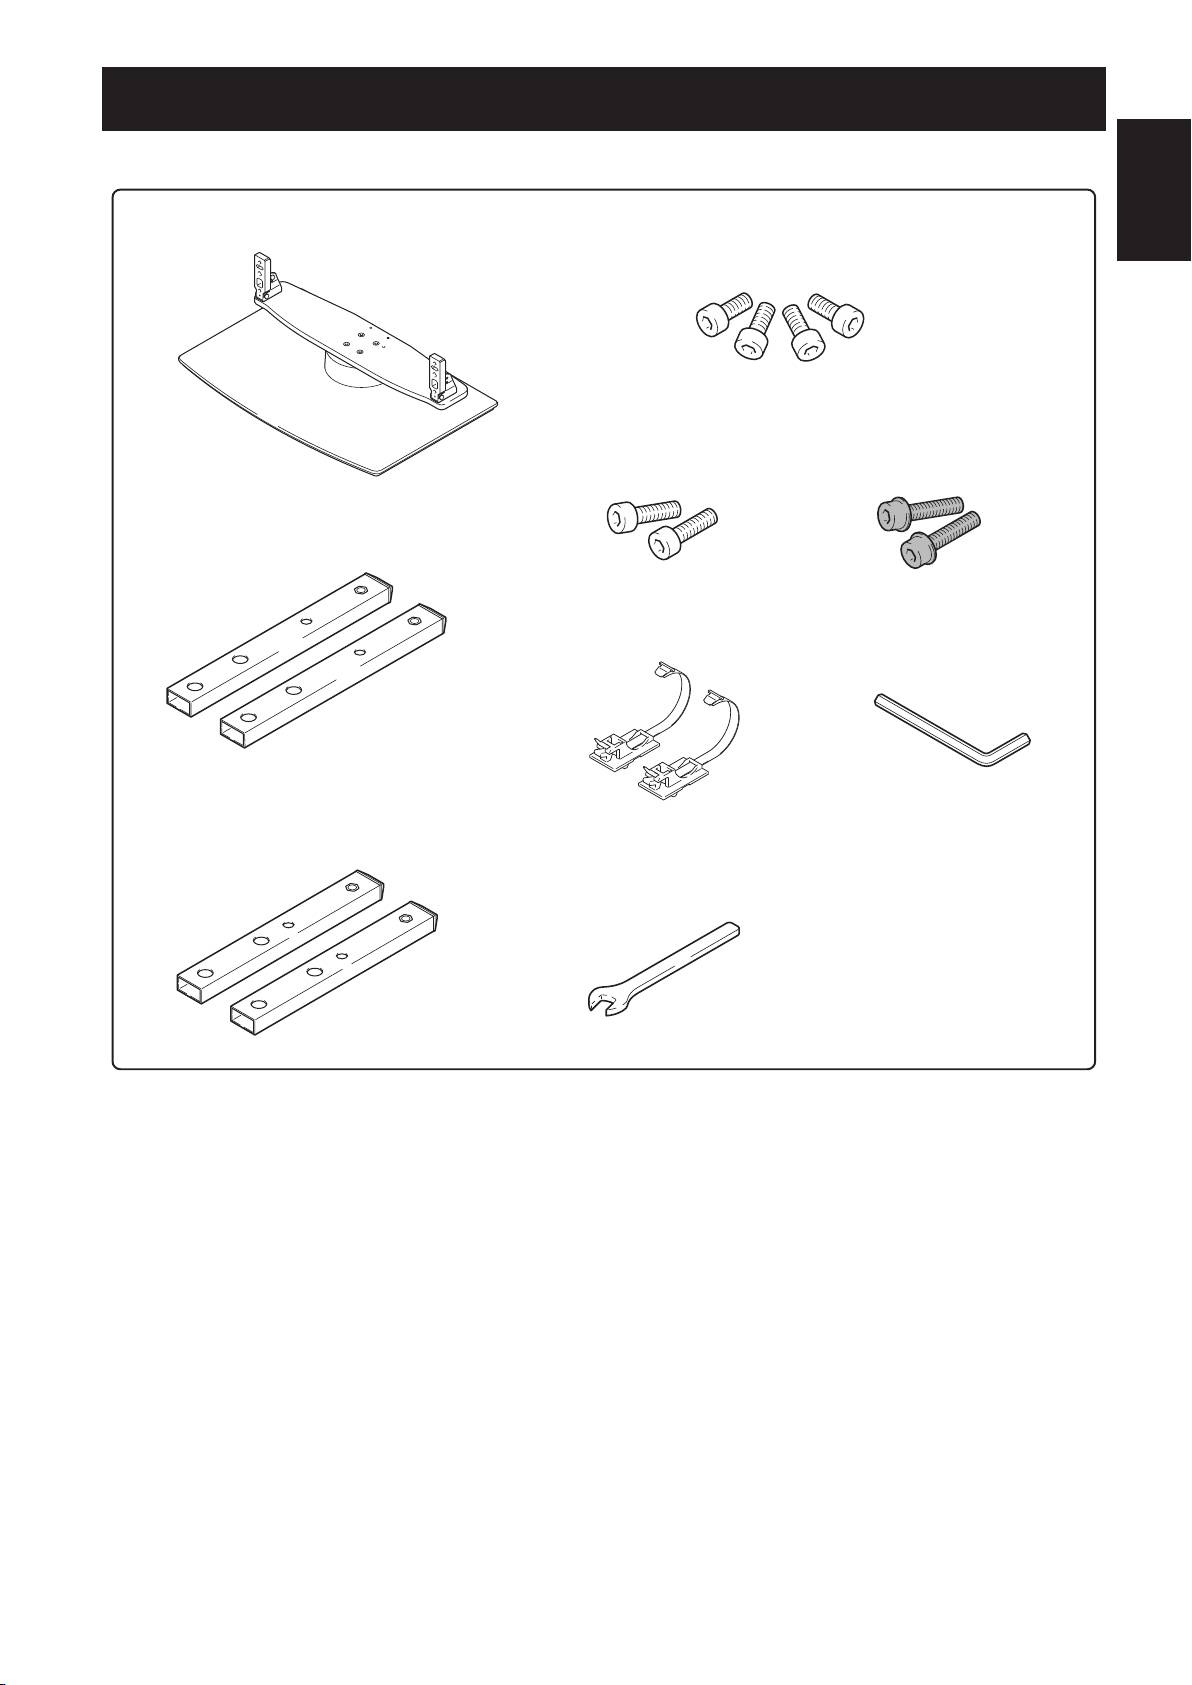
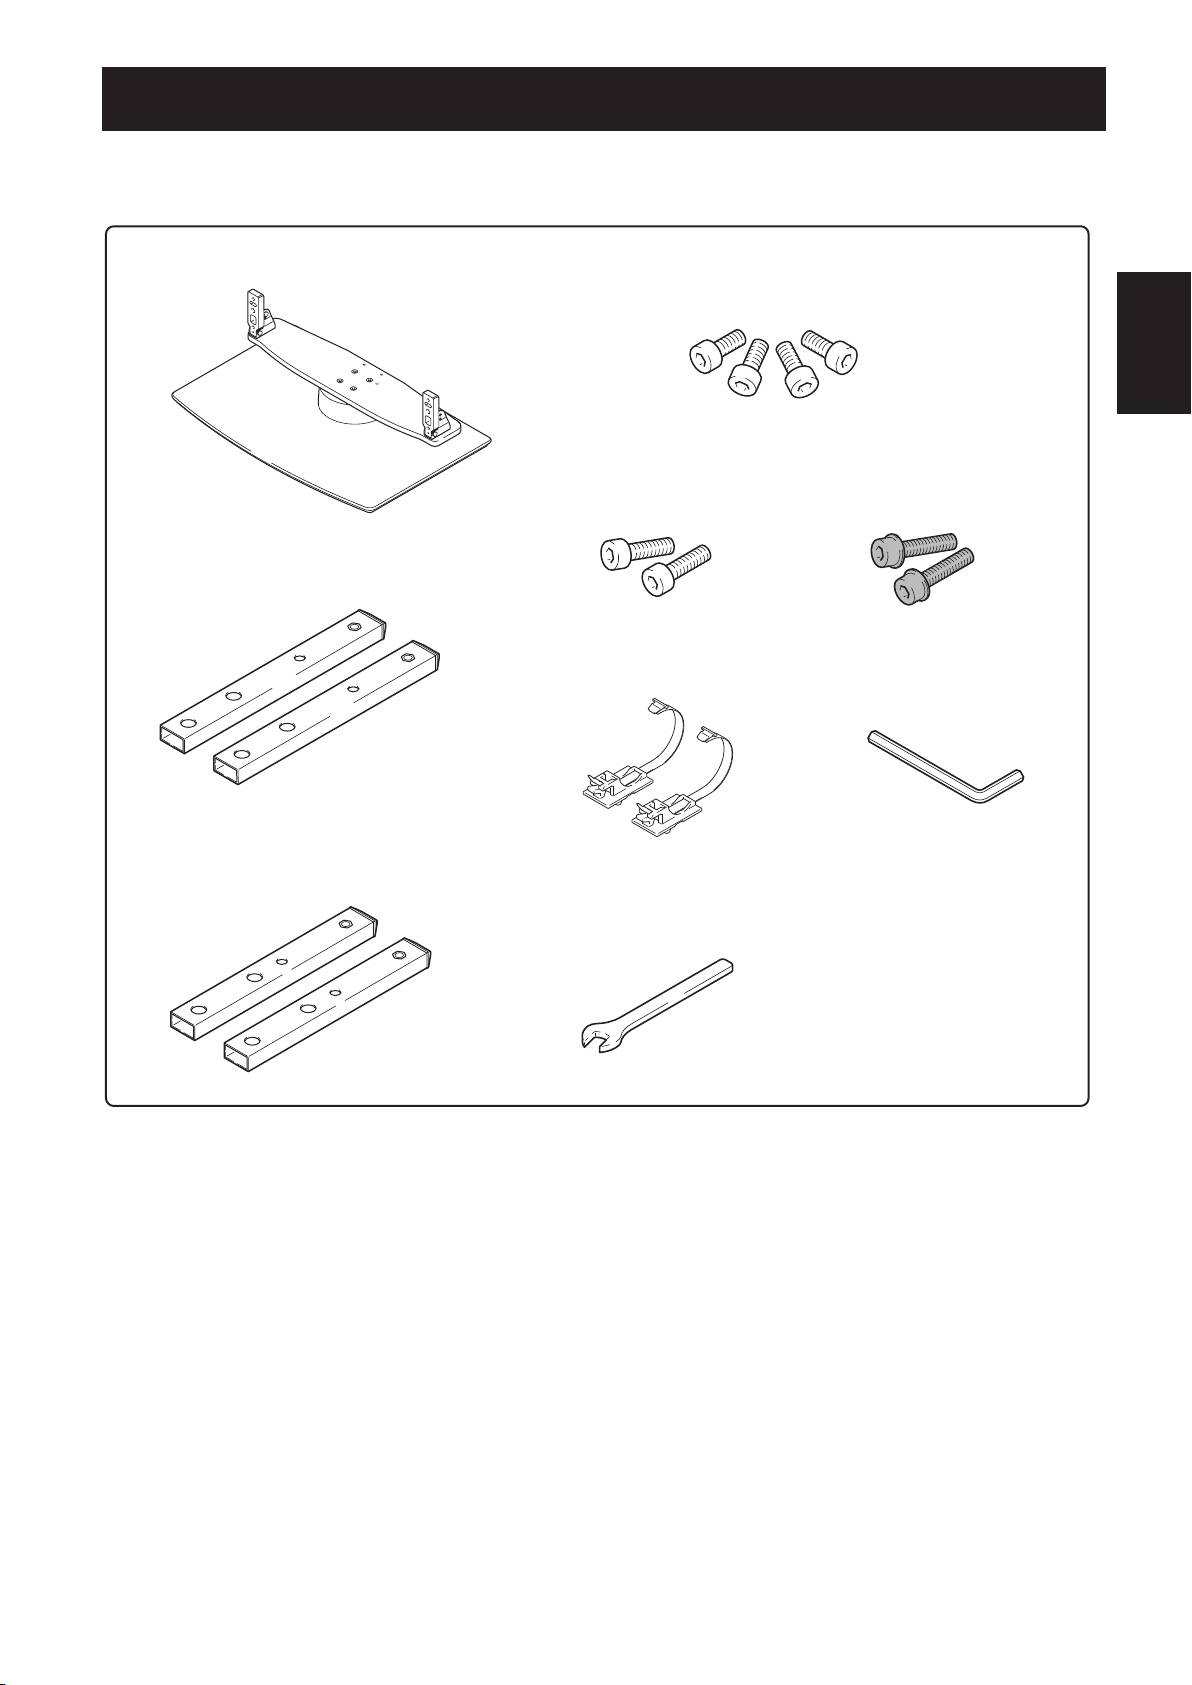
Checking the Enclosed Parts
Check to make sure that you have all the enclosed parts before assembly and installation.
English
3
En
t5BCMFUPQTUBOEY
t*OTUBMMBUJPOTDSFXT
.YNNTJMWFSY
<VTFEUPBODIPSUIFTVQQPSUDPMVNOTBOEUIFUBCMFUPQTUBOE>
t*OTUBMMBUJPOTDSFXT
t*OTUBMMBUJPOTDSFXT
.YNNTJMWFSY
.YNNCMBDLY
t4VQQPSUDPMVNOT-Y<MPOHDPMVNOT>
'PSVOEFSTQFBLFSNPEFMT
t$BCMFCJOEFSTY
t)FYBHPOBMXSFODIY
%JBHPOBMTJ[FNN
t4VQQPSUDPMVNOT4Y<TIPSUDPMVNOT>
'PSFYDFQUVOEFSTQFBLFSNPEFMT
t$XSFODIYNN
t0QFSBUJOHJOTUSVDUJPOT
UIJTEPDVNFOUY
PDK-TS36B_AZR1279B.indb 3 2008/07/07 9:32:32
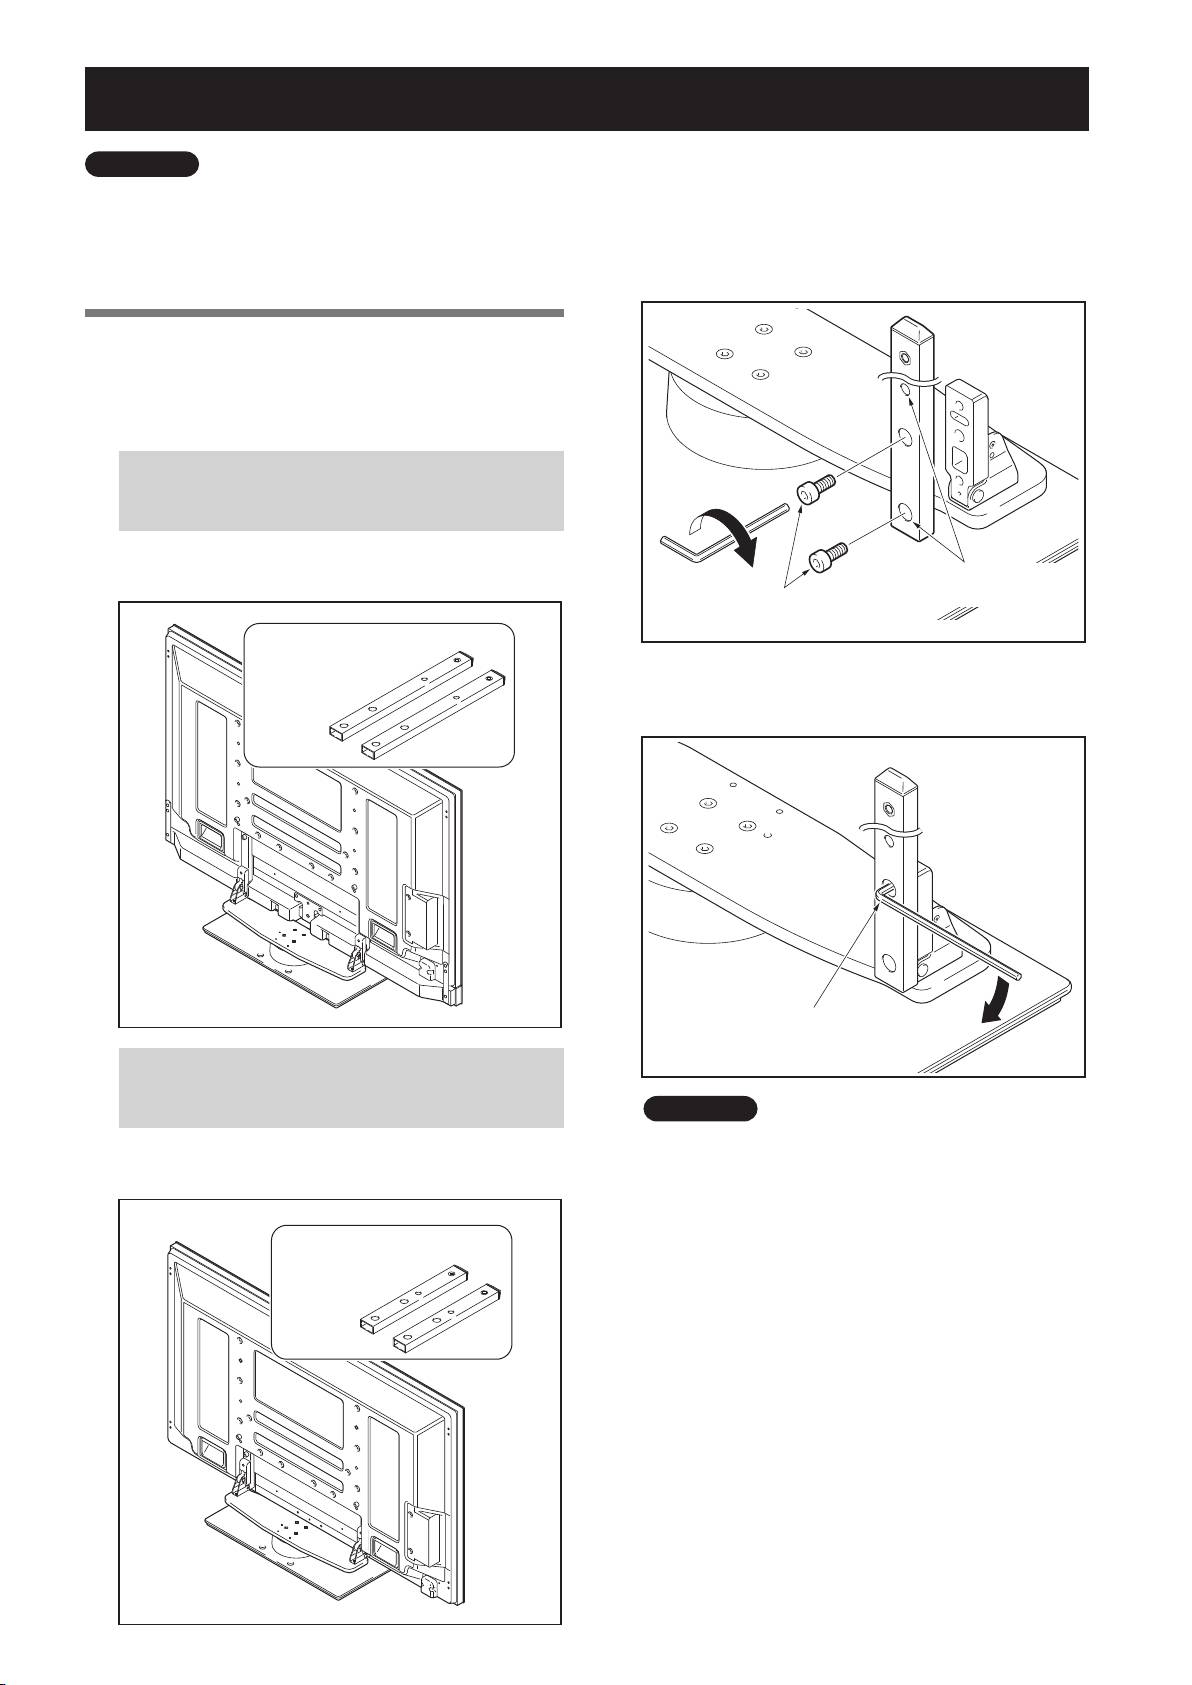
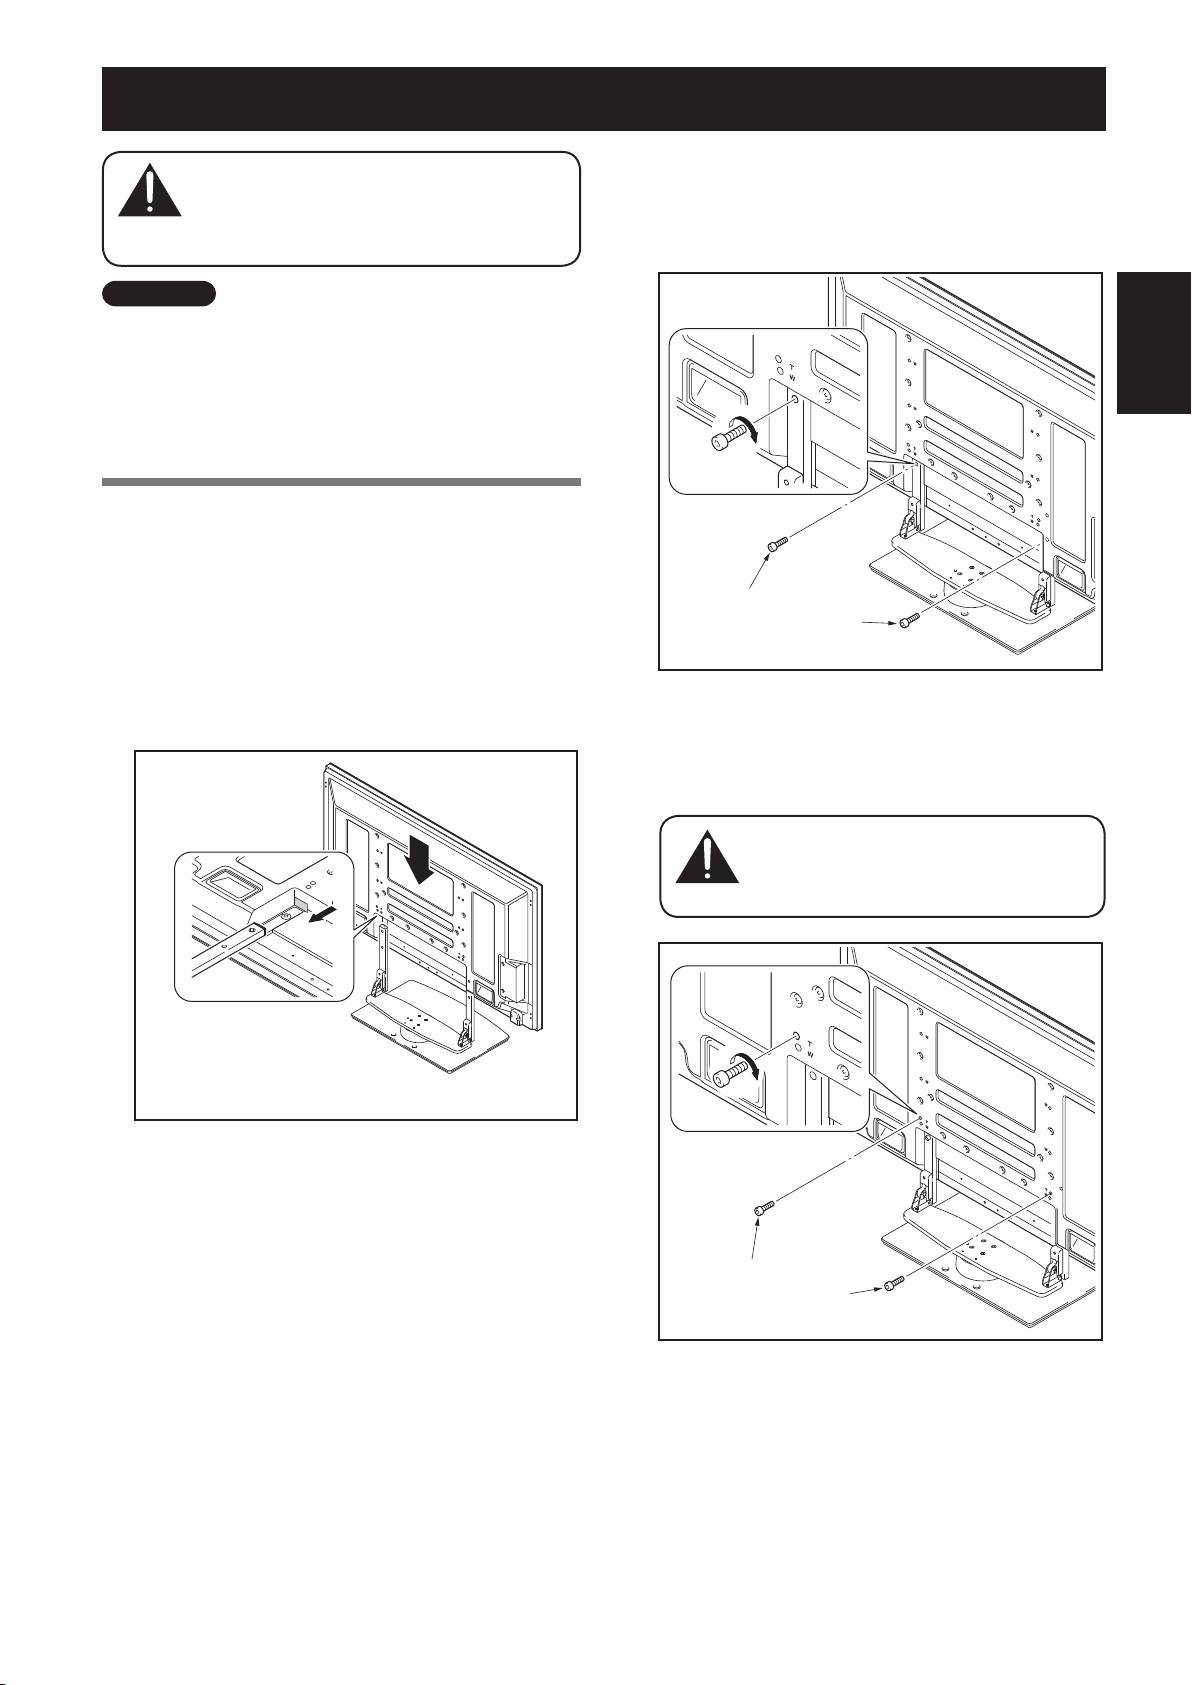
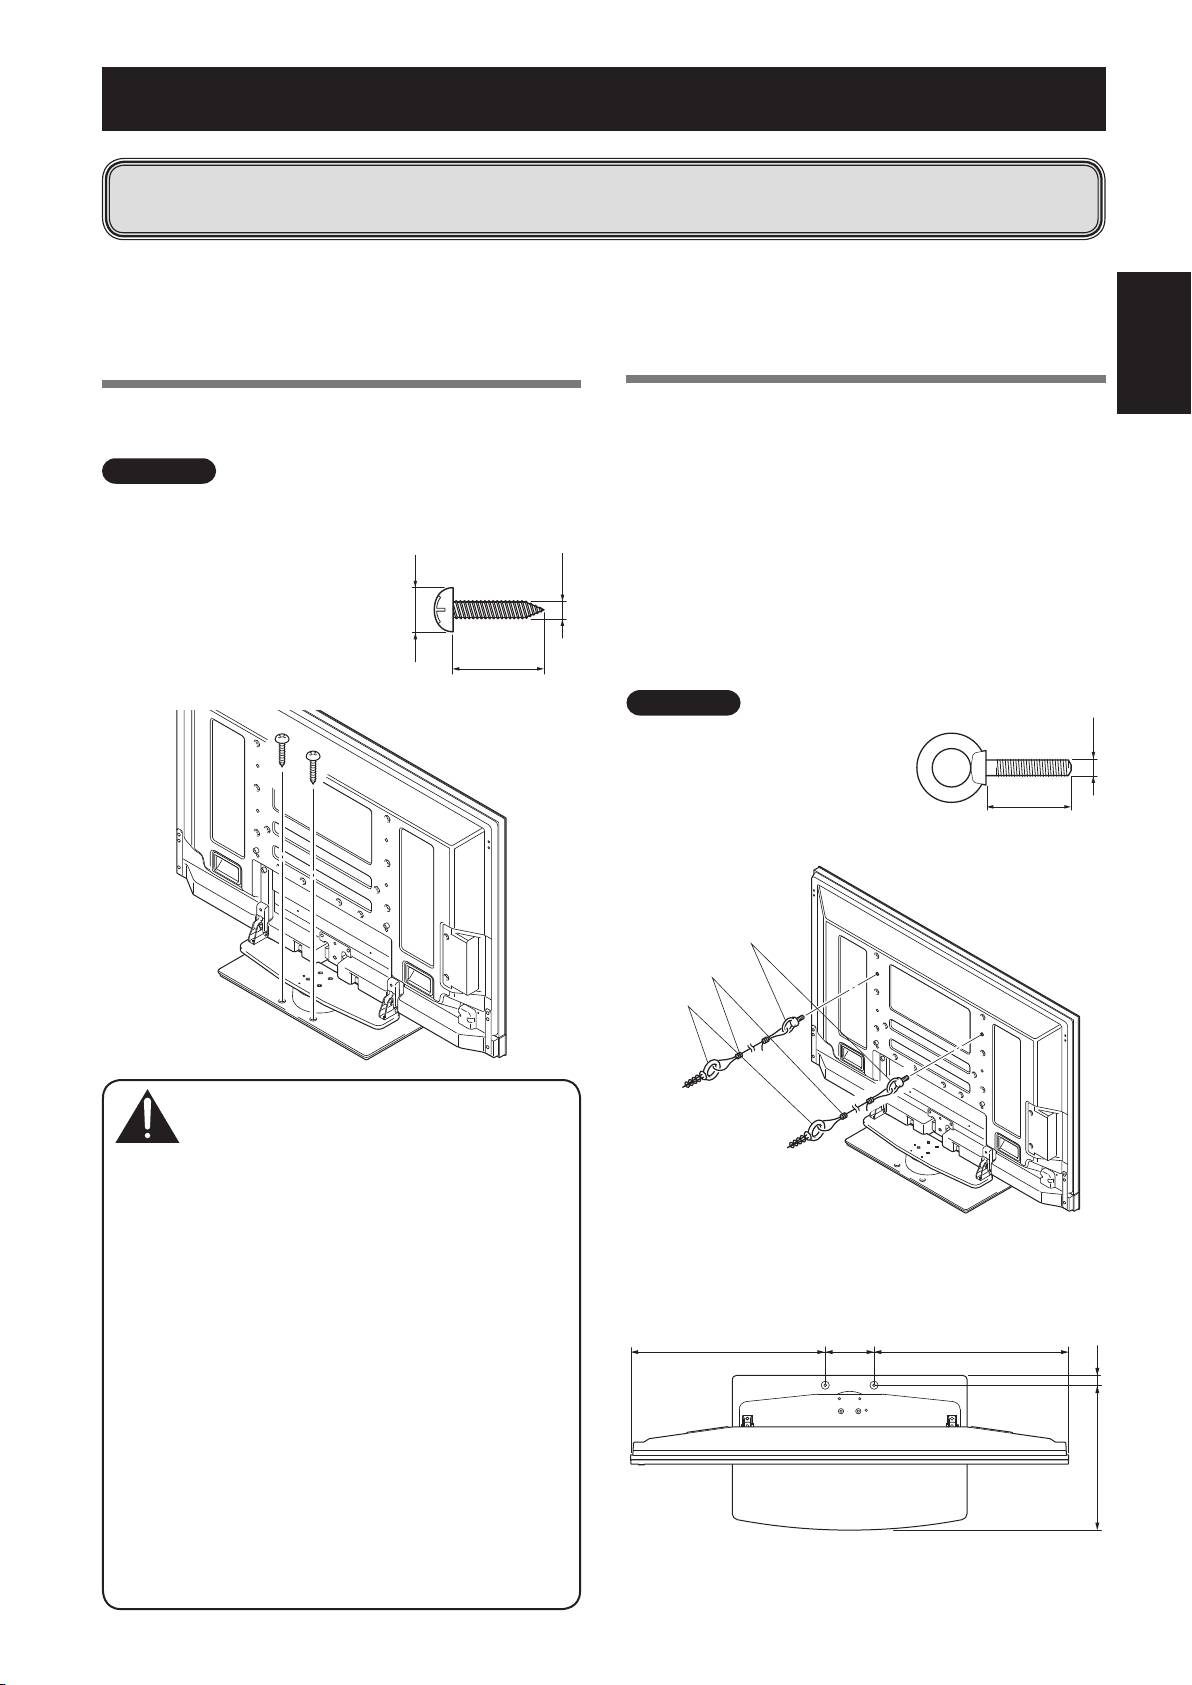
Attaching the Pioneer Television
The weight of a 50 inch Pioneer television
(without speaker) is about 34 kg (75 lbs), they
have no depth, and are unstable. Therefore,
at least two people must assemble and install
English
them.
5
En
Ìi
• Be sure to install it on a flat stable location.
• Insert the screws in the holes vertically and do not tighten
them with more force than necessary.
• Make sure that you install the support columns reliably with
reference to the procedure in “Assembling the Stand”.
Attachment Method
1
Attaching the Pioneer television to the
stand.
Fit the stand’s support columns to the bottom of the
Pioneer television as indicated by the arrows, then slowly
insert them vertically. Be extremely careful not to insert
the support columns of the stand into any part of the
Pioneer television other than the stand insertion slots.
Note that doing so might damage the Pioneer television
panel or its ports or result in the warping of the stand.
-JOFVQUIFDPMVNO
TVQQPSUTXJUIUIFCPUUPN
PGUIF1JPOFFSUFMFWJTJPO
BTJOEJDBUFEJOUIF
BDDPNQBOZJOHEJBHSBN
2
Securing the Pioneer television with
Installation screws
.
Secure them using the enclosed hexagonal wrench.
*OTUBMMBUJPOTDSFXT
.YNNTJMWFS
#AUTION
#AUTION
3
Securing the Pioneer television with
Installation screws
.
Attach the Pioneer television at the points marked with
“T” using the enclosed hexagonal wrench.
There have been cases where unforeseen
accidents such as the equipment breaking or
falling over occurred because the stand was
installed with wrong screws.
*OTUBMMBUJPOTDSFXT
.YNNCMBDL
4
Attaching the speakers.
Refer to the operating instructions for the speaker for the
installation method.
PDK-TS36B_AZR1279B.indb 5 2008/07/07 9:32:33
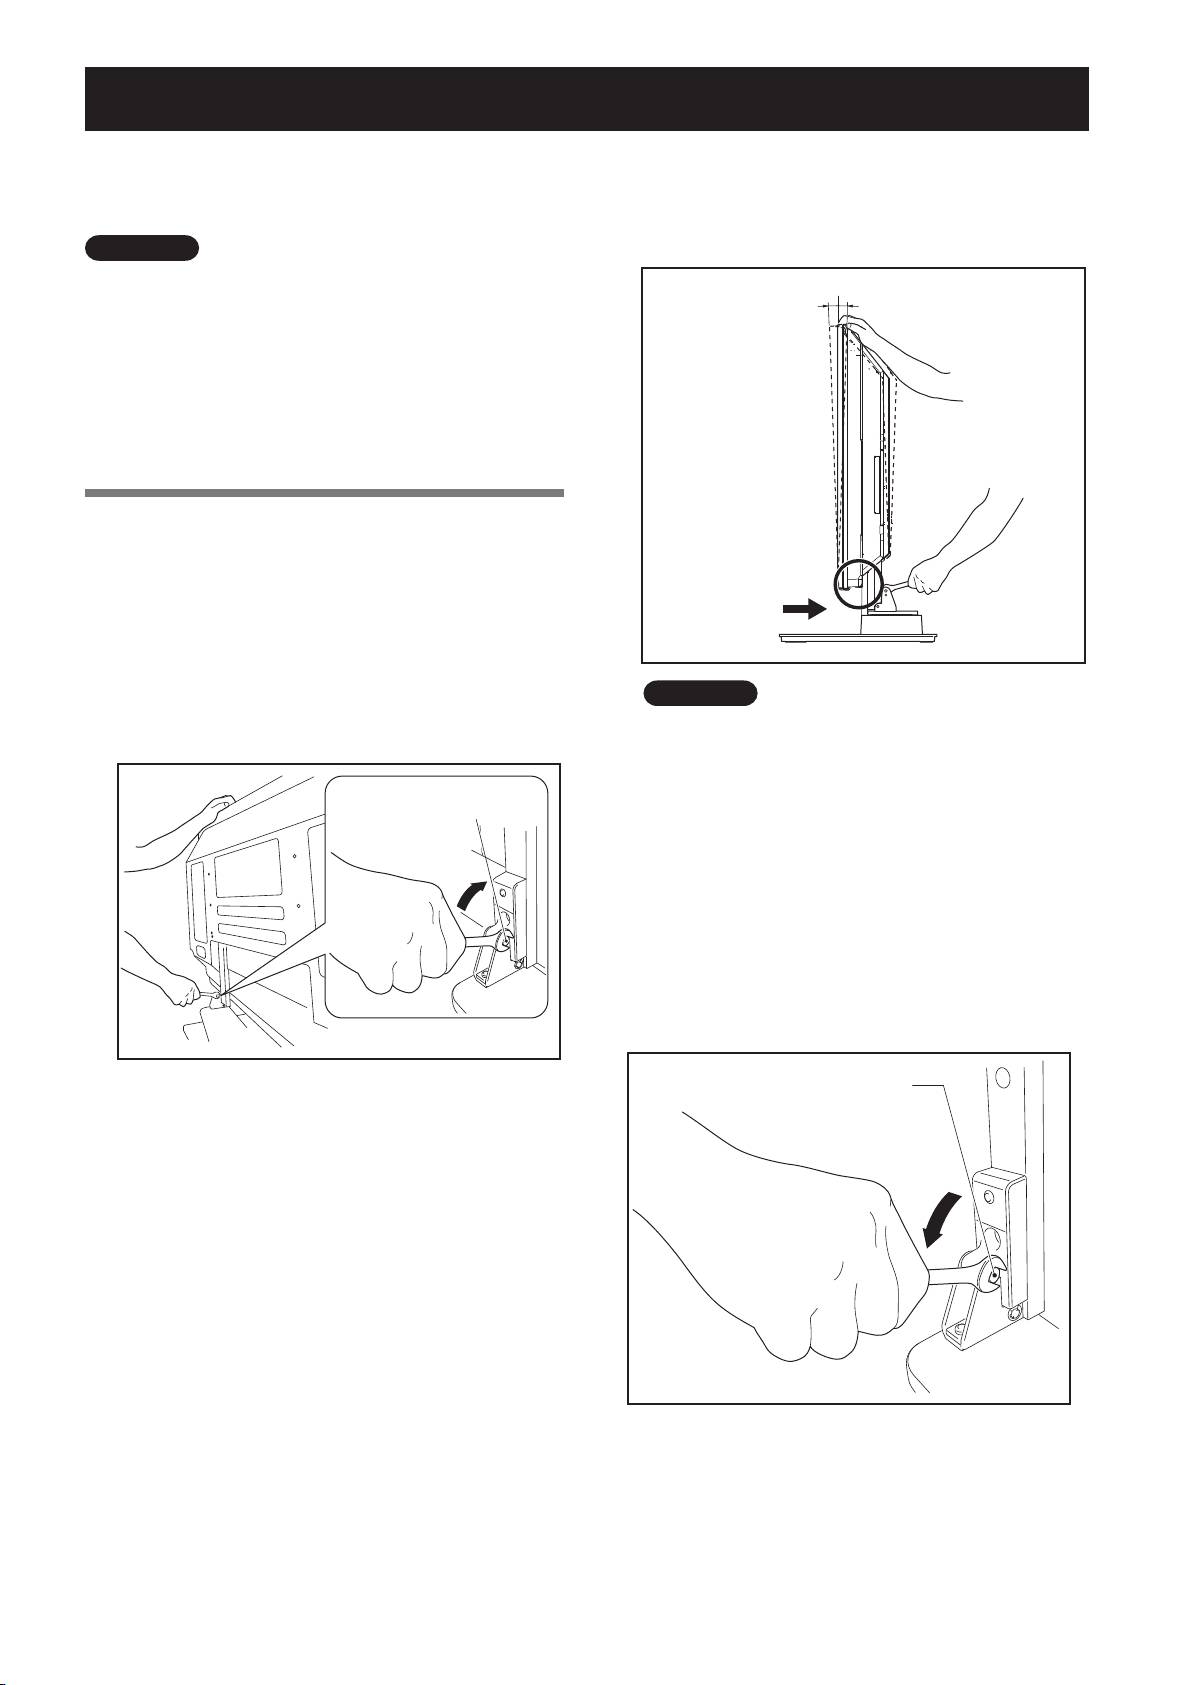
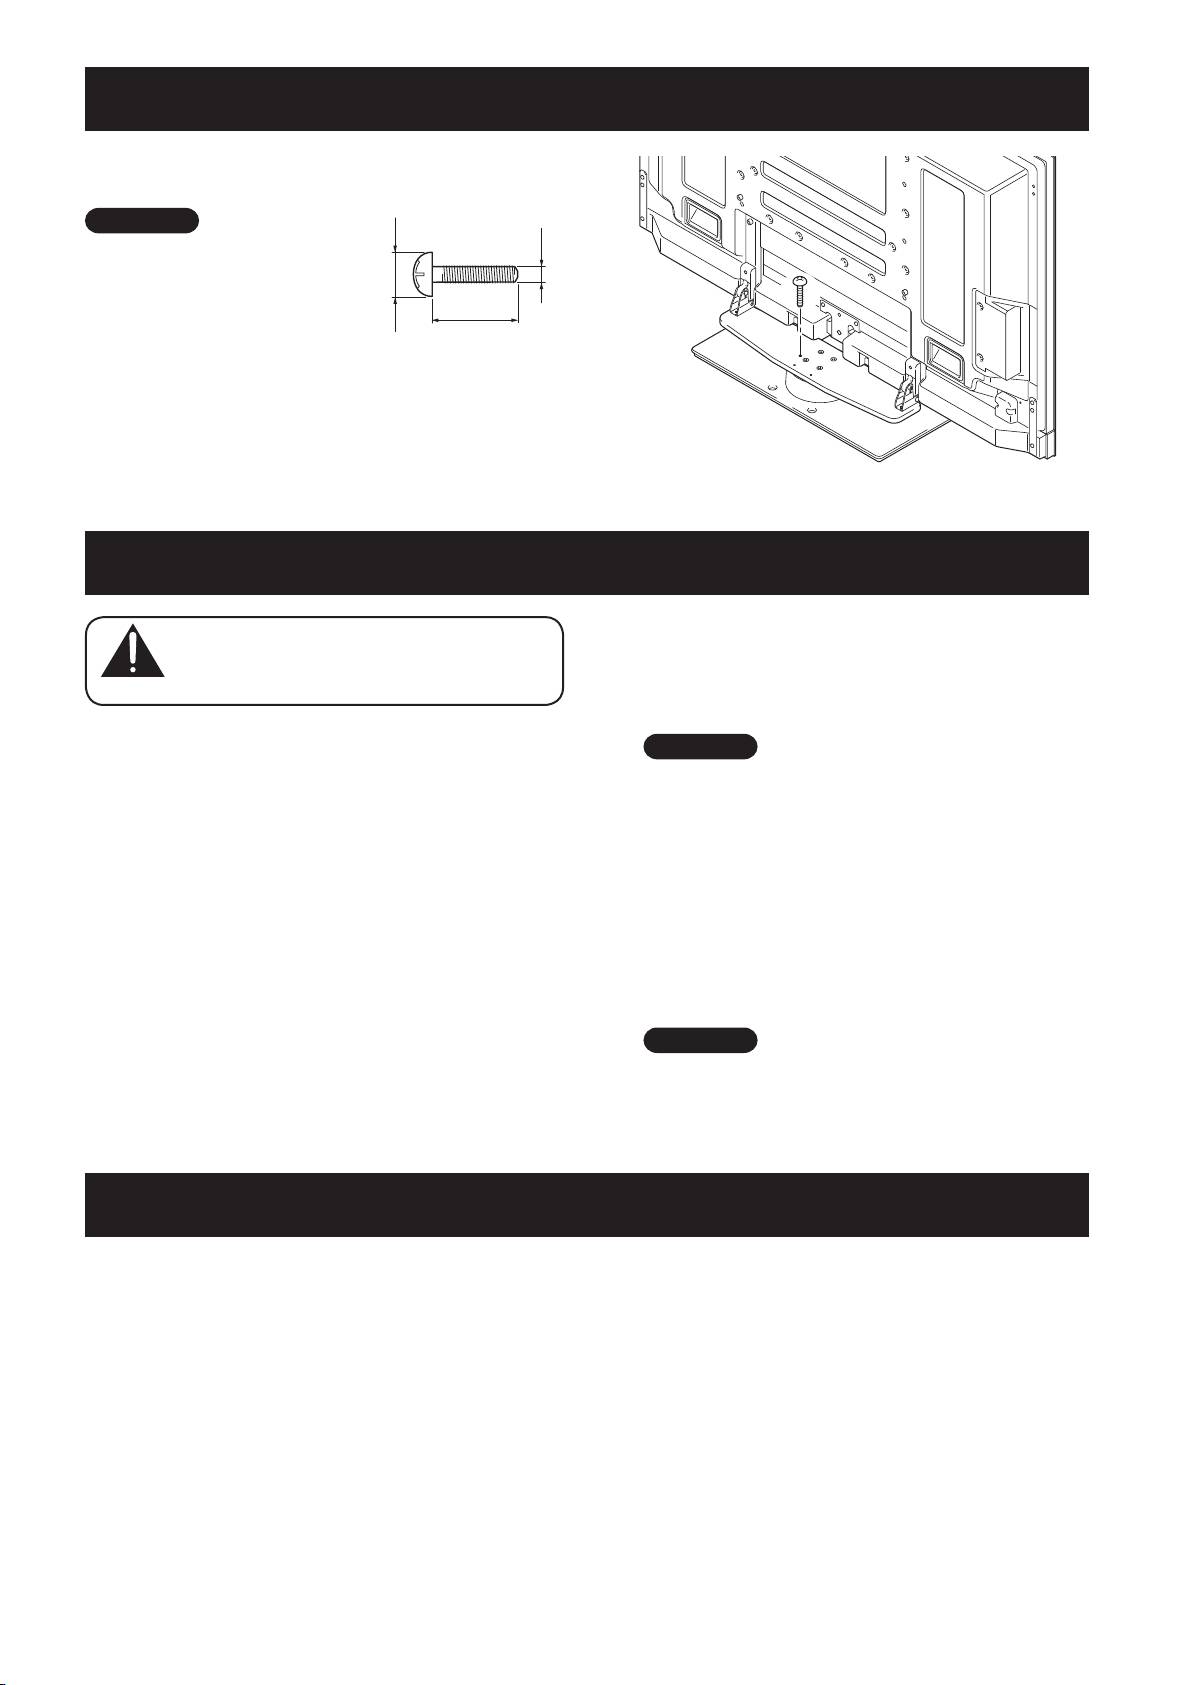
Forward/Backward Angle of Inclination Adjustment Mechanism
On this stand, you can adjust the angle of inclination of the
Pioneer television within a range of approximately 2° forward
or backward according to your preference.
6
En
Ìi
• Be sure to adjust the angle only after you have
attached the Pioneer television.
• Be sure to install it on a flat table or other flat
surface.
• Be sure to hold the top of the Pioneer television
with your hand while adjusting the angle.
Adjustment Procedure
1
Loosen the forward/backward inclination
anchor bolts using the enclosed C wrench (2
locations on the left and right).
While being sure to hold the top of the Pioneer television
with your hand, loosen the
forward/backward
inclination anchor bolts
on the left and right sides by
rotating them upwards using the enclosed C wrench.
'PSXBSECBDLXBSE
JODMJOBUJPOBODIPSCPMU
-PPTFOJOH
2
Set the angle you prefer.
Set the angle you prefer by slowly moving the Pioneer
television.
Ìi
3
Tighten the forward/backward inclination
anchor bolts (2 locations on the left and
right).
Firmly tighten the
forward/backward inclination
anchor bolts
on the left and right sides by rotating them
downward using the enclosed C wrench.
Be sure to hold the top of the Pioneer television with your
hand until you have fully tightened the bolts.
While adjusting the angle, be very careful to keep your
hands out of the place indicated by the arrow on the
figure.
'PSXBSECBDLXBSE
JODMJOBUJPOBODIPSCPMU
5JHIUFOJOH
4
Check once more to make sure that the
forward/backward inclination anchor bolts
are fully tightened.
PDK-TS36B_AZR1279B.indb 6 2008/07/07 9:32:33
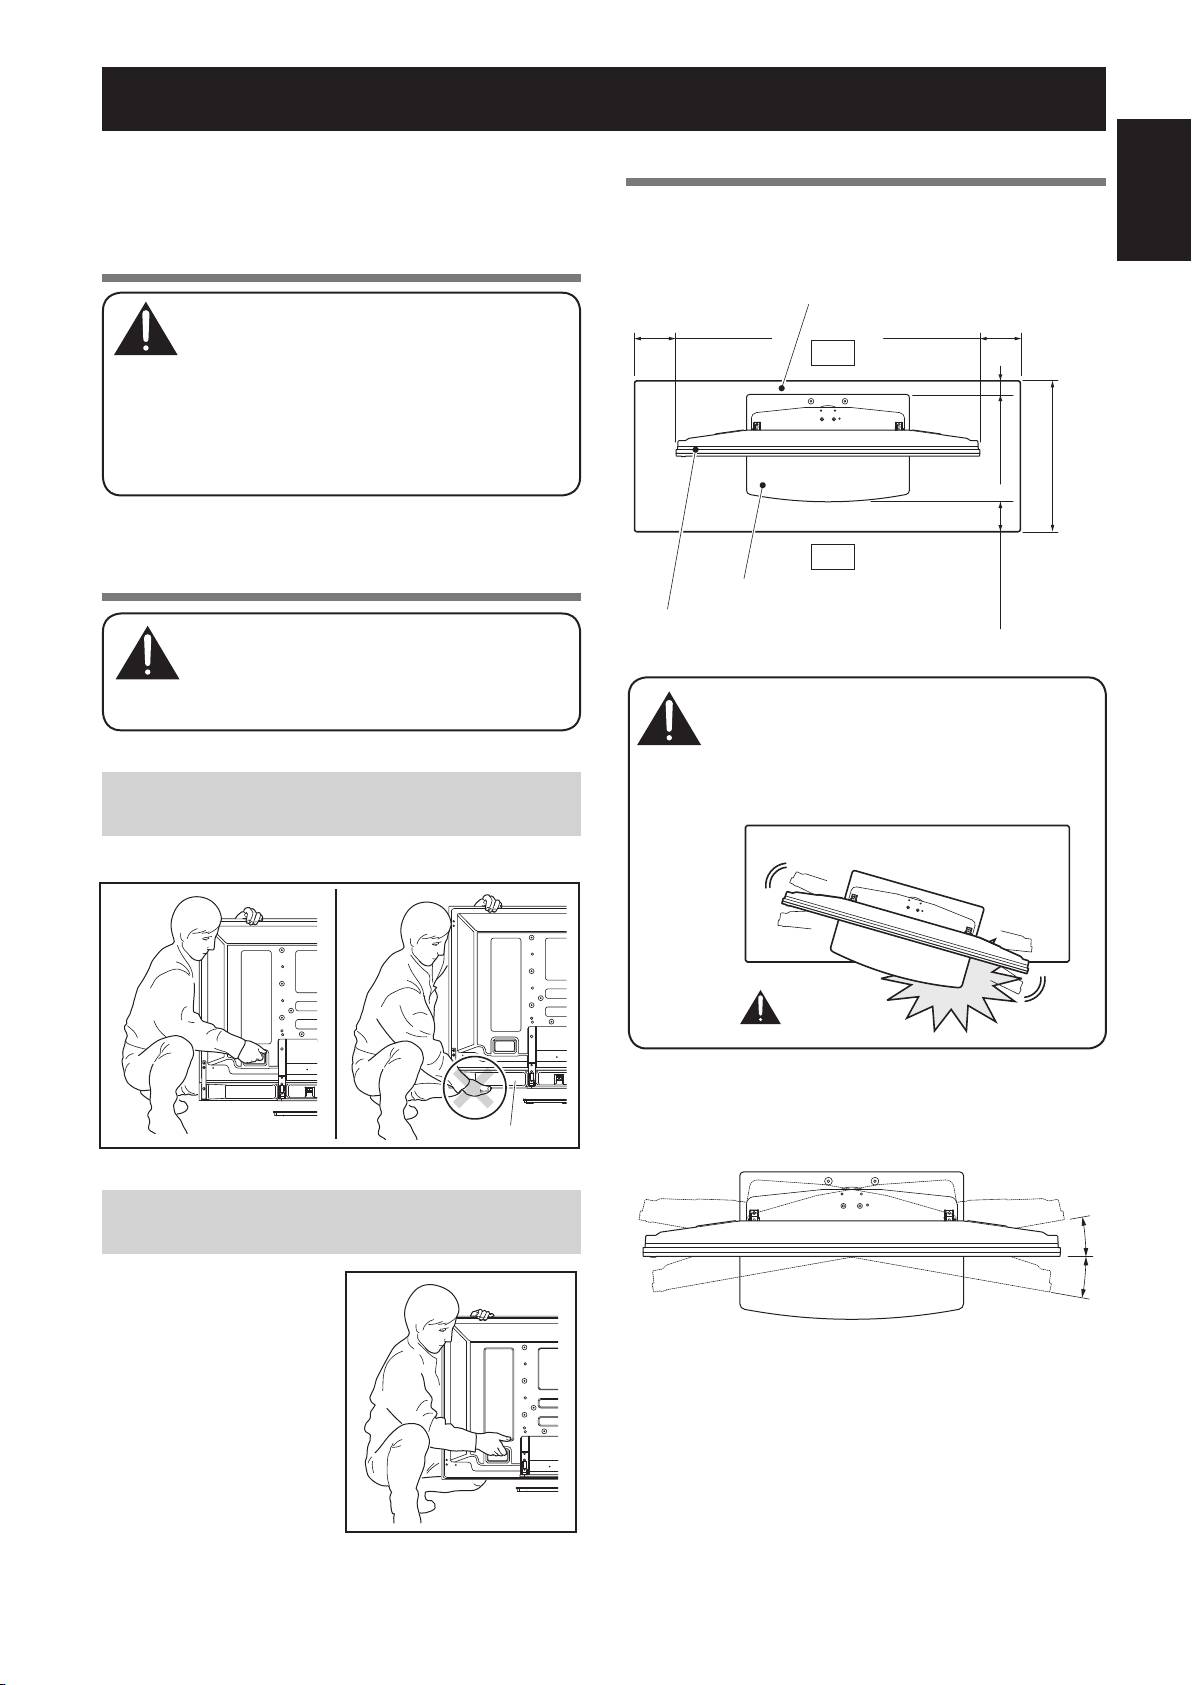
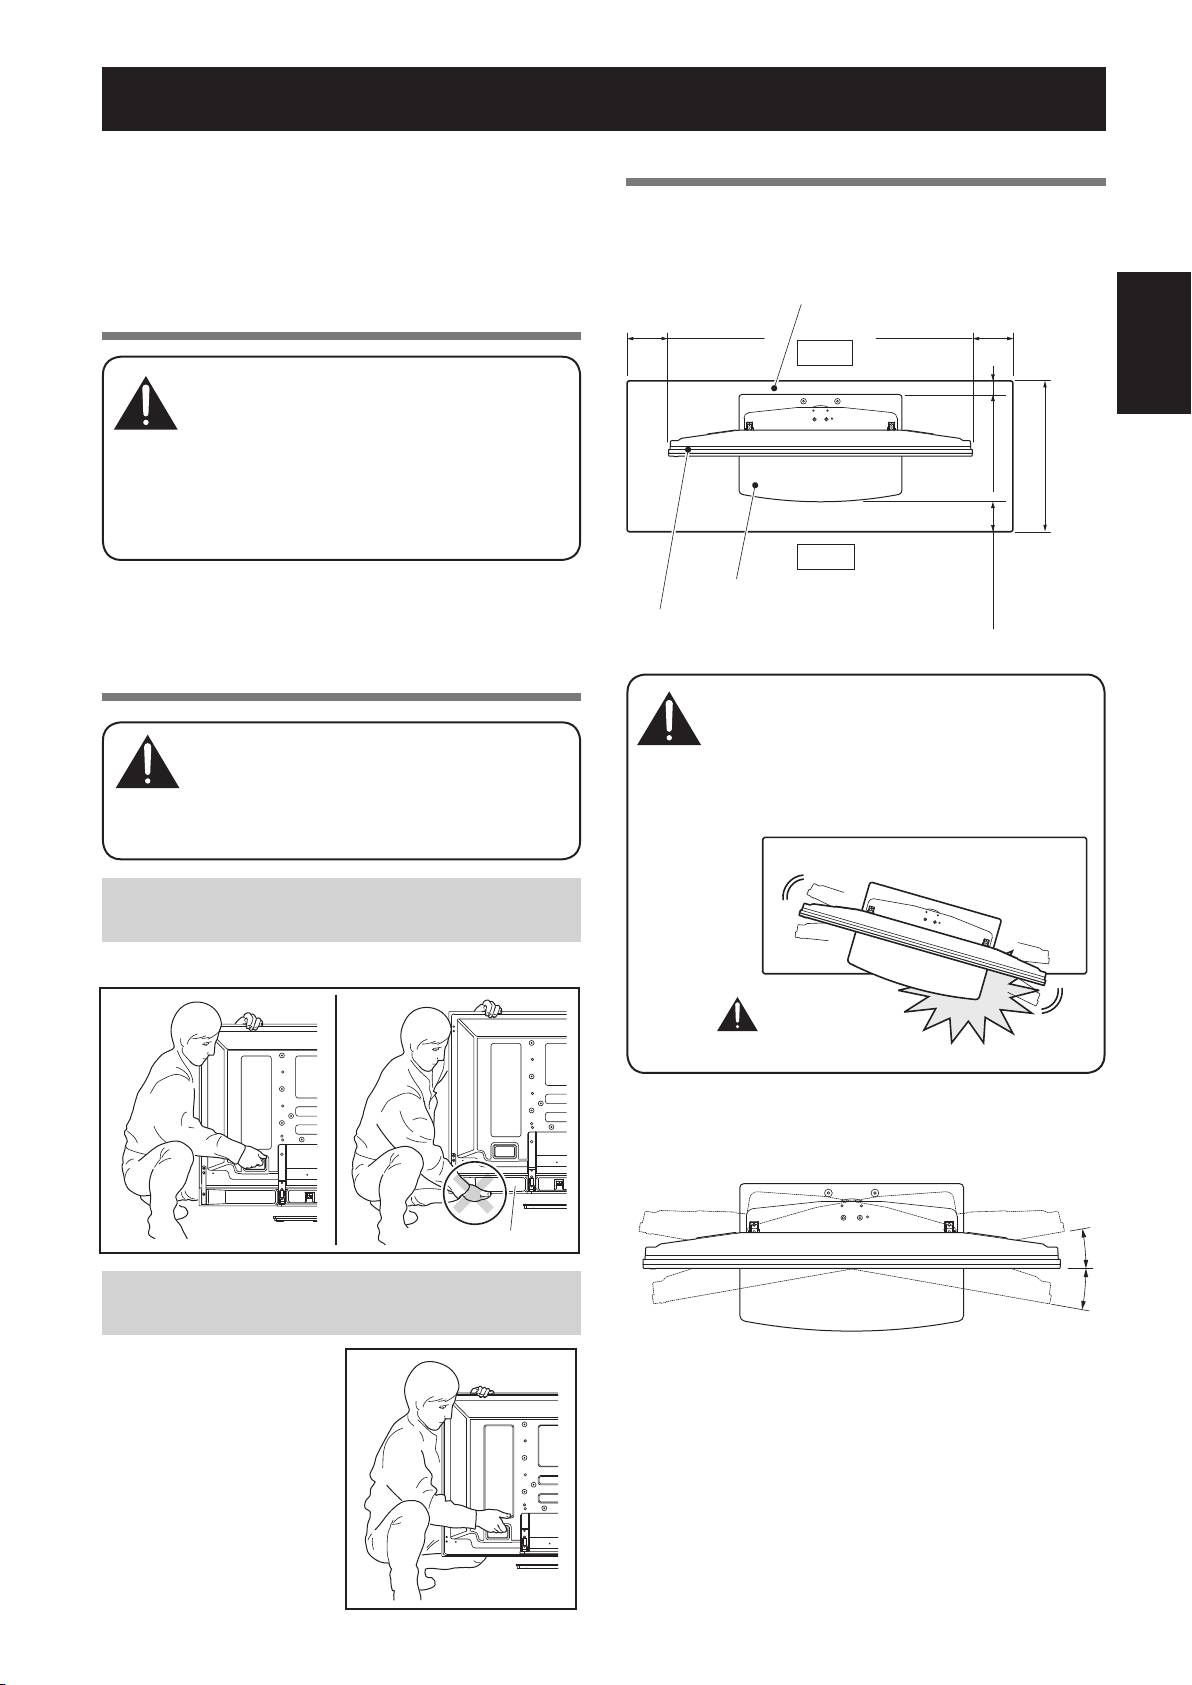
Installing the Product on a TV table etc.
Be sure to observe the following precautions when moving
or installing this product with a Pioneer television into a TV
table or other enclosure.
English
Precautions when moving
• When moving the product more than a few
meters, first remove the speaker, then remove
the Pioneer television from the stand and move
the speaker, Pioneer television, and stand
separately.
• When detaching the Pioneer television from the
stand, be sure to follow the procedure described
in “Detaching the Pioneer Television from the
Stand” on page 10.
Precautions when installing in a TV
table or other enclosure
When installing in a TV table or other enclosure,
hold the Pioneer television by the handles
located on the rear of the Pioneer television. If
you hold the speakers, they may be damaged or
twisted.
When the Pioneer television you have purchased is
under speaker models.
Hold the Pioneer television by its handles and from the top.
7
En
6OEFSTQFBLFS
When the Pioneer television you have purchased is
except under speaker models.
Hold the Pioneer television
by its handles and from the
top.
#AUTION
#AUTION
Installation precautions
Make sure that you always secure a space at least as large
as that shown in the following diagram in front of and behind
the table top stand.
57UBCMF
.JONN
.JONN
JODI
#BDL
JODI
.JONN
JODI
%FQUIPGUIF57UBCMF
NNJODI
PSNPSFSFDPNNFOEFE
'SPOU
5BCMFUPQTUBOE
1JPOFFSUFMFWJTJPO
.JONN
JODI
• If the stand protrudes from the TV table, it
could cause unforeseen accidents such as the
equipment breaking or falling over.
• When rotating, take care not to allow the
display to bump into walls or surrounding
objects.
*ÀÌÀÕÃÊÃÊ
`>}iÀÕð
❖
Range of angle rotation
×
×
#AUTION
PDK-TS36B_AZR1279B.indb 7 2008/07/07 9:32:34
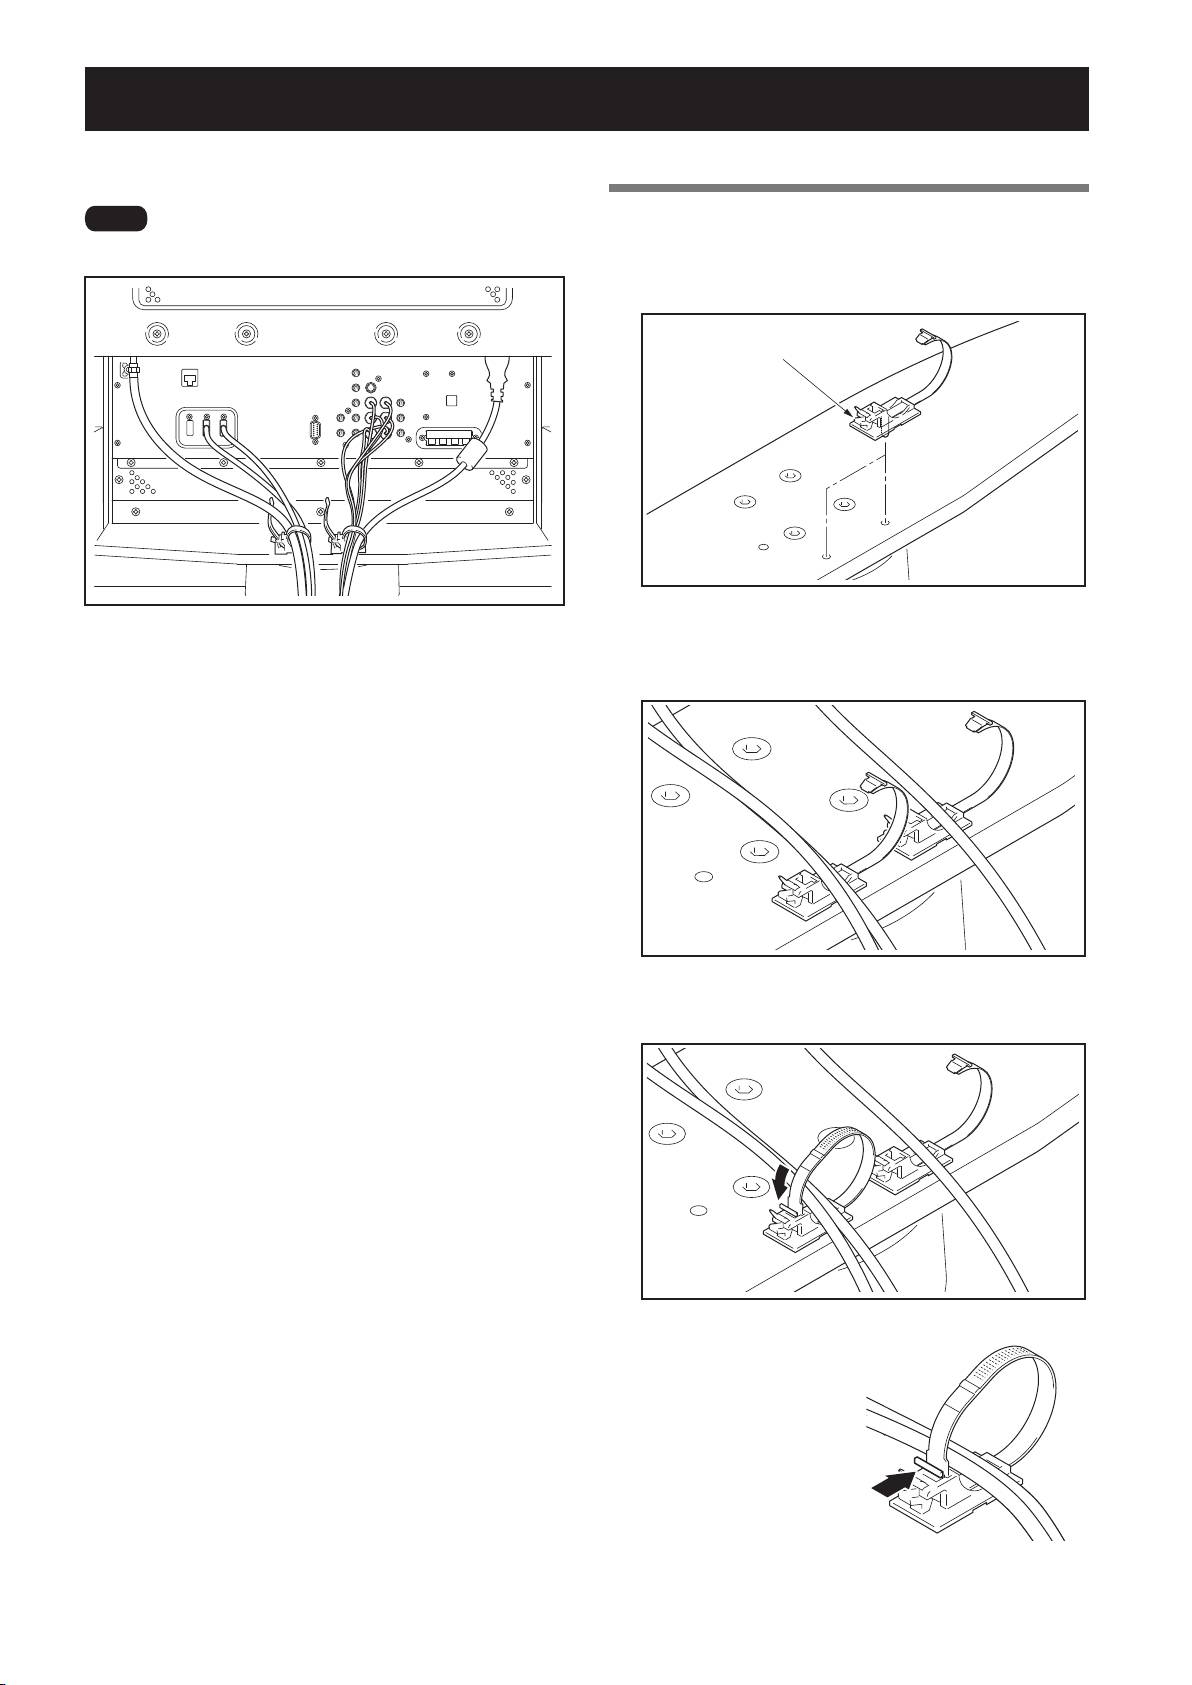
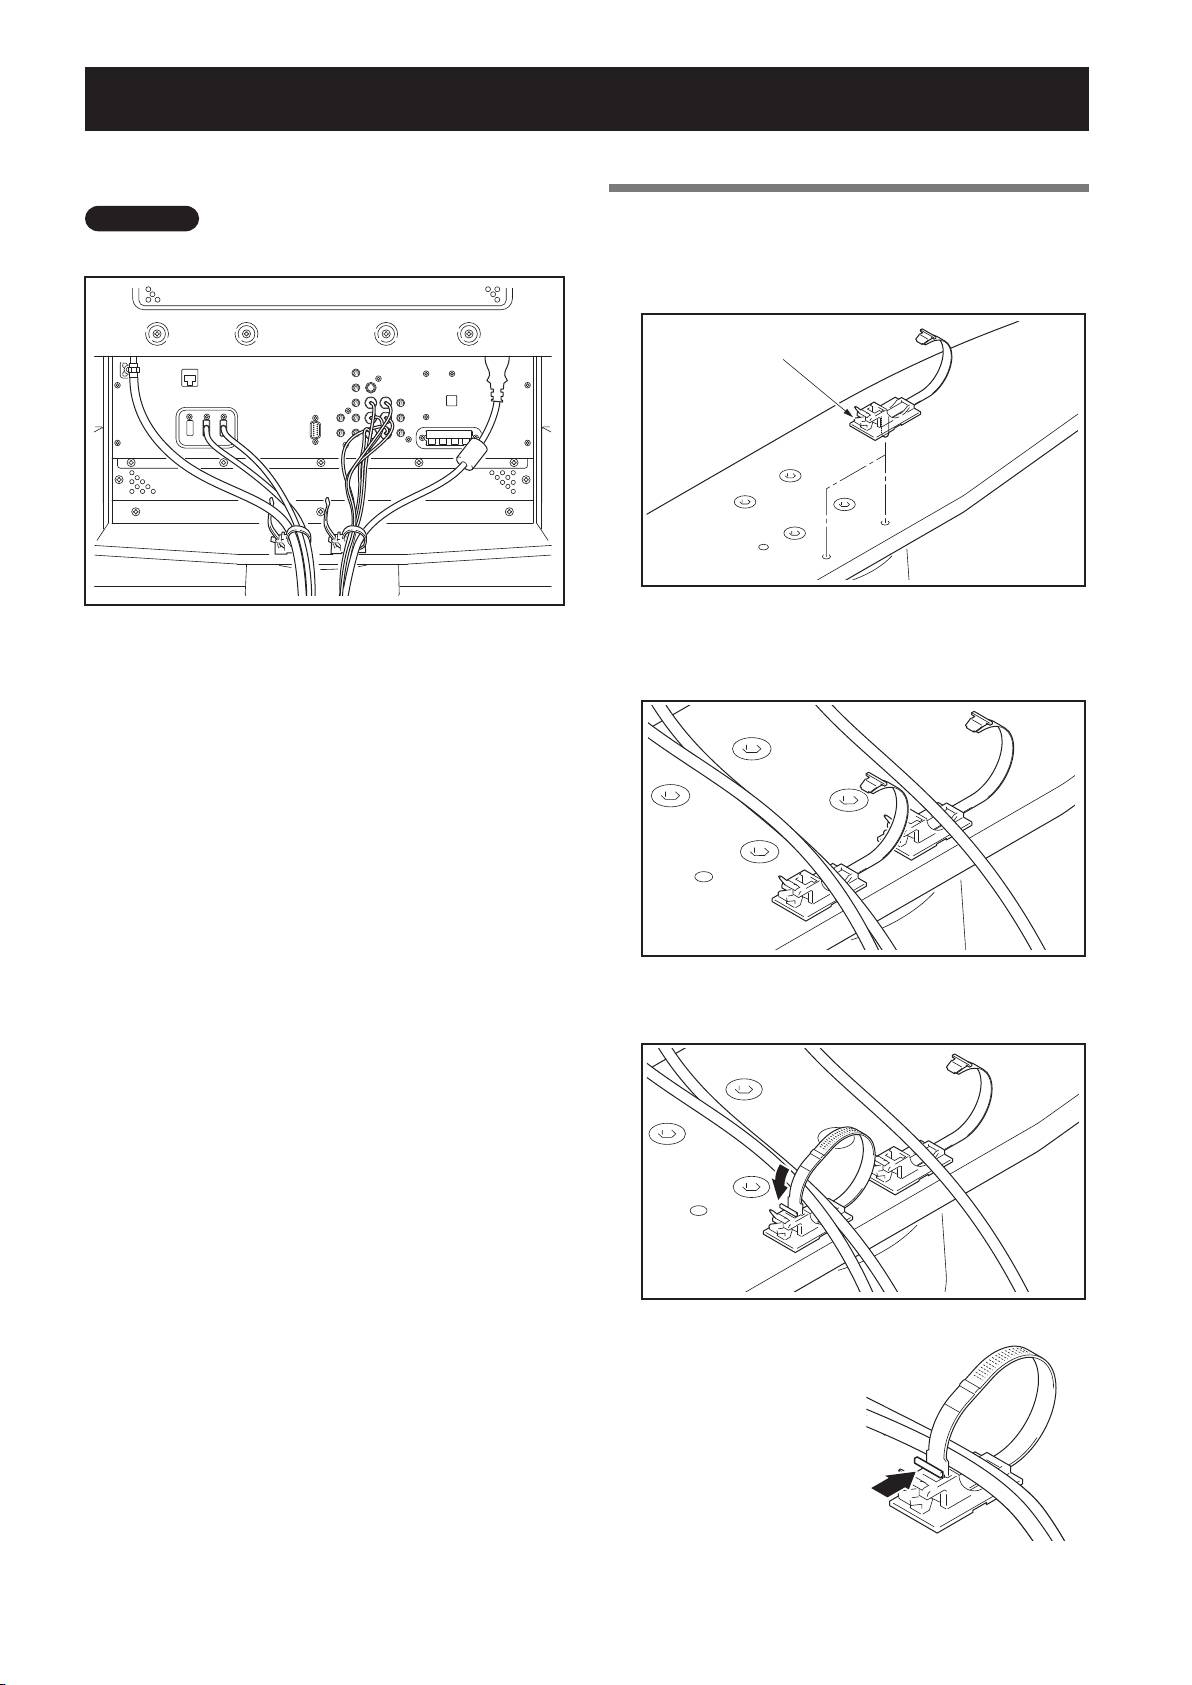
Preparing the Cables
Use the enclosed cable binders to bind the cables.
8
En
Ìi
Using the cable binders
1
Insert the cable binder through the hole
Be very careful not to apply force to the bases of the cables.
on
the top of the rotating platform of the
stand.
$BCMFCJOEFS
2
Gathering cables and placing them on the
cable binder.
3
Locking the cable binder.
❖
Removing a cable binder
The lock is released by pushing
the part indicated by the arrow
in the figure.
PDK-TS36B_AZR1279B.indb 8 2008/07/07 9:32:35
Preventing Equipment from Falling Over
After installing the stand, be sure to take special care to ensure that the Pioneer television
will not fall over.
English
• Because of the Pioneer television’s weight, if it could fall down, this can result in injury.
• For safety, be sure to take special care to ensure that the Pioneer television will not fall over.
Stabilizing on TV table or other location
Stabilize the equipment as shown in the diagram using
screws that are available on the market.
9
En
Ìi
• A TV table with adequate strength, width and depth
should
always be used to support the Pioneer television.
Failure to do so could result in falling over.
• To stabilize the Pioneer
television on a TV table, use
screws that have a nominal
diameter of 6 mm (1/4 inch).
Select the appropriate screws
after consulting a professional
installer if necessary.
#AUTION
Using a wall for stabilization
1
Attaching falling prevention bolts to the
Pioneer television.
2
Using strong cords to stabilize it
appropriately and firmly to a wall, pillar,
or other sturdy element.
• Perform this work in the same way on the left and
right sides.
• Th
e length of the cords used must be long enough to
allow the stand to rotate freely.
• A table with adequate strength should always be used
to support the Pioneer television. Failure to do so could
result in personal injury and physical damage.
• When installing the Pioneer television, please take the
necessary safety measures to prevent it from falling or
overturning in case of emergencies, such as earthquakes,
or of accidents.
• If you do not take these precautions, the Pioneer
television could fall down and cause injury.
• The screws, hooks and other fittings that you use
to secure the Pioneer television to prevent it from
overturning will vary according to the composition and
thickness of the surface to which it will be attached.
• Select the appropriate screws, hooks and other fittings
after first inspecting the surface carefully to determine
its thickness and composition and after consulting a
professional installer if necessary.
Ìi
Use falling prevention bolts,
ropes and fittings that are
available on the market.
Recommended bolts:
Nominal diameter M8
Length 12 mm to 15 mm (1/2 to 5/8 inch)
£'BMMJOHQSFWFOUJPOCPMUT
Ó$PSET
'JUUJOHT
❖
Position of table screws: Without speakers
Unit: mm (inch)
NN
JODI
.JONN
NNUPNN
UPJODI
JODI
.
NNUPNN
UPJODI
PDK-TS36B_AZR1279B.indb 9 2008/07/07 9:32:36
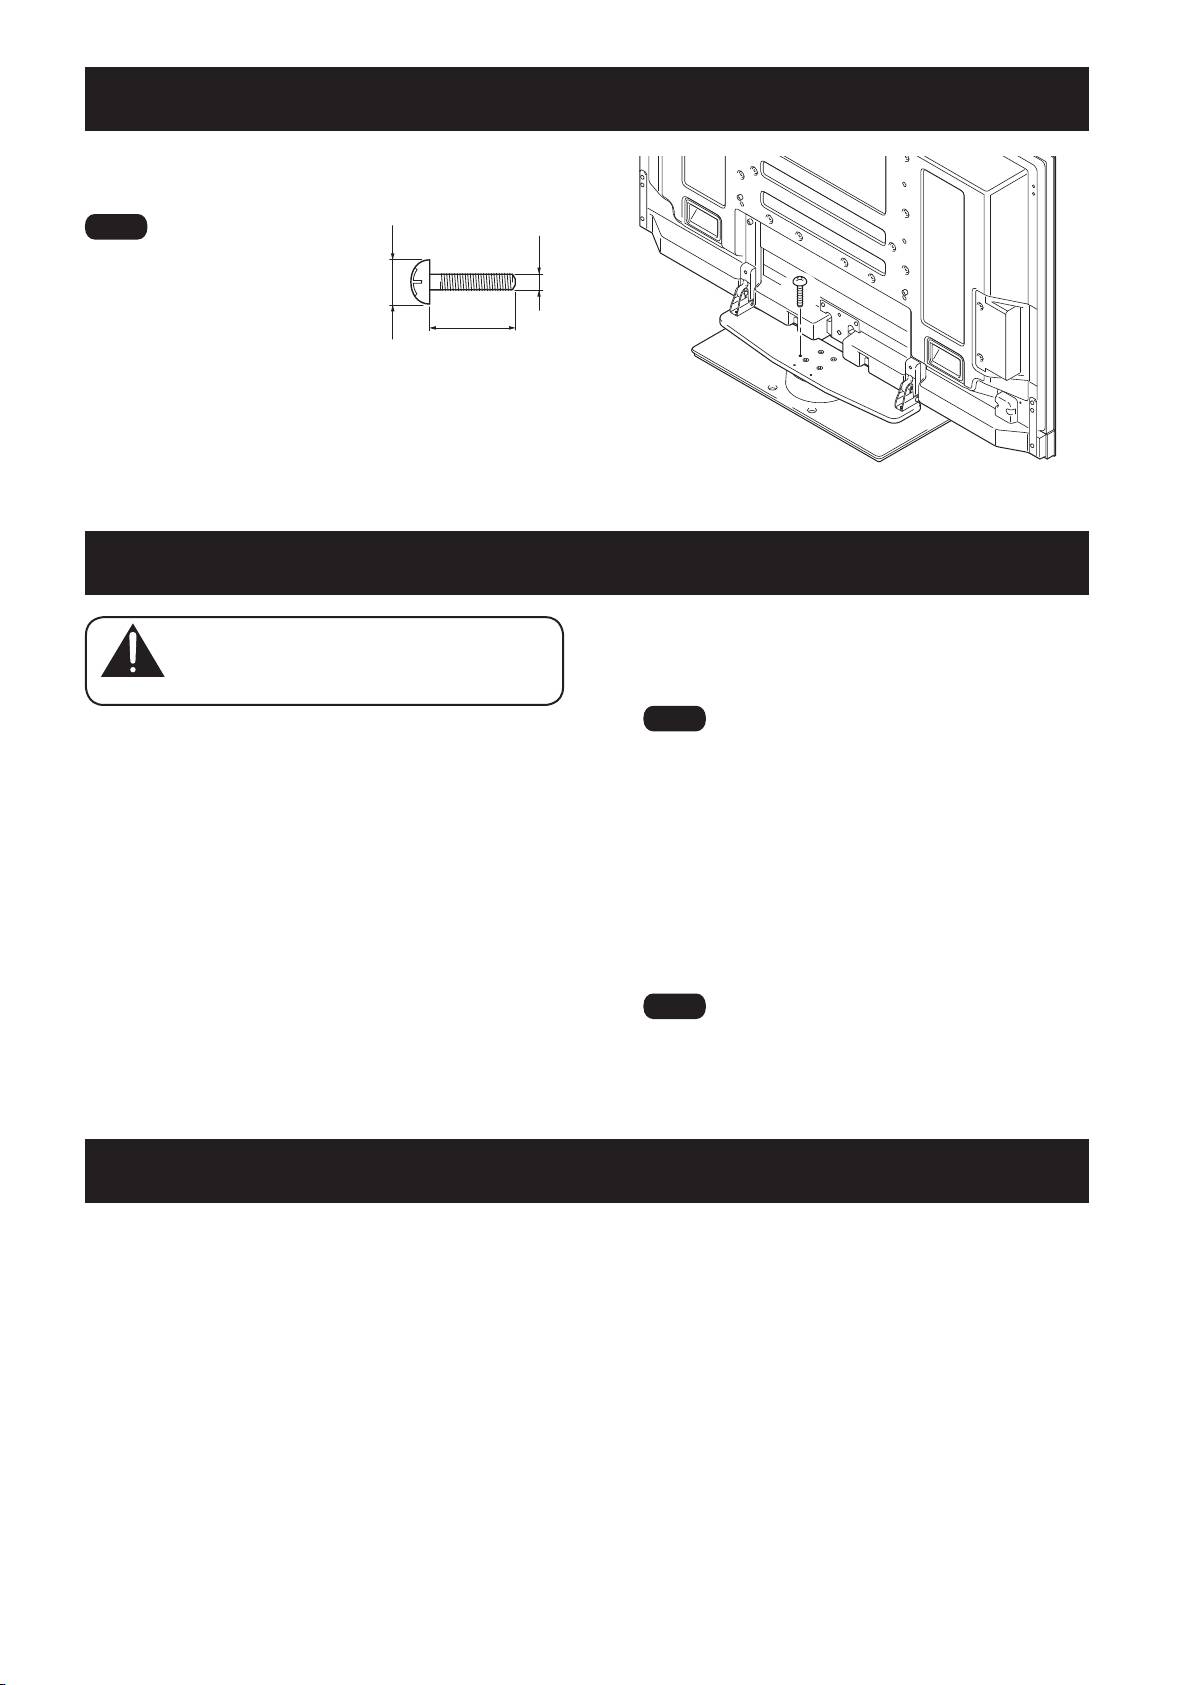
Fixing the rotation to the front
Stabilize the equipment as shown in the diagram using
screws that are available on the market.
10
En
Ìi
Use a screw that has a nominal
diameter of M4 and length
from 20 mm to 30 mm (13/16 to
1-3/16 inch) to fix the rotation
to the front.
.
NNUPNN
UPJODI
NNUPNN
UPJODI
Detaching the Pioneer Television from the Stand
#AUTION
4
Referring to steps 2 and 3 in “Attaching
To remove the Pioneer television from the
stand, be sure to always follow the procedure
the Pioneer Television” (Page 5.), remove
described below to prevent accidents.
the installation screws (4 screws).
1
First, confirm that the forward/backward
inclination anchor bolt is securely
tightened.
2
First clear a space on a flat floor etc.
where you can lay the Pioneer television
flat, then lay a sheet to protect it from
scratches or other damage.
3
Remove the speakers.
Ìi
Do not remove the screws (M8 x 16 mm: silver) by
procedure 2 in Page 5. The support columns might slip out
of place and fall over.
5
Holding the Pioneer television by its
handles and from the bottom, lift the
display vertically.
6
Place the Pioneer television slowly onto
the sheet laid out in step 2 with its screen
facing downwards.
Ìi
When reattaching the Pioneer television to the stand, be
certain that the left/right support columns are set at the
same angle.
Specifications
External dimensions 577 mm (W) x 321 mm (H) x 380 mm (D) (22-23/32 in. (W) x 12-5/8 in.(H) x 14-31/32 in. (D))
[When using the support columns S]
Weight 10.8 kg (23.9 lbs)
• The above specifications and exterior may be modified without prior notice to improve the product.
PDK-TS36B_AZR1279B.indb 10 2008/07/07 9:32:36
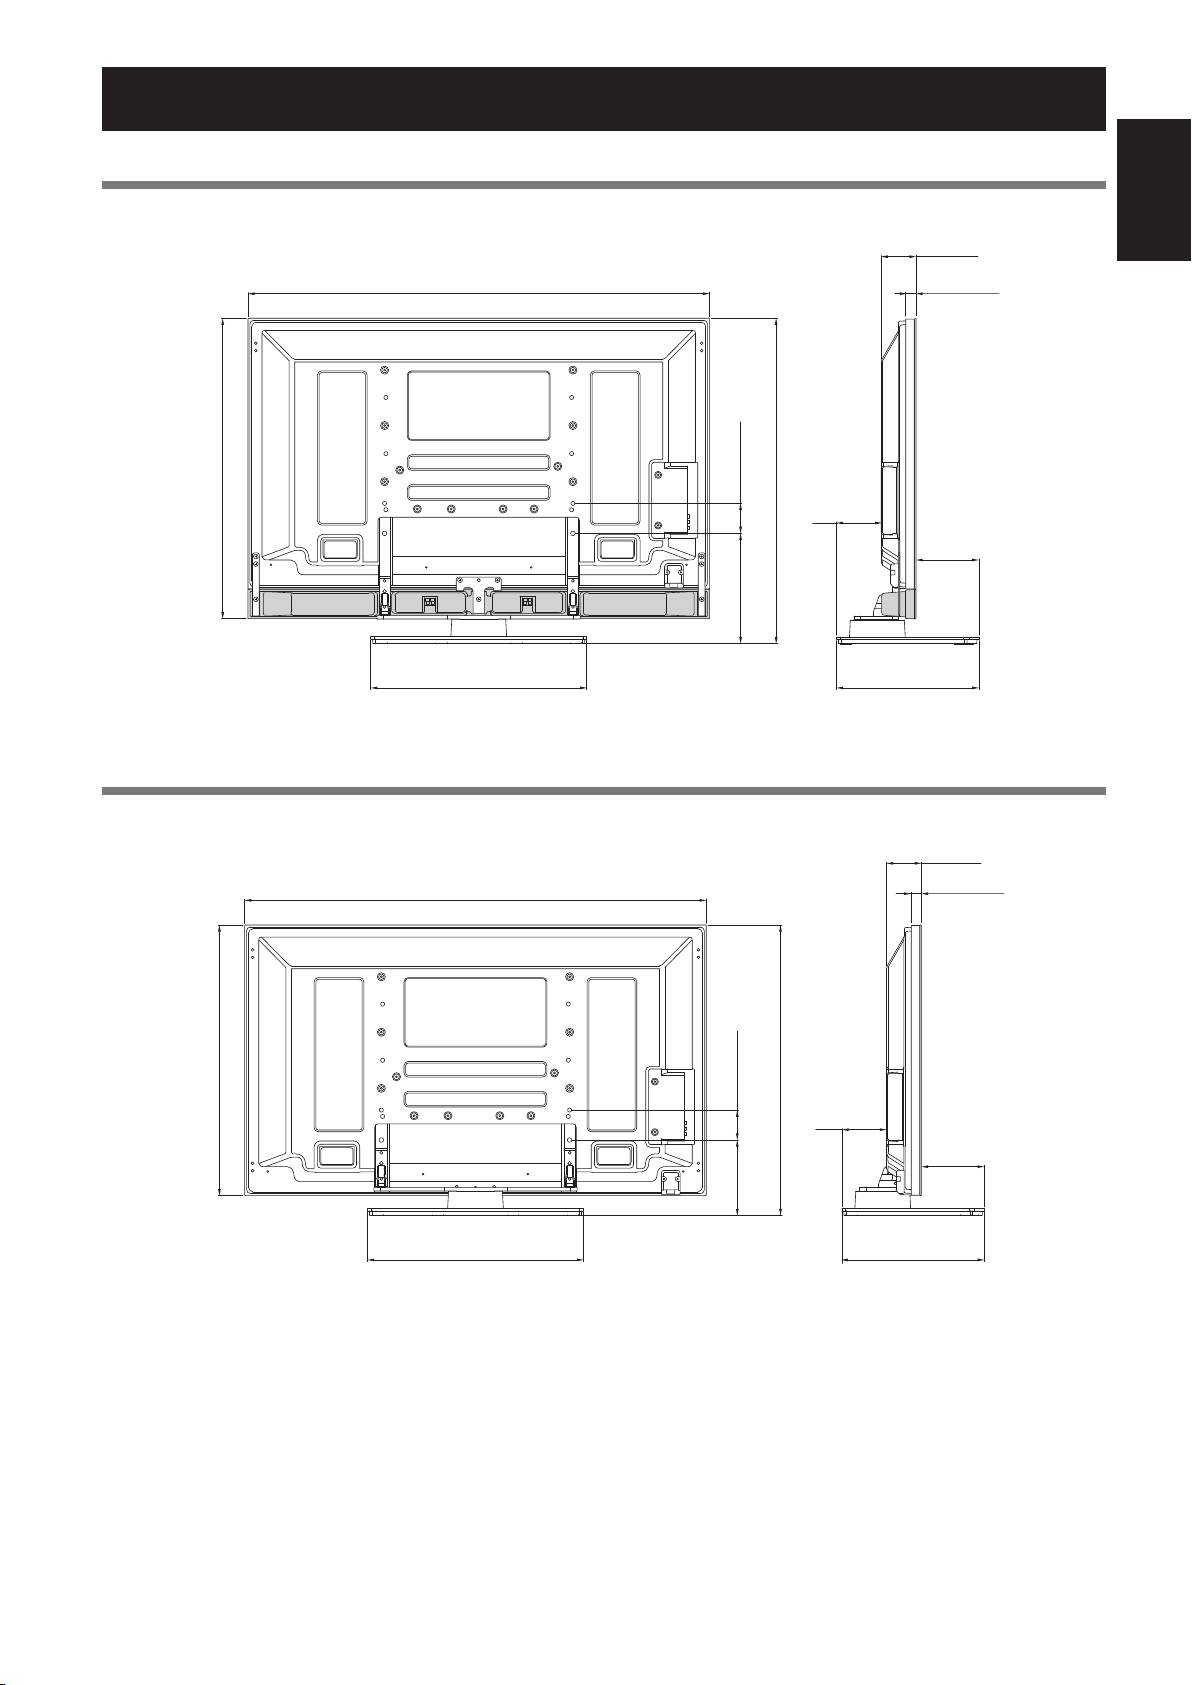
Dimensions Diagram
50 inch display model (under speaker models)
Unit: mm (inch)
English
11
En
93 (3-21/32)
1233 (48-17/32)
27 (1-1/16)
80 (3-5/32)
126
803 (31-5/8)
(4-31/32)
866 (34-3/32)
161
(6-11/32)
291.5
(11-15/32)
577 (22-23/32)
380 (14-31/32)
50 inch display model (except under speaker models)
Unit: mm (inch)
93 (3-21/32)
27 (1-1/16)
1233 (48-17/32)
723 (28-15/32)
80 (3-5/32)
126
786 (30-15/16)
(4-31/32)
161
(6-11/32)
211
(8-5/16)
577 (22-23/32)
380 (14-31/32)
Published by Pioneer Corporation.
Copyright © 2008 Pioneer Corporation.
All rights reserved.
PDK-TS36B_AZR1279B.indb 11 2008/07/07 9:32:37
Nous vous remercions d’avoir choisi un produit Pioneer.
Veuillez lire attentivement ce mode d’emploi pour savoir
Avertissements
comment utiliser correctement et en toute sécurité votre pied
de table. Nous vous conseillons de conserver soigneusement
Ce produit est un pied de table conçu exclusivement pour
ce mode d’emploi à proximité et dans un endroit sûr afin de
les téléviseurs Pioneer (PDP-5020FD / PDP-111FD / PDP-
pouvoir vous y référer le cas échéant.
LX5090H / PDP-LX5090 / PDP-LX509A / PDP-C509A).
L’utilisation de ce produit avec un autre modèle peut être
Installation
à l’origine d’un manque de stabilité pouvant entraîner une
blessure.
• En cas de difficultés, veuillez consulter votre revendeur.
Pour de plus amples informations, veuillez contacter le
• Pioneer ne saura être tenu responsable d’aucun
magasin où vous avez acheté votre écran.
dommage résultant d’une installation ou d’une
utilisation incorrecte de ce produit, de sa modification
N’installez pas et ne modifiez pas ce pied de table sans
ou encore de catastrophes naturelles.
respecter les instructions fournies. Ne l’utilisez pas pour
un téléviseur Pioneer autre que ceux cités et ne le modifiez
pas ou ne l’utilisez pas à des fins autres que celles pour
lesquelles il a été conçu. En outre, n’utilisez pas ce support
pour un écran a plasma autre que ceux pour lesquels il a
été conçu et ne le modifiez pas ou ne l’utilisez pas a des fins
autres que celles pour lesquelles il a été conçu.
Une installation incorrecte est extrêmement dangereuse car
elle peut provoquer la chute du support ou un autre accident.
Lieu d’installation
•
Sé
lectionnez un emplacement assez solide pour supporter
le poids du pied de table et de l’écran.
Table des matières
• As
surez-vous de placer le produit sur une surface plane et
stable.
Avertissements ...................................................... 12
• N’
installez pas le pied de table à l’extérieur ou dans un lieu
humide, par exemple à proximité d’une source chaude ou d’
Vérification des pièces contenues dans le
une plage.
carton d’emballage ................................................ 13
•
N’
installez pas le support à un endroit où il pourrait être
soumis à des chocs ou à des vibrations.
Assemblage du pied de table ............................... 14
Montage et installation
Installation et fixation du téléviseur Pioneer ...... 15
• Montez le pied de table en suivant les instructions et
Mécanisme d’ajustement de l’angle d’inclinaison
vissez solidement toutes les vis aux endroits prévus à
en avant et en arrière ............................................ 16
cet effet.
Des accidents ont été constatés (casse, chute du
Installation du produit sur un meuble de
matériel, etc.) après l’installation de l’écran parce que
télévision, etc. ........................................................ 17
le pied de table n’avait pas été installé conformément
aux instructions.
Préparation des câbles .......................................... 18
•
Po
ur une bonne installation, l’écran doit toujours être
Prévenir le basculement et la chute de
installé par au moins deux personnes.
l’équipement ......................................................... 19
• Av
ant de procéder à l’installation, mettez l’écran ainsi
que les équipements périphériques hors tension en
Fixation de la rotation à l’avant ........................... 20
coupant l’alimentation, puis retirer la prise du câble
Démontage du téléviseur Pioneer du
d’alimentation de la prise murale.
pied de table .......................................................... 20
Ce produit pivote de 10° vers la gauche et la droite et s’incline
Spécificités.............................................................. 20
de 2° environ en avant et en arrière. Ne placez pas d’objets
Schéma de dimensions .......................................... 21
dans le champ de rotation de ce produit et du téléviseur
Pioneer. Installez ce produit de façon à ce que, en utilisation
normale, ou lorsque vous le faites pivoter, il ne dépasse
pas de la surface ou du meuble de télévision sur lequel
il est posé. Sans cela, des accidents pourraient survenir,
entraînant la détérioration de l’appareil ou sa chute (Voir
page 17).
Lorsque vous réglez l’angle vers l’avant et vers l’arrière, faites
extrêmement attention à ne pas placer vos mains entre le
bas du téléviseur Pioneer et le pied de table (voir page 16).
Il convient de prévenir les accidents provoqués par la chute
du produit en prenant des mesures fiables visant à éviter
toute chute (voir page 19).
12
Fr
PDK-TS36B_AZR1279B.indb 12 2008/07/07 9:32:37
Vérification des pièces contenues dans le carton d’emballage
Cette vérification vous permettra de vous assurer que vous possédez bien toutes les pièces nécessaires avant de procéder au
montage et à l’installation du support.
Français
13
Fr
t1JFEEFUBCMFY
t7JTEJOTUBMMBUJPO
.YNNBSHFOU¹FY
<6UJMJT¹FTQPVSGJYFSMFTDPMPOOFTEFTVQQPSUFUMFQJFEEFUBCMF>
t7JTEJOTUBMMBUJPO
t7JTEJOTUBMMBUJPO
.YNNBSHFOU¹FY
.YNNOPJSY
t$PMPOOFTEFTVQQPSU-Y<$PMPOOFTMPOHVFT>
1PVSMFTNPE¼MFTµFODFJOUFTBVEFTTPVT
t4FSSFD³CMFTY
t$M¹IFYBHPOBMFµTJYQBOTY
5BJMMFFOEJBHPOBMFNN
t$PMPOOFTEFTVQQPSU4Y<$PMPOOFTDPVSUFT>
4BVGQPVSMFTNPE¼MFTµFODFJOUFTBVEFTTPVT
t$M¹IFYBHPOBMFNNY
t.PEFEFNQMPJDFEPDVNFOUY
PDK-TS36B_AZR1279B.indb 13 2008/07/07 9:32:37
Assemblage du pied de table
14
Fr
,i>ÀµÕi
• Pour monter le pied de table, travaillez toujours sur une
surface plane.
• Introduisez les vis à la verticale et ne les serrez pas plus que
nécessaire.
Procédure de montage
1
Sélectionnez les colonnes de support à fixer.
Sélectionnez les colonnes de support en fonction du
téléviseur Pioneer que vous avez acheté (sur les deux types
de colonnes de support proposés, un seul doit être utilisé).
Quand le téléviseur Pioneer que vous avez
acheté est un modèle avec enceintes en dessous
de la dalle.
[Colonnes de support utilisées : colonnes de
support L (Colonnes longues)]
$PMPOOFTEFTVQQPSUVUJMJT¹FT
DPMPOOFTEFTVQQPSU-
$PMPOOFTMPOHVFT
Quand le téléviseur Pioneer que vous avez
acheté est un modèle sans enceintes en dessous
de la dalle.
[
Co
lonnes de support utilisées : colonnes de
support S (Colonnes courtes)]
$PMPOOFTEFTVQQPSUVUJMJT¹FT
DPMPOOFTEFTVQQPSU4
$PMPOOFTDPVSUFT
2
Fixez les colonnes sur le pied de table à
l’aide des vis d’installation
(2 sur le côté
gauche et 2 sur le côté droit).
A l’aide de la clé hexagonale fournie, vissez légèrement
les vis en commençant par celle du haut.
-FTPSJGJDFTMFTQMVTMBSHFT
7JTEJOTUBMMBUJPO
TFUSPVWFOUµMBWBOU
.YNNBSHFOU¹F
3
Vissez à fond les vis d’installation (2 sur le
côté gauche et 2 sur le côté droit).
7JTTF[µGPOEMFTWJTEJOTUBMMBUJPO
,i>ÀµÕi
Veillez à bien ranger les colonnes de support non
utilisées, la clé hexagonale, la clé C et le mode d’emploi
au même endroit.
PDK-TS36B_AZR1279B.indb 14 2008/07/07 9:32:38
Installation et fixation du téléviseur Pioneer
Le poids (sans enceintes) d’un téléviseur Pioneer
50 pouces avoisine les 34 kg. Sa largeur étant
limitée, il n’est pas stable. Par conséquent,
ils doivent toujours être installés par deux
personnes à la fois.
Français
15
Fr
,i>ÀµÕi
• Montez toujours le téléviseur Pioneer sur une surface plane
et stable.
• Introduisez les vis à la verticale et ne les serrez pas plus que
nécessaire.
• Veillez à bien installer les colonnes de support solidementen
vous reportant à la procédure « Assemblage du pied de table ».
Méthode de fixation
1
Installation du téléviseur Pioneer sur le
pied de table.
Mettez les colonnes de support en place au bas du
téléviseur Pioneer comme indiqué par les flèches, puis
insérez-les lentement à la verticale.
Veillez à ne pas insérer les colonnes dans le téléviseur
Pioneer ailleurs que dans les fentes prévues à cet effet.
Cela risquerait d’endommager le téléviseur Pioneer, ses
ports ou de déformer le pied de table.
"MJHOF[MFTDPMPOOFTEV
TVQQPSUTVSMBQBSUJF
JOG¹SJFVSFEVU¹M¹WJTFVS
1JPOFFSDPNNFJOEJRV¹
TVSMJMMVTUSBUJPO
!TTENTION
!TTENTION
2
Fixez solidement le téléviseur Pioneer avec
les vis d’installation
.
Vissez solidement celles-ci au moyen de la clé
hexagonale fournie avec le pied de table.
7JTEJOTUBMMBUJPO
.YNNBSHFOU¹F
3
Fixez solidement le téléviseur Pioneer avec les
vis d’installation
.
Fixez le téléviseur Pioneer aux endroits signalés par un
« T » à l’aide de la vis hexagonale fournie.
Des accidents - chute ou casse imprévisible
du matériel – dus à l’utilisation de vis
inadaptées pour installer le pied ont déjà été
constatés.
7JTEJOTUBMMBUJPO
.YNNOPJS
4
Mise en place des enceintes.
Pour la méthode d’installation, reportez-vous au mode
d’emploi des enceintes.
PDK-TS36B_AZR1279B.indb 15 2008/07/07 9:32:39
Mécanisme d’ajustement de l’angle d’inclinaison en avant et en arrière
Avec ce pied de table, vous pouvez choisir de régler l’angle
d’inclinaison du téléviseur Pioneer de 2° environ en avant ou
en arrière.
16
Fr
,i>ÀµÕi
• Ne réglez l’angle d’inclinaison qu’après avoir fixé
le téléviseur Pioneer.
• Assurez-vous de l’installer sur une table plane ou
toute autre surface plane.
• Veillez à tenir le téléviseur Pioneer par le haut
d’une main quand vous réglez l’angle
d’inclinaison.
Procédure d’ajustement
1
Desserrez les boulons d’ancrage servant à
régler l’inclinaison en avant et en arrière à
l’aide de la clé hexagonale fournie
(
2 emplacements à gauche et à droite).
En tenant fermement le haut du téléviseur Pioneer
d’une main, desserrez les
boulons d’ancrage servant
à régler l’inclinaison avant et arrière
situés à gauche
et à droite en les tournant vers le haut à l’aide de la clé
hexagonale fournie.
#PVMPOTEBODSBHFTFSWBOUµ
S¹HMFSMJODMJOBJTPOFOBWBOU
FUFOBSSJ¼SF
%FTTFSSFNFOU
2
Choisissez l’angle d’inclinaison que vous
préférez.
Choisissez l’angle que vous préférez en manipulant
doucement le téléviseur Pioneer.
,i>ÀµÕi
Lorsque vous ajustez l’angle, faites bien attention à ne
pas placer vos mains à l’endroit indiqué par un cercle sur
le schéma.
3
Serrez les boulons d’ancrage servant à
régler l’inclinaison en avant et en arrière
(2 emplacements à gauche et à droite).
Serrez fermement les
boulons d’ancrage servant à
régler l’inclinaison en avant et en arrière
, situés sur
le côté gauche et sur le côté droit, en les tournant vers
le bas à l’aide de la clé hexagonale fournie. Tant que les
boulons ne sont pas complètement serrés, tenez le haut
du téléviseur Pioneer dans votre main.
#PVMPOTEBODSBHFTFSWBOUµS¹HMFS
MJODMJOBJTPOFOBWBOUFUFOBSSJ¼SF
3FTTFSSFNFOU
4
Vérifiez une fois de plus que les boulons
d’ancrage servant à régler l’inclinaison en
avant et en arrière sont complètement
serrés.
PDK-TS36B_AZR1279B.indb 16 2008/07/07 9:32:39
Installation du produit sur un meuble de télévision, etc.
Veillez à observer les précautions suivantes lorsque vous
déplacez ce produit ou que vous l’installez avec un téléviseur
Pioneer dans un meuble de télévision ou un autre espace
clos.
Précautions à respecter lors du
déplacement du produit
• Avant de déplacer l’appareil sur plusieurs
Français
mètres, démontez les enceintes. Séparez
également le téléviseur Pioneer de son support
et transportez chaque partie séparément.
• Lorsque vous démontez le téléviseur Pioneer
du pied de table, assurez-vous de suivre la
procédure décrite dans la partie « Démontage
du téléviseur Pioneer du pied de table » à la
page 20.
Précautions à observer lors de
l’installation du produit dans un meuble
de télévision ou autre espace clos
En cas d’installation dans un meuble de
télévision ou autre espace clos, tenez le
téléviseur Pioneer par les poignées situées à
l’arrière du téléviseur. Si vous le soulevez par
les enceintes, ces dernières risqueraient d’être
endommagées ou de se tordre.
Si vous avez acheté un téléviseur Pioneer avec
enceintes en dessous de la dalle
Tenez le téléviseur Pioneer par les poignées et par les côtés.
17
Fr
)BVUQBSMFVSEVEFTTPVT
Si vous avez acheté un téléviseur Pioneer sans
enceintes en dessous de la dalle
Tenez le téléviseur Pioneer
par ses poignées et par le
bas.
!TTENTION
!TTENTION
Précautions d’installation
Veillez à toujours ménager devant et derrière le pied de
table un espace au moins égal à celui qui est indiqué sur le
schéma ci-dessous.
.FVCMFEFU¹M¹WJTJPO
NNNJOJ NNNJOJ
"SSJ¼SF
"WBOU
1SPGPOEFVSSFDPNNBOE¹FEVNFVCMF
EFU¹M¹WJTJPONNPVQMVT
1JFEEFUBCMF
5¹M¹WJTFVS1JPOFFS
NNNJOJ NNNJOJ
• Tout dépassement du support par rapport au
meuble de télévision risquerait de provoquer la
chute ou la détérioration de l’appareil.
• Lors des rotations du support, veillez à ce que
l’écran n’entre pas en contact avec le mur ou
avec les autres objets environnants.
/ÕÌÊ`j«>ÃÃiiÌÊ
iÃÌÊ`>}iÀiÕÝ°
❖
Fourchette de l’angle de rotation
×
×
!TTENTION
PDK-TS36B_AZR1279B.indb 17 2008/07/07 9:32:40
Préparation des câbles
Utilisez les serre-câbles pour regrouper les câbles.
18
Fr
,i>ÀµÕi
Utilisation des serre-câbles
1
Insérez le serre-câble dans les orifices
Veillez à ne pas forcer la base des câbles.
se trouvant au-dessus de la plate-forme
pivotante du pied de table.
4FSSFD³CMFT
2
Rassemblez les câbles et placez-les dans le
serre-câble.
3
Fermez le serre-câble.
❖
Retrait d’un serre-câble
Le système de fermeture est
débloqué en appuyant sur la
zone indiquée par le cercle sur
la figure.
PDK-TS36B_AZR1279B.indb 18 2008/07/07 9:32:41
Prévenir le basculement et la chute de l’équipement
Après avoir installé le pied de table, veillez à prendre les précautions nécessaires pour que le
téléviseur Pioneer ne tombe pas.
• En raison de son poids, toute chute du téléviseur Pioneer risque de blesser quelqu’un.
• Par souci de sécurité, veillez à prendre les mesures nécessaires pour éviter toute chute de votre téléviseur Pioneer.
Stabilisation sur un meuble de
télévision ou une autre surface
Français
Stabilisez le pied de table comme indiqué sur le schéma à l’
aide de vis vendues dans le commerce.
19
Fr
,i>ÀµÕi
• Le téléviseur Pioneer doit toujours être installé sur un meuble
de télévision suffisamment solide, large et profond. Sans
cela, il risquerait de tomber.
• Pour stabiliser le téléviseur
Pioneer sur un meuble de
télévision, utilisez des vis de
6 mm de diamètre nominal.
Pour sélectionner les vis, consultez
si nécessaire un installateur
professionnel.
!TTENTION
Utilisation d’un mur pour stabiliser le pied
de table
1
Fixation des boulons empêchant la chute
sur le téléviseur Pioneer.
2
Utilisation de câbles solides pour stabiliser
solidement le dispositif sur un mur, un
pilier ou d’autres éléments stables.
• Ces opérations doivent être effectuées de la même
manière à gauche et à droite.
• La l
ongueur des câbles utilisés doit être suffisante
pour permettre au pied de table de tourner librement
sur sa base.
• Choisissez toujours une table suffisamment solide
pour supporter le téléviseur Pioneer. Il en résulterait
autrement des blessures corporelles et des dégâts
physiques.
• Lors de l’installation du téléviseur Pioneer, veuillez
prendre les mesures de sécurité nécessaires pour
l’empêcher de tomber ou de basculer en cas de situation
exceptionnelle, comme un tremblement de terre, ou en
cas d’accident.
• Si vous ne prenez pas ces précautions, le téléviseur
Pioneer pourrait tomber et entraîner des blessures.
• Les vis, crochets et autres pièces de fixation que vous
utilisez pour fixer en place le téléviseur Pioneer afin de
l’empêcher de basculer dépendront de la composition et
de l’épaisseur de la surface sur laquelle vous le fixez.
• Sélectionnez les vis, crochets et autres raccords
appropriés après avoir tout d’abord soigneusement
inspecté la surface pour déterminer sa composition
et son épaisseur et après avoir pris contact avec un
installateur professionnel si besoin est.
,i>ÀµÕi
Utilisez des boulons, des cordons ou
d’autres dispositifs de fixation en
vente dans le commerce.
Boulons recommandés : Diamètre
nominal M8, longueur de 12 mm à
15 mm.
£7JTEFQS¹WFOUJPO
EFDIVUFT
Ó$³CMF
"UUBDIF
❖
Position des vis de fixation à la table et au sol : sans
les enceintes
Unité : mm
NN
NNµNN
.JONN
.
NNµNN
PDK-TS36B_AZR1279B.indb 19 2008/07/07 9:32:41
Fixation de la rotation à l’avant
Stabilisez le pied de table comme indiqué sur le schéma à l’
aide de vis vendues dans le commerce.
20
Fr
,i>ÀµÕi
Utilisez une vis de M4 de diamètre
et longue de 20 mm à 30 mm afin
de fixer la rotation à l’avant.
.
NNµNN
NNµNN
Démontage du téléviseur Pioneer du pied de table
!TTENTION
4
En vous référant aux opérations 2 et 3
Lorsque vous démontez le téléviseur Pioneer de
son support, observez strictement la procédure
décrites dans le chapitre Installation et
décrite ci-dessous pour éviter tout accident.
fixation du téléviseur Pioneer (page 15),
retirez les 4 vis d’installation.
1
Assurez-vous d’abord que les boulons
d’ancrage servant à l’inclinaison en avant
et en arrière sont serrés correctement.
2
Faites d’abord de la place sur une surface
plane (sol, etc.) où vous pouvez poser le
téléviseur Pioneer à plat, puis déposez
une pièce de tissu afin de le protéger des
rayures et autres dégâts éventuels.
3
Retirez les enceintes.
,i>ÀµÕi
Ne retirez pas les boulons (M8 x 16 mm) argentés (voir étape 2
page 15), sinon les colonnes de support risquent de se déplacer
et de tomber.
5
Tout en tenant le téléviseur Pioneer par
les poignées et par le bas, placez-le à la
verticale.
6
Placez soigneusement le téléviseur Pioneer
sur la pièce de tissu installée lors de l’étape
2, l’écran étant placé face au sol.
,i>ÀµÕi
Lorsque vous remontez le téléviseur Pioneer sur le pied
de table, assurez-vous d’installer les colonnes de support
de gauche et de droite en respectant le même angle.
Spécificités
Dimensions extérieures : 577 mm (largeur) x 321 mm (hauteur) x 380 mm (profondeur)
(en cas d’utilisation de colonnes de support S)
Poids : 10,8 kg
• Le
s caractéristiques techniques indiquées ci-dessus ainsi que les dimensions extérieures peuvent êtres modifiées sans avis
préalable en vue d’améliorer le produit.
PDK-TS36B_AZR1279B.indb 20 2008/07/07 9:32:42
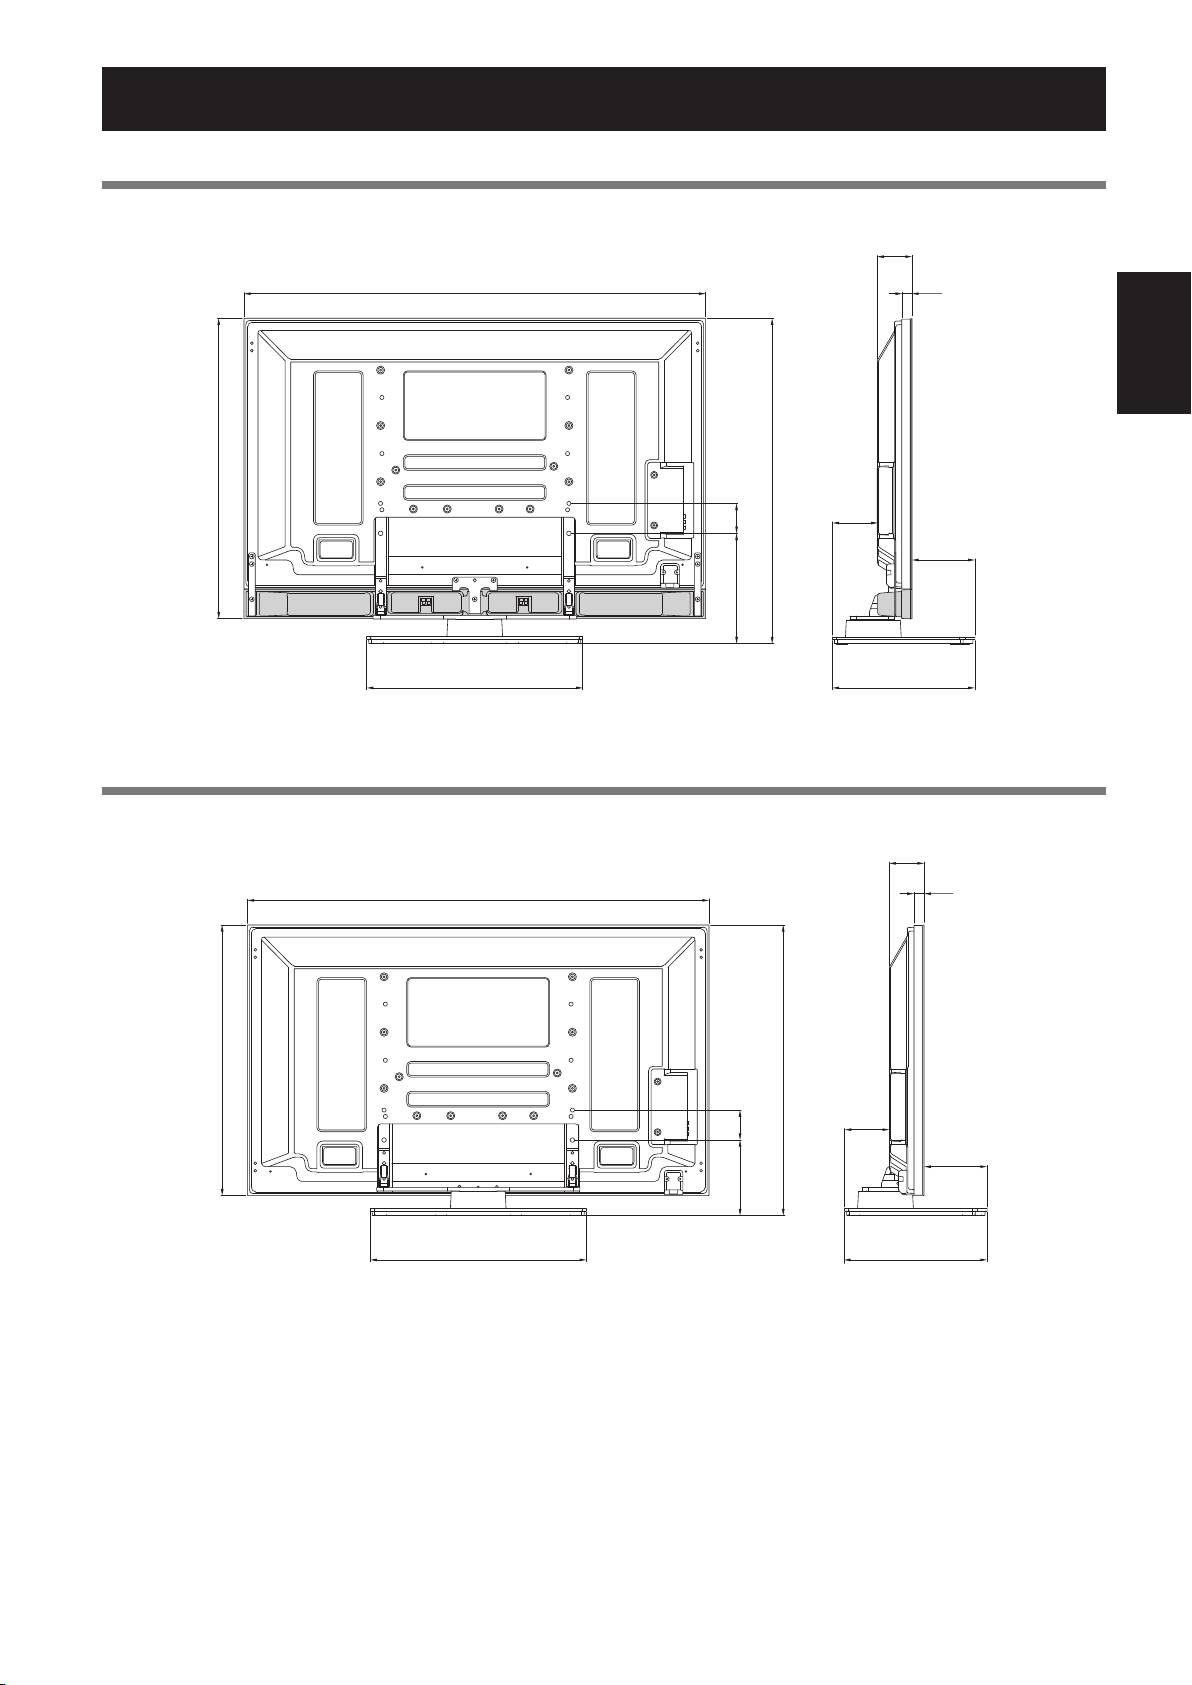
Schéma de dimensions
Ecran d’affichage 50 pouces (modèles avec haut-parleur du dessous)
Unité : mm
Français
21
Fr
93
1233
27
803
866
126
80
161
291,5
577
380
Ecran d’affichage 50 pouces (sauf modèles sans haut-parleur du dessous)
Unité : mm
93
1233
27
723
786
126
80
161
211
577
380
Publication de Pioneer Corporation.
© 2008 Pioneer Corporation.
Tous droits de reproduction et de traduction réservés.
PDK-TS36B_AZR1279B.indb 21 2008/07/07 9:32:43
