Pioneer HTP-SL100: instruction
Class: Household, kitchen appliances, electronics and equipment
Type: Home Theater System
Manual for Pioneer HTP-SL100
Table of contents

1
En
S-SL100-LR
S-SL100CR
ඵᖑᏣقಜ
Subwoofer / Enceinte d’extrêmes graves / Subwoofer / Subwoofer /
S-SLW500
Subwoofer / Altavoz de subgraves / Subwoofer / Subwoofer /
Subwoofer / Subwoofer / Apubassokaiutin / Сабвуфер /
ົմඵᖑᏣ
ᐈձКь
cover_S-SL100-LR_S-SL100CR.fm 1 ページ 2011年4月11日 月曜日 午前10時45分

S-SL100-LR_S-SL100CR_En.fm 2 ページ 2011年4月12日 火曜日 午前11時31分
Thank you for buying this Pioneer product.
Please read through these operating instructions so you will know how to operate your model properly. After you have finished reading the
instructions, put them away in a safe place for future reference.
S-SLW500
• This product is a passive subwoofer, and must be combined
Before you start
with the VSX-S300 or other audio device provided with a built-
in subwoofer amplifier.
S-SL100-LR/S-SL100CR
• This speaker system has an impedance of 4 Ω, and should be
• This speaker system has an impedance of 8 Ω, and should be
connected only to an amplifier designed with a load
connected only to an amplifier designed with a load
impedance of 4 Ω (the amplifier’s speaker output connector
impedance of 8 Ω (the amplifier’s speaker output connector
should clearly be labeled “4 Ω”).
should clearly be labeled “8 Ω”).
In order to prevent damage to the speaker system resulting
In order to prevent damage to the speaker system resulting
from input overload, please observe the following precautions:
from input overload, please observe the following precautions:
•Do not supply power to the speaker system in excess of the
•Do not supply power to the speaker system in excess of the
maximum permissible input.
maximum permissible input.
•When using a graphic equalizer to emphasize loud sounds in
•When using a graphic equalizer to emphasize loud sounds in
the high-frequency range, do not use excessive amplifier
the high-frequency range, do not use excessive amplifier
volume.
volume.
•Do not try to force a low-powered amplifier to produce loud
•Do not try to force a low-powered amplifier to produce loud
volumes of sound (the amplifier’s harmonic distortion will be
volumes of sound (the amplifier’s harmonic distortion will be
increased, and you may damage the speaker).
increased, and you may damage the speaker).
Caution: installation
Caution: installation
• Do not place the speaker on an unstable surface, as doing so
• Do not place the speaker on an unstable surface, as doing so
may cause the speaker to fall and cause damage or bodily
may cause the speaker to fall and cause damage or bodily
injury.
injury.
• Switch off and unplug your AV equipment and consult the
• Switch off and unplug your AV equipment and consult the
instructions when connecting up components. Make sure you
instructions when connecting up components. Make sure you
use the correct connecting cables.
use the correct connecting cables.
• Install the center speaker below the TV. When installing the
• Do not attach these speakers to the wall or ceiling, as they may
center speaker on top of the TV, be sure to secure it with tape
cause injury in the event of a fall.
or some other suitable means. Otherwise, the speaker may fall
from the TV due to external shocks such as earthquakes,
Caution: in use
endangering those nearby or damaging the speaker.
• Do not use the speaker to output distorted sound for long
Caution: in use
periods of time. This can result in damages to the speaker and
poses a potential fire hazard.
• Do not use the speaker to output distorted sound for long
periods of time. This can result in damages to the speaker and
• Do not place heavy or large objects on top of the speaker.
poses a potential fire hazard.
Doing so could provoke the speaker to fall, causing damages
• Do not place heavy or large objects on top of the speaker.
or bodily injury.
Doing so could provoke the speaker to fall, causing damages
• Do not sit or stand on the speaker, or let children play on the
or bodily injury.
speaker. Doing so could provoke the speaker to fall, causing
• The speaker system grill cannot be removed. Do not try to
damages or bodily injury.
forcibly remove it since doing so may damage the grille.
• The speaker system grill cannot be removed. Do not try to
• This product incorporates autoregression technology to
forcibly remove it since doing so may damage the grille.
protect the speakers. If the speakers stop emitting noise when
receiving too large a signal, turn the volume down on the amp
and wait a few seconds. The protection feature disables itself
Pioneer is not responsible for any accidents or damage that
automatically.
result from improper installation, misuse or modification of
the product, or natural disasters.
Cleaning the speaker cabinet
With normal use, wiping with a dry cloth should be sufficient to
keep the cabinet clean. If necessary, clean with a cloth dipped in
a neutral cleanser diluted five or six times with water, and wrung
out well. Do not use furniture wax or cleansers.
Never use thinners, benzine, insecticide sprays or other chemicals
on or near this unit since these will corrode the surfaces.
2
En
S-SLW500
What’s in the box
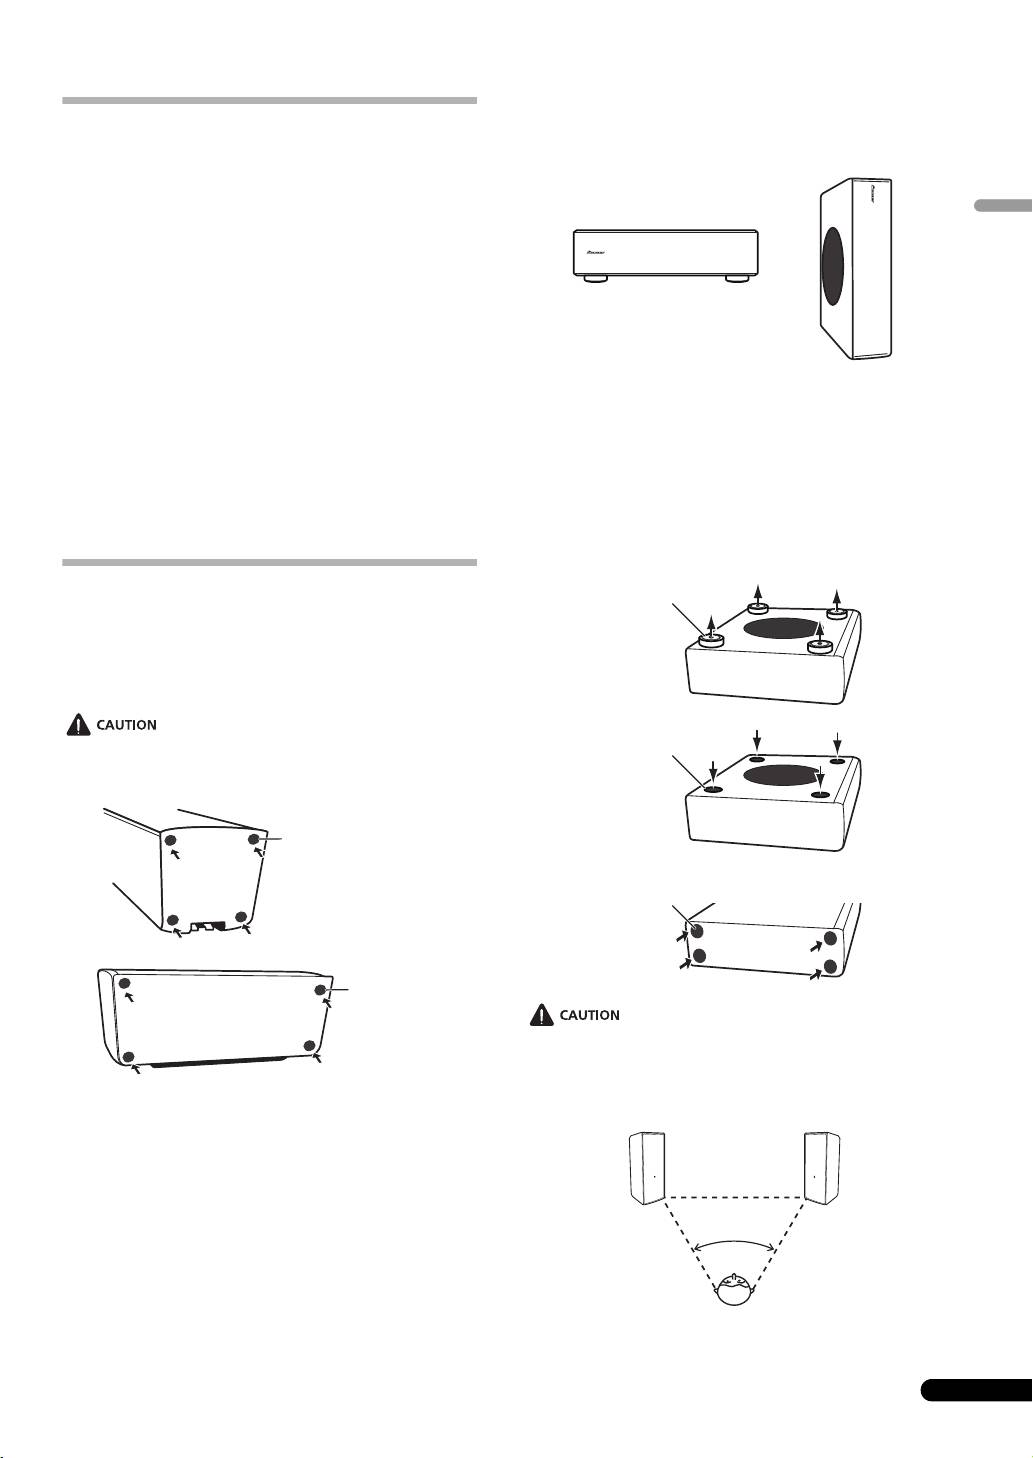
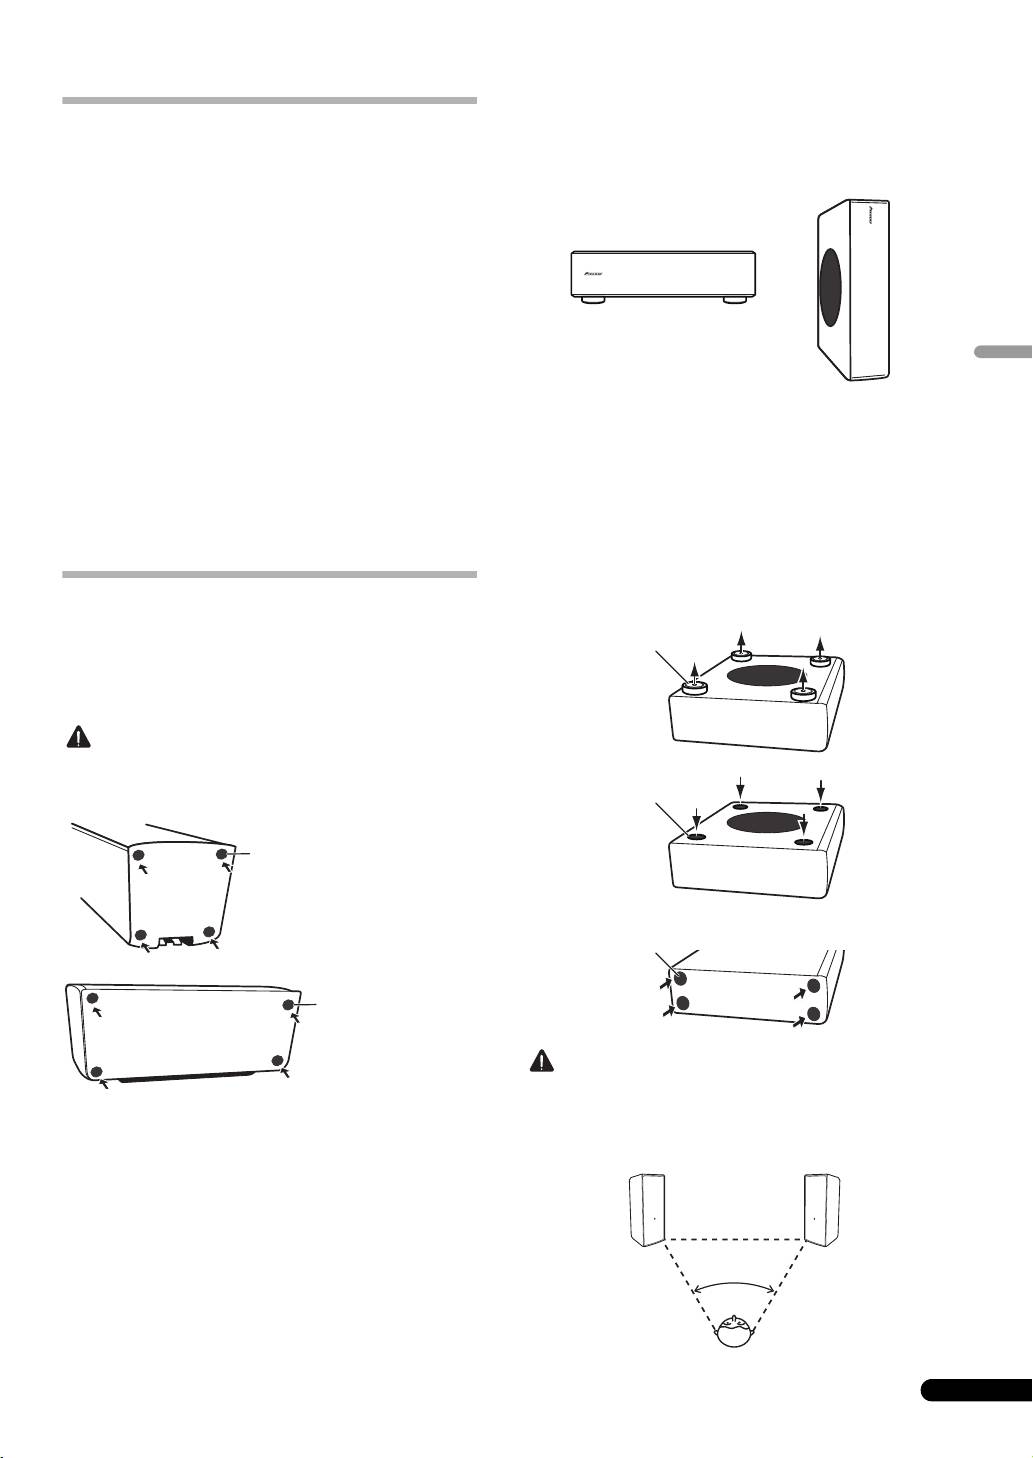
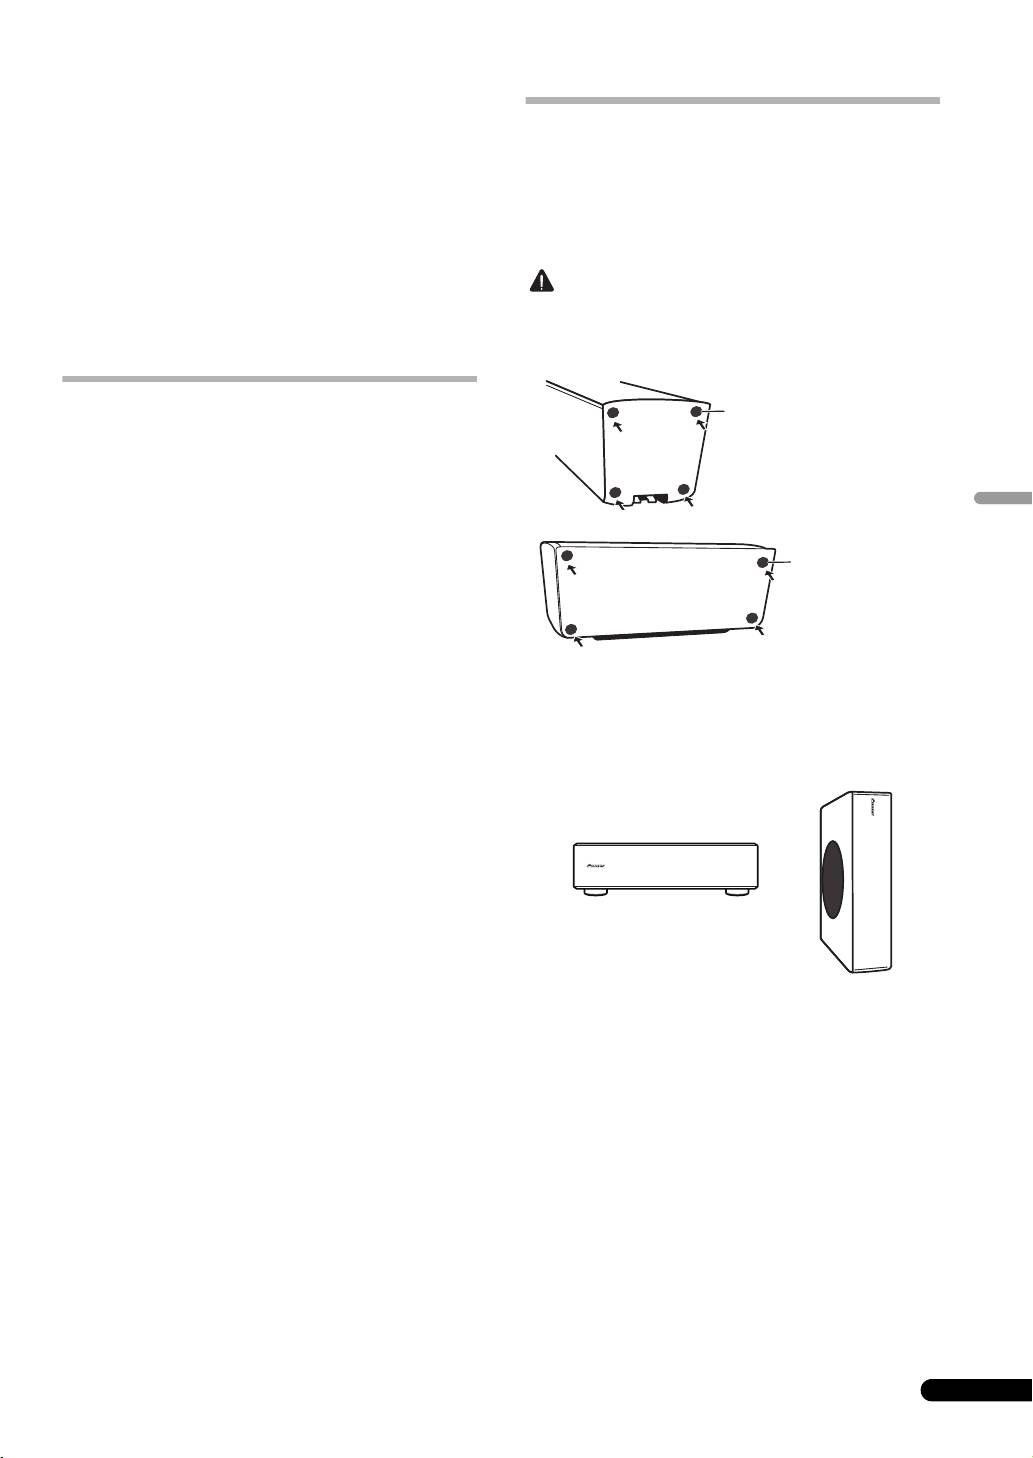
Installing the subwoofer
The subwoofer can be mounted in either vertical or horizontal
orientation. The factory default is horizontal orientation.
S-SL100-LR
• Speaker cord (4 m) x 2
• Non-skid pads x 8
English
• Warranty card x 1 (European model only)
• Operating instructions (this document)
S-SL100CR
• Speaker cord (4 m) x 1
• Speaker cord (10 m) x 2
• Non-skid pads x 12
• Warranty card x 1 (European model only)
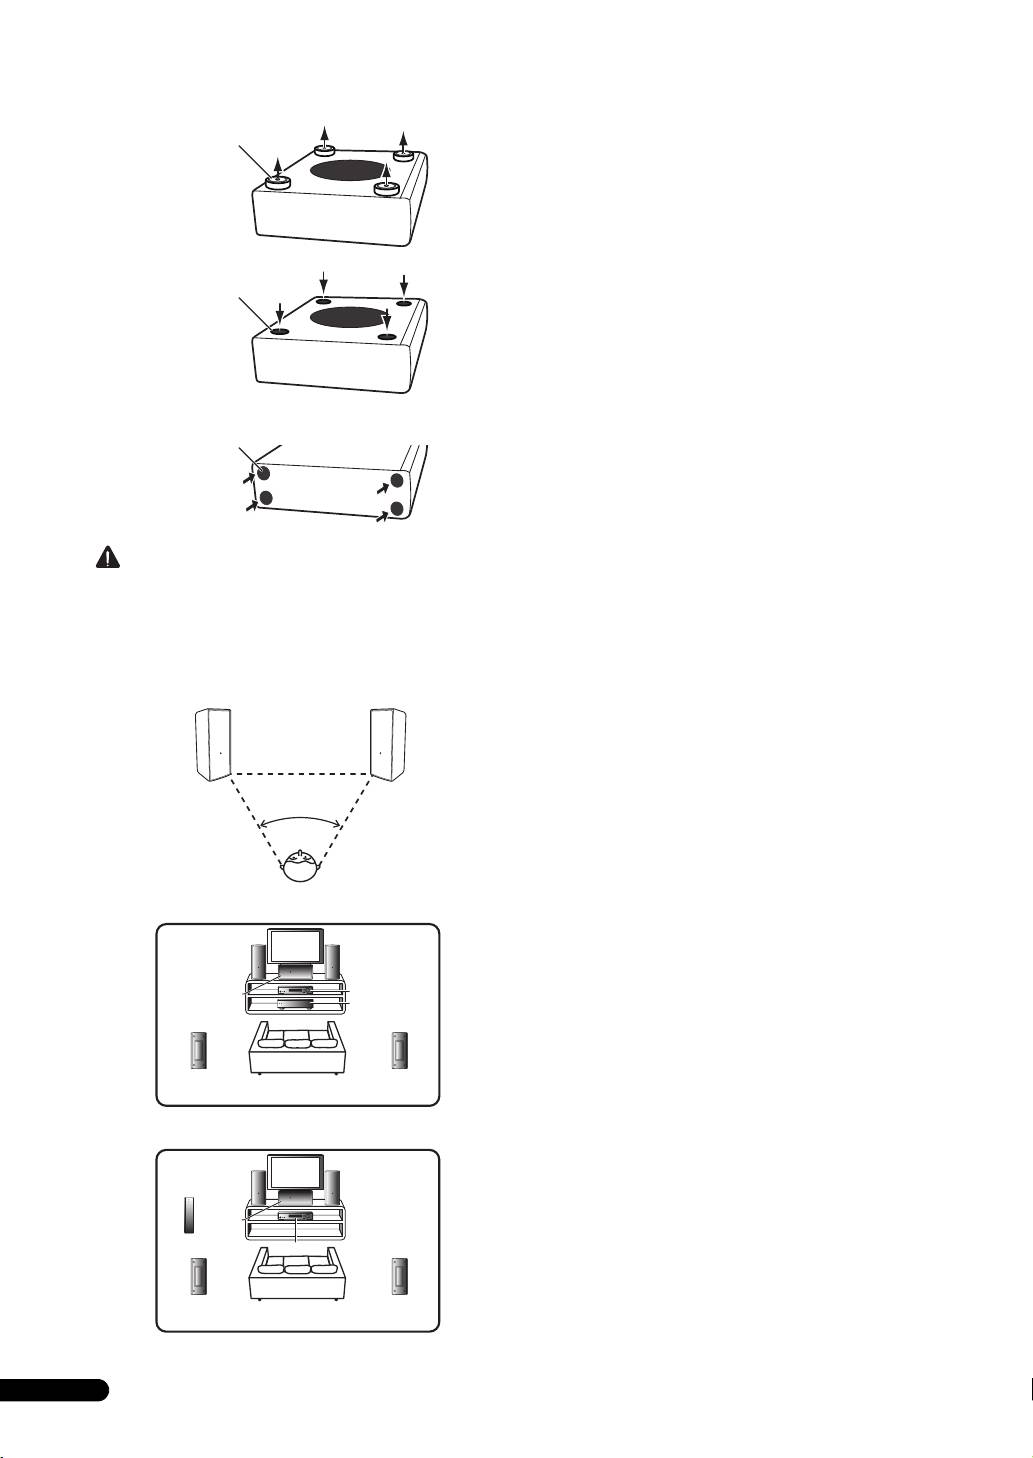
For vertical orientation installation
• Operating instructions (this document)
1 The feet are attached with Phillips screws; use a Phillips
screwdriver to remove them.
S-SLW500
2 Apply the accessory seals to the place the feet were
• Speaker cord (3 m) x 1
located to hide the screw holes.
• Non-skid pads x 4
3 Apply the non-skid pads to the four corners of the surface
•Seal x 4
where the subwoofer is to be mounted. Note that the non-
• Warranty card x 1 (European model only)
skid pads may not be fully effective on all surfaces, so do not
install in slippery locations.
Installation
S-SL100-LR/S-SL100CR
Install non-skid pads
Use the accessory non-skid pads as necessary, depending on your
installation location.
Lay the unit on its side on soft cloth or other material that will not
scar the unit.
・ Do not attempt to perform these procedures while tilting the
unit at an angle. Lay the unit on its side on soft cloth or other
material that will not scar the unit.
Mounting location
3
En
Non-skid pads
Non-skid pads
Step 1
Feet
Step 2
Seals
Step 3
Non-skid pads
50˚ to 60˚
S-SL100-LR_S-SL100CR_En.fm 3 ページ 2011年4月12日 火曜日 午前11時31分
S-SL100-LR_S-SL100CR_En.fm 4 ページ 2011年4月12日 火曜日 午前11時31分
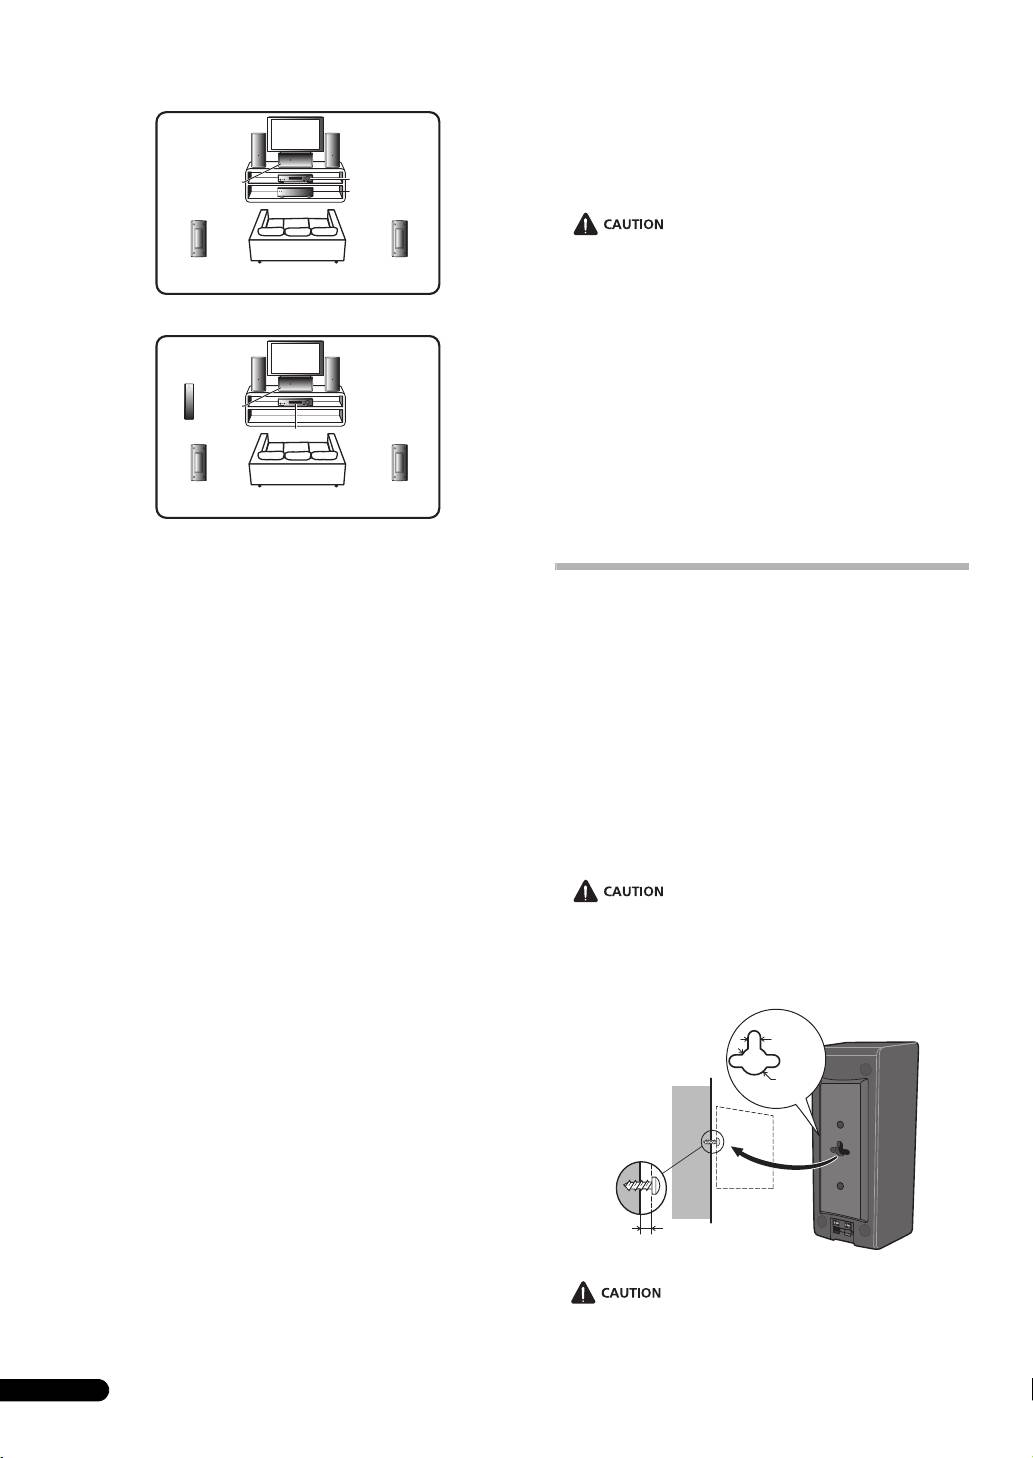
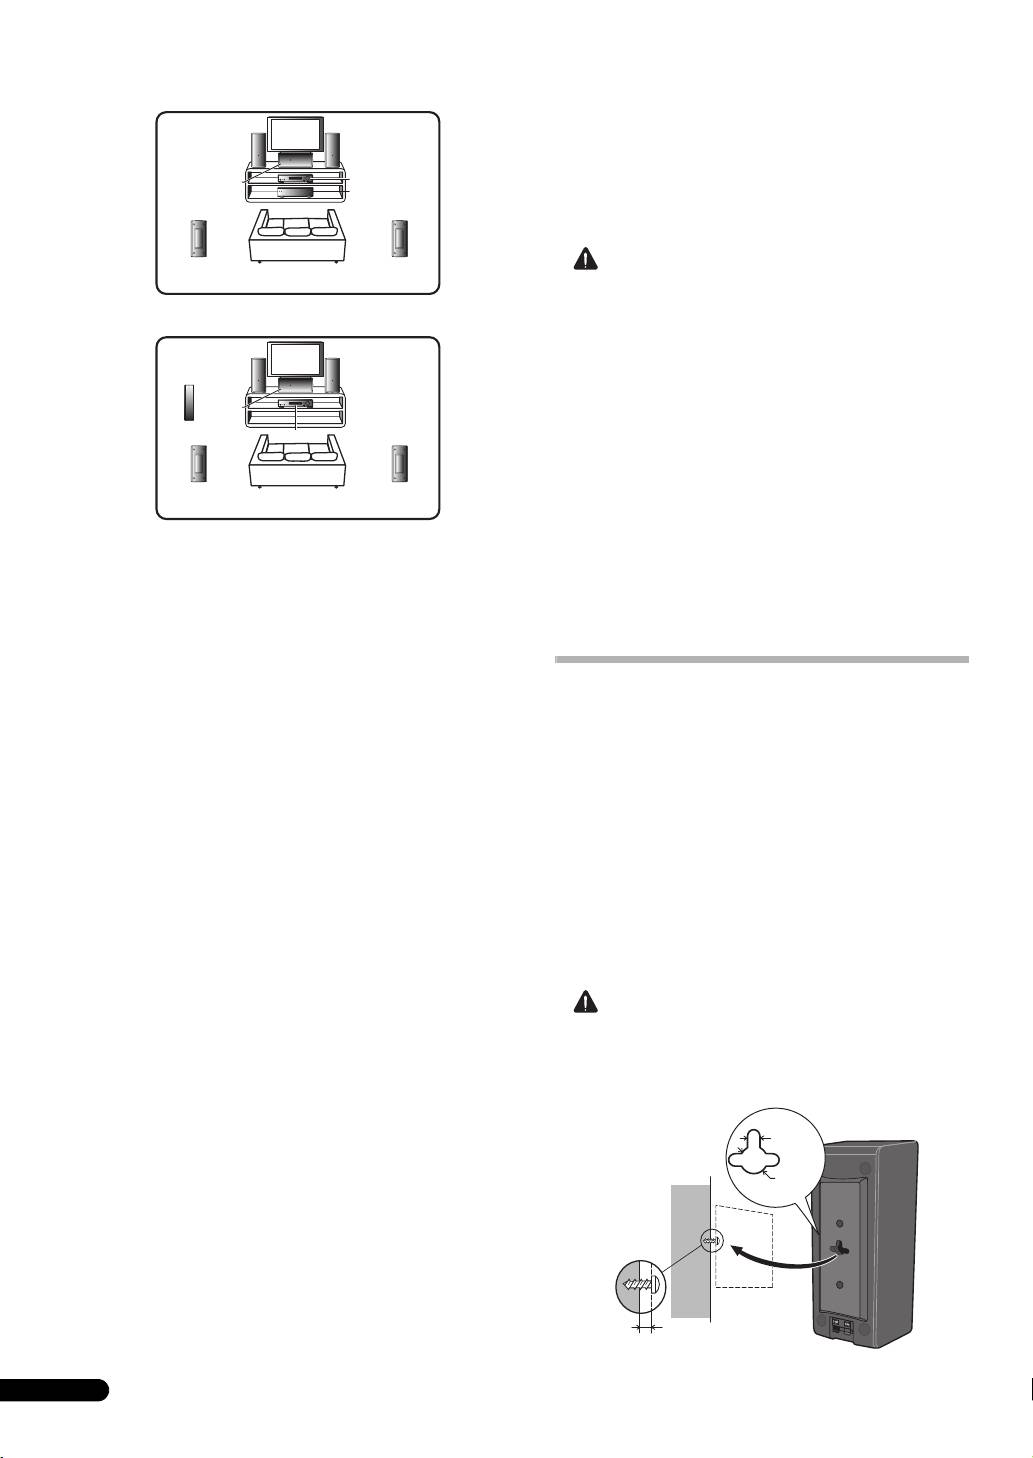
Installation example: Horizontal orientation
• The subwoofer is not magnetically shielded and so should not
be placed near a TV or monitor, as the interaction of magnetic
materials can cause distortion of the colors on your TV screen.
Devices easily affected by magnetism (magnetic media cards,
1
3
wrist-watches, video tapes, etc.) should not be placed near the
4
2
subwoofer.
5
• When installing the speaker system on a TV rack or AV rack,
6
8
7
the rack or other audio components may vibrate due to
vibrations generated by the speaker. Caution should be taken
to assure that the rack shelves or other components do not
Installation example: Vertical orientation
shift positions due to the vibration.
• Do not place disc media (DVD, CD) players on top of the
subwoofer since sound skipping may occur due to vibration.
1
3
• When installing, allow at least 10 cm space between the rear
2
of the unit and any wall; when installing vertically, also allow
at least 10 cm space between the unit's left side and any wall.
5
4
If insufficient distance is taken, the unit may display
inadequate performance, or may malfunction.
• Since the speaker system is heavy, installation in unstable
6
8
7
locations is extremely dangerous and should not be
attempted. A falling speaker may cause damage or personal
injury.
1 Front left speaker
2 Center speaker
3 Front right speaker
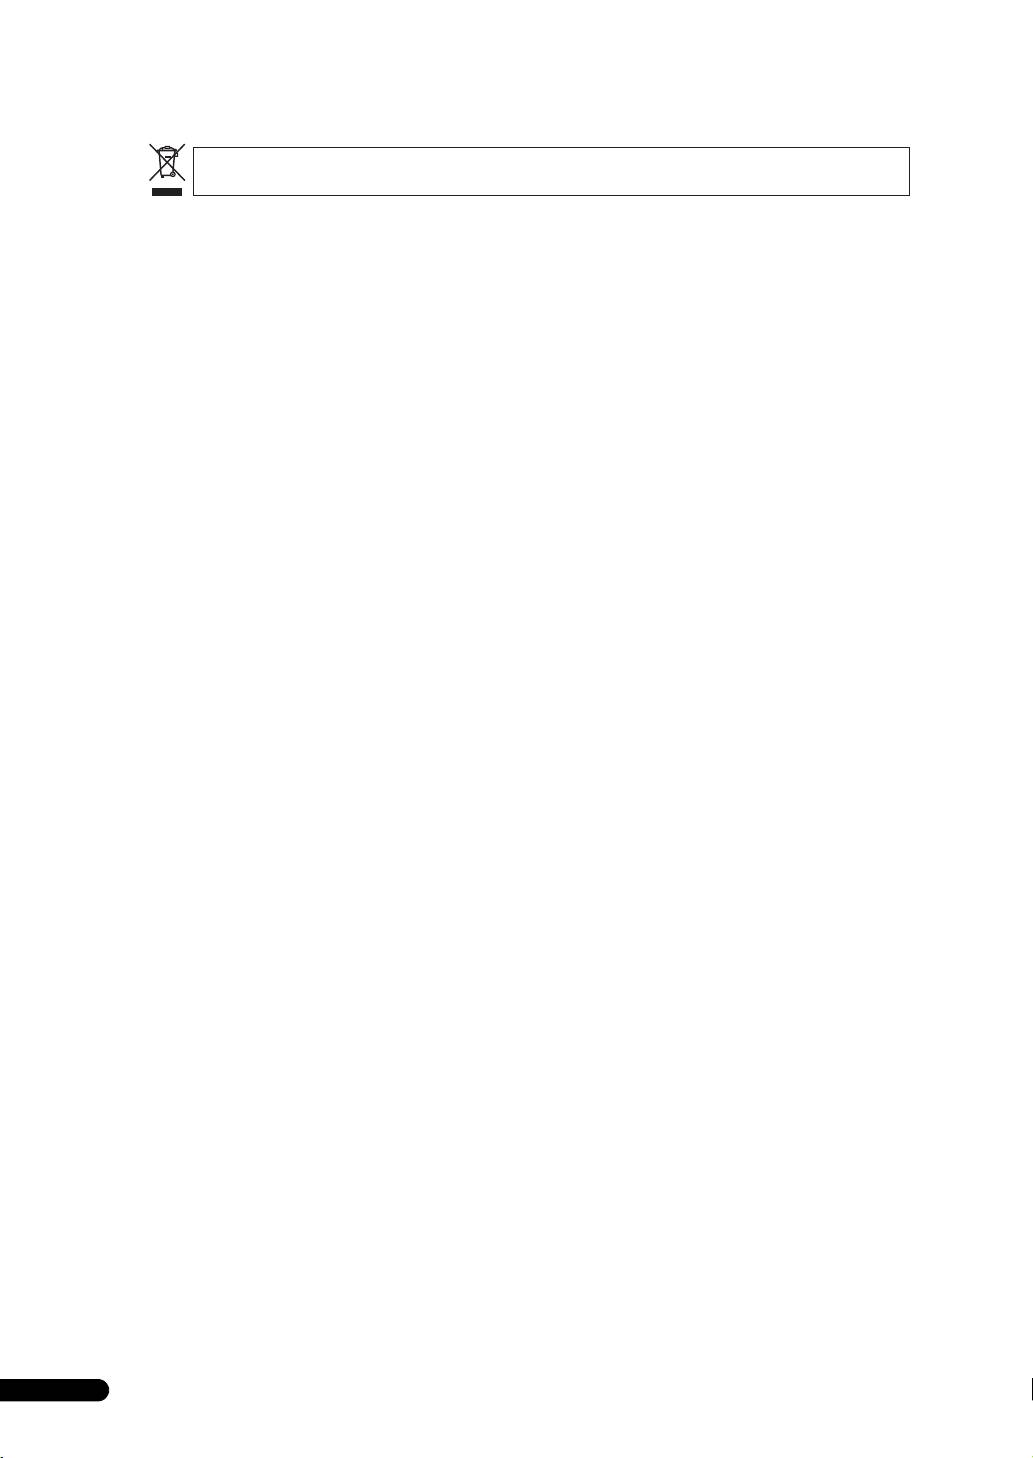
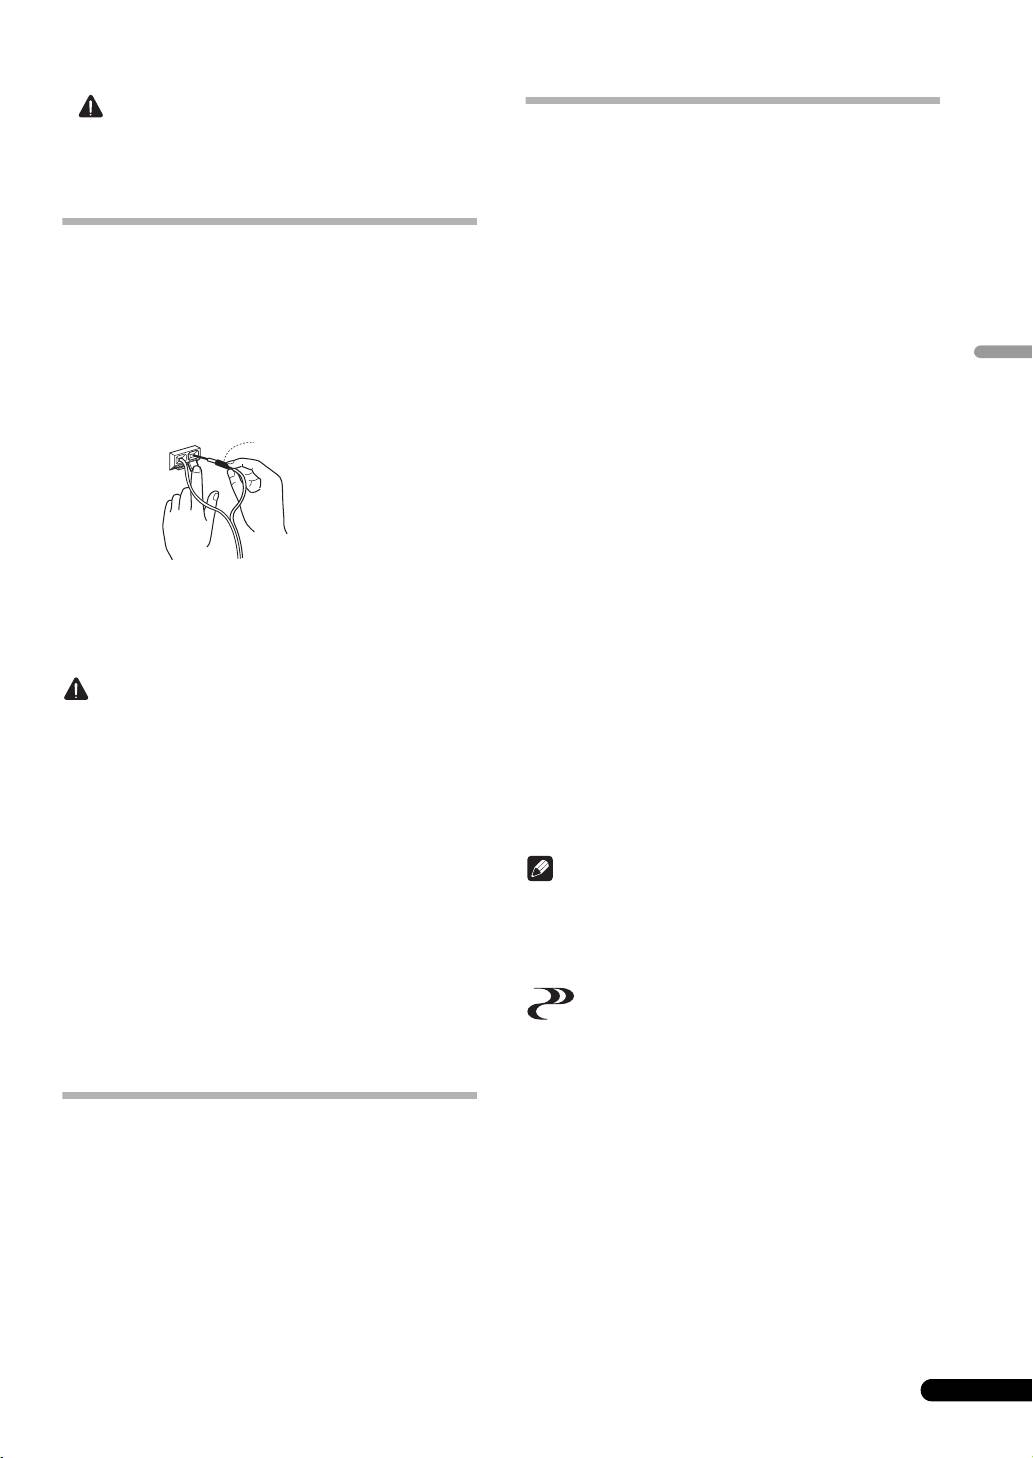
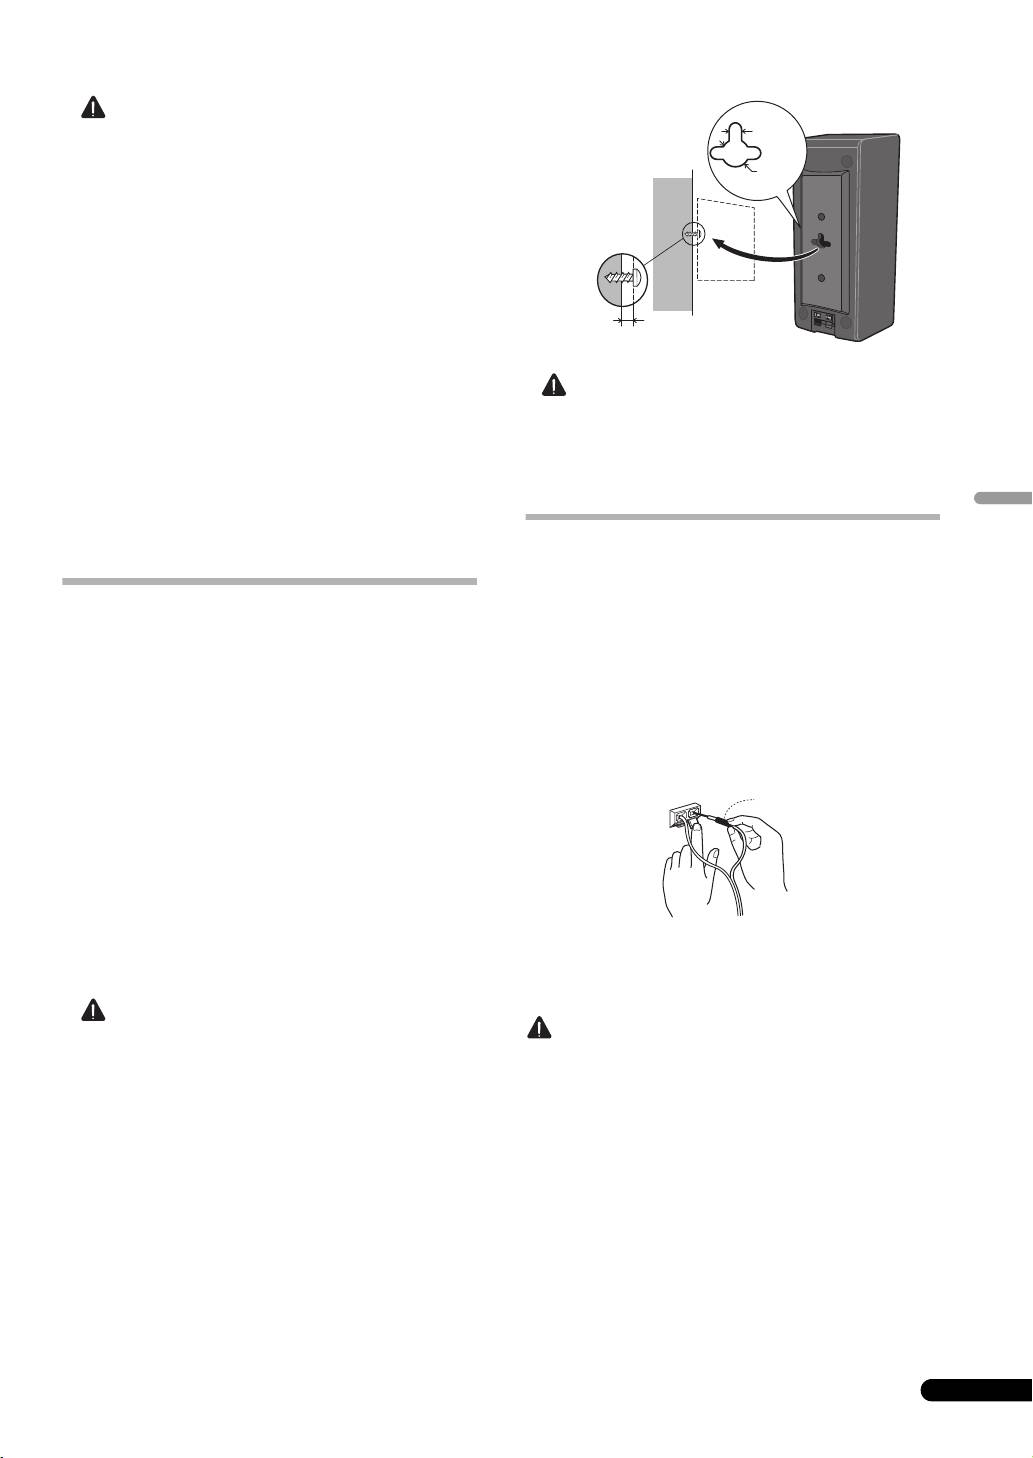
Wall mounting the speakers
4 Receiver
5 Subwoofer
(S-SL100-LR/S-SL100CR)
6 Surround left speaker
7 Listening position
8 Surround right speaker
The front, center and surround speakers have a mounting hole
which can be used to mount the speaker on the wall.
S-SL100-LR/S-SL100CR
Before mounting
• Front speakers installed to the right and left should be
• Remember that the speaker system is heavy and that its
separated by about 1.8 m to 2.7 m distance. They should be
weight could cause the screws to work loose, or the wall
installed at equal distances from the television, and at equal
material to fail to support it, resulting in the speaker falling.
heights from the floor.
Make sure that the wall you intend to mount the speakers on
• Optional speaker stands can be purchased to facilitate
is strong enough to support them. Do not mount on plywood
optimal mounting of the surround speakers at or slightly
or soft surface walls.
above the listener’s ear height.
• Mounting screws are not supplied. Use screws suitable for the
• The surround effect will be diminished if the surround
wall material and support the weight of the speaker.
speakers are mounted at extreme distances from the listener’s
position.
• This speaker system furnished in this system are designed for
use close to a CRT-based TV or color monitor. However, if color
• If you are unsure of the qualities and strength of the wall,
distortion is caused due to the installation, try turning off the
consult a professional for advice.
power to the CRT-based TV or color monitor for 15 to 30
• Pioneer is not responsible for any accidents or damage that
minutes, then turning on the power again. The self-
result from improper installation.
degaussing function built into the CRT-based TV or color
monitor should help ameliorate the effect of the speakers on
the image. If color distortion continues to be a problem,
5 mm
separate the speakers farther away from the screen. If
magnets or devices emitting magnetic fields are installed
nearby, the interactive effect with the speaker system may
10 mm
cause color distortion in a CRT-based TV or color monitor.
S-SLW500
Mounting screw
• The subwoofer reproduces ultra-low sounds in monaural,
(not supplied)
using the fact that the human ear has little directional
sensitivity to sounds in the low frequencies. As a result, the
subwoofer can be located in a variety of places, but if placed
too distant, the linkage between sounds of the subwoofer and
other speakers may seem unnatural. The intensity of the
6 mm to 8 mm
sound from the subwoofer can be adjusted by changing the
distance from the wall.
• Do not mount this product on a wall or hang from a ceiling. If
the unit falls it may result in personal injury.
4
En
S-SL100-LR_S-SL100CR_En.fm 5 ページ 2011年4月12日 火曜日 午前11時31分
Connection
Specifications
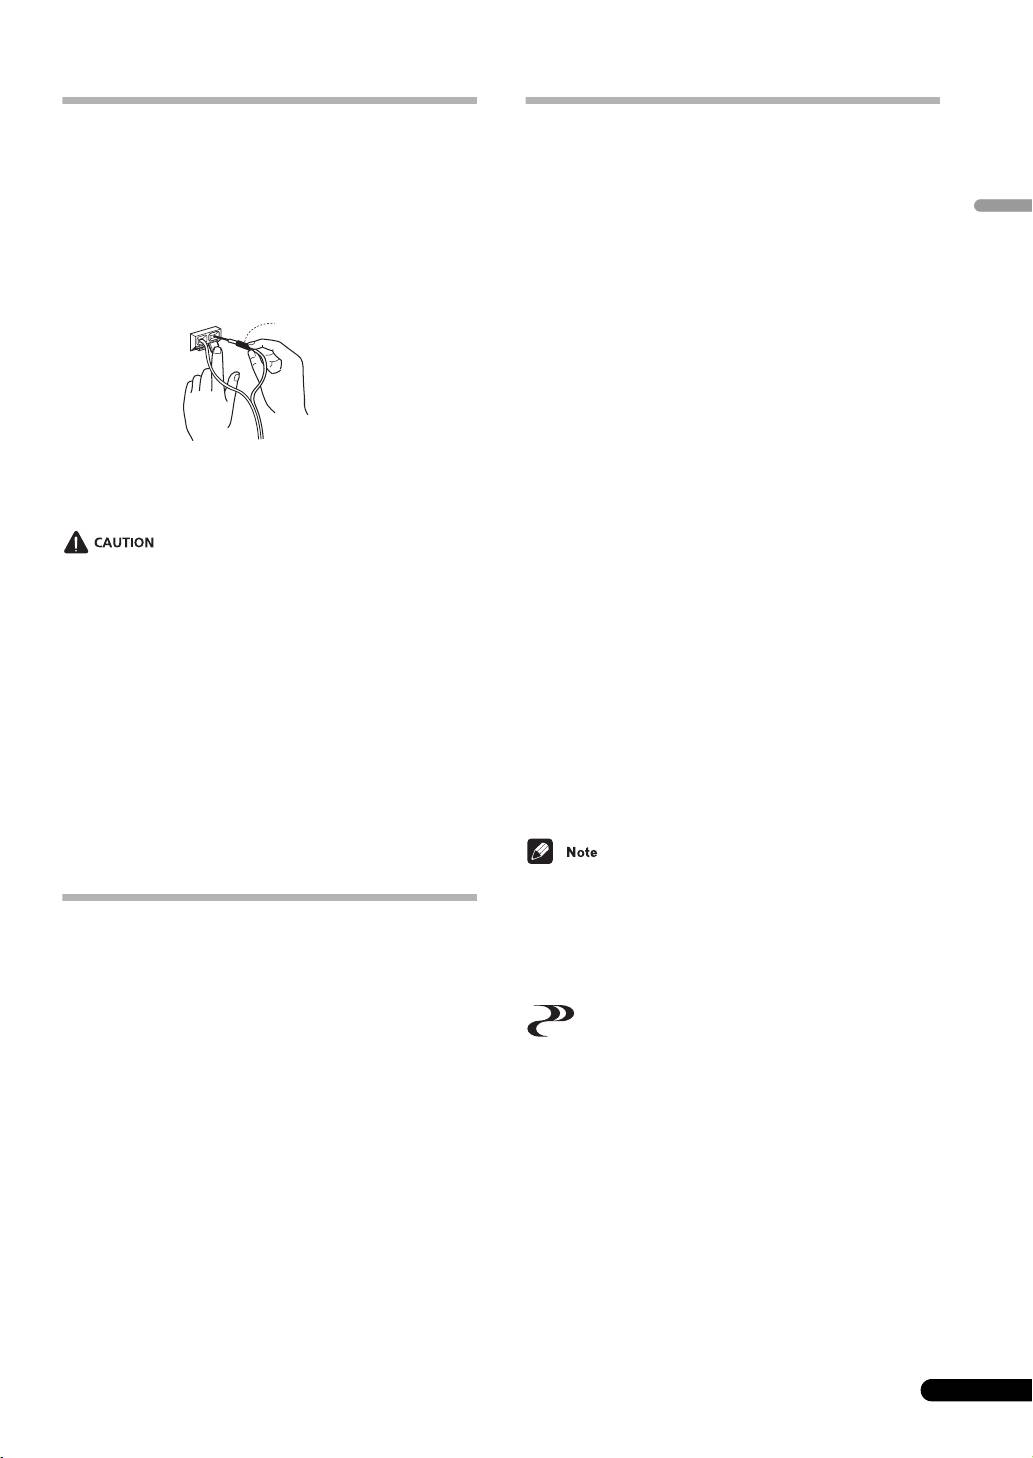
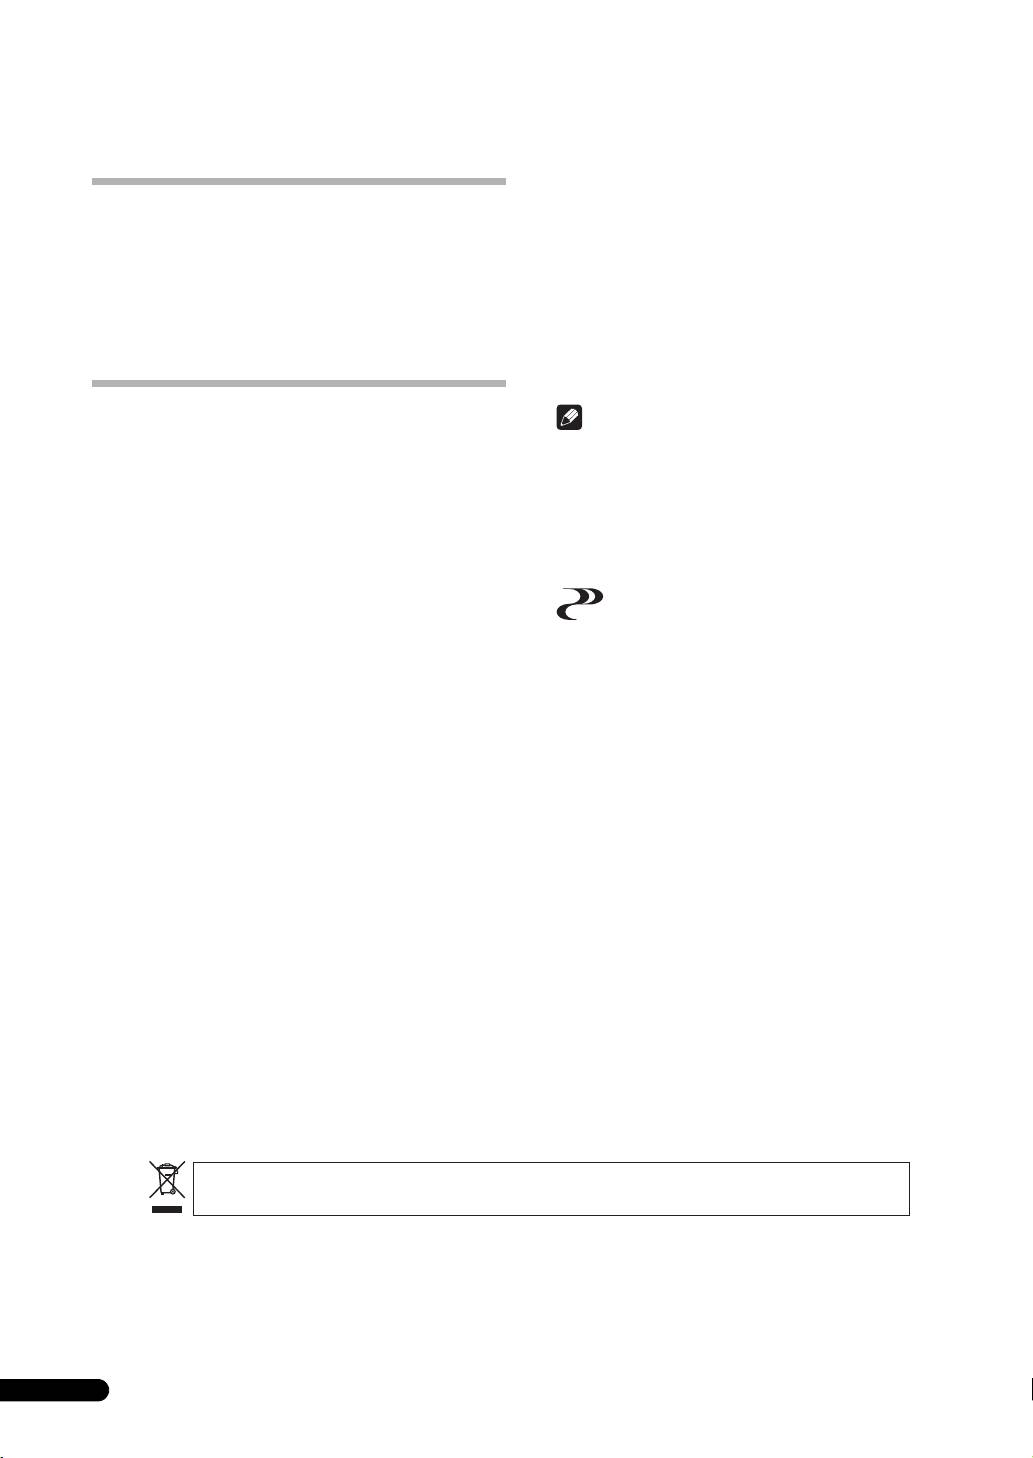
Connecting the cord
S-SL100-LR/S-SL100CR
1 Attach one end of the supplied speaker cord to the rear
Enclosure. . . . . . . . Closed-box bookshelf type (magnetically shielded)
Configuration . . . . . . . . . . . . . . . . . . . . . . . . . . 10 cm x 7 cm, full range
of the each speaker.
Impedance. . . . . . . . . . . . . . . . . . . . . . . . . . . . . . . . . . . . . . . . . . . . . . 8 Ω
English
• Connect the wire with the colored marker to the red (+)
Frequency range . . . . . . . . . . . . . . . . . . . . . . . . . . . . . . 100 Hz to 20 kHz
terminal; the plain wire to the black (–) terminal. Press down
Sensitivity. . . . . . . . . . . . . . . . . . . . . . . . . . . . . . . . . . . . . . . . . . . . . .81 dB
the spring-loaded tab and insert the wire, as shown below.
Maximum input power . . . . . . . . . . . . . . . . . . . . . . . . . . . . . . . . . . 100 W
Release the tab to secure the wire.
Exterior dimensions . . . . . . 86.5 (W) mm x 206 (H) mm x 85.5 (D) mm
Weight . . . . . . . . . . . . . . . . . . . . . . . . . . . . . . . . . . . . . . . . . . . . . . . 0.7 kg
Red (+)
Black (–)
Red colored marker
Supplied accessories (S-SL100-LR)
Speaker cord (4 m) . . . . . . . . . . . . . . . . . . . . . . . . . . . . . . . . . . . . . . . . . 2
Non-skid pads . . . . . . . . . . . . . . . . . . . . . . . . . . . . . . . . . . . . . . . . . . . . . 8
Warranty card (European model only) . . . . . . . . . . . . . . . . . . . . . . . . . 1
Operating instructions (this document)
Supplied accessories (S-SL100CR)
Speaker cord (4 m) . . . . . . . . . . . . . . . . . . . . . . . . . . . . . . . . . . . . . . . . . 1
Speaker cord (10 m) . . . . . . . . . . . . . . . . . . . . . . . . . . . . . . . . . . . . . . . . 2
2 Connect the other ends of the cords to the amp’s speaker
Non-skid pads . . . . . . . . . . . . . . . . . . . . . . . . . . . . . . . . . . . . . . . . . . . . 12
output terminals (for more details, refer to your amp
Warranty card (European model only) . . . . . . . . . . . . . . . . . . . . . . . . . 1
instruction manual).
Operating instructions (this document)
S-SLW500
Enclosure. . . . . . . . . . . . . . . . . . . . . . . . . . . . Bass-reflex bookshelf type
• These speaker terminals carry HAZARDOUS LIVE voltage. To
Configuration . . . . . . . . . . . . . . . . . . . . . . . . . . . . . . . . . . . . .16 cm cone
prevent the risk of electric shock when connecting or
Impedance. . . . . . . . . . . . . . . . . . . . . . . . . . . . . . . . . . . . . . . . . . . . . . 4 Ω
disconnecting the speaker cords, disconnect the power cord
Frequency range . . . . . . . . . . . . . . . . . . . . . . . . . . . . . . . 35 Hz to 2.0 kHz
before touching any uninsulated parts.
Sensitivity. . . . . . . . . . . . . . . . . . . . . . . . . . . . . . . . . . . . . . . . . . . . . .78 dB
• After connecting the plugs, pull lightly on the cords to make
Maximum input power . . . . . . . . . . . . . . . . . . . . . . . . . . . . . . . . . . 100 W
sure that the ends of the cords are securely connected to the
Exterior dimensions
terminals. Poor connections can create noise and
Horizontal orientation. . . . 435 (W) mm x 121 (H) mm x 360 (D) mm
interruptions in the sound.
Vertical orientation . . . . .108.5 (W) mm x 435 (H) mm x 360 (D) mm
Weight . . . . . . . . . . . . . . . . . . . . . . . . . . . . . . . . . . . . . . . . . . . . . . . 4.5 kg
• If the cords’ wires happen to be pushed out of the terminals,
allowing the wires to come into contact with each other, it
Supplied accessories
places an excessive additional load on the receiver. This may
Speaker cord (3 m) . . . . . . . . . . . . . . . . . . . . . . . . . . . . . . . . . . . . . . . . . 1
cause the amp to stop functioning, and may even damage the
Non-skid pads . . . . . . . . . . . . . . . . . . . . . . . . . . . . . . . . . . . . . . . . . . . . . 4
receiver.
Seal . . . . . . . . . . . . . . . . . . . . . . . . . . . . . . . . . . . . . . . . . . . . . . . . . . . . . 4
• When using a set of speakers connected to an receiver, you
Warranty card (European model only) . . . . . . . . . . . . . . . . . . . . . . . . . 1
won’t be able to obtain the normal stereo effect if the polarity
(+, –) of one of the speakers (left or right) is reversed.
• The S-SL100-LR is shipped with two speaker systems per
package.
Operation (S-SL100-LR/S-SL100CR)
• The S-SL100CR is shipped with three speaker systems per
package.
• Specifications and design subject to possible modification
Since the S-SL100-LR/S-SL100CR are designed as compact
without notice, due to improvements.
satellite speakers, it is recommended that they be used in
combination with a sub-woofer to provide full base sound. In this
case, set your amplifier (receiver) speaker setting to “small” and
the crossover frequency to 200 Hz.
is a trademark placed on a product with Pioneer’s Phase
Control technology. This technology enables high-grade sound
reproduction through each component by improving overall
phase matching.
© 2011 PIONEER CORPORATION.
All rights reserved.
5
En
For European model
6
En
If you want to dispose this product, do not mix it with general household waste. There is a separate collection system for used
electronic products in accordance with legislation that requires proper treatment, recovery and recycling.
Private households in the member states of the EU, in Switzerland and Norway may return their used electronic products free of charge to
designated collection facilities or to a retailer (if you purchase a similar new one).
For countries not mentioned above, please contact your local authorities for the correct method of disposal.
By doing so you will ensure that your disposed product undergoes the necessary treatment, recovery and recycling and thus prevent potential
negative effects on the environment and human health.
K058b_A1_En
S-SL100-LR_S-SL100CR_En.fm 6 ページ 2011年4月12日 火曜日 午前11時31分

S-SL100-LR_S-SL100CR_En.fm 7 ページ 2011年4月12日 火曜日 午前11時31分
English
7
En

S-SL100-LR_S-SL100CR_En.fm 2 ページ 2011年4月12日 火曜日 午前11時33分
Nous vous remercions d’avoir acheté ce produit Pioneer.
Veuillez lire attentivement ce mode d’emploi de manière à pouvoir utiliser votre modèle correctement. Après avoir lu ces explications,
conservez-les en lieu sûr pour éventuellement les consulter plus tard.
S-SLW500
• Cet appareil est une enceinte d’extrêmes graves passive et il
Avant de commencer
doit être combiné avec le VSX-S300 ou un autre dispositif
audio, incorporant un amplificateur de caisse de basse.
S-SL100-LR/S-SL100CR
• Cette enceinte acoustique a une impédance de 4 Ω, et elle doit
• Cette enceinte acoustique a une impédance de 8 Ω, et elle doit
être raccordée uniquement à un amplificateur conçu pour
être raccordée uniquement à un amplificateur conçu pour
une impédance de charge de 4 Ω (le connecteur de sortie
une impédance de charge de 8 Ω (le connecteur de sortie
haut-parleur de l’amplificateur doit porter clairement
haut-parleur de l’amplificateur doit porter clairement
l’identification pour “4 Ω”).
l’identification pour “8 Ω”).
Pour éviter d’endommager les enceintes par une surcharge à
Pour éviter d’endommager les enceintes par une surcharge à
l’entrée, observez les précautions suivantes :
l’entrée, observez les précautions suivantes :
•Ne fournissez pas aux enceintes acoustiques une puissance
•Ne fournissez pas aux enceintes acoustiques une puissance
électrique dépassant l’entrée maximale autorisée.
électrique dépassant l’entrée maximale autorisée.
•Si vous utilisez un égaliseur graphique pour accentuer les
•Si vous utilisez un égaliseur graphique pour accentuer les
sons dans la plage des hautes fréquences, n’élevez pas trop
sons dans la plage des hautes fréquences, n’élevez pas trop
le volume de l’amplificateur.
le volume de l’amplificateur.
•N’essayez pas de pousser un amplificateur de faible
•N’essayez pas de pousser un amplificateur de faible
puissance à produire un volume sonore élevé, car la
puissance à produire un volume sonore élevé, car la
distorsion harmonique de l’amplificateur en serait
distorsion harmonique de l’amplificateur en serait
accentuée et vous pourriez endommager les haut-parleurs.
accentuée et vous pourriez endommager les haut-parleurs.
Précautions: Installation
Précautions: Installation
• Ne placez pas l’enceinte sur une surface instable, car elle
• Ne placez pas l’enceinte sur une surface instable, car elle
pourrait tomber et provoquer ainsi des blessures corporelles
pourrait tomber et provoquer ainsi des blessures corporelles
ou des dégâts.
ou des dégâts.
• Mettez votre système audiovisuel hors tension et débranchez-
• Mettez votre système audiovisuel hors tension et débranchez-
le, puis consultez le mode d’emploi avant de brancher des
le, puis consultez le mode d’emploi avant de brancher des
composants. Prenez soin d’utiliser correctement les cordons
composants. Prenez soin d’utiliser correctement les cordons
de raccordement.
de raccordement.
• Installez le haut-parleur central sous le téléviseur. Si vous
• N’attachez pas ces enceintes sur un mur ou au plafond car en
installez le haut-parleur central sur le dessus du téléviseur,
tombant, elles pourraient causer des blessures.
veillez à l’immobiliser avec un ruban adhésif ou un autre
moyen approprié. Si non, le haut-parleur pourrait tomber du
Précautions: d’utilisation
téléviseur par suite de chocs externes, tels que des séismes ;
• N’utilisez pas l’enceinte pour produire des sons distordus
il pourrait alors blesser des personnes ou être endommagé.
pendant une longue période. Ceci pourrait endommager
Précautions: d’utilisation
l’enceinte et même provoquer un incendie.
• N’utilisez pas l’enceinte pour produire des sons distordus
• Ne posez pas d’objets lourds ou volumineux sur le dessus des
pendant une longue période. Ceci pourrait endommager
enceintes. Ce faisant, l’enceinte pourrait tomber et provoquer
l’enceinte et même provoquer un incendie.
des blessures ou des dégâts.
• Ne posez pas d’objets lourds ou volumineux sur le dessus des
• Ne montez pas et ne vous asseyez pas sur les enceintes et ne
enceintes. Ce faisant, l’enceinte pourrait tomber et provoquer
laissez pas des enfants jouer sur celles-ci. Ce faisant,
des blessures ou des dégâts.
l’enceinte pourrait tomber et provoquer des blessures ou des
• La grille des enceintes ne peut pas être enlevée. N’essayez pas
dégâts.
de la retirer de force car elle pourrait en être endommagée.
• La grille des enceintes ne peut pas être enlevée. N’essayez pas
• Cet appareil incorpore une technologie d’autorégression afin
de la retirer de force car elle pourrait en être endommagée.
de protéger les haut-parleurs. Si les haut-parleurs cessent
d’émettre des sons à la réception d’un signal trop puissant,
réduisez le volume sur l’amplificateur et attendez quelques
Pioneer n’assume aucune responsabilité en cas d’accidents ou
secondes. Cette fonction de protection se désactive
de dégâts, résultant d’une installation inappropriée, d’une
automatiquement.
erreur d’utilisation, d’une altération du produit ou de
catastrophes naturelles.
Nettoyage du coffret de l’enceinte
Normalement, il suffira de frotter le coffret de ces enceintes avec
un linge sec pour maintenir leur propreté. Au besoin, trempez un
linge dans un détergent neutre allongé de cinq à six fois son
volume d’eau et essorez bien le linge avant de l’utiliser pour frotter
le coffret. N’utilisez pas de cire ou de détergent pour mobilier.
N’employez jamais de diluant, benzine, insecticide en atomiseur
ou autre produit chimique sur les coffrets ou à proximité, car cela
endommagerait leurs surfaces.
2
Fr
S-SLW500
Contenu de l’emballage
Installation de l’enceinte d’extrêmes graves
L’enceinte d’extrêmes graves peut être montée en position
verticale ou horizontale. La position par défaut est l’orientation
S-SL100-LR
horizontale.
• Cordon d’enceinte (4 m) x 2
• Coussinets antidérapants x 8
• Carte de garantie x 1 (modèle européen seulement)
• Mode d’emploi (ce document)
S-SL100CR
• Cordon d’enceinte (4 m) x 1
• Cordon d’enceinte (10 m) x 2
• Coussinets antidérapants x 12
Français
• Carte de garantie x 1 (modèle européen seulement)
• Mode d’emploi (ce document)
Pour une installation en position verticale
1 Les pieds sont attachés avec des vis cruciformes ; utilisez
S-SLW500
un tournevis à pointe cruciforme pour les déposer.
• Cordon d’enceinte (3 m) x 1
2 Appliquez les joints fournis comme accessoires à l’endroit
• Coussinets antidérapants x 4
ou se trouvaient les pieds pour cacher les trous des vis.
•Joint x 4
3 Fixez les coussinets antidérapants aux quatre coins de la
• Carte de garantie x 1 (modèle européen seulement)
surface où l’enceinte d’extrêmes graves doit être montée.
Sachez que les coussinets antidérapants ne seront pas
efficaces sur toutes les surfaces ; ne les installez donc pas à
des endroits glissants.
Installation
S-SL100-LR/S-SL100CR
Fixation des coussinets antidérapants
Utilisez les coussinets antidérapants selon les besoins, en
fonction de l’endroit de l’installation.
ATTENTION
Déposez l’appareil sur son flanc sur un linge ou un autre matériau
qui ne le griffera pas.
• N’essayez pas d’effectuer ces démarches en inclinant
l’appareil. Déposez l’appareil sur son flanc sur un linge ou un
autre matériau qui ne le griffera pas.
Emplacement de montage
3
Fr
Coussinets antidérapants
Coussinets antidérapants
Etape 1
Pieds
Etape 2
Joints
Etape 3
Coussinets antidérapants
ATTENTION
50˚ à 60˚
S-SL100-LR_S-SL100CR_En.fm 3 ページ 2011年4月12日 火曜日 午前11時33分
Exemple d'installation : Orientation horizontale
• L’enceinte d’extrêmes graves n’est pas blindé
magnétiquement; par conséquent, on ne la placera pas près
d’un téléviseur ou d’un moniteur, car l’interaction des
matériaux magnétiques peut provoquer une distorsion des
1
3
couleurs sur l’écran du téléviseur. Des dispositifs facilement
4
2
affectés par le magnétisme (cartes magnétiques, montres,
5
bandes vidéo, etc.) ne devraient pas être placés près de
l’enceinte d’extrêmes graves.
ATTENTION
6
8
7
• Si les enceintes acoustiques sont installées dans un rack de
télévision ou un rack audiovisuel, celui-ci et les autres
Exemple d'installation : Orientation verticale
composants audio pourraient vibrer par suite des vibrations
produites par les haut-parleurs. On veillera à ce que les
étagères, racks et autres composants ne bougent pas par
suite des vibrations.
1
3
• Ne placez pas des lecteurs de disques (DVD, CD) sur le dessus
2
de l’enceinte d’extrêmes graves car des interruptions des sons
5
pourraient se produire du fait des vibrations.
4
• Lors de l’installation, laissez un espace d’au moins 10 cm
entre l’arrière de l’appareil et toute paroi. Lors d’une
installation verticale, laissez un espace d’au moins 10 cm
6
8
7
entre la face gauche et toute paroi. Si une distance suffisante
n’est pas prise, les performances de l’appareil seront
inadéquates ou il pourrait mal fonctionner.
1 Haut-parleur avant gauche
2 Haut-parleur central
• Comme l’enceinte acoustique est pesante, son installation
3 Haut-parleur avant droit
dans un endroit instable est extrêmement dangereuse. La
4 Récepteur
chute d’une enceinte pourrait causer des blessures ou des
5 Enceinte d’extrêmes graves
dégâts.
6 Haut-parleur surround gauche
7 Position d'écoute
8 Haut-parleur surround droit
Fixation des enceintes sur une paroi
S-SL100-LR/S-SL100CR
(S-SL100-LR/S-SL100CR)
• Les haut-parleurs avant installés sur la droite et la gauche doit
être séparés d'environ 1,8 m à 2,7 m. Ils doivent être installés
à une distance égale du téléviseur et à une hauteur égale par
Les enceintes avant, centrale et surround sont munies d’un trou
rapport au plancher.
de fixation, permettant de les installer sur une paroi.
• Des supports d’enceinte peuvent être achetés en option pour
Avant l’installation
permettre un placement optimal des haut-parleurs surround
• Souvenez-vous que l’enceinte est pesante et que son poids
au niveau des oreilles de l’auditeur ou légèrement au-dessus.
peut faire se décrocher les vis ou arracher le matériau de la
• L’effet surround sera atténué si les haut-parleurs surround
paroi, provoquant la chute de l’enceinte. Assurez-vous que la
sont montés très loin de la position de l’auditeur.
paroi sur laquelle vous voulez monter les enceintes est assez
solide pour les supporter. N’installez pas les enceintes sur des
• Les enceintes fournies avec ce système sont conçues en vue
parois en contreplaqué ou sur une surface friable.
d’une utilisation à proximité d’un téléviseur à écran
cathodique ou un moniteur couleur. Cependant, si une
• Les vis de fixation ne sont pas fournies. Utilisez des vis
distorsion des couleurs est provoquée du fait de l’installation,
appropriées en fonction du matériau de la paroi et soutenez
essayez de couper l’alimentation du téléviseur à écran
l’enceinte pendant son installation.
cathodique ou du moniteur couleur pendant 15 à 30 minutes,
puis remettez-le sous tension. La fonction d’auto-
ATTENTION
démagnétisation incorporée au téléviseur à écran cathodique
ou au moniteur couleur devrait contribuer à améliorer l’effet
• Si vous hésitez quant aux qualités et à la résistance de la paroi,
des haut-parleurs sur l’image. Si la distorsion des couleurs
demandez conseil à un professionnel.
reste un problème, éloignez davantage les enceintes par
• Pioneer n’est pas responsable en cas d’accident ou de dégâts
rapport à l’écran. Si des aimants ou des dispositifs émettant
résultant d’une installation inadéquate.
un champ magnétique sont installés à proximité, l’interaction
avec les enceintes peut provoquer une distorsion des couleurs
sur le téléviseur à écran cathodique ou sur le moniteur
couleur.
S-SLW500
• L’enceinte d’extrêmes graves reproduit des sons ultra graves
en monaural, tirant parti de la faible sensitivité directionnelle
de l’oreille humaine aux basses fréquences. Par conséquent,
le caisson peut être placé en divers endroits, mais s’il est trop
éloigné, la liaison entre les sons du caisson et des autres haut-
parleurs risque de sembler peu naturelle. L’intensité du son de
l’enceinte d’extrêmes graves peut être ajustée en modifiant la
distance par rapport au mur.
4
Fr
5 mm
10 mm
Vis de montage
(non fournies)
6 mm à 8 mm
S-SL100-LR_S-SL100CR_En.fm 4 ページ 2011年4月12日 火曜日 午前11時33分
Fiche technique
• Ne montez pas cet appareil sur une paroi et ne la suspendez
pas au plafond. Elle pourrait provoquer des blessures en
tombant.
S-SL100-LR/S-SL100CR
Coffret . . . . . . . . . . .Type blibliothèque fermée (blindage magnétique)
Configuration . . . . . . . . . . . . . . . . . . . . . 10 cm x 7 cm, plage complète
Impédance. . . . . . . . . . . . . . . . . . . . . . . . . . . . . . . . . . . . . . . . . . . . . . 8 Ω
Plage de fréquence. . . . . . . . . . . . . . . . . . . . . . . . . . . . . 100 Hz à 20 kHz
Connexions
Sensibilité . . . . . . . . . . . . . . . . . . . . . . . . . . . . . . . . . . . . . . . . . . . . .81 dB
Puissance d’entrée maximum. . . . . . . . . . . . . . . . . . . . . . . . . . . . 100 W
Connexion du cordon
Dimensions extérieures . . . . 86,5 (L) mm x 206 (H) mm x 85,5 (P) mm
Poids . . . . . . . . . . . . . . . . . . . . . . . . . . . . . . . . . . . . . . . . . . . . . . . . 0,7 kg
1 Fixez une extrémité du cordon de haut-parleur fourni sur
l’arrière de chaque haut-parleur.
Accessoires fournis (S-SL100-LR)
Cordon d’enceinte (4 m) . . . . . . . . . . . . . . . . . . . . . . . . . . . . . . . . . . . . 2
• Connectez le fil à repère coloré sur la borne rouge (+) et
Coussinets antidérapants . . . . . . . . . . . . . . . . . . . . . . . . . . . . . . . . . . . 8
Français
l’autre fil sur la borne noire (–). Enfoncez l’onglet à ressort et
Carte de garantie (modèle européen seulement) . . . . . . . . . . . . . . . . 1
insérez le fil comme illustré ci-dessous. Relâchez l’onglet pour
Mode d’emploi (ce document)
immobiliser le fil.
Accessoires fournis (S-SL100CR)
Cordon d’enceinte (4 m) . . . . . . . . . . . . . . . . . . . . . . . . . . . . . . . . . . . . 1
Cordon d’enceinte (10 m) . . . . . . . . . . . . . . . . . . . . . . . . . . . . . . . . . . . 2
Coussinets antidérapants . . . . . . . . . . . . . . . . . . . . . . . . . . . . . . . . . . 12
Carte de garantie (modèle européen seulement) . . . . . . . . . . . . . . . . 1
Mode d’emploi (ce document)
S-SLW500
Coffret . . . . . . . . . . . . . . . . . . . . . . . . . . Type bibliothèque, basse reflex
2 Raccordez l’autre bout des cordons sur les bornes de
Configuration . . . . . . . . . . . . . . . . . . . . . . . . . . . . . . . . . .Cône de 16 cm
sortie d’enceinte de l’amplificateur (pour plus
Impédance. . . . . . . . . . . . . . . . . . . . . . . . . . . . . . . . . . . . . . . . . . . . . . 4 Ω
d’informations, consultez le mode d’emploi de votre
Plage de fréquence. . . . . . . . . . . . . . . . . . . . . . . . . . . . . 35 Hz à 2,0 kHz
amplificateur).
Sensibilité . . . . . . . . . . . . . . . . . . . . . . . . . . . . . . . . . . . . . . . . . . . . .78 dB
Puissance d’entrée maximum. . . . . . . . . . . . . . . . . . . . . . . . . . . . 100 W
Dimensions extérieures
Orientation horizontale . . . 435 (L) mm x 121 (H) mm x 360 (P) mm
Orientation verticale. . . . .108,5 (L) mm x 435 (H) mm x 360 (P) mm
• Ces bornes d’enceintes sont sous une tension
Poids . . . . . . . . . . . . . . . . . . . . . . . . . . . . . . . . . . . . . . . . . . . . . . . . 4,5 kg
OPÉRATIONNELLE DANGEREUSE. Pour prévenir tout risque
de secousse électrique lors du branchement ou du
Accessoires fournis
débranchement des cordons d’enceinte, débranchez le
Cordon d’enceinte (3 m) . . . . . . . . . . . . . . . . . . . . . . . . . . . . . . . . . . . . 1
cordon d’alimentation avant de toucher des parties non
Coussinets antidérapants . . . . . . . . . . . . . . . . . . . . . . . . . . . . . . . . . . . 4
isolées.
Joint . . . . . . . . . . . . . . . . . . . . . . . . . . . . . . . . . . . . . . . . . . . . . . . . . . . . . 4
Carte de garantie (modèle européen seulement) . . . . . . . . . . . . . . . . 1
• Après avoir branché les fiches, tirez légèrement sur celles-ci
pour vous assurer que leur extrémité est parfaitement
immobilisée par les bornes. De mauvaises connexions sont la
source de parasites, voire d’interruptions des sons.
• Si les fils des cordons devaient ressortir des bornes et si ces
• Le S-SL100-LR est livré avec deux enceintes par ensemble.
fils entraient mutuellement en contact, le récepteur subirait
• Le S-SL100CR est livré avec trois enceintes par ensemble.
une forte charge supplémentaire. Ceci pourrait provoquer une
• Spécifications et design sous réserve de modifications sans
interruption de l’amplificateur, voire endommager le
préavis en raison d’améliorations éventuelles.
récepteur.
• A l’emploi d’un jeu d’enceintes raccordé à un récepteur, si la
polarité (+, –) d’une des enceintes acoustiques (gauche ou
est une marque de commerce, appliquée sur un appareil
droite) est inversée, vous n’obtiendrez pas un effet
doté de la technologie “Phase Control” de Pioneer. Cette
stéréophonique normal.
technologie autorise une reproduction sonore de haut niveau par
chaque composant grâce à une amélioration de la
synchronisation d’ensemble des phases.
Fonctionnement (S-SL100-LR/S-
© 2011 PIONEER CORPORATION.
SL100CR)
Tous droits de reproduction et de traduction réservés.
Comme les S-SL100-LR/S-SL100CR sont conçus comme
enceintes satellites compactes, il est recommandé de les utiliser
en combinaison avec une enceinte d’extrêmes graves pour
bénéficier d’excellents sons graves. Dans ce cas, ajustez le
réglage d’enceinte de l’amplificateur (récepteur) sur faible et la
fréquence de recouvrement sur 200 Hz.
5
Fr
ATTENTION
Rouge (+)
Marqueur de couleur rouge
Noir (–)
ATTENTION
S-SL100-LR_S-SL100CR_En.fm 5 ページ 2011年4月12日 火曜日 午前11時33分
Remarque

Pour le modèle européen
6
Fr
Si vous souhaitez vous débarrasser de cet appareil, ne le mettez pas à la poubelle avec vos ordures ménagères. Il existe un système de
collecte séparé pour les appareils électroniques usagés, qui doivent être récupérés, traités et recyclés conformément à la législation.
Les habitants des états membres de l’UE, de Suisse et de Norvège peuvent retourner gratuitement leurs appareils électroniques usagés aux
centres de collecte agréés ou à un détaillant (si vous rachetez un appareil similaire neuf).
Dans les pays qui ne sont pas mentionnés ci-dessus, veuillez contacter les autorités locales pour savoir comment vous pouvez vous débarrasser
de vos appareils.
Vous garantirez ainsi que les appareils dont vous vous débarrassez sont correctement récupérés, traités et recyclés et préviendrez de cette façon
les impacts néfastes possibles sur l’environnement et la santé humaine.
K058b_A1_Fr
S-SL100-LR_S-SL100CR_En.fm 6 ページ 2011年4月12日 火曜日 午前11時33分

S-SL100-LR_S-SL100CR_En.fm 7 ページ 2011年4月12日 火曜日 午前11時33分
Français
7
Fr

S-SL100-LR_S-SL100CR_En.fm 2 ページ 2011年4月12日 火曜日 午前11時36分
Wir danken Ihnen dafür, dass Sie sich für dieses Produkt von Pioneer entschieden haben.
Bitte lesen Sie diese Bedienungsanleitung vor der Inbetriebnahme aufmerksam durch, damit Sie die optimale Leistung von diesem Produkt
erzielen können. Bitte bewahren Sie diese Anleitung anschließend für spätere Bezugnahme griffbereit auf.
S-SLW500
• Bei diesem Produkt handelt es sich um einen passiven
Vor der Inbetriebnahme
Subwoofer, der mit dem Modell VSX-S300 oder einem anderen
Audiogerät kombiniert werden muss, dass über einen
S-SL100-LR/S-SL100CR
eingebauten Subwoofer-Verstärker verfügt.
• Dieses Lautsprechersystem besitzt eine Nennimpedanz von
• Dieses Lautsprechersystem besitzt eine Nennimpedanz von
8 Ω und darf daher ausschließlich an einen Verstärker mit
4 Ω und darf daher ausschließlich an einen Verstärker mit
einer Lastimpedanz von 8 Ω angeschlossen werden (die
einer Lastimpedanz von 4 Ω angeschlossen werden (die
Lautsprecherklemmen des Verstärkers müssen mit der
Lautsprecherklemmen des Verstärkers müssen mit der
Beschriftung „8 Ω“ gekennzeichnet sein).
Beschriftung „4 Ω“ gekennzeichnet sein).
Um eine Beschädigung des Lautsprechersystems durch ein
Um eine Beschädigung des Lautsprechersystems durch ein
zu starkes Eingangssignal zu vermeiden, sind die folgenden
zu starkes Eingangssignal zu vermeiden, sind die folgenden
Vorsichtshinweise sorgfältig zu beachten:
Vorsichtshinweise sorgfältig zu beachten:
•Die zulässige Belastbarkeit (Eingangspegel) dieses
•Die zulässige Belastbarkeit (Eingangspegel) dieses
Lautsprechersystems darf auf keinen Fall überschritten
Lautsprechersystems darf auf keinen Fall überschritten
werden.
werden.
•Wenn ein Grafik-Equalizer verwendet wird, um den hohen
•Wenn ein Grafik-Equalizer verwendet wird, um den hohen
Frequenzbereich anzuheben, darf die Lautstärke am
Frequenzbereich anzuheben, darf die Lautstärke am
Verstärker nicht auf einen übermäßig hohen Pegel
Verstärker nicht auf einen übermäßig hohen Pegel
eingestellt werden.
eingestellt werden.
•Versuchen Sie auf keinen Fall, einen sehr hohen
•Versuchen Sie auf keinen Fall, einen sehr hohen
Lautstärkepegel von einem Verstärker mit niedriger
Lautstärkepegel von einem Verstärker mit niedriger
Ausgangsleistung zu erzielen (dies führt zu einer Erhöhung
Ausgangsleistung zu erzielen (dies führt zu einer Erhöhung
des Klirrfaktors des Verstärkers und kann eine
Beschädigung des Lautsprechers verursachen).
des Klirrfaktors des Verstärkers und kann eine
Beschädigung des Lautsprechers verursachen).
Vorsichtshinweise zur Aufstellung
• Stellen Sie den Lautsprecher auf einer stabilen Unterlage auf.
Vorsichtshinweise zur Aufstellung
Anderenfalls besteht die Gefahr, dass der Lautsprecher
• Stellen Sie den Lautsprecher auf einer stabilen Unterlage auf.
umkippt und Verletzungen oder eine Beschädigung
Anderenfalls besteht die Gefahr, dass der Lautsprecher
verursacht.
umkippt und Verletzungen oder eine Beschädigung
• Schalten Sie die AV-Anlage aus, und ziehen Sie alle
verursacht.
Netzstecker ab, bevor Sie die Anschlüsse unter Bezugnahme
• Schalten Sie die AV-Anlage aus, und ziehen Sie alle
auf die Bedienungsanleitungen der einzelnen Komponenten
Netzstecker ab, bevor Sie die Anschlüsse unter Bezugnahme
herstellen. Achten Sie unbedingt darauf, die richtigen
auf die Bedienungsanleitungen der einzelnen Komponenten
Anschlusskabel zu verwenden.
herstellen. Achten Sie unbedingt darauf, die richtigen
• Stellen Sie den Mittellautsprecher unterhalb des
Anschlusskabel zu verwenden.
Fernsehgerätes auf. Wenn sich eine Aufstellung des
• Dieser Lautsprecher darf auf keinen Fall an einer Wand oder
Mittellautsprechers auf dem Fernsehgerät nicht vermeiden
der Decke montiert werden, da er anderenfalls herunterfallen
lässt, achten Sie darauf, diesen mit Klebeband oder auf eine
und Verletzungen verursachen kann.
andere geeignete Weise zu sichern. Anderenfalls besteht die
Gefahr, dass der Lautsprecher aufgrund von externen
Vorsichtshinweise zum Betrieb
Erschütterungen, z. B. bei einem Erdbeben, herunterfällt und
Verletzungen verursacht oder beschädigt wird.
• Verwenden Sie den Lautsprecher auf keinen Fall zur
Wiedergabe von verzerrtem Klang über längere Zeiträume
Vorsichtshinweise zum Betrieb
hinweg. Anderenfalls kann der Lautsprecher beschädigt
• Verwenden Sie den Lautsprecher auf keinen Fall zur
werden, und es besteht die Gefahr eines Brandausbruchs.
Wiedergabe von verzerrtem Klang über längere Zeiträume
• Stellen Sie keine schweren oder großen Gegenstände auf den
hinweg. Anderenfalls kann der Lautsprecher beschädigt
Lautsprecher. Anderenfalls besteht die Gefahr, dass der
werden, und es besteht die Gefahr eines Brandausbruchs.
Lautsprecher umkippt und Verletzungen oder eine
• Stellen Sie keine schweren oder großen Gegenstände auf den
Beschädigung verursacht.
Lautsprecher. Anderenfalls besteht die Gefahr, dass der
• Bitte sorgen Sie dafür, dass sich Personen nicht auf den
Lautsprecher umkippt und Verletzungen oder eine
Lautsprecher setzen oder sich darauf stellen, und dass Kinder
Beschädigung verursacht.
nicht auf dem Lautsprecher spielen. Anderenfalls besteht die
• Die Frontverkleidung dieses Lautsprechers kann nicht
Gefahr, dass der Lautsprecher umkippt und Verletzungen oder
abgenommen werden. Bitte versuchen Sie auf keinen Fall, die
eine Beschädigung verursacht.
Frontverkleidung gewaltsam zu entfernen, da sie dadurch
beschädigt werden kann.
• Die Frontverkleidung dieses Lautsprechers kann nicht
abgenommen werden. Bitte versuchen Sie auf keinen Fall, die
• Dieses Produkt enthält eine Autoregressions-Technologie
Frontverkleidung gewaltsam zu entfernen, da sie dadurch
zum Schutz der Lautsprecher. Falls ein Signal mit zu hohem
beschädigt werden kann.
Pegel zugeleitet wird, so dass die Lautsprecher keinen Ton
mehr abgeben, verringern Sie die Lautstärke am Verstärker,
Pioneer übernimmt keinerlei Haftung für Unfälle oder
und warten Sie dann einige Sekunden, bis die Tonausgabe
Schäden, die durch eine unsachgemäße Aufstellung,
fortgesetzt wird. Die Schutzfunktion wird automatisch
zweckentfremdeten Gebrauch bzw. Nachgestaltung des
deaktiviert.
Produkts oder höhere Gewalt entstehen.
2
De
Reinigen des Lautsprechergehäuses
Unter normalen Bedingungen lassen sich Staub, Fingerabdrücke
Aufstellung
und leichte Verschmutzungen durch Abreiben des
Lautsprechergehäuses mit einem trockenen Tuch entfernen. Falls
hartnäckige Schmutzflecken an den Außenflächen vorhanden
S-SL100-LR/S-SL100CR
sind, tauchen Sie einen sauberen Lappen in eine Lösung aus 5 bis
Anbringen der rutschfesten Kissen
6 Teilen eines neutralen Haushaltsreinigers und 1 Teil Wasser,
Verwenden Sie die mitgelieferten rutschfesten Kissen nach
wringen Sie ihn gründlich aus, und wischen Sie die
Erfordernis entsprechend der Unterlage am vorgesehenen
Schmutzflecken dann ab. Benutzen Sie dazu keine
Aufstellungsort.
Möbelpolituren oder -reinigungsmittel.
Verwenden Sie auf keinen Fall Farbverdünner, Leichtbenzin,
VORSICHTSHINWEISE
Insektizide oder andere Chemikalien zur Reinigung des Gehäuses
oder in der Nähe dieses Lautsprechers, da derartige Mittel das
Legen Sie den Lautsprecher auf eine Seite auf eine weiche Decke
Oberflächenfinish anlösen.
oder eine andere Unterlage in einem Material, das keine Kratzer
verursachen kann.
Mitgeliefertes Zubehör
S-SL100-LR
• Lautsprecherkabel (4 m) x 2
• Rutschfestes Kissen x 8
• Garantiekarte x 1 (nur Modell für Europa)
Deutsch
• Bedienungsanleitung (dieses Dokument)
S-SL100CR
• Lautsprecherkabel (4 m) x 1
• Lautsprecherkabel (10 m) x 2
• Rutschfestes Kissen x 12
• Garantiekarte x 1 (nur Modell für Europa)
• Bedienungsanleitung (dieses Dokument)
S-SLW500
Aufstellung des Subwoofers
S-SLW500
Der Subwoofer kann wahlweise in vertikaler oder horizontaler
• Lautsprecherkabel (3 m) x 1
Lage aufgestellt werden. Bei der Auslieferung aus dem
Herstellerwerk ist der Lautsprecher für die Aufstellung in
• Rutschfestes Kissen x 4
horizontaler Lage vorbereitet.
• Aufkleber x 4
• Garantiekarte x 1 (nur Modell für Europa)
Für Aufstellung in vertikaler Lage
1 Die Füße sind mit Kreuzschlitzschrauben befestigt;
verwenden Sie einen Kreuzschlitzschraubendreher, um die
Füße zu entfernen.
2 Befestigen Sie die mitgelieferten Aufkleber an den
Stellen, von denen die Füße entfernt wurden, um die
Schraubenlöcher zu verdecken.
3 Befestigen Sie die rutschfesten Kissen an den vier Ecken
der Oberfläche, auf der der Subwoofer aufgestellt werden
soll. Bitte beachten Sie, dass die rutschfesten Kissen nicht bei
allen Arten von Unterlagen wirksam sind, so dass eine
Aufstellung auf einer glatten Oberfläche zu vermeiden ist.
3
De
Rutschfestes Kissen
Rutschfestes Kissen
S-SL100-LR_S-SL100CR_En.fm 3 ページ 2011年4月12日 火曜日 午前11時36分
1 Linker Frontlautsprecher
Schritt 1
2 Mittellautsprecher
Füße
3 Rechter Frontlautsprecher
4 Receiver
5Subwoofer
6 Linker Surround-Lautsprecher
7 Hörposition
8 Rechter Surround-Lautsprecher
S-SL100-LR/S-SL100CR
Schritt 2
• Zwischen dem rechten und dem linken Frontlautsprecher
Aufkleber
sollte ein Abstand von ca. 1,8 m bis 2,7 m vorhanden sein. Die
beiden Frontlautsprecher sollten jeweils im gleichen Abstand
vom Fernsehgerät und auf gleicher Höhe über dem Boden
aufgestellt werden.
• Lautsprecherständer sind als Sonderzubehör erhältlich, die
eine optimale Aufstellung der Surround-Lautsprecher auf
oder geringfügig über dem Ohrenniveau an der Hörposition
Schritt 3
ermöglichen.
Rutschfeste Kissen
• Wenn die Surround-Lautsprecher in einem zu großen Abstand
von der Hörposition aufgestellt werden, kann der optimale
Surround-Effekt nicht erzielt werden.
• Das Lautsprechersystem dieser Anlage ist auf den Betrieb in
der Nähe eines herkömmlichen Fernsehgerätes oder
Farbmonitors mit Kathodenstrahlröhre ausgelegt. Falls
jedoch aufgrund der Aufstellung Farbverzerrungen auftreten,
schalten Sie das Fernsehgerät bzw. den Farbmonitor mit
Kathodenstrahlröhre 15 Minuten bis 30 Minuten lang aus und
・ Halten Sie den Subwoofer bei der Ausführung dieser
dann wieder ein. In den meisten Fällen beseitigt die
Arbeitsschritte nicht in einem Winkel geneigt. Legen Sie den
eingebaute Entmagnetisierungsfunktion des Fernsehgerätes
Lautsprecher auf eine Seite auf eine weiche Decke oder eine
bzw. Farbmonitors mit Kathodenstrahlröhre derartige durch
andere Unterlage in einem Material, das keine Kratzer
die Lautsprecher verursachten Bildstörungen. Falls die
verursachen kann.
Farbverzerrungen auf diese Weise nicht automatisch beseitigt
Aufstellungsort
werden, sorgen Sie für einen größeren Abstand der
Lautsprecher vom Bildschirm. Wenn sich Magneten oder
Geräte, die Magnetfelder erzeugen, in der Nähe befinden,
kommt es möglicherweise zu einer gegenseitigen
Beeinflussung mit dem Lautsprechersystem, die
Farbverzerrungen auf dem Bildschirm eines herkömmlichen
Fernsehgerätes oder Farbmonitors mit Kathodenstrahlröhre
verursachen kann.
S-SLW500
• Der Subwoofer gibt sehr tiefe Frequenzen monaural wieder,
da das menschliche Gehör im tiefen Frequenzbereich kein
genaues Ortungsvermögen besitzt und die Richtung, aus der
der Schall eintrifft, nicht unterscheiden kann. Daher kann der
Aufstellungsbeispiel: Horizontale Ausrichtung
Subwoofer an einem beliebigen Ort im Hörraum aufgestellt
werden, sofern kein so großer Abstand besteht, dass eine
unnatürlich wirkende Klangbalance zwischen dem Subwoofer
und den übrigen Lautsprechern erhalten wird. Die Intensität
des vom Subwoofer abgegebenen Klangs kann justiert
werden, indem der Abstand des Subwoofers zur nächsten
Wand geändert wird.
• Da der Subwoofer nicht magnetisch abgeschirmt ist, sollte er
nicht in der Nähe eines Fernsehgerätes oder Monitors
aufgestellt werden; anderenfalls kann es aufgrund von
magnetischen Einstreuungen zu Verzerrungen und
Farbstörungen im Fernsehbild kommen. Gegenstände, die für
Aufstellungsbeispiel: Vertikale Ausrichtung
magnetische Einstreuungen empfindlich sind
(aufmagnetisierte Bank- oder Monatskarten, Armbanduhren,
Videokassetten usw.) sollten nicht in die Nähe des
Subwoofers gebracht werden.
4
De
VORSICHTSHINWEISE
50˚ bis 60˚
1
3
4
2
5
6
8
7
1
3
2
5
4
6
8
7
S-SL100-LR_S-SL100CR_En.fm 4 ページ 2011年4月12日 火曜日 午前11時36分
VORSICHTSHINWEISE
• Wenn das Lautsprechersystem auf einem Fenseh- oder Hi-Fi-
Schrank aufgestellt wird, kann es durch die vom Lautsprecher
erzeugten mechanischen Schwingungen zu Vibrationen des
Schrankes oder der anderen Komponenten kommen. Stellen
Sie sicher, dass sich die Regale des Schrankes oder die
anderen Komponenten wegen der mechanischen
Schwingungen nicht verschieben.
• Stellen Sie keine Disc-Player (DVD, CD) auf dem Subwoofer
auf, da die mechanischen Schwingungen anderenfalls
Tonaussetzer verursachen können.
• Halten Sie bei der Aufstellung einen Mindestabstand von
10 cm zwischen der Rückseite des Lautsprechers und einer
Wand ein; bei Aufstellung in vertikaler Lage ist zusätzlich ein
Mindestabstand von 10 cm zwischen der linken Seite des
Lautsprechers und einer Wand einzuhalten. Falls kein
ausreichender Abstand besteht, entwickelt der Lautsprecher
• Dieses Produkt darf nicht an einer Wand montiert oder an
u. U. nicht seine volle Leistung, oder eine Funktionsstörung
einer Decke aufgehängt werden. Anderenfalls besteht die
tritt auf.
Gefahr, dass das Gerät herunterfällt und Verletzungen
• Wegen des hohen Gewichts des Lautsprechers ist eine
verursacht.
Aufstellung auf einer unstabilen Unterlage äußerst gefährlich
und ist unbedingt zu vermeiden! Falls der Lautsprecher
herunterfällt, besteht die Gefahr von Verletzungen und einer
Deutsch
Beschädigung.
Anschlüsse
Anschließen der Kabel
Wandmontage der Lautsprecher
1 Schließen Sie ein Ende des mitgelieferten
Lautsprecherkabels an die Eingangsklemmen an der
(S-SL100-LR/S-SL100CR)
Rückseite jedes Lautsprechers an.
• Schließen Sie das Kabel mit der farbigen Markierung an die
Die Frontlautsprecher, der Mittellautsprecher und die Surround-
rote (+) Lautsprecherklemme an, das andere Kabel an die
Lautsprecher besitzen jeweils ein Montageloch, das zur Montage
schwarze (–) Lautsprecherklemme. Drücken Sie die unter
des Lautsprechers an einer Wand verwendet werden kann.
Federspannung stehenden Hebel der Klemmen herunter, und
führen Sie die blanken Drähte der Kabel wie in der Abbildung
Vor der Montage
gezeigt in die Löcher in den Klemmen ein. Lassen Sie den
• Bitte bedenken Sie, dass dieses Lautsprechersystem schwer
Hebel wieder los, um den Draht in der Klemme zu sichern.
ist und sein Gewicht dazu führen könnte, dass sich die
Montageschrauben lockern oder der Werkstoff der Wand
keinen ausreichenden Halt bietet, so dass der Lautsprecher
herunterfällt. Vergewissern Sie sich, dass das Tragvermögen
der zur Montage vorgesehenen Wand für das Gewicht der
Lautsprecher ausreicht. Montieren Sie die Lautsprecher auf
keinen Fall an einer Wand aus Sperrholz oder mit einer
weichen Oberfläche.
• Montageschrauben gehören nicht zum Lieferumfang.
Verwenden Sie ausschließlich Schrauben, die für den
2 Schließen Sie das andere Ende jedes Lautsprecherkabels
Werkstoff der Wand geeignet sind und das Gewicht der
an die Lautsprecherausgangsklemmen des Verstärkers an
Lautsprecher tragen können.
(Einzelheiten hierzu finden Sie in der Bedienungsanleitung
Ihres Verstärkers).
• Falls Sie die Beschaffenheit und das Tragvermögen der Wand
nicht selbst ermitteln können, ziehen Sie bitte einen
• An den Lautsprecherklemmen dieses Gerätes liegt eine
Fachmann zu Rate.
potentiell GEFÄHRLICHE Spannung an. Zur Vermeidung von
Stromschlaggefahr ist unbedingt darauf zu achten, den
• Pioneer übernimmt keinerlei Haftung für Unfälle oder
Netzstecker beim Anschließen oder Abtrennen der
Schäden, die auf eine unsachgemäße Montage
Lautsprecher von der Netzsteckdose zu trennen, bevor
zurückzuführen sind.
irgendwelche nicht isolierten Teile berührt werden.
• Ziehen Sie nach dem Herstellen der Anschlüsse sacht an
jedem Lautsprecherkabel, um sicherzustellen, dass die
Drähte fest in den Klemmen sitzen. Lose Anschlüsse können
Rauschen und Tonaussetzer verursachen.
• Falls die blanken Leiter von zwei Lautsprecherkabeln so weit
aus den Klemmen hervorstehen, dass sie sich gegenseitig
berühren, kann dies eine Überlastung des Verstärkers
verursachen. In einem solchen Fall stellt der Verstärker
möglicherweise den Betrieb ein, und es kann sogar zu einer
Beschädigung des Verstärkers kommen.
5
De
VORSICHTSHINWEISE
5 mm
10 mm
Montageschrauben
(nicht mitgeliefert)
6 mm bis 8 mm
S-SL100-LR_S-SL100CR_En.fm 5 ページ 2011年4月12日 火曜日 午前11時36分
VORSICHTSHINWEISE
Rot (+)
rote Markierung
Schwarz (–)
VORSICHTSHINWEISE
• Falls ein Paar Lautsprecher versehentlich mit vertauschter
S-SLW500
Polarität (+, –) an einen Verstärker angeschlossen wird, kann
Gehäuse . . . . . . . . . . . . . . . . . . . . . . . . . . Bassreflex-Regalausführung
der normale Stereoeffekt nicht erzielt werden.
Aufbau. . . . . . . . . . . . . . . . . . . . . . . . . . . . . . . . . . . . . . . . . 16-cm-Konus
Impedanz . . . . . . . . . . . . . . . . . . . . . . . . . . . . . . . . . . . . . . . . . . . . . . 4 Ω
Frequenzgang. . . . . . . . . . . . . . . . . . . . . . . . . . . . . . . . 35 Hz bis 2,0 kHz
Empfindlichkeit. . . . . . . . . . . . . . . . . . . . . . . . . . . . . . . . . . . . . . . . .78 dB
Betrieb (S-SL100-LR/S-SL100CR)
Maximale Belastbarkeit . . . . . . . . . . . . . . . . . . . . . . . . . . . . . . . . . 100 W
Außenabmessungen
Horizontale Ausrichtung
Da es sich bei den Modellen S-SL100-LR und S-SL100CR jeweils
. . . . . . . . . . . . . . . . . . . . 435 (B) mm x 121 (H) mm x 360 (T) mm
um kompakte Satellitenlautsprecher handelt, wird empfohlen,
Vertikale Ausrichtung . . . 108,5 (B) mm x 435 (H) mm x 360 (T) mm
diese gemeinsam mit einem Subwoofer zu verwenden, um
Masse . . . . . . . . . . . . . . . . . . . . . . . . . . . . . . . . . . . . . . . . . . . . . . . .4,5 kg
dynamische Bässe zu erhalten. In einem solchen Fall wählen Sie
Mitgeliefertes Zubehör
am Verstärker (bzw. Receiver) die Lautsprechereinstellung
Lautsprecherkabel (3 m) . . . . . . . . . . . . . . . . . . . . . . . . . . . . . . . . . . . . .1
„Klein“, und stellen Sie die Übernahmefrequenz auf 200 Hz ein.
Rutschfestes Kissen . . . . . . . . . . . . . . . . . . . . . . . . . . . . . . . . . . . . . . . .4
Aufkleber . . . . . . . . . . . . . . . . . . . . . . . . . . . . . . . . . . . . . . . . . . . . . . . . . .4
Garantiekarte (nur Modell für Europa) . . . . . . . . . . . . . . . . . . . . . . . . . .1
Technische Daten
Hinweis
• Zwei Lautsprechersysteme sind im Verpackungskarton des
S-SL100-LR/S-SL100CR
Modells S-SL100-LR enthalten.
Gehäuse . . . . . . . . . . . . . . . . . . . . . . . Geschlossene Regalausführung
(magnetisch abgeschirmt)
• Drei Lautsprechersysteme sind im Verpackungskarton des
Aufbau. . . . . . . . . . . . . . . . . . . . . 10 cm x 7 cm, Breitbandlautsprecher
Modells S-SL100CR enthalten.
Impedanz . . . . . . . . . . . . . . . . . . . . . . . . . . . . . . . . . . . . . . . . . . . . . . 8 Ω
• Änderungen der technischen Daten und äußeren
Frequenzgang . . . . . . . . . . . . . . . . . . . . . . . . . . . . . . . .100 Hz bis 20 kHz
Aufmachung bleiben im Sinne der ständigen
Empfindlichkeit. . . . . . . . . . . . . . . . . . . . . . . . . . . . . . . . . . . . . . . . .81 dB
Produktverbesserung jederzeit vorbehalten.
Maximale Belastbarkeit . . . . . . . . . . . . . . . . . . . . . . . . . . . . . . . . . 100 W
Außenabmessungen . . . . . . 86,5 (B) mm x 206 (H) mm x 85,5 (T) mm
Masse . . . . . . . . . . . . . . . . . . . . . . . . . . . . . . . . . . . . . . . . . . . . . . . .0,7 kg
ist eine Marke, mit der Geräte gekennzeichnet sind, die
Mitgeliefertes Zubehör (S-SL100-LR)
mit Pioneers Phase Control-Technologie ausgestattet sind. Diese
Lautsprecherkabel (4 m) . . . . . . . . . . . . . . . . . . . . . . . . . . . . . . . . . . . . .2
Technologie gewährleistet eine hochwertige Klangreproduktion
Rutschfestes Kissen. . . . . . . . . . . . . . . . . . . . . . . . . . . . . . . . . . . . . . . . .8
des betreffenden Gerätes durch eine Verbesserung der
Garantiekarte (nur Modell für Europa) . . . . . . . . . . . . . . . . . . . . . . . . . .1
Gesamtphasenanpassung.
Bedienungsanleitung (dieses Dokument)
Mitgeliefertes Zubehör (S-SL100-CR)
Lautsprecherkabel (4 m) . . . . . . . . . . . . . . . . . . . . . . . . . . . . . . . . . . . . .1
© 2011 PIONEER CORPORATION.
Lautsprecherkabel (10 m) . . . . . . . . . . . . . . . . . . . . . . . . . . . . . . . . . . . .2
Alle Rechte vorbehalten.
Rutschfestes Kissen. . . . . . . . . . . . . . . . . . . . . . . . . . . . . . . . . . . . . . . .12
Garantiekarte (nur Modell für Europa) . . . . . . . . . . . . . . . . . . . . . . . . . .1
Bedienungsanleitung (dieses Dokument)
Für Modell für Europa
6
De
Mischen Sie dieses Produkt, wenn Sie es entsorgen wollen, nicht mit gewöhnlichen Haushaltsabfällen. Es gibt ein getrenntes
Sammelsystem für gebrauchte elektronische Produkte, über das die richtige Behandlung, Rückgewinnung und Wiederverwertung
gemäß der bestehenden Gesetzgebung gewährleistet wird.
Privathaushalte in den Mitgliedsstaaten der EU, in der Schweiz und in Norwegen können ihre gebrauchten elektronischen Produkte an
vorgesehenen Sammeleinrichtungen kostenfrei zurückgeben oder aber an einen Händler zurückgeben (wenn sie ein ähnliches neues Produkt
kaufen).
Bitte wenden Sie sich in den Ländern, die oben nicht aufgeführt sind, hinsichtlich der korrekten Verfahrensweise der Entsorgung an die örtliche
Kommunalverwaltung.
Auf diese Weise stellen Sie sicher, dass das zu entsorgende Produkt der notwendigen Behandlung, Rückgewinnung und Wiederverwertung
unterzogen wird, und so mögliche negative Einflüsse auf die Umwelt und die menschliche Gesundheit vermieden werden.
K058b_A1_De
S-SL100-LR_S-SL100CR_En.fm 6 ページ 2011年4月12日 火曜日 午前11時36分

S-SL100-LR_S-SL100CR_En.fm 7 ページ 2011年4月12日 火曜日 午前11時36分
Deutsch
7
De

S-SL100-LR_S-SL100CR_En.fm 2 ページ 2011年4月12日 火曜日 午前11時39分
Vi ringraziamo per avere acquistato questo prodotto Pioneer.
Prima di usare il prodotto, leggere questo istruzioni per l’uso in modo da saperlo utilizzare correttamente. Finito di leggerle, conservarle in
un luogo sicuro per poterle riutilizzare in futuro.
S-SLW500
• Questo diffusore è un subwoofer passivo e deve venire
Prima di cominciare
combinato con un VSX-S300 o altro dispositivo audio dotato di
un amplificatore per subwoofer.
S-SL100-LR/S-SL100CR
• Questo diffusore ha una impedenza di 4 Ω e deve venire
• Questo diffusore ha una impedenza di 8 Ω e deve venire
collegato solo ad amplificatori progettati per una impedenza
collegato solo ad amplificatori progettati per una impedenza
di carico di 4 Ω (il connettore di uscita dell'amplificatore del
di carico di 8 Ω (il connettore di uscita dell'amplificatore del
diffusore deve essere chiaramente etichettato “4 Ω”).
diffusore deve essere chiaramente etichettato “8 Ω”).
Per evitare danni al diffusore dovuti al sovraccarico di segnale
Per evitare danni al diffusore dovuti al sovraccarico di segnale
in ingresso, osservare le seguenti norme:
in ingresso, osservare le seguenti norme:
•Non alimentare il diffusore con potenza oltre il massimo
•Non alimentare il diffusore con potenza oltre il massimo
concesso.
concesso.
•Se si usa un equalizzatore grafico per enfatizzare forti suoni
•Se si usa un equalizzatore grafico per enfatizzare forti suoni
di alta frequenza, non usare volumi eccessivi
di alta frequenza, non usare volumi eccessivi
dell’amplificatore.
dell’amplificatore.
•Non tentare di forzare un amplificatore di bassa potenza a
•Non tentare di forzare un amplificatore di bassa potenza a
produrre alti volumi. La distorsione armonica
produrre alti volumi. La distorsione armonica
dell’amplificatore aumenterebbe e potreste danneggiare il
dell’amplificatore aumenterebbe e potreste danneggiare il
diffusore.
diffusore.
Attenzione: installazione
Attenzione: installazione
• Non posare il diffusore su superfici poco stabilì, dato che
• Non posare il diffusore su superfici poco stabilì, dato che
altrimenti esso potrebbe cadere e causare danni o ferite.
altrimenti esso potrebbe cadere e causare danni o ferite.
• Prima di fare collegamenti, spegnere i propri componenti AV,
• Prima di fare collegamenti, spegnere i propri componenti AV,
scollegarli e consultarne i manuali. Controllare di avere usato
scollegarli e consultarne i manuali. Controllare di avere usato
i cavi di collegamento corretti.
i cavi di collegamento corretti.
• Installare il diffusore centrale sotto il televisore. Se si installa il
• Non applicare questi diffusori ad un muro o al soffitto, dato
diffusore centrale sopra il televisore, fermarlo sempre con
che possono causare ferimenti in caso di caduta.
nastro adesivo o un altro strumento adatto. Altrimenti, il
diffusore potrebbe cadere dal televisore a causa di scosse, ad
Attenzione: in uso
esempio terremoti, mettendo in pericolo gli astanti o
• Non fare emettere al diffusore suono distorto per lunghi
danneggiandosi.
periodi. Questo potrebbe causare danni ai diffusori ed è causa
Attenzione: in uso
potenziale di incendi.
• Non fare emettere al diffusore suono distorto per lunghi
• Non posare oggetti grandi o pesanti sul diffusore. Facendolo il
periodi. Questo potrebbe causare danni ai diffusori ed è causa
diffusore potrebbe cadere, causando danni o ferimenti.
potenziale di incendi.
• Non sedere o appoggiarsi al diffusore, e non lasciare che i
• Non posare oggetti grandi o pesanti sul diffusore. Facendolo il
bambini ci giochino. Facendolo il diffusore potrebbe cadere,
diffusore potrebbe cadere, causando danni o ferimenti.
causando danni o ferimenti.
• La griglia di questo diffusore non può essere rimossa. Non
• La griglia di questo diffusore non può essere rimossa. Non
tentare di toglierla a forza, dato che così facendo la si
tentare di toglierla a forza, dato che così facendo la si
danneggerebbe.
danneggerebbe.
• Questo prodotto include una tecnologia di autoregressione
che protegge i diffusori. Se i diffusori smettono di produrre
Pioneer non è responsabile per incidenti o danni dovuti ad
suono quando ricevono un segnale eccessivo, abbassare il
volume ed attendere qualche secondo. La caratteristica di
una installazione scadente, un uso scorretto, modifiche
protezione dei diffusori si disattiva automaticamente.
portate al prodotto o disastri naturali.
Pulizia del cabinet dei diffusori
Normalmente per mantenere pulito il diffusore dovrebbe bastare
un panno morbido ed asciutto. Se necessario, passarlo con un
panno inumidito con un detergente neutro diluito cinque o sei
volte con acqua, quindi strizzarlo bene. Non usare cere o pulenti
per mobilia.
Non usare mai diluenti, benzina, spray insetticidi o altre sostanze
chimiche su o vicino a quest’unità, dato che essi ne corrodono la
superficie.
2
It
